manuals.online logo
Brands
  1. Home
  2. •
  3. Brands
  4. •
  5. Nav TV
  6. •
  7. Automobile Electronic
  8. •
  9. Nav TV OPV-2LR User manual

Nav TV OPV-2LR User manual

Telephone: + 44 (0)870 801 0440
Fax telephone: + 44 (0)870 801 0441
[email protected]
Unit R4
Capital Business Park
Wentloog
Cardiff
CF3 2PU
OPV-2LR
NAV TV (UK) LTD
NAV TV (UK) LTD
A/V INPUT & VIDEO IN MOTION
RANGE ROVER SPORT / LR3
With TV Tuner / DVD
OPERATING INSTRUCTIONS
From the main menu of the car system you
will need to select TV then supply 12V+ to the
switch cable (BLUE) to switch audio and video
to your new external source. The switch wire
will then need to be deactivated when you re-
vert back to any of the other functions if you
wish to listen to the audio from another
source.
e11*72/245*2004/104*4020*00
RoHS 2002/95/EC—2002/96/EC
Disclaimer
NAV TV (UK) Ltd is not liable for any incidental, consequential or indirect damages. In case of erratic behavior of the vehicle’s electrical
system please disconnect the NAV TV product and contact our technical support Team. NAV TV (UK) Ltd does not assume liability for any
diagnostic fees.
LOCATION & REMOVAL
Installation for OPV-2LR (CAN):
Installation has to be done behind the RADIO at the large
black plug.
Plug the black plug from the radio unit into the female
side of the supplied harness, then plug in the male side of
the supplied harness to the radio unit. Plug in and mount
the interface.
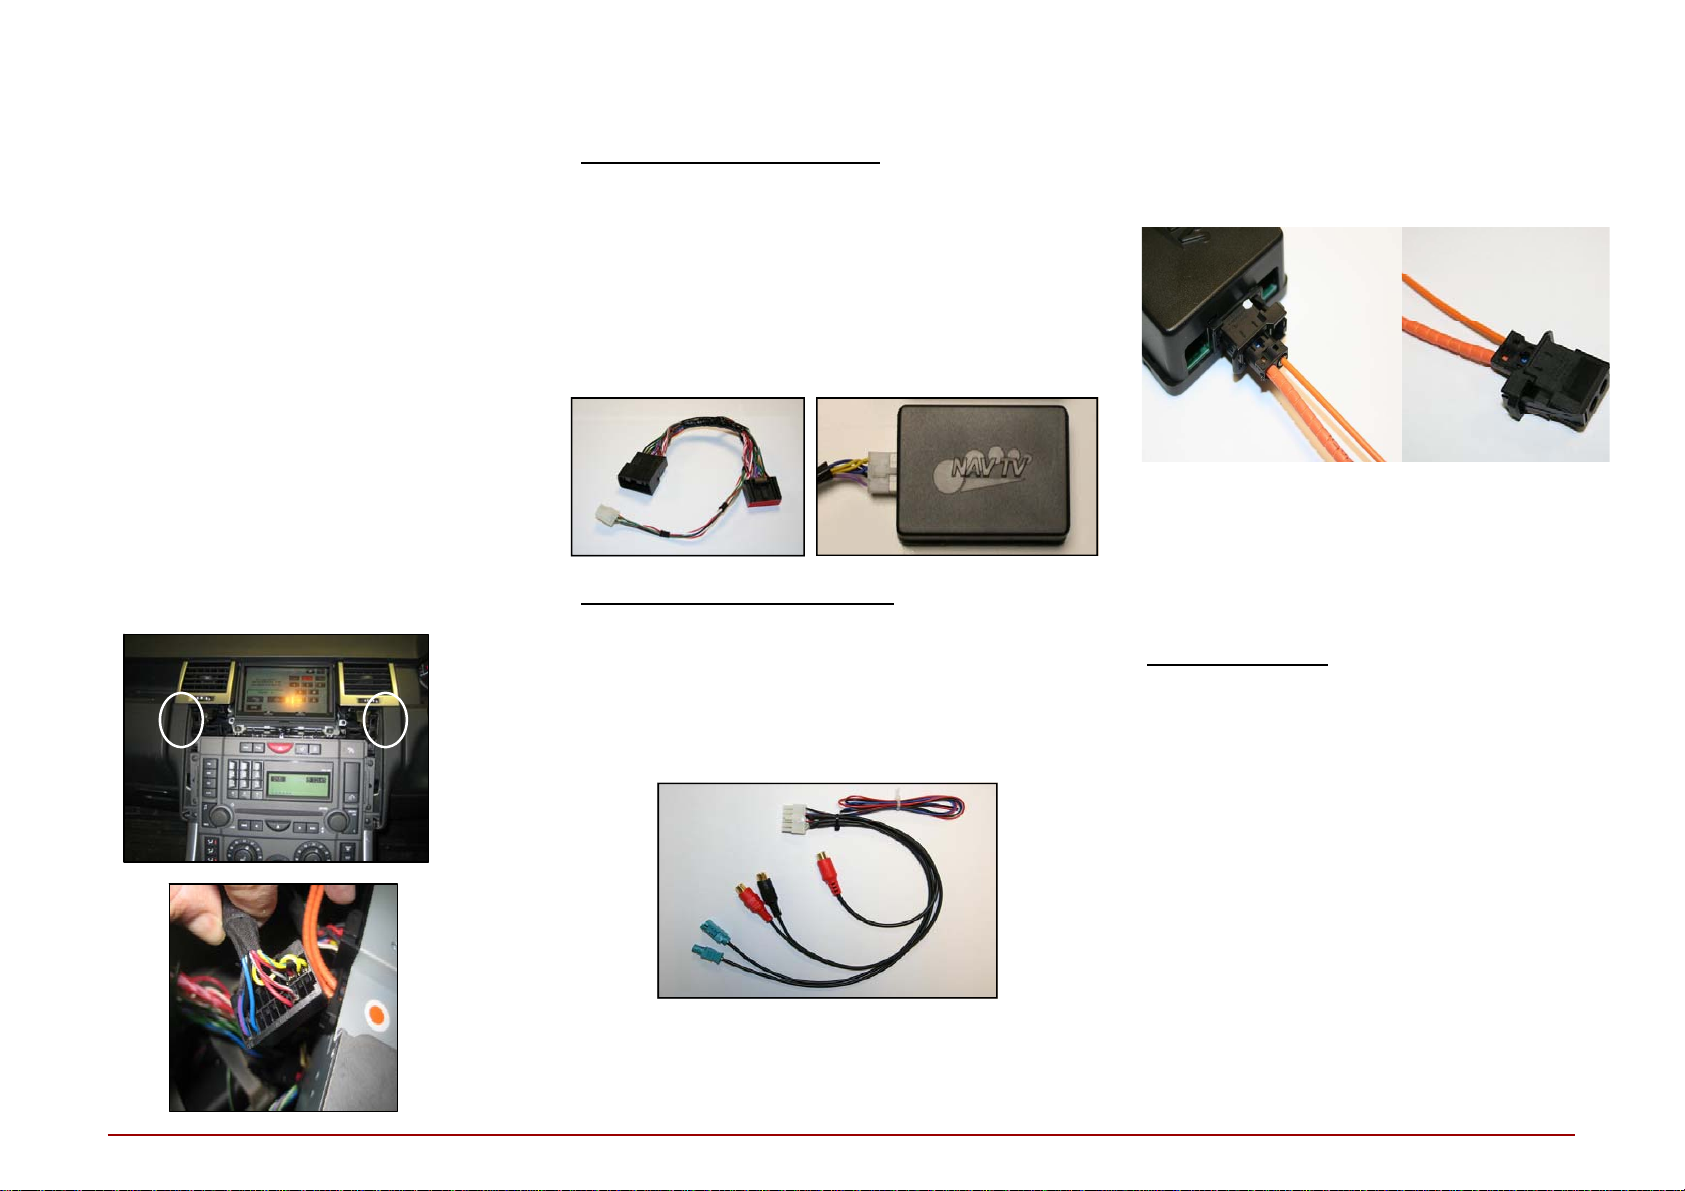
Installation for OPV-2LR (MOST)
Remove the GREEN plug from the GREEN socket on the
screen unit,
Plug the GREEN plug into the male green socket supplied,
next plug the supplied green female plug into the screen
unit, see below
INSTALLATION
Insert OPTICAL leads into OPV-2LR loom and car loom
AT THE SCREEN/RADIO to create a loop, see dia-
gram below
To remove the (out) fibre optic cable from the factory
connector you will need to remove the black outer cas-
ing and push out the blue locking insert. You will need
to do the same to insert the cable into the supplied
loom. (shown in diagram above)
Other Connections
Connect the RED cable to 12v+ PERM
Connect the BLACK cable to 12v- GROUND
Connect the BLUE cable to 12v+ to switch from factory
TV to your added source. Also see operating instruc-
tions.
Connect the cable AUDIO sockets to your audio source.
See fig 5
Connect the cable VIDEO socket to your video source,
see fig 5
INSTALLATION
Fig 2
Fig 1
Installation is made at the front monitor and radio.
Remove the radio surround trims and the radio top trim on
Sport, then pull forward the leather side trims that cover
the bottom screws of the air vents (circled below)
Remove the 4 screws holding the air vents and remove,
Remove the screen.
Access is now available to the rear of the radio to con-
nect the supplied loom.
On LR3 you may remove the radio by removing the 4
screws and unit above housing hazard button.
Locate the plug in the radio shown in fig 2.
INTERFACE CAR CONNECTOR
OUT cable from screen
IN cable from interface
Fig 5

Other Nav TV Automobile Electronic manuals

Nav TV TOOKI-POR User manual

Nav TV

Nav TV TOOKI-POR User manual

Nav TV NTV-KIT805 User manual

Nav TV

Nav TV NTV-KIT805 User manual

Nav TV MOST-HUR MB User manual

Nav TV

Nav TV MOST-HUR MB User manual

Nav TV Sonata-CAM User manual

Nav TV

Nav TV Sonata-CAM User manual

Nav TV SRX VIM User manual

Nav TV

Nav TV SRX VIM User manual

Nav TV NTV-KIT873 User manual

Nav TV

Nav TV NTV-KIT873 User manual

Nav TV ProMASTER-CAM User manual

Nav TV

Nav TV ProMASTER-CAM User manual

Nav TV AUDI DYNAMIC-INT User manual

Nav TV

Nav TV AUDI DYNAMIC-INT User manual

Nav TV UCT-13 User manual

Nav TV

Nav TV UCT-13 User manual

Nav TV REC-AV XG User manual

Nav TV

Nav TV REC-AV XG User manual

Nav TV NTV-KIT701 User manual

Nav TV

Nav TV NTV-KIT701 User manual

Nav TV OPI-A User manual

Nav TV

Nav TV OPI-A User manual

Nav TV Volvo VIM User manual

Nav TV

Nav TV Volvo VIM User manual

Nav TV Tooki Audi User manual

Nav TV

Nav TV Tooki Audi User manual

Nav TV UCT-13 User manual

Nav TV

Nav TV UCT-13 User manual

Nav TV Genesis VIM XG User manual

Nav TV

Nav TV Genesis VIM XG User manual

Popular Automobile Electronic manuals by other brands

Prime Tech H-066 user manual

Prime Tech

Prime Tech H-066 user manual

Waeco MagicWatch MWE150 Installation and operating manual

Waeco

Waeco MagicWatch MWE150 Installation and operating manual

Saab 32 026 005 installation instructions

Saab

Saab 32 026 005 installation instructions

Curtis 3140 manual

Curtis

Curtis 3140 manual

Motorola MA1 user manual

Motorola

Motorola MA1 user manual

Chamberlain LiftMaster Professional 975LMC Owner's instructions

Chamberlain

Chamberlain LiftMaster Professional 975LMC Owner's instructions

EPS 301 Operation & installation manual

EPS

EPS 301 Operation & installation manual

Axxess AX-MLINK-HD installation instructions

Axxess

Axxess AX-MLINK-HD installation instructions

PIKO 55003 instructions

PIKO

PIKO 55003 instructions

Valeo Light/on&off instruction manual

Valeo

Valeo Light/on&off instruction manual

GU Electronic FORD SYNC3 TDC2 manual

GU Electronic

GU Electronic FORD SYNC3 TDC2 manual

HaWeKo HYK280 installation manual

HaWeKo

HaWeKo HYK280 installation manual

Axxess AX-FT901 manual

Axxess

Axxess AX-FT901 manual

Volvo 31399562 installation instructions

Volvo

Volvo 31399562 installation instructions

Volvo 30756314 installation instructions

Volvo

Volvo 30756314 installation instructions

IDESA ideTronic PSLQ10 Using instructions

IDESA

IDESA ideTronic PSLQ10 Using instructions

Car Solutions 841109 manual

Car Solutions

Car Solutions 841109 manual

Audiovox Pursuit PT100 Owners and installation manual

Audiovox

Audiovox Pursuit PT100 Owners and installation manual

manuals.online logo
manuals.online logoBrands
  • About & Mission
  • Contact us
  • Privacy Policy
  • Terms and Conditions

Copyright 2025 Manuals.Online. All Rights Reserved.