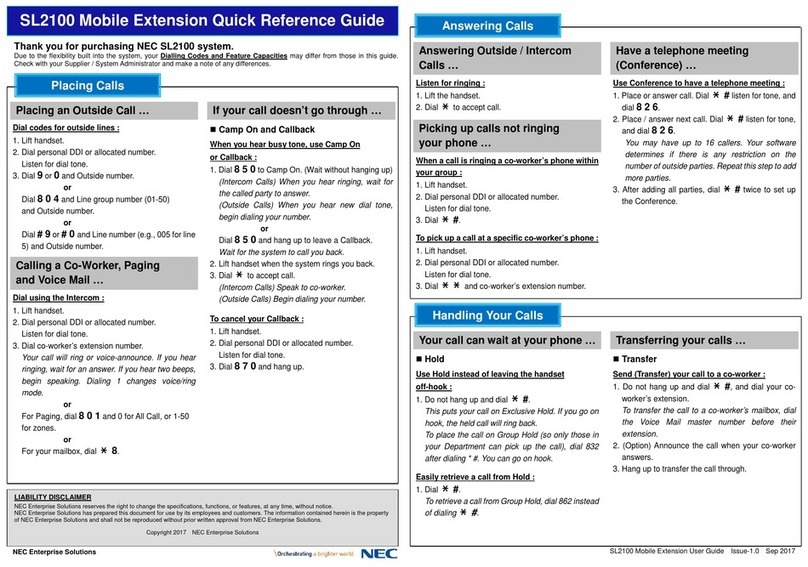
NEC UNIVERGE SL2100 User manual

ACD Installation Manual
GVT-010790-301-00 NA
ISSUE 1.0

Copyright
NEC Corporation reserves the right to change the specifications, functions, or features at any time,
without notice.
NEC Corporation has prepared this document for use by its employees and customers. The
information contained herein is the property of NEC Corporation and shall not be reproduced without
prior written approval of NEC Corporation.
Dterm is a registered trademarks of NEC Corporation. Windows is a registered trademark of Microsoft
Corporation. AT&T is a registered trademark of AT&T Wireless Services, Inc. All other brand names
and product names referenced in this document are trademarks or registered trademarks of their
respective companies.
Copyright 2017
NEC Corporation

TABLE OF CONTENTS
Chapter 1 Introduction
Section 1 WHAT IS ACD?.................................................................................................. 1-1
Chapter 2 Setting Up ACD for the First Time
Section 1 ARRANGE EXTENSIONS INTO ACD GROUPS.............................................. 2-1
Section 2 SET UP WORK SCHEDULES AND WORK PERIODS..................................... 2-2
Section 3 ASSIGN EXTENSIONS FOR EACH WORK PERIOD....................................... 2-4
Section 4 ARRANGE TRUNKS INTO INCOMING RING GROUPS.................................. 2-6
Section 5 DETERMINE TRUNK WORK SCHEDULES..................................................... 2-7
Section 6 ASSIGN INCOMING TRUNK RING GROUPS TO ACD GROUPS................... 2-8
Section 7 BASIC PROGRAMMING................................................................................. 2-10
Section 8 BASIC OPERATIONS...................................................................................... 2-11
Chapter 3 Advanced ACD Features
Section 1 DETERMINING WHICH ADVANCED FEATURES ARE NEEDED.................... 3-1
ACD Setup Options..................................................................................................... 3-2
Description......................................................................................................... 3-2
Programming...................................................................................................... 3-3
Related Features................................................................................................ 3-3
Operation........................................................................................................... 3-3
Emergency Call........................................................................................................... 3-4
Description......................................................................................................... 3-4
Programming...................................................................................................... 3-4
Related Features................................................................................................ 3-4
Operation........................................................................................................... 3-5
Headset Operation (with Automatic Answer)............................................................... 3-6
Description......................................................................................................... 3-6
Programming...................................................................................................... 3-6
Related Features................................................................................................ 3-6
Operation........................................................................................................... 3-6
Hotline for ACD Agents................................................................................................ 3-8
Description......................................................................................................... 3-8
Programming...................................................................................................... 3-8
Related Features................................................................................................ 3-9
Operation........................................................................................................... 3-9
SIE Key for ACD Groups........................................................................................... 3-10
Description....................................................................................................... 3-10
Programming.................................................................................................... 3-10
Related Features.............................................................................................. 3-11
Operation.......................................................................................................... 3-11
Off-Duty Mode........................................................................................................... 3-13
Description....................................................................................................... 3-13
Programming.................................................................................................... 3-13
Related Features.............................................................................................. 3-13
Operation......................................................................................................... 3-14
Overflow Options....................................................................................................... 3-15
Description....................................................................................................... 3-15
Programming.................................................................................................... 3-22
Related Features.............................................................................................. 3-23
ISSUE 1.0 SL2100
ACD Installation Manual i

Operation......................................................................................................... 3-23
Queue Status Display................................................................................................ 3-24
Description....................................................................................................... 3-24
Programming.................................................................................................... 3-25
Related Features.............................................................................................. 3-26
Operation......................................................................................................... 3-26
Supervisor, ACD Group............................................................................................. 3-27
Description....................................................................................................... 3-27
Programming.................................................................................................... 3-27
Related Features.............................................................................................. 3-27
Operation......................................................................................................... 3-28
Supervisor, ACD System........................................................................................... 3-31
Description....................................................................................................... 3-31
Programming.................................................................................................... 3-31
Related Features.............................................................................................. 3-32
Operation......................................................................................................... 3-32
Supervisor Monitor / ACD Monitor............................................................................. 3-35
Description....................................................................................................... 3-35
Programming.................................................................................................... 3-35
Related Features.............................................................................................. 3-35
Operation......................................................................................................... 3-36
Identification Codes for ACD Agents......................................................................... 3-37
Description....................................................................................................... 3-37
Programming.................................................................................................... 3-38
Related Features.............................................................................................. 3-39
Operation......................................................................................................... 3-39
Traffic Reports........................................................................................................... 3-41
Description....................................................................................................... 3-41
Programming.................................................................................................... 3-42
Related Features.............................................................................................. 3-42
Operation......................................................................................................... 3-42
Wrap-Up Time............................................................................................................ 3-43
Description....................................................................................................... 3-43
Programming.................................................................................................... 3-43
Related Features.............................................................................................. 3-44
Operation......................................................................................................... 3-44
Chapter 4 PROGRAMMING
Section 1 BEFORE YOU START PROGRAMMING.......................................................... 4-1
Section 2 HOW TO USE THIS MANUAL........................................................................... 4-1
Section 3 UNIQUE PROGRAMMING CONSIDERATIONS............................................... 4-2
Section 4 HOW TO ENTER PROGRAMMING MODE...................................................... 4-2
Section 5 HOW TO EXIT PROGRAMMING MODE........................................................... 4-3
Section 6 USING KEYS TO MOVE AROUND IN THE PROGRAMS................................ 4-4
Section 7 PROGRAMMING NAMES AND TEXT MESSAGES......................................... 4-5
Section 8 USING SOFTKEYS FOR PROGRAMMING...................................................... 4-5
Section 9 WHAT THE SOFTKEY DISPLAY PROMPTS MEAN......................................... 4-6
Section 10 PROGRAMMING YOUR SYSTEM.................................................................. 4-6
Program 11 : System Numbering................................................................................. 4-7
11-13 : Service Code Setup (for ACD)............................................................... 4-7
11-17 : ACD Group Pilot Number....................................................................... 4-9
Program 15 : Extension, Basic Setup........................................................................ 4-10
15-02 : Multiline Telephone Basic Data Setup................................................. 4-10
SL2100 ISSUE 1.0
ii ACD Installation Manual
15-07 : Programmable Function Keys.............................................................. 4-17
15-08 : Incoming Virtual Extension Ring Tone Setup....................................... 4-25
15-09 : Virtual Extension Ring Assignment...................................................... 4-27
15-10 : Incoming Virtual Extension Ring Tone Order Setup............................. 4-28
15-11 : Virtual Extension Delayed Ring Assignment........................................ 4-30
Program 20 : System Option Setup........................................................................... 4-31
20-02 : System Options for Multiline Telephones............................................. 4-31
20-04 : System Options for Virtual Extensions................................................. 4-34
20-06 : Class of Service for Extensions........................................................... 4-35
20-13 : Class of Service Options (Supplementary Service)............................. 4-36
Program 22 : Incoming Call Setup............................................................................. 4-40
22-01 : System Options for Incoming Calls...................................................... 4-40
22-03 : Trunk Ring Tone Range....................................................................... 4-42
22-05 : Incoming Trunk Ring Group Assignment............................................. 4-44
Program 41 : ACD Setup........................................................................................... 4-45
41-02 : ACD Group and Agent Assignments................................................... 4-45
41-03 : Incoming Ring Group Assignment for ACD Group.............................. 4-46
41-05 : ACD Agent Work Schedules................................................................ 4-47
41-06 : Trunk Work Schedules......................................................................... 4-48
41-07 : ACD Weekly Schedule Setup.............................................................. 4-49
41-08 : ACD Overflow Options......................................................................... 4-50
41-09 : ACD Overflow Table Setting................................................................ 4-52
41-11 : VRS Delay Announcement.................................................................. 4-53
41-12 : Night Announcement Setup................................................................. 4-55
41-13 : VRS Message Number for Night Announcement................................ 4-56
41-14 : ACD Options Setup.............................................................................. 4-57
41-16 : ACD Threshold Overflow..................................................................... 4-59
41-17 : ACD Login Mode Setup....................................................................... 4-60
41-18 : ACD Agent Identity Code Setup.......................................................... 4-61
41-19 : ACD Voice Mail Delay Announcement................................................. 4-62
41-20 : ACD Queue Display Settings............................................................... 4-63
Program 47 : InMail................................................................................................... 4-64
47-03 : InMail Group Mailbox Options.............................................................. 4-64
Program 90 : Maintenance Program.......................................................................... 4-65
90-20 : Traffic Report Data Setup.................................................................... 4-65
90-21 : Traffic Report Output............................................................................ 4-67
ISSUE 1.0 SL2100
ACD Installation Manual iii

LIST OF TABLES
Table 2-1 Sample ACD Group Worksheet......................................................................... 2-2
Table 2-2 Sample ACD Agent Work Schedule Worksheet (41-05-01)............................... 2-3
Table 2-3 ACD Agent Work Schedule Worksheet (41-05-01)............................................ 2-3
Table 2-4 Sample ACD Assignment Worksheet (41-02-01)............................................... 2-5
Table 2-5 ACD Assignment Worksheet (41-02-01)............................................................ 2-5
Table 2-6 Sample ACD Incoming Trunk Ring Group Worksheet (22-05-01)..................... 2-6
Table 2-7 ACD Incoming Trunk Ring Group Worksheet (22-05-01)................................... 2-7
Table 2-8 Sample Trunk Work Schedule Worksheet (41-06-01)........................................ 2-8
Table 2-9 Trunk Work Schedule Worksheet (41-06-01)..................................................... 2-8
Table 2-10 Sample ACD Incoming Trunk Ring Group Assignment Worksheet
(41-03-xx)................................................................................................... 2-9
Table 2-11 Sample ACD Incoming Trunk Ring Group Assignment Worksheet
(41-03-xx)................................................................................................... 2-9
Table 2-12 ACD Incoming Trunk Ring Group Assignment Worksheet (41-03-xx)........... 2-10
Table 3-1 Advanced Features Guide................................................................................. 3-1
Table 3-2 ACD Setup Options (Program 41-14-xx)............................................................ 3-2
Table 3-3 BLF For ACD Agents......................................................................................... 3-8
Table 3-4 BLF for co-workers who are not ACD Agents.................................................... 3-8
Table 3-5 ......................................................................................................................... 3-25
Table 4-1 Keys for Entering Data (Digital (2W) Multiline Terminal, IP Multiline
Terminal)..................................................................................................... 4-4
Table 4-2 Keys for Entering Names................................................................................... 4-5
Table 4-3 Softkey Display Prompts.................................................................................... 4-6
Table 4-4 Function Number List ...................................................................................... 4-18
Table 4-5 Function Number List ...................................................................................... 4-22
Table 4-6 Program 15-08 - Incoming Signal Frequency Patterns.................................... 4-25
Table 4-7 Note [Digital (2W)/IP Multiline Terminal]........................................................... 4-32
Table 4-8 Program 22-03 - Incoming Signal Frequency Patterns ................................... 4-42
SL2100 ISSUE 1.0
iv ACD Installation Manual
Introduction
SECTION 1 WHAT IS ACD?
1.1 Equitable Distribution of Calls Among Agents
Automatic Call Distribution (ACD) uniformly distributes calls among member agents of a programmed
ACD Group. When a call rings into an ACD Group, the system automatically routes the call to the
agent that has been idle the longest. Automatic Call Distribution is much more sophisticated and
comprehensive than Department Calling and other group services – it can accurately judge the work
load at each agent and distribute calls accordingly. Automatic Call Distribution operation is further
enhanced by:
• ACD Announcements (which play to incoming callers)
• ACD Call Queuing
• ACD Overflow
• Agent Log In and Log Out Services
• Flexible Time Schedules
1.2 Unique Considerations
Simplifying Multiline Operation with One-Touch Keys
A Multiline user can access many features through Service Codes (e.g., Service Code *0 answers a
Message Waiting from a co-worker). To streamline the operation of their phone, a Multiline user can
store these codes under One-Touch Keys. This provides one-button operation for almost any feature.
To find out more, read the One-Touch Calling and One-Touch Serial Operation features in your
Features and Specifications Manual.
Programmable Keys
When reading an instruction using programmable keys, you will see a notation similar to (Program
15-07-01 or SC 751: 05). This means that the key requires function code 05, and you can program this
code through Program 15-07-01 or by dialing Service Code 751. Service Code 752 is also used and
requires a previously programmed “751” key to be undefined before the system will accept the 752
programming (if a key is programmed with a function using the 751 code, undefine the key using 751
+ 000). Refer to the Programmable Function Keys feature in your Features and Specifications Manual
if you need more information.
Using Handsfree
The manual assumes each extension has Automatic Handsfree. This lets a user just press a line key
or the SPEAKER key to answer or place a call. For extensions without Automatic Handsfree, the user
must:
• Lift the handset or press the SPEAKER key for Intercom dial tone
• Lift the handset or press the SPEAKER key, then press a line key for trunk dial tone
ACD Installation Manual 1-1
Introduction
1

ACD Agents and Non-ACD Ring Groups
If an ACD agent is assigned to several different ring groups (Program 22-04-01), while they are logged
into the ACD group, they will only receive calls from the ACD ring group. Calls from other ring groups
will only ring the agent's extension while they are logged out.
SL2100 ISSUE 1.0
1-2 Introduction

Setting Up ACD for the First Time
When setting up ACD for the first time, perform the following procedures in the sequence listed below.
1. Arrange Extensions into ACD Groups.
2. Set up Work Schedules and Work Periods.
3. Assign Extension to ACD Groups for each Work Period.
4. Arrange Trunks into incoming Ring Groups.
5. Determine Trunk Work Schedules.
6. Assign incoming Ring Groups to ACD Groups.
SECTION 1 ARRANGE EXTENSIONS INTO ACD GROUPS
Your first step in setting up ACD is to find out how many ACD Groups you need and which extensions
should be in each group. Use the Table 2-1 Sample ACD Group Worksheet on page 2-2 to arrange
extensions into ACD Groups.
• ACD requires that the IP7[ ]-CPU-C1 have the ACD license.
• There are 8 ACD Groups, 128 ACD Agents Max per group, and 128 Trunks.
1. Select the ACD Group Number.
The system allows up to 8 ACD Groups. You can have up to 128 ACD agents per group. You can
put any agent in any group. In addition, an agent can be logged into only one group at a time, but
a SIE key can be programmed for other groups. This allows, for example, a Technical Service
representation to answer Customer Service calls at lunch time when many of the Customer
Service reps are unavailable.
In the Table 2-1 Sample ACD Group Worksheet on page 2-2, in the Member Extensions
column, enter the member extensions for each ACD Group.
If an extension is a member of more than one ACD Group, ensure that extension is active in only one
ACD Group during a particular Work Period. Refer to ASSIGN EXTENSIONS FOR EACH WORK
PERIOD on page 2-4.
The Table 2-1 Sample ACD Group Worksheet on page 2-2 shows extensions 105, 107, 117
and 139 in ACD Group 1. Extensions 109, 111 and 115 are shown in ACD Group 2.
2. Choose an ACD Master Number.
The ACD Master Number is the extension number for the ACD Group. Calls transferred to an
ACD Master Number enter that ACD Group and are routed to the group member extensions
accordingly. Although the master number can be any valid extension number, it is recommended
you choose a number that is not in close sequence with those numbers typical for that group of
member extensions.
In the Table 2-1 Sample ACD Group Worksheet on page 2-2, enter the Master Number for each
of the ACD Groups. The sample worksheet below uses 3998 for ACD Group 1 and 3999 for ACD
Group 2.
3. Enter an ACD Group Name.
In the ACD Group Worksheet, enter a name for each group. The sample worksheet below uses
Tech Service for ACD Group 1 and Customer Support for ACD Group 2.
ACD Installation Manual 2-1
Setting Up ACD for the First Time
2

4. Set the Skip Time.
When a call comes into an ACD Group, it rings each available ACD Agent for a preset time and
then routes to the next agent. This preset time is called the Skip Time. The default Skip Time
setting is 10 seconds.
In ACD Group 1, for example, a call would ring the ACD Agent at extension 105 before trying the
next available extension. If 10 seconds is too long to keep callers waiting, shorten the interval. If
you want callers to ring for more than 10 seconds, lengthen the Skip Time interval. Your Skip
Time setting is the same for all ACD Groups.
In the ACD Group Worksheet, enter the Skip Time interval. The sample worksheet below uses
10 seconds for the Skip Time.
Table 2-1 Sample ACD Group Worksheet
Sample ACD Group Worksheet
ACD Group Num-
ber (1-8) (41-02-01)
ACD Master Num-
ber (11-17-01)
ACD Group Name Member Extensions (41-02-01)*1
1 3998 Tech Service 105, 107, 117, 139
2 3999 Customer Support 109, 111, 115
Skip Time Interval (41-14-10) 10
*1. Indicate if extension is a member of more than one ACD Group.
SECTION 2 SET UP WORK SCHEDULES AND WORK PERIODS
A Work Schedule allows you to divide a day into segments (called Work Periods) for scheduling the
activity in your ACD Groups.
• You can set up as many as four Work Schedules, with up to eight Work Periods in each Work
Schedule.
• Each day of the week has one Work Schedule.
• Different days can share the same Work Schedule.
For example, you can designate two Work Periods for the work week, Monday through Friday. Work
Period 1 can be from 8:00 AM to 5:00 PM, when your business is open. Work Period 2 can be from
5:00 PM to 8:00 AM, when your business is closed.
Use the Table 2-3 ACD Agent Work Schedule Worksheet (41-05-01) on page 2-3 to set up your
Work Schedules and Work Periods. Refer to Table 2-2 Sample ACD Agent Work Schedule Worksheet
(41-05-01) on page 2-3.
To set up the work schedule for trunks, refer to DETERMINE TRUNK WORK SCHEDULES on
page 2-7.
SL2100 ISSUE 1.0
2-2 Setting Up ACD for the First Time

1. Designate a worksheet for each Work Schedule.
Make additional copies of the Table 2-3 ACD Agent Work Schedule Worksheet (41-05-01) on
page 2-3 so you will have enough for all of your work schedules.
In the upper right corner of each worksheet, write the number of the corresponding work
schedule.
2. Assign Days of the Week to each Work Schedule.
In the Day(s) of Week row of each worksheet, indicate which days of the week to use the Work
Schedule. The sample worksheet is for Monday through Friday.
3. Set the start and stop time of each work Period.
Enter a start and stop time for each Work Period. Keep in mind that if you leave holes in your
Work Schedule, there will be periods during the day when no ACD service is available. Try to
accommodate the typical divisions of time during the day. For example, the sample worksheet
below shows five Work Periods corresponding to mornings (1), lunch (2), afternoons (3), evenings
(4) and late night (5).
Table 2-2 Sample ACD Agent Work Schedule Worksheet (41-05-01)
Sample ACD Agent Work Schedule Worksheet (41-05-01)
ACD Work Schedule Number (1-4) 1
Day(s) of Week (41-07-01) Monday-Friday
Work Period Start Time End Time
1 8:00 AM Noon
2 Noon 1:00 PM
3 1:00 PM 5:00 PM
4 5:00 PM Midnight
5 Midnight 8:00 AM
Table 2-3 ACD Agent Work Schedule Worksheet (41-05-01)
ACD Agent Work Schedule Worksheet (41-05-01)
ACD Work Schedule Number (1-4)
Day(s) of Week (41-07-01)
Work Period Start Time End Time
1
2
ISSUE 1.0 SL2100
ACD Installation Manual 2-3

ACD Agent Work Schedule Worksheet (41-05-01)
3
4
5
6
7
8
SECTION 3 ASSIGN EXTENSIONS FOR EACH WORK PERIOD
In this step you will assign ACD Groups and the member extensions, set up in ARRANGE
EXTENSIONS INTO ACD GROUPS on page 2-1, for each daily Work Period. ACD will use the Work
Schedules and Work Period durations you have already set up in SET UP WORK SCHEDULES AND
WORK PERIODS on page 2-2. Your system automatically implements the schedules and periods you
have set up.
Use the Table 2-5 ACD Assignment Worksheet (41-02-01) on page 2-5 and the Table 2-4 Sample
ACD Assignment Worksheet (41-02-01) on page 2-5 to assign ACD Groups and the member
extensions for each daily Work Period.
1. Enter the extension number in an ACD Group.
In the Extension column of the worksheet, enter the extension you entered in the
Table 2-1 Sample ACD Group Worksheet on page 2-2. Make additional copies of the ACD
Assignment Worksheet as required. The sample worksheet below includes extensions 105, 107,
117, 139, 109, 111, and 115. To make it easier to visualize the groups, the extensions are entered
consecutively by ACD Group.
2. Enter an ACD Number for each extension number.
ACD numbers are software assignments the system needs when configuring ACD. There are 128
possible ACD numbers. Wherever possible, try to make your ACD numbers in consecutive order.
In the ACD Number column of the Table 2-5 ACD Assignment Worksheet (41-02-01) on
page 2-5, enter the ACD number for each extension number. In the sample below, the ACD
numbers are consecutive within each basic ACD Group.
3. Assign Extensions to ACD Groups for each Work Period
Set up the ACD groups by assigning extensions to ACD Groups for each Work Period. For
example, if you assign four extensions to the same ACD Group for the same Work Period, the
extensions function together as an integrated ACD group. You have great flexibility in which
extensions are in each group for different times of the day.
Using the Table 2-5 ACD Assignment Worksheet (41-02-01) on page 2-5, enter the ACD Group
number (1~2) for each extension for each available Work Period WP1~WP8. Refer to
Table 2-3 ACD Agent Work Schedule Worksheet (41-05-01) on page 2-3 to review Work
Schedule setup.
In the sample below, extension ports 105, 107 and 117 are in ACD Group 1 for WP1 (morning)
and WP3 (afternoon). These extensions are not part of the group during lunch, evenings or late
night. Extension 139 covers group 1 calls during the evenings. ACD Group 1 is unavailable during
lunch. Extensions 109, 111 and115 are in ACD Group 2 from 8:00 AM to 5:00 PM. Extension 109
is part of ACD Group 1 in the evening, and extension 139 is part of ACD Group 2 during lunch.
SL2100 ISSUE 1.0
2-4 Setting Up ACD for the First Time

Table 2-4 Sample ACD Assignment Worksheet (41-02-01)
Sample ACD Assignment Worksheet (41-02-01)
ACD Num-
ber (1-128)
Extension
Number
For each extension number, enter ACD Group for each work period (WP)
(41-05-01)
WP 1 WP 2 WP 3 WP 4 WP 5 WP 6 WP 7 WP 8
1 105 1 1
2 107 1 1
3 117 1 1
4 139 2 1
5 109 2 2 2 1
6 111 2 2 2
7 115 2 2 2
Table 2-5 ACD Assignment Worksheet (41-02-01)
ACD Assignment Worksheet (41-02-01)
ACD Num-
ber (1-128)
Extension
Number
For each extension number, enter ACD Group for each work period (WP)
(41-05-01)
WP 1 WP 2 WP 3 WP 4 WP 5 WP 6 WP 7 WP 8
ISSUE 1.0 SL2100
ACD Installation Manual 2-5
ACD Assignment Worksheet (41-02-01)
ACD Num-
ber (1-128)
Extension
Number
For each extension number, enter ACD Group for each work period (WP)
(41-05-01)
WP 1 WP 2 WP 3 WP 4 WP 5 WP 6 WP 7 WP 8
SECTION 4 ARRANGE TRUNKS INTO INCOMING RING GROUPS
ACD can be set to automatically answer incoming calls.
Incoming trunk calls can automatically route to specific ACD Group (128 trunks ports and 50 Ring
groups are available). These types of calls ring directly into the ACD Group without being transferred
by a co-worker or the Automated Attendant. Calls can route directly to ACD:
• Assign the trunk to an Incoming Trunk Ring Group (in this section).
• Set up the trunk work schedules (Refer to DETERMINE TRUNK WORK SCHEDULES on
page 2-7.)
• Assign Incoming Ring Groups to ACD Groups (Refer to ASSIGN INCOMING TRUNK RING
GROUPS TO ACD GROUPS on page 2-8.)
DISA, DID and tie trunks can ring an ACD master number directly.
Use the Table 2-7 ACD Incoming Trunk Ring Group Worksheet (22-05-01) on page 2-7 and the
sample below when completing this step.
1. Determine which trunks you want answered by ACD Groups.
In the Trunk Port column of the worksheet, enter the number of each trunk you want ACD to
automatically answer. In the example below, trunks 1 and 2 will be automatically answered by
ACD.
2. Assign the trunk ports to Incoming Ring Groups.
In the Incoming Ring Group columns, enter the Incoming Trunk Ring Group for each trunk port,
for each Night Service mode. Trunks that have the same basic function and that will be assigned
the same priority in ASSIGN INCOMING TRUNK RING GROUPS TO ACD GROUPS on
page 2-8 should be in the same incoming Ring Group.
For example, if you have trunks 1~4 that will be primarily answered by the same ACD Group, put
trunks 1~4 in the same incoming group.
You can mix assignments if the trunks have different functions during the different Night Service
modes.) In the example below, trunk 1 is in incoming group 2, while trunk 2 is in incoming group 3.
ASSIGN INCOMING TRUNK RING GROUPS TO ACD GROUPS on page 2-8 sets the Incoming
Trunk Ring Group priority. Priority groups always have precedence over normal groups.
For example, if a call from a priority group rings in when while a normal group call is already
ringing, ACD services the priority call first. ACD services multiple priority calls on a first-come, first-
served basis. Keep this in mind when assigning the trunk ports to incoming Ring Groups.
Table 2-6 Sample ACD Incoming Trunk Ring Group Worksheet (22-05-01)
Sample ACD Incoming Trunk Ring Group Worksheet (22-05-01)
Trunk
Number
Incoming Ring Group
Day Night Rest Midnight Day 2 Night 2 Rest 2 Midnight
2
1 2 2 2 2
2 3 3 3 3
SL2100 ISSUE 1.0
2-6 Setting Up ACD for the First Time

Table 2-7 ACD Incoming Trunk Ring Group Worksheet (22-05-01)
ACD Incoming Trunk Ring Group Worksheet (22-05-01)
Trunk
Number
Incoming Ring Group
Day Night Rest Midnight Day 2 Night 2 Rest 2 Midnight
2
SECTION 5 DETERMINE TRUNK WORK SCHEDULES
Trunk Work Schedules are similar to normal ACD Work Schedules except that they apply only to
trunks assigned to ACD groups. Refer to ASSIGN INCOMING TRUNK RING GROUPS TO ACD
GROUPS on page 2-8. The Trunk Work Schedule allows you to divide a day into segments (called
Work Periods) to determine when trunks route to ACD Groups. You can set as many as four Work
Schedules, with up to eight Work Periods in each Work Schedule. Each day of the week has one
Trunk Work Schedule, but different days can share the same schedule.
For example, Monday-Friday can have the same daily schedule where Work Period 1 lasts from 8:00
AM to 5:00 PM. Saturday can have a Work Period 1 lasting from 8:00 AM to 1:00 PM. Use the
Table 2-9 Trunk Work Schedule Worksheet (41-06-01) on page 2-8 and the sample below to set up
Trunk Work Schedules.
1. Designate a worksheet for each Trunk Work Schedule.
Make additional copies of the Table 2-9 Trunk Work Schedule Worksheet (41-06-01) on
page 2-8 so you will have one worksheet for each Work Schedule.
In the upper right corner of each worksheet, write the number of the corresponding Trunk Work
Schedule (1~8). The sample worksheet below is for Trunk Work Schedule 1.
ISSUE 1.0 SL2100
ACD Installation Manual 2-7

2. Assign Days of the week to each Work Schedule.
The day of the week assignment for each Trunk Work Schedule must correspond to the weekday
assignments made in SET UP WORK SCHEDULES AND WORK PERIODS on page 2-2. For
example, if Work Schedule 1 is set for Monday through Friday in SET UP WORK SCHEDULES
AND WORK PERIODS on page 2-2, that assignment must be reflected in the Trunk Work
Schedule.
3. Set the start and stop time of each work period.
Enter a start and stop time for each Work Period. Keep in mind that if you leave holes in your
Work Schedule there will be periods during the day when the trunk does not ring the ACD Group.
Also, try to accommodate the typical divisions of time periods during the day. For example, the
sample worksheet below shows two Work Periods corresponding to day (1) and night (2).
Table 2-8 Sample Trunk Work Schedule Worksheet (41-06-01)
Sample Trunk Work Schedule Worksheet (41-06-01)
Trunk Work Schedule Number (1-4) 1
Day(s) of Week (41-07-01) Monday-Friday
Work Period Start Time End Time
1 8:00 AM 5:00 PM
2 5:00 PM 8:00 AM
Table 2-9 Trunk Work Schedule Worksheet (41-06-01)
Trunk Work Schedule Worksheet (41-06-01)
Trunk Work Schedule Number (1-4)
Day(s) of Week (41-07-01)
Work Period Start Time End Time
1
2
3
4
5
6
7
8
SECTION 6 ASSIGN INCOMING TRUNK RING GROUPS TO ACD
GROUPS
This section explains how to customize Trunk Ring ACD Groups for each Work Period. You will assign
Incoming Trunk Ring Groups to ACD Groups for each daily Work Period. If a trunk within the incoming
group is assigned to an ACD Group, incoming calls on that trunk directly ring the first available ACD
agent. The system always knows the day of the week, so ACD can implement the schedules and
periods you program automatically. Use the Table 2-12 ACD Incoming Trunk Ring Group Assignment
Worksheet (41-03-xx) on page 2-10 and the sample below when completing this step.
There are 50 Ring Groups, eight Work Periods and 8 ACD Groups.
You can assign whether the night announcement is used for the ring group. The night announcement
function is not available for ACD pilot number calls.
SL2100 ISSUE 1.0
2-8 Setting Up ACD for the First Time

Set the Incoming Trunk Ring Group priority. Priority groups always have precedence over normal
groups. For example, if a call from a priority group rings in when while a normal group call is already
ringing, ACD services the priority call first. ACD services multiple priority calls on a first-come, first-
served basis.
1. Select the Incoming Trunk Ring Group you want to program.
In the Incoming Trunk Ring Group field at the top of the worksheet, enter the number of the
incoming group you are programming. To see which trunks you assigned to the ring group, refer
to DETERMINE TRUNK WORK SCHEDULES on page 2-7. The sample worksheets on the next
page are for Incoming Ring Groups 2 and 3.
2. Enter the Incoming Trunk Ring Group for each Work Period.
In the ACD column for each Work Period, enter the number of the ACD group (1~8) that will
answer the Incoming Ring Group calls. Only one ACD Group can answer an Incoming Ring
Group calls during any single Work Period. In the sample worksheet on the next page for Ring
Group 2, for example, Incoming Trunk Ring Group 1 rings into ACD Group 1 during Work Periods
1 and 3. It rings into ACD Group 2 during Work Period 2.
3. Set whether or not the Incoming Trunk Ring Group entered in the previous step should play the
Night Announcement.
Select whether the Incoming Trunk Ring Group should have the Night Announcement enabled.
Night Announcement used is selected from the VRS.
4. Set the priority of the Incoming Trunk Ring Group being defined.
Set the Incoming Trunk Ring Group for Priority or Normal operation. Priority Ring Groups have
precedence over Normal Ring Groups. For example, if a normal trunk is already ringing an ACD
group when a priority trunk rings in, the new call starts ringing and the normal trunk waits in queue
behind it. Two priority trunks ringing at the same time will ring the ACD Group on a first-come,
first-served basis.
Table 2-10 Sample ACD Incoming Trunk Ring Group Assignment Worksheet (41-03-xx)
Sample ACD Incoming Trunk Ring Group Assignment Worksheet (41-03-xx)
Incoming Trunk Ring Group (22-05-01) 2
For each work period (WP 1-8) enter:
ACD ACD Group that should answer the Incoming Ring Group trunks (ACD Groups: 1-8)
(41-03-01)
N Night Announcements (0 = Disable, 1 = Enable) (41-03-02)
P Trunk priority (0 = Normal, 1 ~ 7 = Priority) (41-03-03)
WP1 WP2 WP3 WP4
ACD N P ACD N P ACD N P ACD N P
1 1 1 2 1 0 1 0 0
WP5 WP6 WP7 WP8
ACD N P ACD N P ACD N P ACD N P
Work periods use the same Work Schedules as ACD Agents. See Table 2-3 ACD Agent Work Schedule Worksheet
(41-05-01) on page 2-3.
Table 2-11 Sample ACD Incoming Trunk Ring Group Assignment Worksheet (41-03-xx)
Sample ACD Incoming Trunk Ring Group Assignment Worksheet (41-03-xx)
Incoming Trunk Ring Group (22-05-01) 3
For each work period (WP 1-8) enter:
ACD ACD Group that should answer the Incoming Ring Group trunks (ACD Groups: 1-8)
(41-03-01)
N Night Announcements (0 = Disable, 1 = Enable) (41-03-02)
ISSUE 1.0 SL2100
ACD Installation Manual 2-9

Sample ACD Incoming Trunk Ring Group Assignment Worksheet (41-03-xx)
P Trunk priority (0 = Normal, 1 ~ 7 = Priority) (41-03-03)
WP1 WP2 WP3 WP4
ACD N P ACD N P ACD N P ACD N P
2 1 1 1 1 0 2 0 0
WP5 WP6 WP7 WP8
ACD N P ACD N P ACD N P ACD N P
Work periods use the same Work Schedules as ACD Agents. See Table 2-3 ACD Agent Work Schedule Worksheet
(41-05-01) on page 2-3.
Table 2-12 ACD Incoming Trunk Ring Group Assignment Worksheet (41-03-xx)
ACD Incoming Trunk Ring Group Assignment Worksheet (41-03-xx)
Incoming Trunk Ring Group (22-05-01)
For each work period (WP 1-8) enter:
ACD ACD Group that should answer the Incoming Ring Group trunks (ACD Groups: 1-8)
(41-03-01)
N Night Announcements (0 = Disable, 1 = Enable) (41-03-02)
P Trunk priority (0 = Normal, 1 ~ 7 = Priority) (41-03-03)
WP1 WP2 WP3 WP4
ACD N P ACD N P ACD N P ACD N P
WP5 WP6 WP7 WP8
ACD N P ACD N P ACD N P ACD N P
Work periods use the same Work Schedules as ACD Agents. See Table 2-3 ACD Agent Work Schedule Worksheet
(41-05-01) on page 2-3.
SECTION 7 BASIC PROGRAMMING
Program No. Program Name / Description
11-13-01 through
11-13-06
Service Code Setup (For ACD)
If required, customize the service codes used with the ACD feature.
11-17-01 ACD Group Pilot Number
Enter the master number, up to eight digits, for each ACD Group (1~8). Try to use entries that are
not part of your normal extension numbering range.
15-07-01 Programmable Function Keys
Assign an ACD Log In/Log Out key (code *10) for one-button Log In/Log Out operation.
20-06-01 Class of Service for Extensions
Assign a Class of Service (1~15) to an extension.
22-05-01 Incoming Trunk Ring Group Assignment
Assign each trunk that should directly ring an ACD Group to an Incoming Trunk Ring Group (1~50).
Then, use Program 41-03-xx to assign Incoming Trunk Ring Groups to ACD Groups for each Work
Period.
41-02-01 ACD Group and Agent Assignments
For each ACD extension number, assign an ACD Group (1~8). An ACD Group number is assigned
to each Work Period number (1~8).
SL2100 ISSUE 1.0
2-10 Setting Up ACD for the First Time

Program No. Program Name / Description
41-03-01 Incoming Ring Group Assignment for ACD Group – ACD Group Number
For each Incoming Trunk Ring Group (1~50) set up in Program 22-05-01, designate into which ACD
Group (1~8) the trunks should ring for each of the eight Work Periods.
41-03-02 Incoming Ring Group Assignment for ACD Group – Night Announcement Service
For each Incoming Trunk Ring Group (1~50) set up in Program 22-05-01, designate whether the
Night Announcement Service should be enabled (1) or disabled (0).
41-03-03 Incoming Ring Group Assignment for ACD Group – Priority Data
For each Incoming Trunk Ring Group (1~50) set up in Program 22-05-01, assign an Incoming Trunk
Ring Group as normal (0) or define the priority (1~7).
41-05-01 ACD Agent Work Schedules
Set up the Work Schedules for ACD Agents and Groups. For each ACD Work Schedule (1~4), des-
ignate the start and stop times for each of the eight Work Periods. Once you set up the schedules,
assign them to days of the week in Program 41-07-01. (This is the same program used by the ACD
Agent Work Schedules.)
41-06-01 Trunk Work Schedules
Set up the Work Schedules for trunks. For each Trunk Work Schedule (1~4), designate the start and
stop times for each of the eight Work Periods. Once you set up the schedules, assign them to days
of the week in Program 41-07-01. (This is the same program used by the Trunk Work Schedules.)
41-07-01 ACD Weekly Schedule Setup
Assign the Work Schedule (1~4) to days of the week (1=Sunday, 7=Saturday). The assignments you
make in this program apply to both the ACD Agent Work Schedules (Program 41-05-01) and the
Trunk Work Schedules (Program 41-06-01).
41-12-03 Night Announcement Setup – ACD Night Announce Sending Time
Define the night announce sending time (0~64800) for each ACD group (1~8).
41-13-01 VRS Message Number for Night Announcement – VRS Message Number
For each ACD Group (1~8), define the VRS message number (0~100) to be used as the night an-
nouncement.
41-13-02 VRS Message Number for Night Announcement – Tone Kind at Message Interval
For each ACD Group (1~8), define the what the caller will hear between the night announcements
(0=Ring Back Tone, 1=MOH Tone, 2=BGM Source).
41-14-10 ACD Options Setup – ACD No Answer Skip Time
For each ACD Group (1~8), set how long the system waits before transferring an unanswered call to
the next ACD agent (0=disabled or 1~64800 seconds).
7.1 Default Settings
ACD is not set up.
SECTION 8 BASIC OPERATIONS
8.1 Transferring Calls to an ACD Group
To Transfer a call to an ACD Group:
1. At the multiline telephone, press the Transfer key.
- OR -
At single line telephone, hookflash.
You hear Transfer dial tone.
2. Dial ACD Group Master number.
You can press a One-Touch Key for the master instead.
3. Hang up.
ISSUE 1.0 SL2100
ACD Installation Manual 2-11

8.2 Answering Outside Calls that Ring Your ACD Group
To answer an outside call that rings your ACD Group:
DISA, DID and tie trunks can ring an ACD master number directly.
Refer to ARRANGE TRUNKS INTO INCOMING RING GROUPS on page 2-6, DETERMINE TRUNK
WORK SCHEDULES on page 2-7 and ASSIGN INCOMING TRUNK RING GROUPS TO ACD
GROUPS on page 2-8 for information on setting up other trunk types to ring ACD Groups. Trunks can also
be transferred to ACD master numbers.
1. Lift handset.
2. If you don't automatically answer the call, press the flashing line key.
8.3 Agent Log In and Log Out
8.3.1 To log your extension into the ACD Group
8.3.1.1 Multiline
Your display shows: WAIT ACD LOGIN. If Program 12-07-01 has a customized Day/Night mode
message defined, the ACD agent’s display will not indicate the WAIT ACD LOGIN status (however, the
agent may still log in using the following procedure).
1. Press the Speaker key.
2. Dial *5.
You hear confirmation tone.
- OR -
Press ACD Log On/Off key (PRG 15-07-01 or SC 752: code *10).
You hear a single beep.
Your display will show the ACD Group to which you are logged in.
8.3.1.2 Single Line Telephone
1. Lift handset.
2. Dial *5.
You hear confirmation tone.
8.3.2 To log your extension out of an ACD Group
8.3.2.1 Multiline
Your display shows the ACD Group where you are logged in.
1. Press the Speaker key.
2. Dial *5.
- OR -
Press ACD Log On/Off key (PRG 15-07-01 or SC 752: code *10).
Your display shows: ACD LOGOUT (1:Yes, 0:No)
SL2100 ISSUE 1.0
2-12 Setting Up ACD for the First Time
Other manuals for UNIVERGE SL2100
29
Table of contents
Other NEC Telephone manuals

NEC
NEC SL1100 User manual

NEC
NEC TT820e User manual

NEC
NEC Univerge SV8100 User manual

NEC
NEC Univerge SV8100 User manual

NEC
NEC Dterm Series i User manual

NEC
NEC polycom VVX 1500 Instruction manual

NEC
NEC DS1000 Owner's manual

NEC
NEC DDXXEE SSeerriieess User manual

NEC
NEC DS2000 IntraMail User manual

NEC
NEC Xen Master User manual