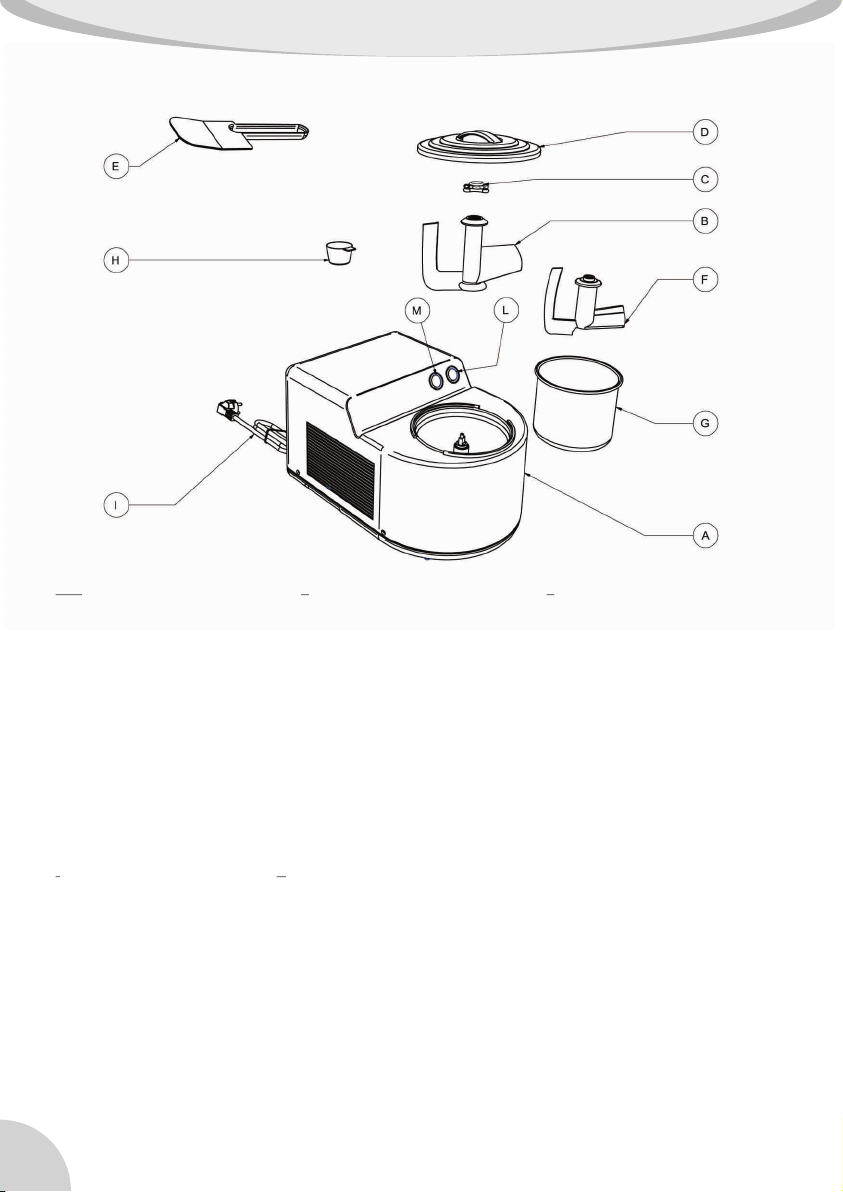
3). Lock the paddle in place by screwing (clockwise) the knob (C) over the shaft.
4). Press the (L) switch to start the cooling. Pre-cool the machine for 5 minutes.
5). Press (M) switch to start the mixing paddle.
6). Pour the mixture into the bowl. For best results, it is suggested to pre-mix ingredients in a separate bowl so as to
obtain a smooth, lump-free mixture. Always use ingredients at fridge temperature so as to reduce temperature
differences and cut down preparation time.
7). Place the transparent cover (D) on the bowl. Preparation time varies according to quantity, temperature of the
mix, type of ice cream (cream-style or sherbet), and room temperature.
8). When ice cream has reached the desired consistency, switch off (L) and (M) switches.
9). Unscrew knob (C) anticlockwise and pull out the paddle.
10). When taking out the ice cream for serving or storing, use the spatula (E). Avoid all metal tools!
11). Allow the motor to cool down (approximately 10 minutes); it is then possible to make a new batch of ice cream
by repeating all the above operations.
12). Unplug the unit when finished.
Use of the removable bowl makes it easier to make consecutive batches of ice cream. The removable bowl is also
easier to clean. When using the removable bowl:
1). Remove the lid (D), unscrew the knob (C) and remove the mixing paddle (B).
2). Pour two measuring cups (H) (50ml) full of brandy or other liquor into the fixed bowl.
3). Insert the removable bowl (G) securely; making sure it is level with the top part of the unit.
4). Insert the mixing paddle for the removable bowl (F) and secure the paddle into place by locking knob (C)
clockwise. The appliance is now ready for use.
5). Follow the procedure described in the paragraph “USING THE FIXED BOWL” from item 4 to item 10.
6). To remove the bowl unscrew knob (C) anticlockwise. Pull out the bowl (G). If you wish, you may leave the ice
cream in the bowl and use the latter to store the product in the freezer compartment (-12° C**).
7). Unplug the unit when finished.
USEFUL HINTS
Mix and blend ice-cream ingredients in a separate bowl.
Use pre-cooled ingredients.
Do not fill the bowl more than half full. This will allow the volume to increase during churning to maximum bowl
capacity.
To avoid the forming of ice or frost, do not leave the ice cream in the bowl for too long with the refrigeration on. Turn off
the unit as soon as the ice cream has reached the desired consistency. Serve the ice cream into pre-cooled
recipients.
Making good, healthy, natural ice cream, with the right consistency, depends on the following factors:
An appliance in good working order: leave enough space on the sides of the unit so as to allow air to circulate freely.
This air is necessary to cool the compressor.
Good, fresh ingredients.
A good recipe: a perfect blend of ingredients and perfect processing.
CLEANING THE MACHINE
Make sure the machine has been switched off and unplugged before performing any cleaning operations.
Wash the paddle, the clear lid, the locking knob and the removable bowl in a warm, soapy water.
Use a damp cloth to clean the body of the machine. NEVER IMMERSE THE MAIN BODY OF THE ICE CREAM MAKER
IN WATER!
When the removable aluminum bowl is used, it is essential to eliminate every trace of salt/water solution from
the parts that come in contact whit it, in order to prevent corrosion.
Store the ice cream in the freezer compartment of the refrigerator (-12° C**), in sealed storage bowl.
When defrost, ice cream should be eaten within 24 hours.
Never re-freeze ice cream which has been previously thawed, even partially so.
USING REMOVABLE BOWL
HOW TO MAKE AN EXCELLENT ICE-CREAM
STORING ICE-CREAM
As alternative, you can use
a solution of salt and water (40ml water and 10g salt). The wall of removable bowl must be completely wet:
this operation is most important to allow the good cold transmission from fixed to removable bowl.
•
•
•
•
•
•
•
•
•
•
•
•
•
•
English Français
76
INSTRUCTIONS GENERALES DE SECURITE
Pendant l'utilisation des appareils électriques, il est indispensable de respecter scrupuleusement quelques
règles de sécurité fondamentales, en particulier:
Lire attentivement le mode d'emploi avant d'installer et utiliser l'appareil.
Ne pas plonger le corps principal de l'appareil dans l'eau ou autres liquides: danger de chocs électriques.
Faire très attention quand l'appareil est utilisé par ou en présence d'enfants.
Débrancher l'appareil de la prise de courant quand il n'est pas utilisé et avant de le démonter ou de le nettoyer.
Ne pas toucher les parties en mouvement.
Ne pas utiliser l'appareil si le cordon d'alimentation ou la fiche sont abîmés, ou après un fonctionnement
anormal de l'appareil, ou si l'appareil est tombé par terre ou s'il a été endommagé de quelque façon que ce
soit. Dans ces cas, il est recommandé de s'adresser au Service Après-vente agrée pour les réparations.
Emploi d'accessoires qui n'ont pas été recomandés ou vendus par le constructeur de cet appareil pourrait
entraîner des risques d'incendie ou des chocs électriques ou des lésions à l’utilisateur.
Ne pas utiliser l'appareil à l'extérieur.
Eviter que le cordon d'alimentation puisse pendre le long du bord de la table ou du plan de travail ou touches
des surfaces chaudes.
CONSERVER CES INSTRUCTIONS
ATTENTION
Toute réparation ne devra être exécutée que par des centres d'assistance technique ou de personnel agrées.
Après avoir sorti l'appareil de l'emballage, s'assurer qu'il soit intact. En cas de doute, ne pas utiliser l'appareil
et s'adresser à un centre d'assistance technique agrée.
Les sachets en plastique, le polystyrène, les clous etc., étant des sources potentielles de danger, ne doivent
pas être laissés à la portée des enfants.
Cet appareil est destiné exclusivement à l'emploi pour lequel il a été conçu. Le constructeur et le vendeur de
l'appareil déclinent toute responsabilité en cas de non-respect des indications contenues dans ce manuel
d'utilisation.
S'assurer que la tension de réseau correspond à celle qui est indiquée sur l'appareil avant d'insérer la fiche
dans la prise de courant.
Ne pas utiliser d’objets ou utensiles coupants à l’intérieur du bol. Ceux-ci risquent en effet de griffer ou abîmer
la cuve. Une spatule en caoutchouc ou une cuillère plastique peuvent être utilisées lorsque l'appareil est
éteint en position “0” ou “OFF”.
Ne jamais nettoyer l’appareil avec des utensiles abrasives.
Ne pas utiliser l’appareil sur surfaces chaudes ou près de flammes.
Ne pas nettoyer aucune partie de la machine dans le lave vaisselles.
N’arrêter jamais la machine en retirant la fiche de la prise de courant.
L'appareil doit obligatoirement être relié au secteur et avoir une prise de courant avec une portée minimum de
10A, avec contact de mise à la terre efficace. Le constructeur n'est pas responsable des dommages
éventuels causés par l'absence de la mise à terre dans l'installation.
Avant d'effectuer n'importe quelle opération d'entretien ou de nettoyage, vérifier que l'appareil ait été
débranché du secteur en retirant la fiche de la prise de courant.
Ne jamais laver l'appareil avec des jets d'eau, ne jamais l'immerger dans l'eau!
IMPORTANT:
Laisser la machine reposer sur un plan horizontal pendant au moins 12 h avant de l'utiliser pour la
première fois. Les agents réfrigérants pourraient en effet être dispersés, au cas où la machine aurait été
renversée pendant le transport et ils doivent avoir le temps de revenir dans la bonne position. Suivre la
même procédure par la suite aussi, toutes les fois que la machine aura été mise en position non
horizontale pour quelque motif que ce soit. Placer la machine de façon à ce qu'il y ait suffisamment
d'espace autour (au moins 20 cm), pour ne pas obstruer les prises d'air latérales.
•
•
•
•
•
•
•
•
•
•
•
•
•
•
•
•
•
•
•
•
•
•