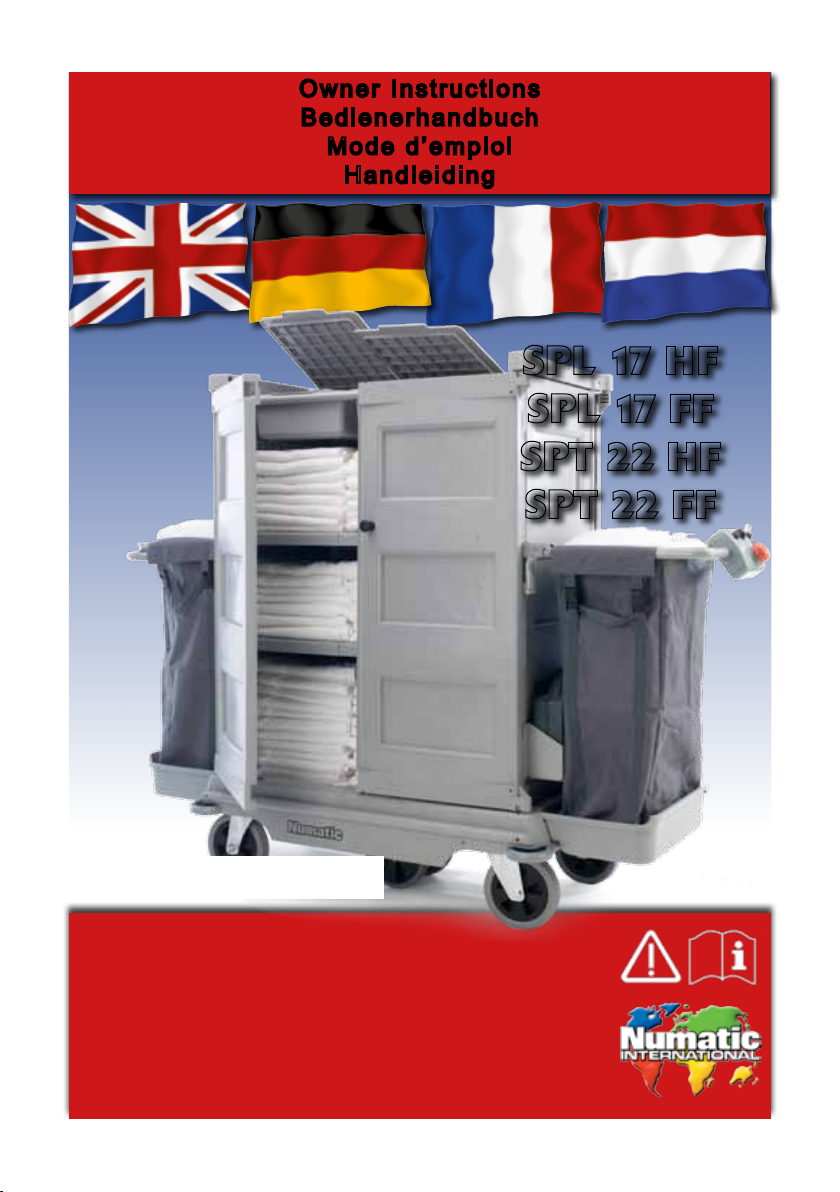
Numatic SPL 17 HF User manual

Original Instructions
Warning! Read instructions before using the machine.
Warnhinweis
Lesen Sie vor Gebrauch der Maschine das Handbuch.
Attention
Lisez la notice avant d’utiliser la machine.
Waarschuwing
Lees deze instructies voor u de machine gebruikt
Owner Instructions
Bedienerhandbuch
Mode d’emploi
Handleiding
SPL 17 HF
SPL 17 FF
SPT 22 HF
SPT 22 FF
Accessories are NOT supplied
with this trolley.

2
Unpacking the machine.
4
3
5
Ensure the battery has been charged before use.
6
1 2

Auspacken des Wagens
Vergewissern Sie sich, dass der Akku vor dem Einsatz geladen wurde.
Déballage de l’appareil
Assurez-vous que la batterie soit entièrement chargée avant l’utilisation du
chariot.
Pak de machine uit
Zorg ervoor dat de accu voor gebruik volledig is opgeladen.

4
Fit the Battery
Fit the battery to the machine and plug in the motorised trolley.
Ensure the battery has been charged before use.
Always ensure that the battery is disconnected before making any
adjustments.
3
1 2
4

5
Installez la batterie
Installez la batterie dans la machine et branchez l’alimentation.
Befestigen Sie den Akku
Befestigen Sie den Akku an der Maschine, und schließen Sie die Stromversorgung an.
Vergewissern Sie sich, dass der Akku vor dem Einsatz aufgeladen wurde.
STELLEN SIE STETS SICHER, DASS DER ANTRIEB AUSGESCHALTET IST,
BEVOR SIE ÄNDERUNGEN VORNEHMEN.
Assurez-vous que la batterie a été chargée avant utilisation.
ASSUREZ-VOUS TOUJOURS QUE LA BATTERIE EST DÉCONNECTÉE AVANT
D’EFFECTUER TOUTE OPÉRATION DE MAINTENANCE.
Plaats de accu
Plaats de accu en sluit de voedingskabel aan.
Zorg ervoor dat de accu voor gebruik opgeladen is.
CONTROLEER ALTIJD DAT DE MACHINE IS UITGESCHAKELD VOORDAT U DE
ACCU PLAATST

6
Using the Machine
Main Control On / Off Key
Machine Off Isolator Button
Forward Switch
Reverse Switch
1
2
3
Insert key (Fig 1) and turn 900
clockwise to the ‘ON’ position.
4
1
2
1
2
3
4
3

7
Utilisation de la machine
Arbeiten mit der Maschine
EIN/AUS-Schlüsselschalter für
Hauptsteuerung
Trennschalter für „NOT-AUS“
Umschalter Vorwärts
Umschalter Rückwärts
1
2
3
Stecken Sie den Schlüssel in das Schaltschloss, und drehen Sie ihn eine Viertelumdrehung im
Uhrzeigersinn auf die „EIN“-Position.
4
Clé de commande principale
Marche/Arrêt
Bouton d’arrêt d’urgence
Commutateur avant
Commutateur arrière
1
2
3
Insérez la clé dans le contact et tournez d’un quart de tour vers la droite
4
Gebruik van de machine
Hoofdbedieningssleutel
AAN/UIT (ON/OFF)
Machine ‘UIT’ (OFF) noodknop
Schakelaar vooruit
Schakelaar achteruit
1
2
3
Doe de sleutel in het contactslot en draai de sleutel een kwartslag naar rechts in
de ‘AAN’-stand (‘ON’).
4

8
Emergency Stop
Machine Charging
To ensure your machine remains at its maximum efciency and prolong
your battery life, please follow the simple steps below:
Under normal daily usage:
Recharge battery after each use
regardless of machine operation
time.
Connect the charger unit to the
battery and plug the charger into a
suitable power supply.
The battery charge state is shown by the light
sequence on the front of the charger.

9
Bouton d’arrêt d’urgence
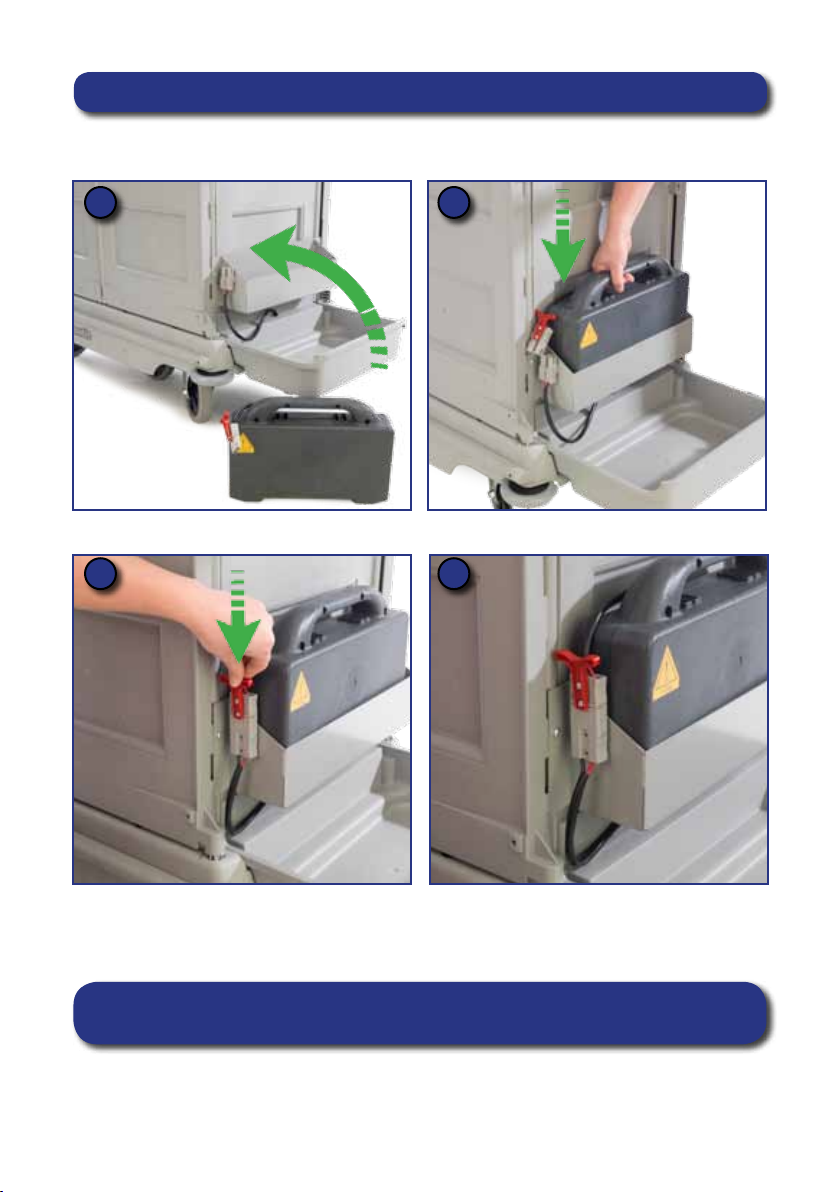
Gestion des batteries
Pour vous assurer que votre machine reste à son efcacité maximum et pour prolonger la vie de
vos batteries, veuillez suivre les étapes simples ci-dessous :
Pour un usage quotidien normal :
Rechargez les batteries après chaque utilisation, quel que soit le temps de fonctionnement de la
machine.
Raccordez le chargeur à la batterie et branchez le chargeur sur une prise de courant
appropriée.
L’état de charge de la batterie est indiqué par la séquence de voyants sur l’avant du
chargeur.
Notausschalter
Akkupege
Um sicherzustellen, der Antrieb seine maximale Efzienz erhält, und um die
Lebensdauer der Akkus zu verlängern, führen Sie die folgenden einfachen Schritte aus:
Bei normalem täglichem Einsatz:
Laden Sie die Akkus unabhängig von der Betriebszeit der Maschine nach jeder Verwendung
wieder auf Schließen Sie das Ladegerät an den Akku und an eine geeignete Stromversorgung an.
Der Akkuladestand wird durch eine LED-Sequenz an der Vorderseite des Ladegeräts angezeigt
Noodstopknop
Accu-onderhoud
Om te garanderen dat uw machine steeds even doeltreffend blijft werken en de accu’s zo lang
mogelijk gebruikt kunnen worden, dient u gewoon de volgende eenvoudige stappen te volgen:
Bij normaal dagelijks gebruik:
Laad de accu’s na elk gebruik op, ongeacht de gebruikstijd.
Sluit het laadapparaat op de accu aan en sluit de lader op de netvoeding aan.
De LED’s aan de voorzijde van de lader geven de laadtoestand van de accu’s aan.

10
Signal (LED) Meaning
Red LED on First phase of charge in progress
Yellow LED on Second phase of charge in progress
Green LED on
End of charge or maintenance phase
Disconnect from power supply
Switch power supply, Off then On, to
restart the charging cycle
Red LED ashing
Unsuitable battery or
charging malfunction
Safety timer exceeded
Internal short circuit
Disconnect from power supply
Switch power supply, Off then On, to
restart the charging cycle
Yellow LED ashing Battery not connected
INITIAL TEST
Green LED with 2 ashes Battery charger congured for recharging
Gel or AGM batteries
Red LED with 2 ashes Battery charger congured for recharging
Lead-acid (Wet) traction batteries
The battery meter displays the charge level of the battery; when fully charged,
all meter lights are illuminated.
The battery supplied for this machine allows for a run time of 180 mins approx,
when fully charged.
Charge time is approximately 6 hours.

11
Spare replacement batteries are available from your supplier.
See SPL / SPT Spares list for part numbers.
The SPL / SPT trolley comes with its own stand-alone charger.
Insert the charging lead required for your country into the charger.
Connect the charger to a suitable power supply.
Recharge the machine fully after its last use.
Do not leave the machine in a discharged state.
If the machine will be standing unused for a period of 30 days or more, then
batteries must be fully charged.
Once mains power is connected the red charging indicator will illuminate.
To ensure a full charge, the battery should be left for a period of 6 hrs.
Once fully charged, disconnect the charging lead from both the power
supply and the machine.
Under abnormal use;
i.e. leaving the machine without charging for a period of time, we advise
that you disconnect the battery from the machine.
Note:
Batteries should be recharged every three months.
Charge fully the day before you start using the machine again.
Removing the battery pack fuse
The battery pack comes with a 40 amp safety fuse tted
Replace the fuse using (208526) Numatic approved part.

12
Das Akkumessgerät zeigt den Ladestand der Akkus an. Wenn die Akkus vollständig geladen sind,
leuchten alle LEDs der Ladeanzeige im Bedienfeld.
Die bei dieser Maschine mitgelieferte Batterie ermöglicht eine Laufzeit von ca. 180 Minuten, wenn
voll aufgeladen.
Die Ladezeit beträgt ca. 6 Stunden.
Signal (LED) Bedeutung
Rote LED leuchtet Erste Ladephase läuft
Gelbe LED leuchtet Zweite Ladephase läuft
Grüne LED leuchtet
Ende der Lade- oder Erhaltungsphase
Von der Stromversorgung trennen
Netzschalter erst Aus dann Ein zum Neustart der
Auadung
Rote LED blinkt
Ungeeignete Batterie oder Störung bei der
Auadung
Sicherheitstimer abgelaufen
Interner Kurzschluss
Von der Stromversorgung trennen
Netzschalter erst Aus dann Ein zum Neustart der
Auadung
Gelbe LED blinkt Batterie ist nicht angeschlossen
TEST BEIM EINSCHALTEN
Akkuladegerät für das Wiederauaden von
Gel- oder
AGM-Akkus
Rote LED blinkt zweimal
Akkuladegerät für das Wiederauaden von
Fahrzeugantriebsakkus (nass) auf Blei-
Säure-Basis

13
Entfernen der Akkupaket-Sicherung
Das Akkupaket ist mit einer 40-A-Sicherung ausgestattet.
Ersetzen Sie die Sicherung durch das Ersatzteil (208526).
Im Lieferumfang der SPL / SPT ist ein eigenes, unabhängiges Ladegerät enthalten.
Führen Sie das für Ihr Land erforderliche Ladekabel in das Ladegerät ein.
Verbinden Sie das Ladegerät mit einer geeigneten Stromversorgung.
Sobald der Netzanschluss hergestellt ist, leuchtet die rote Ladeanzeige.
Um sicherzugehen, dass der Akku vollständig geladen wird, lassen Sie ihn 6 Stunden
angeschlossen.
Nachdem der Akku vollständig geladen ist, trennen Sie das Ladekabel von der
Stromversorgung und der Maschine.
Lassen Sie den Wagen nicht im entladenen Zustand stehen.
Wenn der 30 Tage oder länger nicht eingesetzt wird, müssen die Akkus vollständig aufgeladen
werden.
Ersatz- oder Reserveakkus erhalten Sie bei Ihrem Numatic Fachhändler.
Die Teilenummern entnehmen Sie der Ersatzteilliste für die SPL / SPT.
Wird der Wagen für einen längeren Zeitraum nicht eingesetzt, empfehlen wir die Batterie vom
Antrieb zu trennen.
Akkus sollten alle drei Monate neu aufgeladen werden.
Laden Sie die Maschine am Tag, bevor Sie sie wieder einsetzen, vollständig auf.

14
Signal (Diode) Signication
Voyant rouge allumé Première phase de charge en cours
Voyant jaune allumé Seconde phase de charge en cours
Voyant vert allumé
Fin de charge ou phase de maintenance
Débrancher la prise d’ alimentation
Eteindre et allumer an de redémarrer le cycle de
charge
Voyant rouge clignotant
Système batterie inapproprié ou dysfonctionnement
au niveau de la charge
Temps imparti dépassé
Court-circuit interne
Débrancher la prise d’ alimentation
Eteindre et allumer an de redémarrer le cycle de
charge
Voyant jaune clignotant Batterie non-connectée
TEST INITIAL
Voyant vert avec 2 clignotements Chargeur de batterie conguré pour recharger des
batteries Gel ou AGM
Voyant rouge avec 2 clignote-
ments
Chargeur de batterie conguré pour recharger des
batteries de traction (à électrolyte) au plomb-acide
Le compteur de batterie afche le niveau de charge des batteries. En charge complète, tous les
voyants du compteur sont allumés .
La batterie fournie pour ce chariot offre une autonomie de 180 min environ.
Le temps de charge est de 6 heures au maximum.

15
Le SPL / SPT est livré avec son propre chargeur autonome.
Insérez le câble de charge requis pour votre pays dans le chargeur.
Branchez le chargeur sur une prise de courant appropriée.
Retrait du fusible du bloc-batterie
Une fois que l’appareil est branché, l’indicateur de charge rouge s’allume.
Pour une charge complète, la batterie doit rester branchée 6 h.
Lorsque la charge est terminée, débranchez le câble de charge à la fois de la prise de
courant et de la machine.
La batterie est livrée avec un fusible de sécurité de 40 ampères monté.
Remplacez le fusible en utilisant une pièce de rechange approuvée par Numatic (208526).
Rechargez la machine entièrement après sa dernière utilisation.
Ne laissez pas la machine avec une batterie déchargée.
Si la machine ne doit pas être utilisée pendant une période de 30 jours ou plus, les batteries,
dans ce cas, doivent être entièrement chargées
Des batteries de rechange sont disponibles auprès de votre fournisseur.
Voir la liste des pièces de rechange du SPL / SPT pour les références.
En période de stockage prolongé, procédez au rechargement des batteries tous les 3 mois
et la veille de la remise en service de la machine.
Les batteries doivent être rechargées tous les trois mois.
Effectuez une charge complète la veille, avant de commencer à utiliser de
nouveau la machine.

16
Als het accuniveau zo laag wordt dat alleen het rode lampje blijft branden, dient de gebruiker de
accu op te laden of te vervangen.
De bijgeleverde batterij heeft een werktijd van circa 180 minuten IN DE HOOGSTE STAND,
INDIEN volledig opgeladen.
De laadtijd bedraagt ongeveer 6 uur.
Signaal (LED) Betekenis
Rode LED aan Eerste fase van het laadproces
Gele LED aan Tweede fase van het laadproces
Groene LED aan
Einde van laadproces of onderhoudsfase
Stekker uit het stopcontact halen
Zet de schakelaar UIT en dan AAN, om de laadcyclus
opnieuw te starten
Rode LED knippert
Ongeschikte batterij of laden functioneert niet
Veilige
laadduur overschreden
Interne kortsluiting
Stekker uit het stopcontact halen
Zet de schakelaar UIT en dan AAN, om de laadcyclus
opnieuw te starten
Gele LED-lampje knippert Batterij niet aangesloten
INITIAL TEST
Groene LED knippert 2
keer Lader geschikt voor het opladen van gel- of AGM-accu’s
Rode LED knippert 2 keer Lader geschikt voor het opladen van (natte)
loodzuuraccu’s

17
De SPL / SPT wordt geleverd met een eigen oplader. Doe de laadkabel
(geschikt voor Nederlands stopcontact) in de oplader.
Sluit de oplader aan op een geschikt stopcontact.
De zekering van het accupack verwijderen
Het accupak is voorzien van een zekering van 40 Ampère.
Vervang de zekering door het originele Numatic-onderdeel (208526).
Laad de machine volledig op na het laatste gebruik.
Laat de machine niet met ongeladen accu’s staan.
Als de machine gedurende 30 dagen of langer niet zal worden gebruikt, dienen de accu’s
helemaal te worden opgeladen.
Vervangende accu’s zijn verkrijgbaar bij uw leverancier.
Zie de onderdelenlijst voor de SPN 1804 voor de onderdelennummers.
Onder bijzondere omstandigheden;
bijv. als de machine langere tijd niet wordt opgeladen, is het aan te bevelen om de accu los te
koppelen van de machine.
Wanneer de machine eenmaal is aangesloten op het stopcontact, gaat het rode
indicatielampje voor het laden branden.
De accu’s van de machine zijn na 6 uur volledig opgeladen.
Wanneer de accu’s volledig zijn opgeladen, trekt u de stekkers van het laadsnoer uit het
stopcontact en uit de machine.
Opmerking:
De accu’s moeten elke drie maanden worden opgeladen.
Laad de accu’s volledig op op de dag voordat u de machine weer in gebruik neemt.

18
WEEE (Waste, Electrical and Electronic Equipment)
SPL / SPT Trolley and packaging should be sorted for environmentally-friendly recycling.
Only for EU countries.
Do not dispose of Trolley into household waste.
According to the European Directive 2002/96/EC on waste electrical electronic equipment and
its incorporation into national law.
SPN Trolleys that are no longer suitable for use must be separated, collected and sent for
recovery in an environmentally-friendly manner.
Safety Critical Component
Charging Lead:
H05VV-F x 1.0 mm2 x 3 core
Battery Charger:
100 - 240 Volt (50-60 Hz)
PPE
(Personal protective equipment) that may be required for certain operations).
Ear Protection Safety Footwear Head Protection Safety Gloves
Dust/Allergens
Protection
Eye Protection Protective
Clothing Hi-Vis Jacket
Caution
oorsign
Note:
A risk assessment should be conducted to determine which PPE should be worn.
About the Machine
1
2
3
4
5
6
7
8
9
Company Name & Address
Machine Description
Voltage Frequency
Power rating
Max Gradient
Weight (ready to use)
CE Mark
WEEE Logo
Machine yr/wk Serial number
Rating Label
1
2
3 4
56
7
8
9

19
Read the instruction manual before using the appliance.
Do not use on surfaces having a gradient exceeding that marked on the appliance.
The machine is not to be stored outdoors in wet conditions.
This machine is for indoor use only.
As with all electrical equipment care and attention must be exercised at all times during
its use, in addition to ensuring that routine and preventative maintenance is carried out
periodically in order to ensure its safe operation.
Failure to carry out maintenance as necessary, including the replacement of parts to the
correct standard could render this equipment unsafe and the manufacturer can accept no respon-
sibility or liability in this respect.
When ordering spare parts always quote the Model Number / Serial Number specied on the
Rating Plate.
Warning: do not use on slopes.
This appliance is not intended for use by persons (including children) with reduced physical,
sensory or mental capabilities, or lack of experience and knowledge, unless they have been given
supervision or instruction concerning use of the appliance by a person responsible for their safety.
Children should be supervised to ensure that they do not play with the appliance.
NOTE:
This machine is also suitable for commercial use, for example in hotels, schools, hospitals, facto-
ries, shops and ofces for other than normal housekeeping purposes.
DO’S AND DON’TS:
DO ensure only competent persons unpack/assemble the machine.
DO keep your machine clean.
DO replace any worn or damaged parts immediately.
DO regularly examine the power cord for damage, such as cracking or ageing.
If damage is found, replace the cord before further use.
DO only replace the power cord with the correct Numatic approved replacement parts.
DO ensure that the work area is clear of obstructions and / or people.
DO ensure that the working area is well illuminated.
DON’T use steam cleaners or pressure washers to clean the machine or use in the
rain.
DON’T attempt machine maintenance or cleaning unless the power plug has been
removed from the supply outlet.
DON’T allow any inexperienced repairs. Call the experts.
DON’T strain cable or try to unplug by pulling on cable.
DON’T allow the machine to be used by inexperienced or unauthorised operators or
without appropriate training.
DON’T expect the machine to provide trouble-free, reliable operation unless maintained correctly.
DON’T remove the handle from the machine except for service and repair.
ORIGINAL INSTRUCTIONS
READ MANUAL BEFORE USE
Information for Motorised trolley
Component Interval Inspect for
Charging Lead DAILY Scufng, cracks, splits, conductors showing
CAUTION
DO
DON’T
WARNING

20
It is essential that this equipment is correctly assembled and operated in accordance
with current safety regulations.
When using the equipment always ensure that all necessary precautions are taken to
guarantee the safety of the operator and any other persons who may be affected.
The machine, while charging, must be positioned so that the mains plug is easily accessible.
When cleaning, servicing or maintaining the machine, replacing parts or converting to another
function the power source shall be switched off.
Battery operated machines shall be disconnected by removing the Battery pack.
Operators shall be adequately instructed as to the correct use of the machine.
PRECAUTIONS WHEN WORKING WITH BATTERIES
1. Always wear protective clothing e.g. face visor, gloves and overalls when working with batteries.
2. Whenever possible always use a properly designated and well-ventilated area for charging. Do
not smoke or bring naked ames into the charging area.
3. Remove any metallic items from hands, wrists and neck i.e. rings, chains etc. before working on
a battery.
4. Never rest tools or metallic objects on top of the battery.
5. When charging is complete disconnect from the mains supply.
6. The battery must be removed from the machine before it is scrapped.
7. The machine must be disconnected from the supply when removing the battery.
8. The batteries are to be disposed of safely and in accordance with the battery directive.
9. Only use genuine NUMATIC replacement batteries.
10. Do not allow the batteries to become fully discharged; it may not be possible to recharge them.
11. The batteries tted to this product are Valve Regulated Lead Acid (VRLA) gel electrolyte type.
The tting of any other type of battery may cause a safety hazard.
BATTERY CARE
1. Always recharge the batteries after use. This can be done at any time it is not necessary to wait
until they are fully discharged; they do not develop a “memory”.
2. Leaving the charger to operate for a minimum of 4 hours after the green light has come on, at
least weekly, will prolong battery life.
3. Do not store the machine with the batteries discharged.
WARNING
This manual suits for next models
3
Table of contents
Languages:
Other Numatic Cleaning Equipment manuals

Numatic
Numatic HENRY User manual

Numatic
Numatic TGB 8572/200T User manual

Numatic
Numatic MV 570 User manual

Numatic
Numatic HZ370-2 User manual

Numatic
Numatic Streamline Streamvac User manual

Numatic
Numatic NHL 15 User manual

Numatic
Numatic WBV370NX User manual

Numatic
Numatic EcoMatic EM-3 User manual

Numatic
Numatic NSU 370 User manual

Numatic
Numatic HENRY User manual