4.4 GNSS Test
!This test should only be performed where the EPIRB2 Pro has a clear and unobstructed
view of the sky. This is required to allow the GNSS receiver to acquire a signal from
sufficient satellites to allow it to determine a position. Ensure the area marked “GNSS
Antenna” is not obstructed.
It is recommended that a GNSS test is carried out at least once every six months to ensure correct
operation of the EPIRB2 Pro.
Press and hold the TEST key for 5 seconds. The LED will illuminate red to indicate the key has
been pressed, then start flashing. Shortly after, the LED will cease flashing and become a steady red
light. Release the TEST key when the LED is steady red.
During the GNSS test the LED will repeat a long red flash followed by a short green flash until
either a position fix is obtained or the GNSS test fails.
A successful test will be indicated by a number of green LED flashes and an unsuccessful test
will be indicated by a number of red LED flashes. The number of flashes indicates the number of
GNSS tests remaining (e.g. 7 flashes = 7 tests remaining).
The test result flashes will be repeated after 2 seconds.
If there are 10 or more tests remaining then the LED will flash 10 times only (repeated).
The EPIRB2 Pro has the capacity to carry out 60 GNSS tests within the lifetime of the battery.
If there are no tests remaining immediately after the current test, the LED will flash green or red
rapidly for three seconds (not repeated) depending on whether the GNSS test was successful or
not, respectively.
When there are no tests remaining, the LED will flash red rapidly for three seconds on key release
(not repeated).
The test can be ended at any time by holding the TEST key for 1 to 2 seconds.
For further information regarding Self Test and Self Test history use the Ocean Signal App to connect
to your EPIRB2 Pro using Near Field Communication (NFC).
5. APPROVALS
In addition to Cospas Sarsat Type Acceptance, the EPIRB2 Pro complies with the following National
Approvals:
5.1 European Union
Hereby, Ocean Signal Ltd. declares that the radio equipment type EPIRB2 Pro is in compliance with
Radio Equipment Directive 2014/53/EU. The DoC can be found on following website link:
https://oceansignal.com/approvals-documents/
5.2 UK
Complies with UK Radio Equipment Regulation (UK RER):2017
5.3 USA
Complies with FCC 47 CFR Part 80 and US Coast Guard requirements
5.4 Canada
Complies with ISED RSS GEN and RSS287
5.5 Australia/New Zealand
Complies with AS/NZS 4280.1
See “www.oceansignal.com/approvals-documents” for documentation.
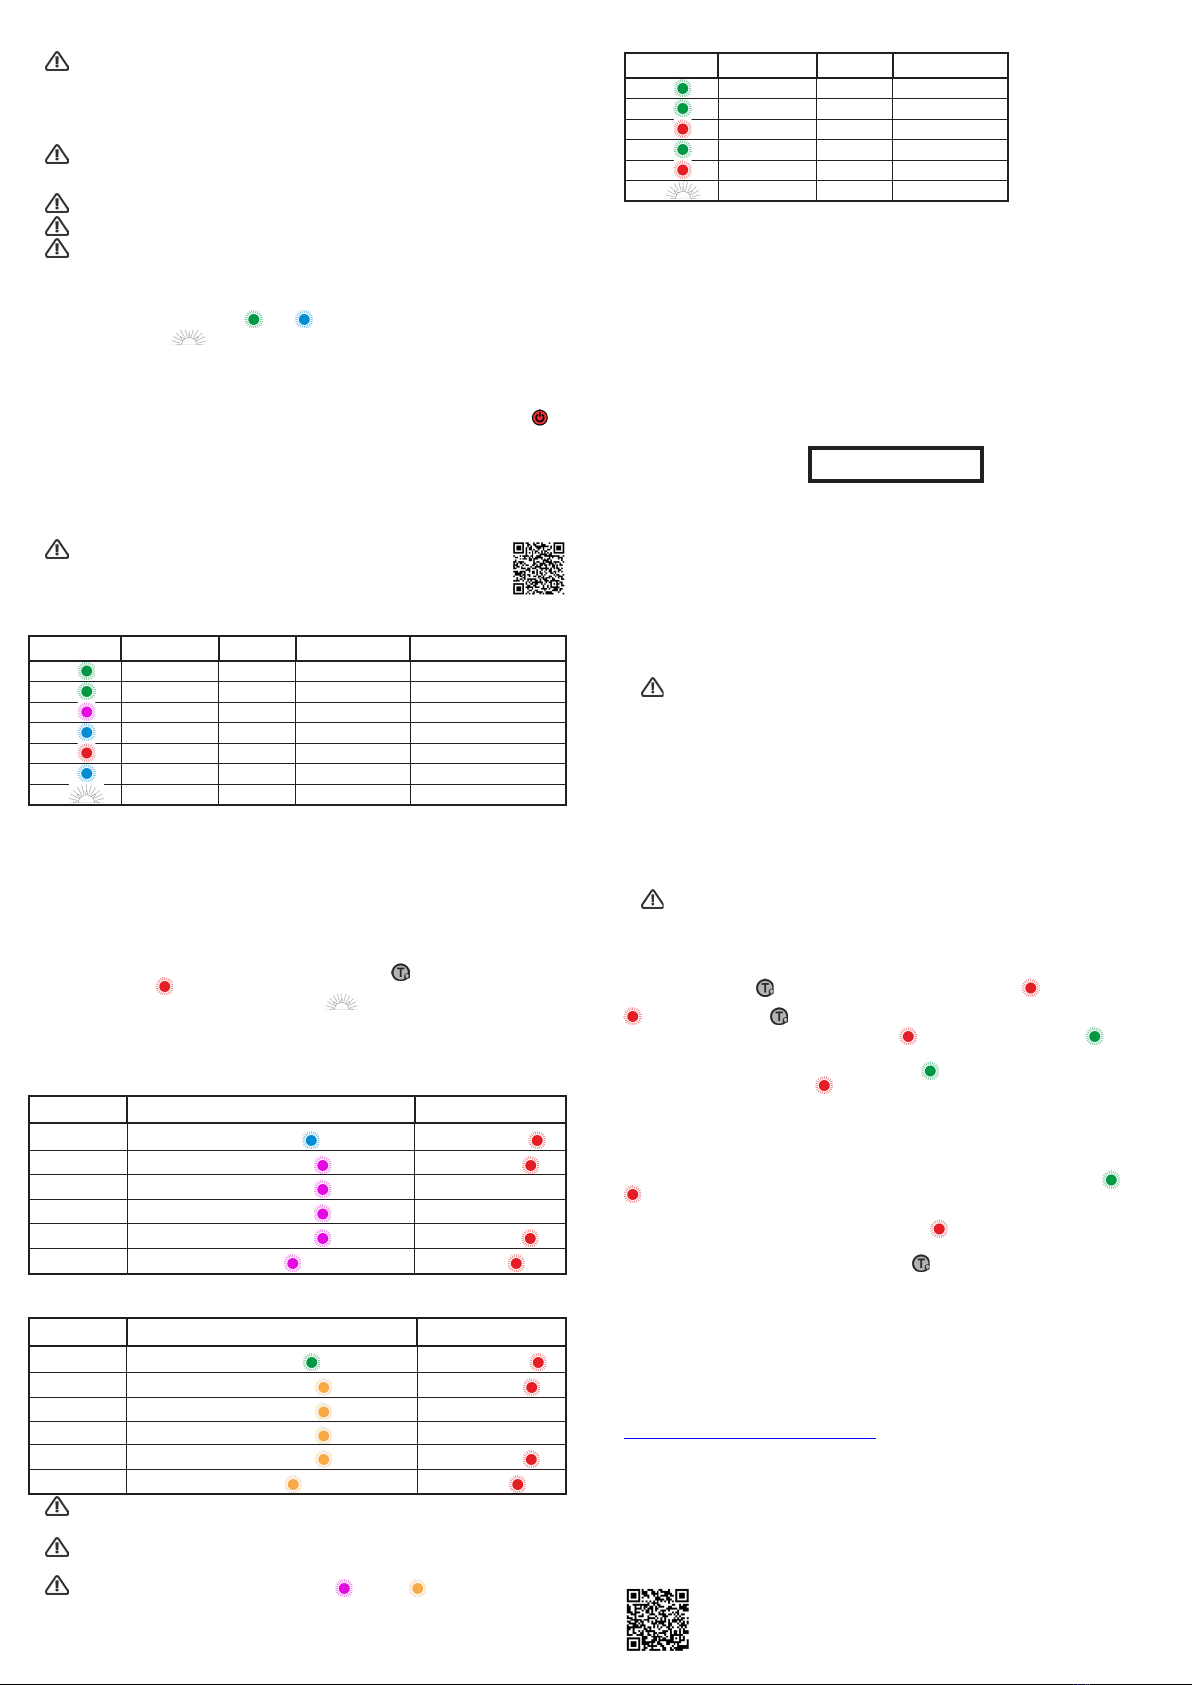
2.5 LED Indications for units configured with non-RLS Protocol
LED When Transmit GNSS
(x1) Every 5 s Searching
(x3) Once each cycle Fix acquired
(x5) At transmit 406MHz No Fix
(x5) At transmit 406MHz Fix acquired
(x1) Every 2.5 s* 121MHz
(x1) Every 2.5 s
* The 121MHz Homer will not transmit until after the second 406MHz transmission.
3. HRU REPLACEMENT
The EPIRB2 Pro is mounted in an Auto Release Housing, this contains a HR1E Hydrostatic Release
Unit (HRU). The HRU unit must be replaced two years after installation - the expiry date is marked on
the HRU and on the front of the housing.
If this date has been reached then the HRU must be replaced with an Ocean Signal HR1E, failure to do
so may result in the HRU not operating correctly during an emergency situation.
See the User Manual for further information regarding the HRU replacement procedure.
NOTE: The expiry date should be two years from the date of installation on to your vessel,
but no more than three years from the date of manufacture provided.
Note the HRU Expiry Date here:
4. INSPECTION
During the monthly EPIRB self test it is advised that the following inspection is performed.
• Inspect the EPIRB for obvious signs of damage including the state of the antenna. Any
creases in the antenna may cause the operation of the EPIRB to be impaired.
• Confirm that the EPIRB is securely mounted on the Manual Bracket.
• Inspect the lanyard and ensure it is not attached to any structures.
• Confirm the battery is within the specified expiry date.
• Clean the EPIRB and mounting. It is recommended that the EPIRB is cleaned only using a
damp cloth.
There are no user serviceable parts inside the EPIRB2 Pro.
!DO NOT OPEN THE EPIRB2 Pro, DOING SO WILL INVALIDATE THE WARRANTY AND MAY
CAUSE FALSE ALERTS.
NOTE:
Non-RLS Protocol is usually
country specific and is not a
user changeable function.
4. TESTING
Routine testing of your beacon once a month is highly recommended to ensure it is in good working
order. Follow the guidance notes in the User Manual for the frequency that tests should be carried
out. Each test reduces operation time of your beacon in an emergency.
4.1 Functional test
To test your beacon is functioning correctly, press and hold the TEST key for 1 to 2 seconds. The
LED will illuminate red to indicate the key has been pressed, then start flashing. Release the
TEST Key when flashing. After a short pause the strobe will flash and the indicator LED will
produce a flash sequence.
A passed test flash sequence indicates the total number of hours that the battery has already been in
use, up to the time that the test was initiated.
4.2 LED Indications with RLS Enabled
No. of Flashes Functional Test Pass Fail
10 to 1hr 59min 121.5MHz homer
22hrs to 3hrs 59min 406MHz power
34hrs to 5hrs 59min
46hrs to 7hrs 59min
58hrs to 9hrs 59min Battery failure
610hrs + No GNSS
4.3 LED Indications for units configured with non-RLS Protocol
No. of Flashes Functional Test Pass Fail
10 to 1hr 59min 121.5MHz homer
22hrs to 3hrs 59min 406MHz power
34hrs to 5hrs 59min
46hrs to 7hrs 59min
58hrs to 9hrs 59min Battery failure
610hrs + No GNSS
!Because this test transmits a short burst on the aircraft distress frequency of 121.5MHz,
please only carry out this test in the first 5 minutes of each hour.
!The battery must be replaced either prior to the expiry date shown on the rear label or
after the EPIRB2 has been activated.
!If, during a self test, the LED flashes magenta or amber the EPIRB2 Pro may not
have sufficient energy to operate for the specified 48-hour period. Battery replacement
is recommended.
NOTE: More information regarding test results is available using the Mobile App.
2. OPERATION
!WARNING: Use only in situations of grave and imminent danger.
Deliberate misuse may result in a severe penalty.
Ensure that your beacon is always fitted with an unused battery that is within the marked expiry date.
Failure to do so may result in reduced operating time when used in a real emergency. Please observe
the recommendations on testing in section 9 of the User Manual.
!Category 1 beacons are designed to be automatically deployed from the Automatic
Release Housing and will automatically be activated on contact with the water. Category
1 beacons MUST be removed from the housing before they can be manually activated.
!To prevent loss, secure the beacon to your person or life raft using the attached lanyard.
!Never secure the lanyard to the vessel, this will cause the EPIRB to sink with the vessel.
!When active the beacon is designed to operate while floating in the water. For best
operation do not take the beacon into a life raft or obstruct the upper case.
2.1 Optical Indications on activation
• The LED will illuminate green (blue if RLS is enabled) for 1 second.
• The strobe light will start flashing.
• Within 1 minute of activation, the indicator LED will flash a quick burst of 5 indicating
406MHz transmission*.
2.2 Deactivation
To deactivate your beacon after use or if it is accidentally activated, press and hold the ON/OFF
Key until the LED flashes red twice, then release.
2.3 Automatic Activation (Ensure the Antenna is released)
The beacon requires removal from the Auto Release Housing to allow automatic activation. As the
beacon is released from the bracket the water contacts are enabled. Place the EPIRB2 Pro in the
water to activate. Only manual activation is possible while the EPIRB remains in the Auto Release
Housing.
!For full installation details see the User Manual:
* The first 406MHz transmission is made between 48 and 52 seconds following activation.
2.4 LED Indications with RLS Enabled
LED When Transmit GNSS RLS
(x1) Every 5 s Searching
(x3) Once each cycle Fix acquired
(x5) At transmit 406MHz No Fix RLS Request sent
(x5) At transmit 406MHz Fix acquired RLS Request sent
(x1) Every 2.5 s* 121MHz RLS Reply not received
(x1) Every 2.5 s* 121MHz RLS Reply received
(x1) Every 2.5 s
www.oceansignal.com/products/epirb2-pro


