Ocean Signal EPIRB2 User manual

User Manual
English
Class 2, Category 1
Emergency Position Indicating Radio Beacon
with RLS
www.oceansignal.com
EPIRB2 Pro

EPIRB2 Pro USER MANUAL
2 912S-04393 - 01.00 22/05/2023
© 2023 Ocean Signal Ltd
The technical data, information and illustrations contained in this manual were believed
to be correct at the time of print. Ocean Signal Ltd reserve the right to change specifica-
tions and other information contained in this manual as part of our continual improvement
process.
No part of this manual may be reproduced, stored in a retrieval system or transmitted in
any form, electronic or otherwise, without the prior permission of Ocean Signal Ltd.
No liability can be accepted for any inaccuracies or omissions in this manual.
Ocean Signal® and rescueME® are registered trademarks of Ocean Signal Ltd.
For ease of access please record details of your EPIRB2 Pro here:
Owners Name: .......................................................
Vessel Name: .......................................................
Beacon HEX ID (UIN): .......................................................

22/05/2023 912S-04393 - 01.00 3
EPIRB2 Pro USER MANUAL
IN CASE OF EMERGENCY
USE ONLY IN SITUATIONS OF
GRAVE AND IMMINENT DANGER
MANUAL ACTIVATION
1 2 3
45
678

EPIRB2 Pro USER MANUAL
4 912S-04393 - 01.00 22/05/2023
1. ABOUT YOUR EPIRB
1.1 COSPAS/SARSAT System
The basic Cospas-Sarsat concept is illustrated in the figure below.
The System is composed of:
• distress radio beacons (ELTs for aviation use, EPIRBs for maritime use, and
PLBs for personal use) which transmit signals during distress situations
• instruments on board satellites in geostationary and low-altitude Earth
orbits which detect the signals transmitted by distress radio beacons
• ground receiving stations, referred to as Local User Terminals (LUTs), which
receive and process the satellite downlink signal to generate distress alerts
• Mission Control Centers (MCCs) which receive alerts produced by LUTs and
forward them to Rescue Coordination Centers (RCCs), Search and Rescue
Points Of Contacts (SPOCs) or other MCCs
The Cospas-Sarsat System includes two types of satellites:
• satellites in low-altitude Earth orbit (LEO) which form the LEOSAR System
• satellites in geostationary Earth orbit (GEO) which form the GEOSAR System
The future Cospas-Sarsat System will include a new type of satellite in the medium-al-
titude Earth orbit (MEO) which will form the MEOSAR System. The EPIRB2 Pro is fully
compatible with the new MEOSAR satellites.

22/05/2023 912S-04393 - 01.00 5
EPIRB2 Pro USER MANUAL
1.2 Return Link Service
The Galileo Return Link Service (RLS) is a free-of-charge global service available to
Cospas-Sarsat RLS compatible beacons. The new functionality, currently offered uniquely
by Galileo, enables a communication link that relays a Return Link Message (RLM) back to
the originating beacon through the Galileo Navigation Signal in Space.
The RLS feature is an indication on the EPIRB2 Pro that confirms to the User that the
distress signal from the EPIRB2 Pro has been localised by the Cospas-Sarsat system and is
being sent to the SAR authorities. It does NOT mean that a search and rescue mission has
been launched, but only confirms that the distress alert has been received by the Cospas-
Sarsat system and is being routed to the appropriate SAR agencies.
The RLS aims to send an acknowledgment to the beacon within 30 minutes following
activation (the response may not be received by the beacon for significantly longer).
RLS is an optional function and may not be permitted in all countries.
The full RLS specification can be found here:
https://gsc-europa.eu/sites/default/files/sites/all/files/Galileo-SAR-SDD.pdf

EPIRB2 Pro USER MANUAL
6 912S-04393 - 01.00 22/05/2023
1. ABOUT YOUR EPIRB 4
1.1 COSPAS/SARSAT System 4
1.2 Return Link Service 5
2. GENERAL 7
2.1 Introduction 7
2.2 Exposure to RF Electromagnetic Energy 7
2.3 Warnings 7
2.4 What’s in the Box 8
2.5 Operating Modes 8
3. EPIRB2 PRO OVERVIEW 9
4. INSTALLATION 10
4.1 Location 10
4.2 Remove the EPIRB2 Pro from the Auto Release Housing 11
4.3 Mounting Dimensions 12
4.4 Fit the Auto Release Housing 12
4.5 Load the EPIRB2 Pro into the Auto Release Housing 14
5. OPERATION 16
5.1 Manual Activation 17
5.2 Optical Indications on activation 19
5.3 Deactivation 20
6. FALSE ALERTS 20
7. TESTING 21
7.1 NFC and Mobile App. 21
7.2 Beacon Test 22
7.3 GNSS Test 24
8. BEACON REGISTRATION 25
8.1 Advice to owners of EPIRBs 25
8.2 Country Specific Registration Information 25
8.3 UNREGISTERED BEACON 26
9. APPENDIX 27
9.1 Maintenance 27
9.2 Batteries 29
9.3 Decommissioning and Disposal 29
9.4 Transport 30
9.5 HRU Replacement 31
9.6 Specifications 32
9.7 Approvals 33
9.8 Spares 33
10. WARRANTY INFORMATION 35
10.1 Limited Warranty 35
10.2 Extended Warranty 35

22/05/2023 912S-04393 - 01.00 7
EPIRB2 Pro USER MANUAL
2. GENERAL
2.1 Introduction
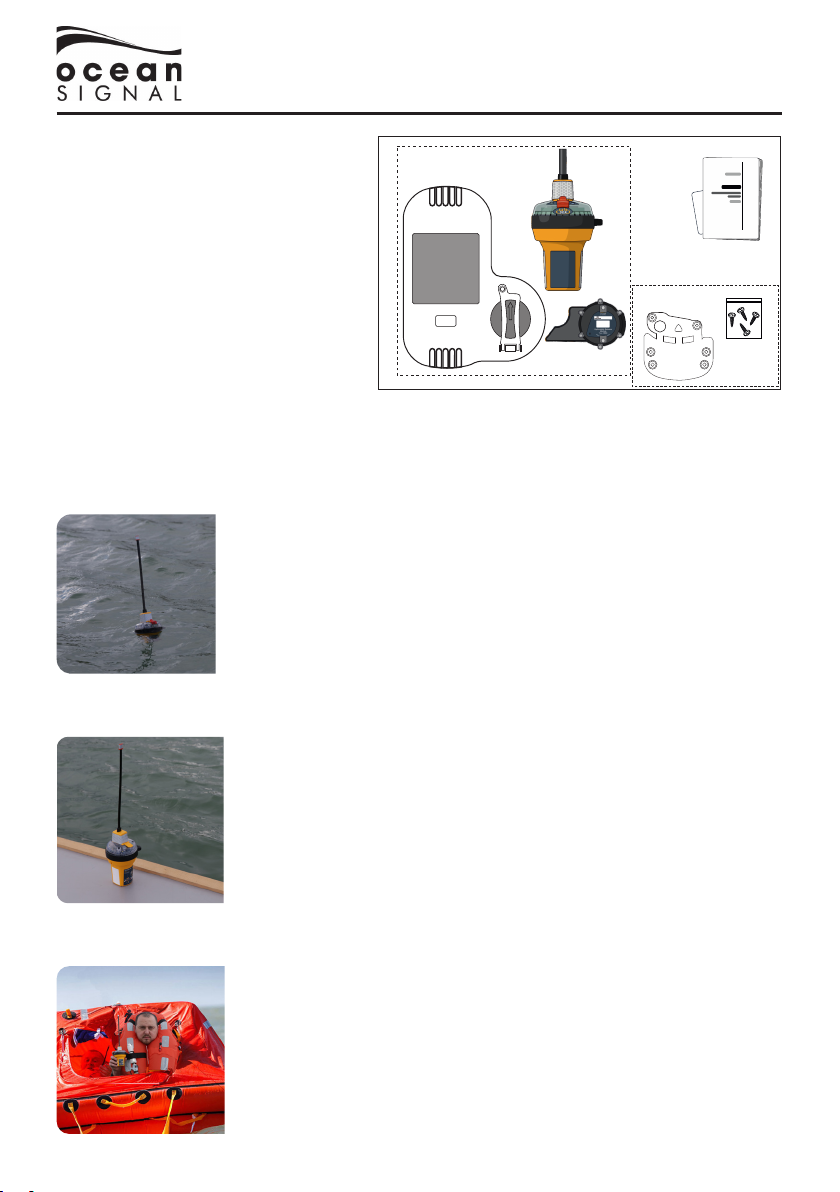
This manual provides valuable information for the installation, operation and routine
maintenance of the EPIRB2 Pro complete with the included Auto Release Housing.
Please read this manual completely before using your EPIRB2 Pro.
2.2 Exposure to RF Electromagnetic Energy
This product complies with EN62479 (EU) at separation distances of 25 mm and with
RSS-102 (Canada).
2.3 Warnings
!It is a legal requirement to register your EPIRB2 Pro with your National Authority.
!Only use your EPIRB2 Pro in a situation of grave and imminent danger.
!Deliberately misusing your EPIRB2 Pro or setting it off accidentally may result in
prosecution and a fine.
!Contains Lithium batteries:
- store between -30°C (-22ºF) to+70°C (+158ºF)
If the EPIRB2 Pro is stored at higher temperatures the battery life may
be degraded and should be replaced earlier than the date stated. Failure
to do this may result in the EPIRB2 not fulfilling the stated 48hr
operating
life. The effect is more pronounced as the temperature increases.
- DO NOT ATTEMPT TO REPLACE THE BATTERIES YOURSELF
unauthorised opening and battery replacement may put
your life at risk.
- do not short circuit, incinerate or recharge.
!Please see section 9.4 for information on safe transportation.
!The battery in your EPIRB2 Pro should be replaced immediately if it has been
activated, or if the test indicator shows the battery as ‘used’, or if the expiry date
marked on the unit has been exceeded.
!Battery replacement must be carried out at an Ocean Signal authorised battery
replacement centre using manufacturer supplied battery components. The
EPIRB2 Pro is supplied with an automatic release housing for external installation
only. See the installation guidelines in section 4 for further information.
!Please read these instructions carefully. Failure to follow the guidance in this
manual may result in loss of warranty.

EPIRB2 Pro USER MANUAL
8 912S-04393 - 01.00 22/05/2023
2.4 What’s in the Box
1. EPIRB2 Pro
Cat1 Assembly
2. User Guide &
Labels
3. Adapter Bracket
& Mounting Screws (x6)
2.5 Operating Modes
Your EPIRB2 Pro may be operated in a variety of modes.
2.5.1 Automatic Release and Activation
Should the vessel sink the EPIRB2 Pro will automatically be
released from its housing and float to the surface. Contact with
the water will automatically activate the EPIRB2 Pro.
2.5.2 Manual activation on deck
When deploying the EPIRB2 Pro on a deck, ensure it is vertical
and clear of obstructions that might impede a clear view of
the sky. If the unit is thrown into the water then it will activate
automatically.
2.5.3 Manual activation in a life raft
The EPIRB2 Pro may be deployed from a life-raft, where it should
be held in a vertical position so that there is a clear view of the
sky. It is recommended that the EPIRB2 Pro is held outside of the
canopy. The EPIRB2 Pro can also be tethered to the life-raft and
allowed to float alongside.
1
3
2

22/05/2023 912S-04393 - 01.00 9
EPIRB2 Pro USER MANUAL
!The lanyard is provided to attach the EPIRB2 Pro to the life raft or your person,
once it is activated. Do not use it to attach it to the ship, as this may result in the
loss of the EPIRB2 Pro if the vessel sinks.
!It is important that the vessel details are marked on the EPIRB2 Pro. Please use
a fine tip UV resistant indelible pen to clearly mark the MMSI, Vessel Name and
Call Sign in the spaces provided. Cover this label with the clear protective label
provided to protect the text from wear.
1
2
3
4
5
6
7
1) ON/OFF Key (Under flap)
2) Indicator LED
3) Break Off Tab
4) Antenna
5) Strobe light
6) TEST Key
7) NFC Antenna
8) Lanyard under rubber band
9) Serial Number/ UIN Label
10) Programming Details Label
3. EPIRB2 PRO OVERVIEW
8
10
9

EPIRB2 Pro USER MANUAL
10 912S-04393 - 01.00 22/05/2023
4. INSTALLATION
!Failure to follow the following installation guidelines may cause the EPIRB2 Pro to
operate incorrectly.
!Do not mount the EPIRB2 Pro closer than 1.0 metre to any steering compass as
this may affect the accuracy of the compass.
!Keep the EPIRB2 Pro away from any strong magnetic sources such as
loudspeakers, compass compensation magnets, etc.
!To prevent possible build up of ice within the Auto Release Housing mount the unit
to a vertical surface.
!Do not install or operate in a location subject to high intensity RF fields (e.g.radar
or communications antennas)
!GNSS operation may be impaired if operated within 10m of GMDSS sat-com
systems.
4.1 Location
The location selected must be sufficiently robust to support the weight of the entire unit.
Exposure to the elements and surrounding hazards along with vibration should also be
taken into consideration when choosing the location. Ensure that the mounting location
allows easy access to the EPIRB2 Pro for maintenance and servicing.
To ensure that the EPIRB2 Pro will always float free from the sinking vessel ensure that the
Auto Release Housing is located high up on the superstructure, free from any obstructions
and located in a position where it will not be trapped, regardless of the angle of the sinking
vessel. Always leave at least 150mm (6”) around the Auto Release Housing to ensure the
cover releases reliably.
150mm (6") 150mm (6")
150mm (6")
Open above to allow
EPIRB to float free

22/05/2023 912S-04393 - 01.00 11
EPIRB2 Pro USER MANUAL
4.2 Remove the EPIRB2 Pro from the Auto Release Housing
Prior to installation the EPIRB2 Pro must be removed from the housing.
1. Remove the pin
2. Release the safety catch from the release knob
3. Turn the knob anti-clockwise to release the cover
4. Pull the cover free and place to one side.
5. Lift the Hydrostatic clip and remove the EPIRB2 Pro from the mount
1 2 3
4 5

EPIRB2 Pro USER MANUAL
12 912S-04393 - 01.00 22/05/2023
4.3 Mounting Dimensions
4.4 Fit the Auto Release Housing
Using the dimensions shown, use four of the No10 x 1” screws supplied to secure the Auto
Release Housing to the chosen structure using the holes marked ‘O’ on the diagram . For
mounting surfaces constructed of a material unsuitable for these screws use suitable
fixings (not supplied).
Fixing holes ‘E’ are provided to match the Ocean Signal E100/E100G if this product is being
used to replace these older models.
Retro-fit Adapter Bracket

22/05/2023 912S-04393 - 01.00 13
EPIRB2 Pro USER MANUAL
4.4.1 Retro-fit Adapter Bracket
The EPIRB2 Pro Auto Release Housing comes with an Adapter Bracket that allows easy
installation where older EPIRBs from other manufacturers have been fitted. Attach the
Adapter Bracket to the Auto Release Housing using the two holes ‘A’ and two of the No10 x
1” screws supplied.
The Adapter Bracket provides fixing holes suitable for:
• J - Jotron Tron 60S
• M - McMurdo E5/G5

EPIRB2 Pro USER MANUAL
14 912S-04393 - 01.00 22/05/2023
4.5 Load the EPIRB2 Pro into the Auto Release Housing
!When replacing the EPIRB2 Pro in the Auto Release Housing please ensure that
the unit is clean and dry. The area around the activation controls and the lanyard
should be free from water and dirt to ensure reliable operation.
The EPIRB2 Pro is held in place inside the Auto Release Housing by the HR1E Hydrostatic
Release Unit (HRU) which locks into position using a spring.
Following installation (or after maintenance, testing, etc.) it is necessary to replace the
EPIRB2 Pro into the Auto Release Housing.
1. Pull back the HRU
2. Load the EPIRB2 Pro, controls
facing up, into the location seat,
ensuring to carefully fold the
antenna back behind the EPIRB2
Pro.
3. Gently lower the HRU back into
the locked position - this holds
the EPIRB2 Pro securely in place.
4. When installing your EPIRB2 Pro
for the first time, the expiry date
on the HRU label (shown below)
should be completed with an
indelible pen .
NOTE: The expiry date should be two years
from the date of installation on to
your vessel, but no more than three
years from the date of manufacture.
5. Clearly mark the expiry date on
to the separate label provided for
use on the outside of the Housing.

22/05/2023 912S-04393 - 01.00 15
EPIRB2 Pro USER MANUAL
6. Place the housing cover over
the back plate, by placing the
locating holes (on the side of
the housing) over the clips.
7. Push and rotate the housing release knob into the locked position (right).
8. Fold the latch up over the release knob
9. Insert the pin to retain the latch
10. Complete the provided identification label using a UV stable indelible pen.
Fit to the side of the Auto Release Housing cover left hand side in an easily
visible position and use the clear protective label to cover it. Fix the HRU
expiry label to the housing in the rectangular recess and cover with the clear
protective label.
7 8 9
Push & Turn the knob Close the catch Insert the pin

EPIRB2 Pro USER MANUAL
16 912S-04393 - 01.00 22/05/2023
5. OPERATION
The EPIRB2 Pro is designed for best operation while floating in water. If used in other situa-
tions ensure that the EPIRB2 Pro is placed in the open, clear of any cover and kept upright.
Do not place the EPIRB2 Pro close to large structures or under cover.
In the event that the vessel sinks the EPIRB2 Pro will automatically be released from the
housing and will activate on contact with the water.
In the case of abandoning ship, if possible, recover the EPIRB2 Pro and tie to the survival
craft or person using the lanyard. For optimum operation, it is recommended that the
EPIRB2 Pro be tied to the raft with the lanyard and floated in the sea.
!The EPIRB2 Pro is prevented from accidental activation while mounted in the Auto
Release Housing.
!For manual activation the EPIRB2 Pro MUST be removed from the housing and the
antenna allowed to deploy fully.
IN CASE OF EMERGENCY
USE ONLY IN SITUATIONS OF
GRAVE AND IMMINENT DANGER

22/05/2023 912S-04393 - 01.00 17
EPIRB2 Pro USER MANUAL
5.1 Manual Activation
5.1.1 Remove from the Enclosure
1. Remove the pin
2. Release the safety catch from the release knob
3. Turn the knob anti-clockwise to release the cover
4. Pull the cover free and discard.
5. Lift the Hydrostatic clip and remove the EPIRB2 Pro from the mount
1 2 3
4 5

EPIRB2 Pro USER MANUAL
18 912S-04393 - 01.00 22/05/2023
5.1.2 EPIRB2 Pro Manual Activation
1. Break off the red protective tab from the top of the EPIRB2 Pro.
2. Lift the yellow flap up to expose the Red ON/OFF button.
3. Press and hold the red button for 1 second to activate.
(Until the green LED starts to flash)
The EPIRB2 Pro will now be operational. The strobe lights will begin to flash at a rate of
once every 2.5 seconds as soon as the unit is activated.
For best performance it is important that the EPIRB2 Pro is in an upright position with a
clear view of the sky and as far away from any metallic structures as possible.
The EPIRB2 Pro contains a GNSS receiver. Ensure that the GNSS antenna is not obstructed
and has a complete, unobstructed view of the sky – as indicated on the top of the EPIRB2
Pro.
A lanyard is provided to tether the EPIRB2 Pro to the lifeboat or life raft to ensure that it
does not drift away. Make sure this is firmly attached.
5.1.3 EPIRB2 Pro Automatic Operation
The EPIRB2 Pro will sense when it has been placed in water and automatically begin to
operate after a short delay, in the same manner as described above.
!If the EPIRB2 Pro is mounted in the Auto Release Housing this function is disabled
until the EPIRB2 Pro has been released.
If the EPIRB2 Pro is mounted in the Auto Release Housing in the event that the vessel sinks
the EPIRB2 Pro will automatically be ejected from the housing allowing it to float to the
surface and begin transmission.
123

22/05/2023 912S-04393 - 01.00 19
EPIRB2 Pro USER MANUAL
5.2 Optical Indications on activation
• The LED will illuminate green (blue if RLS is enabled) for 1 second.
• The strobe light will start flashing.
• Within 1 minute* of activation, the indicator LED will flash a quick burst of 5
indicating 406MHz transmission.
5.2.1 LED Indications with RLS Enabled
LED When Transmit GNSS RLS
(x1) Every 5 s Searching
(x3) Once Fix acquired
(x5) At transmit 406MHz No Fix Request sent
(x5) At transmit 406MHz Fix acquired Request sent
(x1) Every 2.5 s* 121MHz Reply not received
(x1) Every 2.5 s* 121MHz Reply received
(x1) Every 2.5 s
5.2.2 LED Indications for units configured with non-RLS Protocol
LED When Transmit GNSS
(x1) Every 5 s Searching
(x3) Once Fix acquired
(x5) At transmit 406MHz No Fix
(x5) At transmit 406MHz Fix acquired
(x1) Every 2.5 s** 121MHz
(x1) Every 2.5 s
* The 121MHz Homer will not transmit until after the first 406MHz transmission.

EPIRB2 Pro USER MANUAL
20 912S-04393 - 01.00 22/05/2023
5.3 Deactivation
5.3.1 Deactivation if Manually Activated
If the EPIRB2 Pro has been inadvertently activated or the emergency situation has passed,
it can be turned off simply by pressing and holding for 1 to 2 seconds the ON/OFF key. It
is not possible for the user to replace the red protective cover. Return the EPIRB2 Pro to an
Ocean Signal authorised service centre for checking and replacement.
5.3.2 Deactivation if Automatically Activated
If the EPIRB2 Pro was automatically activated by placing in water, remove from the water
and dry. The EPIRB2 Pro will automatically switch off after approximately 30 seconds.
6. FALSE ALERTS
False alerts are a serious problem - they cause valuable resources to be diverted away
from real emergency situations. If a false alert is initiated, by any means, it is important to
contact the nearest search and rescue authority and inform them of the false alert.
Report the following information:
1. EPIRB2 Pro Hex ID.
2. Date, time and duration.
3. Cause of activation.
4. Location when the alert was activated.
5. Location at time of deactivation.
If the EPIRB2 Pro was activated by mistake then turn it off. The first emergency trans-
mission will not occur for approximately 50 seconds. If the unit is turned off within this time
then EPIRB2 Pro will not have sent an emergency distress alert.
The EPIRB2 Pro is fitted with water activation contacts. Although the Auto Release Housing
is designed to prevent accidental activation in heavy seas and adverse weather conditions,
if the EPIRB2 Pro is not correctly fitted in its housing it is possible that this may cause a
false alert situation.
If the unit has been dropped into the water then remove from the water and dry the case.
Wait approximately 30 seconds for the water contacts to de-activate. If the unit is still
flashing after this period, check that the unit has not been manually activated; if so then
follow the procedure to manually switch the EPIRB2 Pro off.
Once the EPIRB2 Pro is switched off, it is advisable to carry out a self test before replacing
the EPIRB2 Pro into the Auto Release Housing.
!Should the EPIRB2 Pro fail to deactivate, bend the antenna down and completely
wrap in several layers of aluminium foil , or place in a metal container with a
tightly fitting lid.
Other manuals for EPIRB2
2
Table of contents
Other Ocean Signal Marine Equipment manuals

Ocean Signal
Ocean Signal 702S-03932 User manual

Ocean Signal
Ocean Signal OS-702S-03933 User manual

Ocean Signal
Ocean Signal EPIRB2 User manual

Ocean Signal
Ocean Signal rescueME PLB3 User manual

Ocean Signal
Ocean Signal rescureME MOB1 User manual

Ocean Signal
Ocean Signal M100 User manual

Ocean Signal
Ocean Signal RescueMe EPIRB3 User manual

Ocean Signal
Ocean Signal EPIRB3 Pro User manual

Ocean Signal
Ocean Signal PLB1 User manual

Ocean Signal
Ocean Signal rescueME EPIRB1 User manual