Ocean Signal rescueME EPIRB1 User manual

User Manual
Emergency Position
Indicating Radio Beacon
English
EPIRB1
www.oceansignal.com

© 2018 Ocean Signal Ltd
The technical data, information and illustrations contained in this manual were
believed to be correct at the time of print. Ocean Signal Ltd reserve the right to
change specifications and other information contained in this manual as part of our
continual improvement process.
No part of this manual may be reproduced, stored in a retrieval system or trans-
mitted in any form, electronic or otherwise, without the prior permission of Ocean
Signal Ltd.
No liability can be accepted for any inaccuracies or omissions in this manual.
Ocean Signal® and rescueME® are registered trademarks of Ocean Signal Ltd.
For ease of access please record details of your EPIRB here.
Owners Name: .......................................................
Vessel Name: .......................................................
Beacon HEX ID (UIN): .......................................................

3 Version 01.12 18/02/2021
EPIRB1 User Manual
IN CASE OF EMERGENCY
USE ONLY IN SITUATIONS OF
GRAVE OR IMMINENT DANGER
• Remove the EPIRB from the bracket
• Pull the antenna out from the body to its full extent*
by pulling on the red cap
• Remove break off tab
• Lift the fl ap up
• Press the ON key for one second to activate the
beacon
• The green led will fl ash to indicate activation
• Release the ON key
• The strobe light will start fl ashing to indicate it is
activated
• Remove the lanyard cover
• Holding the free end of the lanyard, throw the EPIRB
into the water
* Pull the antenna out until fi rm resistance is felt.
The antenna will extend to 25.5cm.
Note: Refer to section 4.2 for deactivation instructions
1
2
3
4
5
6

EPIRB1 User Manual
4 Part No. 912S-01365
IN CASE OF EMERGENCY 3
1. GENERAL 5
1.1 Introduction 5
1.2 Exposure to RF Electromagnetic Energy 5
1.3 Warnings 5
1.4 Operating Mode 5
1.5 COSPAS/SARSAT System 6
2. INSTALLATION 6
3. EPIRB1 OVERVIEW 7
3.1 EPIRB Class 7
4. OPERATION 8
4.1 Activation 8
4.2 Deactivation 9
4.3 False Alerts 9
5. TESTING 10
5.1 Beacon Test 10
5.2 GPS Test 11
6. APPENDIX 12
6.1 Maintenance and Troubleshooting 12
6.2 Batteries 12
6.3 Transport 12
6.4 Disposal 12
6.5 Specifi cations 13
6.6 Approvals 14
6.7 Registration 14
6.8 Optional Accessories 14
6.9 Limited Warranty 15

5 Version 01.12 18/02/2021
EPIRB1 User Manual
1. GENERAL
1.1 Introduction
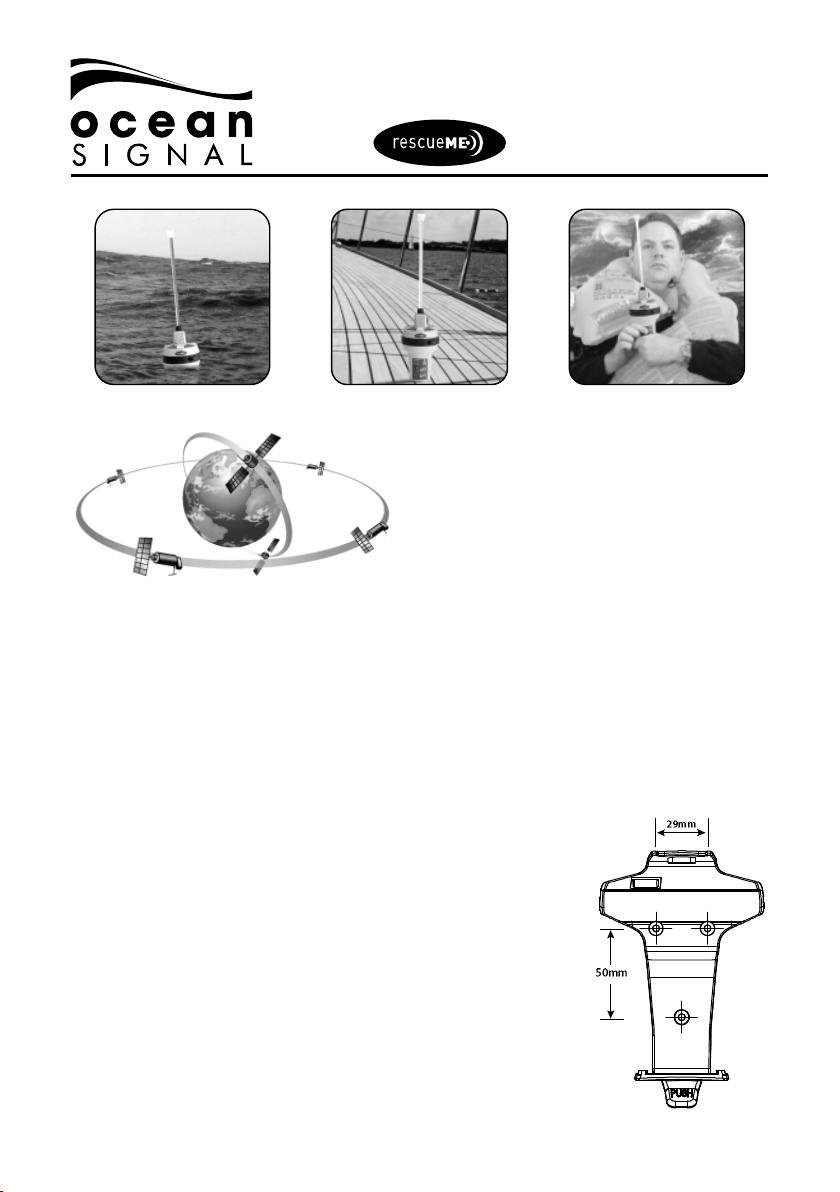
The rescueME range of products provide the user with the latest technology
specifi cally designed for compact size and ease of operation. The EPIRB1 is an
Emergency Position Indicating Radio Beacon (EPIRB) for manual release only. It is
intended as a carry off EPIRB, but may also be used as a supplementary alerting
device as specifi ed in SOLAS regulations.
1.2 Exposure to RF Electromagnetic Energy
This product complies with EN62479 (EU) and RSS-102 (Canada).
1.3 Warnings
! It is a legal requirement to register your EPIRB with your National
Authority.
! Only use your EPIRB in a situation of grave and imminent danger.
! Deliberately misusing your EPIRB or setting it off accidentally may
result in prosecution and a fi ne.
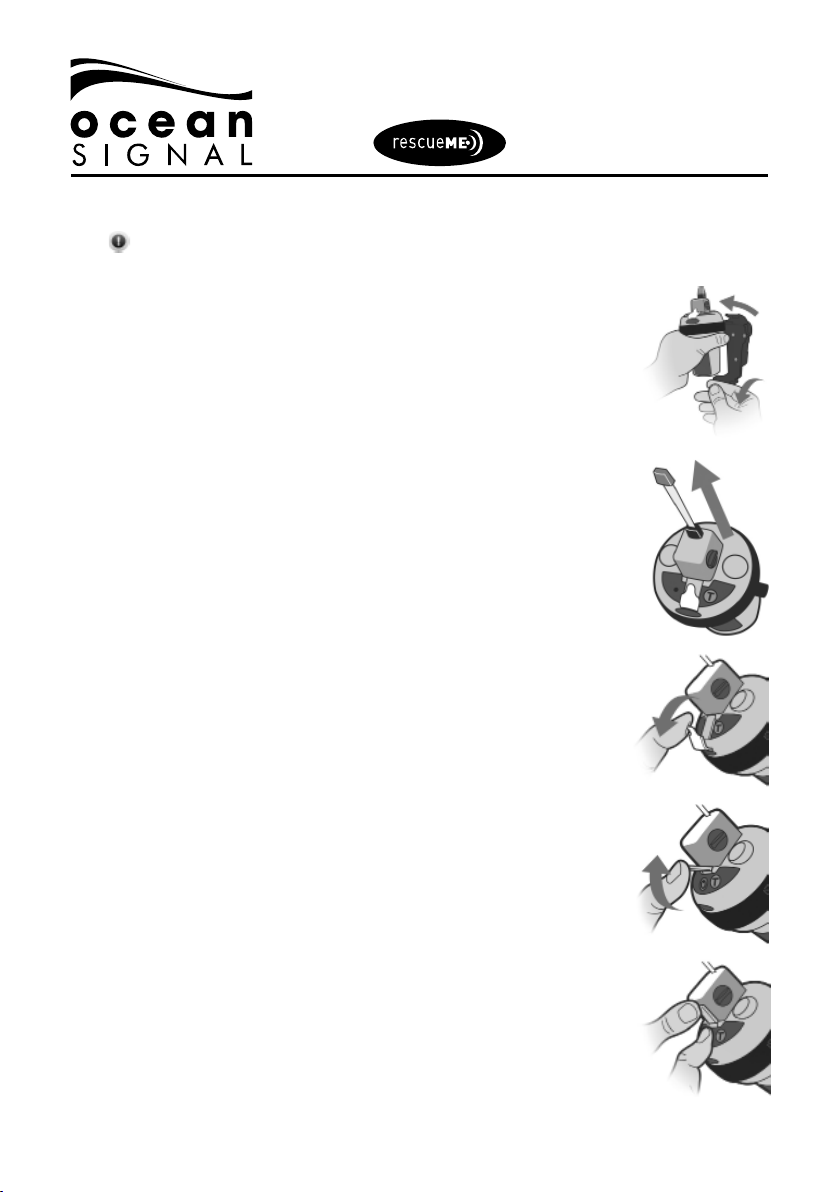
! Your EPIRB contains small lithium batteries.
! Please see section 6.3 for information on safe transportation.
! The battery in your EPIRB should be replaced immediately if it has been
activated, or if the test indicator shows the battery as ‘used’, or if the
expiry date marked on the unit has been exceeded.
! The EPIRB1 is supplied with a manual mounting bracket for internal
or protected areas only. See the installation guidelines in section 2 for
further information.
! Please read these instructions carefully. Failure to follow the guidance
in this manual may result in loss of warranty.
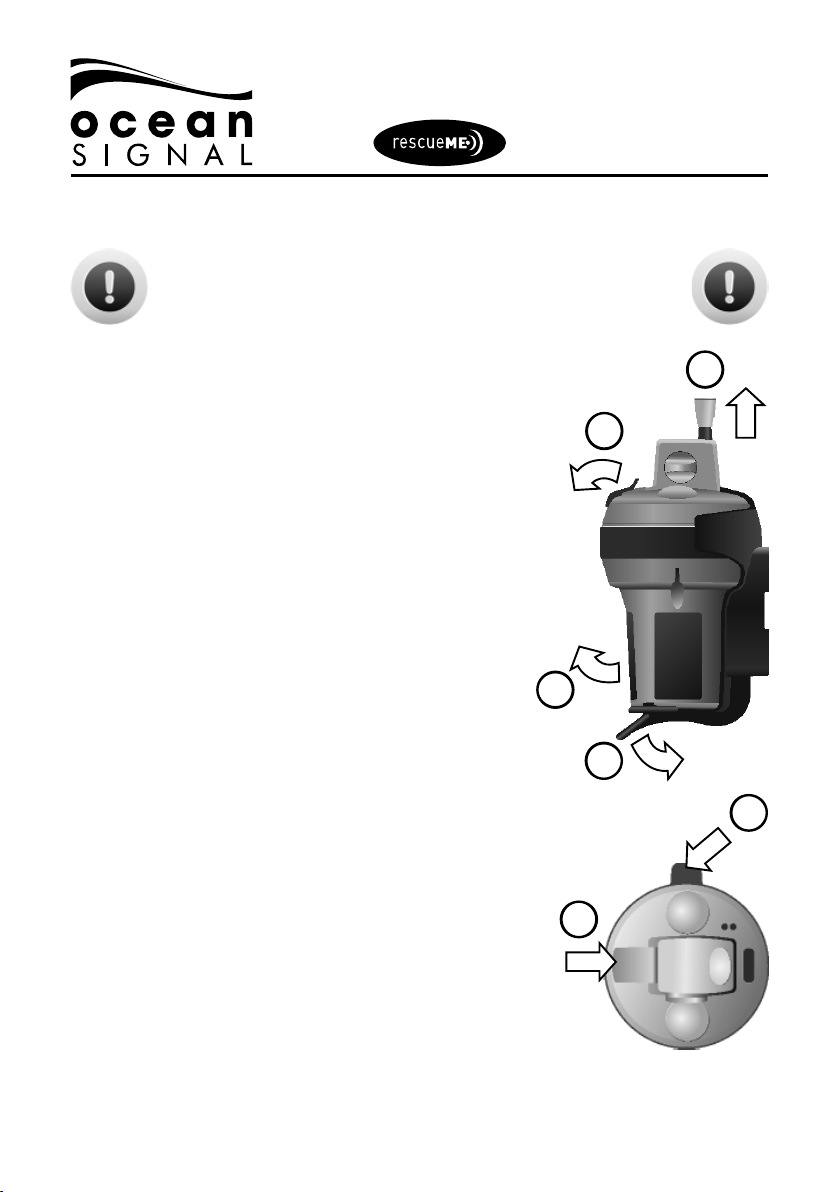
1.4 Operating Mode
Your EPIRB1 may be operated in a variety of modes.
1.4.1 Floating in water (a)
This is the preferred method of operation. Ensure the EPIRB is fi rmly tied to the
life raft or person before deployment. (Auto activation on Class 2 only)
1.4.2 On deck (b)
When deploying the EPIRB on a deck, ensure it is vertical and clear of obstructions
that might impede a clear view of the sky.
1.4.3 In a safety raft (c)
The EPIRB may be deployed in a life-raft, where it should be held in a vertical posi-
tion so that there is a clear view of the sky, preferably outside of the canopy.

EPIRB1 User Manual
6 Part No. 912S-01365
[a] Floating in water [b] Deployed on deck [c] Used in a liferaft
1.5 COSPAS/SARSAT System
The COSPAS/SARSAT system utilises two satellite ar-
rays to provide distress alert and location data to
search and rescue authorities. The GEOSAR
system can provide near immediate alerting
within the coverage of the receiving satel-
lite. The LEOSAR system provides coverage
of the polar region beyond the range of the
GEOSAR system. It can calculate the location of
distress events using Doppler processing techniques and is less susceptible to ob-
structions which could block a signal in a given direction. The system is comprised
of instruments on board the satellites which detect the signals from the distress
beacons. Ground receiving stations, referred to as Local Users Terminals (LUTs)
receive and process the satellite downlink signal to generate the distress alerts.
The distress alerts, generated by the LUTs, are then received by Mission Control
Centres (MCCs) which then forward the alert to Rescue Co-ordination Centres
(RCCs), Search and Rescue Points of Contacts (SPOCs) and other MCCs.
2. INSTALLATION
The EPIRB1 should be mounted where it is easily accessible in
an emergency. The bracket should be securely fi xed to a fl at
bulkhead using the three screws provided. Mounting dimen-
sions are shown in the drawing. If the unit is to be mounted
externally it must be mounted in the optional manual release
housing to provide long term protection and to prevent the
EPIRB being accidentally knocked off in heavy weather.
Do not mount the EPIRB closer than 1 metre to any steering
compass as this may affect the accuracy of the compass.
Keep the EPIRB away from any strong magnetic sources such
as loudspeakers, compass compensation magnets, etc., which
might cause inadvertent activation.

7 Version 01.12 18/02/2021
EPIRB1 User Manual
1) Break Off Tab
2) ON Key (Under fl ap)
3) Strobe light
4) Indicator LED
5) Antenna pull grip
6) Antenna rewind knob
7) TEST Key
8) Lanyard under rubber band
! The lanyard is provided to attach the EPIRB to the life raft or your per-
son, once it is activated. Do not use it to attach it to the ship, as this may
result in the loss of the EPIRB if the vessel sinks. Once the rubber band
is removed pass the large loop
over your hand to hold the EPIRB
and then attach the small loop to
the life raft.
! It is important that the vessel details are marked on the EPIRB. Please
use a fi ne tip UV resistant indelible pen to clearly mark the MMSI, Vessel
Name and Call Sign in the spaces provided. Cover this label with the
clear protective label provided to protect the text from wear.
3.1 EPIRB Class
• Class 2 EPIRBs can be manually activated using the ON key. They will
also automatically activate when immersed in water.
• Class 3 EPIRBs can only be manually activated using the ON key. They
DO NOT automatically activate when immersed in water. Class 3 EPIRB1
beacons are only approved for sale in Australia and New Zealand.
1
2
3
45
6
7
8
3. EPIRB1 OVERVIEW

EPIRB1 User Manual
8 Part No. 912S-01365
4. OPERATION
! WARNING: USE ONLY IN SITUATIONS OF GRAVE AND
IMMINENT DANGER. MISUSE MAY RESULT IN A SEVE-
RE PENALTY
Ensure that your EPIRB1 is always fi tted with an unused battery
that is within the marked expiry date. Failure to do so may result
in reduced operating time when used in a real emergency. Please
observe the recommendations on testing in section 5.
4.1 Activation
Only activate your EPIRB in situations requiring emergency as-
sistance from the rescue authorities. Deliberate misuse of your
EPIRB may result in a fi ne.
• Remove the EPIRB from its bracket by pushing the tab on the
bottom of the cradle down
• To activate your EPIRB in an emergency, pull the red antenna
tab out completely until fi rm resistance is felt (25.5cm).
• Remove break off tab
• Lift the protective fl ap and press the ON key for one second
until the green starts LED fl ashing and then release the key.
• During operation the green LED will fl ash once every fi ve
seconds while the GPS is turned on and obtaining a fi x. Once
a fi x is obtained, the green LED will fl ash quickly three times.
• Each time a 406MHz transmission is made the LED will fl ash
quickly fi ve times; green for transmission with a GPS position
and red for a transmission without a position.
• The Red LED will fl ash every 2.5 seconds while the 121.5MHz
homing beacon is active.
• Hold your beacon with the antenna standing vertically. Keep
the area marked ‘GPS Antenna’ free from obstruction, which
would interfere with the GPS reception.
1
2
3
4
5

9 Version 01.12 18/02/2021
EPIRB1 User Manual
! AUTOMATIC ACTIVATION (class 2): When placed in water the EPIRB1 will
automatically activate in the same manner as above after a short delay.
When operating the EPIRB in water, tether the beacon to your body or
the liferaft.
Note: The fi rst alert is transmitted after 50 seconds to allow time to deactivate the
unit if accidentally turned on. The homing beacon is not activated until after the
fi rst alert is sent.
4.2 Deactivation
To deactivate your EPIRB after use or if it is accidentally activated, press the ON key
for one second until the indicator LED fl ashes red twice, then release. Rewind the
antenna using the knob on the top of the EPIRB. Do not push the antenna back into
the EPIRB as this may cause it to be damaged.
If the EPIRB was automatically activated due to immersion in water, remove from
the water and dry thoroughly. The EPIRB will automatically switch off after ap-
proximately 30 seconds.
Should your EPIRB fail to deactivate, wind in the antenna and completely wrap the
EPIRB in several layers of aluminium foil, or place in a metal container.
4.3 False Alerts
False alerts cause the rescue authorities unnecessary time and expense.
To avoid false alerts make sure your EPIRB is safely stowed with the protective
fl ap closed and the antenna fully wound in. Make sure that there is no excessive
pressure applied to the protective cover. Ensure that anybody carrying the EPIRB is
fully aware that this device is for emergencies and should only be used in situations
of grave and imminent danger.
If you accidentally activate your beacon or otherwise set it off when a rescue is not
required, contact your local emergency services as soon as possible and advise
them of your beacon’s 15 digit HEX code (UIN), your current location and the time
the beacon was fi rst activated.
For USA phone: 1-800-851-3051 (USAF Rescue Coordination Center)
For UK phone: +44 (0)1326 317575 (UKCG)

EPIRB1 User Manual
10 Part No. 912S-01365
5. TESTING
Routine testing of your EPIRB is recommended to ensure it is in good working
order if needed in an emergency. Monthly testing is recommended, but remember
that each test will reduce the battery capacity slightly and reduce the operating
time of your EPIRB during an emergency.
5.1 Beacon Test
! Pull the antenna out completely until fi rm resistance is felt (25.5cm)
before commencing the test. Retract the antenna after the test.
To test your EPIRB1 is functioning correctly, press and hold the TEST key for at
least one second. The red LED will come on to indicate the switch is depressed, fol-
lowed by the red LED fl ashing rapidly, indicating test mode is activated. The switch
may now be released. The strobe light will fl ash once (indicating that the 406 and
121.5MHz signal has been transmitted).
After a short pause, the
indicator LED will produce a
fl ash sequence of either:
• 1 green fl ash; OR
• 1 to 6 amber fl ashes; OR
• 2 to 5 red fl ashes.
! This fl ash sequence is
repeated a second time
after a short delay and
then the EPIRB1 will
automatically turn off.
The number of green/amber flashes in each group indicates the number of hours
the battery has been used for as shown in the table
Green/Amber Indicator
*Changes to Amber after 1
hour of use
Red Indicator
Status
No. of
Flashes No. of Hours Used Failure Type
1 Flash 0 to 1hr (Green) 121.5MHz homer
1 to 2hrs (Amber)
2 Flashes 2 to 4hrs (Amber) 406MHz generation
3 Flashes 4 to 6hrs (Amber) 406MHz power
4 Flashes 6 to 8hrs (Amber) Faulty battery
5 Flashes 8 to 10hrs (Amber) Other failure
6 Flashes Over 10hrs (Amber)
Table 1: Pass/Fail indication

11 Version 01.12 18/02/2021
EPIRB1 User Manual
! Because the test transmits a short burst on the aircraft distress frequency
of 121.5MHz, please only carry out this test in the fi rst fi ve minutes of each
hour.
! It is recommended to test your EPIRB once a month.
! The amber test result indicates the battery has been used for over one
hour or the allowed number of tests has been exceeded. The EPIRB will
still operate normally in distress, but the battery should be replaced to
ensure the full operating life when your EPIRB is needed.
5.2 GPS Test
! As testing the GPS receiver expends signifi cant amounts of battery
energy, do not test the GPS operation more than once a year. Testing the
GPS receiver is limited to 12 tests over the lifetime of the battery, after
this the GPS test will fail to activate.
! This test must only be performed where the EPIRB has a clear and
unobstructed view of the sky. This is required to allow the GPS receiver
to acquire a signal from suffi cient satellites to allow it to determine a
position. Make sure the area marked ‘GPS Antenna’ is not obstructed.
Press and hold the TEST key. The LED will illuminate red to indicate the key has
been pressed, then start fl ashing. After approximately ten seconds the LED will
cease fl ashing and become a steady red light. The TEST key can now be released.
Note: If the TEST key is released before ten seconds, the EPIRB will enter the self
test mode.
During the GPS test the LED will repeat a long red fl ash followed by a short green
fl ash until either a position fi x is obtained or the GPS test fails.
A successful test will be indicated by the strobe fl ashing and the green LED fl ash-
ing. The number of green fl ashes indicates one more than the number of GPS tests
remaining (eg 8 fl ashes = 7 tests remaining). The unit automatically turns off after
the test indication.
If after fi ve minutes the GPS receiver has not received a position, a failure will be
indicated by the red LED fl ashing after which the unit will turn off.
The test can be ended at any time by holding the ON key for one second or by hold-
ing the TEST key for fi ve seconds.

EPIRB1 User Manual
12 Part No. 912S-01365
6. APPENDIX
6.1 Maintenance and Troubleshooting
Your EPIRB will require little maintenance except periodic cleaning, if required.
Always use a damp cloth to clean the case and dry thoroughly. Do not use solvents
or other cleaning fl uids as this may cause the plastics to deteriorate. Ensure the
antenna is free to unwind.
6.2 Batteries
The EPIRB1 contains Lithium batteries for long operating life. Your battery must
be replaced either after the expiry date or after the EPIRB has been activated, even
if only for a short period of time. Battery replacement must be done at an Ocean
Signal authorised battery replacement centre.
All Lithium batteries self discharge slowly over time at a rate that is related to tem-
perature. Maximum performance of the battery is achieved with long term storage
at an average temperature of no greater than 20°C.
6.3 Transport
When shipping your EPIRB the following guidance and regulations should be fol-
lowed, but you are advised to contact your nearest battery replacement centre or
Ocean Signal prior to shipping as regulations may have changed.
• Always pack your EPIRB securely in a stout cardboard carton. Ocean Signal
advises that you keep the original packaging in case of return for service.
• For surface transport the EPIRB may be shipped under special provision 188.
• For air transport the EPIRB should be shipped as category UN3091 and packed
under IATA packing instruction 970 section II. If you are hand carrying your
EPIRB on an aircraft please contact you airline for advice
6.4 Disposal
Care should be taken when disposing of your EPIRB when it is no longer required.
It is recommended to remove the battery from the EPIRB by removing the case lid.
The case screws are covered by the top label. Dispose of the battery in accordance
with local waste regulations. Please note that the EPIRB1 is not user serviceable
and removing the lid will invalidate the warranty.

13 Version 01.12 18/02/2021
EPIRB1 User Manual
6.5 Specifi cations
406MHz Transmitter
Frequency 406.040 MHz ±1KHz
Output Power 5 W (nominal)
Modulation Phase ±1.1 Radians Pk (16K0G1D)
Encoding Biphase L
Rate 400 bps
121.5MHz Transmitter
Frequency 121.5 MHz
Output Power 40mW±2dB
Modulation Swept Tone AM (3K20A3X)
Modulation Depth ~97%
Frequency Stability ±50ppm
Duty Cycle ~35%
Low Duty Cycle Strobe
Light Type Dual High Intensity LED
Flash Rate 20-30 per minute
Battery
Type Lithium Manganese Dioxide (LiMnO2)
Operating >48Hours @ -20°C
Battery Replacement Period 10 years
GPS Receiver
Satellites Tracked 66 Channel
Sensitivity -148dBm
Cold Start Re-acquisition -163dBm
GPS Antenna Microstrip Patch
General
Dimensions of Body 178mm x 89mm x 100mm
Weight 422grams
Environmental
IEC60945 Category Portable
Operating Temperature Class 2 -20C to +55C
Storage Temperature Class 2 -30C to +70C
Waterproof 10m depth
Approvals
Cospas Sarsat standards T.001, T.007
Test standards IEC61097-2, RTCM SC11000-2
Class
Australia/New Zealand Class 3 (Manual activation only)
RoW (except Aus/NZ) Class 2 (Manual and Automatic activation)

EPIRB1 User Manual
14 Part No. 912S-01365
6.6 Approvals
6.6.1 Marine Equipment Directive
The EPIRB1 is approved under the EU Marine Equipment Directive under Annex
A,1/5.6 of the current implementing regulation for carry off purposes only. The
Declaration of Conformity can be downloaded from:
www.oceansignal.com/products/epirb1.
6.6.2 Industry Canada Approval
This device complies with Industry Canada licence-exempt RSS standard(s).
Operation is subject to the following two conditions: (1) this device may not cause
interference, and (2) this device must accept any interference, including interfer-
ence that may cause undesired operation of the device.
6.7 Registration
It is a legal requirement to register your EPIRB with your national authority. Failure
to do so may result in prosecution. Accurate registration will help the authorities if
your EPIRB is activated and may speed up your rescue.
To register your beacon, contact your national registration authority via post, email
or online. Provide your 15 digit HEX ID (UIN), 5 digit checksum if required, your
contact details and emergency contact information. Some countries also require
additional information such as boat type and identifi cation or alternative emergency
contacts.
For UK registrations go to: www.gov.uk/406beacon
For USA registrations go to: www.beaconregistration.noaa.gov
For Australia go to: www.amsa.gov.au/beacons
For New Zealand go to: www.beacons.org.nz
Details of other authorities may be found at:
www.406registration.com/countriessupported.aspx
It is important to make sure that registration details are kept up to date and that
the authority is advised of change of ownership or disposal of your EPIRB.
6.8 Optional Accessories
Replacement Mounting Bracket (Class 3)................................................. 703S-01597
Replacement Mounting Bracket (class 2)................................................. 703S-01600

15 Version 01.12 18/02/2021
EPIRB1 User Manual
6.9 Limited Warranty
Your Ocean Signal EPIRB1 is warranted against manufacturing defects in materials
and workmanship for a period of fi ve years from the date of purchase and in ac-
cordance with the following conditions.
Ocean Signal will at its discretion, repair or replace faulty product free of charge
excluding the cost of shipping. Proof of purchase shall be required in order for a
warranty claim to be valid from the original purchaser. All claims shall be made in
writing to Ocean Signal or an approved service dealer.
Ocean Signal shall not be liable to the buyer under the above warranty:
• for any repairs or modifi cations carried out on the EPIRB using parts that are
not supplied or approved by the manufacturer Ocean Signal including batter-
ies and for work carried out other than by Ocean Signal or approved service
dealers,
• for any part, material or accessory that is not manufactured by Ocean Signal
the consumer will be covered by the guarantee / warranty offered to Ocean
Signal by the manufacturer or supplier,
• for product which has not been fully paid for,
• for any product supplied by Ocean Signal to a customer under an alternative
warranty agreement,
• for the cost of shipping product to and from the customer.
The battery is only warranted until the date of expiry and provided the unit is tested
in accordance with the information in the user manual. This warranty does not ap-
ply to a used battery as indicated by the electronic witness (see page 8).
The following specifi c items are excluded from this warranty:
• lift up fl ap and associated mechanism,
• retractable antenna.
This warranty does not affect your statutory rights. This warranty is to be inter-
preted under English law.
For further assistance please contact our Technical Service Department.
Email: service@oceansignal.com

Ocean Signal Ltd.
Unit 4, Ocivan Way
Margate
CT9 4NN
United Kingdom
info@oceansignal.com
www.oceansignal.com
Other manuals for rescueME EPIRB1
1
Table of contents
Other Ocean Signal Marine Equipment manuals

Ocean Signal
Ocean Signal RescueMe EPIRB3 User manual

Ocean Signal
Ocean Signal rescueME PLB3 User manual

Ocean Signal
Ocean Signal EPIRB3 Pro User manual

Ocean Signal
Ocean Signal PLB1 User manual

Ocean Signal
Ocean Signal OS-702S-03933 User manual

Ocean Signal
Ocean Signal EPIRB2 User manual

Ocean Signal
Ocean Signal 702S-03932 User manual

Ocean Signal
Ocean Signal EPIRB2 User manual

Ocean Signal
Ocean Signal M100 User manual

Ocean Signal
Ocean Signal rescureME MOB1 User manual