manuals.online logo
Brands
  1. Home
  2. •
  3. Brands
  4. •
  5. Omron
  6. •
  7. Accessories
  8. •
  9. Omron ZFX-C-CD User manual

Omron ZFX-C-CD User manual

This manual suits for next models

3

Other Omron Accessories manuals

Omron LASER ZX - User manual

Omron

Omron LASER ZX - User manual

Omron ZN-DPS1- *** -S Series User manual

Omron

Omron ZN-DPS1- *** -S Series User manual

Omron FQ User manual

Omron

Omron FQ User manual

Omron ZFX-C User manual

Omron

Omron ZFX-C User manual

Omron E3T - User manual

Omron

Omron E3T - User manual

Omron E2C-EDA Series User manual

Omron

Omron E2C-EDA Series User manual

Omron fh series Instruction Manual

Omron

Omron fh series Instruction Manual

Omron ZX Series User manual

Omron

Omron ZX Series User manual

Omron E3MC - User manual

Omron

Omron E3MC - User manual

Omron B5WC User manual

Omron

Omron B5WC User manual

Omron FZ4-L350-10 User manual

Omron

Omron FZ4-L350-10 User manual

Omron E8MS - User manual

Omron

Omron E8MS - User manual

Omron F3M-S825-1 User manual

Omron

Omron F3M-S825-1 User manual

Omron E3X-HD6 User manual

Omron

Omron E3X-HD6 User manual

Omron F10 User manual

Omron

Omron F10 User manual

Omron E3ZM - User manual

Omron

Omron E3ZM - User manual

Omron E3C-LDA -  3 User manual

Omron

Omron E3C-LDA - 3 User manual

Omron E3X-DA11TW User manual

Omron

Omron E3X-DA11TW User manual

Omron ZX-GT - User manual

Omron

Omron ZX-GT - User manual

Omron EE-SX47 - User manual

Omron

Omron EE-SX47 - User manual

Omron F210 User guide

Omron

Omron F210 User guide

Omron Z4M-W10 User manual

Omron

Omron Z4M-W10 User manual

Omron E3S-CR62 - User manual

Omron

Omron E3S-CR62 - User manual

Omron F400 - 06-1999 User manual

Omron

Omron F400 - 06-1999 User manual

Popular Accessories manuals by other brands

Quincy lab 140AE-1 operating manual

Quincy lab

Quincy lab 140AE-1 operating manual

HomePro ZIR000 user manual

HomePro

HomePro ZIR000 user manual

DOL 20SCR Technical user guide

DOL

DOL 20SCR Technical user guide

RAB Smart Task installation manual

RAB

RAB Smart Task installation manual

Kemppi KMS 300 quick guide

Kemppi

Kemppi KMS 300 quick guide

Stearns 57,500 Series Installation and service instructions

Stearns

Stearns 57,500 Series Installation and service instructions

iGuzzini TWILIGHT COPENAGHEN manual

iGuzzini

iGuzzini TWILIGHT COPENAGHEN manual

Adelaide Annexe & Canvas Avan Deluxe installation guide

Adelaide Annexe & Canvas

Adelaide Annexe & Canvas Avan Deluxe installation guide

OHAUS 5000 instruction manual

OHAUS

OHAUS 5000 instruction manual

HOME8 WLS1300 quick start guide

HOME8

HOME8 WLS1300 quick start guide

MAXBOTIX MaxSonar quick start guide

MAXBOTIX

MAXBOTIX MaxSonar quick start guide

ioSmart iSmart56 Installation and user guide

ioSmart

ioSmart iSmart56 Installation and user guide

Focusrite Scarlett 18i8 user guide

Focusrite

Focusrite Scarlett 18i8 user guide

Velleman ED38105 user manual

Velleman

Velleman ED38105 user manual

JumpSport SkyBounce user manual

JumpSport

JumpSport SkyBounce user manual

Prima-Temp PRIYA Instructions for use

Prima-Temp

Prima-Temp PRIYA Instructions for use

Tefcold BC85I-BC85I W user manual

Tefcold

Tefcold BC85I-BC85I W user manual

Vaisala WMS302 user guide

Vaisala

Vaisala WMS302 user guide

manuals.online logo
manuals.online logoBrands
  • About & Mission
  • Contact us
  • Privacy Policy
  • Terms and Conditions

Copyright 2025 Manuals.Online. All Rights Reserved.

Cat. No. Q28E-EN-01
Appendix for ZFX-C_-CD
Code reading functionality
Smart Sensor
ZFX-C
USERS MANUAL
Cat. No. Z264-E1-06A Note: Specifications subject to change without notice.
Authorized Distributor:
Printed in Europe
Cat. No. Z264-E1-06A Smart Sensor ZFX-C USER´S MANUAL
ZFX-C1_/C2_-CD Additional Functions Instructions
1
ZFX-C1_/C2_-CD
Additional Functions Instructions
This document describes the additional functions of the ZFX-C1_/C2_-CD. Other functions are the same as
those for the ZFX-C1_/C2_. Also read the User's Manual (Z264) for the ZFX-C1_/C2_.
Functions original to the ZFX-C1_/C2_-CD are as follows:
•Three measurement items: Barcode, 2D Code, Multi Colors
•Auto functions
Inspection by Individual Application
Barcode
This function reads and verifies barcodes. Read results and verification results can also be output.
Measurement items to be executed from this measurement item onwards can also be specified according to
the verification results. This allows you to specify a measurement flow matched to the code type. Nine barcode
types can be read.
JAN/EAN/UPC, Code39, Codabar(NW-7), ITF(Interleaved 2 of 5), Code 93, Code128/GS1-128,
GS1 DataBar*(Truncated, Stacked, Omni-directional, Stacked Omni-directional, Limited, Expanded, Expanded
Stacked), Pharmacode, GS1-128 Composite Code(CC-A,CC-B,CC-C)
*GS1 DataBar was formerly known as RSS.
Reading will end in error if the barcode type is incorrectly set. Set the barcode type before starting reading. When
AUTO setting is executed, the captured barcode is read, and the following items can be set:
•Code type p.6
•Direction (for Pharma only) p.6
•Reverse decode (for Pharma only) p.6
Setup Measurement
Measurement region
One barcode is read in a single measurement region.
When the measurement region contains multiple
barcodes, the result of the first barcode to be read is
output.
Draw the measurement region, then execute
AUTO setting. The barcode type and some of the
decode conditions are automatically set.
Important
ZFX-C1_/C2_-CD Additional Functions Instructions
2
Region settings
This function sets the measurement region.
XMENU mode - [Setup] - [Item] - [Region]
Registering the master data for verification
Master data are used for verification. After reading process, the read text string can be verified against the pre-
registered master data. 32 sets of master data can be registered as text string. Also, processing to be executed
from this measurement item onwards can also be branched according to the verification results when
measurement control function is ON.
XMENU mode - [Setup] - [Item] - [Master data]
Measurement control p.5
When the manual registration screen is displayed after execution of AUTO setting, unavailable characters in manual
registration (control codes, 2-byte characters, 1-byte kana characters, etc.) are displayed as "?".
Item Description
Measurement region Sets the region to be measured.
Item Description
Master data There are two modes for registering master data, auto setting and manual setting.
Auto setting:
The actual barcode is used to register the master data. When the [AUTO] button is
pressed, the barcode is read and the result is registered as the master data. Text string up
to 32 characters long are registered. Control codes also can be registered.
Manual setting:
Text string up to 32 characters long can be registered as master data via the software
keyboard. Check available characters in the ASCII table. 2-byte characters, 1-byte kana
characters and control codes cannot be entered.
The following characters can be used as wildcards:
*: Wildcard for zero or more characters
?: Wildcard for one character
ASCII code table p.3
Rename This is the text string displayed as the verification result on the result display screen.
First meas. Item No. This is the Start No. of measurement items to be executed, when the measurement
control is set to ON and the read text string match the master data.
Last meas. Item No. This is the End No. of measurement items to be executed, when the measurement control
is set to ON and the read text string match the master data.
Important
ZFX-C1_/C2_-CD Additional Functions Instructions
3
ASCII code table
Threshold
This function sets the judgment conditions.
XMENU mode - [Setup] - [Item] - [Limits]
The following table shows the ASCII codes that can be used for manual registration of master data and also for
registering characters of Limits.
Item Description
Num. of characters Sets the range of number of characters to be judged as OK.
Range: 0 to 1024
Characters The read text string is judged as OK when it is the same as the characters in this menu.
Up to 32 characters can be set. Check available characters in the ASCII table. 2-byte
characters, 1-byte kana characters and control codes cannot be entered.
The following characters can be used as wildcards:
*: Wildcard for zero or more characters
?: Wildcard for one character
ASCII code table p.3
Note
Upper 4 bits
Lower 4 bits
ZFX-C1_/C2_-CD Additional Functions Instructions
4
Image adjustment (if necessary)
The following items can be changed and set to the image of the measurement target.
XMENU mode - [Setup] - [Item] - [Img Adj]
Operation mode details (if necessary)
Set items below as required.
XMENU mode - [Setup] - [Item] - [Detail] - [Function condition]
Item Description
Select Camera For details, refer to Chapter 3 "Image Adjustment" of the ZFX User's Manual.
Color filter
Filtering
BGS level
Setup Item Setting Value Description
Verification func. OFF (default value) When set to ON, verification with the master data is executed.
ON
Verified master data All master data (default
value)
Selects the model to be used for verification.
Master data 0 to 31
Partial verification OFF (default value) The number of digits in the read results to be verified with the
master data can be limited. When [Partial verification] is set to
ON, set the first and last compared digit positions. Up to 32
characters can be set as the number of digits.
Example: First compared digit 2, last compared digit 6
The text string used for verification becomes "MRON2".
ON
Compared digit 1 to 1024 (default value
first digit:1 last digit:1)
Output characters OFF (default value) Sets whether or not to output the read results on the serial
interface.
ON
Error string Max. 20 digits (default
value: NG)
Sets the text string to be output when a read error occurs.
ASCII code table p.3
Partial output OFF (default value) Sets whether or not to specify a range in the read data to output
from when [Output characters] is set to ON.
ON
Output digit 1 to 1024 (default value
first digit:1 last digit:1)
Sets the first and last digit positions to output. If the read text
string contains non-targeted digits, the error string is output.
Measurement control OFF Sets whether or not to control the next measurement item to be
executed based on the verification results.
ON (default value)
OMRON 2 0 0 8
2nd digit 6th digit
ZFX-C1_/C2_-CD Additional Functions Instructions
5
Output function of the read results
Measurement control function
Decode condition detailed settings
Be Sure to set the detailed conditions for the barcode type. Set other items as required. By AUTO setting, Code
type, Direction(Pharma) are set automatically.
•The output order
The read results can be output on the serial interface. When the calculation results are output at the same time,
the calculation results are output first, followed by the read results (text string).
•Code conversion
The following character codes need to be converted for output. The texts after conversion are output.
Example: Output of read results together with two expressions
Read result: ABC
[Expression] - [Data0]: 123
[Expression] - [Data1]: 456
The output order is as follows:
123,456 (delimiter)
ABC (delimiter)
This function enables control of the next measurement item to be executed based on the verification results with the
master data. The overall judgment result does not reflect the measurement items that are not executed.
Example: Measurement of product A and product B are branched according to the verification results.
Setting master data 0
•Register the barcode of product A.
•First meas. Item No.: 1
Last meas. Item No.: 3
Setting master data 1
•Register the barcode of product B.
•First meas. Item No.: 4
Last meas. Item No.: 6
Registering master data, First meas. Item No., Last meas. Item No. p.2
Note
Character code Before conversion After conversion
Comma &h2c &h8540
Tab &h09 &h8541
Space &h20 &h8542
CR &h0D &h8543
LF &h0A &h8544
Note
Measurement Item0 : Barcode
Measurement Item1 : Pattern Search
Measurement Item2 : Area
Measurement Item3 : Area
Measurement Item4 : Pattern Search
Measurement Item5 : Area
Measurement Item6 : Area
Measurement Item for Product A
Measurement Item for Product B
ZFX-C1_/C2_-CD Additional Functions Instructions
6
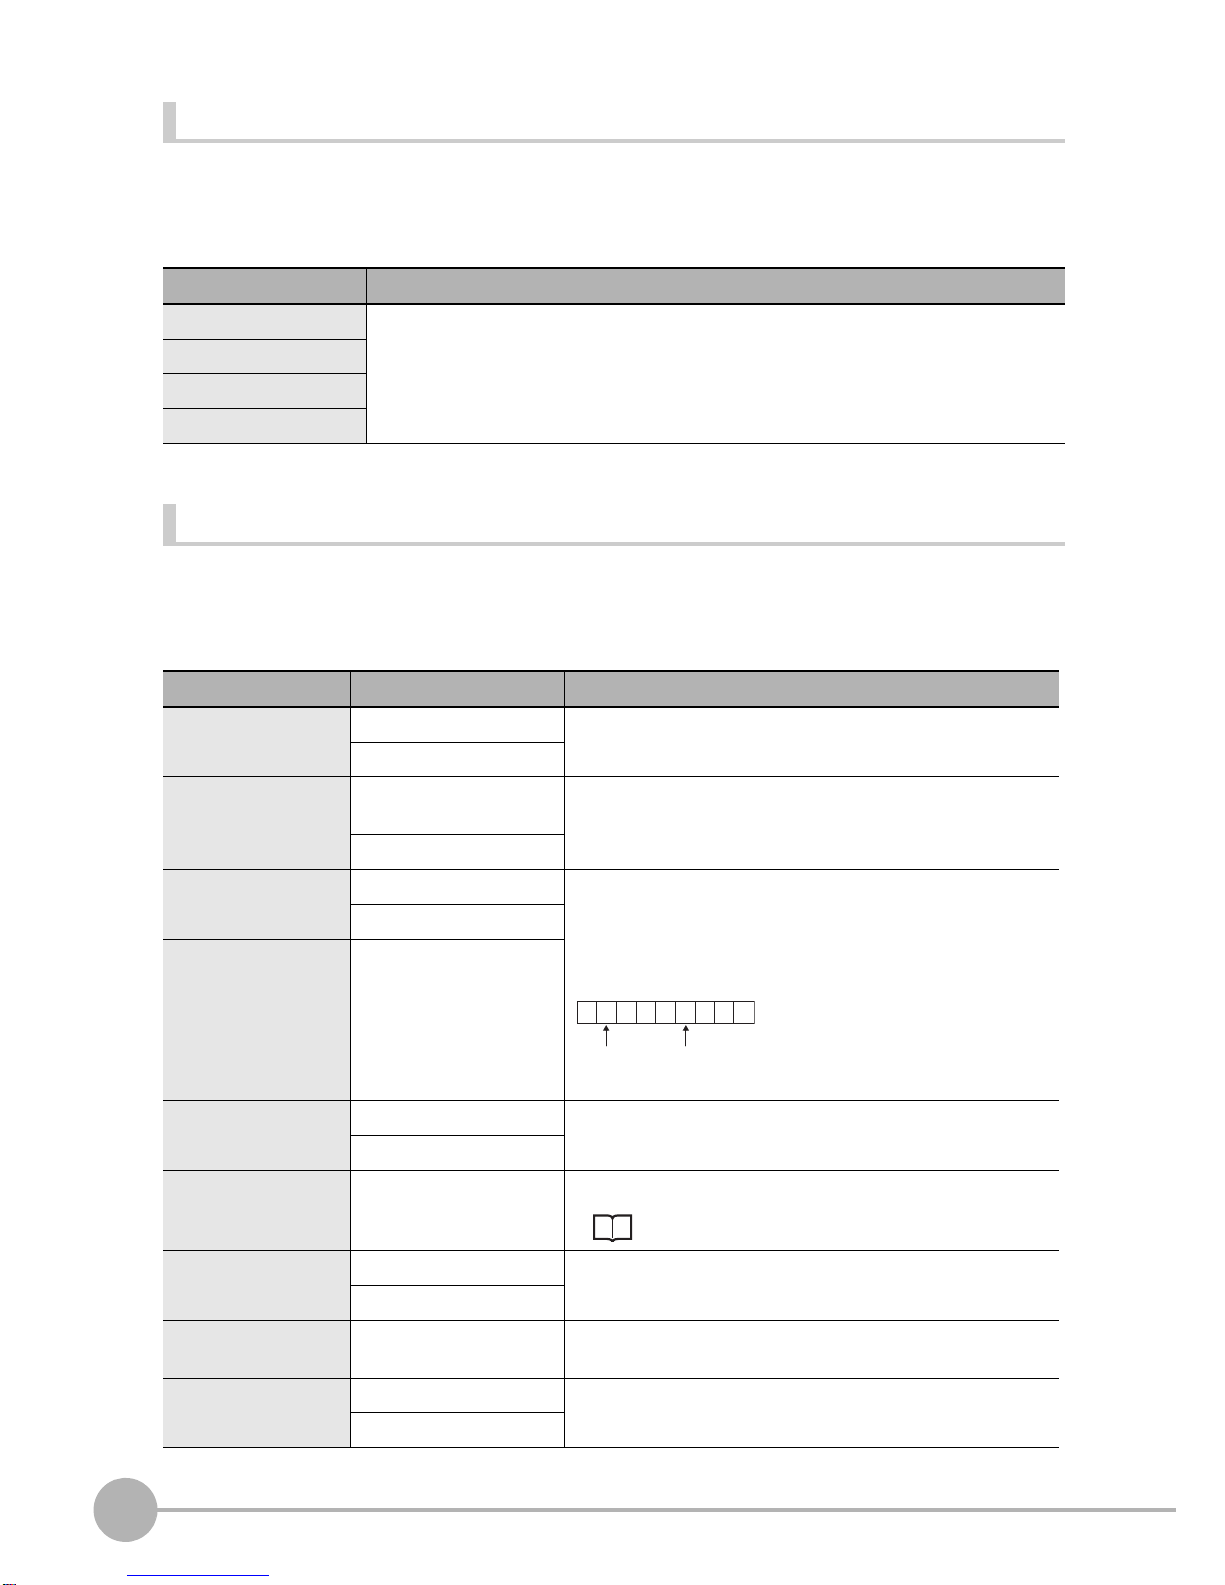
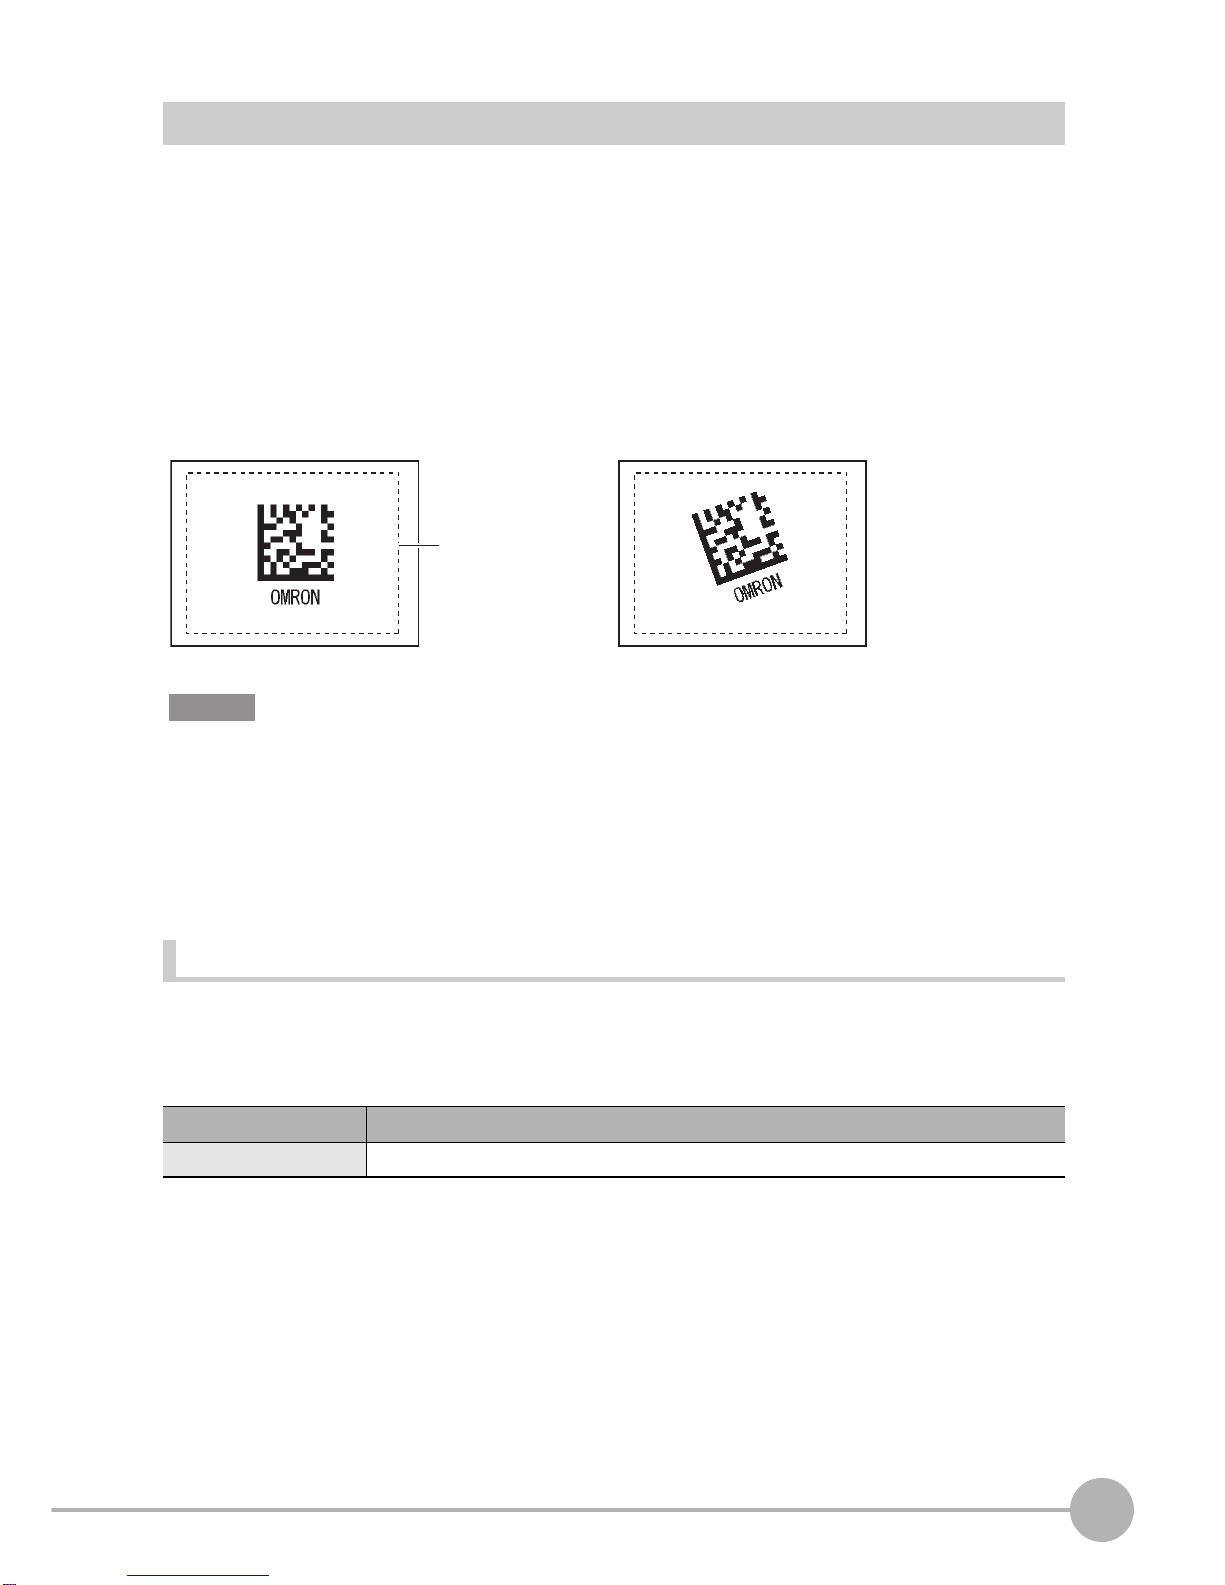
XMENU mode - [Setup] - [Item] - [Detail]- [Decode condition]
Possible output results
The following values can be output when expressions are set.
Setup Item Setting Value Description
Code type JAN/EAN/UPC (default
value)
Selects the type of barcode to be read.
Code39
Codebar(NW-7)
ITF
Code 93
Code128, GS1-128
GS1 DataBar
Pharmacode
Timeout 1 to 9999 ms (default
value: 9999)
Sets the timeout time in read processing. A read error occurs if
measurement does not end after the preset timeout time is
exceeded.
Check digit OFF Selects whether or not to insert a check digit. This item is
enabled only when the following barcode types are selected:
Codebar, Code39, ITF (Interleaved 2 of 5). When the other
codes are selected, this item is set to ON.
ON (default value)
Composite component OFF (default value) Sets whether or not to support composite codes.
This item is enabled only when the following barcode types are
selected:
Code128/GS1-128, GS1-DataBar
ON
Direction (Pharma) Horizontal mode (default
value)
Selects the reading direction. This item is enabled only when
Pharmacode is selected as the barcode type.
Vertical mode
Reverse (Pharma) OFF (default value) Sets whether or not to use the reverse mode. This item is
enabled only when Pharmacode is selected as the barcode
type.
ON
Item Description
Judgment result (JG) The judgment result is output. (0: OK, -1: NG, -2: not measured)
Index (IN) Outputs the verification results (master model No.). (-2: verification results OFF or read
error, -1: verification results NG, 0 to 31: model No.)
Num. of characters (N) Outputs the read number of characters. (0 to 1024)
Characters Outputs the read text string.
Only codes that can be registered manually and 2-byte characters can be displayed as
text string in the result display screen. Other character codes (including control codes)
that are read are displayed as spaces. The read string is displayed up to 32 characters.
When more than 32 characters are read, “···“ is displayed at the end of the string.
ZFX-C1_/C2_-CD Additional Functions Instructions
7
2D Codes
This function reads and verifies 2D codes. Read results and verification results can also be output.
Measurement items to be executed from this measurement item onwards can also be specified according to
the verification results. This allows you to specify a measurement flow matched to the code type. Eight 2D
Code types can be read.
Data Matrix(EC200), QR Code, MicroQR Code, PDF417, MicroPDF417, Maxi Code, AZtec Code, Codablock
Reading will end in error if the 2D Code type is incorrectly set. Set the code type before starting reading. When AUTO
setting is executed, the captured 2D barcode is read, and the following items can be set:
•Code type p.11
•Mirror p.11
•Code color (for Data Matrix and PDF417 only) p.11
•Shape (for Data Matrix only) p.11
Region settings
This function sets the measurement region.
XMENU mode - [Setup] - [Item] - [Region]
Item Description
Measurement region Sets the region to be measured.
Setup Measurement
Measurement region
One 2D barcode is read in a single measurement region.
When the measurement region contains multiple 2D
codes, the result of the first 2D code to be read is output.
Draw the measurement region, then execute
AUTO setting. The code type and some of the
decode conditions are automatically set.
Important
ZFX-C1_/C2_-CD Additional Functions Instructions
8
Registering the master data for verification
Master data are used for verification. After reading process, the read text string can be verified against the pre-
registered master data. 32 sets of master data can be registered as text string. Also, processing to be executed
from this measurement item onwards can also be branched according to the verification results when
measurement control function is ON.
XMENU mode - [Setup] - [Item] - [Master data]
Measurement control p.5
When the manual registration screen is displayed after execution of AUTO setting, unavailable characters in manual
registration (control codes, 2-byte characters, 1-byte kana characters, etc.) are displayed as "?".
Item Description
Masterdata There are two modes for registering master data, auto setting and manual setting.
Auto setting:
The actual code is used to register the master data. When the [AUTO] button is pressed,
the code is read and the result is registered as the master data. Text string up to 32
characters long are registered. Control codes also can be registered.
Manual setting:
Text string up to 32 characters long can be registered as master data via the software
keyboard. 2-byte characters, 1-byte kana characters and control codes cannot be
entered. Check available characters in the ASCII table.
The following characters can be used as wildcards:
*: Wildcard for zero or more characters
?: Wildcard for one character
ASCII code table p.3
Rename This is the text string displayed as the verification result on the result display screen.
First meas. Item No. This is the Start No. of measurement items to be executed, when the measurement
control is set to ON and the read text string match the master data.
Last meas. Item No. This is the End No. of measurement items to be executed, when the measurement control
is set to ON and the read text string match the master data.
Important