manuals.online logo
Brands
  1. Home
  2. •
  3. Brands
  4. •
  5. OPTO-EDU
  6. •
  7. Microscope
  8. •
  9. OPTO-EDU A33.1501 User manual

OPTO-EDU A33.1501 User manual

WWW.CNOEC.COM.CN OPTO-EDU(BEIJING)CO.,LTD.
1
A33.1501
3.5” LCD Digital Microscope
Instruction Manual
Pleasereadthismanualcarefullybeforeusemicroscope!
WWW.CNOEC.COM.CN OPTO-EDU(BEIJING)CO.,LTD.
2
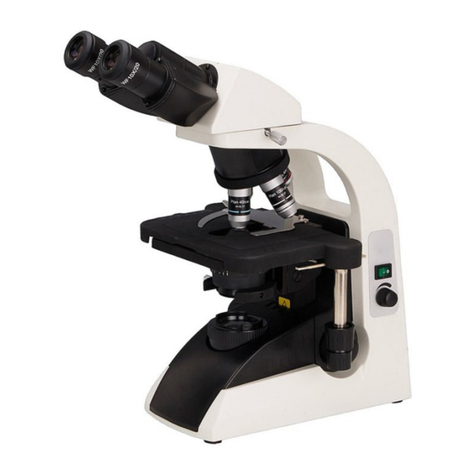
Diagram of Digital Microscope Parts
1. Screen module
2. LCD monitor
3. Power connection
4. Eyepiece
5. Tube
6. Lens turret
7. Objective
8. Vernial scale, sliding ruler (Optional)
9. Disc Diaphragm & Colour filter disc
10. LED lighting (transmitted light)
11. Working Stage
12. Focusing wheel
13. Dimmer for top LED lighting
14. Dimmer for bottom LED lighting (transmitted light)
WWW.CNOEC.COM.CN OPTO-EDU(BEIJING)CO.,LTD.
3
15. Sliding ruler moving knob forwards/back
16. Sliding ruler moving knob left/right
17. Levers for clamping mounting plate
18. Mounting plate clamp
19. Clamping screw
20. Prepared slide
Note: Sliding ruler is optional, may not included in box.
1. Location, connection types
Before you begin with the assembly of your microscope, you must select a
suitable location. First you should ensure that your microscope is set up on
a stable, vibration free surface.
Power connection (220 V or 110V) is required for observations using the
electrical LED lighting and the electronic LCD eyepiece (screen module).
Furthermore the microscope possesses an interface to a PC (USB
connection).
2. Start-up, electrical LED lighting
WWW.CNOEC.COM.CN OPTO-EDU(BEIJING)CO.,LTD.
4
Before start-up, please check that the lighting switch is in the “OFF
position ”. The microscope has two lighting units: the transmitted light from
below and direct light from top. The transmitted light unit is used for
transparent specimens. To view solid non-transparent specimens use the
direct light unit (Top Lighting). Use of both forms of lighting simultaneously
is only recommended for semi-transparent specimens. The brightness of
light can be adjusted by turning the switch.
To start-up, the power supply plug, which is provided, is connected to the
power connection at the rear of the microscope foot and to a convenient
outlet (220V or 110V). Finally, switch on the desired lighting using the
lighting switch and set the required brightness turning the switch.
3. Observation
3.1 Microscope observation in general
Once you have assembled the microscope and appropriately adjusted the
illumination, the following principles apply:
a) Begin each observation with the lowest magnification, thus centering and
positioning of the object to be observed will be easier.
Move the microscope table, using the focusing wheel completely down and
then turn the lens turret until it engages on the lowest magnification (the
4X-objective is vertical).
b) Begin with a simple observation. Place a prepared slide directly under
the objective on the microscope table, by clamping it into the stage. For this,
move the lever for the clamping mounting plate to the side, put the prepared
slide onto the stage and carefully allow the clamping mounting plate to
return onto the prepared slide. The object which is to be observed must be
exactly above or below the illumination. In order to achieve this, there are
two milled thumb screws on the stage. This is the so-called stage drive. By
turning these screws it is possible to precisely position the object, in the left
or right direction and forwards or backwards.
c) Then switch on the LCD monitor, by pressing the power switch on the
screen module; the red operating light will light up. Then look at the LCD
monitor and carefully turn the focusing wheel until the image is sharp. With
the stage you can now centre the object at the desired place on the LCD
monitor.
d) For higher magnification turn the lens turret to a higher setting (objectives
10X and 40X).
Note:
Before you change the objective setting, first move the microscope
table fully downwards. This will avoid possible damage!
WWW.CNOEC.COM.CN OPTO-EDU(BEIJING)CO.,LTD.
5
The higher the magnification, the more light is needed for a good image
quality.
Important notes:
Depending on the preparation in use, higher magnification in individual
cases will not lead to a better picture! The magnification is altered by
changing the objective. This alters the sharpness of the image which must
be adjusted by the focusing wheel. Proceed here very carefully. If you raise
the microscope table too quickly, the objective and the slides can touch
each other and be damaged!
e) The magnification factor of the LCD eyepiece amounts to 10x. In
combination with the 4X-objective we obtain a total magnification of 40X, i.e.
1 mm of the object is shown as 40 mm on the LCD monitor. With the 10X
objective we have a total magnification of 100X, correspondingly, with the
40X objective 400X.
f) The colour filter disc, beneath the microscope table helps you when
viewing very brightly or transparent preparations. For this please select the
suitable colour depending upon the object being observed. The
components of colourless or transparent objects (e.g. grain containing
starch, single-celled organisms) will be much easier to recognise.
3.2 Operation of the screen module
3.2.1 Observing the screen
If you switch on the LCD monitor (see section 3.1 c), you will see the live
image of your object as well as three different displays.
a) Lower right is the remaining internal storage capacity of the screen
module available for image files and showing picture’s revolution above it.
b) In the centre alongside a magnifying glass symbol, is the electronic zoom
factor. By pressing the arrow keys “up ” or “down” electronic magnification
of the image can be set with a factor from 1 to 8. For a fast run keep the
keys pressed down.
c) At the top right hand corner, is a camera symbol. (photographic mode or
video mode)
3.2.2 Producing photographs
By pressing of the photo button “SNAP ” a photograph is taken of the live
image, which is stored.
3.2.3 Photograph management
By pressing “MODE” again you change from video record mode to photo
WWW.CNOEC.COM.CN OPTO-EDU(BEIJING)CO.,LTD.
6
management mode. You can see the photos and videos. By pressing
“LEFT” or “RIGHT”, you can select a required picture or video. By pressing
“MODE” you can return to live image.
By pressing the “MENU” button whilst displaying the picture (video), a menu
bar appears, which you can control using the appropriate arrow keys.
Here you can also change certain settings and bring them into force by
pressing the “OK” input key.
Overview of the menu:
a) Delete. By pressing “OK”, you can select Single (delete selected image
file), All(delete all image files) or Select(you can delete the one you want to)
b) Copy to Card.
c) Slide show
e) Protect (writing and delete protection for image file). By pressing “OK”,
you can select Single (protect selected image file), All(protect all image files)
or Select(the one you want to protect).
3.2.4 Capture settings
By pressing the “MENU” button whilst displaying the live image a menu bar
appears, which you can control using the appropriate arrow keys. Here you
can also change settings and bring them into force by pressing the “OK”
input key.
Overview of the menu:
a) Size (picture resolution, number of pixels width x height):
12M(4023x3024), 8M(3264x2448), 5M(2560x1290), 3M( 2048 x 1536),
2M( 1600 x 1200), 1.3M(1280 x 1024), VGA(640 x 480).
b)Quality: Fine, Standard, Economy.
c) EV: you can select EV from -2.0-----+2.0
d) White Balance. Auto for the default
e) ISO: Auto for the default.
f) Color: Standard, Vivid, Sepia, Monochrome.
g) Saturation: Normal, High, Low
h) Sharpness: Normal, Normal, Soft.
i) Time Stamp: OFF, Date only (can show the date on the picture or video),
Date &Time (can show the date and time on the picture or video).
3.2.5 Camera setup
By pressing the “MENU” button whilst displaying the live image a menu bar
appears, which you can control using the appropriate arrow keys. Then by
WWW.CNOEC.COM.CN OPTO-EDU(BEIJING)CO.,LTD.
7
pressing the “RIGHT” button, you can setup the camera setting.
a) Format: Execute (warning: all the files will be lost), Cancel.
b) Language: There are 9 kinds of languages. The default is English.
c) Auto off: 1Min, 3Min, 5Min, off
d) Sys. Reset: Execute (warning: all the setting will be to the default),
Cancel.
e) Light Freq: 60HZ, 50HZ
f) TV Output: NTSC, PAL
g) Date Input: Off, Set
h) USB: PC Cam, Disk Drive, Printer
3.2.6 Video record
By pressing button “MODE” in the photographic mode during live image
display, a symbol of a movie camera appears on the top left and on the right
beneath the volume of free internal storage capacity for photographs. You
take the photograph with the “SNAP” photograph button, by renewed
pressing of this button you terminate it. During the photograph the movie
camera symbol blinks and the current time pf the photograph is indicated.
You can set sizes of QVGA(320 x 240) or VGA( 640 x 480) in the menu,
with the” menu” and the “OK” buttons. Furthermore with “EV” the same
picture effects can be selected as with photos.
4. Image output and storage
The LCD Micro offers you three possibilities for image output and storage:
a) You can view the image directly on the LCD monitor. The equipment
offers SD card 2G for your photographs.
(See section 3.2.)
b) You can store your photographs on a suitable memory card (SD =
Secure Digital)(NOT INCLUDED). The memory card slot of the LCD Micro
is on the bottom of the screen module beside the USB connection. To use,
push the memory card, with the contacts at the front, into the slot, until they
engage with a faint click. If the installation is correct, a memory card symbol
appears above on the LCD monitor. This is again released by pressing and
releasing the memory card, which after a faint click, can be taken out of the
slot. Your photographs are now transportable.
c) If you connect your microscope to the PC using the USB cable provided,
you can transfer the photographs to the PC. The USB connection of the
LCD Micro is on the bottom of the screen module beside the memory card
slot. Put the smaller B-plug (Micro) into the socket on the microscope and
the larger A plug (PC) into a free USB port in your computer. After a
WWW.CNOEC.COM.CN OPTO-EDU(BEIJING)CO.,LTD.
8
successful USB connection, the operating system will recognise new
hardware and then two new drive assemblies will be initialized.
These are marked as “removable data carrier e” and “removable data
carrier f”, the letters vary depending upon the number of drive assemblies in
your computer. They are made available on the work station, as well as in
Windows Explorer. The first drive assembly recognized (e:) is the internal
memory of the screen module. The second (f:) contains – if a memory card
is inserted – the contents of the card.
Caution:
When taking a photograph, no USB connection between PC and
microscope may exist. Before you interrupt the USB connection or switch
the screen module off, you must remove the screen module (removable
data carrier e:) in the PC with the help of the hardware assistant and
“deactivate” the card drive assembly (removable data carrier f:) ! If the drive
assemblies are not deactivated, the PC might “crash” or there might even
be a loss of data!
5. Technical data
System requirements for USB connection / memory card use:
Windows operating system
Main board with USB connection
Media programme (e.g. Image processing programme, programme for
playing films)
Memory card
Memory card reader
6. Using the Microscope with eyepiece
6.1 Remove the LCD eyepiece from the tube and place the ordinary
eyepiece into the tube.
6.2 Place a prepared slide directly under the objective on the microscope
table, by clamping it into the stage. For this, move the lever for the clamping
mounting plate to the side, put the prepared slide onto the stage and
carefully allow the clamping mounting plate to return onto the prepared
slide. The object which is to be observed must be exactly above or below
the illumination. In order to achieve this, there are two milled thumb screws
on the stage. This is the so-called stage drive. By turning these screws it is
possible to precisely position the object, in the left or right direction and
forwards or backwards.
6.3 After you have set up the microscope with the corresponding
illumination, look through the Eyepiece.
WWW.CNOEC.COM.CN OPTO-EDU(BEIJING)CO.,LTD.
9
6.4 Always start observing using the lowest magnification with the
microscope. Use the 4X Objective Lens by rotating the Objective Lens
Turret so that the 4X Objective Lens is aiming at the center of the Stage
(when it is in the proper position it will click into place). The 4X Objective
Lens will give a 40X (40 power) view with the 10X Eyepiece. Final Power is
calculated by multiplying the Objective Lens Power by the Eyepiece Power
(e.g., 4 X 10 = 40).
6.5 Focus the microscope by slowly turning the Focusing Knob, until an
image forms in the Eyepiece.
6.6 The colour filter disc, beneath the microscope table helps you when
viewing very brightly or transparent preparations. For this please select the
suitable colour depending upon the object being observed. The
components of colourless or transparent objects (e.g. grain containing
starch, single-celled organisms) will be much easier to recognise.
6.7 To increase magnification, rotate the Objective Lens Turret to center the
10X Objective Lens over the specimen for 100X, or the 40X Objective Lens
for 400X, or change the eyepiece from 10X to 16X. When using higher
magnifications focusing becomes more critical and the objective lens will
come closer to the specimen in order to reach focus. Don’t let the lens
touch the slide as you may break the slide and damage the lens.
7. Care and maintenance
7.1 The microscope is a high quality optical appliance. Therefore you
should make sure that dust or moisture do not come into contact with your
microscope.
7.2 Avoid putting fingerprints on any optical surfaces.
7.3 If dust or dirt should nevertheless have gotten onto your microscope, or
the accessories, you should first remove this with a soft brush. Then clean
the soiled area with a soft, lint-free cloth. To remove fingerprints from the
optical surfaces it is best to use a lint-free, soft cloth, to which you have
applied some alcohol.
7.4 After usage, you should stow the microscope and the accessories in
their correct containers again.
Remember:
A well maintained microscope will keep its optical quality for years and thus
maintain its value.

Other OPTO-EDU Microscope manuals

OPTO-EDU A11.6603 User manual

OPTO-EDU

OPTO-EDU A11.6603 User manual

OPTO-EDU A14.1065 User manual

OPTO-EDU

OPTO-EDU A14.1065 User manual

OPTO-EDU A12.1061 User manual

OPTO-EDU

OPTO-EDU A12.1061 User manual

OPTO-EDU A18.1831 User manual

OPTO-EDU

OPTO-EDU A18.1831 User manual

OPTO-EDU A22.1504 Series User manual

OPTO-EDU

OPTO-EDU A22.1504 Series User manual

OPTO-EDU A13.1005-B User manual

OPTO-EDU

OPTO-EDU A13.1005-B User manual

OPTO-EDU A11.1141 Series User manual

OPTO-EDU

OPTO-EDU A11.1141 Series User manual

OPTO-EDU XD Series User manual

OPTO-EDU

OPTO-EDU XD Series User manual

OPTO-EDU A15.1302 User manual

OPTO-EDU

OPTO-EDU A15.1302 User manual

OPTO-EDU A33.5121 User manual

OPTO-EDU

OPTO-EDU A33.5121 User manual

OPTO-EDU A12.0911 User manual

OPTO-EDU

OPTO-EDU A12.0911 User manual

OPTO-EDU A15.2601-T User manual

OPTO-EDU

OPTO-EDU A15.2601-T User manual

OPTO-EDU A11.0214 User manual

OPTO-EDU

OPTO-EDU A11.0214 User manual

OPTO-EDU A11.1009 Series User manual

OPTO-EDU

OPTO-EDU A11.1009 Series User manual

OPTO-EDU A34.5017 User manual

OPTO-EDU

OPTO-EDU A34.5017 User manual

OPTO-EDU A13.2604-B User manual

OPTO-EDU

OPTO-EDU A13.2604-B User manual

OPTO-EDU A10.1018 User manual

OPTO-EDU

OPTO-EDU A10.1018 User manual

OPTO-EDU A22.1201 User manual

OPTO-EDU

OPTO-EDU A22.1201 User manual

OPTO-EDU A22.0302 User manual

OPTO-EDU

OPTO-EDU A22.0302 User manual

OPTO-EDU A41.1903 User manual

OPTO-EDU

OPTO-EDU A41.1903 User manual

OPTO-EDU A23.3645N Series User manual

OPTO-EDU

OPTO-EDU A23.3645N Series User manual

OPTO-EDU A12.1095 User manual

OPTO-EDU

OPTO-EDU A12.1095 User manual

OPTO-EDU A63 .7080 User manual

OPTO-EDU

OPTO-EDU A63 .7080 User manual

OPTO-EDU A15.1091 User manual

OPTO-EDU

OPTO-EDU A15.1091 User manual

Popular Microscope manuals by other brands

Supereyes A006 user guide

Supereyes

Supereyes A006 user guide

Olympus SZX-AR1 Software Help

Olympus

Olympus SZX-AR1 Software Help

Rodenstock Z Series Operator's manual

Rodenstock

Rodenstock Z Series Operator's manual

Bresser Junior 8851310 operating instructions

Bresser Junior

Bresser Junior 8851310 operating instructions

Velleman CAMCOLMS1 user manual

Velleman

Velleman CAMCOLMS1 user manual

Orbitor OR7031 user guide

Orbitor

Orbitor OR7031 user guide

Viavi INX 760 user guide

Viavi

Viavi INX 760 user guide

Accu-Scope 3078 Series manual

Accu-Scope

Accu-Scope 3078 Series manual

Ken A Vision T-3300 instruction manual

Ken A Vision

Ken A Vision T-3300 instruction manual

ThermoMicroscopes Aurora-2 user manual

ThermoMicroscopes

ThermoMicroscopes Aurora-2 user manual

Optika B-350 Operation manual

Optika

Optika B-350 Operation manual

Gundlach 40B quick start guide

Gundlach

Gundlach 40B quick start guide

3B SCIENTIFIC PHYSICS 100 instruction manual

3B SCIENTIFIC PHYSICS

3B SCIENTIFIC PHYSICS 100 instruction manual

Celestron 4040 instruction manual

Celestron

Celestron 4040 instruction manual

BestScope BS-2081 instruction manual

BestScope

BestScope BS-2081 instruction manual

Olympus CHA instruction manual

Olympus

Olympus CHA instruction manual

Olympus BX63 instructions

Olympus

Olympus BX63 instructions

Reichert Neopan-Pol I operating instructions

Reichert

Reichert Neopan-Pol I operating instructions

manuals.online logo
manuals.online logoBrands
  • About & Mission
  • Contact us
  • Privacy Policy
  • Terms and Conditions

Copyright 2025 Manuals.Online. All Rights Reserved.