Ortovox f1 focus User manual

das ist der entscheidende Vorteil des ORTOVOX Lawinen-
Verschütteten-Suchgerätes f1 focus. Die sofortige Suche mit
einem VS-Gerät und Bergung mit Lawinenschaufel und
-sonde durch die Tour-Teilnehmer bieten bei einem Lawinen-
unfall nahezu die einzige Überlebenschance. Wenn erst
Fremdhilfe geholt werden muss, ist es meist zu spät! Beach-
ten Sie den Lawinenlagebericht und wählen Sie sichere
Touren. Führen Sie stets das Lawinen-Verschütteten-Such-
gerät f1 focus und die ORTOVOX SAFETY Produkte mit sich.
Bitte lesen Sie die Bedienungsanleitung aufmerksam, üben
Sie die Handhabung Ihres VS-Gerätes f1 focus und die Ver-
schüttetensuche.
Informationen dazu unter
www.ortovox.com
ORTOVOX wünscht allen Skibergsteigern, Freeridern und
Snowboardern schöne und sichere Touren!
this is the decisive advantage of the ORTOVOX avalanche
transceiver f1 focus. In an avalanche, allmost all chances of
survival depend on the immediate search and rescue of com-
panions equipped with an avalanche transceiver, an avalan-
che shovel and a probe. In most cases, help is too late, if
dependent upon rescue services summoned to the scene!
Please follow the avalanche warnings and select safe routes.
Always take the avalanche transceiver f1 focus and the
necessary ORTOVOX safety products with you. Carefully
read the manual, practice all hand motions and searching
techniques.
For more information, please visit our website at
www.ortovox.com
ORTOVOX wishes great, safe skiing and deep powder to
all ski mountaineers, free riders and snowboarders!
EINFACH FINDEN... INHALT
www.lawine.org
Current avalanche warning
services information!
Bedienungselemente 3
Technische Daten 4
Anlegen des VS-Gerätes 5
Sende- und Empfangskontrolle 6/7
Verschüttetensuche 8/9
Suchschema 10/11
Suche nach mehreren
Verschütteten 12/13
3-Kreis-Suchmethode 14/15
Service 15
Garantie 16/17
Serviceadressen 18
Operating elements 3
Technical data 4
Wearing technique 5
Transmitting and receiving control 6/7
Search 8/9
Search sketch 10/11
Multiple burials 12/13
3 Circle Search Method 14/15
Service 14
Warranty 16/17
Service addresses 18
D
www.ortovox.com
E
D
LAWINEN-
VERSCHÜTTETEN-
SUCHGERÄT
AVALANCHE
TRANSCEIVER
GEBRAUCHSANLEITUNG
MANUAL
SIMPLY FIND IT... INDEX
E
www.lawine.org
Aktuelle Informationen der
Lawinenwarndienste!

OPERATING
ELEMENTS
E
BEDIENUNGSELEMENTE
Optische Suchanzeige
Ohrhöreranschluss
Lautsprecher
Batteriedeckel
Entfernungsskala
für Empfang
Verriegelungs-
Schiebeschalter
Batteriezustands-/
Sendekontroll-Leuchte
Einschaltbajonett
Lautstärkendrehschalter
Sendeposition
1
2
3
4
5
6
7
8
9
10
FUNKTION: analog
GEHÄUSE: ergonomisch, wasserdicht, schlagfest
GRÖSSE: 130 x 80 x 20 mm
FREQUENZ: 457 kHz
REICHWEITE: bis zu 80 m
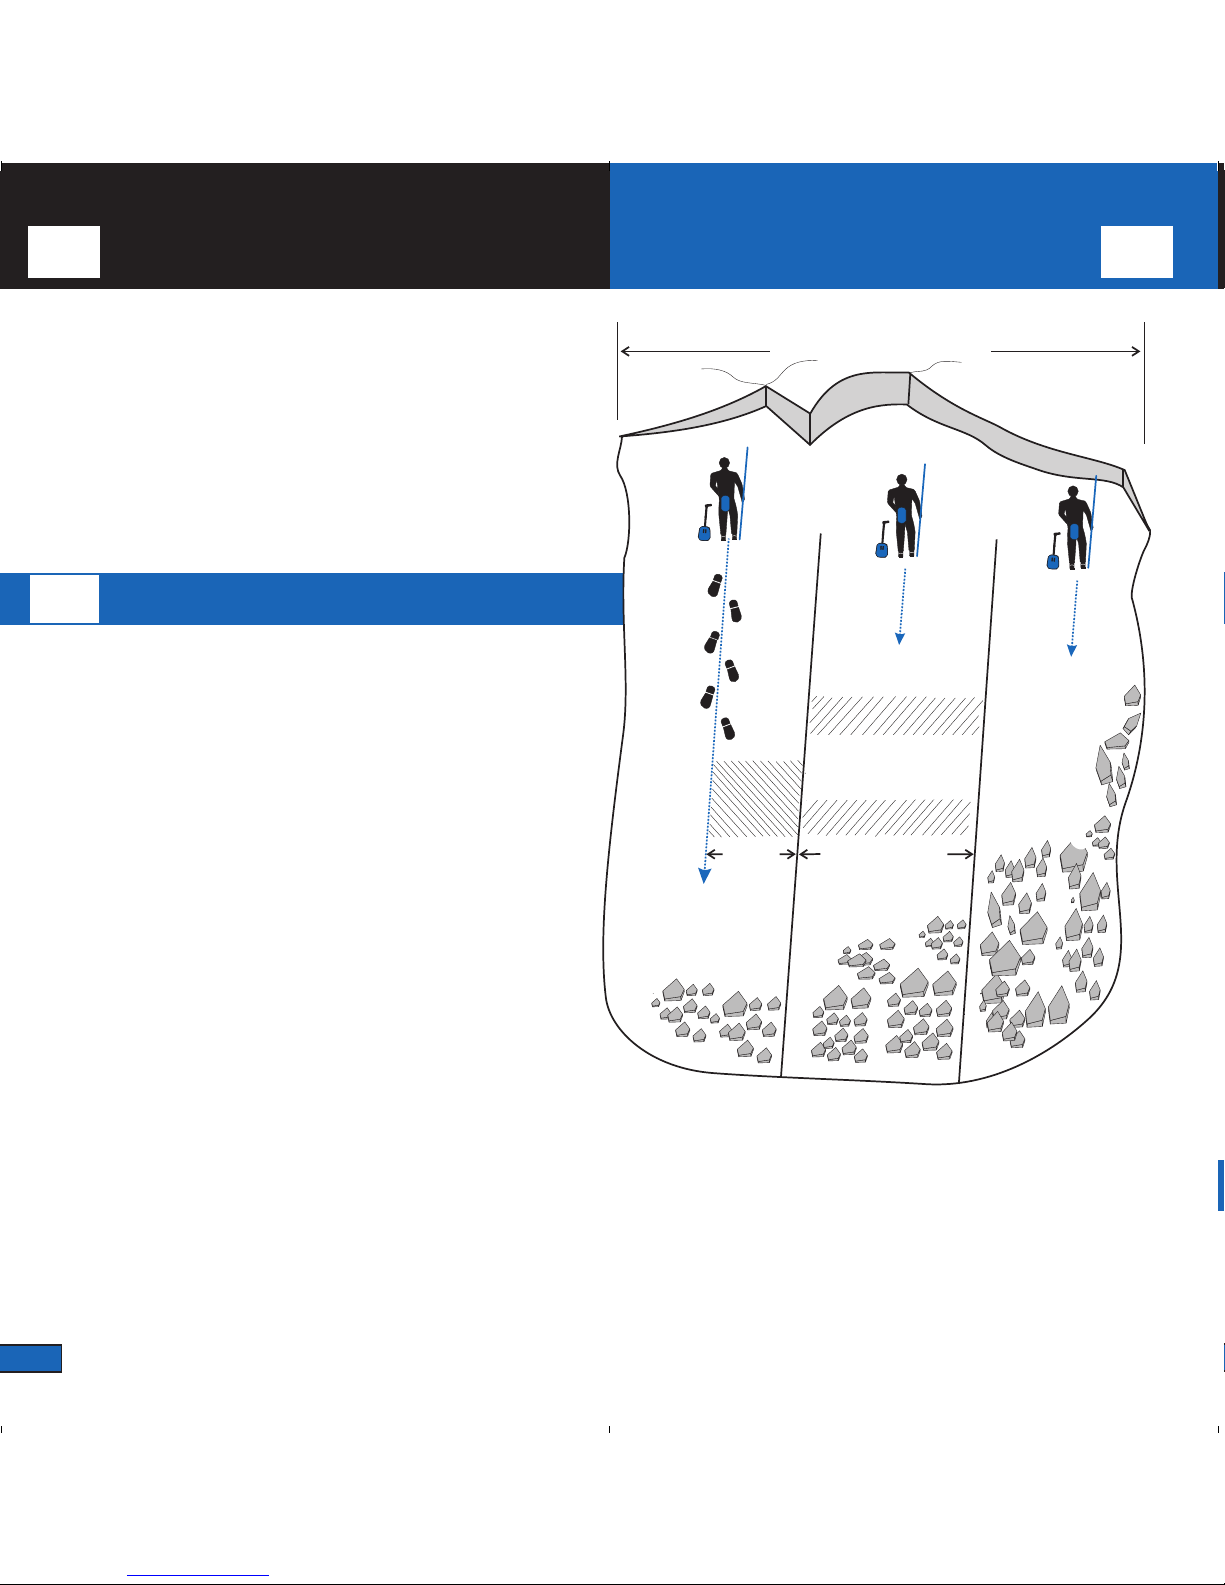
SUCHSTREIFENBREITE: bis zu 40 m
TEMPERATURBEREICH: -20°C bis +45°C
Sollte das Gerät naß geworden sein, nicht mit Heißluft trocknen.
Durch Heißluft kann das Gerät auch nach Abkühlung einen blei-
benden Funktionsschaden erleiden.
STROMVERSORGUNG:
2 Batterien Alkaline AA LR6 Mignon 1,5 Volt E91 AM3
BETRIEBSDAUER
SENDEN: ca. 350 Stunden
EMPFANGEN: ca. 40 Stunden
GEWICHT: ca. 230 g inkl. Batterien und Tragegurt
Das ORTOVOX f1 focus übertrifft die hohen
Anforderungen der EURO-Norm EN 300 718.
3
2
10
4
7
6
9
1
8
5
FUNCTION: analogue
CASING: ergonomic, waterproof, shock-resistant
DIMENSIONS: 130 x 80 x 20 mm
FREQUENCY: 457 kHz
RANGE: up to 80 m
SEARCH STRIP WIDTH: up to 40 m
TEMPERATURE RANGE: -20°C to +45°C
If your transceiver becomes wet, do not use direct heat, i.e. hair
dryer, to dry it out. Heat applied in such a direct manner may cause
major and lasting damage to your transceiver, regardless of whether
or not the unit is permitted to cool off after such a heat application.
BATTERIES: 2 x 1.5 V alkaline (no rechargeables)
LR6 mignon 1,5 Volt E91 AM3 (2 "AA" batteries)
WORKING LIFE
TRANSMITTING: about 350 h
RECEIVING: about 40 h
WEIGHT: about 230 g incl. batteries and straps
The ORTOVOX f1 focus surpasses the high require-
ments of the European standard EN 300 718.
Visual search indicator
Socket for earplug
Loudspeaker
Battery compart-
ment lid
Scaled display
for search zones
Locking switch
Visual control light for battery
capacity and function control light
Bayonet switch (forced ON/OFF)
Switch for volume control
Transmitting position
1
2
3
4
5
6
7
8
9
10
D
TECHNISCHE DATEN EU-KONFORMITÄTSERKLÄRUNG
EC-DECLARATION OF CONFORMITY
TECHNICAL DATA
Hersteller: X-log Elektronik GmbH
Verantwortliche Person: Herr Nowotny
Bahnhofstr. 95, D-82166 Gräfelfing
erklärt, dass das Produkt: Typ: ORTOVOX
Modell: f1 focus
Verwendungszweck:Lawinenverschüttetensuche
bei bestimmungsgemäßer Verwendung den grundlegenden Anforderungen
gemäß Artikel 3 der R&TTE-Richtlinien 1999/5/EG entspricht und dass
die nachfolgenden Normen angewandt wurden:
1. Gesundheit (Artikel 3.1.a der R&TTE-Richtlinien):
Angewandte Norm(en): ETS 300718 Ausgabe: 05/01
2. Sicherheit (Artikel 3.1.a der R&TTE-Richtlinien):
Angewandte Norm(en): ETS 300718 Ausgabe: 05/01
3. Elektromagnetische Verträglichkeit
(Artikel 3.1.b der R&TTE-Richtlinien):
Angewandte Norm(en): ETSI EN 300718-1 Ausgabe: 05/01
4. Effiziente Nutzung des Funkfrequenzspektrums
(Artikel 3.2 der R&TTE-Richtlinien):
Angewandte Norm(en): ETSI EN 300718-2 Ausgabe: 05/01
5. Elektromagnetische Verträglichkeit und Funkspektrumsangelegenheiten
(Artikel 3.3.e der R&TTE-Richtlinien)
Angewandte Norm(en): ETSI EN 300718-3 Ausgabe: 02/04
Gräfelfing, 24.04.2006 i. A. Andrea Reintges
(Ort/Datum der Konformitätserklärung) (Name)
Manufacturer: X-log Elektronik GmbH
Responsible person: Mister Nowotny
Bahnhofstr. 95, D-82166 Gräfelfing
declares that the product: type: ORTOVOX
model: f1 focus
intended use: Search for avalanche victims
complies with the essential requirements of Article 3 of the R&TTE
1999/5/EC Directive, if used for its intended use and that the following
standards have been applied:
1. Health (Article 3.1.a of the R&TTE Directive):
Applied standard(s): ETS 300718 issue: 05/01
2. Safety (Article 3.1.a of the R&TTE Directive):
Applied standard(s): ETS 300718 issue: 05/01
3. Electromagnetic compatibility
(Article 3.1.b of the R&TTE Directive):
Applied standard(s): ETSI EN 300718-1 issue: 05/01
4. Efficient use of the radio frequency spectrum
(Article 3.2 of the R&TTE Directive):
Applied standard(s): ETSI EN 300718-2 issue: 05/01
5. Electromagnetic compatibility and Radio spectrum Matters (ERM)
(Article 3.3.e of the R&TTE Directive):
Applied standard(s): ETSI EN 300718-3 issue: 02/04
Gräfelfing, 24.04.2006 i. A. Andrea Reintges
(Place/date of the declaration of conformity) (Name)

Das VS-Gerät vor Beginn der Tour anlegen. Nie
im Rucksack, sondern immer unter der Oberbe-
kleidung tragen!
Das f1 focus so vor den Körper halten, dass der
Lautstärkendrehschalter (9) zum Gesicht und die
Batteriekontroll-Leuchte (7) nach oben zeigen.
Einschaltbajonett (8) mit der rechten Hand durch
Druck und eine Vierteldrehung einrasten lassen
Die entstandene Schlaufe über den Kopf ziehen
und den linken oder rechten Arm durchführen.
Das frei herunterhängende Körperband auf die
erforderliche Länge einstellen, um den Rücken
führen und mit dem Schnellverschluss am Gerät
fixieren.
WEARING TECHNIQUE
5
ANLEGEN DES VS-GERÄTES
1
2
3
4
1
2
3
4
D
1
2 3
4
REINIGUNG DER TRAGEGURTE!
Die Tragegurte sind zum Waschen abnehmbar.
Lösen Sie mit Hilfe eines spitzen Gegenstandes
den kleinen Keil bei der Gurtbefestigung und zie-
hen ihn heraus (sorgfältig aufbewahren!).
Mit einem kräftigen Zug (senkrecht nach oben)
lässt sich der Gurt abnehmen. Nach dem Wa-
schen den Gurt wieder montieren und mit dem
Keil sichern.
Adjust the body strap to the proper length, lead
it around your back and snap it into the quick
fastener.
HOW TO CLEAN THE BODY BELT
The body belts can be taken off for washing:
Undo the small wedge situated in the middle of
the belt attachment with a sharp tool and pull it
out (keep safe!).
Remove the belt by pulling it firmly upwards.
After having washed the belt, attach and secure
it with the wedge.
Put on your ORTOVOX transceiver f1 focus be-
fore starting a tour! Avalanche transceivers
should never be carried in the backpack, they
should always be worn on your body, preferably
under your outer clothing!
Hold the f1 focus in front of your body so that the
volume control switch (9) is showing to your face
and the battery control light (7) facing up.
Plug the bayonet switch (8) into its socket and,
with gentle pressure, twist 1/4 of a turn with your
right hand.
You will now have a full loop shoulder strap which
you need to put over your head and pass through
either your left or right arm.
E
5
6
5
6
65

TRANSMITTING AND RECEIVING CONTROL
Einschalten/Senden: ON/OFF-Verschluss (8) einstecken, leicht andrücken und gleichzeitig um ein Viertel (90°) dre-
hen. Die Kontroll-Leuchte (7) blinkt ca. 30 x mit einer Blinkgeschwindigkeit von ca. 2 x pro Sekunde. Danach geht die
Blinkanzeige in ein langsameres Blinken über. Bei schwächer werdenden Batterien verringert sich die schnelle
Blinkanzahl. Bei weniger als 15 schnellen Blinkzeichen (7) sind die Batterien zu wechseln. Die Batteriekontrolle
kann erst nach einer Wartezeit von ca. 3 Minuten wiederholt werden! Die Kontroll-Lampe (7) blinkt nur, wenn
das Gerät auf SENDEN (10) geschaltet ist.
Umschalten auf Empfang: Um in den Suchmodus zu gelangen den Verriegelungsschalter (6) nach rechts
drücken und den Drehschalter (9) auf die Position „SUCHEN 80“ stellen. Nach Umschalten auf Empfang ist
vom Lautsprecher (3) zuerst nur ein kurzer Sendesignalton zu hören. Danach folgt das charakteristische
Empfangsrauschen. Die Lautstärke des Rauschens verändert sich durch Drehen am Lautstärkenregler (9). Sie
wird beim Drehen im Uhrzeigersinn, also von höherer zu niedrigerer Bereichsangabe, leiser. Dabei werden der
elektronische Verstärker und die Lautsprecherfunktion überprüft.
Zurückschalten auf Senden: Durch das Zurückdrehen des Empfangsumschalters (9) im Gegenuhrzeigersinn gelangen
Sie in die Sendeposition (10). Der Empfangsumschalter wird automatisch verriegelt.
Überprüfen der Ohrhörerfunktion: Führen Sie den Ohrhörer in den Ohrhöreran-
schluss (2) und schalten Sie das f1 focus auf Empfang. Im Ohrhörerbetrieb ist nun das
6
D
E
SENDE- UND EMPFANGSKONTROLLE
1
2
3
4
1
2
3
1
Switching on/Transmitting: Plug the forced ON/OFF bayonet switch (8) into its socket and, with gentle pressu-
re, twist 1/4 of a turn. The control light will flash about 30 times at an interval of 2 times per second. Thereafter
the flashing speed will slow down showing the perfect functioning of the device. When the batteries go flat, the
number of quick flashes will decrease. If the device shows less than 15 quick flashes (7), the batteries must
be changed. The battery check can only be repeated after a 3 minutes' pause! The visual control light (7) only
flashes if the device is in TRANSMIT MODE (10).
Switching-over to receive mode: Unlock the locking mechanism by pushing the slider/locking switch (6) to the
right and the switch for volume control to „SEARCH 80”. After having switched your f1 focus to receive mode, a
short transmitting signal can be heard through the loudspeaker (3). Then the typical receiver rustle follow. Its volu-
me is controlled by the switch for volume control (9). Turning the switch clockwise decreases it, i.e. from a
higher to a lower search zone. By so doing, the functions of the electronical amplifier and the loudspeaker are
tested, as well.
Switching back to transmit mode: To return to transmit mode (10) turn the quick switch to receive mode (9)
anti-clockwise. It will be locked automatically in the transmitting position (10).
Test of earphone functions: Insert the earphone plug into the earphone socket (2) and put your f1 focus on recei-
ve mode. Now you hear the transmitter signal in the earphone. The integrated loudspeaker (3) is switched off
automatically when using the earphone.
4

Sendersignal zu hören. Der Lautsprecher (3) ist bei Ohrhörerbetrieb ausgeschaltet.
Tägliche Funktionsprüfung vor Antritt der Tour!
• Alle Teilnehmer stellen Ihr VS-Gerät auf EMPFANGEN.
• Ein Gruppenmitglied (vorzugsweise der Gruppenleiter) stellt sein VS-Gerät auf SENDEN (10).
• Wenn alle VS-Geräte einen akustischen und optischen Empfang haben, funktionieren die Empfänger.
• Nach der Prüfung der EMPFÄNGER erfolgt die Überprüfung der SENDER.
• Die Teilnehmer stellen ihr VS-Gerät auf SENDEN (10) und gehen EINZELN und in Abständen von ca. 15 m am
Empfangsgerät vorbei. Wenn das Empfangsgerät ein hör- und sichtbares Signal von jedem einzelnen VS-Gerät
empfängt, ist die Sendefunktion in Ordnung.
Bei Abweichungen von den beschriebenen Funktionen das VS-Gerät bitte direkt an Ihre ORTOVOX-Servicestelle zur
Reparatur senden (Siehe Seite 16).
WICHTIGER HINWEIS!
Wir empfehlen die Batterien während der Sommerpause aus dem Gerät zu nehmen (4) und
im nächsten Winter neue Batterien einzusetzen. Auf Geräte mit ausgelaufenen Batterien gewähren wir keine Garantie.
Keine wiederaufladbaren Batterien (Akkus wie z.B. Ni-Cd-Zellen)
verwenden, da bei diesen Reichweite und Betriebsdauer wesent-
lich kürzer sind. Führen Sie immer Ersatzbatterien mit.
7
2 3
Please check the functions daily before going on tour!
• All group members put their transceiver on RECEIVE MODE.
• One member (preferably the group leader) puts his avalanche transceiver on TRANSMIT MODE (10).
• If all members receive acoustic and visual signals, the receivers are correctly working.
• After checking the RECEIVERS, the group has to test the function of their TRANSMITTERS.
• The group members put their avalanche transceivers on TRANSMIT MODE and pass the group leader’s recei-
ver ONE BY ONE at a distance of about 15 m. When the group leader receives acoustic and visual signals from
every single group member’s avalanche transceiver, the transmitters are working well.
When you notice any divergences from the functions described, please send your device directly to the ORTOVOX
service center to have it repaired (see page 16).
IMPORTANT INFORMATION!
It is recommended that the batteries are taken out during the summer and new
batteries are put in for the winter. Leaking batteries void the warranty. Do not use rechargeable batteries (e.g.
NiCd accumulators) as the range and working life of these batteries are significantly shorter. We recommend that
you carry spare batteries and change batteries.

8
VERSCHÜTTETENSUCHE
1
2
1
2
Open the quick lock clasp and pull your f1 focus away from your body for about 1 m. The shoulder strap
will still secure the device to your body so there is no risk of losing it.
Switching to receive mode: Turn the switch for volume control (9) from transmit mode (10) to receiving
position "80". To do so, the locking switch (6) has to be unlocked by pushing the slider to the right. The sig-
nals of other devices can now be received.
Range: Due to laws of physics, transceivers’ ranges depend on the receiving and transmitting devices anten-
nae’s relational position to each other. If the transceivers are unfavourably positioned, the range can be con-
siderably reduced. This can be partially amended by pivoting the receiving beacon. A maximum range can
only be achieved when both transceivers’ longitudinal axis are aligned. Therefore, it is recommended to slo-
wly pivot the ORTOVOX f1 focus in all directions for finding the best receiving position when searching for
the first signal. Transmitting and receiving performance can be interferred by lightnings, ski lifts, power lines
and plants, walkie-talkies, mobile phones and headlamps with voltage regulators. When in use, we recom-
mend switching off mobile phones and walkie-talkies. Minimum distance of 30 cm between two avalanche
transceivers, metal, walkie-talkie, mobile phone, etc.
Schnellverschluss öffnen und das f1 focus ca. 1 m vom Körper wegziehen. Das Schulterband sichert auch
weiterhin das Gerät am Körper und es kann so nicht verloren werden.
Umschalten auf Empfang: Den Lautstärkendrehschalter (9) von der Sendeposition (10) auf die
Empfangsposition „80” stellen. Dazu muss der Verriegelungsschalter (6) nach rechts geschoben werden. Die
Signale der Sender können jetzt empfangen werden.
Reichweite: Aus physikalischen Gründen ist die Reichweite abhängig von der Lage der Antennen des Sende-
und Empfangsgerätes zueinander. Die Reichweite kann bei ungünstiger Lage der Geräte erheblich einge-
schränkt sein, was durch Drehen des empfangenden Gerätes zum Teil ausgeglichen werden kann. Die maximale
Reichweite wird erreicht, wenn die beiden Geräte in der Längsrichtung hintereinander angeordnet sind.
Deshalb bei der Suche nach dem Erstempfang das f1 focus VS-Gerät langsam in alle Richtungen drehen, um
den besten Empfang zu erhalten. Störungen in der Sende- und Empfangsleistung können durch Blitz, Lift- und
Stromanlagen, Funkgeräte, Mobiltelefone und Stirnlampen mit Spannungsregler entstehen. Mobiltelefone und
Funkgeräte bei der Suche auschalten. Mindestabstand 30 cm zwi-
schen zwei VS-Geräten, zu Metall, Funkgerät, Mobiltelefon, etc.
1 2
E
VERSCHÜTTETENSUCHE
D

9
3
4
3
4
Grobsuche (= Suche nach dem Erstempfang): Bei Alleinsuche gehen Sie den vermuteten Verschüttungsraum
in 40 m breiten Suchstreifen ab. Nach dem ersten akustischen Empfang stellen Sie durch Schwenken des
Gerätes fest, aus welcher Richtung Sie das stärkste Signal erhalten und gehen in diese Richtung (siehe Seite
10/11).
Feinortung: Bei ca. 50 m Abstand zum Verschütteten erscheint zusätzlich zum akustischen Empfangssignal
die optische Anzeige (1) im FOCUS-Pfeil (= grünes Licht = Aufforderung zum Gehen!).
Korrektur der Suchrichtung: Bei Abweichung von der korrekten Suchrichtung nimmt das akustische Signal
ab und die optische Suchanzeige wird schwächer und erlischt.
Punktortung: Zur präzisen Punktortung im Bereich von 2-0 m legen Sie zur leichteren Orientierung eine Sonde
flach auf den Boden und markieren Sie bitte die beiden Punkte mit dem jeweils stärksten Empfangssignal.
Halbieren Sie diese Strecke. Drehen Sie nun die Sonde
um 90 Grad. Bitte markieren Sie auf der entstehenden
senkrechten Linie erneut die beiden stärksten Signale.
Halbieren Sie auch diese Strecke und markieren Sie
diesen Punkt mit der Sonde – hier befindet sich der
Verschüttete.
5
5
35
Coarse search (= search for the first signal): When you are searching on your own, please walk through the
search area by dividing the area in search strips of about 40 m. After receiving the first acoustic
signal, please find out the direction of the loudest signal while turning the receiving transceiver horizontally.
Walk towards this direction (see page 10/11).
Fine search: At a distance of about 50 m from the buried person, in addition to the acoustic receiving signal,
the visual search indicator (1) of the FOCUS arrow flashes (= green light = please walk!).
Correction of the search direction: When deviating from the correct search path, the acoustic signal decrea-
ses and the visual search indicator gets weaker and finally goes out.
Pinpoint search: For initiating the precise pinpoint search in the area from 2 to 0 m, put a probe horizontal-
ly on the ground and mark the opposite ends or fade points of the strongest signal. Divide this line in half and
take a 90 degree turn. Mark once more both strongest signals on the new vertical line - there you will find
the buried person.
4

10
SUCHSCHEMA
GROBSUCHE, FEINORTUNG, PUNKTORTUNG
Erstempfang
First audible signal
Zone 1
Zone 0
Zone 2
Zone 3
„akustische” Reich-
weite bis zu 80 m
Acoustic range
up to 80 m
Grobsuche Coarse search Feinortung Fine search
p( )
max. 40 m
„optische”
Reichweite
ca. 50 m
„visual” range of
about 50 m
Den vermuteten
Verschüttungsraum ab-
gehen (Suchstreifenbreite:
40 m).
Walk through the anticipa-
ted search area (search
strip width: 40 m)
Die „grüne” optische
Anzeige (1) leuchtet bei
Annäherung ab ca. 50 m.
The „green” visual search
indicator (1) flashes at a
distance of about 50 m.
Das erste akustische
Empfangssignal ist im
Lautsprecher hörbar.
The first acoustic recei-
ving signal can be heard
through the loudspeaker.
D
the lowest search zone is
reached, you cannot reduce
the volume any more and
you have to start the pin-
point search.

11
SEARCH SKETCH
Punktortung Pinpoint search
verfüg-
bares
Signal
Available
signal
Zone 4
COARSE SEARCH, FINE SEARCH, PINPOINT SEARCH
Pfeilanzeige bei Abweichung
vom richtigen Suchweg
(= Feldlinie)
Arrow indication when
deviating from the correct
search path (= induction line)
FELDLINIE
INDUCTION
LINE
Markieren Sie die beiden
Punkte mit dem stärksten
Empfangssignal in der Längs-
richtung. Halbieren Sie diese
Strecke. Drehen Sie nun die
Sonde um 90 Grad. Bitte mar-
kieren Sie auf der entstehenden
senkrechten Linie erneut die bei-
den stärksten Signale und hal-
bieren Sie diese Strecke – hier
befindet sich der Verschüttete.
Mark the opposite ends or fade
points of the strongest signal
on the main axis. Divide this
line in half and take a 90
degree turn. Mark once more
both strongest signals on the
new vertical line, divide this line
in half – there you will find the
buried person.
E
Bei weiterer Annäherung an
das Sendesignal erscheinen
die gelbe und dann die rote
LED-Anzeige. Nun den Laut-
stärkenschalter (9) leiser dre-
hen und weitergehen. Wenn
das Leiserdrehen nicht
mehr möglich ist, die Punkt-
ortung durchführen.
If you approach the transmit-
ting signal, first the yellow
and then the red light will
flash. Now turn back the
switch for volume control
and continue walking. If
the lowest search zone is
hd d

12
INFORMATION TO USER
GROBSUCHE MIT
MEHREREN SUCHERN
This device complies with Part 15 of the FCC Rules.
Operation is subject to the following two conditi-
ons:(1) the device may not cause harmful interfe-
rence and (2) the device must accept any interfe-
rence received, including interference that may
cause undesired operation.
The user's manual or instruction manual for an
intentional radiator shall caution the user that
changes or modifications not expressly approved
by the party responsible for compliance could void
the user's authority to operate the equipment.This
equipment has been tested and found to comply
with the limits for an intentional radiator pursuant
to part 15 of the FCC Rules. These limits are desi-
gned to provide reasonable protection against
harmful interference in a residential installation. This
equipment generates, uses, and can radiate radio fre-
quency energy and if not installed and used in accordance with the instructions may cause harmful inter-
ference to radio communications. However, there is no guarantee that interference will not occur in a par-
ticular installation. If this equipment does cause harmful interference to radio or television reception, which
can be determined by turning the equipment off and on, the user is encouraged to try to correct the inter-
ference by one or more of the following measures:
• Reorient or relocate the receiving antenna.
• Increase the separation between the equipment and receiver.
• Connect the equipment into an outlet on a circuit different from that to which the receiver is connected.
• Consult the dealer or an experienced radio/TV technician for help.
120 m
max. 40 m
Suchstreifenbreite
Search strip width
20 m
D
E
COARSE SEARCH WITH
SEVERAL SEARCHERS
E
SUCHSTREIFENBREITE:
Wenn mehrere Helfer zur Verfügung stehen, dann wird
der Suchraum in Streifen zu 40 m Breite aufgeteilt.
SEARCH STRIP WIDTH:
If several searchers are available, divide each of their
search areas into maximum 40 m strip widths.

13
• Zur Suche nach mehreren Signalen/Verschütteten geht der Sucher vom Liegepunkt des zuerst
georteten VS-Gerätes rechtwinklig nach links (bzw. nach vorne oder nach rechts) weg.
Das zuerst geortete Signal wird schwächer und verschwindet schließlich ganz.
• Das neu angepeilte Signal wird nun mit jedem Schritt stärker.
SUCHE NACH MEHREREN VERSCHÜTTETEN
Zweite gewählte Richtung
Direction chosen second
Dritte gewählte Richtung
Direction chosen third
Erste gewählte Richtung
Direction chosen first
1. Liegepunkt
1st place
D
• If you have to search for several buried persons, you make a 90 degree turn from the first located
avalanche transceiver and are going to the left (or in front or to the right) of the first located
transceiver. Thus, the first located signal gets weaker and then it completely disappears.
• The newly headed signal gets stronger while approaching.
MULTIPLE BURIALS
E

14
3-KREIS-SUCHMETHODE
3 CIRCLE SEARCH METHOD
D
E
Günstige Suchmethode für die Ortung mehrerer Verschütteter auf engem Raum.
• Ortung des ersten Verschütteten; die Helfer graben nach dem Erstgefundenen.
• Bei VS-Geräten mit manueller Lautstärkenregelung erhöht nun der Sucher die Lautstärke um eine
Empfangsstufe.
• Zur Suche nach dem zweiten Signal geht der Sucher einen ersten Kreis mit einem Radius von 3 m
um den zuerst Georteten. Dabei werden Display und LED’s besonders aufmerksam nach markanten
Anzeige-Änderungen beobachtet. Eine markante Anzeigen-Änderung deutet auf die Signalaufnahme
des zweiten Verschütteten hin. Folgen Sie nun diesem Signal.
• Anschließend geht der Sucher den zweiten Kreis mit einem Radius von 6 m.
• Der dritte und letzte Kreis hat einen Radius von 9 m.
•Wichtig: Angefangene Kreise konsequent zu Ende führen. Begehen Sie die Kreise langsam und
führen Sie das Gerät knapp über der Schneeoberfläche!
Good search method for locating several persons buried close together.
• Location of the first buried person; the helpers dig for the first person found.
• Now the searcher having an avalanche transceiver with manual volume control increases the volume
by switching into a higher search zone.
• In order to search for the second signal the searcher is walking a first circle of a 3 m radius around
the person located first. By doing so, he has to watch the display and the LEDs for noticeable indication
changes. A noticeable indication change points to a signal received from a second person buried.
Now follow this signal.
• Then the searcher is walking a second circle of a 6 m radius.
• The third and last circle has a radius of 9 m.
•Important: Finish firmly the circle you started. Walk slowly the circles and keep the transceiver
close to the snow surface!
SERVICE
The ORTOVOX patroller is a rescue device. Its perfect function might be crucial for life. Therefore
you should return your device for factory service according to the date indicated on the test seal. We suggest
that you send back the device during the summer months to ensure that you have a fully tested device at the
beginning of the winter season. For repairs or factory servicing, please return your ORTOVOX transceiver to an
appropriate service center (see page 18).

15
Grobsuche
Coarse search
Feinortung
Fine search
Punktortung
Pinpoint search
40m
20m
123
SERVICE
Das ORTOVOX patroller ist ein Rettungsgerät, von dessen einwandfreier Funktion ein Leben abhän-
gen kann. Sie sollten daher das Gerät unbedingt zu dem am Prüfsiegel empfohlenen Termin zur Werksüberprü-
fung einsenden. Bitte nehmen Sie unseren Überprüfungsservice in den Sommermonaten in Anspruch, damit Ihr
Gerät rechtzeitig zum Winterbeginn einsatzbereit ist. Zur Reparatur oder Werksüberprüfung bitten wir Sie, Ihr
VS-Gerät direkt an unsere Servicestelle zu senden (siehe Seite 18).

When purchasing a new ORTOVOX Avalanche Transceiver, on presentation of the filled out guarantee card (see instruc-
tions for use) and dealer invoice we grant the 5-year ORTOVOX guarantee from the date of purchase, but no longer
than 6 years from the date of manufacture. The number IV/ 14 on the seal in the battery compartment means, for
example: ORTOVOX guarantee valid until 4th quarter 2014; the Avalanche Transceiver was manufactured 5 years ear-
lier in the 4th quarter 2009. The seal also gives a reminder of the recommended transceiver test in the 4th quarter
2014. As part of the ORTOVOX guarantee, faulty parts are repaired free of charge or the avalanche transceiver is
replaced by a beacon of the same design. Damage caused by improper handling and natural wear is excluded. In the
case of damage due to battery leakage, the ORTOVOX guarantee is voided. Batteries are excluded from the guaran-
tee. Any further warranty and consequential damage are expressly excluded. Enforced guarantees do not extend the
guarantee obligation nor does a new guarantee period begin.
16
GARANTIE
WARRANTY
D
E
Beim Kauf eines neuen ORTOVOX-LVS-Gerätes gewähren wir bei Vorlage der ausgefüllten Garantiekarte (siehe
Gebrauchsanleitung) und Händlerrechnung die 5 - jährige ORTOVOX-Garantie ab Verkaufsdatum, längstens jedoch
6 Jahre ab Herstellungsdatum. Die Zahl IV/ 14 auf dem Siegel im Batteriefach bedeutet z.B.: ORTOVOX-Garantie
gültig bis IV. Quartal 2014; das Gerät wurde 5 Jahre vorher im IV. Quartal 2009 hergestellt. Das Siegel erinnert
zusätzlich an die empfohlene Geräteüberprüfung im IV. Quartal 2014. Im Rahmen der ORTOVOX-Garantie werden
mangelhafte Teile unentgeltlich instand gesetzt oder das LVS-Gerät wird gegen ein baugleiches Gerät ausge-
tauscht. Ausgenommen sind Schäden, die durch unsachgemäße Handhabung und natürlichen Verschleiß hervor-
gerufen werden. Bei Schäden wegen ausgelaufener Batterien erlischt die ORTOVOX-Garantie. Batterien sind von
der Garantie ausgenommen. Eine weitergehende Gewährleistung und Folgeschäden sind ausdrücklich ausge-
schlossen. Durchgeführte Garantieleistungen bewirken weder eine Verlängerung der Garantiepflicht, noch beginnt
damit eine neue Garantiezeit.
Garantieablaufdatum:
IV/14 (= 4. Quartal 2014)
Empfohlene Geräteüberprüfung:
2014
Guarantee expiry date
IV/ 14 (= 4th quarter 2014)
Recommended appliance test:
2014

WICHTIG! IMPORTANT!
Sorgfältig aufbewahren
Please hold in safe keeping
GARANTIEKARTE
Frau/Herr Ms./Mrs./Mr.:
Straße Street:
PLZ, Ort City, State: E-Mail email:
Telefon Phone: Modell Model: ORTOVOX f1 focus
Serien Nr. Serial no.:
(Innenseite Batteriedeckel See inside battery compartment lid)
Gekauft bei Bought from:
Genaue Fehlfunktionsbeschreibung!!! Exact description of malfunctioning!!!
✃
Im Reklamationsfall diese Karte ausfüllen und an die für Sie zuständige Servicestelle senden (siehe Seite 18).
In case of claims please fill in this card and send your device to your ORTOVOX service center (see page 18).
WARRANTY CARD
DE
www.ortovox.com

SERVICEADRESSENSERVICE ADDRESSES
D
18
Änderungen vorbehalten
Austria: ORTOVOX Vertriebs GmbH
Obere Klaus 176
A - 8970 Schladming
Tel: +43- (0) 36 87 2 25 51
Fax: +43- (0) 36 87 - 2 20 88
twww.ortovox.com
BeNeLux: Babacool International BV
Dissenseweg 71,
NL-5081 AG Hilvarenbeek
Tel: +31 (0) 613967745
www.babacool-international.nl
Bulgaria: Odysseia IN Ltd.
20v, Stamboliiski Blvd.
1301, Sofia
Tel: +359 2 989 0538
Fax: +359 2 958 3200
www.stenata.com
Canada: ORTOVOX CANADA LTD
4610 Bowness Road NW
CA - Calgary, Alberta T3B 0B3
Tel: +1- (0) 403-283-8944
Fax: +1 -(0) 403-283-8446
Chile: Chile Montana
General Holley 50 Local 20-21
Providencia. Metro los Leones
Fono/Fax : 2334054
www.chilemontana.cl
Czech Republic: Summitride s.r.o.
Stará 27, CZ - 602 00 Brno
Tel: +420- (0) 604287284
www.summitride.cz
Denmark: Fritidsagenten a/s
Lejrvej 23 A
DK - 3500 Vaerloese
Tel: +45- (0) 44 47 90 94
Fax: +45- (0) 44 47 80 84
Finland: Heaven Distribution oy
Viertolantie 2-4b
SF - 00730 Helsinki
Tel: +358- (0) 40 520 6942
Fax: +358- (0) 9 3883 313
www.kiipeilytekniikka.com
France: Alizés Sarl
z.a.c. de l‘échangeur
20, imp. Denis Papin
F - 73100 Grésy-sur-Aix
Tel: +33- (0)4 79 34 80 77
Fax: +33- (0) 4 79 34 15 07
Germany:
ORTOVOX SERVICE CENTER
Kapellenstraße 5
D - 92245 - Kümmersbruck-Moos
www.ortovox.com
Great Britain: Noble Custom
26 Church Street
GB - LE12 6TX, Wymeswold
Tel: +44- (0) 1509 889195
Fax: +44- (0) 1509 889195
www.noblecustom.co.uk.com
Iceland: Útilíf
Hagasmári 1
IS - 201 Kópavogi
Tel: +354- (0) 545 1500
Fax: +354- (0) 522 8001
India: MATRIX CORPATION
Patti Natha Singh Village
Haripur-Rampur Ghat Road
Poanta Sahib - H.P. India
Tel: +91- (0) 94180 - 89640
www.matrixcorpn.com
Italy: Outback ‘97 s.r.l.
Via Baioni, 24
I - 24123 Bergamo
Tel: +39- 035 - 36 11 03
Fax: +39- 035 - 36 17 76
www.outback.it
Japan: Magic Mountain co. Itd.
2-8-5 Nobidome, Niiza City
J - Saitama 352-0011
Tel: +81- (0) 48 - 480 00 88
Fax: +81- (0) 48 - 480 00 89
New Zealand: Marvelox Adventure
27 Heywards Road, Clarkville
RD 2 Kaiapoi
NZ - Christchurch 7692
Tel +64-3-375 5000 or 0800-558888
Fax +64-3-327 0177 or 0800-258 000
www.marvelox.com
Norway: Sport Sensation as
Sofiemyrveien 10
N – 1412 Sofiemyr
Tel: +47- (0) 22-300208
Fax: +47- (0) 22-300209
Poland: Tatra Trade s.c. - Hardware
ul. Droga na Bystre 2 a
PL - 34-500 Zakopane
Tel: +48- (0) 18-20 134 28
Fax: +48- (0) 18-20 134 2
Russia: Alpex
Srednaya Pereyaslavskaya ul. 13
Stroenie 2
RUS - 129110 Moskau
Tel: +007- (0) 495-6311 855
Fax: +007- (0) 495 6843 608
Slovakia: ZÁKLADNÝ TÁBOR, s.r.o.
HUDY SPORT
29. augusta 13
SK - 036 01 MARTIN
Tel. 00421 (0)434220497
e-mail: [email protected]
Slovenia: Iglu Sport d.o.o.
Trzaska 393, SLO - 1000 Ljubljana
Tel: +386- 124 12 760
Fax: +386- 124 12 757
Spain: Extrem Izadi Distribución
Avenida Guadalupe, 15
E - 10133 Escurial
Tel: +34- (0) 927 16 15 93
Fax: +34- (0) 927 16 15 93
Sweden: Trygve Alm a/s - Sverige
S:t Olofsgatan 35
SE – 753 30 Uppsala
Tel: +46- (0) 18 12 05 35
Fax: +46- (0) 18 12 05 36
Switzerland: Roger Guenat Sa
Z.I. au Grivaz, CH - 1607 Palézieux
Tel.: +41 (0) 21 947 4666
Fax: +41 (0) 21 947 5216
www.roger-guenat.ch
USA:
ORTOVOX USA, Inc.
Distribution Center
2698 South Redwood Road
Unit S
USA – West Valley, UT 84119
Tel: +1- (0) 801 – 886 8050
Fax: +1- (0) 801 – 410 1586

LA RECHERCHE FACILITEE ... En cas d’avalanche, c’est un avan-
tage décisif d’utiliser un f1 focus. Car seul un sauvetage immé-
diat, effectué par les membres du groupe munis d'A.R.V.A. de
pelles et de sondes offre une chance de survie aux personnes
ensevelies. Si l’on doit faire appel à des secours extérieurs,
il est souvent trop tard quand ceux-ci arrivent!
Consultez les bulletins d'estimations du risque d'avalanche et
choisissez des itinéraires sûrs. Emmenez toujours votre appareil
de recherche de victimes d’avalanche ORTOVOX f1 focus ainsi
que les produits de sécurité ORTOVOX indispensables. Lisez
attentivement ce mode d’emploi, apprenez à vous servir de
votre appareil, entraînez-vous, répétez tous les gestes et
chaque étape du processus de recherche.
Pour plus d'informations veuillez consulter notre site
www.ortovox.com
ORTOVOX vous souhaite de passer de belles journées en
montagne tout en respectant les consignes de sécurité.
...è il vantaggio decisivo del localizzatore A.R.V.A. f1 focus. La
ricerca e l’immediato soccorso da parte dei compagni muniti di
localizzatori A.R.V.A., sonde e pale sono spesso l'unica possibi-
lità di sopravvivenza qualora si sia travolti da una valanga.
Quando si è obbligati a cercare aiuto da parte di altri è sempre
troppo tardi! Ascolta i bollettini del servizio informazioni valanghe
e sceglie percorsi sicuri e adatti alle condizioni. Utilizzate quindi
sempre il localizzatore A.R.V.A. ORTOVOX f1 focus ed i prodotti
di sicurezza ORTOVOX. Vi preghiamo di leggere attentamente le
istruzioni per l'uso esercitandovi all'uso del vostro apparecchio
ripetendo più volte le necessarie operazioni e la procedura di
localizzazione.
Per ogni genere di informazioni sui prodotti consultate il nostro
sito internet:
www.ortovox.com
Auguriamo le più entusiasmanti e sicure escursioni a tutti
sciatori alpinisti, freeriders e snowboarders!
A.R.V.A. CONTENU
www.lawine.org
Informations des services de
prévisions d'avalanches!
www.lawine.org
Informazioni aggiornate presenti nei
bollettini valanghe!
Éléments de commande 3
Données techniques 4
Mise en place de l'A.R.V.A. 5
Contrôle d'émission et de réception 6/7
Recherche d'ensevelis 8/9
Schéma de recherche 10/11
Recherche de plusieurs ensevelis 12/13
Méthode de recherche
par micro-bandes circulaires 14/15
SAV 15
Garantie 16/17
Adresses SAV 18
Componenti e comandi operativi 3
Dati tecnici 4
Come indossare l'apparecchio 5
Controllo di trasmissione e ricezione 6/7
Ricerca 8/9
Schema di ricerca 10/11
Ricerca di più travolti 12/13
Ricerca di più travolti con
sistema a 3 cerchi 14/15
Assistenza 14
Garanzia 16/17
Indirizzi dei centri assistenza 18
F
www.ortovox.com
I
F
APPAREIL
DE RECHERCHE
DE VICTIMES
D'AVALANCHE
LOCALIZZATORE
A.R.V.A.
APARATO DE BÚSQUEDA
DE VÍCTIMAS
DE AVALANCHAS
MODE D'EMPLOI
ISTRUZIONI PER L'USO
INSTRUCCIONES DE USO
ESP
LA RICERCA FACILE... INDEX
I

I
ÉLÉMENTS DE COMMANDE
Indicateur visuel de recherche
Prise pour écouteur
Haut-parleur
Couvercle du compartiment à piles
Echelle de distances pour la recherche
de victimes (réception)
Dispositif de verrouillage
Voyant de contrôle (à la fois émission
et état des piles)
Fixation à baïonnette (marche/arrêt
automatique)
Bouton de réglage du volume
Position d'émission
1
2
3
4
5
6
7
8
9
10
3
2
10
4
7
6
9
1
8
5
FUNZIONI: analogiche
INVOLUCRO: ergonomico, impermeabile, resistente agli urti
DIMENSIONI: 130 x 80 x 20 mm
FREQUENZA: 457 kHz
PORTATA: fino a 80 mt.
LARGHEZZA DEL CORRIDOIO DI RICERCA: fino a 40 mt.
ESCURSIONE TERMICA SUPPORTATA: da -20°C a +45°C
Qualora il vostro localizzatore si bagnasse non asciugatelo
utilizzando fonti di calore diretto (es. asciugacapelli) che
potrebbero causare danni permanenti anche dopo il raf-
freddamento susseguente l'applicazione.
BATTERIE: 2 stilo alcaline AA LR6 mignon 1,5Volt E91 AM3
AUTONOMIA: IN TRASMISSIONE: ca. 350 ore
IN RICEZIONE: ca. 40 ore
PESO: ca. 230 gr. nastro e batterie compresi
L'ORTOVOX f1 focus supera i criteri elevati delle
normative europee EN 300 718.
Indicatore ottico
Presa per auricolare
Altoparlante
Vano batterie
Scala delle distanze per
la ricezione durante la
ricerca dei travolti
Interruttore a scorrimento di serraggio
Spia di controllo carica batteria e
modalità trasmissione
Innesto di accensione obbligata
a baionetta
Selettore volume
Posizione di trasmissione
1
2
3
4
5
6
7
8
9
10
F
DONNÉES TECHNIQUES
DÉCLARATION EUROPÉENNE DE CONFORMITÉ
DICHIARAZIONE EUROPEA DI CONFORMITÀ
DATI TECNICI
Fabricant: X-log Elektronik GmbH
Responsable: Monsieur Nowotny
Bahnhofstr. 95, D-82166 Gräfelfing
déclare que le produit Type: ORTOVOX
Modèle: f1 focus
Objet d’emploi: Recherche de victimes d’avalanche
est conforme aux exigences essentielles selon l’article 3 des dispositions
R&TTE 1999/5/EG quand on l’utilise selon le but auquel il est destiné et
que les normes citées ci-dessous ont été appliquées:
1. Santé (article 3.1.a des dispositions R&TTE):
Norme(s) appliquée(s): ETS 300718 Edition: 05/01
2. Sécurité (article 3.1.a des dispositions R&TTE):
Norme(s) appliquée(s): ETS 300718 Edition: 05/01
3. Compatibilité électromagnétique
(article 3.1.b des dispositions R&TTE):
Norme(s) appliquée(s): ETSI EN 300718-1 Edition: 05/01
4. Utilisation efficace du spectre radioélectrique
(article 3.2 des dispositions R&TTE):
Norme(s) appliquée(s): ETSI EN 300718-2 Edition: 05/01
5. Compatibilité électromagnétique
(article 3.3.e des dispositions R&TTE):
Norme(s) appliquée(s): ETSI EN 300718-3 Edition: 02/04
Gräfelfing, le 24.04.2006 i. A. Andrea Reintges
(lieu et date de la déclaration de conformité) (Nom)
Produttore: X-log Elektronik GmbH
Responsabile: Signor Nowotny
Bahnhofstr. 95, D-82166 Gräfelfing
dichiara che il prodotto: Tipo: ORTOVOX
Modello: f1 focus
Scopo di impiego: Ricerca di vittime di valanga
è conforme ai requisiti essenziali secondo quanto previsto dall’articolo 3 delle
direttive R&TTE 1999/5/EC, tenendo conto delle condizioni di uso a cui è
destinato il prodotto e che le norme indicate in basso sono state applicate:
1. Salute (articolo 3.1.a delle direttive R&TTE):
Norma/e applicata/e: ETS 300718 Edizione: 05/01
2. Sicurezza (articolo 3.1.a delle direttive R&TTE):
Norma/e applicata/e: ETS 300718 Edizione: 05/01
3.
Compatibilità elettromagnetica (articolo 3.1.b delle direttive R&TTE):
Norma/e applicata/e: ETSI EN 300718-1 Edizione: 05/01
4. Uso efficiente dello spettro radioelettrico
(articolo 3.2 delle direttive R&TTE):
Norma/e applicata/e: ETSI EN 300718-2 Edizione: 05/01
5. Compatibilità elettromagnetica
(articolo 3.3.e delle direttive R&TTE):
Norma/e applicata/e: ETSI EN 300718-3 Edizione: 02/04
Gräfelfing, il 24.04.2006 i. A. Andrea Reintges
(luogo et data della dichiarazione di conformità) (Nome)
FONCTION: analogue
BOITIER: ergonomique, étanche, résistant aux chocs
DIMENSIONS: 130 x 80 x 20 mm
FRÉQUENCE: 457 kHz
PORTÉE: jusqu'à 80 m
LARGEUR DE LA BANDE DE RECHERCHE: jusqu'à 40 m
TEMPÉRATURE: de -20°C à +45°C
Un appareil mouillé ne doit jamais être séché avec une
source de chaleur violente type sèche cheveux, son utili-
sation peut causer des dommages irréversibles.
ALIMENTATION:
2 piles alcaline AA LR6 mignon 1,5 Volt E91 AM3
AUTONOMIE
ÉMISSION: environ 350 heures
RÉCEPTION: environ 40 heures
POIDS: environ 230 g, piles et sangle comprises
L’appareil ORTOVOX f1 focus dépasse les exigences
élevées de la norme européenne EN 300 718.
COMPONENTI
E COMANDI

IMPORTANT! L’appareil ORTOVOX f1 focus doit être
mis en place correctement avant de partir pour une sor-
tie. Un appareil de recherche de victimes d’avalanche ne
doit jamais être placé dans un sac à dos, mais toujours
porté à même le corps sous les vêtements!
Placez le f1 focus au niveau de l’abdomen, de façon à ce
que le bouton de réglage du volume (9) soit tourné vers le
corps et que le voyant de contrôle des piles (7) soit en haut.
Tenez la fixation à baïonnette (8) avec la main droite et
encastrez la dans son logement en exerçant une pressi-
on tout en effectuant un quart de tour (marche-arrêt
automatique).
Passez la sangle fermée autour du cou et posez-la, selon
vos habitudes, sur le bras gauche ou sur le bras droit.
Réglez enfin la longueur de la sangle, faites-la passer der-
5
MISE EN PLACE DE L’APPAREIL
1
2
3
4
1
2
3
4
F
1
2 3
4
Regolare la lunghezza desiderata della cintura
addominale ora liberamente appesa, farla girare
attorno al corpo e poi fissarla all’apparecchio con
il serraggio rapido.
LAVAGGIO DELLA FETTUCCIA DEL
SISTEMA DI ALLACCIATURA
Il lavaggio può avvenire come segue:
Togliere il piccolo inserto/cuneo dal centro di fis-
saggio della fettuccia all’A.R.V.A. con un oggetto
appuntito. Estraendolo si abbia cura di conservar-
lo attentamente.
Tirare vigorosamente (verticalmente verso l’alto)
la fettuccia e toglierla. Dopo il lavaggio, aver cura
di reinserire il cuneo.
IMPORTANTE! Come regola si deve indossare il locali-
zzatore A.R.V.A. f1 focus correttamente prima di
cominciare l’escursione sciistica. I localizzatori A.R.V.A.
non devono mai essere portati nello zaino, ma sempre
sotto i capi di abbigliamento (attaccati al corpo)!
Tenere l’apparecchio f1 focus davanti in modo che il
selettore volume (9) sia rivolto verso di sè e la spia
di controllo della batteria (7) sia rivolta verso l’alto.
Inserire con la mano destra l’attacco di accensione a
baionetta (8) nell’apertura prevista facendo pressione
e ruotando di un quarto di giro (accensione obbligata).
Passare il cappio così formato sopra la testa e, a
seconda di come lo si vuole portare, sopra al brac-
cio sinistro oppure destro.
5
6
5
6
65
rière l’épaule et fixez-la à l’appareil avec la fermeture à
baîonnette rapide.
LAVAGE DES SANGLES
Les sanglesdecorps peuvent être enlevées afin de les laver.
Veuillez détacher le petit clip au centre de la fixation
pour les sangles, à l'aide d'un objet pointu et sortez-le
(à garder soigneusement!).
En tirant fortement la sangle (verticalement en haut),
vous pouvez l'enlever. Après avoir lavé les sangles, atta-
chez les sangles en fixant le clip.
COME INDOSSARE L’APPARECCHIO
I

CONTROLLO DI TRASMISSIONE E RICEZIONE
Mise en marche/émission: Encastrez la fixation à baïonnette (8) dans son logement en exerçant une légère pres-
sion et en effectuant un quart de tour. Le voyant de contrôle (7) clignote environ 30 fois au rythme de 2 clignote-
ments par seconde. Puis le rythme du clignotement ralentit confirmant ainsi le bon fonctionnement en mode d'é-
mission. Le rythme du clignotement diminue lorsque les piles commencent à s'épuiser. Si l'on compte moins de 15
clignotements (7) rapides, il faut changer les piles. Le contrôle des piles ne pourra être répété qu'après une pause
de 3 minutes. Le voyant de contrôle (7) ne clignote que si l'appareil est en mode EMISSION (10).
Passage en mode de réception: Pour passer au mode de recherche, débloquez le dispositif de verrouillage à glis-
sement (6) en le faisant glisser vers la droite et en tournant le commutateur de réception (9) vers la gauche en
position „80”. Après avoir passé votre f1 focus en mode de réception, un signal court de l’émetteur est d'abord
perceptible. Puis on entend le bruit caractéristique du récepteur. On peut régler l'intensité de ce bruit en actionnant
le bouton de réglage du volume (9). Ce dernier diminue si l'on tourne le bouton dans le sens des aiguilles d'une
montre, c'est à dire du volume le plus élevé vers celui du plus bas. Cela permet de vérifier l’amplificateur électro-
nique ainsi que le haut-parleur.
Commutation en mode d’émission: Pour passer en mode d’émission (10), faites glisser vers la droite le dispositif de
verrouillage à glissement (6). Le commutateur de réception (9) retourne automatiquement en position d’émission (10)
Contrôle du fonctionnement de l’écouteur: Branchez la fiche de l’écouteur sur la
prise pour écouteur (2) et passez votre f1 focus en „réception”. Vous entendez alors
les signaux de l’émetteur. Le haut-parleur (3) s’arrête automatiquement quand
l'écouteur est mis en marche.
6
F
I
CONTRÔLE D’ÉMISSION ET DE RÉCEPTION
1
2
3
4
1
2
3
1
Per accendere il f1focus, inserire l’innesto a baionetta ACCESO/SPENTO (8), premere leggermente e ruotarlo di
ca. 90 gradi. La spia di controllo lampeggia circa 30 volte, alla frequenza di circa 2 volte al secondo. Dopo que-
sta fase la spia comincia a lampeggiare più lentamente segnalando la corretta condizione di trasmissione
dell’apparecchio. Quando le batterie cominciano a scaricarsi il numero dei lampeggi veloci diminuisce. Quando si
notano meno di 15 lampeggi veloci (7) è arrivato il momento di sostituire le batterie. Il controllo delle batterie può
essere ripetuto solo dopo un intervallo di attesa di ca. 3 minuti! La spia di controllo (7) lampeggia solo quando è
in modo TRASMISSIONE (10).
Commutazione in ricezione: Per passare al regime di ricezione basta spostare verso destra l’interruttore di sgan-
cio (6) e ruotare il commutatore di ricezione (9) in senso antiorario fino alla posizione „80”. Dopo aver passato il
f1 focus al regime di ricezione si sente un segnale acustico del trasmettitore proveniente dall’altoparlante (3). In
questo modo si controlla il funuionamento dell'amplificatore elettronico e dell'altoparlante.
Commutazione in trasmissione: Per passare al regime di trasmissione (10) basta spostare a destra l’interrutto-
re di sgancio (6). Il commutatore di ricezione (9) rientra automaticamente nella posizione di trasmissione (10).
Controllo del funzionamento dell’auricolare: Inserire l’auricolare nell’apposita presa (2) e posizionare il f1 focus
in regime di ricezione. Il segnale del trasmettitore sarà avvertito nell’auricolare. L’altoparlante (3) si spegne auto-
maticamente se si utilizza l’auricolare.
4
Other manuals for f1 focus
3
Table of contents
Other Ortovox Transceiver manuals

Ortovox
Ortovox F1 retriever User manual

Ortovox
Ortovox 3+ User manual

Ortovox
Ortovox Zoom+ User manual

Ortovox
Ortovox S1 User manual

Ortovox
Ortovox S1 User manual

Ortovox
Ortovox d3 User manual

Ortovox
Ortovox Zoom+ User manual

Ortovox
Ortovox M2 User manual

Ortovox
Ortovox RECCO 3+ User manual

Ortovox
Ortovox S1 User manual

Ortovox
Ortovox f1 focus User manual

Ortovox
Ortovox M2 User manual

Ortovox
Ortovox 3+ User manual

Ortovox
Ortovox S1 User manual

Ortovox
Ortovox 3+ Assembly instructions

Ortovox
Ortovox DIRACT User manual

Ortovox
Ortovox f1 focus User manual

Ortovox
Ortovox X1 User manual

Ortovox
Ortovox Zoom+ User manual

Ortovox
Ortovox Zoom+ User manual