Oster BVLB07-L00 User manual

Instruction Manual
BLENDER
READ ALL INSTRUCTIONS BEFORE USING THIS APPLIANCE
Manuel d’Instructions
MÉLANGEUR
LIRE TOUTES LES INSTRUCTIONS AVANT D ’ UTILISER CET APPAREIL
Manual de Instrucciones
BATIDORA
LEA TODAS LAS INSTRUCCIONES ANTES DE USAR ESTE APARATO
Manual de Instruções
LIQUIDIFICADORA
LEIA TODAS AS INSTRUÇÕES ANTES DE USAR ESTE APARELHO
BVLB07-L00
BVLB07-L00
1
2
3
3
1
MODEL
MODÈLE
MODELO
MODELO
MODEL
MODÈLE
MODELO
MODELO

English-1
IMPORTANT SAFEGUARDS
When using electrical appliances, basic safety precautions should be followed, including the
following:
READ ALL INSTRUCTIONS BEFORE USE.
1. Unplug cord from outlet when not in use or before cleaning.
2. To protect against risk of electrical shock, do not immerse the cord, plug or motor base in
water or other liquids.
3. DO NOT let cord hang over edge of table or counter or touch hot surfaces.
4. Never leave appliance unattended when in use.
5. Children should be supervised to ensure that they do not play with the appliance.
6. Avoid contact with moving parts. Keep hands and utensils out of jar while blending to
prevent personal injury or damage to the blender. A rubber spatula may be used only
when the blender is not running.
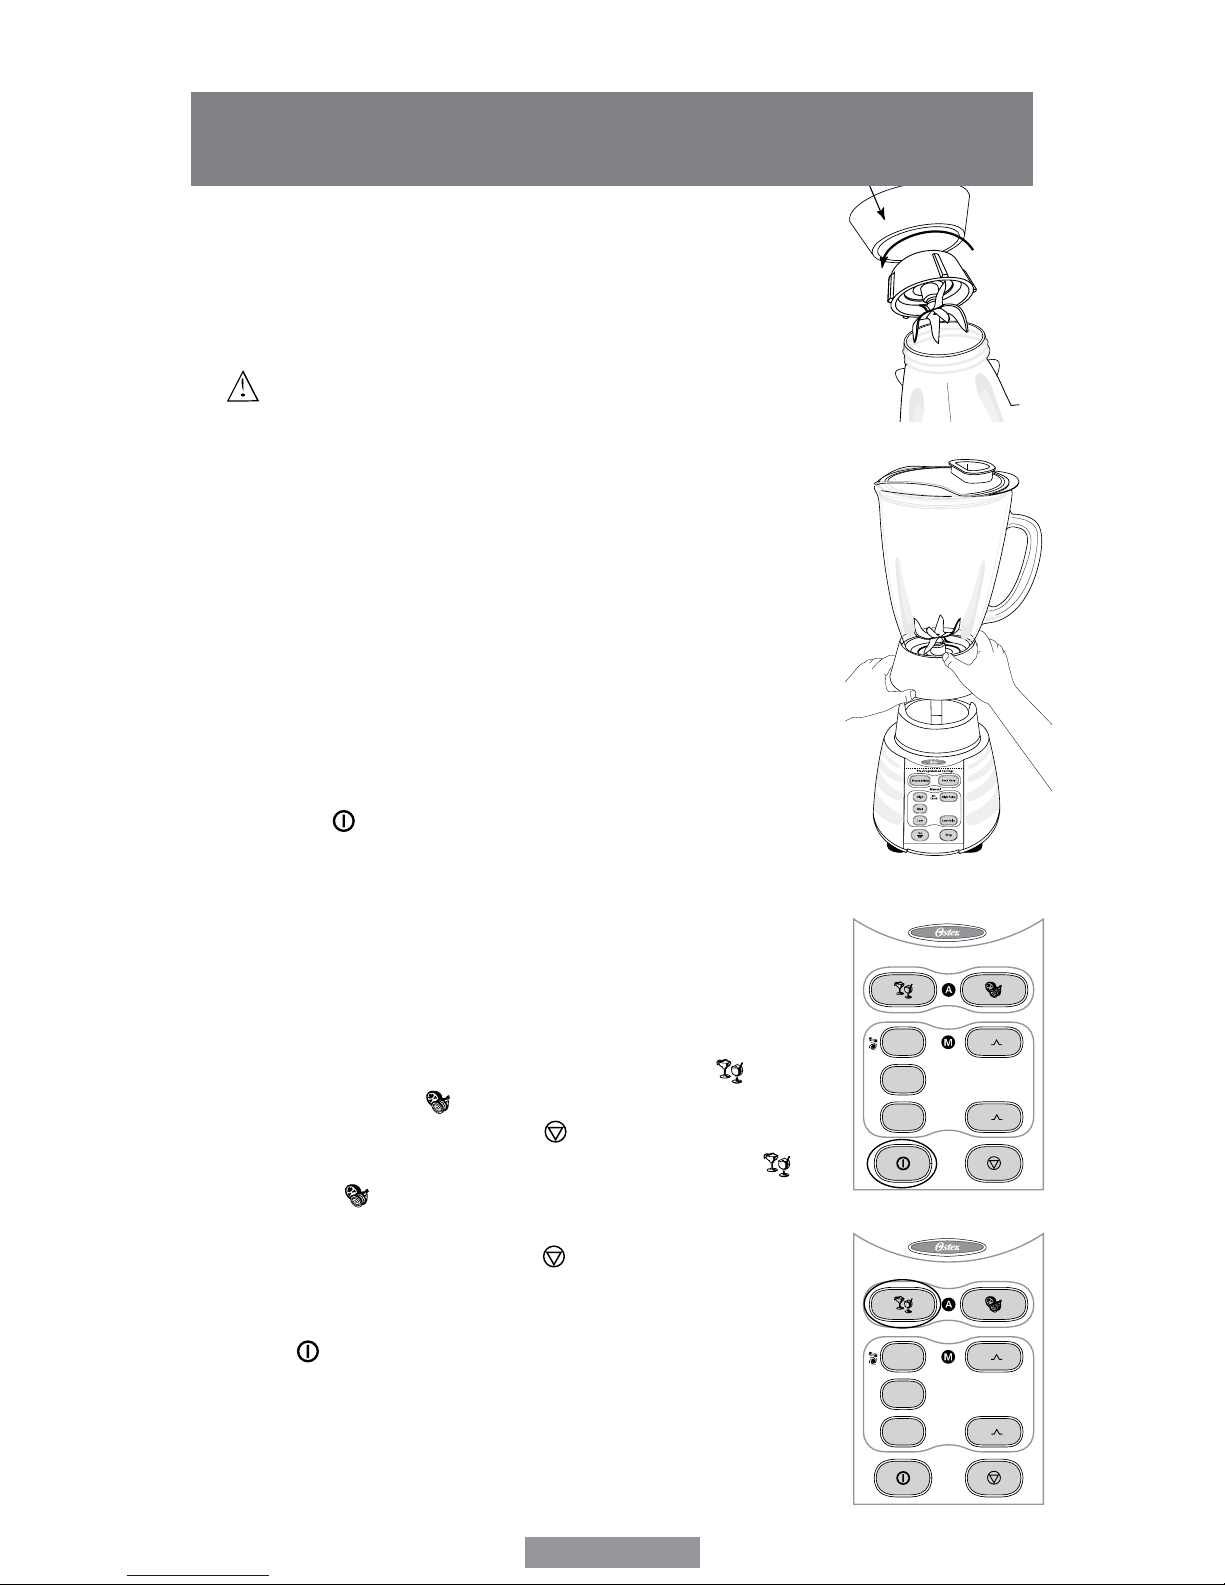
7. The blade is sharp. Handle with care. Care shall be taken when handling the sharp
cutting blades, emptying the bowl and during cleaning.
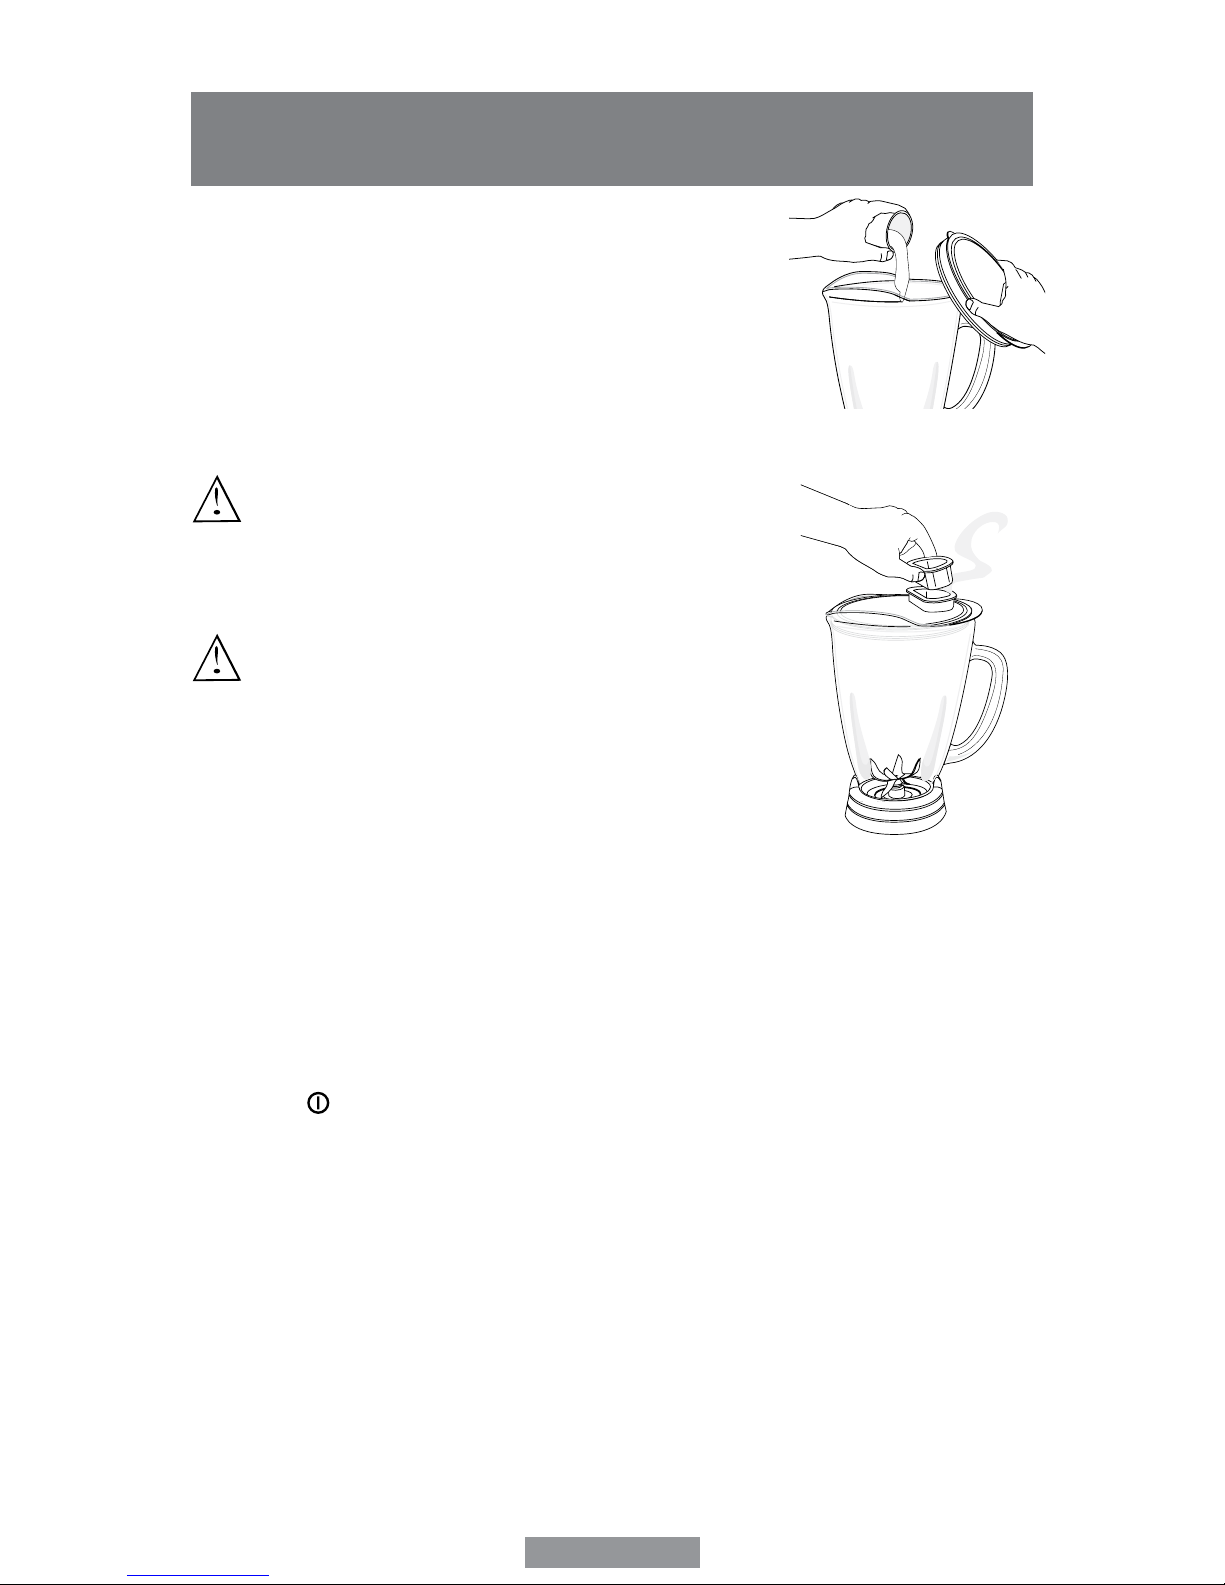
8. Always put the lid on the jar before operating the blender.
9. DO NOT operate any appliance with a damaged cord or plug or after the appliance
malfunctions or is dropped or damaged in any manner. Return the appliance to the
nearest Authorised Appliance Service Centre for examination, repair or electrical or
mechanical adjustment.
10.DO NOT use outdoors or for commercial purposes; this appliance is for household use only.
11. Use this appliance for its intended use as described in this manual.
12.When blending hot liquids, remove centre piece of two-piece cover.
13.To reduce the risk of injury, never place cutter-assembly blades on base without jar
properly attached.
14.Always operate on a flat surface.
15.Always disconnect the blender from the supply if it is left unattended and before
assembling, disassembling or cleaning.
16.The use of attachments, not made by manufacturer, including canning or ordinary jar
and processing assembly parts, is not recommended by Sunbeam Products, Inc., doing
business as Jarden Consumer Solutions, and may cause risk of injury to persons.
17.DO NOT operate blender continuously for more than 3 minutes.
18.This appliance is not intended for use by persons (including children) with reduced
physical, sensory or mental capabilities, or lack of experience and knowledge, unless
they have been given supervision or instruction concerning use of the appliance by a
person responsible for their safety.
THIS PRODUCT IS FOR HOUSEHOLD USE ONLY.
The maximum rating marked on the product is based on the attachment that draws the
greatest load. Other attachments may draw less power.
POWER CORD INSTRUCTIONS
Please follow the instructions below to ensure the safe use of the power cord
• DO NOT use an extension cord with this product.
• DO NOT pull, twist or otherwise abuse the power cord.
• Ifthesupplycordisdamaged,itmustbereplacedbythemanufacturer,itsserviceagentor
similarly qualified persons in order to avoid a hazard.
SAVE THESE INSTRUCTIONS

English-2
FITTING A REPLACEMENT PLUG
FOR U.K. AND IRELAND ONLY
If the plug is not suitable for the socket outlets in your home, it can be removed and
replaced by a plug of the correct type. Please refer to “Installation of a plug” below.
Installation of a plug Applicable to U.K. and Ireland.
WARNING - THIS APPLIANCE MUST BE EARTHED.
NOTE: If the terminals in the plug are not marked or if you are unsure or in doubt about
theinstallationoftheplugpleasecontactaqualiedelectrician.Ifa5A3-pinplugistted,
it must be an ASTA approved plug, conforming to BS1363 standard. Replacement 5A
fuses must be BSI or ASTA BS1362 approved.
The wires in the mains lead are coloured as such:
GREEN AND YELLOW - EARTH
BROWN - LIVE
BLUE - NEUTRAL
Please note that the colour of these mains wires may not correspond with the colour
markings that identify the terminals in your plug.
Please proceed as follows:
The wire which is coloured GREEN AND YELLOW must be connected to the terminal
which is marked with the letter “E” or by the earth symbol or coloured GREEN or
GREEN AND YELLOW.
The BROWN coloured wire must be connected to the terminal, which is marked with the
letter “L” or is coloured RED.
The BLUE coloured wire must be connected to the terminal, which is marked with the
letter “N” or is coloured BLACK.
5 am p

English-3
1
2
3
4
6
5
9
8
7
1. Filler Cap – Allows you to add ingredients during use. Also, you can
open to allow steam to escape when blending hot foods.
2. Jar Lid Food Chute – Seals the blender jar.
3. Jar – Made from heavy-duty glass. Has a maximum capacity of 6 cups (1.5 L).
4. Sealing Ring – Seals the jar to the multi-functional blade for leak-proof operation.
5. Multi-Functional Blade – Creates a forward and reverse action when the
Pre-Programmed settings are in use.
6. Threaded Jar Bottom
7. Jar Skirt – Allows for counter-to-table appeal and stability.
8. Sturdy Stylish Base – Holds the jar securely. Contains a powerful, reversible,
variable speed motor. It uses Pre-Programmed logic that takes the guesswork
out of creating foods and drinks.
9. Control Panel
DESCRIPTION OF THE APPLIANCE

English-4
A. (
1
2
3
3
1
)Pre-Programmed Settings –Use to select “Frozen Drinks” button (
1
2
3
3
1
) or
“Food Chop” button (
1
2
3
3
1
). Blender automatically shuts off when cycle is
nished.
B. (
1
2
3
3
1
3)Manual Controls –“High (Ice Crush)” button (
1
2
3
3
1
) – Use for max speed
or ice crushing.
C. (
1
2
3
3
1
2) Manual Controls –“Medium” button – Use for medium speed.
D. (
1
2
3
3
1
1) Manual Controls –“Low” button – Use for low speed.
E. (
1
2
3
3
1
)High Pulse Button –Press and hold to Pulse, release the button to stop.
(Pulse button will not light up.)
F. (
1
2
3
3
1)Low Pulse Button –Press and hold to Pulse, release the button to stop.
(Pulse button will not light up.)
G. (
1
2
3
3
1
)Power Button –Turns the product On and Off.
H. (
1
2
3
3
1
)Stop Button – Use to Stop the product. (Stop button will not light up.)
1
2
33
1
A
B
C
D
E
F
G
H
CONTROL PANEL

English-5
Congratulations on your purchase of an Oster®Blender.
Your product includes the following technology features:
•A user-friendly backlit touchpad design gives you the option of Pre-Programmed
Settings or Manual Controls. Try a frozen drink, smoothie, salsa or soup from the
recipe section in the instructions.
•A multi-functional blade optimises Pre-Programmed food and drink preparation.
•A powerful reversible motor keeps the ingredients near the blade by spinning at
very low speeds and gradually speeding up to the Pre-Programmed level, ensuring
optimum results from smooth to chunky.
•Manual Controlsgiveyoutheexibilitytooperatetheblenderfor
personal recipes.
•A jar lid food chute lets you add ingredients without removing the jar lid.
•Oster®Technology gives you the latest and greatest innovations by Oster®blenders
to provide the ultimate chopping and blending solution.
– Reversing Blade pulls ingredients into blades for optimal chopping,
blending and consistency.
– 6 point Star Blade for the best food chopping and ice crushing.
– Pre-programmed settings provide one-touch operation and auto shut-off
when complete.
YOUR OSTER®BLENDER FEATURES

English-6
Beforeyouusetheproductforthersttime,separatethelid,jarlid
food chute and blade from the jar. Wash in warm, soapy water or
top rack in the dishwasher. Rinse and dry well.
ASSEMBLY
1. Install the sealing ring over the multi-functional blade.
Blade is sharp. Handle with care.
2. Turn the jar upside down so the small opening is at the top.
3. Turn the multi-functional blade with sealing ring upside down
and place into the bottom of the jar.
4. Position the open end of the threaded jar bottom over
the jar and sealing ring. Turn clockwise to tighten.
Note: Be sure the threaded jar bottom is locked securely to the jar
before using.
5. Snap on jar skirt.
6. Slide the jar onto the base.
7. Plug the power cord into a standard household 220-volt,
AC outlet. You are now ready to start.
USING THE PRE-PROGRAMMED SETTINGS
1. Press the (
1
2
3
3
1
)button to turn the product on.
Thepowerlightwillash,meaningtheproductisactive
and ready to use.
2. Choose a recipe from the recipe section of this manual or use
one of your own.
3. Put the ingredients into the jar.
4. Securethellercapandjarlidfoodchute.
5. Press one of the two Pre-Programmed Setting buttons
appropriate for your recipe. “Frozen Drinks” button (
1
2
3
3
1
)
“Food Chop” button (
1
2
3
3
1
)
6. To change your selection, press (
1
2
3
3
1
)button followed by
another Pre-Programmed Setting button. Frozen Drinks (
1
2
3
3
1
) or
Food Chop (
1
2
3
3
1
).
7. Oncetheprogramisnished,theproductautomaticallystops.
Please note: You may press the (
1
2
3
3
1
) button to cancel the
program at any time. The blinking red light
indicates that the blender is ready.
8. Press (
1
2
3
3
1
) button to turn the product off.
This product is pre-programmed to turn off automatically
if not used for a period of several minutes. All lights will
turn off when the unit automatically powers down. 1
2
33
1
1
2
33
1
USING YOUR OSTER®BLENDER

English-7
1
2
33
1
USING THE MANUAL CONTROLS
The Manual Controls include:
High (
1
2
3
3
1
3) (Ice Crush (
1
2
3
3
1
) - High speed
Medium (
1
2
3
3
1
2)- Medium speed
Low (
1
2
3
3
1
1) - Low speed
High Pulse (
1
2
3
3
1
)
Low Pulse (
1
2
3
3
1)
Use these buttons for personal recipes or to
continue mixing after a Pre-Programmed Setting
is nished.
1. Press (
1
2
3
3
1
) buttontoturntheproducton.Thepowerlightwillash,
meaning the product is active and ready to use.
2. Choose a recipe from the recipe section of this manual or use one
of your own.
3. Put the ingredients into the jar.
4.Securethellercapandthejarlidfoodchute.
Using the High (
1
2
3
3
1
3)- Ice Crush (
1
2
3
3
1
) button
1. Press the High (Ice Crush) button (
1
2
3
3
1
) to run the product at a high
speed.
2. Press (
1
2
3
3
1
) button to cancel the operation at any time.
3. Press (
1
2
3
3
1
)button to turn the product off.
Using the Medium button (
1
2
3
3
1
2)
1. Press the Medium button (
1
2
3
3
1
2) to run the product at a medium
speed.
2. Press (
1
2
3
3
1
) button to cancel the program at any time.
3. Press (
1
2
3
3
1
) button to turn the product off.
Using the Low button (
1
2
3
3
1
1)
1. Press (
1
2
3
3
1
1) button to run the product at a low speed.
2. Press (
1
2
3
3
1
) button to cancel the program at any time.
3. Press (
1
2
3
3
1
) button to turn the product off.
Using the High Pulse
1. Press and hold (
1
2
3
3
1
) button.
2. Release the (
1
2
3
3
1
) button to stop.
3. Press (
1
2
3
3
1
) button to turn the product off.
Use lower pulse settings for food and higher pulse settings for drinks.
Using the Low Pulse
1. Press and hold the Low Pulse button (
1
2
3
3
1).
2. Release (
1
2
3
3
1) button to stop.
3. Press (
1
2
3
3
1
) button to turn the product off.
Use lower pulse settings for food and higher pulse settings for drinks.
1
2
33
1

English-8
After Use
1. Lift the jar with the attached jar skirt straight up from
the base, remove the lid and empty the jar.
2. If necessary, use a rubber spatula to scrape foods
away from the sides of the jar.
Cleaning
Always unplug appliance before cleaning.
Release the multi-functional blade from the
bottom of the jar skirt by turning the jar bottom
cover anti-clockwise.
Thellercap,jarlidfoodchuteandbladeare
dishwasher safe. Use the top rack of the dishwasher
for the jar lid, jar lid food chute and multi-functional blade.
Place sealing ring into bottom basket of dishwasher. You
can also wash the parts in warm, soapy water.
Rinse well and dry.
Wipe the base with a soft, damp cloth to clean. Never
submergethelowprolebaseinaliquid.Checktheparts
as you put them back together.
Storing
Reassemble the blender for storage. Leave the lid open
a gap, or slightly loose, so no odours are retained.
WARNING: Never put the jar, or any other parts, in a
microwave oven. Never store foods or drinks in the jar.
CARING AND MAINTAINING YOUR OSTER®BLENDER

English-9
Liquids
Putliquidsintothejarrst,unlesstherecipesaysotherwise.
Using the jar lid food chute
Do not remove the lid while in use. Food may splatter
ifyoudo.Instead,openthellercaptoaddsmaller
ingredients.
Working with Hot Foods or Liquids
WARNING: When you work with HOT FOODS,
remove the ller cap to vent steam. Keep hands
and other exposed skin away from the lid opening
to prevent possible burns.
When you work with HOT LIQUIDS, remove the ller
cap and start at a low speed, and then gradually
increase to a faster speed. Do not add liquid over the
1L level. Always keep hands away from steam.
Ingredient Quantities
Use only the amount of food suggested in the recipes. If you
want greater amounts, prepare in batches. Using larger amounts
may overload and strain the motor. You might also get different
results from those described.
Frequently Asked Questions
Why doesn’t the blender/food processor turn on?
•Makesurethebaseispluggedinanactivepowerreceptacle.
•Verifyblinkingredlightisactiveafterpushing
the (
1
2
3
3
1
) button.
How can I prevent liquids from leaking out?
Check to see that the sealing ring is correctly assembled in between
the multi-functional blade and the jar.
BLENDING TIPS

English-10
Note: These recipes have been optimised with the Pre-Programmed Settings.
When experimenting with your own recipes you may choose to stop the
Pre-Programmed Setting at any time by hitting the (
1
2
3
3
1
) button or you
may run the cycle more than once if a smoother result is desired.
Frozen Drinks
FROZEN MARGARITA Makes 4 servings
4 oz. gold tequila
2 oz. orange and cognac liqueur
2 Tbsp. fresh lime juice
40g sugar
300g ice
Garnish: Extra lime juice and salt for coating glass rims
1. In jar, place ingredients in order given above.
2. Cover jar with lid. Press (
1
2
3
3
1
) button, then press (
1
2
3
3
1
) button.
3. Dip rim of stemmed glasses in lime juice then in salt; pour drink into glasses.
Creative Cook’s Note: If desired, granulated sugar can be used in place of salt.
Note:Forasmoothernish,usethe(
1
2
3
3
1
) button 3 to 4 times after the frozen
drink cycle is complete.
STRAWBERRY DAIQUIRI Makes 4 servings
1 can (6 oz.) frozen limeade concentrate
5 oz. rum
100g whole strawberries with stems removed
1 Tbsp. sugar
350g ice
Garnish: Small whole strawberries and lime slices
1. In jar, place ingredients in order given above.
2. Cover jar with lid. Press (
1
2
3
3
1
) button, then press (
1
2
3
3
1
) button.
3. Pour into stemmed glasses.
4. Garnish, if desired, with strawberry and lime slice.
Creative Cook’s Note: For variety, substitute fresh raspberries, blackberries or cubed
mango in equal amounts for the strawberries.
Note:Forasmoothernish,usethe(
1
2
3
3
1
)button 3 to 4 times after the frozen drink cycle
is complete.
RECIPES

English-11
PIÑA COLADA Makes 4 servings
230ml pineapple juice
6 oz. golden rum
575ml cream of coconut
1 tsp. lemon juice
200g ice
Garnish: Pineapple slices, maraschino cherries
1. In jar, place ingredients in order given above.
2. Cover jar with lid. Press (
1
2
3
3
1
) button, then press (
1
2
3
3
1
) button.
3. Pour into tall glasses.
4. Garnish, if desired, with pineapple slice and cherry.
Note:Forasmoothernish,usethe(
1
2
3
3
1
)button 3 to 4 times after the frozen drink cycle
is complete.
Smoothies and Shakes
STRAWBERRY SHAKE Makes 2 servings
8 to 10 medium fresh, ripe strawberries with stems removed
230ml milk
475ml strawberry ice cream
1.Injar,placeingredientsinordergivenabove.Putberriesinrst!
2. Cover jar with lid. Press (
1
2
3
3
1
) button, then press (
1
2
3
3
1
) button.
3. Pour into tall glasses.
CHOCO-PEANUT BUTTER SHAKE Makes 2 servings
230ml milk
475ml chocolate ice cream
40g peanut butter
¼ tsp. vanilla
1. In jar, place ingredients in order given above.
2. Cover jar with lid. Press (
1
2
3
3
1
) button, then press (
1
2
3
3
1
) button.
3. Pour into tall glasses.
BRANDY ALEXANDER Makes 4 servings
3 Tbsp. milk
4 oz. crème de cacao
2 oz. brandy
475ml vanilla ice cream
1. In jar, place ingredients in order given above.
2. Cover jar with lid. Press (
1
2
3
3
1
) button, then press (
1
2
3
3
1
) button.
3. Pour into stemmed glasses.

English-12
HONEY-VANILLA BLAST Makes 1 serving
230ml fat-free milk
230ml (8 oz.) fat free vanilla yogurt
3 chunks frozen banana, about 1 medium
40g protein powder
2 Tbsp. honey
1. In jar, place ingredients in order given above.
2. Cover jar with lid. Press (
1
2
3
3
1
) button, then press (
1
2
3
3
1
) button.
3. Pour into tall glass to serve.
MORNING MOCHA SMOOTHIE Makes 1 serving
120ml fat-free milk
230ml (8 oz.) low-fat coffee yogurt
2 Tbsp. chocolate syrup
6 ice cubes
1. In jar, place ingredients in order given above.
2. Cover jar with lid. Press (
1
2
3
3
1
) button, then press (
1
2
3
3
1
) button.
3. Pour into tall glass to serve.
VERY BERRY SMOOTHIE Makes 1 serving
230ml orange juice
120ml vanilla low-fat yogurt
100g frozen mixed berries
2 frozen banana chunks, about 1 small
2 Tbsp. honey
1. In jar, place ingredients in order given above.
2. Cover jar with lid. Press (
1
2
3
3
1
) button, then press (
1
2
3
3
1
) button.
3. Pour into tall glass to serve.
TROPICAL POWER PUNCH SMOOTHIE Makes 2 servings
1 can (6 oz.) pineapple juice
1 can (8 oz.) crushed pineapple
100g mango sorbet
½ tsp. coconut extract
100g ice
1. In jar, place ingredients in order given above.
2. Cover jar with lid. Press (
1
2
3
3
1
) button, then press (
1
2
3
3
1
) button.
3. Pour into tall glasses to serve.

English-13
Salsas
GARDEN FRESH SALSA Makes 2 cups
½ small onion, cut into 4 pieces
¼ green pepper, cut into 4 pieces
½ cucumber, cut into quarters
1 large garlic clove
12 oz. (4-5) plum tomatoes, cut each into eighths
3 Tbsp. red wine vinegar
1 tsp. Worcestershire sauce
1/8 tsp. hot pepper sauce
Salt and Pepper to taste
Tortilla chips for serving
1. In jar, place ingredients, except tortilla chips, in order given above.
2. Cover jar with lid. Press (
1
2
3
3
1
) button, then press (
1
2
3
3
1
) button.
3. Pour into bowl; serve with tortilla chips.
FIERY RED SALSA Makes 3 cups
2 large garlic cloves
1 can (15 oz.) whole tomatoes, drained
1 medium onion, cut into quarters
½ cup cilantro leaves
1-4 jalapeno peppers, quartered
½-1 tsp. sugar
Salt to taste
1 Tbsp. lime juice
1 can (15 oz each) whole tomatoes, drained
Tortilla chips for serving
1. In jar, place ingredients, except tortilla chips, in order given above. (Note: Place one
can of tomatoes in after garlic cloves and second can after rest of ingredients are
added. Also, place onion in middle of jar to avoid blockage.)
2. Cover jar with lid. Press (
1
2
3
3
1
) button, then press (
1
2
3
3
1
) button.
3. Pour into bowl; serve with tortilla chips.
Creative Cook’s Note: When handling hot peppers, such as jalapeños, use rubber
gloves and keep hands away from your eyes.

English-14
SALSA VERDE Makes 1½ cups
½ small onion, cut into 4 pieces
½ small green pepper, cut into 4 pieces
2 garlic cloves
40g cilantro leaves
½ tsp. ground cumin
¼ tsp. green hot pepper sauce
1/8 tsp. salt
12 oz. (8-9) tomatillos, roasted, husks removed
Tortilla chips for serving
1. In jar, place ingredients, except tortilla chips, in order given above.
2. Cover jar with lid. Press (
1
2
3
3
1
) button, then press (
1
2
3
3
1
) button.
3. Pour into bowl; serve with tortilla chips.
Notes:Workedneonchopcycle.12oz.oftomatillosisabout8or9.
Soups and Foods
CREAM OF TOMATO SOUP Makes 4 servings
4-5 medium ripe tomatoes, cut in quarters
1 small onion, cut in quarters
3-4 fresh basil leaves
2 Tbsp. butter
½ tsp. salt
230ml milk
1. Place tomatoes, onion and basil in the jar.
2. Cover jar with lid. Press (
1
2
3
3
1
) button, then press (
1
2
3
3
1
) button.
3. Pour processed mixture into 3 qt. saucepan. Add butter, salt and milk.
4. Stir while gently heating to 145°F; do not let soup boil.
PEACHY APPLESAUCE Makes 1¼ cups
1 large apple, peeled, cored and quartered
1 large peach, pitted, peeled and quartered (If out of season, use 2 canned peach
halves.)
2 Tbsp. water
1. In small saucepan, cook fruits in water 5-8 minutes or until very tender.
2. In jar, place fruits and liquid.
3. Cover jar with lid. Press (
1
2
3
3
1
) button, then press (
1
2
3
3
1) button 3 or 4 times, then High
Pulse button (
1
2
3
3
1
) until smooth.
4. Remove from jar; place in covered containers.
5. Chill or freeze at once.

English-15
GREEN PEA BABY FOOD Makes 1½ cups
1 pkg. (10 oz.) frozen baby green peas
170ml cup water
1. In small saucepan, cook peas in water 10-15 minutes or until very tender.
2. In jar, place peas and liquid.
3. Cover jar with lid. Press (
1
2
3
3
1
) button, then press (
1
2
3
3
1
) button.
4. Remove from jar. Place in covered containers.
5. Chill or freeze at once.
HONEY-WHEAT PANCAKES Makes 12 pancakes
300ml cups low-fat buttermilk
2 eggs
2 Tbsp. honey
350ml cups reduced-fat buttermilk baking mix
50gwhole-wheatour
25g honey-crunch wheat germ
1 tsp. baking powder
Butter and syrup for serving
1. In jar, place ingredients in order given above.
2. Cover jar with lid. Press (
1
2
3
3
1
) button, then press (
1
2
3
3
1
) button 8-10 times. When done,
scrape jar and stir in the batter lightly.
3. For each pancake, pour about ¼ cup batter onto preheated griddle; cook until tops
begin to bubble; turn over and continue to cook until golden.
4. Serve hot with butter and syrup.

English-16
EUROPE GUARANTEE
Please keep your receipt as this will be required for any claims under this guarantee.
This appliance is guaranteed for 2 years after your purchase as described in this
document.
During this guaranteed period, if in the unlikely event the appliance no longer functions
due to a design or manufacturing fault, please take it back to the place of purchase, with
your till receipt and a copy of this guarantee.
Therightsandbenetsunderthisguaranteeareadditionaltoyourstatutoryrights,which
are not affected by this guarantee. Only Holmes Products (Europe) Ltd. (“Holmes”) has
the right to change these terms.
Holmes undertakes within the guarantee peri od to repair or replace the appliance, or any
part of appliance found to be not working properly free of charge provided that:
• youpromptlynotifytheplaceofpurchaseorHolmesoftheproblem;.and
• theappliancehasnotbeenalteredinanywayorsubjectedtodamage,misuse,
abuse, repairor alteration by a person other than a person authorised by Holmes.
Faults that occur through, improper use, damage, abuse, use with incorrect voltage,
acts of nature, events beyond the control of Holmes, repair or alteration by a person
other than a person authorised by Holmes or failure to follow instructions for use are not
covered by this guarantee. Additionally, normal wear and tear, including, but not limited
to, minor discoloration and scratches are not covered by this guarantee.
The rights under this guarantee shall only apply to the original purchaser and shall not
extend to commercial or communal use.
Ifyourapplianceincludesacountry-specicguaranteeorwarrantyinsertpleaserefer
to the terms and conditions of such guarantee or warranty in place of this guarantee or
contact your local authorised dealer for more information.
This marking indicates that this product should not be disposed with other household
wastes and should be disposed separately throughout the EU. To prevent
possible harm to the environment or human health from uncontrolled waste
disposal due to the presence of hazardous substances within the product,
recycle it responsibly to promote the sustainable reuse of materials and
resources. To return your used device, please use the return and collection
systems available to you or contact the retailer where the product was purchased. They
can take this product for environmentally safe recycling.
Holmes Products (Europe) Limited
1 Francis Grove
London
SW19 4DT
UK

Français-1
L’utilisation d’appareils électriques requiert certaines précautions élémentaires d’emploi, en
particulier:
LIRE SOIGNEUSEMENT TOUTES LES INSTRUCTIONS AVANT D’UTILISER VOTRE
MELANGEUR.
1. Eteindre et débrancher votre mélangeur après usage et avant de le nettoyer.
2. Pour éviter tout risque d’électrocution, ne pas plonger le fil électrique, la prise électrique
ou la base de l’appareil dans l’eau ou tout autre liquide.
3. NE PAS laisser le fil électrique pendre sur le bord d’une table ou d’un comptoir, ni le
mettre en contact avec des surfaces chaudes.
4. Ne jamais laisser l’appareil sans surveillance pendant son usage.
5. Les enfants doivent être sous surveillance pour s’assurer qu’ils ne jouent pas avec
l’appareil.
6. Eviter tout contact avec les éléments en mouvement. Maintenir mains et ustensiles hors
du récipient durant le fonctionnement afin de réduire les risques de blessure et pour ne
pasendommagerlemélangeur.Vouspouvezutiliserunespatuleencaoutchouclorsque
le mélangeur n’est pas en service.
7. La lame est coupante. Utiliser avec précaution. Faire attention quand vous manipulez les
lames aiguisées, lorsque vous videz le récipient et pendant le nettoyage.
8. Toujours mettre le couvercle sur le récipient avant la mise en marche.
9. NE PAS utiliser cet appareil lorsque le fil électrique ou la fiche électrique est
endommagé, ni lorsque cet appareil ne fonctionne pas normalement, qu’il est tombé ou
qu’il a subi quelque dommage que ce soit. En cas de contrôle, réparation, ou réglage
électrique ou mécanique, veuillez retourner cet appareil uniquement au Centre de
Service Autorisé le plus proche de chez vous.
10. NE PAS utiliser à l’extérieur, n’est pas destiné à un usage commercial. Cet appareil est
uniquement destiné à un usage domestique.
11. NE PAS se servir de cet appareil pour d’autres usages que ceux pour lesquels il a été
conçu, tel qu’il est écrit dans ce mode d’emploi.
12. Lorsque vous mélangez des liquides brûlants, retirer la pièce centrale du couvercle.
13. Pour éviter tout risque de blessure, ne jamais mettre les lames sur la base sans avoir
mis le récipient correctement en place.
14. Toujours utiliser sur une surface plane.
15. Débranchez le mélangeur quand il ne sert pas, avant de monter ou de démonter toute
pièce et avant de le nettoyer.
16. Sunbeam Products, Inc., qui fait commerce sous le nom de Jarden Consumer Solutions
ne recommande pas l’utilisation de pièces, accessoires ou récipients autres que ceux
fabriqués par ce fabricant, cela pourrait provoquer des blessures corporelles.
17. NE PAS utiliser l’appareil de manière continue pendant plus de 3 minutes.
18. Cet appareil n’est pas conçu pour être utilisé par des personnes (y compris des enfants)
aux capacités physiques, sensorielles ou mentales réduites, ou par des personnes
manquant d’expérience ou de connaissances, à moins qu’elles ne soient encadrées par
une personne responsable de leur sécurité qui puisse leur expliquer comment utiliser
l’appareil.
CET APPAREIL EST UNIQUEMENT DESTINE A UN USAGE DOMESTIQUE.
La capacité électrique maximale de cet appareil est basée sur l’accessoire qui requiert le plus
de puissance. Il est possible que d’autres accessoires en requièrent moins.
IMPORTANTES MESURES DE SÉCURITÉ

Français-2
CONSERVER CES INSTRUCTIONS
INSTRUCTIONS RELATIVES AU FIL ÉLECTRIQUE
Veuillezsuivrelesinstructionsci-dessouspourassureruneutilisationentoutesécurité
du fil électrique.
• NE PAS vous servir d’une rallonge avec cet appareil.
• NE PAS tirer brusquement sur le fil, ne pas l’entortiller et ne pas le maltraiter.
• Encasdedétériorationdufiloudelaprised’alimentation,seullefabricant,un
représentant du service après-vente ou une personne agréée sont habilités à
remplacer la pièce endommagée pour éviter tout danger.

Français-3
1. Cheminée à couvercle – Permet d’ajouter des ingrédients durant le fonctionnement.
Ouverte, elle laisse échapper la vapeur lors du mélange d’aliments chauds.
2. Couvercle du récipient – Ferme le récipient.
3. Récipient – En verre très résistant, il a une capacité maximale de 6 tasses (1,5 L).
4. Joint d’étanchéité – Assure l’herméticité de l’ensemble couteau et récipient.
5. Couteau multifonction – Tourne dans un sens et dans l’autre lorsque les réglages
programmés sont sélectionnés.
6. Fond leté du récipient
7. Support du récipient – Garantit l’esthétique et la stabilité sur le comptoir.
8. Socle-moteur robuste – Tient fermement le récipient. Contient un moteur puissant,
réversible et à vitesse variable. Sa logique programmée évite les devinettes dans la
préparation d’aliments et de boissons.
9. Tableau de commande – (instructions plus detallées sur la page suivante)
DESCRIPTION DE L’APPAREIL
1
2
3
4
6
5
9
8
7
Table of contents
Languages:
Other Oster Blender manuals

Oster
Oster BLSTUS User manual

Oster
Oster BLSTMG User manual

Oster
Oster BLSTCP User manual

Oster
Oster BLSTEG7881C User manual

Oster
Oster BLSTEG7890B Instruction Manual

Oster
Oster BEST02-E01 User manual

Oster
Oster 4094 User manual

Oster
Oster 2612-049 User manual

Oster
Oster Texture Select Pro Series User manual

Oster
Oster 6641 User manual

Oster
Oster OPB9000 Operational manual

Oster
Oster OSTERIZER BLENDER/LIQUEFIER Manual

Oster
Oster BLSTPYG1209B User manual

Oster
Oster BLSTVB-071 User manual

Oster
Oster IN2ITIVETM 6710 User manual

Oster
Oster BLSTDP-W00 User manual

Oster
Oster Fusion User manual

Oster
Oster 6800 User manual

Oster
Oster XPERT Series User manual

Oster
Oster OSTERIZER User manual