manuals.online logo
Brands
  1. Home
  2. •
  3. Brands
  4. •
  5. Palram
  6. •
  7. Greenhouse Kit
  8. •
  9. Palram Grow&Store - 6'x12' User manual

Palram Grow&Store - 6'x12' User manual

Instrucciones de Montaje
Assembly Instructions
Grow&Store - 6’x12’
English_Spanish_xxxxx
366x185x209cm / 144"x72¾"x82¼"
www.palramapplications.com
Company information:
Palram Americas Inc.
9735 Commerce Parkway
Kutztown, PA, USA
Greenhouse Service Center:
Toll Free: (877) 627-8476
E-Mail: [email protected]
IMPORTANT
Please read these instructions carefully before you start to assemble this greenhouse.
Keep these instructions in a safe place for future reference.
a Customer Service
For assistance with assembly or for replacement parts – please log onto our website
or call our service line (number is on the title page).
Additional information can be found at our website: www.palramapplications.com
a Safety Advice
•It is of utmost importance to assemble all of the parts according to the directions.
Do not skip any step.
•We strongly recommend using work gloves during assembly.
•Always wear shoes and safety goggles when working with extruded aluminium.
•If using a step ladder or power tools ensure that you follow the manufacturer’s safety
advice.
•Do not touch overhead power cables with the aluminium profiles.
•Do not attempt to assemble the greenhouse in windy or wet conditions.
•Dispose of all plastic bags safely keep them out of reach of small children.
•Keep children away from the assembly area.
•Do not lean against or push the greenhouse during construction.
•Do not position your greenhouse in an area exposed to excessive wind.
•Do not attempt to assemble this greenhouse if you are tired, have taken drugs or
alcohol or if you are prone to dizzy spell.
•Hot items such as recently used grills, blowtorches etc. must not be stored in the
greenhouse. Ensure there are no hidden pipes or cables in the ground before
inserting the pegs.
•This product is designed to use as greenhouse only.
a Care & Maintenance
When your greenhouse needs to be cleaned, use a mild detergent solution and rinse with
cold clean water. DO NOT use acetone, abrasive cleaners or other special detergents to
clean the clear panels. It is recommended to check periodically that
roof panels caps (plastic part 329 & profile 981) are set in place.
a Tools & Equipment
•Tape measure
•Work gloves
•Lubricant
•Phillips head screwdriver
•Step ladder
•Drill bit
a Before Assembly
This is a multi-part assembly best achieved
by two people. Allow at least half a day for
assembly process.
Selecting a site - the greenhouse must be ,
positioned and fixed on a flat level surface.
Choose a sunny position away from
overhanging trees.
We are strongly recomend to fix your
greenhouse directly to a solid concrete
foundation. When doing that use the pre
drilled holes in the metal base supplied.
Take out all components parts of the
packages. Sort the parts and check against the
contents parts list.
During assembly parts should be laid out close
at hand. Keep all small parts (screws etc.) in a
bowl so they do not get lost.
In purpose to facilitate parts’identification
and assembly process, all-positioned profiles
are used in this greenhouse. As a result some
apertures in the profiles are not
used during assembly.
•Large hammer
•Spanner
•T001 - Special tool for Screws 411 and nuts 412
EN
•Screws 411 and nuts 412 are used throughout the assembly process.
•Screws 411 are to be assembled from the outside and nuts 412 from the inside of the
greenhouse.
•If not specified otherwise, do not fasten screws and nuts (411 & 412) more than 2-3 turns
only. Do not tighten them until completion of the panels’assembly.
These 2 icons indicate if screws’ tightening is required or not.
•However, in some steps, temporary tightening of a few screws may be needed to prevent
a profile from falling till it will be fully connected in the next steps.
a During Assembly
Carry out the assembly steps in the order set
out in the instructions.
Step 1: Make sure the base is square by
measuring the diagonals and level by
using a spirit level.
Steps 8, 9, 12: The oval hole in the crossbars
A256 should always be assembled
to the base of the greenhouse.
Door assembly (Steps 7, 56-63)
Door can be installed as a left hand door
or right hand door to your decision. These
instructions show a right hand door assembly.
Step 7: determines door direction
door post 987 is where door hinges will
be located.
Steps 56-63: Door assembly should be
done according to this decision.
Steps 41: Decide on the window’s location
before assembly. Window can be installed in
one of the indicated options.
Step 65: Firmly connect the greenhouse
to a level final position immediately after
completion of the assembly.
IMPORTANTE
Por favor, lea estas instrucciones cuidadosamente antes de empezar a montar este
invernadero.
Mantenga estas instrucciones en un lugar seguro para referencia futura.
a Servicio de Ayuda al Cliente
Para obtener ayuda con el montaje o para las piezas de recambio - por favor entre a nuestro
sitio web o llame a nuestra línea de servicio (el número está en la página de título).
Información adicional se puede encontrar en nuestro sitio web: www.palramapplications.com
a Consejo de Seguridad
•Es de suma importancia montar todas las partes de acuerdo con las instrucciones.
No se salte ningún paso.
•Recomendamos firmemente el uso de guantes de trabajo durante el montaje.
•Use siempre zapatos y gafas de seguridad al trabajar con aluminio extruido.
•Al usar una escalera plegable o herramientas eléctricas asegúrese de que sigue las
instrucciones de seguridad de los fabricantes.
•No toque los cables eléctricos aéreos con los perfiles de aluminio.
•No intente montar el invernadero en días de viento o días con humedad.
•Disponga todas las bolsas plásticas en lugar seguro - guárdelas fuera del alcance
de niños.
•Mantenga a los niños fuera del área de montaje.
•No se apoye ni empuje el invernadero durante la construcción.
•No coloque su invernadero en un área expuesta al viento excesivo.
•No intente montar este invernadero si usted está cansado, ha tomado drogas o alcohol
o si usted es propenso a ataques de mareo.
•Artículos calientes recientemente usados tales como parrillas, sopletes etc. no deben
ser almacenados en el invernadero. Asegúrese de que no haya ninguna tubería o cables
ocultos en la tierra antes de insertar las clavijas.
•Este producto es designado a ser usado solamente como invernadero.
a Cuidados & Mantenimiento
Cuando su invernadero necesite limpieza, utilice una solución detergente suave y enjuague
con agua limpia fría. NO UTILICE acetona, limpiadores abrasivos u otros detergentes
especiales para limpiar los paneles. Se recomienda comprobar periódicamente que los
paneles del techo>tapones (parte de plástico 329 y perfil 981) están colocados en el lugar.
a Herramientas & Equipos
•Cinta métrica
•Broca
•Guantes de trabajo
•Martillo grande
•Lubricante
•Llave inglesa
a Antes del Montaje
Esto es un montaje de varias partes, mejor
ejecutado por dos personas. Dé un plazo de por
lo menos medio día para el proceso de montaje.
Seleccionar un sitio – el invernadero debe ser
montado, posicionado y fijo en una superficie
plana.
Elija un lugar soleado lejos de árboles con
ramas colgantes.
Recomendamos firmemente que fije su
invernadero directamente a una fundación
de concreto sólido. Al hacer esto, utilice los
agujeros preperforados en la base de metal
proveída.
Saque todas las partes componentes de los
paquetes. Clasifique las partes y compruebe
contra la lista del contenido.
Durante el montaje las partes deben ser
colocadas cerca del alcance de la mano.
Guarde todas las piezas pequeñas (tornillos
etc.) en un tazón para que no se pierdan.
En el propósito de facilitar la identificación de
las partes y el proceso de montaje, todos los
perfiles posicionados son usados
en este invernadero.
Consecuentemente algunas
aberturas en los perfiles no
son utilizadas durante
el montaje.
a Durante el Montaje
Ejecute los pasos del montaje en el orden
indicado en las instrucciones.
Paso 1: Cerciórese de que la base sea
cuadrada midiendo las diagonales y el nivel
usando un nivel de burbuja.
Pasos 8, 9, 12: El agujero oval en las
barras transversales A256 debe ser siempre
montado a la base del invernadero.
Montaje de la puerta (Pasos 7, 56-63)
La puerta puede ser instalada como una
puerta de mano izquierda o derecha a su
decisión. Estas instrucciones muestran un
montaje de puerta de mano derecha.
Paso 7: determina la dirección de la
puerta; la jamba 987 de la puerta es
donde las bisagras serán ubicadas.
Pasos 56-63: El montaje de la puerta debe
ser realizado según esta decisión.
Pasos 41: Decida sobre la localización de
la ventana antes del montaje. La ventana
puede ser instalada en una de las opciones
indicadas.
Paso 65: Conecte firmemente el
invernadero a un nivel de posición final
inmediatamente después de la finalización
de la asamblea.
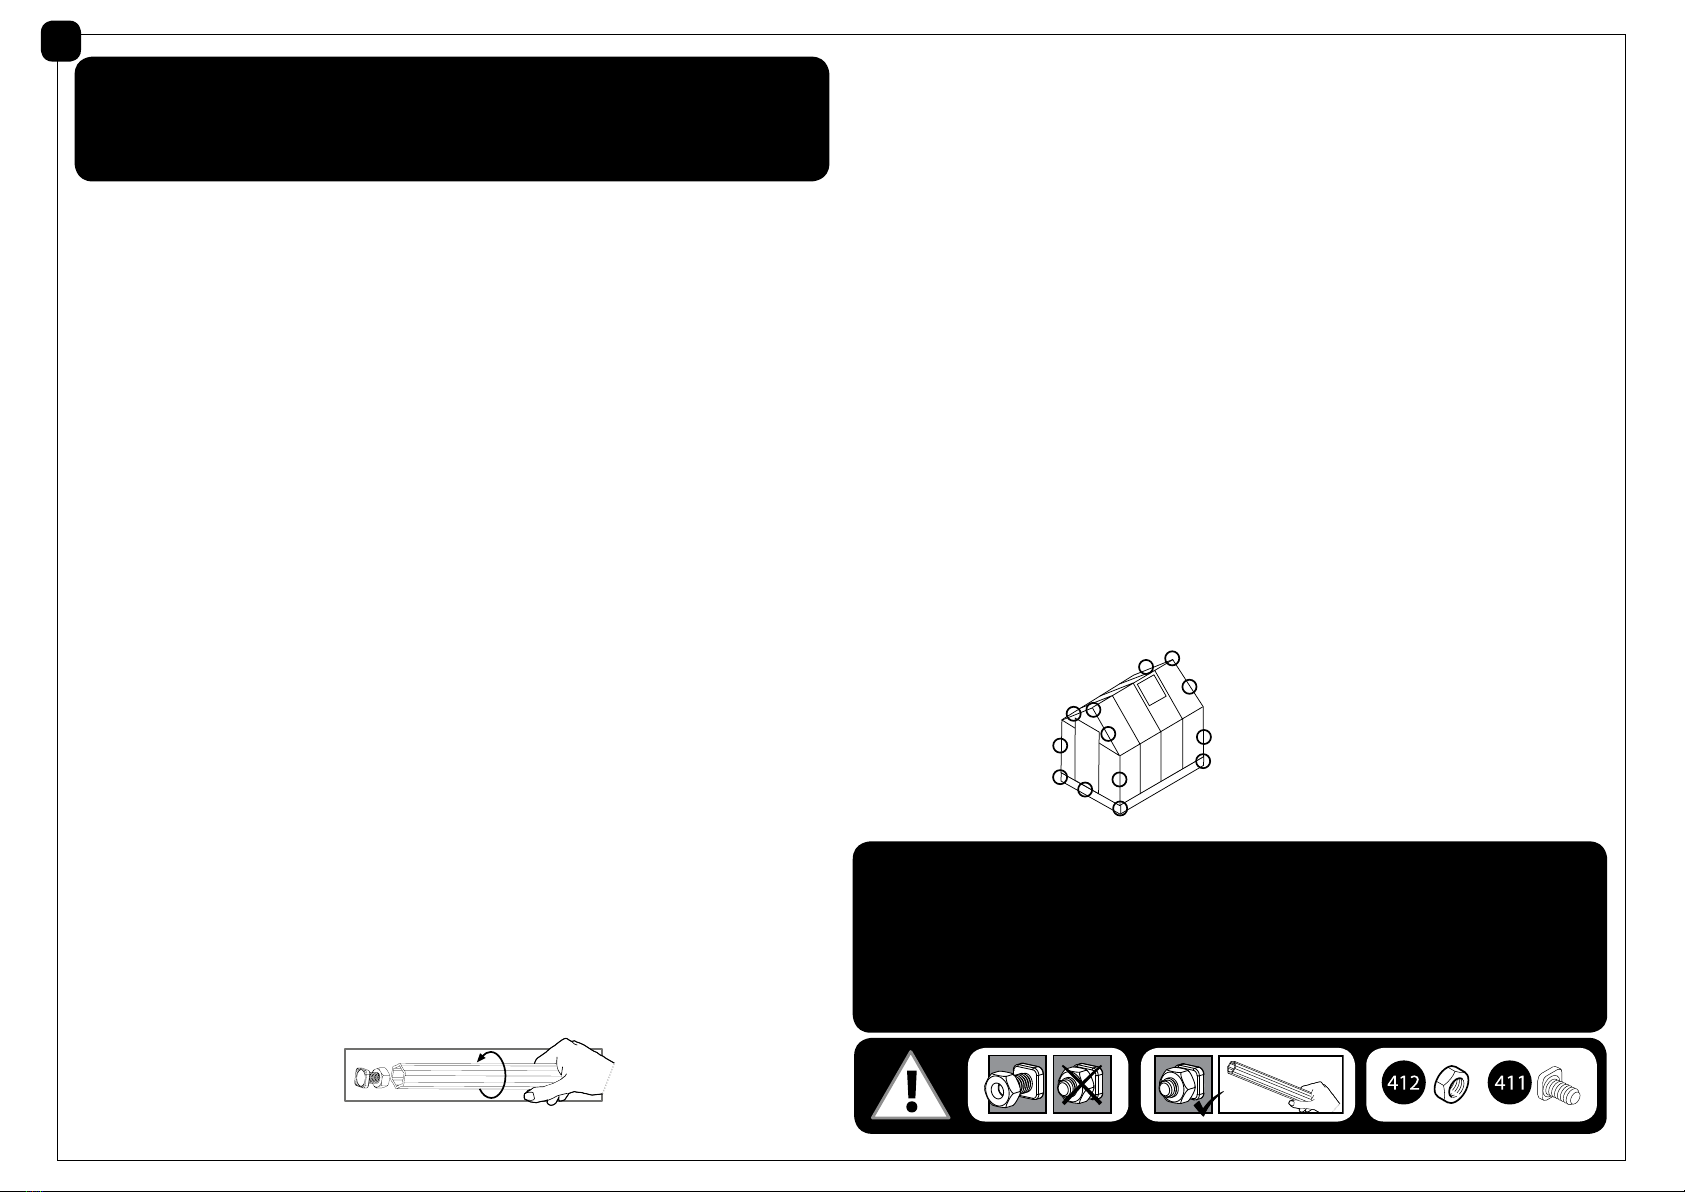
Los tornillos 411 y las tuercas 412 son usados durante todo el proceso de montaje.
l
Los tornillos 411 deben ser montados desde el exterior y las tuercas 412 desde el
interior del invernadero.
lNo apriete los tornillos y tuercas (411 y 412) más de 2-3 vueltas. No los apriete hasta
terminar el montaje de los paneles, a menos que orientado de otra manera.
lSin embargo, en algunos pasos, el ajuste temporal de algunos tornillos puede ser
necesario para evitar que un perfil caiga hasta que sea conectado completamente en
los pasos siguientes.
SP
•Escalera plegable
•Destornillador cabeza de tornillo Phillips
•T001 – Herramienta especial para
Tornillos 411 y Tuercas 412
Item Qty. Item Qty.
985 4
Contents
996 8
256 8
994 1
7169 1
962 2
961 4
995 1
988 2
987 2
7168 4
Item Item Qty.Qty.Item Qty.
Contents
318 (PVC)
23
(+1)
2
7009 (PVC) (+1)
292 2
4037 2
T001 1
973 2
972 4
328
32
(+3)
999 4
981 12
993 20
983 2
986 2
7170 3
3017
3016
2
2
992 2
984 4
Item Qty. Item Qty. Item Qty.Item Qty.
Contents
08 2
288 4
07 1
7172 7
7163 4
7162 9
7011 10
567 2
7173 2
17161
96 6
990 1
989 1
991 1
126 2
286 4
06 1
570 2
560 1
7165 2
7164 2
7166 2
559 1
447
8
(+1)
4008 16
(+1)
422
16
(+2)M4
411
152
(+13)
M6
461
6
(+1)M6
465
16
(+2)
M4
4043
10
(+1)
412 156
(+9)
M6
463
462
464
4
4
8
7083 2
7084 2
7085 2
7086 2
7088 2
423 2
Qty.Item
M4 x 50mm
M4
343 2
329 10
344L 2
344R 2
22
99 1
22 2
Qty.Item Qty.Item Item Qty.
Contents
b
a
b
a
185
cm /
723/4
”
185
cm /
723/4
”
372
cm /
1461/2
”
372
cm /
1461/2
”
0 1 2 3 4
b
a=b
a=
1
x4
x2
x4
x4
961
961
961
126
126
412
411
a
b
412
411
126
961
961
x2
a
b
2
x2
x4 x4
x4
962
447
962
962
411
412
962
962
962
a
a
a
a
a
b
b
b
b
b
x2
961
961
+
+
+
+
447
7169
a
a
b
b
3
x2 x2
x1
4117169 412
7169
7169
a
b
412
411
4
4008
x2
4008
7169
a
a
a
7169
5
x8
x8x4
996
411
412
996
996
996
996
996
412
411
6
x12
x12
411
412
412
411
412
411
a
988 /987
7
aa
aa
987
988
987
987
or
x2
x2
987
988
988
987
8
x8
x8
411
412
256
256
256
256
a
a
c
c
c
b
b
b
286
a
x2
x2
256
286
9
x2
x2
256
286
cc
286
256
b
c
256
a
a
a
b
b
286
286
256
x8
x8
411
412
256
10
x2
7011
x2
7162
b
a
7011 7162
/
7011 7162
/
c
b
7011
7011
7162
7162
c
c
c
c
a
x4
411
11
x4
993
993
993
993
993
993
993
x3
b
b
b
b
a
a
a
a
a
b
411
12
x4
x8
x4
411
412
256
256
a
a
a
a
256
256
256
256
256
b
b
b
b
a
b

Other manuals for Grow&Store - 6'x12'

1

Other Palram Greenhouse Kit manuals

Palram CANOPIA OASIS 12 3.2x3.6 Administrator Guide

Palram

Palram CANOPIA OASIS 12 3.2x3.6 Administrator Guide

Palram Hybrid 7290103110888 User manual

Palram

Palram Hybrid 7290103110888 User manual

Palram Snap & Grow 8x8 User manual

Palram

Palram Snap & Grow 8x8 User manual

Palram Octave 8x12 User manual

Palram

Palram Octave 8x12 User manual

Palram CANOPIA MAJORCA Administrator Guide

Palram

Palram CANOPIA MAJORCA Administrator Guide

Palram Victory Orangery - Garden Chalet User manual

Palram

Palram Victory Orangery - Garden Chalet User manual

Palram Glory Standard User manual

Palram

Palram Glory Standard User manual

Palram 121L x 62W x 148H cm User manual

Palram

Palram 121L x 62W x 148H cm User manual

Palram CANOPIA HARMONY 6x8 / 2x2.5 Administrator Guide

Palram

Palram CANOPIA HARMONY 6x8 / 2x2.5 Administrator Guide

Palram Glory 8'x8' User manual

Palram

Palram Glory 8'x8' User manual

Palram GLORY 6'x8' User manual

Palram

Palram GLORY 6'x8' User manual

Palram Mythos User manual

Palram

Palram Mythos User manual

Palram Mythos 6x4 User manual

Palram

Palram Mythos 6x4 User manual

Palram Americana User manual

Palram

Palram Americana User manual

Palram Plant Inn User manual

Palram

Palram Plant Inn User manual

Palram CANOPIA AMERICANA 12x12 / 3.7x3.7 Administrator Guide

Palram

Palram CANOPIA AMERICANA 12x12 / 3.7x3.7 Administrator Guide

Palram Oasis Hex Greenhouse User manual

Palram

Palram Oasis Hex Greenhouse User manual

Palram Lean To Grow House 4x2 User manual

Palram

Palram Lean To Grow House 4x2 User manual

Palram Harmony 6x8 User manual

Palram

Palram Harmony 6x8 User manual

Palram Victory Orangery User manual

Palram

Palram Victory Orangery User manual

Palram Bella 8'x8'- TwinWall Glazing User manual

Palram

Palram Bella 8'x8'- TwinWall Glazing User manual

Palram Glory 8'x8' User manual

Palram

Palram Glory 8'x8' User manual

Palram Harmony Mythos Hybrid 6x4 User manual

Palram

Palram Harmony Mythos Hybrid 6x4 User manual

Palram Canopia LEAN TO 702969 Administrator Guide

Palram

Palram Canopia LEAN TO 702969 Administrator Guide

Popular Greenhouse Kit manuals by other brands

Infloria GS010999 Assembly instructions

Infloria

Infloria GS010999 Assembly instructions

Gardeners Grow House 8587233 manual

Gardeners

Gardeners Grow House 8587233 manual

juwel 20150 Assembly instructions

juwel

juwel 20150 Assembly instructions

GrowSpan 2000 Series quick start guide

GrowSpan

GrowSpan 2000 Series quick start guide

Halls SILVERLINE 86 LEAN TO manual

Halls

Halls SILVERLINE 86 LEAN TO manual

GrowSpan Canopy-Top Cold Frame Series manual

GrowSpan

GrowSpan Canopy-Top Cold Frame Series manual

Juliana Premium 8,8 Assembly instruction

Juliana

Juliana Premium 8,8 Assembly instruction

Forest garden MGHFP quick start guide

Forest garden

Forest garden MGHFP quick start guide

Juliana Senior manual

Juliana

Juliana Senior manual

Robinson 5' Lean-To Assembly instructions

Robinson

Robinson 5' Lean-To Assembly instructions

Vitavia Freya 5900 Assembly instructions

Vitavia

Vitavia Freya 5900 Assembly instructions

Sproutwell REGATTA Assembly instructions

Sproutwell

Sproutwell REGATTA Assembly instructions

Winter Gardenz PG0812H Assembly manual

Winter Gardenz

Winter Gardenz PG0812H Assembly manual

G21 Hotbed G21 GZ11 XL manual

G21

G21 Hotbed G21 GZ11 XL manual

BCG Traditional Series instructions

BCG

BCG Traditional Series instructions

CLIMA POD Virtue Assembly instructions

CLIMA POD

CLIMA POD Virtue Assembly instructions

Vitavia Hera 4500 Assembly instructions

Vitavia

Vitavia Hera 4500 Assembly instructions

VOLYA DACHNAYA-STRELKA 2011 Assembly manual

VOLYA

VOLYA DACHNAYA-STRELKA 2011 Assembly manual

manuals.online logo
manuals.online logoBrands
  • About & Mission
  • Contact us
  • Privacy Policy
  • Terms and Conditions

Copyright 2025 Manuals.Online. All Rights Reserved.