PayFacto AMP 8200 Quick guide
AMP 8200
Configuration and Setup Guide
April, 2022

Contents
Introduction............................................................................................................................................... 3
Terminal Overview ................................................................................................................................... 4
AMP8200 Terminal Overview............................................................................................................. 4
Terminal Hardware .............................................................................................................................. 5
Terminal Setup and Configuration............................................................................................................ 6
Installing the Printer Paper................................................................................................................... 6
Charging the Terminal.......................................................................................................................... 8
Configuring the Terminal Display Language..................................................................................... 10
Configuring the Terminal Network Connections............................................................................... 11
Installing the SIM Card...................................................................................................................... 12
Configuring the Terminal Wi-Fi Connection ..................................................................................... 14
Working with the Terminal ..................................................................................................................... 15
Powering the Terminal On or Off ...................................................................................................... 15
Terminal Input Options ...................................................................................................................... 16
Card Payment Options ....................................................................................................................... 17
Replacing the Printer Paper ............................................................................................................... 18

AMP8200 Configuration and Installation
Copyright© 2022PayFacto Inc. Page 3of18
•
•
•
◦
◦
◦
◦
▪
▪
•
◦
◦
◦
◦
Introduction
The AMP 8200 mobile payment terminal is perfect for most applications, whether retail, bar/
restaurant, or delivery/transportation. Thissetup guide describes the following topics:
AMP8200 Terminal Overview
Terminal Hardware
Initial terminal configuration
Charging the Terminal
Installing the Printer Paper
Configuring the Terminal Display Language
Configuring the Terminal Network Connections
Installing the SIM Card
Configuring the Terminal Wi-Fi Connection
Working with the terminal
Powering the Terminal On or Off
Terminal Input Options
Card Payment Options
Replacing the Printer Paper
AMP8200 Configuration and Installation
Copyright© 2022PayFacto Inc. Page 4of18
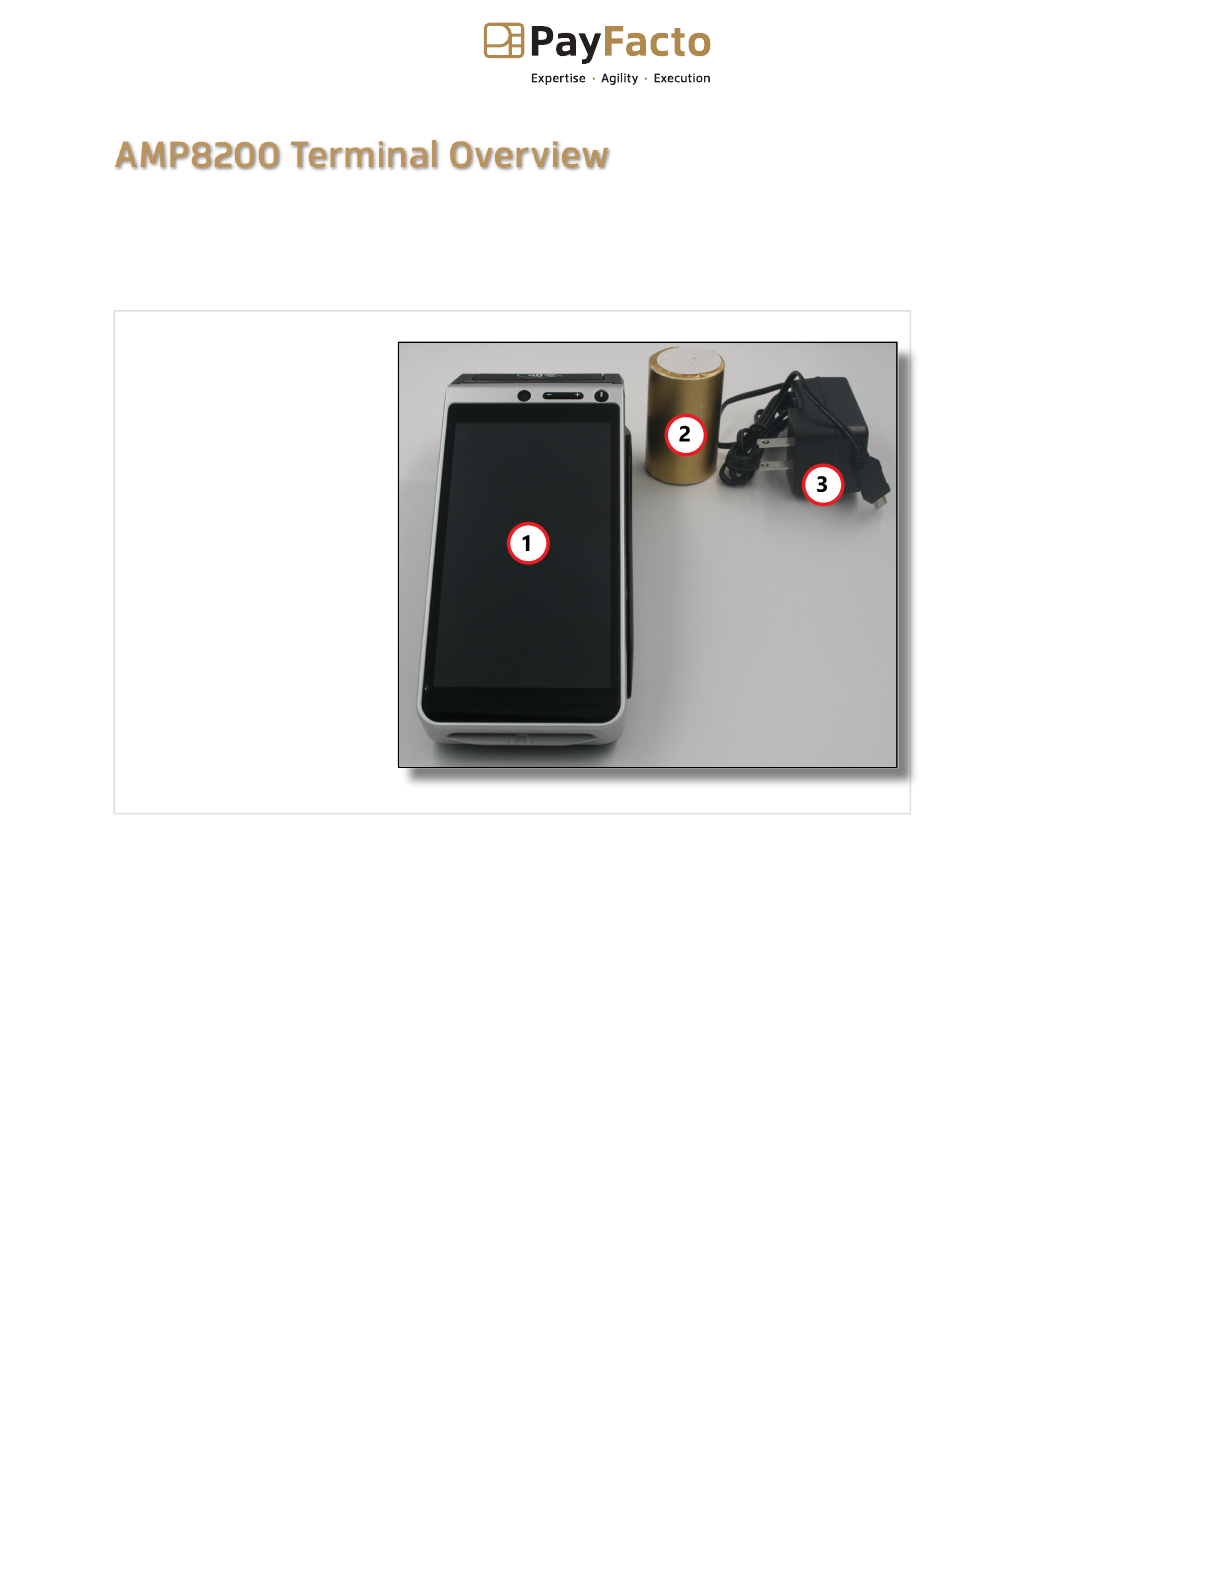
AMP8200 Terminal Overview
This document will introduce you to your payment terminal as well as guide you through the
process of preparing and configuring it in order to quickly begin processing payments.
Your AMP 8200 payment processing terminal comes with the following:
You may also have received an optional charging base, silicone sleeve, extra battery, and screen
cleaning kit, but this document addresses the most basic delivery configuration.
Payment terminal
1.
Roll of printer
paper
2.
AC charging cable
3.

AMP8200 Configuration and Installation
Copyright© 2022PayFacto Inc. Page 5of18
Terminal Hardware
The following illustrations show the location of the main terminal features and hardware:
Front-facing camera
(not used)
1.
Volume control
button
2.
Power button
3.
Color touchscreen
4.
Magnetic stripe
reader
5.
Chip card reader
6.
Rear camera/
scanner
7.
Battery cover
8.
Speaker
9.
Contactless payment
reader/Printer latch
10.
3.5mm audio port
11.
Micro USB charging
port
12.
AMP8200 Configuration and Installation
Copyright© 2022PayFacto Inc. Page 6of18
Installing the Printer Paper
If the supplied roll of printer paper was not already installed in the terminal when you received it,
you will need to install it before you can print any transaction receipts.
TIP: This procedure also applies to replacing a roll of
printer paper.
To install the printer paper:
On the back of the terminal at the top, lift the lever to unlock and open the printer
cover.
NOTE: The printer cover opens on a hinge, it does
not come off the terminal.
1.
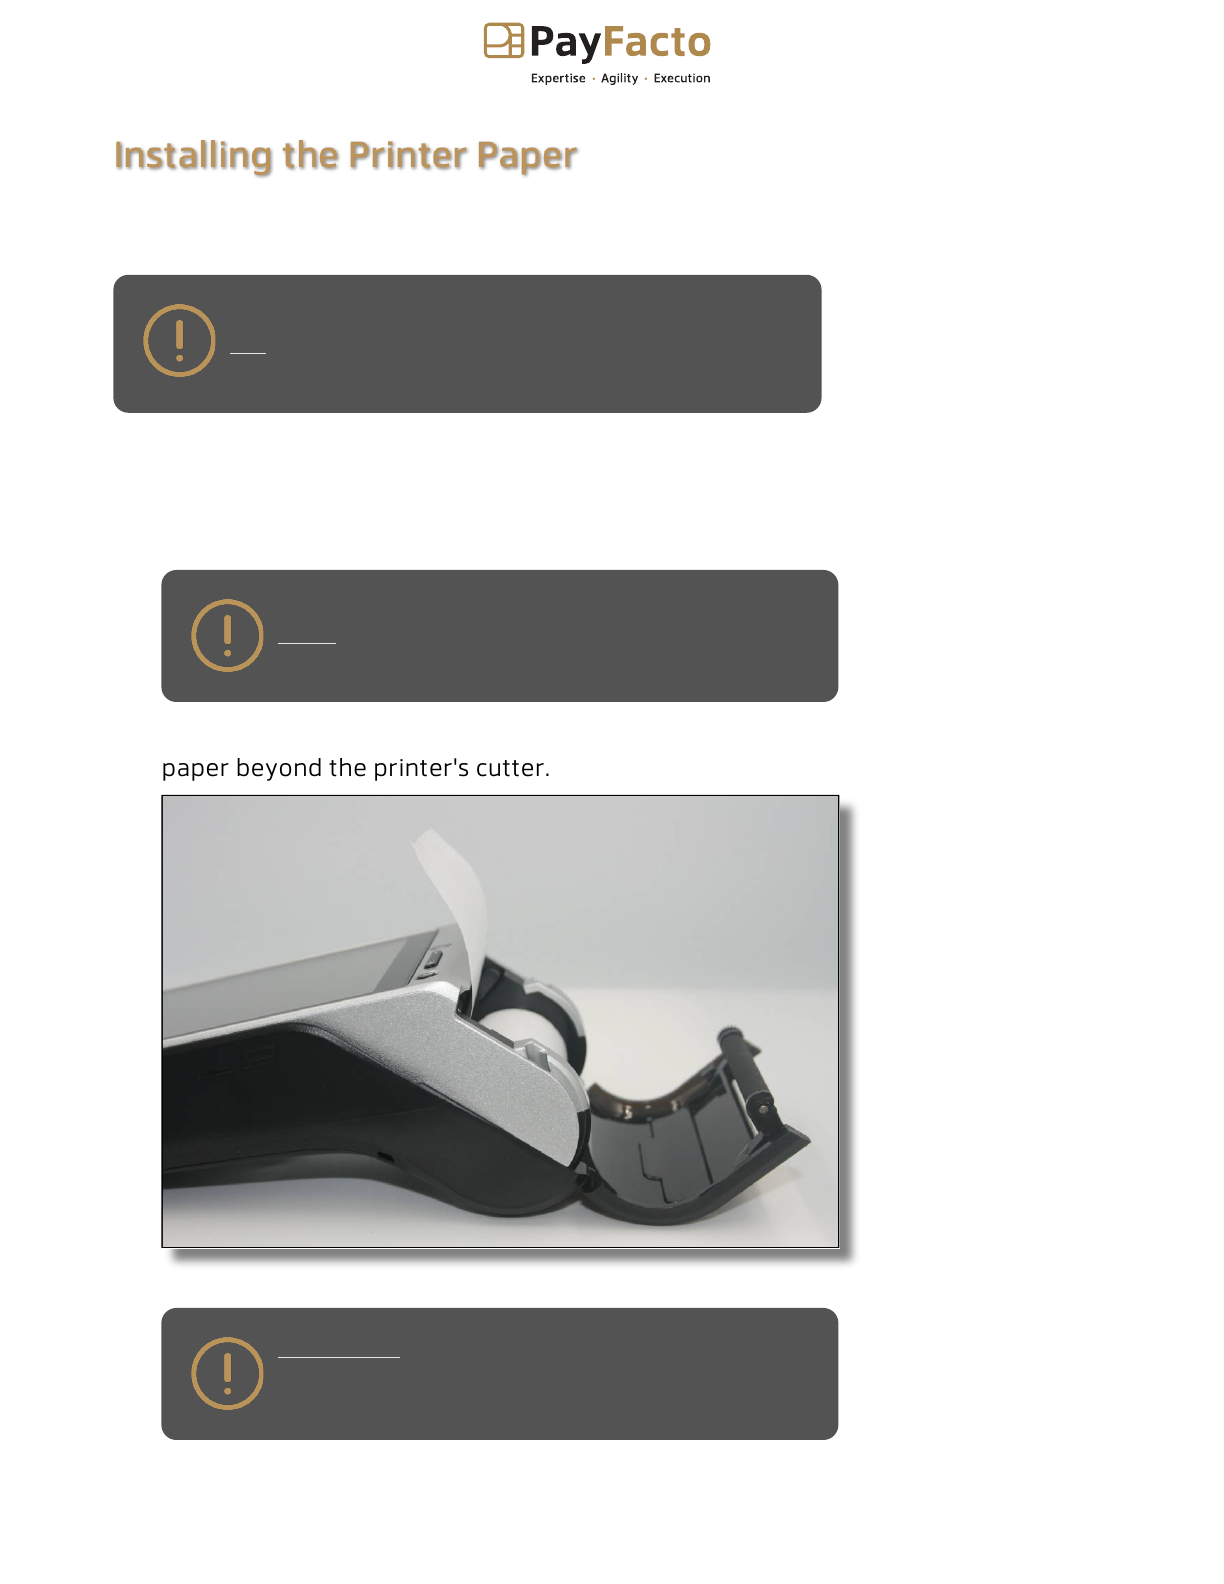
Place the roll of printer paper in the paper tray, leaving about 2 inches (5 cm) of
paper beyond the printer's cutter.
IMPORTANT! Make sure the paper unrolls from the
back of the roll, otherwise the printer will be unable
to print the transaction receipt.
2.

AMP8200 Configuration and Installation
Copyright© 2022PayFacto Inc. Page 7of18
Close the printer cover until it snaps into place and remove any excess paper.
3.
AMP8200 Configuration and Installation
Copyright© 2022PayFacto Inc. Page 8of18
Charging the Terminal
After you remove the terminal and accessories from the box, you need to install the battery and
charge it before you can use the terminal. The battery is shipped in the terminal but is not
connected to prevent the possibility of a short circuit during transport.
To install the battery and charge the terminal:
Turn the terminal over.
1.
On the back of the terminal press the tab to unlock the cover and lift the cover
from the terminal.
2.
You should notice a tag on the battery to assist in removal.
3.
If necessary, lift the battery from the terminal to have better access to the
connection port.
4.
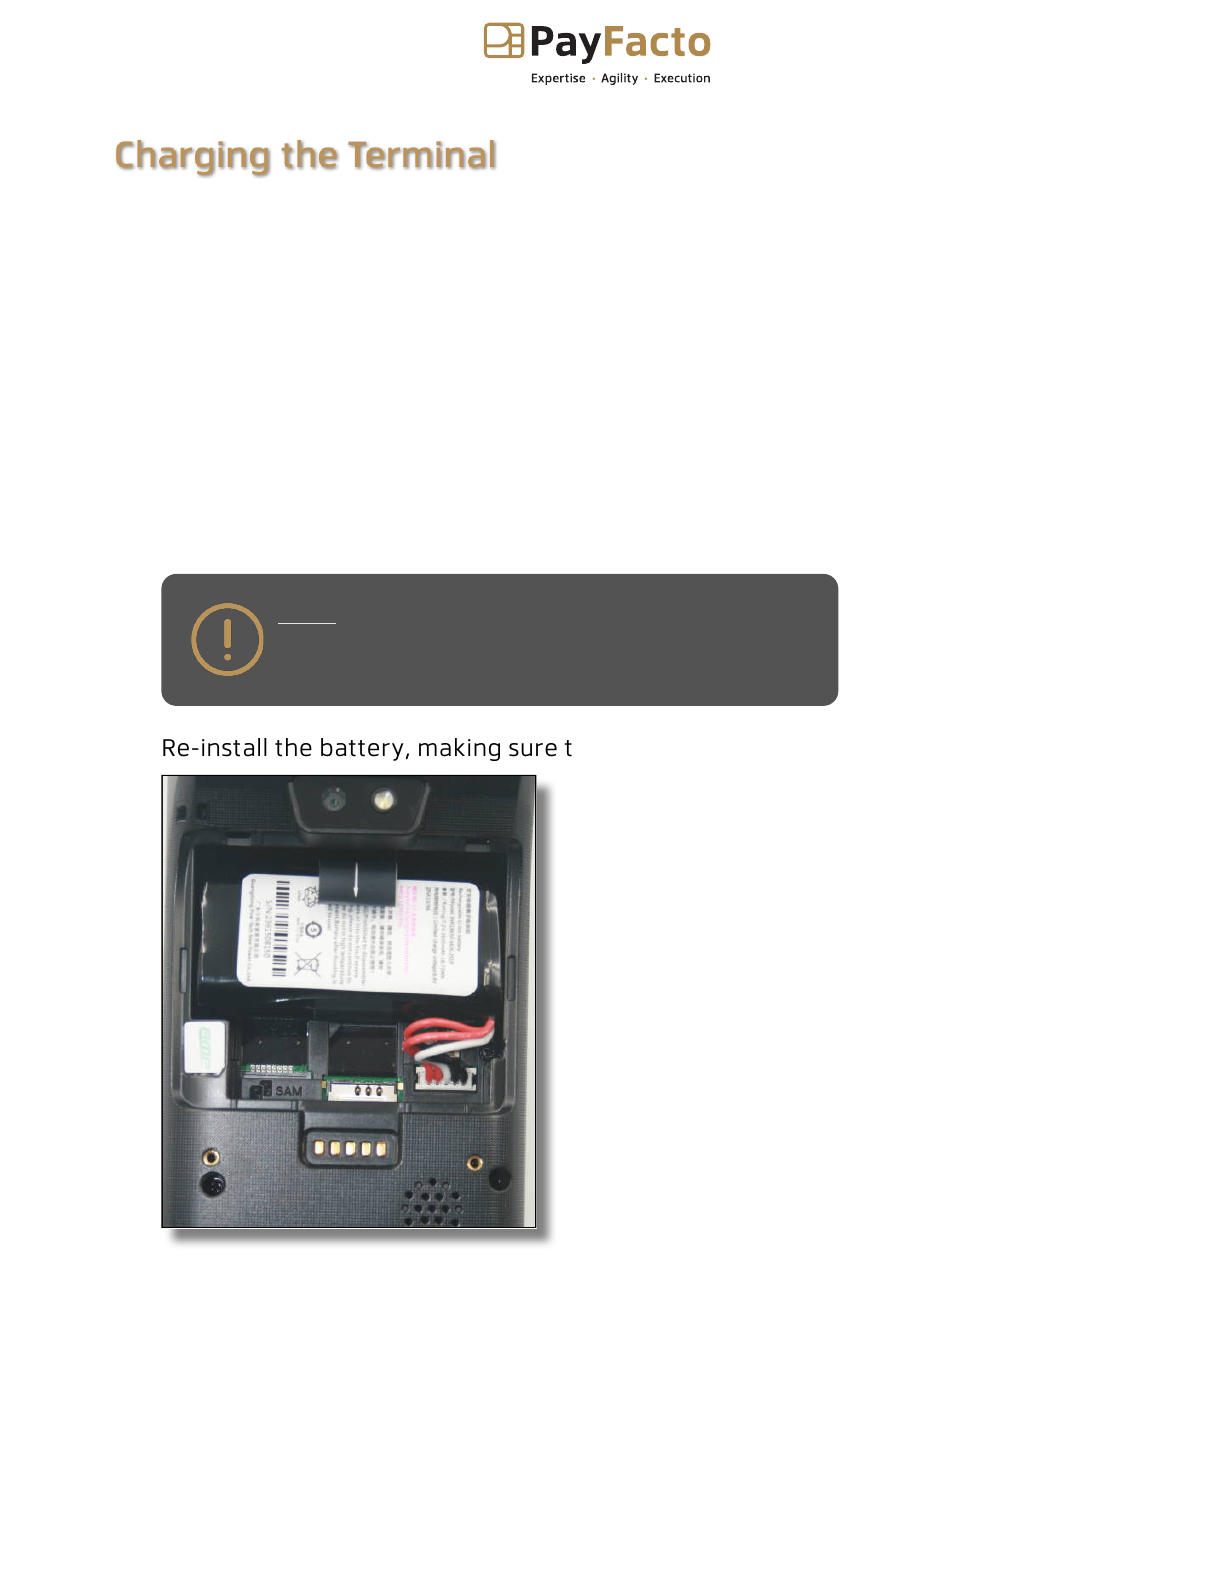
Insert and seat the battery connector in the port, ensuring that the red wires are
on the left side and the black wires are on the right.
NOTE: The battery connector can only fit into the
port one way and should not require much force to
insert.
5.
Re-install the battery, making sure that the tag and label are facing upwards.
6.

AMP8200 Configuration and Installation
Copyright© 2022PayFacto Inc. Page 9of18
NOTE: The terminal’s charging port may have a
protective cover; you will need to remove it before
inserting the micro USB port.
Re-install the battery cover on the terminal until it snaps closed and turn the
terminal over.
7.
Insert the charging cable in an AC outlet and insert the micro USB connector in the
terminal’s charging port, located on the left side, near the bottom of the terminal.
The terminal begins charging.
8.

AMP8200 Configuration and Installation
Copyright© 2022PayFacto Inc. Page 10of18
Configuring the Terminal Display Language
By default, the terminal displays all information in English. This procedure explains how to change
the terminal’s display language if necessary.
IMPORTANT! Selecting a different language changes all
text that appears on the terminal.
To change the terminal display language:
On the terminal’s main screen, touch the Settings icon.
1.
On the
Admin Login
screen, touch the Password field and use the keypad to type
the password: 1234567.
2.
Touch Login.
3.
Scroll to the Personal section and touch Language & input.
4.
Touch Language.
5.
Scroll to and touch the desired language.
6.
Touch the Back icon twice to return to the main screen.
7.

AMP8200 Configuration and Installation
Copyright© 2022PayFacto Inc. Page 11of18
•
•
Configuring the Terminal Network Connections
The terminal requires a network connection to communicate with the payment processor server to
process transactions.
The AMP 8200 is a mobile payment terminal that can connect to mobile (LTE) and wireless (Wi-Fi)
networks.
Mobile network access is required for delivery and transportation use, but it can also serve as a
backup connection if your Wi-Fi network reception is unreliable in certain areas.
Installing the SIM Card
Configuring the Terminal Wi-Fi Connection
AMP8200 Configuration and Installation
Copyright© 2022PayFacto Inc. Page 12of18
Installing the SIM Card
If you plan to use your terminal outside of your usual wi-fi network, you need to install the mobile
SIM card, provided by PayFacto or your mobile communications provider. The SIM card will connect
you to a mobile network, allowing you to process payments anywhere the terminal has reception.
The terminal uses the regular (full) SIM card size.
NOTE: If you plan to use your terminal only on your wi-fi
network, you can skip this procedure and proceed
directly to Configuring the Terminal Wi-Fi Connection.
To install the mobile SIM card:
Make sure the terminal is powered off and turn the terminal over.
1.
On the back of the terminal press the tab to unlock the cover and lift the cover
from the terminal.
2.
Use the tab to lift the battery from the terminal to provide additional space to
work. You do not need to unplug the battery, but you can if you want additional
space to work.
3.
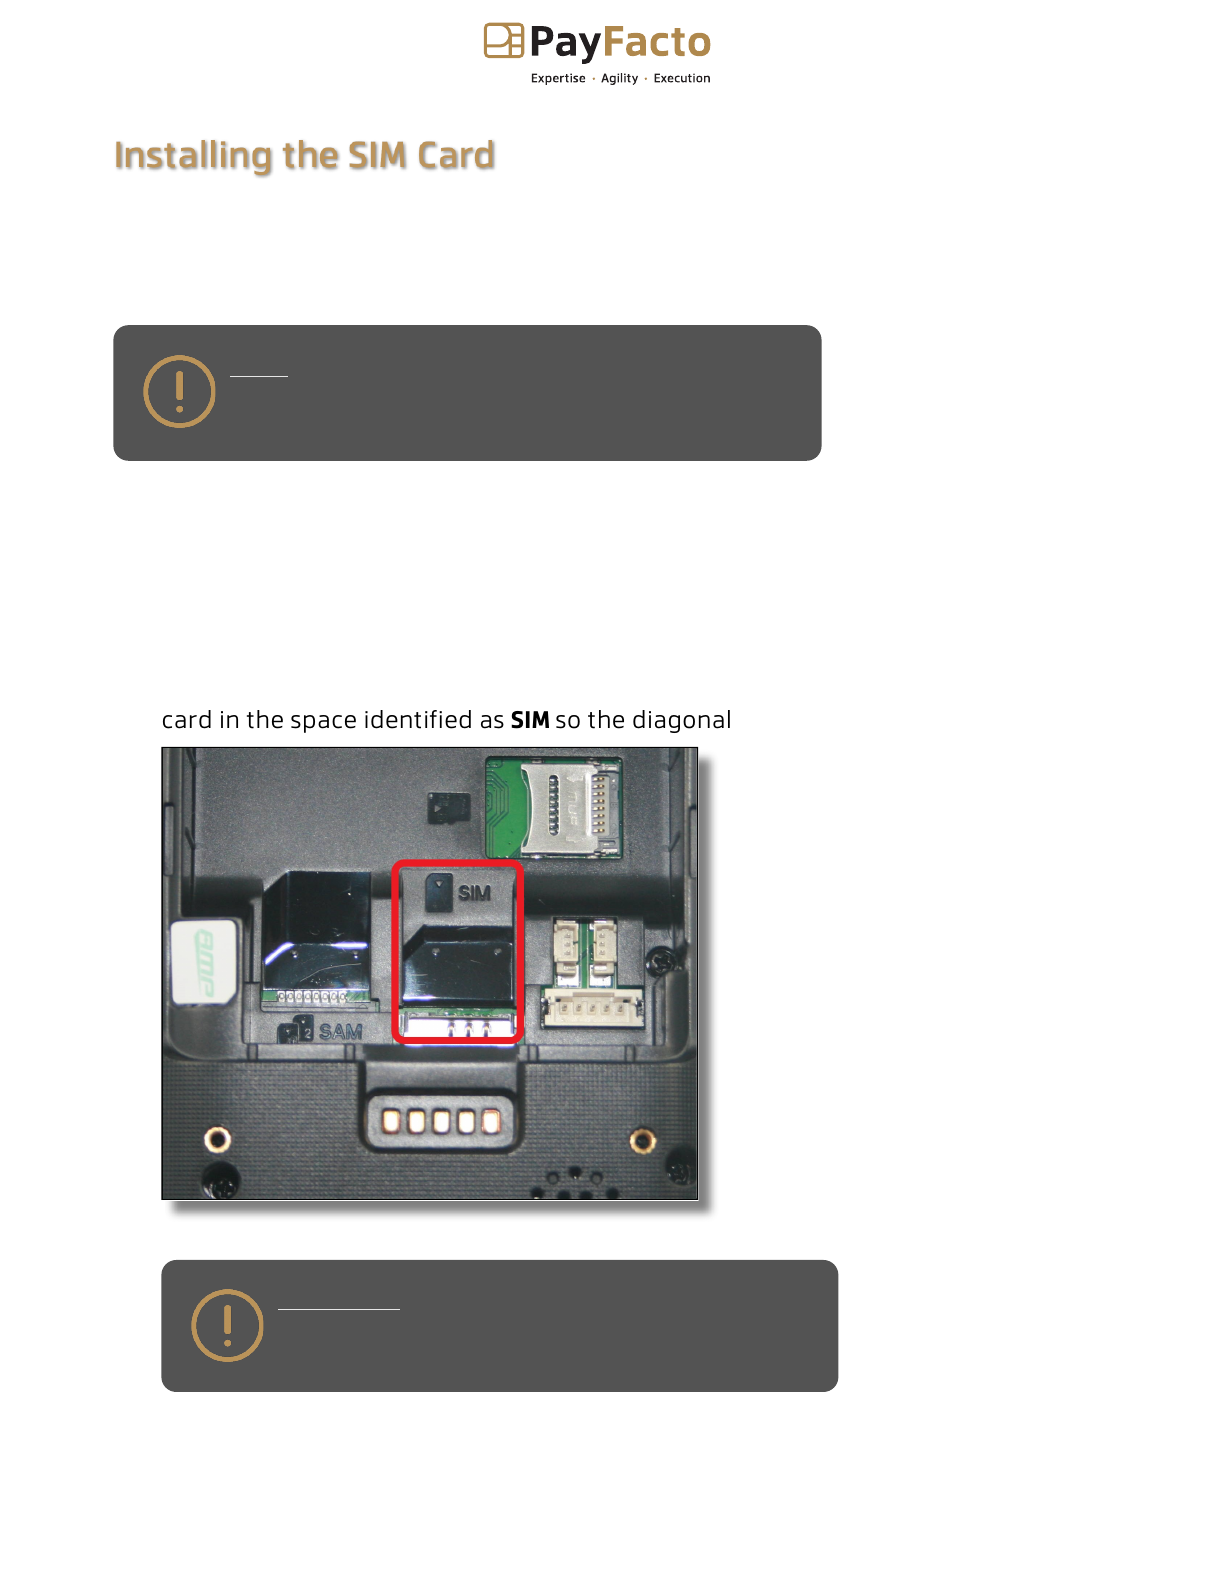
The terminal has illustrations for the different cards it can accept. Insert your SIM
card in the space identified as SIMso the diagonal corner is facing the top left side.
IMPORTANT! The SIM card should not require much
force to insert.
4.

AMP8200 Configuration and Installation
Copyright© 2022PayFacto Inc. Page 13of18
The terminal should identify the SIM card and configure the mobile network settings automatically.
Re-install the battery (if you unplugged the battery, remember to reinsert and
seat the battery connector in the port) and the cover on the terminal until it snaps
closed.
5.
Power on the terminal by pressing and holding the Power button for 3 seconds.
6.

AMP8200 Configuration and Installation
Copyright© 2022PayFacto Inc. Page 14of18
Configuring the Terminal Wi-Fi Connection
This section explains how to turn wi-fi on and connect to your network.
To connect to your wireless network:
On the terminal’s main screen, touch the Settings icon.
1.
On the
Admin Login
screen, touch the Password field and use the keypad to type
the password: 1234567.
2.
Touch Login.
3.
In the Wireless & networks section, touch WLAN.
4.
If WLAN(Wi-Fi) is Off, touch the toggle to turn it on. If WLAN is already on, a list of
available networks appears.
5.
From the list of available networks, touch the name of the network you want to
connect to.
6.
Enter the password for the selected network and touch CONNECT.
TIP: You can touch Show password before typing to
ensure you are entering the password correctly.
7.
After the terminal displays Connected for the selected network, touch the Back
icon to return to the
Settings
screen.
8.
Touch the Back icon again to return to the main screen.
9.
AMP8200 Configuration and Installation
Copyright© 2022PayFacto Inc. Page 15of18
Powering the Terminal On or Off
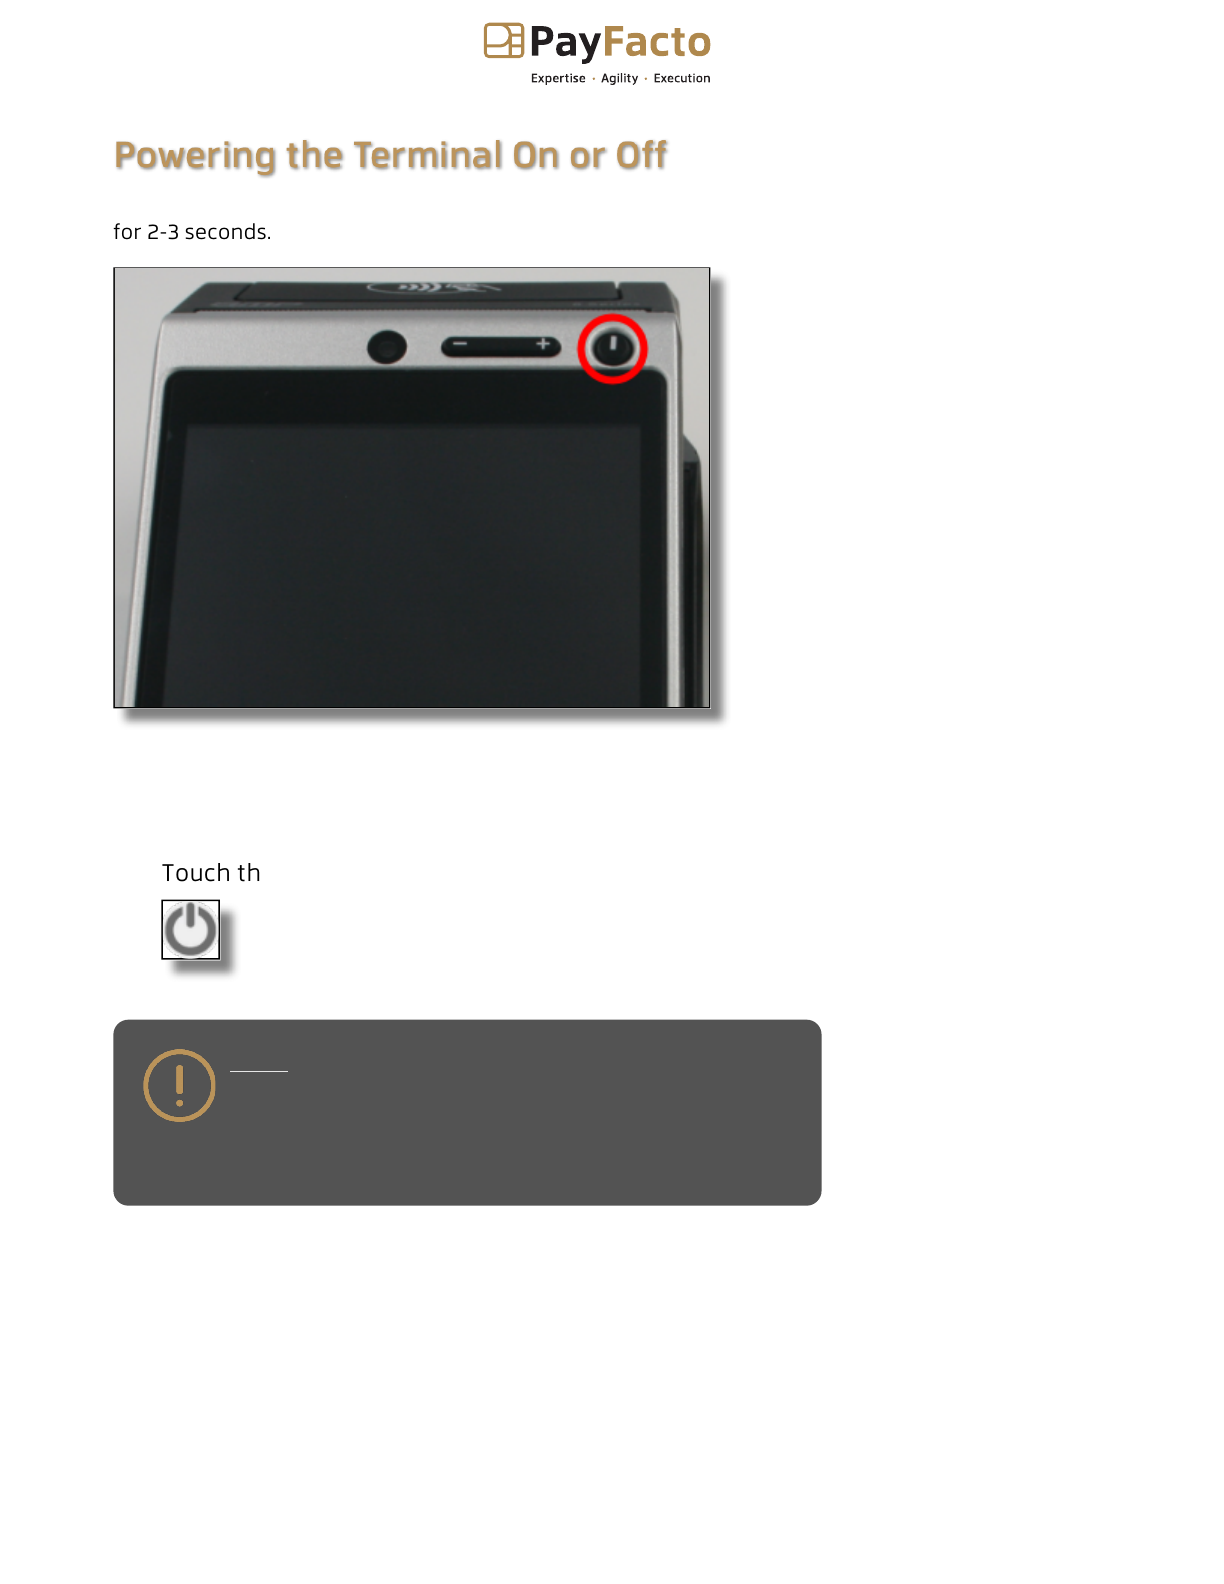
To power the terminal on, press and hold the power button in the top right corner of the terminal
for 2-3 seconds.
To power off the terminal:
NOTE: Avoid allowing the terminal’s battery to run
down to 0%. The terminal requires the battery to be at
least at 10% capacity to process a transaction. It is
strongly recommended that you charge the terminal
overnight or during non-business hours.
Press and hold the power button in the top right corner of the terminal for 2-3
seconds.
1.
Touch the Power off icon on the screen.
2.

AMP8200 Configuration and Installation
Copyright© 2022PayFacto Inc. Page 16of18
Terminal Input Options
Your terminal operators and your customers enter information and respond to prompts using the
terminal’s touch screen. The application prompts you and your customers on the next action to
perform.

AMP8200 Configuration and Installation
Copyright© 2022PayFacto Inc. Page 17of18
Card Payment Options
There are three (3) ways for a customer to use their payment card with the terminal:
Insert the chip card and enter a PIN
•
Swipe the card’s magnetic strip
•
Tap the card for contactless payment
•

AMP8200 Configuration and Installation
Copyright© 2022PayFacto Inc. Page 18of18
Replacing the Printer Paper
The terminal uses 2 ¼” or 58mm thermal paper rolls to print transaction receipts.
To install the printer paper:
On the back of the terminal at the top, lift the lever with the contactless logo to
unlock and open the printer cover.
NOTE: The printer cover opens on a hinge, it does
not come off the terminal.
1.
Place the roll of printer paper in the paper tray, leaving about 2 inches (5 cm) of
paper beyond the printer's cutter.
IMPORTANT! Make sure the paper unrolls from the
back of the roll, otherwise the printer will be unable
to print the transaction receipt.
2.
Close the printer cover until it snaps into place and remove any excess paper.
3.
Table of contents
Other PayFacto Payment Terminal manuals

PayFacto
PayFacto A80 User manual

PayFacto
PayFacto PAX A80 Operator's manual

PayFacto
PayFacto PAX D210 User manual

PayFacto
PayFacto PAX A80 User manual

PayFacto
PayFacto PAX S80 User manual

PayFacto
PayFacto PAX A920 Pro Quick guide

PayFacto
PayFacto PAX A920 Quick guide

PayFacto
PayFacto PAX A35 Operator's manual


