manuals.online logo
Brands
  1. Home
  2. •
  3. Brands
  4. •
  5. Percussion Play
  6. •
  7. Musical Instrument
  8. •
  9. Percussion Play Quintet Ensemble User manual

Percussion Play Quintet Ensemble User manual

10x38mm
Secure Screw
X4
Surface Fixed
1. Assemble Akadinda frame
comprising 2x ‘X’-shaped legs
and 1x horizontal beam. (See
Assembly Guide).Cover 8
holes on horizontal beam
using 4xBlack caps (1.1)
4. Place Akadinda in desired
location and mark 4 holes for
surface fixing.
Ground Surface
Installation Instructions
Height to centre of notes:
KS0 3-5 500mm Depth 400mm
KS1 5-7 650mm Depth 250mm
KS2 7-11 750mm Depth 150mm
Adult 900mm Surface Mounted
5. Fix to Surface using
recommended ground
anchors not supplied
6. Make sure all fixings are
covered and secure using
cover caps provided
(1.1) (1.2)
(1.3)
Black Caps
X8
M10x130
Bolt X2
M8 Lock
Nut X4
M8x25 SS
Washer X8
Eye Straps
X2
M10 Wedge
NutX2
Pin Torx 25
Driver Bit X1
M10 x30 SS
Washer X2
5x70mm
Screw X4
Mount eye straps in the
centre of the beam 360mm
from each end to attach the
beaters.
Pair Large Red
Beaters X2
Instrument
Components:
48 Kg
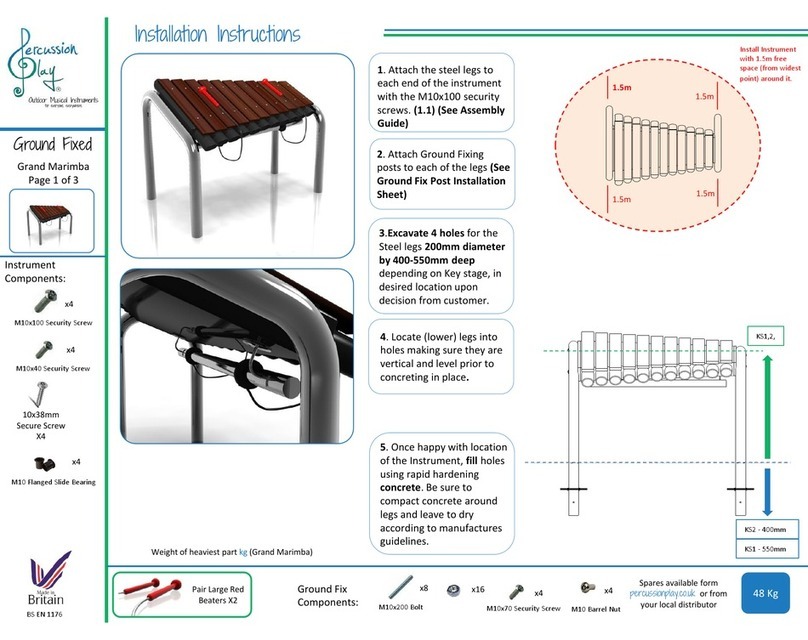
Install Instrument
with 1.5m free space
(from widest point)
around it.
1.5m
1.5m
1.5m
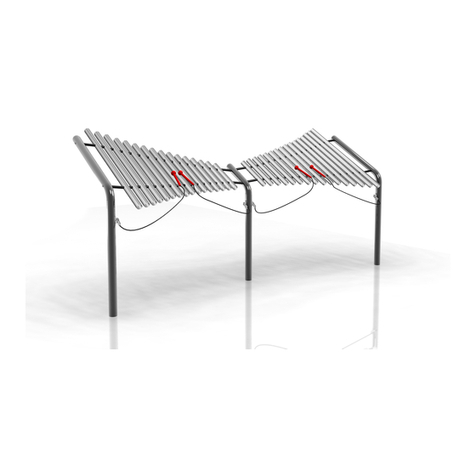
Akadinda
Page 1 of 2
1.5m
Weight of heaviest part 28kg (Frame)
BS EN 1176 L Brackets
x4
2 Part Cover Cap
x4
2.Locate M8x80mm eye bolts
through pre drilled holes
using flat washers on both
sides of the timber to prevent
the fixing pulling into the
timber. Secure in place with
M8 nyloc nuts, cover 4 holes
in ends using 4xBlack caps.
(1.2)(1.3)
3. Attach L Brackets to legs of
frame with coach bolts
provided. Pilot holes required
to stop timber from splitting
M8x50 Coach Screw
x8
Surface Fix
Components:
Ground Anchors
not supplied
Metric Conversion:
150mm/ 6”
250mm/ 10”
360mm/ 14”
400mm/ 16”
500mm/ 20”
650mm/ 26”
750mm/ 30”
900mm/ 35”
1.5m/ 59”
Spares available from
percussionplay.com or from your
local distributor
Surface Fixed
Assembly Guide PPAKAD
M10 wedge nut X2
Black Plastic Cap X8
M10x130 Bolt X2
M10x30 washer X2
M8x25 washer X8
5x70 screw X4
M8 Nyloc nut X4
COMPONENTS LIST:
AKADINDA ASSEMBLY GUIDE
PPAKAD LH UPPER PPAKAD LH LOWER PPAKAD RH LOWERPPAKAD RH UPPER
BLACK CAPS INSERTED INTO REAR OF CROSS BAR
Surface Fix L Bracket X4
2 Part black cap X4
8x50 Coach screw X4
5x40mm
Secure Screw
X4
Black Caps
X8
M10x130
Bolt X2
M8 Lock
Nut X4
M8x25 SS
Washer X8
Eye Straps
X2
M10 Wedge
NutX2
M10 x30 SS
Washer X2
5x70mm
Screw X4
Instrument
Components:
Pair Large Red
Beaters X2 48 Kg
Akadinda
Page 2 of 2
BS EN 1176
TX 25 Driver Bit
Tools:
x1
L Brackets
x4
2 Part Cover Cap
x4
M8x50 Coach Screw
x4
Surface Fix
Components:
Ground Anchors
not supplied
Spares available from
percussionplay.com or from your
local distributor
Surface Fixed
Components:
1. Carefully lay 2 x legs on a
level surface and insert
M10x200 bar and nuts. Using
packing box as protection lay
instrument note side down
on the card. Line up pre
drilled holes in the backboard
with the legs and ensure the
instrument is aligned square
with the legs. Fix in place
using M10x100mm screws
supplied (see installation
guide)
2. Attach surface plates to
each leg with M10x70mm
and Barrel nuts supplied. (
See Surface Fix Installation
Sheet)
Installation Instructions
5. Beaters can be fixed to
Stainless Steel posts with
fixings provided
1100
Ground Surface
Pair Small
Beaters X1 22 Kg
BS EN 1176
1.5m
Weight of heaviest part 15kg
1.5m
Install Instrument
with 1.5m free space
(from widest point)
around it.
Cherub
Page 1 of 3
M10x100 Security Screw
x4
M6x20mm
Secure Screw
Eye Straps
Thread Lock Solution
Required (Not Supplied)
x2
KS1 –750mm
KS2 –900mm
Adult –1100mm
Metric Conversion:
500mm/ 20”
750mm/ 30”
900mm/ 35”
1100mm/ 43”
1.5m/ 59”
3. Fix Surface Plates to level
surface using Coachscrews,
Rawlbolts, chemical anchors
or similar as deemed
appropriate by Installer.
(It is your responsibility to
ensure that the existing
surface is suitable to
receive the appropriate
fixing)
M10 Barrel Nut
x2
M10x70 Security Screw
x2 Ground Anchors
not supplied
2 Part Cover Cap
x8
Surface Fix
Components:
4Make sure all fixings are
covered and secure using
cover caps provided
Spares available from
percussionplay.com or from your
local distributor
Surface Fixed
Assembly Guide PPSWAV
22 Kg
BS EN 1176
Pair Small
Beaters X1
Cherub
Page 2 of 3
TX 45 Driver Bit
x2
TX 30 Driver Bit
x1
Tools:
Components:
M10x100 Security Screw
x4
M6x20mm
Secure Screw
Eye Straps
Thread Lock Solution
Required (Not Supplied)
x2
x4 Thread Lock Solution
Required (Not Supplied)
M10 Barrel Nut
x2
M10x70 Security Screw
x2 Ground Anchors
not supplied
2 Part Cover Cap
x8
Surface Fix
Components:
Saddle Strap X2
M6x20 Pin torx X4
COMPONENTS LIST:
M10x100 Pin torx X4
M10x70 Pin torx X2
M10 Barrel Nut Pin torx X2
Spares available from
percussionplay.com or from your
local distributor
Locate the Surface fix
Plate into the leg of the
instrument.
Fix instrument to Surface
fix plate using M10 bolt
and Barrel Nut and use
thread locking solution
to prevent fixings working
loose.
Fix Surface Plate to the
ground surface Ground
Anchors Not provided
cover fixings with caps
provided
Surface Fixed
Components:
Surface Fix Post Installation
(1.1)
12 3
Cherub
Page 3 of 3
M10 Barrel Nut
x2
M10x70 Security Screw
x2
TX 45 Driver Bit
Tools:
x2
BS EN 1176
Thread Lock Solution
Required (Not Supplied)
Thread Lock Solution
Required (Not Supplied)
2 Part Cover Cap
x8
Spares available from
percussionplay.com or from your
local distributor
Surface Fixed
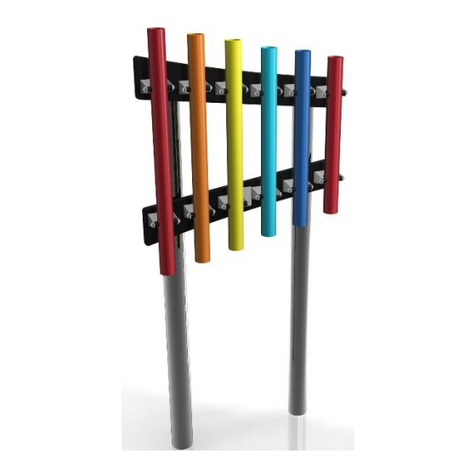
Rainbow Sambas
Page 1 of 2
1. Assemble fixing brackets
to base of sambas using
M8x25mm security screws
and nyloc nuts. (1.1)( See
Assembly Guide)
2.Arrange Sambas in desired
location and mark holes to fix
to desired surface.
3. Fix to Surface using
recommended ground
anchors (Ground Anchors are
not supplied)
4. Make sure all fixings are
covered and secure using
cover caps provided
Ground Surface
Installation Instructions
Sambas will arrive
on site in pre set
heights.
(1.1)
Played with hands
Ground Fix
Components:
Instrument
Components:
Rainbow
Sambas
are pre-
assembled
Weight of heaviest part 14.6kg (XL Samba)
BS EN 1176
47 Kg
Ground Fix
Components:
M8x25 Security Screw
x34
L Brackets
x17
2 Part M12
Cover Cap
x17
M8 Nyloc Nut
x34
1.5m
1.5m
Install Instrument
with 1.5m free space
(from widest point)
around it.
230mm 230mm 230mm 230mm
Metric Conversion:
80mm/ 3”
100mm/ 4”
230mm/ 9”
300mm/ 12”
400mm/ 16”
450mm/ 18”
1.5m/ 59”
Surface Fixed
Assembly Guide PPRASA
47 Kg
Played with hands
Instrument
Components:
Rainbow
Sambas
are pre-
assembled
Rainbow Sambas
Page 2 of 2
TX 40 Driver Bit
Tools:
x1
BS EN 1176
Ground Fix
Components:
Thread Lock Solution
Required (Not Supplied)
Thread Lock Solution
Required (Not Supplied)
Spares available from
percussionplay.com or from your
local distributor
M8x25 Security Screw
x34
L Brackets
x17
2 Part M12
Cover Cap
x17
M8 Nyloc Nut
x34
PPRASA PLAN
M8x25 Pin torx X34
COMPONENTS LIST:
Surface Fix L Bracket X17
M12 2 Part black cap X17
M8 Nyloc nut X34
1. Attach the steel legs to the
base of the instrument with
the M8 Nyloc Nuts and 2 part
security caps. (1.1) (See
Assembly Guide)
Surface Fixed
Ground Surface
850mm from
Plate
Installation Instructions
(1.1) (1.2)
Instrument
Components:
6. Attach the 1 pair of beater
to the saddle strap on the leg.
(1.3)
Surface Fix
Components:
(1.3)
14 Kg
Pair Small Red
Beaters X1
Sansa Rimba
Page 1 of 3
BS EN 1176
Metric
Conversion:
250mm/ 10”
300mm/ 12”
450mm/ 18”
700mm/ 28”
850mm/ 33”
1.5m/ 59”
M8 Nyloc Nut
x4
M6x20 Security Screw
x2
M6 Saddle Strap
x1
2 Part Cover
Cap
x4
M10 Barrel Nut
x1
M10x70 Security Screw
x1 Ground Anchors
not supplied
2 Part Cover Cap
x4
2. Attach Surface Fixing posts
to legs(1.2) (See Ground Fix
Post Installation Sheet)
4. Fix to Surface using
recommended ground
anchors not supplied
3.Locate Plate in desired
location and mark holes to fix
to desired surface.
5. Make sure all fixings are
covered and secure using
cover caps provided
Spares available from
percussionplay.com or from your
local distributor
Install Instrument
with 1.5m free space
(from widest point)
around it.
1.5m
1.5m
Weight of heaviest part 10.5kg (Sansa Rimba)
PPSANS FRONT PPSANS SIDE
COMPONENTS LIST:
2 Part Cover Cap X8
M10 Nut X4
M10x200 Threaded Bar X2
Saddle Strap X1
M6x20 Pin torx X2
M8 Nyloc nut X4
M10x70 Pin torx X1
M10 Barrel Nut Pin torx X1
Surface Fixed
Assembly Guide PPSANS
(1.1)
Surface Fix
Components: 19.5Kg
Pair Small Red
Beaters X1
Sansa Rimba
Page 2 of 3
BS EN 1176
Thread Lock Solution
Required (Not Supplied)
Thread Lock Solution
Required (Not Supplied)
Instrument
Components:
M8 Nyloc Nut
x4
M6x20 Security Screw
x2
M6 Saddle Strap
x1
2 Part Cover
Cap
x4
TX 30 Driver Bit
x1
TX 40 Driver Bit
x1
Tools:
M10 Barrel Nut
x1
M10x70 Security Screw
x1 Ground Anchors
not supplied
2 Part Cover Cap
x4 Spares available from
percussionplay.com or from your
local distributor
Surface Fixed
Components:
Surface Fix Post Installation
Sansa Rimba
Page 3 of 3
BS EN 1176
Metric
Conversion:
50mm/ 2”
250mm/ 10”
350mm/ 14”
400mm/ 16”
450mm/ 18”
TX 45 Driver Bit
Tools:
x2
(1.1)
Locate the Surface fix
Plate into the leg of the
instrument.
Fix instrument to Surface
fix plate using M10 bolt
and Barrel Nut and use
thread locking solution
to prevent fixings working
loose.
Fix Surface Plate to the
ground surface Ground
Anchors Not provided
cover fixings with caps
provided
12 3
Repeat Parts 1-3 for both legs
Thread Lock Solution
Required (Not Supplied)
M10 Barrel Nut
x1
M10x70 Security Screw
x1
Thread Lock Solution
Required (Not Supplied)
2 Part Cover Cap
x4
Surface Fixed
2. Assemble Upper 3 Base
sections using M8 x 16 mm
CSK screws provided (1.1)
Installation Instructions
Tubular Bells will arrive on
site pre assembled
Ground Surface
90 Kg
Pair Large Red
Beaters X1
Instrument
Components:
Tubular Bells
are pre-
assembled
Weight of heaviest part 30kg (ALU Base)
Tubular Bells
Page 1 of 4
BS EN 1176
1.Locate Base in desired
location before attaching the
bells. Fix lower sections to
surface using pre drilled holes
provided. (Surface Anchors
Not supplied) Recommended
M10 Female Rawl Bolts or
chemical anchors
Spares available from
percussionplay.com or from your
local distributor
3. Using the M10x 40 screw
and Barrel Nuts to attach
each of the 9 legs to the base
(1.2)
1.2
4. Make sure that all fixings
are tightly secured and thread
locking solution used if
required.
1.1
M10 Barrel Nut
x9
M10x40 Security Screw
x9
M8x16 CSK Security Screw
x34
Surface Fix
Components:
Surface Fixed
Assembly Guide TBEL SF
90 Kg
Instrument
Components:
Tubular Bells
Are Pre-
assembled
Tubular Bells
Page 2 of 4
BS EN 1176
Surface Fix
Components:
Spares available from
percussionplay.com or from your
local distributor
Pair Large Red
Beaters X1
M10 Barrel Nut
x9
M10x40 Security Screw
x9
M10x16 CSK Security Screw
x34
TX 45 Driver Bit
Tools:
TX 40 Driver Bit
x2
x1
M10x40 P in torx X9
M8x16 CSK Screw X34
M10 Barrel Nut Pin torx X9
COMPONENTS LI ST:
Surface Fixed
Assembly Guide TBEL SF
90 Kg
Instrument
Components:
Tubular Bells
Are Pre-
assembled
Tubular Bells
Page 3 of 4
BS EN 1176
Surface Fix
Components:
Spares available from
percussionplay.com or from your
local distributor
Pair Large Red
Beaters X1
M10 Barrel Nut
x9
M10x40 Security Screw
x9
M8x16 CSK Security Screw
x34
Mount this section of each base to the
deck Deck Anchors Not provided
using pre drilled holes
Insert instrument plates with
stanchions and attach with CSK
M8x16mm Screws provided
TX 45 Driver Bit
Tools:
TX 40 Driver Bit
x2
x1
Surface Fixed
Assembly Guide TBEL SF
90 Kg
Instrument
Components:
Tubular Bells
Are Pre-
assembled
Tubular Bells
Page 4 of 4
BS EN 1176
Surface Fix
Components:
Spares available from
percussionplay.com or from your
local distributor
Pair Large Red
Beaters X1
M10 Barrel Nut
x9
M10x40 Security Screw
x9
M8x16 CSK Security Screw
x34
Join the upper and lower base
sections with CSK M8x16mm Screws
provided
Lower Instrument over the stanchions and attach with
fixings provided(see surface fix installation
instructions)
TX 45 Driver Bit
Tools:
TX 40 Driver Bit
x2
x1
Surface Fixed
Installation Instructions
Ground
Surface
2207
Surface Fix
Components: 59 Kg
Pair Large Red
Beaters X1
Instrument
Components:
Tubular Bells
are pre-
assembled
Weight of heaviest part 10kg (XXL Bell)
Tubular Bells
Page 1 of 2
BS EN 1176
Install Instrument
with 1.5m free space
(from widest point)
around it.
1.5m
1.5m
1.5m
Metric Conversion:
250mm/ 10”
400mm/ 16”
600mm/ 24”
1.5m/ 59”
2207mm/ 98”
Spares available from
percussionplay.com or from your
local distributor
M10 Barrel Nut
x9
M10x40 Security Screw
x9
2 Part Cover Cap
x36
1. Attach Surface Fixing plates
to each of the 9 legs(1.2)
3. Fix Surface Plate to level
surface using Coachscrews,
Rawlbolts, chemical anchors
or similar as deemed
appropriate by Installer.
(It is your responsibility to
ensure that the existing
surface is suitable to
receive the appropriate
fixing)
2.Locate each chime in
desired location and mark
holes to fix to desired surface.
4. Make sure all fixings are
covered and secure using
cover caps provided
1.2
Surface Fixed
Surface Fix Plate Installation
(1.1)
Components:
Tubular Bells
Page 2 of 2
BS EN 1176
(1.1)
Locate the Surface fix
Plate into the leg of the
instrument.
Fix instrument to Surface
fix plate using M10 bolt
and Barrel Nut and use
thread locking solution
to prevent fixings working
loose.
Fix Surface Plate to the
ground surface Ground
Anchors Not provided
cover fixings with caps
provided
12 3
Repeat Parts 1-3 for all 9 legs
Thread Lock Solution
Required (Not Supplied)
M10 Barrel Nut
x9
M10x40 Security Screw
x9
2 Part Cover Cap
x8

Other Percussion Play Musical Instrument manuals
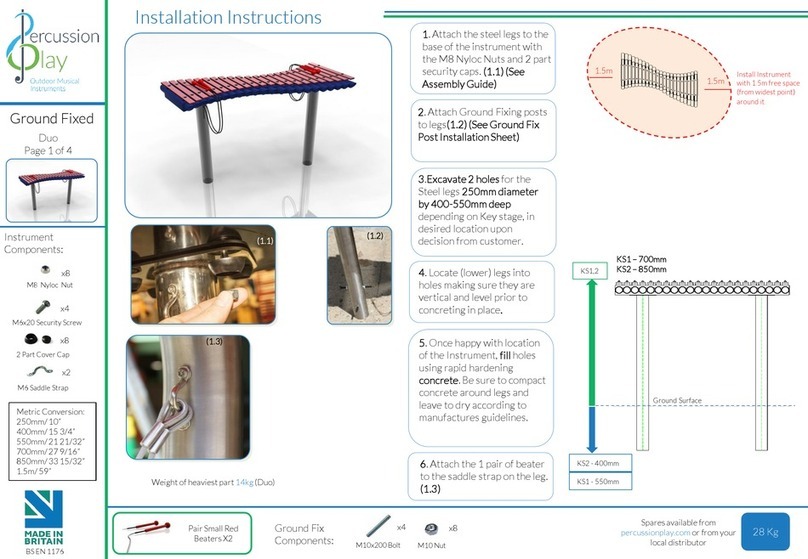
Percussion Play Duo User manual

Percussion Play

Percussion Play Duo User manual

Percussion Play TUTTI User manual

Percussion Play

Percussion Play TUTTI User manual

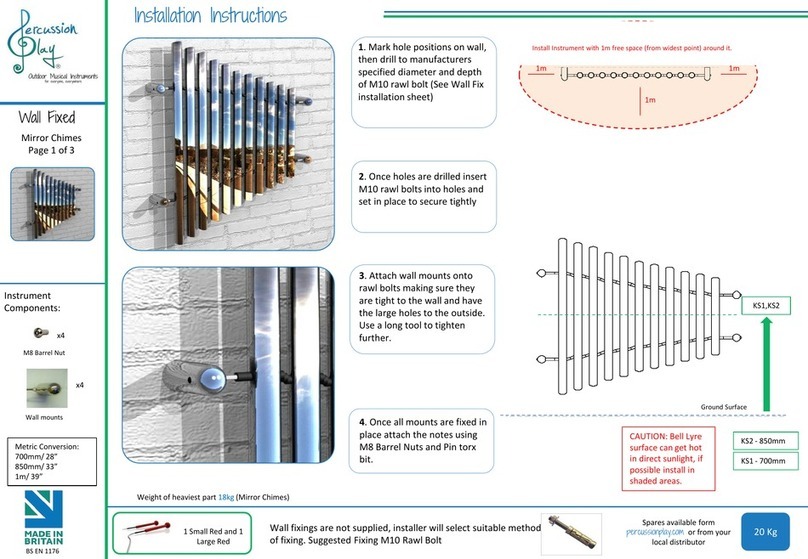
Percussion Play Mirror Chimes User manual

Percussion Play

Percussion Play Mirror Chimes User manual

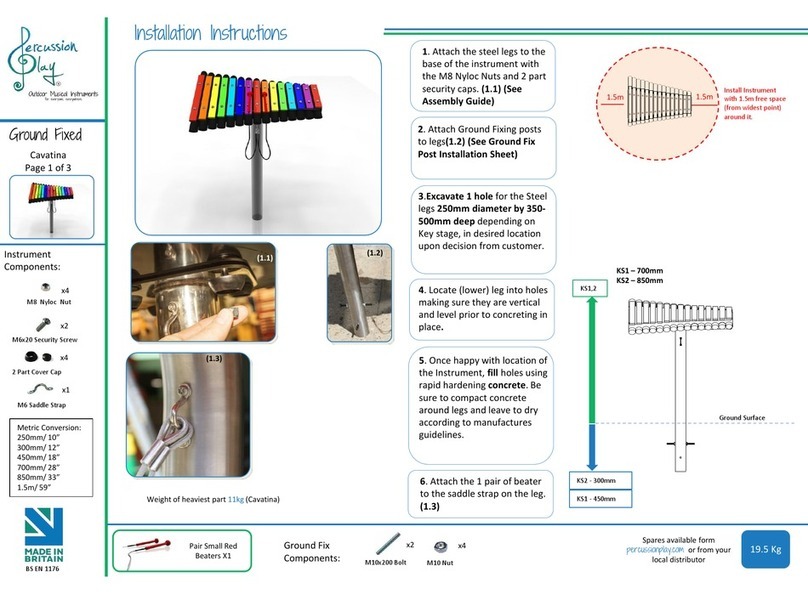
Percussion Play Cavatina User manual

Percussion Play

Percussion Play Cavatina User manual

Percussion Play Cavatina User manual

Percussion Play

Percussion Play Cavatina User manual

Percussion Play Wall Marimba User manual

Percussion Play

Percussion Play Wall Marimba User manual

Percussion Play Grand Marimba User manual

Percussion Play

Percussion Play Grand Marimba User manual

Percussion Play Congas User manual

Percussion Play

Percussion Play Congas User manual

Percussion Play Surface Fixed Tubular Bells User manual

Percussion Play

Percussion Play Surface Fixed Tubular Bells User manual

Percussion Play Freechimes Diatonic Symphony User manual

Percussion Play

Percussion Play Freechimes Diatonic Symphony User manual

Percussion Play CAVATINA Service manual

Percussion Play

Percussion Play CAVATINA Service manual

Percussion Play Surface Fixed User manual

Percussion Play

Percussion Play Surface Fixed User manual

Percussion Play Ground Fixed User manual

Percussion Play

Percussion Play Ground Fixed User manual

Percussion Play Emperor Chimes User manual

Percussion Play

Percussion Play Emperor Chimes User manual

Percussion Play PPBDL-S User manual

Percussion Play

Percussion Play PPBDL-S User manual

Percussion Play Duo User manual

Percussion Play

Percussion Play Duo User manual

Percussion Play Soprano Quartet User manual

Percussion Play

Percussion Play Soprano Quartet User manual

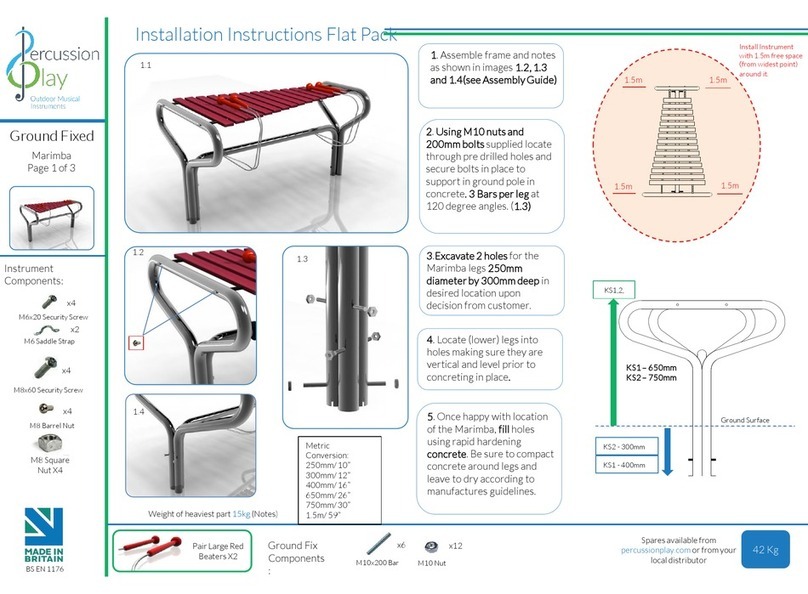
Percussion Play Ground Fixed Marimba User manual

Percussion Play

Percussion Play Ground Fixed Marimba User manual

Percussion Play Harmony Bells User manual

Percussion Play

Percussion Play Harmony Bells User manual

Percussion Play Rainbow Sambas User manual
Percussion Play

Percussion Play Rainbow Sambas User manual

Percussion Play OPC300 User manual

Percussion Play

Percussion Play OPC300 User manual

Percussion Play Babel Drum Service manual

Percussion Play

Percussion Play Babel Drum Service manual

Percussion Play Rainbow Trio Metallophone User manual

Percussion Play

Percussion Play Rainbow Trio Metallophone User manual

Percussion Play Papilio Bells User manual

Percussion Play

Percussion Play Papilio Bells User manual

Popular Musical Instrument manuals by other brands

OpenFab PDX Modular Fiddle Aassembly Instructions

OpenFab PDX

OpenFab PDX Modular Fiddle Aassembly Instructions

Roland VS-2480CD Control Surface Mode Guide

Roland

Roland VS-2480CD Control Surface Mode Guide

ELTEC TRAPSOUND Information manual

ELTEC

ELTEC TRAPSOUND Information manual

Roland HP237 owner's manual

Roland

Roland HP237 owner's manual

Roland VK-8 Midi implementation

Roland

Roland VK-8 Midi implementation

Yamaha PSR-I400 owner's manual

Yamaha

Yamaha PSR-I400 owner's manual

Korg CONCERT C-720 user manual

Korg

Korg CONCERT C-720 user manual

American Audio VMS4.1 User guide and reference manual

American Audio

American Audio VMS4.1 User guide and reference manual

Roland Aerophone Pro owner's manual

Roland

Roland Aerophone Pro owner's manual

Yamaha YC-20 owner's manual

Yamaha

Yamaha YC-20 owner's manual

ns design WAV VIOLIN instructions

ns design

ns design WAV VIOLIN instructions

Casio Celviano GP-300BK user guide

Casio

Casio Celviano GP-300BK user guide

Casio Magical Light ML-1 Operation manual

Casio

Casio Magical Light ML-1 Operation manual

Viscount Smart 30 user manual

Viscount

Viscount Smart 30 user manual

EMG PRO SL-20 Installation information

EMG

EMG PRO SL-20 Installation information

Peavey Patriot Bass owner's manual

Peavey

Peavey Patriot Bass owner's manual

Yamaha Electone E-75 user guide

Yamaha

Yamaha Electone E-75 user guide

Brunner-guitars Outdoor Guitar Basic manual

Brunner-guitars

Brunner-guitars Outdoor Guitar Basic manual

manuals.online logo
manuals.online logoBrands
  • About & Mission
  • Contact us
  • Privacy Policy
  • Terms and Conditions

Copyright 2025 Manuals.Online. All Rights Reserved.