manuals.online logo
Brands
  1. Home
  2. •
  3. Brands
  4. •
  5. Phonocar
  6. •
  7. Automobile Accessories
  8. •
  9. Phonocar VM341 User manual

Phonocar VM341 User manual

Regolazioni • Setting • Réglages • Einstellung • Ajustes
CONTRAST
COLOUR
BRIGHTNESS
PINS
+M
-
ISTRUZIONI DI MONTAGGIO
MOUNTING INSTRUCTIONS
INSTRUCTIONS DE MONTAGE
MONTAGEANLEITUNG
INSTRUCCIONES PARA EL MONTAJE
VM341
INTERFACCIA AUDIO-VIDEO
AUDIO-VIDEO INTERFACE
INTERFAZ AUDIO-VIDEO
MERCEDES
Classe C - E - S - CLK - SLK - ML
car-radio Comand 2.0
Senza TV-Tuner originale
Via F.lli Cervi, 167/C - 42100 REGGIO EMILIA (ITALY)
Tel. 0522 941621 - Fax 0522 942452
www.phonocar.com • e-mail: info@phonocar.it
I- Il modulo VM341 permette di collegare una sorgente Audio-Video con uscita
PAL ai radionavigatori delle vetture con ingressi RGB.
È così possibile installare TV Tuner, DVD Player, Game station ed unità simili,
visualizzando le immagini sul monitor di serie.
Attenzione: la visione delle immagini é consentita solo ed escluvamente a
veicolo fermo.
GB - The VM341-module allows to connect an Audio-Video-source, equipped
with a PAL-exit, to the original radio-navigators with RGB-inputs.
The VM341 allows to install TV-Tuners, DVD-Players, Game-stations and similar
appliances, and get the picture onto the Original Monitor.
Attention: TV-watching is rigorously allowed ONLY when the car is in a standstill
position.
F- Le module VM341 permet de brancher une source Audio Vidéo avec sortie
PAL, aux ensembles radio-navigateurs d’origine avec entrée RGB.
Le VM341 permet d’installer des Tuners TV, DVD, des stations de jeux et des
unités similaires, visualisant les images sur le monitor d’origine.
Attention: la vision des images n’est autorisée par loi, qu’à voiture stationnée.
D- Das Modul VM341 ermöglicht den Anschluss einer Audio-Video-Quelle
mit PAL-Ausgang, an Original-Radio-Navigationen mit RGB-Eingang.
Mit der Interface VM341 können somit TV-Tuner, DVD-Player, Game-Station
und ähnliche Geräte, angeschlossen werden, mit Bild-Aufzeichnung auf dem
Original-Monitor.
Wichtig: das Fernsehen ist einzig und allein NUR BEI STILLSTEHENDEM
WAGEN erlaubt.
E- El modulo VM 341 permite conectar una fuente Audio/Video con salida
PAL a los radios navegadores de los vehículos con entradas RGB.
Es posible instalar TV Tuner, DVD, Play Station, y unidades similares, visualizando
las imágenes en el monitor de origen.
Atención: la visión de las imágenes es consentida solo y exclusivamente con
el vehículo parado .
I- Aprire la scatola la scatola di plastica del VM341 e con un piccolo cacciavite
tenere in cortociurcuito i PIN relativi alla regolazione che vogliamo cambiare.
Esempio:
Per aumentare il CONTRASTO mettere in cortocircuito il pin +con il pin M.
Per diminuire il CONTRASTO mettere in cortocircuito il pin
-
con il pin M.
Stesse procedure per COLORE e LUMINOSITÁ.
GB - Open the plastic-box of the VM341-Interface. By means of a small screw-
driver, keep those PINS, of which you wish to change the setting, under short-
circuit.
Example:
To increase the CONTRAST, put the +pin under short-circuit with the M-pin.
To reduce the CONTRAST, put the -pin under short-circuit with the M-pin.
Use same method to change setting of COLOUR and BRIGHNESS.
F- Ouvrir la boîte en plastique du VM341. Au moyen d’un petit tournevis, mettre
en court-circuit les PINS relatifs aux réglages que vous voulez changer.
Exemple :
Pour augmenter le CONTRAST, mettre en court-circuit le pin+avec le pin M.
Pour réduire le CONTRAST, mettre en court-circuit le pin-avec le pin M.
Même procédure pour la COULEUR et la LUMINOSITE.
D- Den Plastikdeckel des VM341 öffnen. Mittels eines kleinen Schraubenziehers
die PINs
gleichzeitig drücken, deren Einstellung Sie ändern möchten.
Beispiel:
Um den KONTRAST zu erhöhen, Pin+mit Pin Mgleichzeitig drücken
Um den KONTRAST zu reduzieren, Pin-mit Pin Mgleichzeitig drücken
Selbe Vorgehensweise gilt für die FARBE und die HELLIGKEIT.
E- Abrir la caja de plástico del VM 340, con un pequeño destornillador, tener
en cortocircuito los Pin relativos a lo que queremos ajustar.
Ejemplo:
Para aumentar el CONTRASTE meter en cortocircuito el pin +con el pin M.
Para disminuir el CONTRASTE meter en cortocircuito el pin –con el pin M.
Mismo procedimiento para el COLOR y el BRILLO.
CAR RADIO
VM 341
VIE/PINS
AUDIO VIDEO
RL
INPUTS
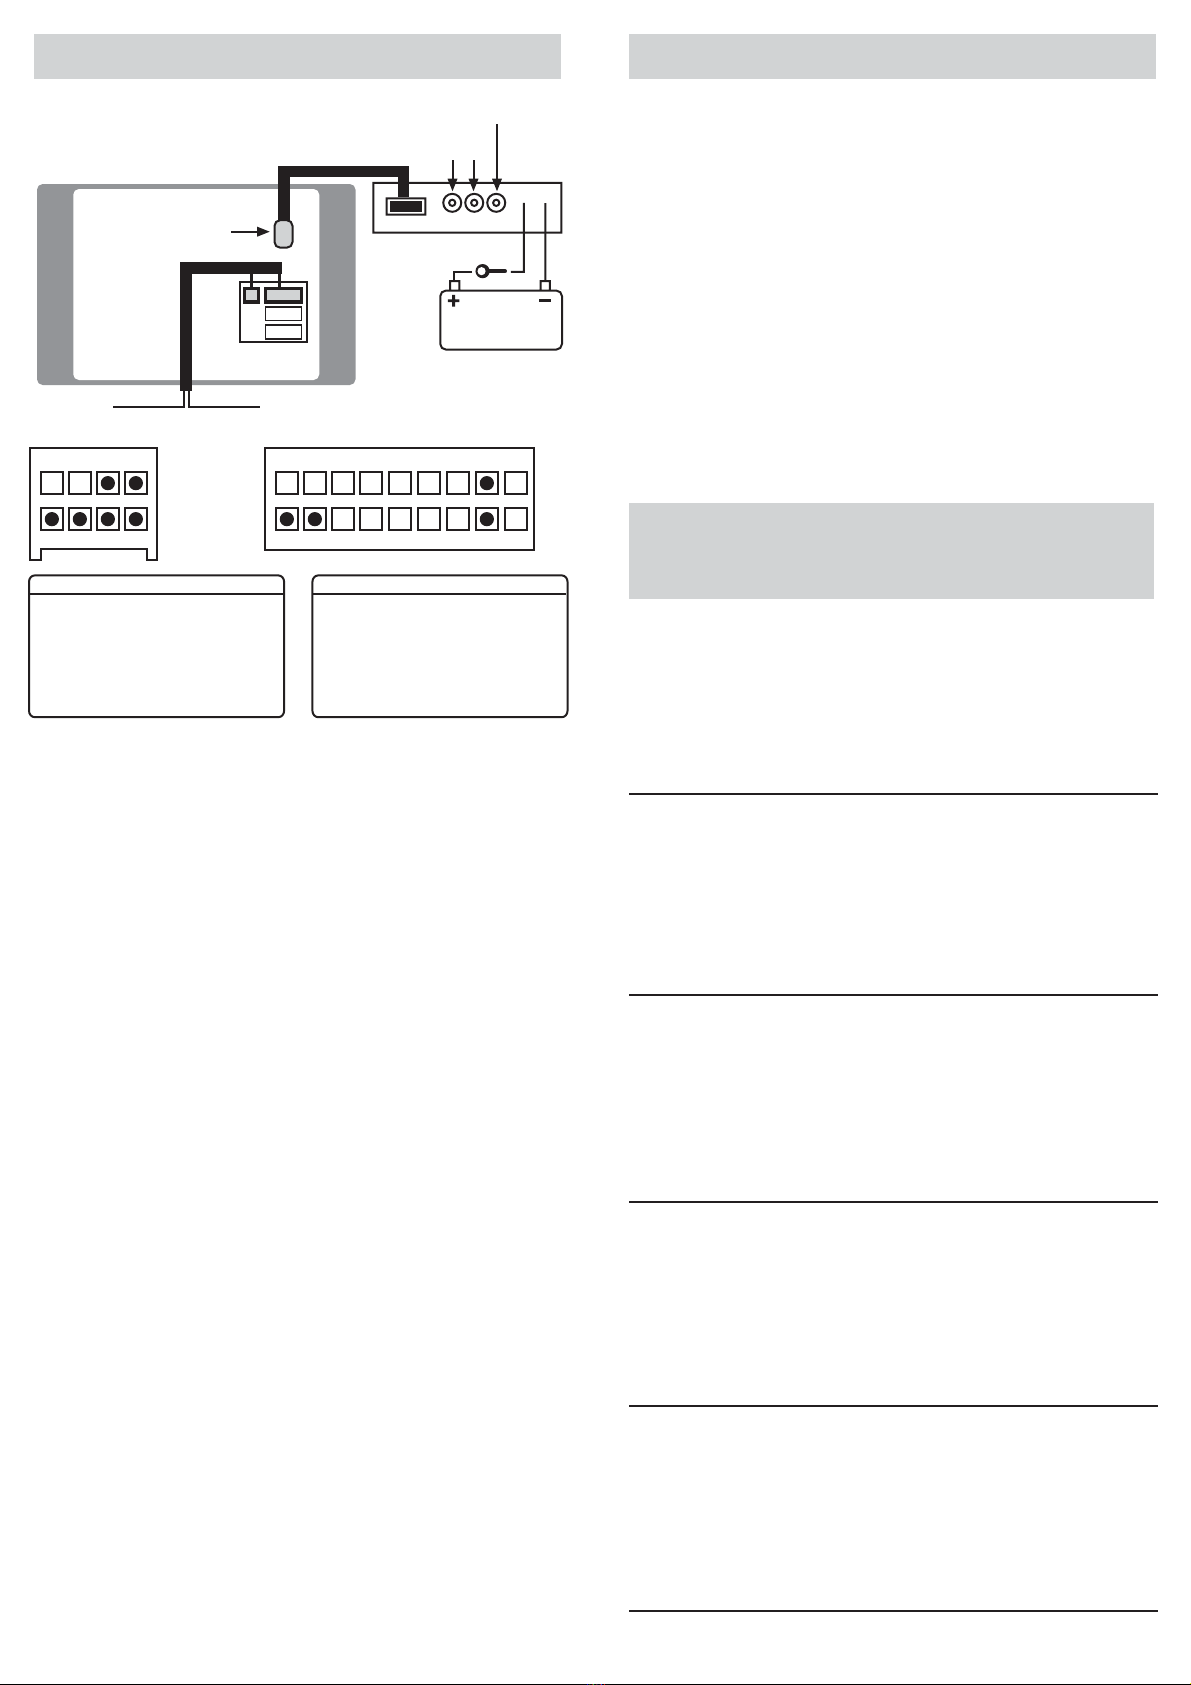
I- L’interfaccia deve sempre essere alimentata sottochiave.
Smontare il radio-navigatore.
Collegare il cablaggio al radio-navigatore ed il connettore a 14 vie al VM341.
Alimentare l’interfaccia e attivare, se necessario, la sorgente.
Connessioni: ROSSO= Alimentazione (+12 V sottochiave)
BLU= non collegare
NERO=Massa.
GB - The Interface power-supply must always be placed under switching (ignition-key).
Demount the radio-navigator.
Connect the cable to the radio-navigator and the 14-pin-connector to the VM341.
Power the Interface and, if necessary, activate the source.
Connections: RED = power-supply (+12V under switch)
BLUE = do NOT connect.
BLACK = ground
F- L’interface doit toujours être alimenté sous clé.
Démonter l’ensemble radio-navigateur.
Brancher le câble à l’ensemble radio-navigateur et le connecteur à 14-voies au VM341.
Alimenter l’Interface et activer la source, si nécessaire.
Connexions: ROUGE = alimentation (+12V sous clé)
BLEU = NON PAS brancher
NOIR = masse
D- Die Strom-Versorgung der Interface muss am Zünd-Plus angeschlossen
werden.
Radio-Navigation ausbauen.
Das Kabel an der Radio-Navigation anschließen; den 14-Pol.Stecker am VM341
einstecken. Die Interface mit Strom versorgen. Falls notwendig, Quelle aktivieren.
Verbindungen: ROT = Stromzufuhr (+12V unter Zünd-Plus)
BLAU = NICHT anschließen
SCHWARZ = Masse
E- El interfaz tiene que estar siempre conectado bajo llave, dispone de un
cable +12 Voltios para habilitar la visión.
Desmontar el radio navegador de su ubicación.
Conectar el cableado de 18 vías al radio navegador y el conector de 14 vías al VM341.
Alimentar el interfaz y activar la fuente si es necesario.
Conexiones: ROJO = Alimentación (+12 Voltios bajo llave)
AZUL = +12 Voltios bajo llave
NEGRO = Negativo (tierra)
Collegamenti • Connections • Connexions • Anschlüsse • Conexiones
I- Per selezionare la sorgente AUX premere TV.
Se il radionavigatore visualizza la scritta NO TV é indispensabile far attivare
l’ingresso TV da un concessionario autorizzato.
GB - To select the AUX-source, press TV.
If the radio-navigator shows the wording “NO TV”, it is necessary to have the
TV-input activated by an authorized Car-Dealer.
F- Pour sélectionner la source AUX, presser TV.
Si l’ensemble radio-navigateur montre l’indication « No TV », il est indispensable
de demander au Revendeurs autorisé d’activer l’entrée TV.
D- Um die AUX-Quelle zu wählen, TV-Taste drücken.
Falls die Radio-Navigation die Angabe „No TV“ aufzeigt, muss der TV-Anschluss
von einem autorisierten Händler aktiviert werden.
E- Para seleccionar la fuente AUX presionar TV.
En el caso de que el radio navegador visualice el mensaje NO TV es indispensable
hacer activar la entrada TV por un concesionario Mercedes.
Cause e Rimedi a problemi di installazione
Causes and Remedies to Installation Problems
Causes et Remèdes de problèmes d’installation
Ursache und Beseitigung von Installationsproblemen
Causas y remedios a los problemas de instalación.
L’immagine é in bianco e nero e oscilla.
L’uscita della sorgente settata su NTSC, commutarla in PAL.
L’immagine oscilla.
Il radionavigatore non é configurato correttamente. Premere PRESET 1.
Il radionavigatore visualizza la scritta “NO TV” dopo l’installazione.
Attivare l’ingresso TV da un concessionario autorizzato.
Il video si disattiva a vettura in movimento.
Dispositivo del radionavigatore per impedire la visione della TV durante la guida.
L’immagine é disturbata.
È stato collegato il filo BLU.
The picture is Black&White and flickers.
The source-exit is set on NTSC. Change into PAL.
The picture flickers.
The radio-navigator-configuration is NOT correct. Press PRESET 1.
The radio-navigator shows the wording “NO TV”, after the installation.
Ask an authorized Car-Dealer to activate the TV-input.
Video switches off, when car is in movement.
this is governed by the radio-navigator, in order avoid TV-watching while driving
the car.
The picture is disturbed.
The BLUE cable has, erroneously, been connected.
L’image est en blanc et noir et instable:
La sortie de la source est fixée sur NTSC. Changer en PAL.
L’image est instable:
L’ensemble radio-navigateur n’est pas correctement configuré. Presser PRESET 1.
L’ensemble radio-navigateur montre l’indication “No TV” après l’installation:
Demander au Revendeur autorisé d’activer l’entrée TV.
Le monitor s’arrête quand la voiture est en mouvement:
cette mesure est prévue par l’ensemble radio-navigateur, afin d’éviter de
regarder la TV quand on est au volant.
L’image est dérangé:
Le câble BLEU a été branché par erreur.
Das Bild ist schwarz/weiß und flackert:
der Quellen-Ausgang ist auf NTSC eingestellt. Auf PAL ändern.
Das Bild flackert:
die Radio-Navigation ist nicht korrekt ausgerichtet. “PRESET 1” drücken.
Die Radio-Navigation zeigt, nach der Installation, “No TV” an:
TV-Eingang von einem autorisierten Händler aktivieren lassen.
Der Monitor setzt aus, sobald das Auto sich in Bewegung setzt:
die Radio-Navigation leitet diese Maßnahme ein, um das Fernsehen am Steuer,
während der Fahrt, zu unterbinden.
Das Bild ist gestört:
irrtümlicherweise wurde das blaue Kabel angeschlossen.
La imagen esta en blanco y negro y oscila
La salida de la fuente está regulada en NTSC, conmutarla a PAL.
La imagen oscila.
El radio navegador no está configurado correctamente. Presionar PRESET 1.
El radio navegador visualiza el mensaje “NO TV” después de la instalación.
Activar la entrada TV a través de un concesionario Mercedes.
El video se desactiva con el coche en movimiento.
Función del radio navegador para impedir la visión de la TV durante la
conducción.
La imagen está disturbada.
Ha sido conectado el cable AZUL.
Attivazione • Activation • Activation • Aktivierung • Activación
56 87
12 43
98 67
18 17 15
16
5
14
4
13
3
12
2
11
1
10
AB
I- Inserire i PIN volanti dell’interfaccia all’interno dei connettori originali.
GB - Insert the free Interface-pins into the original connectors.
F- Introduire les Pins libres de l’Interface à l’intérieur des connecteurs originaux.
D- Die freien Pins der Interface in die Original-Verbinder einstecken.
E- Insertar los Pins sueltos del interfaz en el interior de los conectores de
origen del vehículo.
Bianco/
White
----------------- 7 (B)
Blu/
Blue
----------------------- 3 (B)
Verde/
Green
----------------- 2 (B)
Rosso/
Red
------------------- 1 (B)
Nero sdoppiato-------------- 4/8 (B)
Double black
Giallo/Yellow ----------------- 11 (A)
Arancio/Orange ------------- 2 (A)
Rosa/Pink--------------------- 17 (A)
Marrone/Brown-------------- 18 (A)
B connector A connector

Other Phonocar Automobile Accessories manuals

Phonocar 04048 User manual

Phonocar

Phonocar 04048 User manual

Phonocar 3/706 User manual

Phonocar

Phonocar 3/706 User manual

Phonocar 06890 User manual

Phonocar

Phonocar 06890 User manual

Phonocar VM334 User manual

Phonocar

Phonocar VM334 User manual

Phonocar 03750 User manual

Phonocar

Phonocar 03750 User manual

Phonocar 4/030 User manual

Phonocar

Phonocar 4/030 User manual

Phonocar 3/508 User manual

Phonocar

Phonocar 3/508 User manual

Phonocar 4/130 User manual

Phonocar

Phonocar 4/130 User manual

Phonocar 8/930 User manual

Phonocar

Phonocar 8/930 User manual

Phonocar 03603 User manual

Phonocar

Phonocar 03603 User manual

Phonocar 09004 User manual

Phonocar

Phonocar 09004 User manual

Phonocar 5/928 User manual

Phonocar

Phonocar 5/928 User manual

Phonocar 4/008 User manual

Phonocar

Phonocar 4/008 User manual

Phonocar 05153 User manual

Phonocar

Phonocar 05153 User manual

Phonocar 05730 User manual

Phonocar

Phonocar 05730 User manual

Phonocar 4/926 User manual

Phonocar

Phonocar 4/926 User manual

Phonocar VM342 User manual

Phonocar

Phonocar VM342 User manual

Phonocar 5/980 User manual

Phonocar

Phonocar 5/980 User manual

Phonocar 06821 User manual

Phonocar

Phonocar 06821 User manual

Phonocar 3/722 User manual

Phonocar

Phonocar 3/722 User manual

Phonocar 05143 User manual

Phonocar

Phonocar 05143 User manual

Phonocar DREAM PH2000 User manual

Phonocar

Phonocar DREAM PH2000 User manual

Phonocar VM548 User manual

Phonocar

Phonocar VM548 User manual

Phonocar 7/285 User manual

Phonocar

Phonocar 7/285 User manual

Popular Automobile Accessories manuals by other brands

Magneti Marelli AC161 Installation instruction

Magneti Marelli

Magneti Marelli AC161 Installation instruction

FDI uEZ GUI Start here

FDI

FDI uEZ GUI Start here

JCROffroad JT Install instructions

JCROffroad

JCROffroad JT Install instructions

Rostra VOXXElectronics 250-1930 owner's guide

Rostra

Rostra VOXXElectronics 250-1930 owner's guide

TOP VEHICLE TECH GR3FORD5 installation manual

TOP VEHICLE TECH

TOP VEHICLE TECH GR3FORD5 installation manual

Safe Fleet PRIME DESIGN AR-2000-BLK manual

Safe Fleet

Safe Fleet PRIME DESIGN AR-2000-BLK manual

Skoda Fabia Combi 5J Fitting instructions

Skoda

Skoda Fabia Combi 5J Fitting instructions

Camcar 40077 Al Mounting instructions

Camcar

Camcar 40077 Al Mounting instructions

Camcar 40089 AL Mounting instructions

Camcar

Camcar 40089 AL Mounting instructions

Impac Tradesman 2000 installation manual

Impac

Impac Tradesman 2000 installation manual

DVB OFFROAD BRSB-01 installation manual

DVB

DVB OFFROAD BRSB-01 installation manual

Safari Snorkel SS385HF installation guide

Safari Snorkel

Safari Snorkel SS385HF installation guide

ULTIMATE SPEED 279746 Assembly and Safety Advice

ULTIMATE SPEED

ULTIMATE SPEED 279746 Assembly and Safety Advice

SSV Works DF-F65 manual

SSV Works

SSV Works DF-F65 manual

ULTIMATE SPEED CARBON Assembly and Safety Advice

ULTIMATE SPEED

ULTIMATE SPEED CARBON Assembly and Safety Advice

Witter F174 Fitting instructions

Witter

Witter F174 Fitting instructions

WeatherTech No-Drill installation instructions

WeatherTech

WeatherTech No-Drill installation instructions

TAUBENREUTHER 1-336050 Installation instruction

TAUBENREUTHER

TAUBENREUTHER 1-336050 Installation instruction

manuals.online logo
manuals.online logoBrands
  • About & Mission
  • Contact us
  • Privacy Policy
  • Terms and Conditions

Copyright 2025 Manuals.Online. All Rights Reserved.