Note: To immediately start using this ash please refer to the quick-
start guide. For advanced features please read this manual and be
familiar with your camera manual and operations.
The Phottix Juno Flash is designed to work with most popular lm
and DSLR cameras system. It features manual power control and
transceiver technology for o-camera use.
Warnings
1. Use your ash safely. Do not re the ash into the eyes of people
or animals at short distances – damage and/or blindness can occur.
2. Be careful using the ash in or around cars, buses, motorcycles or
other moving vehicles as accidents can result.
3. Never use the ash near combustible gases (gasoline, solvents,
etc.)
4. Do not expose the ash or batteries to dripping/splashing water,
or high humidity.
5. Do not leave the ash or batteries in a hot location (direct sunli-
ght, in a closed car, etc.)
6. Remove batteries from the ash when not being used for an
extended period of time.
7. Change the batteries when required. Use undamaged batteries in
good condition. Do not mix battery types or new and used batteries.
8. Do not put opaque objects in front of the ash lens when ring
the ash. The energy emitted by the ash may cause objects to burn,
or cause damage to the ash tube or fresnel lens.
9. Use caution in touching the ash head after use. It may be hot and
can cause burns.
10. The ash contains high voltage electronic parts. Do not disas-
semble or attempt to repair the ash. Never touch the ash’s internal
components.
11. Do not touch the External Power Port contacts with any metal
objects – this can cause electric shock and serious injury.
Contents
1. Juno ash
2. Flash bag
3. Flash Stand
4. User guide
5. Flash diuser
Please note:
These instruction assume:
. Both the ash and camera are switched on.
. The ash and camera are set to the same settings as this manual.
. The ash is being used with a compatible camera.
Parts
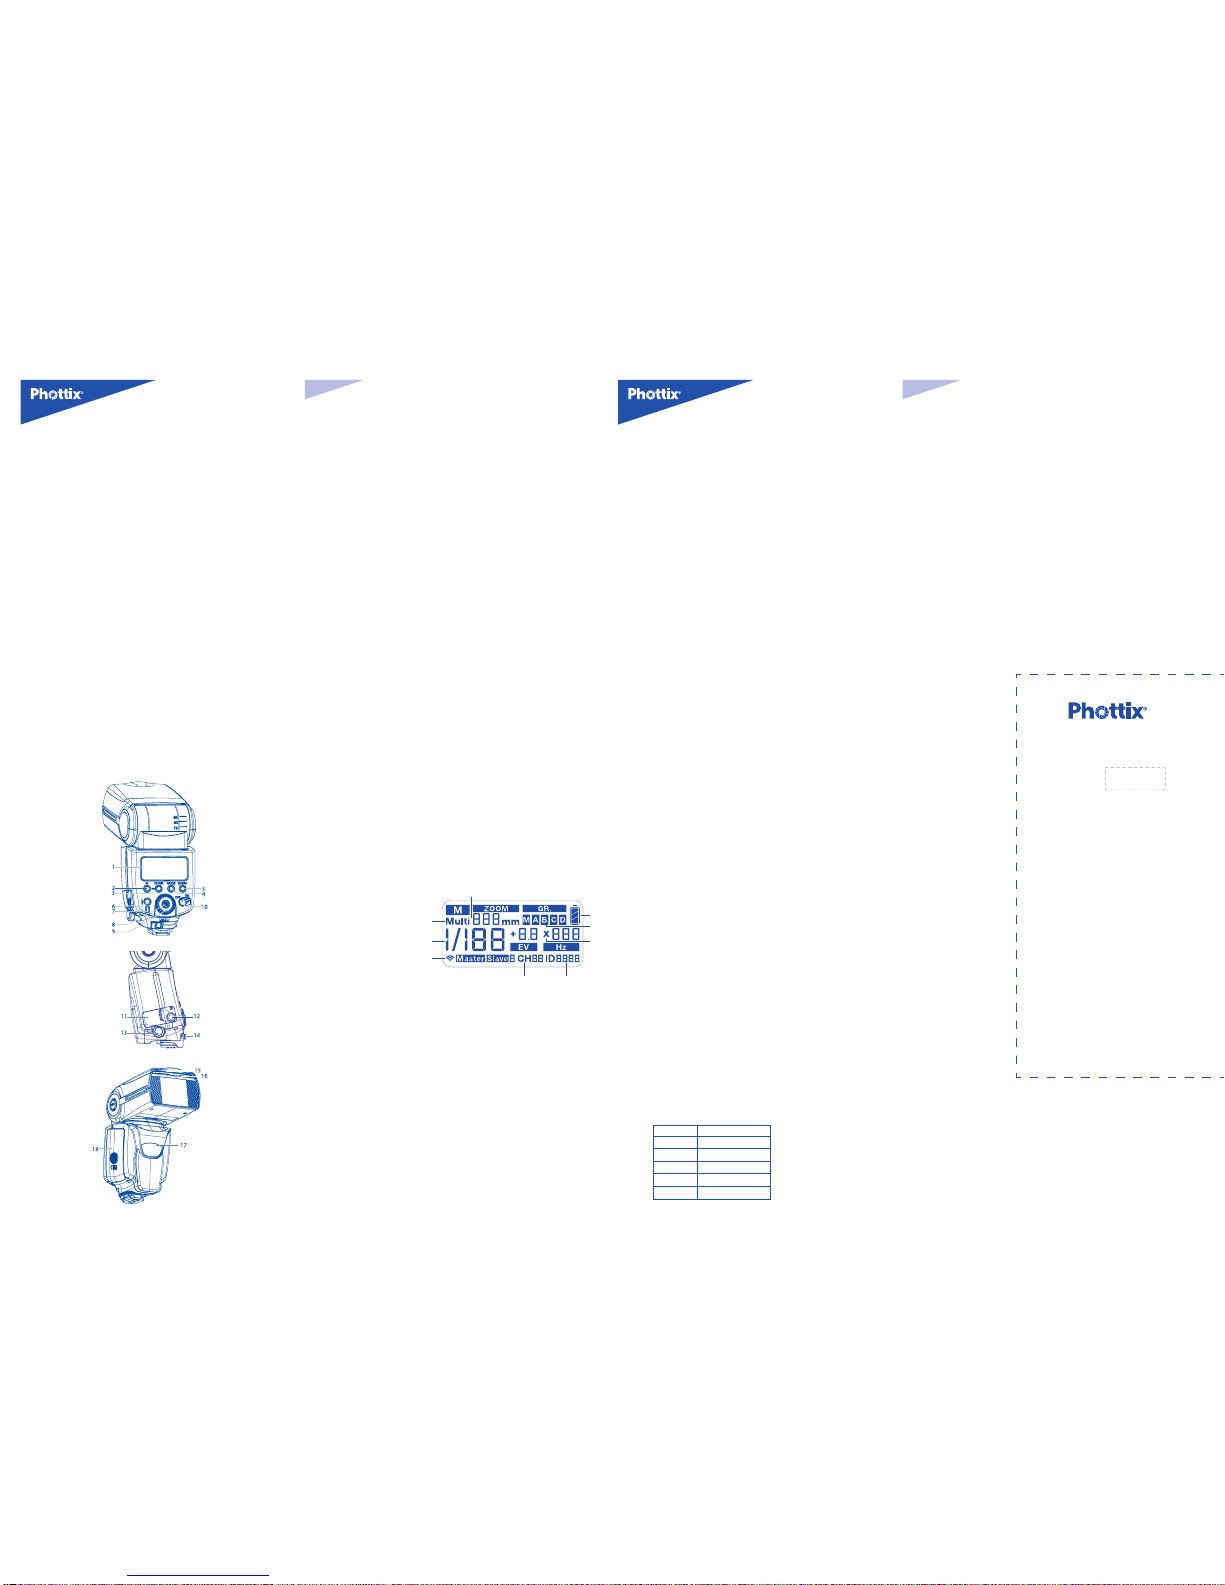
Back / Left Side
1. LCD Display
2. Wireless Mode Button
3. Channel / Group Button
4. Mode Button
5. Zoom Button
6. Test/Status Button
10. Power Light
7. Control Wheel
8. Set Button
9. Power Switch
11. Locking Lever
12. PC Sync Port
13. External Power Port
(Canon compatible)
14. ¼” x 20 Mounting Lug
The Phottix Juno Flash
Front / Right Side
1. Bounce Card
2. Wide Angle Diuser
3. Flash Head
4. Hot Shoe
5. Battery Compartment
Installing batteries
1. Press the battery cover in while pushing it towards the bottom of
the ash. The battery cover will open and raise.
2. Insert AA batteries as shown by the diagram inside the battery
compartment.
3. Lower the battery cover and push back towards the top of the
ash, locking it in place.
Please note:
- Please use four standard high-quality batteries of the same brand.
Make sure all batteries are at similar powers levels.
- Batteries can get hot when the ash is being used. Use caution
when changing batteries.
- If you do not use the ash for an extended period of time, store
with batteries removed.
Attaching the ash to a camera
Turn o both the camera and ash
1. Align the ash hot shoe with the camera hot shoe.
2. Slide the ash into the camera hot shoe until fully inserted.
3. Lock the ash in position by pushing the locking lever to the right
until the lock engages with a click.
4. To Unlock, press the locking release button on the locking lever
and slide to the left.
Turning the Flash On / O
1. To power on the ash move the power switch to the on position.
2. To power o the ash move the power switch to the o position.
Battery Level Indicator
The Battery Level Indicator on the LCD (see below) will display an
approximate indication of how much power remains in the batteries
in the ash. Use this as a rough guide as to when a battery change
is needed. If ash recycling time has become very long (30 seconds)
change the batteries.
Raising and Rotating the Flash Head
1. The ash head will elevate from 7 to 90 degrees with stops at 0, 45,
60, 75 and 90 degrees. Gently raise or lower the ash head into the
required position.
2. The ash head will rotate 180 degrees in either direction with
stops at 30, 60, 75, 90, 120, 150 and 180 degrees. Gently rotate the
ash head into the required position.
Using the Bounce Card or Wide Angle Diuser
The Phottix Juno Flash comes equipped with a white bounce card
and wide angle diuser panel in the ash head.
1. The wide angle diuser panel will cause the ash to spread light to
a 14mm equivalent.
2. The white bounce card can be used when the ash head is in a
raised position to bounce light forward to assist with catch lights in a
subject’s eyes.
To use:
1. Gently pull the diuser panel and bounce card from the ash
head using the ridge on the bottom of the diuser panel.
2. If using the diuser panel it will drop into position over the ash
head. Gently push the bounce card back into the ash head if not
needed. When used, the diuser panel will automatically reset the
ash head zoom to 14mm and ash head zoom cannot be set.
3. If using the bounce card only gently push the diuser panel back
into the ash head.
Using the Flash Head Diuser
The Phottix Juno Flash comes with an attachable diuser that can be
added to the front of the ash head when needed. It is good for so-
ftening light, reducing hot spots and shadows and better coverage
for macro photography.
To use:
1. Align the diuser with the ash head to the relevant slot.
2. Snap one side of the diuser mount into the corresponding ash
head mount.
3. Repeat step 3 on the other side of the diuser.
Overheating Protection
The Phottix Juno contains an overheating protection circuit that
will slow ash recycle time to avoid overheating-related damage.
Approximately 20 full-power ashes in a short amount of time will
trigger this protection. A [ Hot! ] Icon will appear when the overhe-
ating protection circuit is in operation.
To avoid further overheating or possible damage, wait 10 minutes
before using the ash.
PC Sync Port
1. The PC Sync Port can be used with a PC sync cable (male) to trig-
ger the ash – from a ash trigger or camera. This port is input only
– ash signals are not output from this port.
Test/Status Button
1. The Test/Status Button will light solid red when the ash is fully
charged and ready to use.
2. The Test/Status Button will ash red when the ash is recycling.
3. Pressing Test/Status Button will trigger the ash. In Wireless Master
Mode pressing the test button will re slave ashes on the same
channel being controlled by the Master ash.
Power Light
The Power Light will illuminate red when the ash is powered on,
and to indicate the ash is ready to re
External Battery Port
The External Battery Port is Canon-compatible and a Canon CP-E4
compact battery pack or compatible models can be used with the
Phottix Juno.
Please note:
- Batteries must be used in the ash even when an external battery
pack is used.
- Never use non Canon-compatible battery packs.
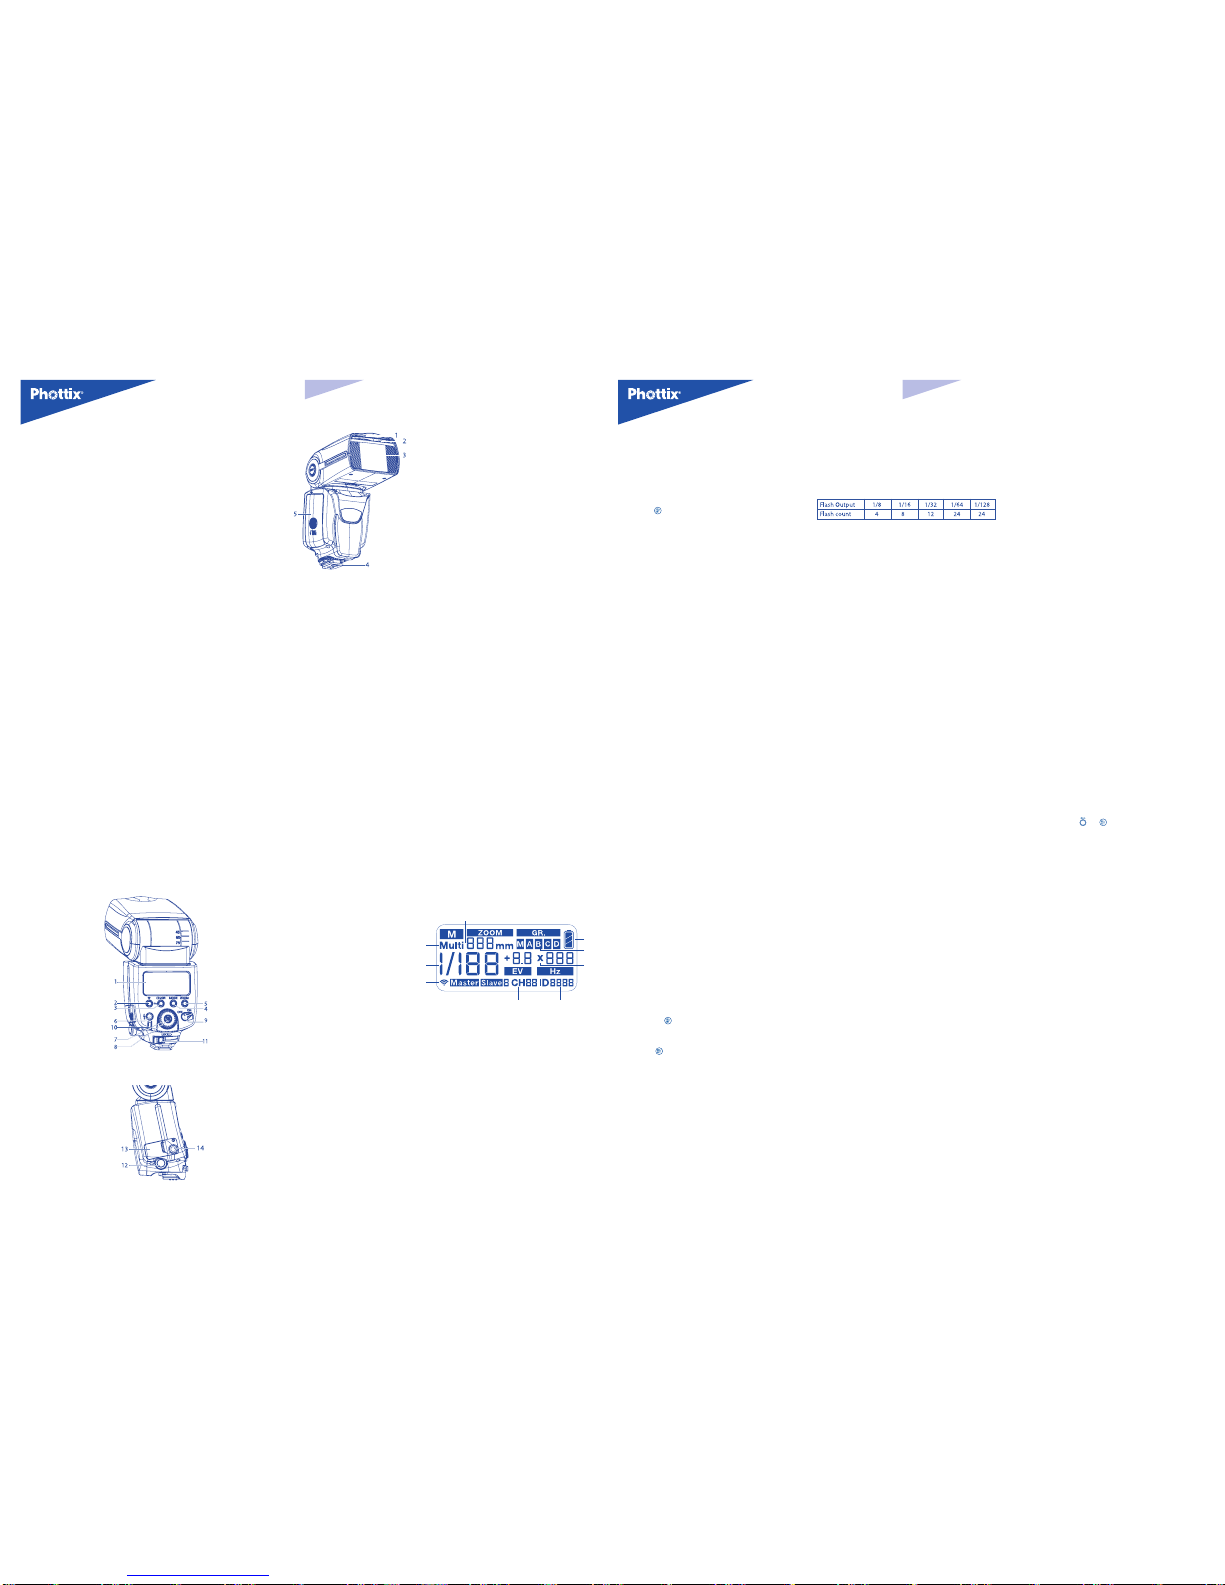
The LCD Display
1
2
8
3
45
6
7
9
The LCD display on the Phottix Juno ash contains important infor-
mation regarding ash settings and functions.
1. Flash mode (M: Manual mode , Multi: Multi mode)
2. Flash output level (1/128 - 1/1 in 1/3 stop increment)
3. Wireless mode settin (Master, Slave, Slave 1, Slave 2 or o (not
display)
4. Channels (CH1-16)
5. ID (CH5-16, ID0000-9999)
6. No. of ash in multi mode(1-90) and frequency display (1-100Hz)
7. Flash zoom range (within 14-200mm)
8. Group display (M,A,B,C,D)
9. Battery indicator
Note: Depends on chosen mode, not all settings will be display at
the same time.
Auto-Save Functions
The Phottix Juno will remember ash settings. Mode, power levels,
etc. will be retained in the ash if it is turned o and then back on.
Setting Flash Zoom
The Phottix Juno Flash allows users to adjust ash head zoom from
14mm to 200mm.
To set:
1. Press the zoom button.
2. Rotate the adjustment wheel to increase or decrease the zoom
distance.
3. Press the button when the zoom adjusted.
Please Note:
When using the ash head diuser panel zoom will set to 14mm
and cannot be changed.
Auto-Idle Functions
To save battery power the Phottix Juno Flash is equipped with Idle
and Auto O modes.
1. In Non-Wireless Slave Modes: The ash will go into Auto Idle mode
after 10/30/60 min depends on setting. if no buttons have been
pressed or it has not been red. The ash LCD will go blank. Hal-
f-pressing the camera shutter button or pressing the test button on
the ash will wake up the Phottix Juno.
2. In Wireless Radio Slave Mode (Slave mode but exclude slave 1 and
slave 2), the ash will not go to auto idle.
Flash Modes
The Phottix Juno has two ash modes: Manual (M) and Multi (Stro-
boscopic).
To change modes:
1. Press the Mode button.
2. Rotate the Control Wheel until the desired mode.
3. Press Press the Set Button to set the new mode.
4. If the Set Button is not pressed the Juno will automatically set
the new mode after approximately 10 seconds.
Manual (M) Mode
In Manual Mode the ash will re at the power level you set. The
Phottix Juno Flash can be adjusted from 1/1 (full power) to 1/128 – 8
stops of adjustments in 1/3rd stop increments. Aperture, shutter
speed and ISO on the camera need to be manually adjusted. For best
results use M-Manual mode on the camera.
Adjusting Power Levels
1. Press the Set Button. The displayed power level will ash.
2.
Rotate the Control Wheel until the desired power level is displayed.
3. Press the Set Button to set the new power level.
4. If the Set Button is not pressed the Juno will automatically set the
new power level after approximately 10 seconds.
Multi: Stroboscopic Mode
With Multi Stroboscopic mode a series of rapid ashes will be
red. The ash count, frequency and power of these ashes can be
programmed on the Phottix Juno. Multi mode is useful for capturing
multiple images of a moving subject in the same photo and other
special eects.
The frequency of the eect (in Hz. - number of ashes per second),
the total number of ashes and output levels can be set.
To use:
1. Set the Juno to Multi mode (above).
2. Pressing the button will cycle through the Power, Flash Count
and Frequency settings. Each setting will ash when highlighted.
3. When highlighted, use the Control Wheel to adjust the setting.
4. Press the button to continue to the next setting. After cycling
through the three settings the display will revert to its native Multi
Mode display
5. If the Set Button is not pressed the Juno will automatically set
the new level(s) after approximately 10 seconds.
Please note:
1. Overheating and damage can result from excessive use of the
Multi Stroboscopic Mode. Do not use more than 20 times in suc-
cession.
2. When overheated the ash will stop ashing and‘hot’icon will
be indicated on screen, please allow the ash to cool down.
Stroboscopic Mode and Shutter Speeds
To determine the proper camera shutter speed to be used with
various Stroboscopic Mode variables, use the following formula:
Number of ashes / Frequency = Shutter Speed
Example: 5x (number of ashes) / 10 Hz (Frequency) = .5 second
shutter speed.
This is a rough guideline: You may need to increase or decrease the
shutter speed to get the desired result.
Multi Stroboscopic Mode Maximum ash count chart.
Please refer to the table below for the maximum number of ashes
that the Juno ash allow with certain power setting.
Wireless Modes
The Phottix Juno has a built-in transceiver. It can be used to trigger
other nearby Juno ashes using radio signal (when used as a“Ma-
ster” transmitter), It can be set as a receiver “Slave” ash and be trig-
gered by Juno Flashes in transmitter mode or by compatible Phottix
Flash Triggers, or optically by other ashes.
Master Mode: The Juno Flash acts as transmitter and triggers other
Juno ashes or compatible Phottix products. While set in Master
Mode the Juno ash can also be used as a ash with power set from
1/1 to 1/128, or set not to re.
Slave Mode: The Juno Flash act as a receiver and res at the set
power level when receiving a radio signal from the Phottix Juno ash
in Master Mode or other compatible Phottix product.
S1 Mode: Optical Slave Mode: The Phottix Juno will be triggered
when other nearby ashes re.
S2 Mode: Optical Slave Delay Mode: The Phottix Juno will be trigge-
red when other nearby ashes re. This mode delays the triggering
of the Juno to account for any TTL pre-ash signals that made cause
unwanted early triggering.
Selecting Wireless Triggering Modes
To access and set the wireless triggering modes on the Juno:
1. Press the Wireless Mode Button.
2. The Wireless Icon in the bottom left of the Juno LCD will ash
when this selection is active.
3. Use the Selection Wheel to cycle between Master (M), Slave (S),
Slave 1 (S1) and Slave 2 (S2) modes.
4. Press the Set Button to select the wireless mode.
5. If the Set Button is not pressed the Juno will automatically set the
selected mode after approximately 10 seconds.
Channels, Groups and Digital ID in Master
and Slave Modes
In Master and Slave Wireless modes Channel, Group and Digital ID
Codes can be set on each ash.
Channel: The channel (1-16) that the Juno transmits or receives
signal on.
Group: Flashes can be designed to a group - A, B, C or D. Very useful
when using several lights.
Digital ID: Allows a unique four digit code to be set on the Juno.
The Juno will only trigger from another Phottix product using that
unique code (when using Channels 5-16 only).
Adjusting Channels, Groups and Digital ID
in Master and Slave Modes
1. Press the Channel/Group Button. The Channel Display on the LCD
will begin to ash.
2. Rotate the Control Wheel to cycle between Channels, Groups and
Digital ID.
3. To adjust: Press the Set Button when Channels, Groups and Digital
ID is selected. The adjustable parameter will begin to ash.
4. Rotate the Control Wheel to make adjustments.
5. Press the Set Button after adjustments are made.
6. If the Set Button is not pressed the Juno will automatically set the
selected mode after approximately 10 seconds.
Please Note:
- In S1 and S2 Modes only the power level can be set on the Juno.
- Do not place any obstacles between the master unit and slave
unit(s). Obstacles can block signal transmissions.
- Ensure the slave ash’s Wireless Signal Receiver Area faces toward
the triggering ash.
- TTL pre-ashes will set o a ash set to S1 Slave mode. The ash
will re before the exposure. Do not mix S1 Slave mode with other
ashes using TTL. In these situations use S2 Slave mode.
Adjusting Group in Master Mode
When using Wireless Master Mode on the Juno you can set Slave
ashes Groups on On or O. Groups set to O will not trigger.
1. Press the Channel/Group Button. The Channel Display on the LCD
will begin to ash.
2. Rotate the Control Wheel to cycle Groups.
3. Press the Set Button and Rotate the Control Wheel to the Group to
be turned on/o.
4. Press the Set Button.
5. The LCD will display an ON or OF (OFF) to show the status of the
group.
6. Press the Set Button and Rotate the Control Wheel to change the
group from On to OFF.
7.The on-camera Flash in Master Mode is Group M. Power can be set
(as above) or it can be turned o and used only as a trigger.
When using Wireless Modes Please Note:
- Make sure the M (Master) Juno and S (Slave) Juno are set to the
same transmission channel (1-16). If Master and Slave ashes are set
to dierent channels the Slave ashes will not re.
- If used, make sure the same Digital ID Code is used on all Juno
ashes. If the codes are dierent the ashes will not trigger.
Custom Functions
The Phottix Juno Flash comes with a number of programmable
custom functions. To edit these functions (below):
1. Press and hold the wireless and CH/GR button simultaneously to
access the custom function menu.
2. Use the control wheel to select between speaker sound (SP) (on/
o) or sleep mode time (SL) (10/30/60min/o).
3. To change a custom setting, press the set button while the cu-
stom setting is displayed.
4. Use the control wheel to make the selection value.
5. Press set to conrm.
Auto Backlight
The backlight will light up for approximately 15 seconds and then go
o if no buttons are pressed..
Resetting to Factory Defaults
The Phottix Juno Flash can reset to factory defaults.
To reset the ash:
1. Press and hold the and buttons for 3 seconds.
2. The ash will reset to factory default settings.
3. All custom functions will be reset to factory defaults.
Changes to the ash capacitor:
If the ash is not used for some time physical changes will take
place within the ash’s capacitor. Make sure to turn on the ash a
minimum of 10 minutes every three months to prevent any physi-
cal changes.
Technical Specication
Flash mode: Manual(M), Multi(Multi)
Guide No.: 58 (ISO100, 200mm)
Flash head coverage: 20-200mm (14mm with wide angle diuser)
Flash head angle: Top: 0-90 degree, Down: 0-7 degree,
Left:0-180 degree, Right:0-180 degree
Battery: 4 AA alkaline or AA(Ni-MH) batteries
Recycle time: 0.1-5seconds
Multi ash frequency: 1-100Hz
Multi ash no: 1-24 time
Recycle power conrm: Test button lit red
Power saving: o/10 min/30min/60min
Wireless option: Master/Slave/S1/S2
Wireless range: Approx 100 meters
Dimension: 190x75x53mm
Weight: 380g
www.phottix.com
Printed in China
En INSTRUCTION MANUAL INSTRUCTION MANUAL
En