manuals.online logo
Brands
  1. Home
  2. •
  3. Brands
  4. •
  5. Planet
  6. •
  7. IP Camera
  8. •
  9. Planet ICA-E3550V User manual

Planet ICA-E3550V User manual

Other Planet IP Camera manuals

Planet ICA-W8100 User manual

Planet

Planet ICA-W8100 User manual

Planet ICA-3350V User manual

Planet

Planet ICA-3350V User manual

Planet ICA-W7100 User manual

Planet

Planet ICA-W7100 User manual

Planet ICA-HM136 User manual

Planet

Planet ICA-HM136 User manual

Planet ICA-5250V User manual

Planet

Planet ICA-5250V User manual

Planet ICA-151 User manual

Planet

Planet ICA-151 User manual

Planet ICA-107 User manual

Planet

Planet ICA-107 User manual

Planet ICA-H610 User manual

Planet

Planet ICA-H610 User manual

Planet ICA-M230 User manual

Planet

Planet ICA-M230 User manual

Planet ICA-3150 User manual

Planet

Planet ICA-3150 User manual

Planet ICA-HM136 User manual

Planet

Planet ICA-HM136 User manual

Planet ICA-100C User manual

Planet

Planet ICA-100C User manual

Planet ICA-312 User manual

Planet

Planet ICA-312 User manual

Planet ICA-HM230 User manual

Planet

Planet ICA-HM230 User manual

Planet ICA-8500 User manual

Planet

Planet ICA-8500 User manual

Planet ICA-HM312 User manual

Planet

Planet ICA-HM312 User manual

Planet RS-21 KLMR User manual

Planet

Planet RS-21 KLMR User manual

Planet ICA-HM317 User manual

Planet

Planet ICA-HM317 User manual

Planet ICA-4500V User manual

Planet

Planet ICA-4500V User manual

Planet ICA-4130S User manual

Planet

Planet ICA-4130S User manual

Planet ICA-3110 User manual

Planet

Planet ICA-3110 User manual

Planet ICA-302 User manual

Planet

Planet ICA-302 User manual

Planet ICA-HM125 User manual

Planet

Planet ICA-HM125 User manual

Planet ICA-HM100 User manual

Planet

Planet ICA-HM100 User manual

Popular IP Camera manuals by other brands

Challenger Smart Force ASFCAM2 quick start guide

Challenger

Challenger Smart Force ASFCAM2 quick start guide

Foscam FI8903W user manual

Foscam

Foscam FI8903W user manual

BenQ DVY22 user manual

BenQ

BenQ DVY22 user manual

Avigilon H4A-BO1-IR installation guide

Avigilon

Avigilon H4A-BO1-IR installation guide

Digital Watchdog DWCA-C128-64 manual

Digital Watchdog

Digital Watchdog DWCA-C128-64 manual

Ganz ZN8 Series user manual

Ganz

Ganz ZN8 Series user manual

ShareTech AV1 user manual

ShareTech

ShareTech AV1 user manual

HOME8 V33040US quick start guide

HOME8

HOME8 V33040US quick start guide

Ezviz C6C quick start guide

Ezviz

Ezviz C6C quick start guide

Melchioni UCAM 2015 manual

Melchioni

Melchioni UCAM 2015 manual

Zxtech Tropox user manual

Zxtech

Zxtech Tropox user manual

Arecont Vision MegaBall AV3146DN-3310-D-LG installation manual

Arecont Vision

Arecont Vision MegaBall AV3146DN-3310-D-LG installation manual

Mitel 6800i Series Administrator's guide

Mitel

Mitel 6800i Series Administrator's guide

Vitek VTC-IR403-212NP quick start guide

Vitek

Vitek VTC-IR403-212NP quick start guide

THOMSON DSC - 323W user guide

THOMSON

THOMSON DSC - 323W user guide

ACTi TCM-5311 Hardware user manual

ACTi

ACTi TCM-5311 Hardware user manual

Eneo MCB-64A0003M0A Quick installation guide

Eneo

Eneo MCB-64A0003M0A Quick installation guide

deView electronics CBDNI36F instruction manual

deView electronics

deView electronics CBDNI36F instruction manual

manuals.online logo
manuals.online logoBrands
  • About & Mission
  • Contact us
  • Privacy Policy
  • Terms and Conditions

Copyright 2025 Manuals.Online. All Rights Reserved.

B. Attach the plate to the surface using the three supplied screws.
C. Attach the bracket to the plate.
2. Install Cable Gland with RJ45 cable.
A. Disassemble the cable gland as shown below:
VERIFY THE CONTENTS INSIDE THE BOX
The package should contain the following items. If any item is missing
or damaged, please contact the seller immediately.
Camera x 1
Quick Installation Guide x 1
Mounting Screw Kit x 1
Cable Gland Package x 1
Sunshield x 1
Bracket x 1
Bracket Plate x 1
1. Hardware Overview
B. Slip the clamping nut through the Ethernet cable. (Ethernet cable
is not included)
C. Wrap around the cable with the sealing insert with claw.

Note
When user closes the back cover, please make sure the
rubber seal is properly attached and the power cable is
plugged well into power cable slot.
2. Installation
Step 1: Hardware Installation
1. Install the bundled bracket
A. Mark the location of the three screw holes using the bracket plate
included in the package.
F. Connect the Ethernet cable to the Ethernet port.
G. Combine all items, and insert the sealing insert into the cable
gland body and then attach the clamping nut to complete the
cable solution.
Note
Make sure the gland body is tightly attached to the
Ethernet port and the washer is secured between them.
Moreover, please also make sure the clamping nut is
tightly attached to the cable gland body and the sealing
insert is squeezed tightly.
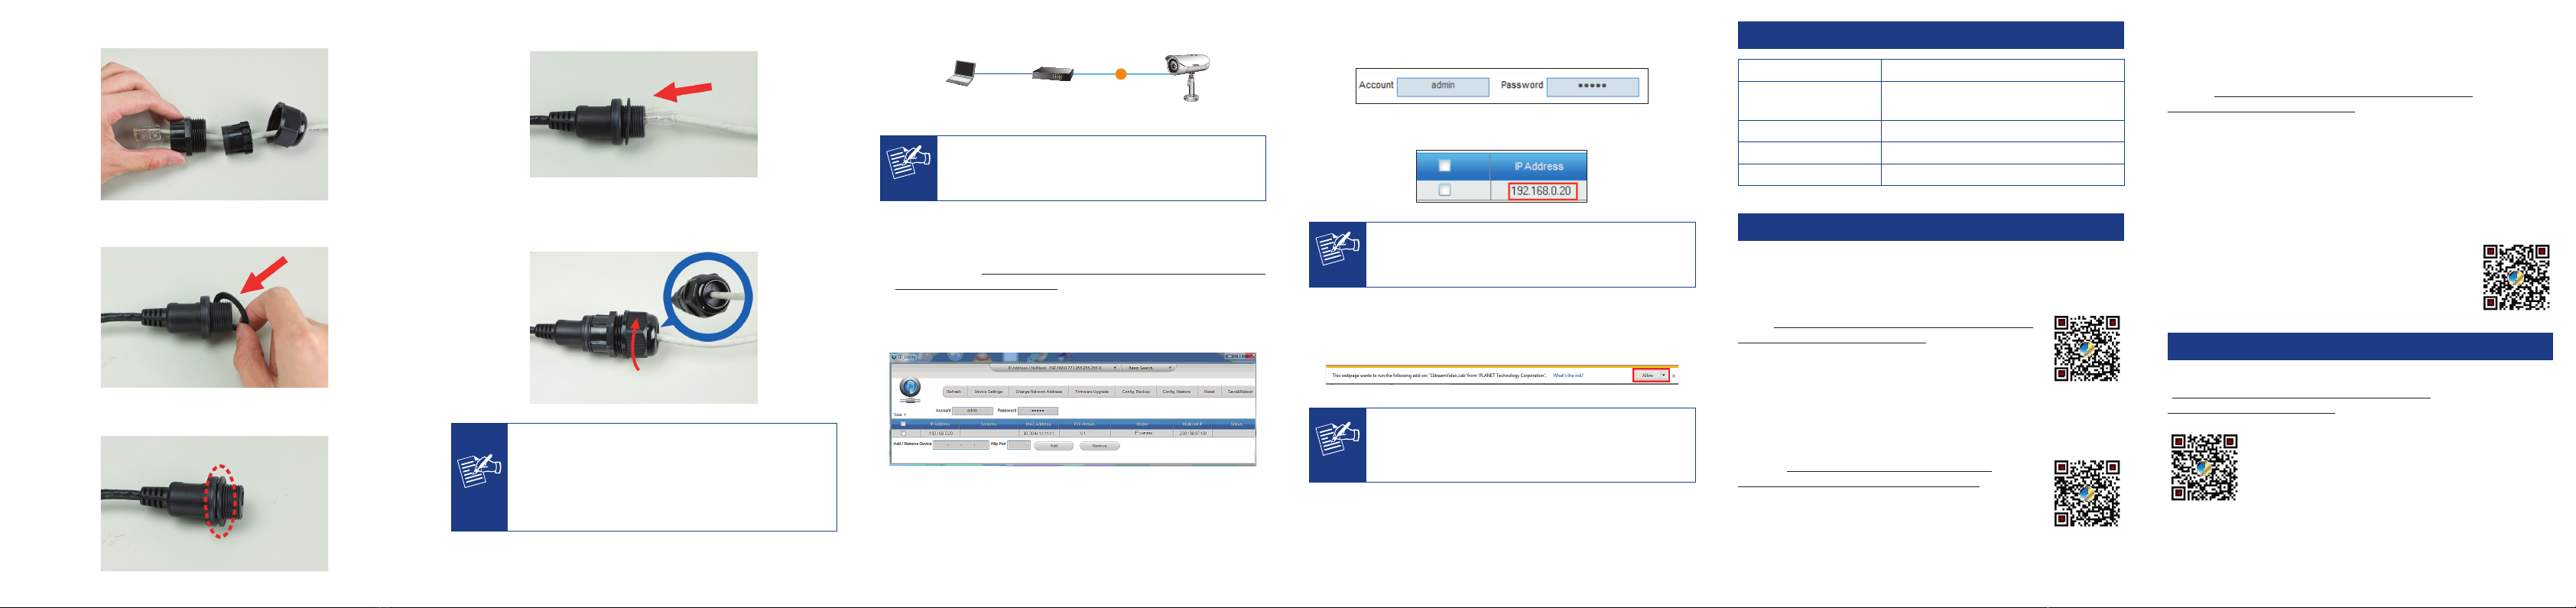
Step 2: Connecting Network and PoE
PoE Ethernet Switch
ICA-E3550V
Laptop
(192.168.0.X)
PoE
Note
The camera supports IEEE 802.3af and is only powered
from PoE.
Step 3: Running Search Tool to Locate the IP Camera
Download camera search tool: IP Utility, from the Download Center
of our website (http://www.planet.com.tw/en/support/download.php?
model=48711&type=8184#list).
Run IP Utility to start searching for cameras.
After the IP Utility is launched, all cameras found in your local area
network will be displayed.
Step 4: The Dialog Box for Further Conguration
The default account and password are both admin.
 ClicktheIPCamera’sIPaddressyouwanttocongure.
Note
The default IP address of camera is 192.168.0.20.
The IP Camera will be connected via Web browser automatically.
 When the device is logged on for the rst time, the browser will
prompt a message; please click “Allow” to install controls.
Note
If IE9 or higher version browser is used, it is suggested
that PLANET camera Web link should be added as a
trusted site.
Appendix A: Default Setting
Default DHCP Client On
Default IP Address 192.168.0.20 – if DHCP Server does not
exist in the network
Default Login User Name admin
Default Login Password admin
Search Tools IP Utility
Appendix B: Extended Software Introduction
PLANET provides the following software to cooperate with ICA-E series
of cameras. With these software, user is able to manage, analyze, and
even recognize vehicle license plate.
CV7L: http://www.planet.com.tw/en/support/download.
php?model=48724&type=8184#list
CV7L is a freeware of video management to help users
monitor and record images / videos from multiple
cameras simultaneously by using a single PC. It is
able to operate up to 16 channels with advanced features such as
event management and recording, tri-display monitoring, smart motion
detection, PTZ control and E-map.
CV7-VA: http://www.planet.com.tw/en/support/
download.php?model=48725&type=8184#list
CV7-VA is a payware of video analytics that is designed
to transform your video surveillance network into a
smart detection system. The software provides Enter
Area, People Counting, Missing Object, Line Crossing, Unattended
Object and Tamper functions. Once a suspicious activity is detected,
users can playback to watch these events and use them as references
or evidences if needed. With these intelligent functions, it can help you
enhance your existing surveillance system while providing you with
valuable information for management.
CV7-LP: http://www.planet.com.tw/en/support/download.
php?model=48726&type=8184#list
CV7-LP is a payware of video analytics that is designed to detect and
recognize vehicle license plates. This software is able to automatically
locate and read license plates appearing in a certain area, and match
this data against the database. It provides efciency in parking and
trafc control, as well as law enforcement. With CV7-LP, you can easily
cross-check if a vehicle that is passing through the parking gate or
parked in the designated space matches its parking permit. Moreover,
law enforcement ofcers can effortlessly identify suspicious vehicles by
matching the license plate with its database.
If you need further information, please scan the QR
code or contact PLANET directly at the following email
address: [email protected].
3. Further Conguration
Fordetailedconguration,pleasecheckuser’smanualonourwebsite.
(http://www.planet.com.tw/en/support/download.
php?model=48711&type=3#list)
If you have any other question, please contact the dealer where you
purchased this product or you can contact PLANET directly at the
following email address: [email protected]
D. Slip the gland body through the Ethernet cable.
E. Place the washer around the Ethernet port.
