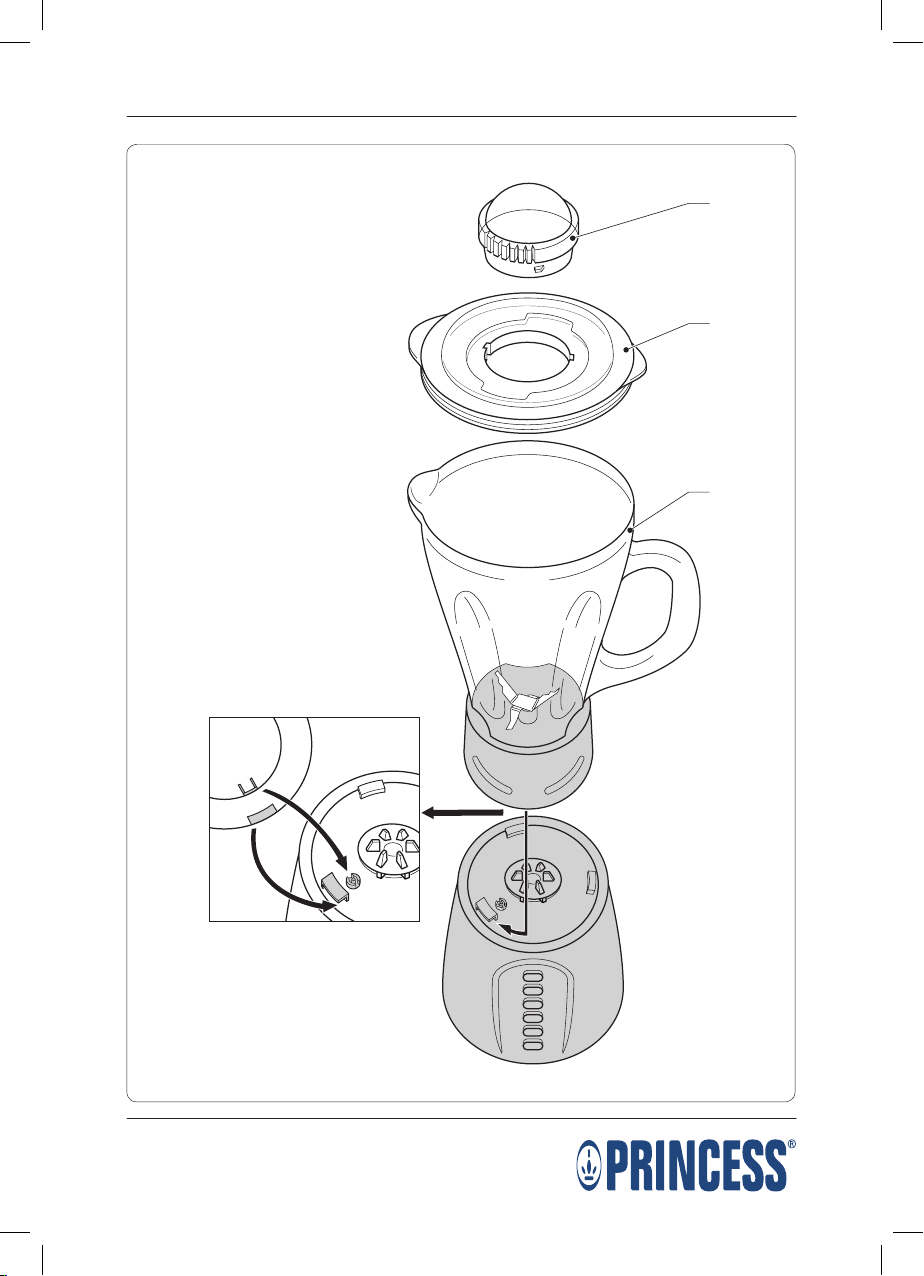
Assembleer het apparaat. Zie het gedeelte•
"Assemblage".
Doe het apparaat en de accessoires in de•
originele verpakking.
Berg het apparaat met de accessoires op•
op een droge en vorstvrije plaats, buiten
bereik van kinderen.
Veiligheidsinstructies
Algemene veiligheid
Lees voor gebruik de gebruiksaanwijzing•
zorgvuldig door. Bewaar de gebruiks-
aanwijzing voor toekomstig gebruik.
Gebruik het apparaat en de accessoires•
uitsluitend voor hun beoogde doeleinden.
Gebruik het apparaat en de accessoires
niet voor andere doeleinden dan
beschreven in de gebruiksaanwijzing.
Houd altijd toezicht op kinderen om te•
voorkomen dat ze met het apparaat spelen.
Het apparaat is niet bedoeld om gebruikt•
te worden door personen (inclusief
kinderen) met een lichamelijke, zintuiglijke,
of geestelijke beperking, of zonder de
benodigde ervaring en kennis tenzij ze
onder toezicht staan of instructies hebben
gekregen over hoe het apparaat kan
worden gebruikt door een persoon die
verantwoordelijk is voor hun veiligheid.
Gebruik het apparaat niet als een onderdeel•
of een accessoire beschadigd of defect is.
Indien een onderdeel of een accessoire
beschadigd of defect is, moet het door de
fabrikant of een erkend servicecentrum
worden vervangen.
Gebruik het apparaat niet in de buurt van•
badkuipen, douches, wastafels of andere
voorzieningen die water bevatten.
Dompel het apparaat niet onder in water•
of andere vloeistoffen. Verwijder het
apparaat niet met uw handen indien het
apparaat is ondergedompeld in water of
andere vloeistoffen. Verwijder onmiddellijk
de netstekker uit het stopcontact.
Gebruik het apparaat niet opnieuw indien
het apparaat is ondergedompeld in water
of andere vloeistoffen.
Dit apparaat is uitsluitend bedoeld voor•
huishoudelijk gebruik en voor gelijksoortige
toepassingsgebieden zoals werknemers-
kantines in winkels, kantoren en andere
werkomgevingen; boerderijen; door gasten
in hotels, motels, bed and breakfasts en
andere woonomgevingen.
Elektrische veiligheid
Controleer voor gebruik altijd of de•
netspanning overeenkomt met de spanning
op het typeplaatje van het apparaat.
Het apparaat mag niet worden bediend•
door middel van een externe timer of een
apart afstandsbedieningssysteem.
Sluit het apparaat aan op een geaard•
stopcontact. Gebruik indien nodig een
geaarde verlengkabel met een geschikte
diameter (minimaal 3 x 1 mm2).
Installeer voor extra bescherming een•
aardlekschakelaar (RCD) met een nominale
reststroom van maximaal 30 mA.
Zorg ervoor dat er geen water in de•
pluggen van het netsnoer en het
verlengsnoer kan komen.
Draai het netsnoer en het verlengsnoer•
altijd volledig uit.
Zorg ervoor dat het netsnoer niet over de•
rand van een werkblad hangt. Zorg ervoor
dat het netsnoer niet per ongeluk
verstrengeld raakt of de oorzaak van een
struikeling kan vormen.
Houd het netsnoer uit de buurt van•
warmtebronnen, olie en scherpe randen.
Gebruik het apparaat niet als het netsnoer•
of de netstekker beschadigd of defect is.
Indien het netsnoer of de netstekker
beschadigd of defect is, moet het door de
fabrikant of een erkend servicecentrum
worden vervangen.
Trek niet aan het netsnoer om de net-•
stekker van de netvoeding te verwijderen.
Verwijder de netstekker van de netvoeding•
wanneer het apparaat niet in gebruik is,
voor montage- of demontage-
werkzaamheden en voor reinigings- en
onderhoudswerkzaamheden.