PURE One Mi Series 2 User manual

Silkscreen text =
Pantone Cool Gray 10C
(for White case colour)
Silkscreen text =
Pantone 877C (for Black
case colour)
Name One Mi Series 2 front silkscreen
Part no. 14S59
Version 2
Date 20/03/2012
Volume
Presets Menu
Source
Select
OneMi-S2-EN.indb 1
4/27/2012 12:42:27 PM

OneMi-S2-EN.indb 2
4/27/2012 12:42:27 PM

1
Thank you for choosing One Mi Series 2. This
manual will help you get your product up and
running in no time and explains how to get the
best out of all its great features. If you need any
further assistance, please visit the support pages
on our website at www.pure.com.
Silkscreen text =
Pantone Cool Gray 10C
(for White case colour)
Silkscreen text =
Pantone 877C (for Black
case colour)
Name One Mi Series 2 front silkscreen
Part no. 14S59
Version 2
Date 20/03/2012
Volume
Presets Menu
Source
Select
OneMi-S2-EN.indb 1
4/27/2012 12:42:27 PM

2
Safety Instructions
1. Keep the radio away from heat sources.
2. Do not use the radio near water.
3. Avoid objects or liquids getting into the radio.
4. Do not remove screws from or open the radio casing.
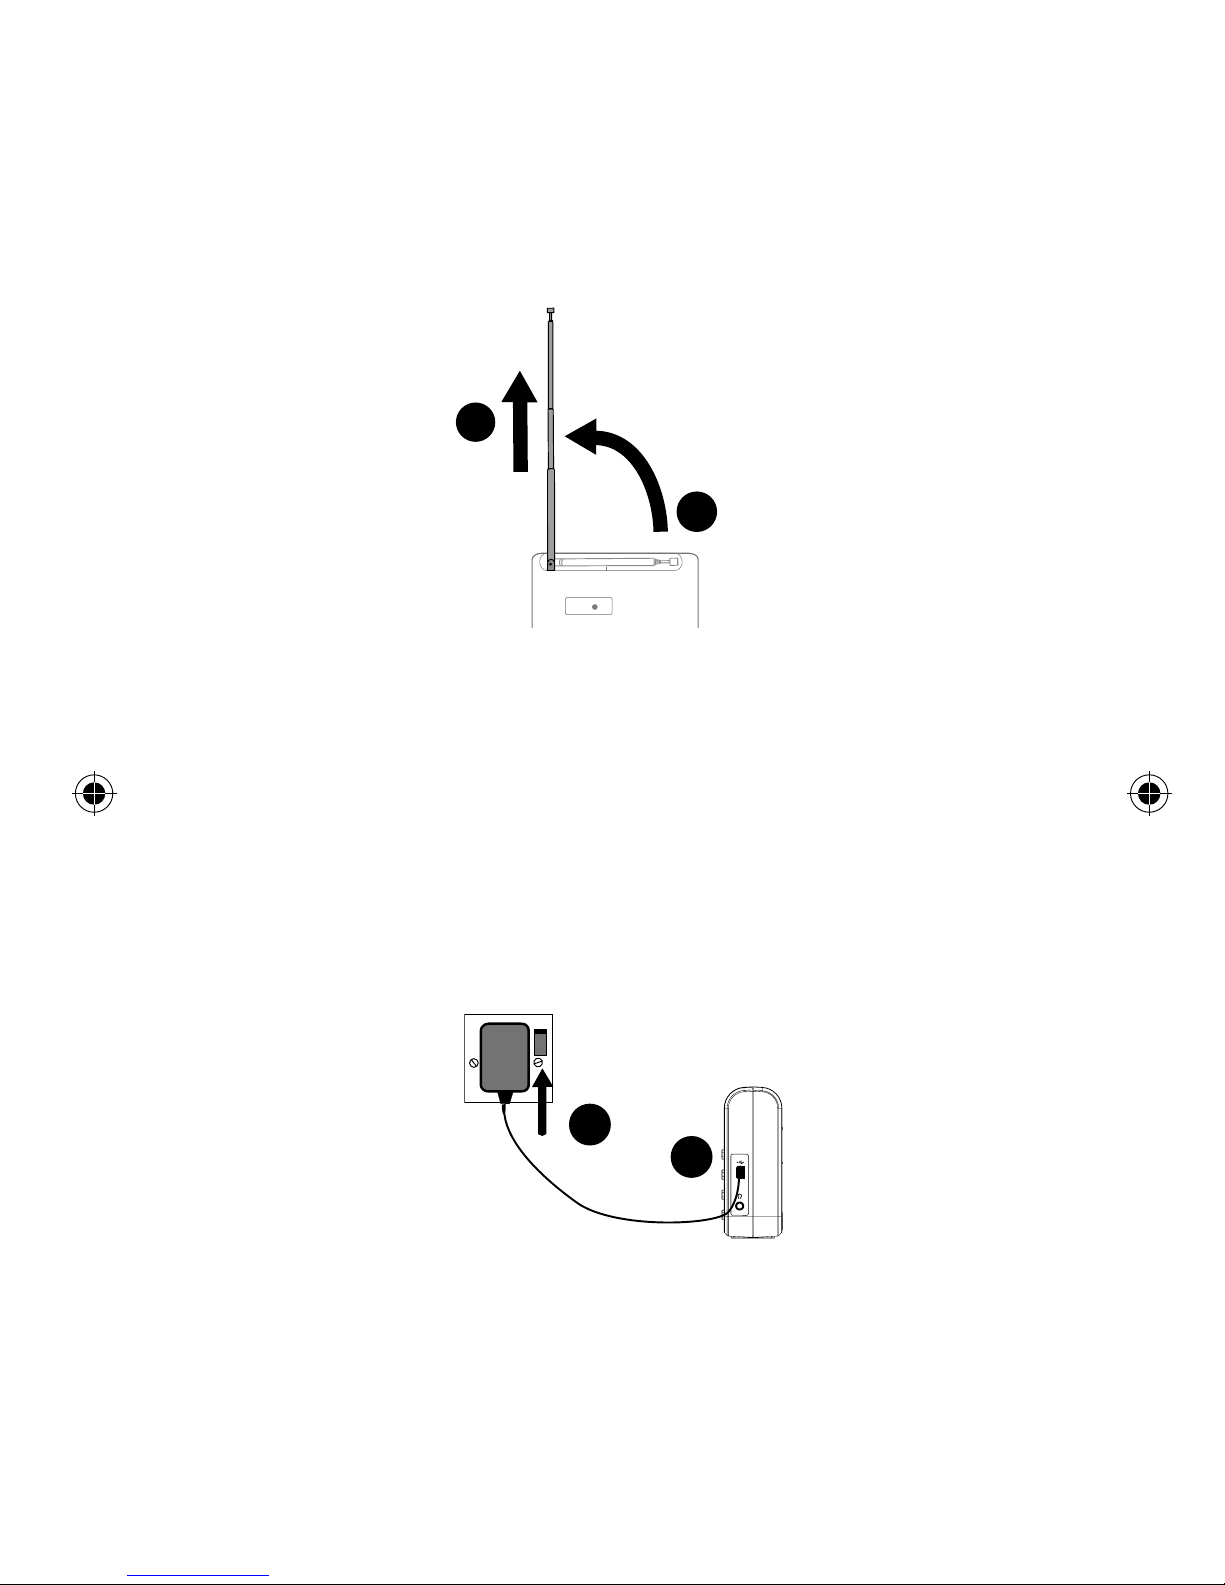
5. Fit the mains adapter to an easily accessible socket, located near the radio
and ONLY use the mains power adapter supplied.
6. Always switch the unit off and disconnect it from mains power before inserting
or removing a ChargePAK.
7. Should not be immersed in water, used in shower or bathroom if plugged into
the mains.
Warranty information
Imagination Technologies Ltd. warrants to the end user that this product will
be free from defects in materials and workmanship in the course of normal
use for a period of two years from the date of purchase. This guarantee covers
breakdowns due to manufacturing or design faults; it does not apply in cases
such as accidental damage, however caused, wear and tear, negligence,
adjustment, modification or repair not authorised by us. Should you have a
problem with your unit please contact your supplier or contact Pure Support at
http://support.pure.com.
Disclaimer
Imagination Technologies Limited makes no representation or warranties with
respect to the content of this document and specifically disclaims any implied
warranties of merchantability or fitness for any particular purpose. Further,
Imagination Technologies Limited reserves the right to revise this publication
and to make changes in it from time to time without obligation of Imagination
Technologies Limited to notify any person or organization of such revisions or
changes.
Trademarks
One Mi Series 2, Pure, the Pure logo, Imagination Technologies, and the
Imagination Technologies logo are trademarks or registered trademarks of
Imagination Technologies Limited.
Copyright
Copyright © 2012 Imagination Technologies Limited. All rights reserved. No part
of this publication may be copied or distributed, transmitted, transcribed, stored
in a retrieval system, or translated into any human or computer language, in any
form or by any means, electronic, mechanical, magnetic, manual or otherwise, or
disclosed to third parties without the express written permission of Imagination
Technologies Limited. Version 1 April 2012.
Disposal of Waste Electrical & Electronic Equipment
This symbol on the product or on its packaging indicates that this
product should not be treated as household waste. Instead it should
be handed over to a suitable collection point for the recycling of elec-
trical and electronic equipment. By ensuring this product is disposed
of correctly, you will help prevent potential negative consequences
for the environment and human health, which could otherwise be
caused by inappropriate waste handling of this product. The recy-
cling of materials will help to conserve natural resources. For more
detailed information about recycling of this product, please contact
your local council office, your household waste disposal service or
the shop where you purchased the product.
OneMi-S2-EN.indb 2
4/27/2012 12:42:27 PM

3
Contents
4 Product Overview
4 Controls
5 Display
5 Side connectors
6 Getting started
6 Position aerial
6 Connect power
7 Select language
7 Autotune
7 Adjusting the volume
8 Listening to radio
8 Selecting digital radio
8 Changing digital station
8 Selecting FM radio
8 Seek tuning
8 Manual tuning
9 Using radio presets
9 Storing a radio preset
9 Selecting a radio preset
10 Basic options
10 Autotune
10 Display information
10 Using textSCAN to pause and control scrolling text
11 Changing the time format
11 Changing the language
12 Advanced options
12 Version
12 Upgrade
12 Reset
13 Installing a ChargePAK A1
14 Technical specifications
16 Pure Warranty Statement for Australia
OneMi-S2-EN.indb 3
4/27/2012 12:42:27 PM

4
Product Overview
Controls
Source
Switch between
Digital and FM radio
Presets
Store and select
preset stations
Vol +/-
Adjust the volume
< Select >
Browse and
select radio
stations
Scroll, change
and confirm
menu options
Menu
Enter/exit
options menu
Standby
On/standby switch
(mains powered)
or on/off switch
(ChargePAK powered)
Silkscreen text =
Pantone Cool Gray 10C
(for White case colour)
Silkscreen text =
Pantone 877C (for Black
case colour)
Name One Mi Series 2 front silkscreen
Part no. 14S59
Version 2
Date 20/03/2012
Volume
Presets Menu
Source
Select
OneMi-S2-EN.indb 4
4/27/2012 12:42:28 PM

5
Display
DIGITAL
PM
BBC R6M
Source indicator
Displays the current radio source:
Digital indicates digital radio
FM indicates FM
Volume/mute Clock
Signal strength
Text area
Displays menus,
settings and station
information
Scroll left/right
Displayed when scrolling is possible
Side connectors
Mini-B type USB connector
For power/ software updates.
3.5 mm stereo headphone socket
OneMi-S2-EN.indb 5
4/27/2012 12:42:28 PM

6
Getting started
Position aerial
Unclip the aerial and fully extend it (steps Aand B).
B
A
Connect power
Note: If you have a ChargePAK A1 rechargeable battery (sold
separately) fit it now before plugging One Mi in. See page 13 for
more information.
1. Insert the jack of the supplied mains adapter into the USB socket
on the side of the radio (C).
2. Plug the mains adapter into the mains supply (D).
D
C
OneMi-S2-EN.indb 6
4/27/2012 12:42:28 PM

7
Select language
1. Press Select.
2. Use the Select scroll <>buttons to view
the different language options.
3. Press Select to choose the language
shown.
Autotune
One Mi will perform an autotune for digital
stations and tune to a station when complete.
The number of stations found is displayed
during an autotune.
Adjusting the volume
Use the Volume + - buttons to adjust the
volume level.
DIGITAL
PM
SCAN 48
DIGITAL
LANGUAGE
DIGITAL
ENGLISH
Silkscreen text =
Pantone Cool Gray 10C
(for White case colour)
Silkscreen text =
Pantone 877C (for Black
case colour)
Name One Mi Series 2 front silkscreen
Part no. 14S59
Version 2
Date 20/03/2012
Volume
Presets Menu
Source
Select
OneMi-S2-EN.indb 7
4/27/2012 12:42:29 PM

8
Listening to radio
Selecting digital radio
Press Source until ‘DIGITAL’ is displayed on
the screen.
Changing digital station
1. Scroll <>to the required station.
2. Push Select to tune into the station.
Selecting FM radio
Press Source until ‘FM’ is displayed at the
top of the screen.
Seek tuning
Hold either the scroll up or scroll down
buttons <>until One Mi starts to
automatically scan for the next station. The
scan will stop when a station with a strong
signal is found.
Manual tuning
Scroll <>to the required frequency.
DIGITAL
PM
DIGITAL
DIGITAL
PM
ABSOLUTE
FM PM
FM
FM PM
88 50
\
FM PM
93 00
\
OneMi-S2-EN.indb 8
4/27/2012 12:42:29 PM

9
Using radio presets
Storing a radio preset
1. Tune into the station that you want to
store.
2. Press Presets so that the < > symbols
are shown on the display.
3. Scroll <>to the required Preset (1-8).
4. Press and hold Select until ‘Saved’ is
displayed on the screen to store the radio
station as a preset.
Note:
To overwrite a radio preset, tune into the
station that you want to store and select the
preset that you want to overwrite at step 3.
Selecting a radio preset
1. Press the Presets button.
2. Scroll < > to the station that you want to
listen to.
3. Press Select to tune into the station.
Store up to 8 digital and 8 FM radio stations for quick access.
DIGITAL
PM
EMPTY 1
DIGITAL
PM
SAVED
DIGITAL
PM
BBC R6M
DIGITAL
PM
TUNING
OneMi-S2-EN.indb 9
4/27/2012 12:42:30 PM

10
Basic options
Autotune
You can use the autotune function to
automatically scan for new digital radio
stations and remove inactive ones.
Note: Autotune is only available when you
have selected ‘Digital’ as the radio source.
1. Press Menu.
2. Scroll < > to ‘Autotune’.
3. Press Select.
4. When the autotune has finished, One Mi
will tune to the last station that you were
listening to.
Display information
1. Press Menu.
2. Scroll < > to ‘Display’.
3. Press Select.
4. Use the scroll < > buttons to switch the
display between the station name, the
date, and scrolling text from the radio
station.
Using textSCAN to pause and
control scrolling text
1. When ‘Scrolling text’ information is
displayed in either digital or FM radio,
press Select to pause the scrolling text.
2. Press the scroll buttons < > to move the
text to the left or right.
3. Press Select to exit textSCAN.
DIGITAL
PM
SCAN 48
DIGITAL
PM
DISPLAY
DIGITAL
PM
AUTOTUNE
DIGITAL
PM
GOOD MORN
DIGITAL
PM
GOOD MORN
DIGITAL
PM
MORNING
OneMi-S2-EN.indb 10
4/27/2012 12:42:30 PM

11
Changing the time format
1. Press Menu.
2. Scroll < > to ‘12/24hr’.
3. Press Select.
4. Use the scroll < > buttons to the time
format between 12 and 24 hours.
5. Press Select.
Changing the language
1. Press Menu.
2. Scroll <>to ‘Language’.
3. Press Select.
4. Use the scroll < > buttons to the required
language.
5. Press Select to save your changes.
DIGITAL
PM
BBC R6M
DIGITAL
BBC R6M
DIGITAL
LANGUAGE
OneMi-S2-EN.indb 11
4/27/2012 12:42:31 PM

12
Version
Press and hold Menu to display the software
version on the screen.
Upgrade
Contact Pure technical support
(http://support.pure.com) for more
information on how to update One Mi to the
latest software version.
Reset
Resetting your One Mi removes all presets
and stored stations and resets all other
options to default settings.
To reset One Mi to default settings:
1. Ensure your aerial is fully extended and
vertical.
2. Press and hold Menu until you see the
software version number on screen.
3. Scroll <>to ‘Reset’ and press Select.
4. Press Select again to confirm that you
want to reset the One Mi to default
settings.
Advanced options
UPGRADE
DR
V6 \ 0
DR
DR
V1 \ 0
UPGRADE
DIGITAL
V1\3
DIGITAL
UPGRADE
DIGITAL
RESET
DIGITAL
CONFIRM
DR
V6 \ 0
DR
V1 \ 0
DIGITAL
V1\3
OneMi-S2-EN.indb 12
4/27/2012 12:42:32 PM

13
Installing a ChargePAK A1
1. Switch One Mi off and disconnect from the mains power supply.
2. Open the battery compartment (A).
3. Place the ChargePAK in the right hand end of the compartment,
logo side out (B).
3. Slide the ChargePAK to the left until it clicks into place on the
ChargePAK connector.
4. Replace the battery cover (C) and connect One Mi to the mains.
5. ChargePAK will begin charging.
Note: When charging your ChargePAK for the first time or after an
extended period of inactivity it is recommended that it is charged
for around 24 hours to ensure full battery power. If ChargePAK
is completely flat there may be a slight delay before the battery
charging indicator is displayed.
A
B
C
OneMi-S2-EN.indb 13
4/27/2012 12:42:32 PM

14
Radio Digital and FM. UK products receive DAB and
FM; non-UK products receive DAB/DAB+/
DMB-Radio/FM depending on region.
Frequencies DAB Band III 174-240MHz, DAB L-Band
1452-1490MHz, FM 87.5-108MHZ.
Audio 1W RMS Full-range 2.5” drive unit.
Input Connectors 5V Mini USB power adaptor socket (also for
software updates).
Output Connectors 3.5mm stereo headphone socket.
Power 230V AC to 5V (800 mA) Mini USB external
power adapter or ChargePAK A1.
Power Consumption Standby: 0.61W Active: 1.53W.
Approvals CE marked. Compliant with the EMC and
Low Voltage Directives (2004/108/EC and
2006/95/EC). ETSI EN 300 401 compliant.
Technical specifications
OneMi-S2-EN.indb 14
4/27/2012 12:42:32 PM

15
OneMi-S2-EN.indb 15
4/27/2012 12:42:33 PM

16
Pure Warranty Statement for Australia
This statement replaces any reference to warranty which may be contained
elsewhere within this manual.
What do you need to do now?
Option 1: You can register your purchase on-line at https://www.pure.com/au/
register/register.asp
Option 2: Or you can do nothing other than keep your proof of purchase as
evidence of your purchase date. This proof of purchase would need to be
presented if warranty service was ever required.
If you have any questions about your warranty you can call us toll free:
1800 988 268
What’s covered by this warranty?
• Pure agrees to refund, repair or replace, at your election, without charge to
you, any part found to be defective during the warranty period.
• If equipment has been used according to its accompanying instruction
manual and is used in a domestic situation, a two year warranty period
applies (excludes rechargeable ChargePAK where fitted. A one year warranty
period applies to all ChargePAKs).
How do you make your claim?
Call 1800 988 268 for instructions on how to return your Pure product for warranty
service or go to: http://support.pure.com/au/ and complete the contact us form.
What’s NOT covered by this warranty?
Under this express warranty Pure will not be liable for loss or damage of any kind
whatsoever, whether direct, indirect, incidental, consequential or otherwise.
• Replacement of parts due to normal wear and tear.
• Products with serial number defacement, modification or removal.
• Water damage or corrosion caused by dampness.
• Any damage or deterioration due to shipments.
• Any damage or deterioration due to shipment.
• Any product which has been subjected to misuse, abuse or accident.
Australian consumers —The benefits to the consumer given by this express
warranty are in addition to other rights and remedies of the consumer under a law
in relation to the goods or services to which this warranty relates. Our goods
come with guarantees that cannot be excluded under the Australian Consumer
Law, You are entitled to a replacement or refund for a major failure and for
compensation for any other reasonably foreseeable loss or damage. You are also
entitled to have the goods repaired or replaced if the goods fail to be of acceptable
quality and the failure does not amount to a major failure.
Pure is distributed and supported in Australia by PIONEER ELECTRONICS
AUSTRALIA PTY LTD, 5 ARCO LANE, HEATHERTON, VICTORIA, 3202.
OneMi-S2-EN.indb 16
4/27/2012 12:42:33 PM

Pure
Imagination Technologies Ltd
Home Park Estate
Kings Langley
Herts, WD4 8LZ
United Kingdom
http://support.pure.com
Pure Australasia Pty Ltd
PO Box 5049
Wonga Park
Victoria 3115
Australia
sales.au@pure.com
http://support.pure.com/au
OneMi-S2-EN.indb 17
4/27/2012 12:42:33 PM

103QC
www.pure.com
connect.pure.com
www.facebook.com/pure
OneMi-S2-EN.indb 18
4/27/2012 12:42:33 PM
Table of contents
Other PURE Radio manuals

PURE
PURE Evoke Play User manual

PURE
PURE HIGHWAY 300DI User manual

PURE
PURE Pop Midi with Bluetooth User manual

PURE
PURE EVOKE-1 XT User manual

PURE
PURE DRX-601EX User manual

PURE
PURE Evoke-2XT User manual

PURE
PURE SENSIA User manual

PURE
PURE Pure flow User manual

PURE
PURE HIGHWAY 300DI User manual

PURE
PURE Marshall Evoke-1 XT User manual

PURE
PURE Evoke C-D4 User manual

PURE
PURE POCKETDAB 2000 User manual

PURE
PURE Pure flow User manual

PURE
PURE ONE mini User manual

PURE
PURE Evoke H2 User manual

PURE
PURE HIGHWAY User manual

PURE
PURE Pop Mini User manual

PURE
PURE elan dx20 User manual

PURE
PURE Siesta Home User manual

PURE
PURE Tempus-1S User manual