RADWAG WPT User manual

User Manual
Single load cell platform scales
Manual number:
ITKU-18-02-01-12-A
•Scales of WPT series
•Table scales of WPT/F series
•Waterproof scales of WPT/H series
•Waterproof scales of WPT/HR series
MANUFACTURER OF ELECTRONIC
WEIGHING INSTRUMENTS
RADWAG Wagi Elektroniczne
26 – 600 Radom Bracka 28 Street - POLAND
Phone +48 48 38 48 800, phone/fax. +48 48 385 00 10
Selling department +48 48 366 80 06
www.radwag.com

- 2 -
JANUARY 2012

- 3 -
TABLE OF CONTENTS
1. NTENDED USE .......................................................................................................................................5I
2. PRECAUTIONS........................................................................................................................................6
2.1. .....................................................................................................................................6Maintenance
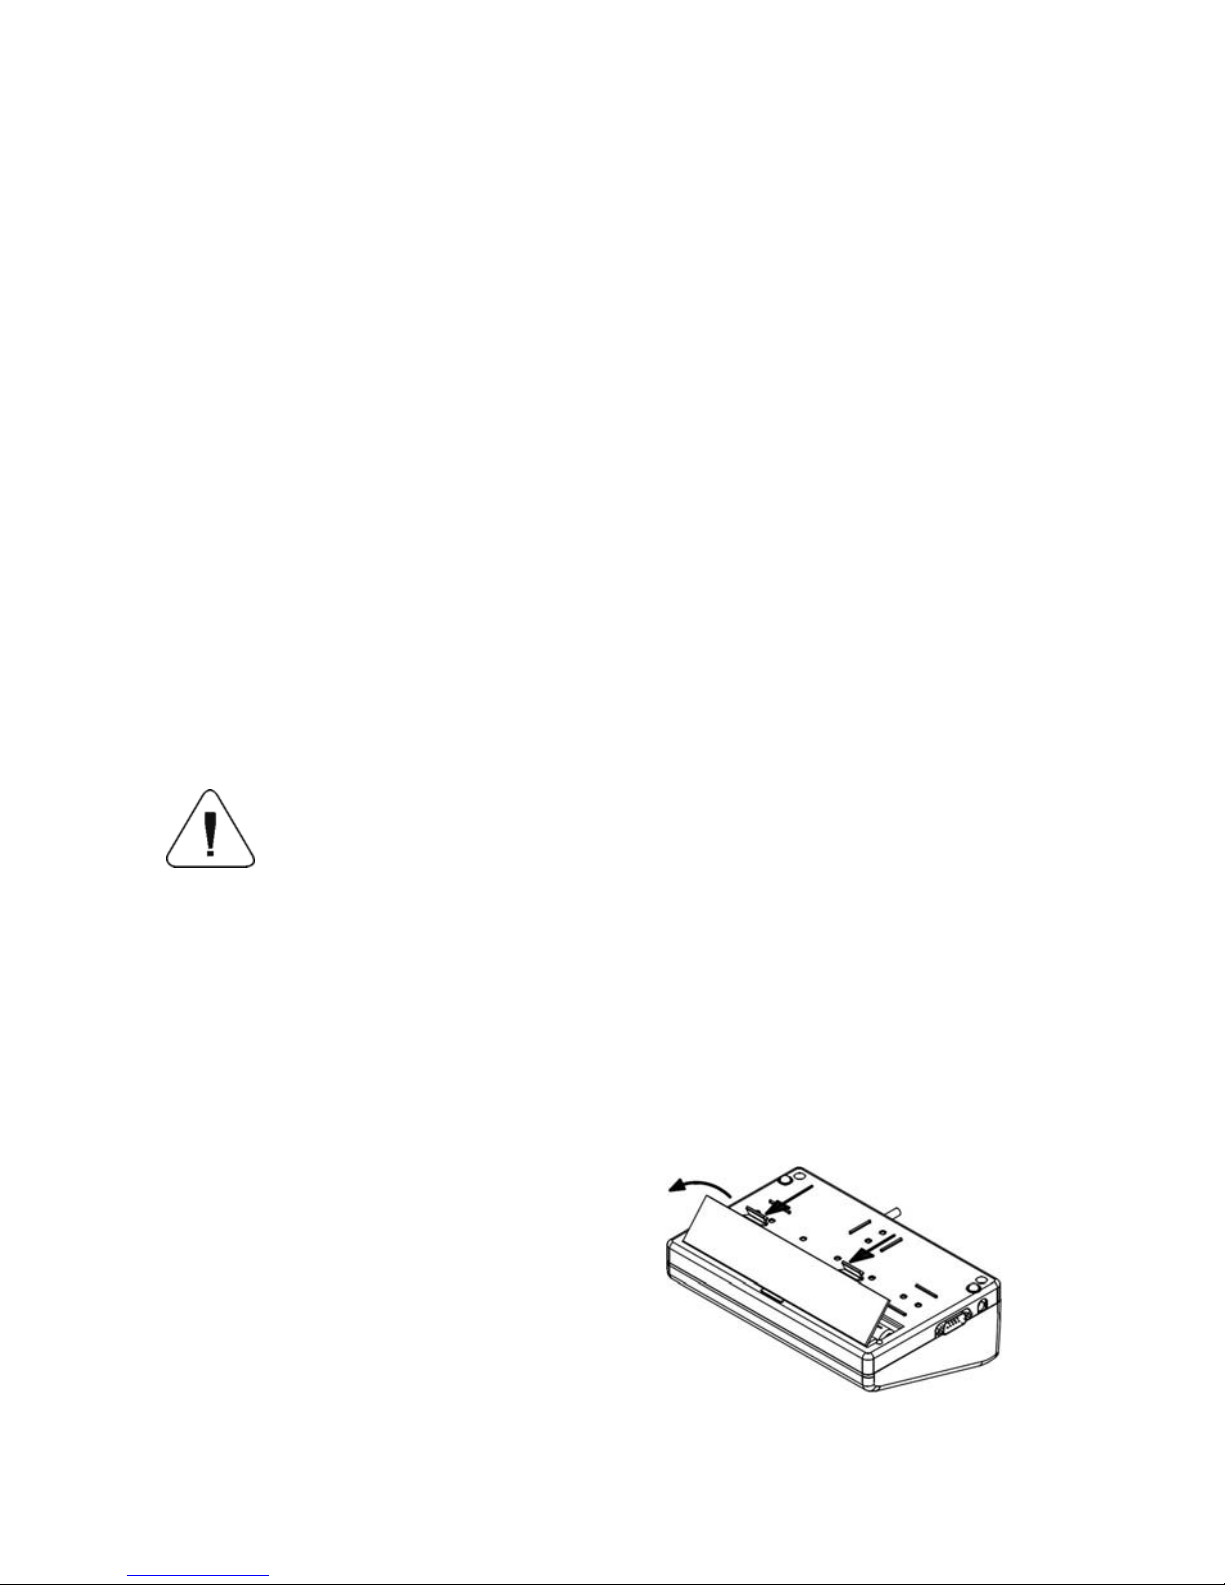
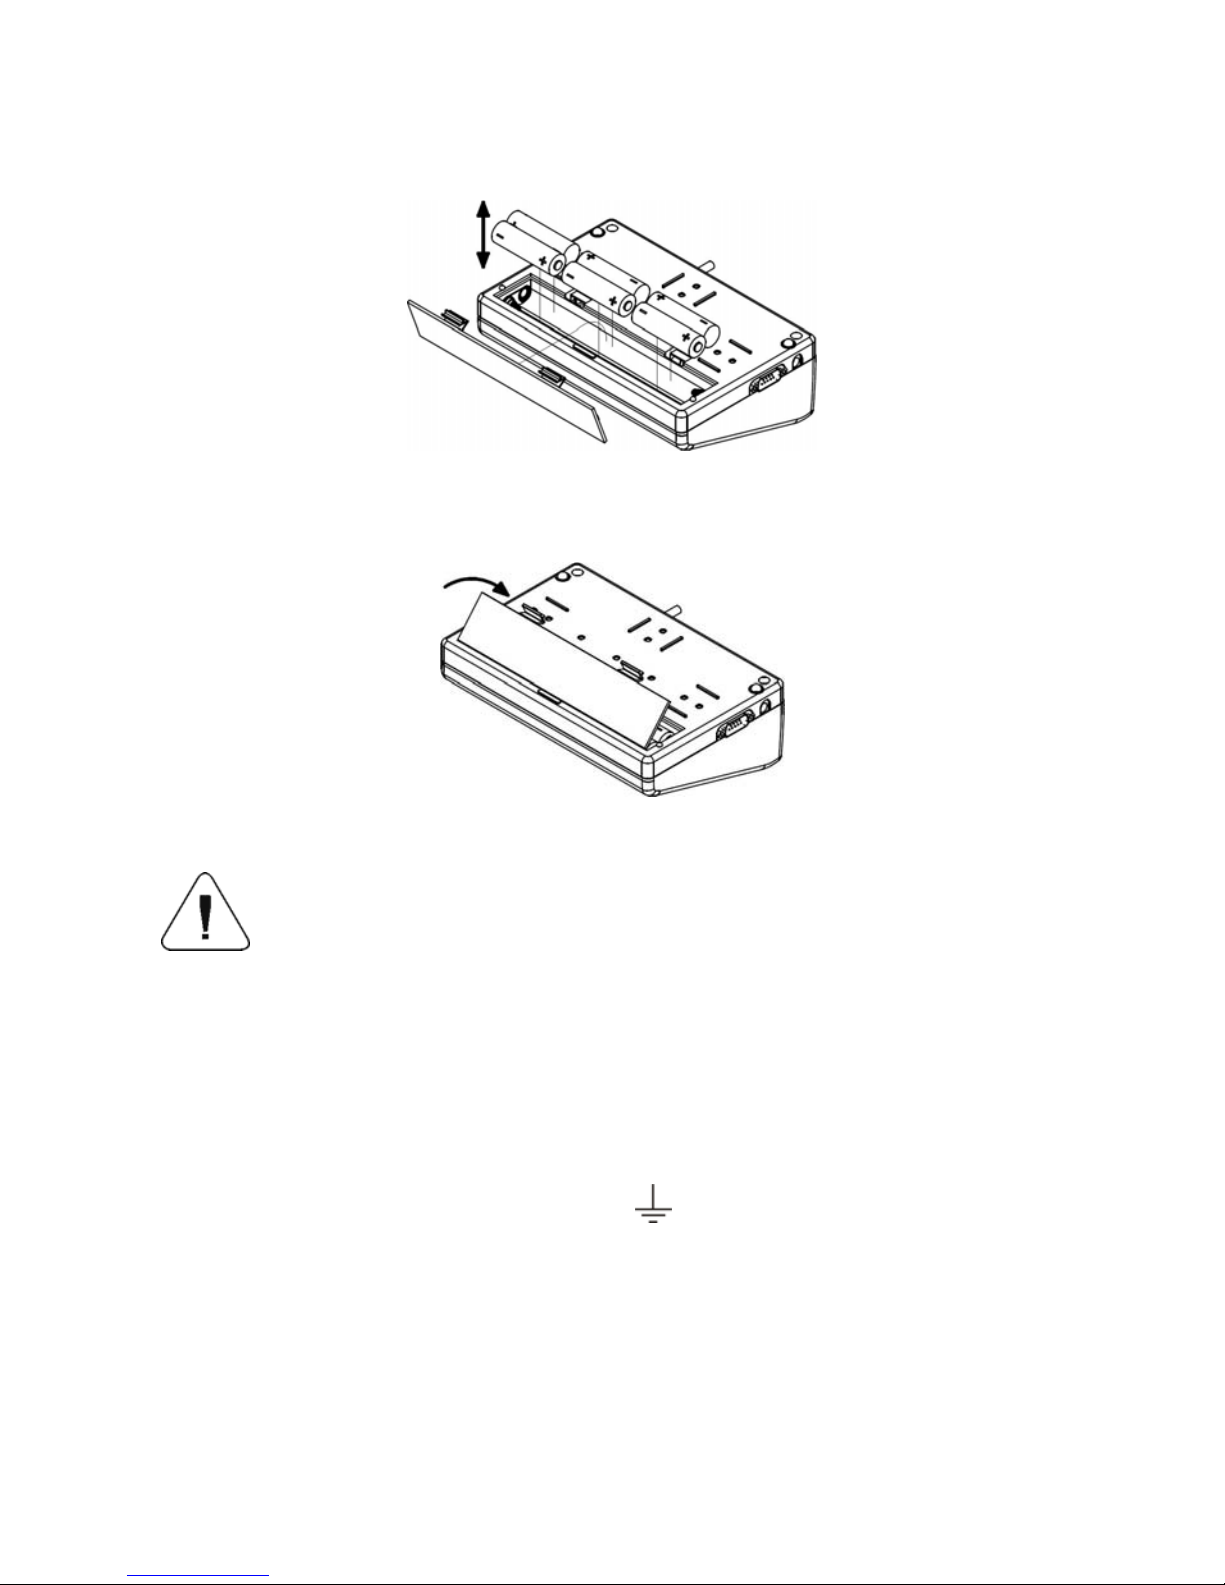
2.2. Accum lator / battery pack ...............................................................................................................6u
2.2.1. er supply of weighing indicators in plastic casings .........................................................7Pow
2.2.2. Replacement of worn batteries..............................................................................................7
2.3. Operation in a strong electrostatic field ............................................................................................8
3. WARRANTY CONDITIONS......................................................................................................................9
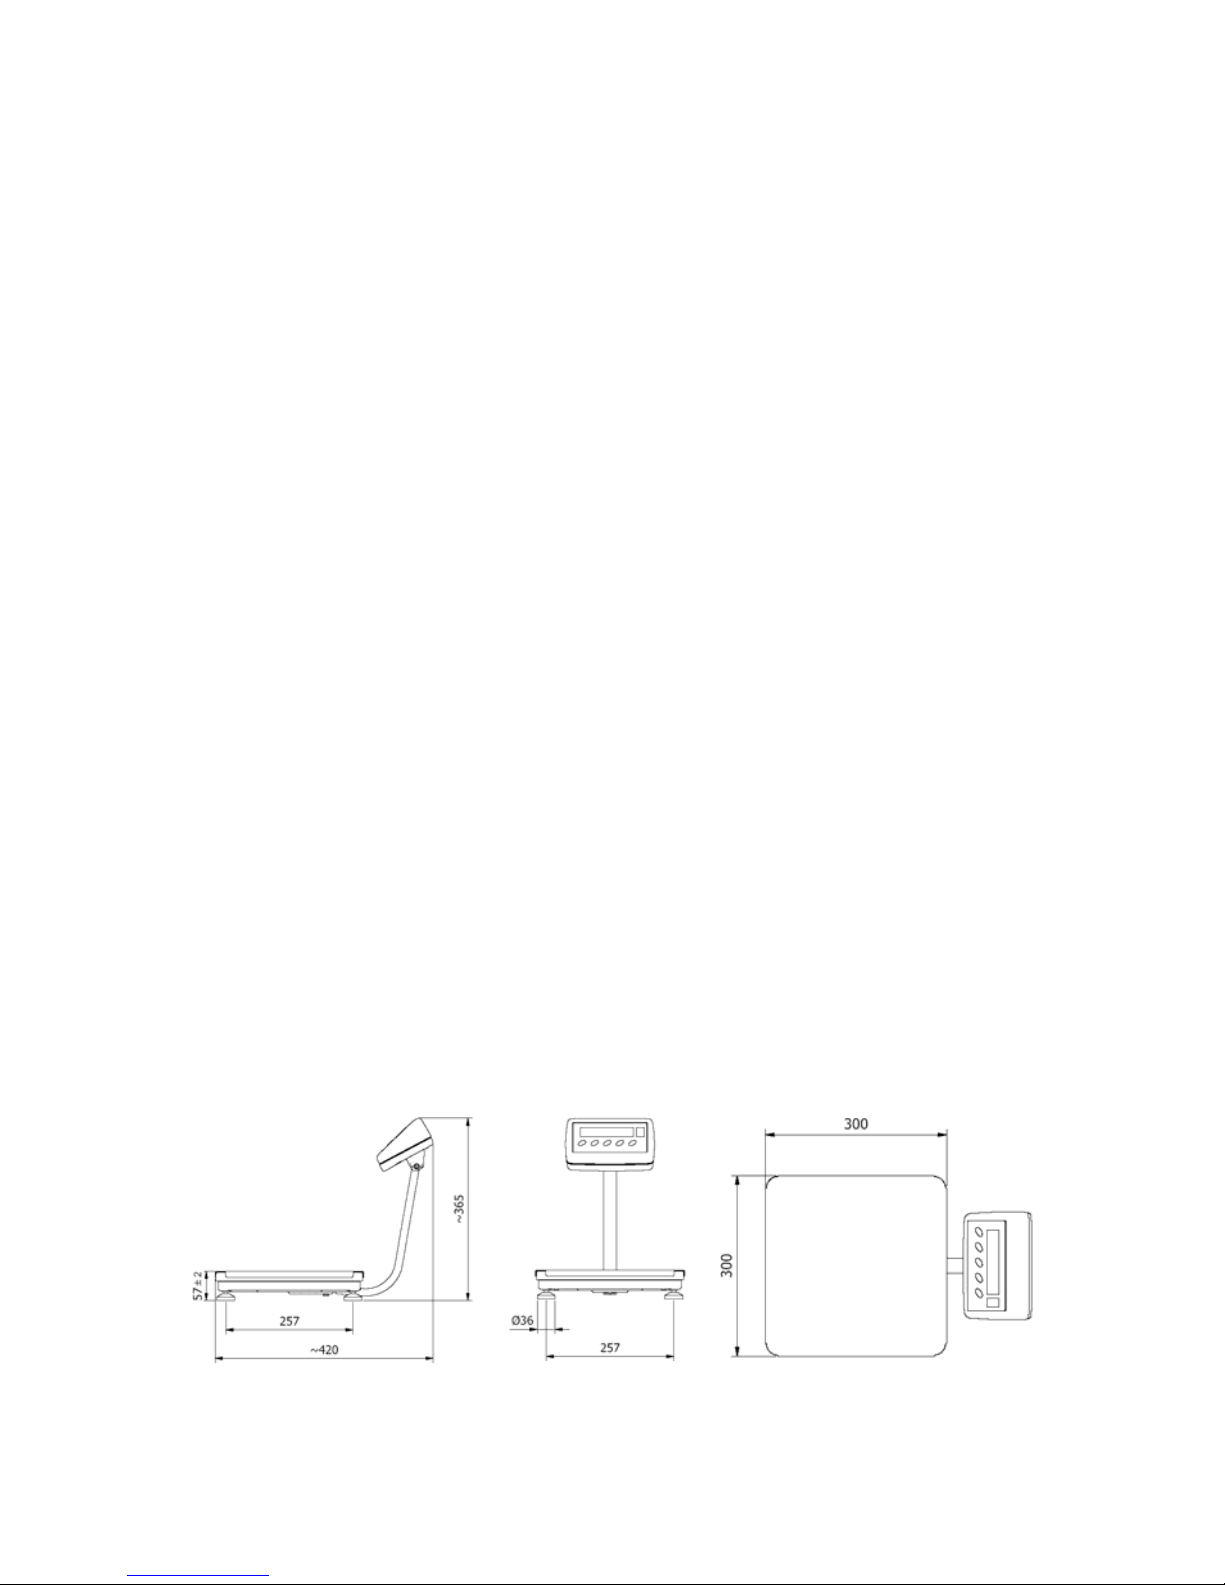
4. MAIN MENSIONS .................................................................................................................................9DI
4.1. able scales WPT/F series...............................................................................................................9
T
4.2. aterproof scales of WPT/H series................................................................................................10W
4.3. aterproof scales of WPT/HR series .............................................................................................12W
4.4. Scales of WPT series .....................................................................................................................12
5. UNP CKING AND ASSEMBLY .............................................................................................................16A
5.1. PT/F series.........................................................................................................16Table scales of W
5.2. PT series .....................................................................................................................17Scales of W
5.3. Waterproof scales of WPT/H, WPT/HR series................................................................................18
6. GETTING STARTED ..............................................................................................................................19
7. KEYPAD.................................................................................................................................................20
8. KEYS’ FUNCTIONS ...............................................................................................................................20
9. I SCRIPTIONS ON THE DISPLAY........................................................................................................21N
10. USER MENU ........................................................................................................................................22
10.1. ....................................................................................................................................22Submenus
10.2. Browsing user menu.....................................................................................................................23
10.2.1. pad..............................................................................................................................23Key
10.2.2. Return to the weighing mode ............................................................................................23
11. WEIGHING ...........................................................................................................................................24
11.1. ..........................................................................................................................................25Tarring
11.2. alue .....................................................................................................................25Inscribing tare v
11.3. .........................................................................................................................................26Zeroing
11.4. eighings in two ranges ..............................................................................................................26W
11.5. eight unit .......................................................................................................27Selection of basic w
Temporarily selected unit .............................................................................................................2811.6.
12. MAIN PARAMETERS...........................................................................................................................29
12.1. el ..................................................................................................................29Setting a filtering lev
12.2. ..................................................................................................................................30Median filter
12.3. .........................................................................................................................31Autozero function
Tare function ................................................................................................................................3212.4.
13. RS 232 PARAMETERS........................................................................................................................33
13.1. pe .................................................................................................................................33Printout ty
13.2. s threshold................................................................................................................34Minimal mas
13.3. ......................................................................................................................................35Baud rate
Serial transmission parameters ....................................................................................................3613.4.
14. OTHER PARAMETERS........................................................................................................................37
14.1. Backlight function .........................................................................................................................37
14.1.1. ing from mains ...................................................................................37Backlight for supply
4.1.2. Backlight for supplying from batteries ...............................................................................381
14.2. .............................................................................................39
“Beep” signal – after pressing a key
14.3. atic switch-off .....................................................................................................................39Autom
14.4. Batter oltage level check ...........................................................................................................40y v
14.4.1. ......................................................................................................40Checking the batteries
14.4.2. discharge pictogram .............................................................................................41Battery
14.4.3. .............................................................................................41Accumulator charging option
14.4.4. Formatting rechargeable battery packs.............................................................................42

- 4 -
15. WORK MODES ....................................................................................................................................43
15.1. of operation modes.......................................................................................43Setting accessibility
15.2. of operation modes..........................................................................................44Selecting quantity
15.3. ..............................................................................................45Counting pieces of the same mass
15.4. .....................................................................47+/- control referring to the inscribed standard mass
15.5. Control of % deviation referring to the inscribed standard mass...................................................49
15.5.1. its weighing.......................................................................49Standard mass determined by
5.5.2. Mass of standard inscribed to scale memory ....................................................................501
15.6. atic tare ..............................................................................................................................51
Autom
15.7. force on the pan – latch..................................................................................52Measurement max
15.8. Totalizing......................................................................................................................................52
15.8.1. ork mode....................................................................................................53Enabling the w
15.8.2. .........................................................................................................53Totalizing procedure
15.8.3. of the last value of sum of weighed goods ..........................................................54Memory
5.8.4. Return to weighing............................................................................................................551
15.9. eighing animals .........................................................................................................................56W
15.10. Tare memory...............................................................................................................................57
15.10.1. Entering the tare value to the scale memory...................................................................57
15.10.2. Selecting a tare value from the memory..........................................................................59
16. USER CALIBRATION...........................................................................................................................60
16.1. ....................................................................................................................................60Calibration
Start mass adjustment..................................................................................................................6216.2.
17. COOPERATION WITH PRINTER.........................................................................................................63
18. COOPERATION WITH COMPUTER....................................................................................................64
19. COM UNICATION PROTOCOL..........................................................................................................65M
19.1. ......................................................................................................................65
General information
19.2. ...........................................................................................66A set of commands for RS interfaces
19.3. ............................................................................................................66Respond message format
19.4. Command’s description ................................................................................................................67
19.4.1. ..............................................................................................................................67Zeroing
19.4.2. ..............................................................................................................................67Tarring
19.4.3. alue ...................................................................................................................67Get tare v
19.4.4. ...................................................................................68Send the stable result in basic unit
19.4.5. in basic unit ..........................................................................68Send the result immediately
19.4.6. .................................................................................69Send the stable result in current unit
19.4.7. in current unit .......................................................................70Send the result immediately
19.4.8. itch on continuous transmission in basic unit ...............................................................70Sw
19.4.9. Switch off continuous transmission in basic unit ...............................................................70
19.4.10. Switch on continuous transmission in current unit ..........................................................71
19.4.11. Switch off continuous transmission in current unit ..........................................................71
9.4.12. Send all implemented commands ...................................................................................711
19.5. omatic printouts..........................................................................................72Manual printouts / aut
19.6. ..............................................................................................................73Continuous transmission
Configuring printouts ....................................................................................................................7319.7.
20. ERROR COMMANDS...........................................................................................................................74
21. TECHNICAL PARAMETERS................................................................................................................75
21.1. PT series ...................................................................................................................75Scales of W
21.2. PT/F series.......................................................................................................77Table scales of W
21.3. aterproof scales of WPT/H series .............................................................................................78W
Waterproof scales of WPT/HR series...........................................................................................8121.4.
22. TROUBLE SHOOTING.........................................................................................................................83
23. ADDITIONAL EQUIPMENT..................................................................................................................83

- 5 -
1.INTENDED USE
Scales are designed for fast and precise measurements of weighed loads
masses and direct commercial settlements. Tarring in full weighing range
enables to determine net mass of weighed loads.
Functions:
•backlight of display
•level of filtration
•autozero function
•setting baud rate of transmission
•continuous data transmission for RS 232
•automatic operation for RS 232
•designed printouts
•designation minimum mass for function operating
•counting pieces
•+/- mass control
•percentage deviation from standard mass
•latch of maximum scale indication
•automatic tare
•memory of tare
•Memory of 9 tare values
•inscribing tare value
•automatic scale switch-off
•user calibration
•Totalizing
•Weighing animals
User functions may have attribute of accessibility. For this reason it is
possible to adjust scale to individual needs to provide access to only
these functions which are currently needed. Attribute determination
accessible / inaccessible is possible in user menu and described in
further part of manual.

2.PRECAUTIONS
2.1. Maintenance
A. Please, read carefully this user manual before and use the device
according to its intended use.
B. Devices that are to be withdrawn from usage should be sent back to
the producer or in case of own utilization do it according to the law.
2.2. Accumulator / battery pack
The device connected to mains inteligently monitors the battery state and
charges it if possible. After sudden lack of power supply from the mains
the device automatically switches to accumulator without breaking
operation.
•Scales aquipped with indicator PUE C/31 (plastic casing) are devices
designed to be supplied from NiMH batteries (nickel-metal-hydrogen)
with rated voltage of 1.2V, size R6 and capacities from 1800 to
2800mAh charged while connected to mains without stopping
operation.
•Scales equipped with PUE C/31H and PUE C/31H/Z weighing
indicators (stainless steal housing) are devices designed to be
supplied from SLA accumulators (Sealed lead acid type) 6V o
and capacity 3to 4Ah charged while connected to mains without
stopping operation.
In case of an elongated storage period in low
temperatures, it is not allowed the full discharge
of the accompanied batteries.
The equipment including accumulators does not belong
to your regular household waste. The European legislation
requires that electric and electronic equipment be collected
and disposed separately from other communal waste with
the aim of being recycled.
- 6 -

Notice:
Some symbols on accumulators identify harmful elements/compounds:
Pb = lead,
Cd = cadmium,
Hg = mercury.
2.2.1. Power supply of weighing indicators in plastic casings
Indicators in plastic casing are intended to be supplied from a power
adapter or from NiMH rechargeable battery pack (standard equipment).
New rechargeable batteries should be formatted according to the
description in the chapter 14.4.4. of this manual.
Alternatively, you can use to power the device R6 size standard non-
rechargible batteries. If you want to use normal batteries instead of
rechargeable ones, proceed as follows:
•Before installing non-rechargeable batteries turn on the device
and set <5.5.CHr6> to <no>, to switch off charging.
•Then install the batteries.
- 7 -
Installing batteries without changing <5.5.CHr6> to <no>
may cause damage of batteries and the indicator.
2.2.2. Replacement of worn batteries
Users have the ability to replace worn out batteries to new ones in
weighing indicators PUE C/31 (plastic casing).
Procedure:
•Open the lid of the chamber for
batteries placed in the bottom of
the indicator casing:

•Remove discharged and then insert new batteries into the chamber,
according to given polarity (+/-):
•Close the lid of the chamber for batteries:
In PUE C/31H and PUE C/31H/Z weighing indicators
(stainless steel housing) the worn out accumulator can
be exchanged to a new one by the authorized service
of the manufacturer.
2.3. Operation in a strong electrostatic field
If the device is about to operate in a strong electrostatic field
(e.g. printing houses etc.) it should be connected to the earthing.
Connect it to the clamp terminal signed .
- 8 -

3.WARRANTY CONDITIONS
A. RADWAG is obliged to repair or change those elements that
appears to be faulty because of production and construction reason,
B. Defining defects of unclear origin and outlining methods
of elimination can be settled only in participation of a
user and the manufacturer representatives,
C. RADWAG does not take any responsibility connected with
destructions or losses derives from non-authorized or inappropriate
(not adequate to manuals) production or service procedures,
D. Warranty does not cover:
•Mechanical failures caused by inappropriate maintenance of
the device or failures of thermal or chemical origin or caused
by atmospheric discharge, overvoltage in mains or other
random event,
•Inappropriate cleaning.
E. Loss of warranty appears after:
•Access by an unauthorized service,
•Intrusion into mechanical or electronic construction
of unauthorized people,
•Removing or destroying protection stickers.
F. Warranty conditions outline the warranty period for rechargeable
batteries attached to the device for 12 months.
G. The detailed warranty conditions one can find in warranty certificate.
H. Contact with the central authorized service:
+48 48 384 88 00 ext. 106 or 107.
4.MAIN DIMENSIONS
4.1. Table scales WPT/F series
WPT/F…/C series – main dimensions
- 9 -

WPT/F…/C/K series – main dimensions
WPT/F…/C/R series – main dimensions
4.2. Waterproof scales of WPT/H series
WPT…H1 series (pillar 24cm) –main dimensions
- 10 -

WPT…H1series (pillar 7cm) –main dimensions
WPT…H2 - WPT…H6 series – main dimensionS
- 11 -

4.3. Waterproof scales of WPT/HR series
WPT…HR2 - WPT…HR6 series – main dimensions
4.4. Scales of WPT series
WPT…C1/K series – main dimensions
- 12 -

WPT…C1/R series - main dimensions
WPT…C1 series – main dimensions
- 13 -

WPT…C2/K series – main dimensions
WPT…C2/R series – main dimensions
- 14 -

WPT…C2 series – main dimensions
WPT…C3/K series – main dimensions
- 15 -

WPT…C3 series – main dimensions
5.UNPACKING AND ASSEMBLY
5.1. Table scales of WPT/F series
Unpack and put the scale on a flat even stable surface far away from
sources of heat.
•maximally screw out the transport protection according to the
drawing below:
•Install the pillar, be careful about the cable linking the indicator with
the load cell:
- 16 -

5.2. Scales of WPT series
Unpack and put the scale on a flat even stable surface far away from
sources of heat and then:
- Remove transport protection:
For versions with an indicator on the pillar:
- 17 -

5.3. Waterproof scales of WPT/H, WPT/HR series
Unpack and put the scale on a flat even stable surface far away from
sources of heat and then:
•Unscrew the pillar and the transport handler from the platform:
- 18 -

•Turn the pillar and mount it to
the platform. The surplus cable
place inside the pillar.
•Pick up the pan and remove
the transport protection.
6.GETTING STARTED
•After unpacking and mounting the scale level it out.
Use levelling legs and the level condition
indicator installed in the basis of the scale.
•Turn the device on using the key – keep pressing the key
for about 0.5 sec,
•Wait for the test completion,
•Then you will see zero indication and pictograms:
- zero indication
- stable result
kg - weight unit
•If the indication is not zero press zero key.
- 19 -

7.KEYPAD
8.KEYS’ FUNCTIONS
Switching on/off
Function key (operation mode selection)
Sending a weighing result to RS232
Zeroing
Tarring
Notice:
After pressing + keys’ functions changes. The way of operation
in this mode is described in details further in this manual.
- 20 -
This manual suits for next models
6
Table of contents
Other RADWAG Scale manuals

RADWAG
RADWAG PS X7.M User guide

RADWAG
RADWAG AS X2 PLUS User guide

RADWAG
RADWAG PS/X series User manual

RADWAG
RADWAG WTC/4 3000 C8/EX User manual

RADWAG
RADWAG PM 4Y User guide

RADWAG
RADWAG CY10 User manual

RADWAG
RADWAG HTY 15 C1/K User manual

RADWAG
RADWAG WTC 200 User manual

RADWAG
RADWAG PS Series User manual

RADWAG
RADWAG WTC series User manual

RADWAG
RADWAG UYA 4Y User manual

RADWAG
RADWAG WLX series User manual

RADWAG
RADWAG WTC 200 User guide

RADWAG
RADWAG Y/KTPS Series User manual

RADWAG
RADWAG UYA 4Y PLUS User guide

RADWAG
RADWAG WTB series User manual

RADWAG
RADWAG PS Series User manual

RADWAG
RADWAG XA 5Y.M User guide

RADWAG
RADWAG WPW/E User manual

RADWAG
RADWAG AS R2 User manual