Renson Algarve Canvas User manual

Handleiding
Notice de montage
Anleitung
Manual
Algarve®Canvas
L
SPEAKERS
R
L
OUT
ANALOG IN
R

2
Algarve®Canvas
L
SPEAKERS
R
L
OUT
ANALOG IN
R
INDEX
1. Important safety and assembly
instructions 5
2. Types of installation & dimensions 8
3. Mounting bases 10
4. Base plate assembly 12
5. Position of the mounting bases 12
5.1 Free-standing type of
installation 12
5.2 Façade mounted installation
type 14
6. Installing the mounting bases 16
7. Positioning frame profiles 20
8. Mounting the frame with a
detached construction type 22
9. Mounting the coupling profile 24
10. Checking the diagonals 26
11. Position the cover plates 28
12. Sealing inside corner joint 32
13. Fitting the canvas profiles 36
14. Fitting the roof plates 40
15. Fitting the canvas fabric 44
16. Finishing the roof plates 48
17. Mounting the Fixscreen 100 SlimF
(≤4,5m) 50
18. Mounting the Fixscreen 150 F
(>4,5m) 56
19. Mounting a Loggia®sliding wall 62
20. Mounting glass sliding panels 68
20.1 Mounting the upper rail 68
20.2 Mounting the lower rail 68
20.3 Install the glass panels 70
20.4 Mounting the fixing block 70
20.5 Mounting the side profiles 72
20.6 Mounting the stop blocks 72
INHALTSANGABE
1. Wichtige Sicherheits- und
Montagehinweise 5
2. Bauarten und Abmessungen 8
3. Montagefüße 10
4. Montage der Fußplatte 12
5. Position der Montagefüße 12
5.1 Freistehende Bauart 12
5.2 Bauart Fassadenmontage 14
6. Platzieren der Montagefüße 16
7. Positionieren der Rahmenprofile 20
8. Montage des Rahmens bei
freistehenden Bautypen 22
9. Montage des Kopplungsbalkens 24
10. Überprüfung der Diagonalen 26
11. Platzieren Sie die Abdeckkappen 28
12. Abdichten der Innenseite der
Eckverbindung 32
13. Montage der Canvas-Profile 36
14. Montage der Dachplatten 40
15. Montage des Canvas-Tuchs 44
16. Endbearbeitung der Dachplatten 48
17. Montage des Fixscreen 100 SlimF
(≤4,5m) 50
18. Montage des Fixscreen 150 F
(>4,5m) 56
19. Montage der Loggia®-Schiebewand 62
20. Montage der Glas-Schiebewand 68
20.1 Montierung die obere Schiene 68
20.2 Montierung das untere
Führungsprofil 68
20.3 Glasfenstern platzieren 70
20.4 Befestigung des Fixierblocks 70
20.5 Befestigung der Seitenprofile 72
20.6 Befestigung der Stoppblöcke 72
TABLE DES MATIÈRES
1. Instructions importantes de sécurité
et de montage 5
2. Types d’installation & dimensions 8
3. Pieds de montage 10
4. Montage du socle du pied 12
5. Position des pieds de montage 12
5.1 Type d’installation autoportante 12
5.2 Type d’installation montage
sur la façade 14
6. Installation des pieds de montage 16
7. Positionnement des profils cadre 20
8. Montage du cadre en cas de type
d’installation autoportante 22
9. Montage de la poutre de couplage 24
10. Contrôle des diagonales 26
11. Montage des plaques d’obturation 28
12. Étanchement du côté intérieur des
jonctions d’angle 32
13. Montage des profils canvas 36
14. Montage des plaques de toiture 40
15. Montage de la toile canvas 44
16. Finition des plaques de toiture 48
17. Montage Fixscreen 100 SlimF
(≤4,5m) 50
18. Montage Fixscreen 150 F (>4,5m) 56
19. Montage d’un panneau coulissant
Loggia®62
20. Montage d’un panneau coulissant
vitré 68
20.1 Fixation du rail supérieur 68
20.2 Montage du rail inférieur 68
20.3 Installation des panneaux vitrés 70
20.4 Montage du bloc de fixation 70
20.5 Fixation des profils latéraux 72
20.6 Installation du bloc d’arrêt 72
INHOUDSTAFEL
1. Belangrijke veiligheids- en montage-
instructies 5
2. Bouwtypes & afmetingen 8
3. Montagevoeten 10
4. Montage van de voetplaten 12
5. Positie van de montagevoeten 12
5.1 Vrijstaand bouwtype 12
5.2 Gevelmontage bouwtype 14
6. Plaatsen van de montagevoeten 16
7. Positioneren kaderprofielen 20
8. Montage van het kader bij
vrijstaand bouwtype 22
9. Koppelbalk monteren 24
10. Controle diagonalen 26
11. Plaatsen afdekkappen 28
12. Afdichten binnenkant hoekverbinding 32
13. Plaatsen van de canvasprofielen 36
14. Montage van de dakplaten 40
15. Montage van canvasdoek 44
16. Afwerking van de dakplaten 48
17. Montage Fixscreen 100 SlimF
(≤4,5m) 50
18. Montage Fixscreen 150 F (>4,5m) 56
19. Montage Loggia®schuifwand 62
20. Montage glazen schuifwand 68
20.1 Bevestigen bovenrail 68
20.2 Monteren onderrail 68
20.3 Plaatsen glaspanelen 70
20.4 Monteren fixeerblok 70
20.5 Bevestigen zijprofielen 72
20.6 Plaatsen stopblokje 72

3
Algarve®Canvas
L
SPEAKERS
R
L
OUT
ANALOG IN
R
21. Mounting of a shifted column or
additional column 74
22. Montage full height Linius wall 76
23. Montage half height Linius wall 84
24. Fitting the UpDown LED 92
25. Setting up the LED lighting
(LED beam) 102
26. Setting UpDown LED Lighting RGB 106
27. Return to the default setting for
LED lighting 110
21. Montage des verschobenen Pfostens
oder zusätzlichen Pfostens 74
22. Montage Linius-Wand vollständige
Höhe 76
23. Montage Linius-Wand in halber
Höhe 84
24. Montage UpDown-LED 92
25. Einstellen der LED-Beleuchtung
(LED Beam) 102
26. Einstellen der RGB-UpDown-LED-
Beleuchtung 106
27. Wiederherstellung der Werks-
einstellungen der LED-Beleuchtung 110
21. Montage d’une colonne décalée ou
colonne intermédiaire 74
22. Montage panneau Linius sur toute
lahauteur 76
23. Montage panneau Linius à
mi-hauteur 84
24. Montage de l’éclairage UpDown
LED 92
25. Programmation de l’éclairage LED
(poutre LED) 102
26. Réglage de l’éclairage UpDown
LED RVB 106
27. Revenir au réglage usine pour
l’éclairage LED 110
21. Montage verschoven of tussenkolom 74
22. Montage Linius wand op volledige
hoogte 76
23. Montage Linius wand op halve
hoogte 84
24. Plaatsing UpDown LED 92
25. Instellen van de LED verlichting
(LEDbeam) 102
26. Instellen UpDown LED verlichting
RGB 106
27. Terugkeren naar de fabrieksinstelling
voor LED verlichting 110

4
Algarve®Canvas
L
SPEAKERS
R
L
OUT
ANALOG IN
R
RENSON®
ALGARVE CANVAS
First read this manual carefully before you
begin. The installation of the RENSON®
Algarve Canvas should be done by a
specialist.
RENSON®reserves the right to make tech-
nical changes to its products without prior
notice.
RENSON®
ALGARVE CANVAS
Lesen Sie diese Anleitung aufmerksam durch,
bevor Sie mit der Montage beginnen. Die
Montage der RENSON®Algarve Canvas
muss durch einen Fachmann erfolgen.
RENSON®behält sich das Recht vor, ohne
vorherige Mitteilung technische Änderungen
seiner Produkte vorzunehmen.
RENSON®
ALGARVE CANVAS
Lisez attentivement ce manuel avant de
commencer. L’installation de l’Algarve
Canvas de RENSON®doit être effectuée par
un professionnel.
RENSON®se réserve le droit d’apporter des
modifications techniques à ses produits sans
avis préalable.
RENSON®
ALGARVE CANVAS
Lees deze handleiding eerst aandachtig
eer u van start gaat. Het plaatsen van de
RENSON®Algarve Canvas dient te gebeu-
ren door een vakman.
RENSON®behoudt zich het recht voor om
zonder voorafgaande kennisgeving techni-
sche wijzigingen aan haar producten aan te
brengen.
SYMBOLEN
Lees deze handleiding eerst
aandachtig eer u van start gaat.
Voldoet aan alle verplichte en van
kracht zijnde veiligheidsnormen
volgens Europese richtlijnen.
PICTOGRAMMES
Lisez attentivement ce manuel avant
de commencer.
Conforme aux principales normes
de sécurité applicables des directi-
ves européennes.
SYMBOLE
Lesen Sie diese Gebrauchsan-
weisung aufmerksam durch, bevor
Sie mit der Montage beginnen.
Entspricht den grundlegenden
Sicherheitsstandards der einschlägi-
gen EG-Vorschriften.
SYMBOLS
First read this manual carefully
before you begin.
In accordance with essential
applicable safety standards of
European directives.
i
i
i
i

5
Algarve®Canvas
L
SPEAKERS
R
L
OUT
ANALOG IN
R
1. IMPORTANT SAFETY
AND ASSEMBLY
INSTRUCTIONS
Opening the packaging
• The system is well packed to protect it
during storage and transport.
• Always store in a dry place at normal
temperature.
• Transport and handle the system carefully.
• Check the packaging for signs of major
damage.
• Open the packaging carefully.
• If using sharp objects, be careful not to
damage the paint.
• Remove the system carefully from the pack-
aging.
Installing the system
• See installation instructions. Algarve®
Canvas must be installed as described in
the installation manual.
• Before you begin the assembly, check
whether all parts are undamaged and all
materials are present.
• Ensure that you have understood the
instruction manual before you start the
assembly.
• It is recommended that the assembly is
done by at least 2 persons using an assem-
bly lift.
• We recommend that at least two people
assemble the product. We also recommend
using a material lift.
• Installers must be both mentally and physi-
cally fit to carry out the installation; they
must also always abide by all safety regu-
lations.
• Check all attachment walls for gas pipes,
water pipes or electrical wiring to prevent
damage.
• Keep children, pets and other unauthorised
personnel at a distance!
1. WICHTIGE
SICHERHEITS- UND
MONTAGEHINWEISE
Öffnen der Verpackung
• Zum Schutz während der Lagerung und
während des Transports wurde das System
mit einer stabilen Verpackung versehen.
• Die Lagerung muss stets in trockener Umge-
bung und unter normalen Temperaturbedin-
gungen erfolgen.
• Transport und Handhabung müssen mit der
nötigen Sorgfalt erfolgen.
• Kontrollieren Sie die Verpackung auf even-
tuelle grobe Beschädigungen.
• Öffnen Sie die Verpackung mit der nötigen
Vorsicht.
• Achten Sie bei Benutzung scharfer Gegen-
stände darauf, den Lack nicht zu beschä-
digen.
• Entnehmen Sie das System mit der nötigen
Umsicht aus der Verpackung.
Anbringung des Systems
• Siehe Montageanweisungen. Algarve®
Canvas muss wie in der Montageanleitung
beschrieben installiert werden.
• Kontrollieren Sie vor Beginn der Montage,
ob alle Teile unbeschädigt und alle Mate-
rialien vorhanden sind.
• Sorgen Sie dafür, dass Sie die Gebrauchs-
anweisung verstanden haben, bevor Sie
mit der Montage beginnen.
• Es wird empfohlen, die Montage mit
mindestens 2 Personen und einem Monta-
gelift durchzuführen.
• Die Installateure müssen sowohl mental
als auch körperlich in der Lage sein, die
Montage durchzuführen. Sie müssen jeder-
zeit alle Sicherheitsvorschriften einhalten.
• Überprüfen Sie alle Befestigungswände
auf Gas-, Wasser- oder Stromleitungen, um
Beschädigungen zu vermeiden.
• Halten Sie Kinder, Haustiere und andere
unbefugte Personen auf Distanz!
1. INSTRUCTIONS IMPOR-
TANTES DE SÉCURITÉ
ET DE MONTAGE
Ouverture de l’emballage
• Le système est protégé par un embal-
lage robuste afin d’éviter des dommages
pendant le stockage et le transport.
• Le stockage se fait toujours dans des condi-
tions sèches et de température normale.
• Le transport et la manipulation doivent être
effectués avec le plus grand soin.
• Vérifiez s’il n’y a pas de dégâts importants
à l’emballage.
• Ouvrez l’emballage prudemment.
• N’endommagez pas la peinture en
employant des objets tranchants.
• Sortez le système prudemment de l’embal-
lage.
Installation du système
• Voir les instructions de pose ci-jointes.
Algarve®Canvas doit être installée confor-
mément au manuel d’installation.
• Contrôlez avant de commencer le montage
que toutes les pièces sont intactes et que
tous les matériaux sont présents.
• Vérifiez que vous comprenez le manuel
avant de commencer le montage.
• Le montage doit être effectué par au moins
2 personnes et à l’aide d’un élévateur.
• Les installateurs doivent être aptes physi-
quement et mentalement à exécuter
l’installation, ils doivent toujours respecter
les conditions de sécurité.
• Vérifiez la présence éventuelle sur les
parois de fixation de conduits de gaz,
électricité ou eau afin d’éviter tout endom-
magement.
• Tenez les enfants, animaux ou autres
personnes non autorisées à distance !
1. BELANGRIJKE VEILIG-
HEIDS- EN MONTAGE-
INSTRUCTIES
Openen van de verpakking
• Het systeem werd ter bescherming tijdens
opslag en transport voorzien van een
stevige verpakking.
• Opslag dient steeds onder droge omstan-
digheden te gebeuren en onder normale
temperatuurscondities.
• Transport en handeling dient met de
nodige zorg te gebeuren.
• Bekijk of er geen grove beschadiging aan
de verpakking op te merken valt.
• Open de verpakking met de nodige voor-
zichtigheid.
• Bij gebruik van scherpe voorwerpen uitkij-
ken om de lak niet te beschadigen.
• Haal het systeem met de nodige omzichtig-
heid uit de verpakking.
Plaatsing van het systeem
• Zie de meegeleverde plaatsingsinstructies
voor de details omtrent de plaatsing van
Algarve®Canvas.
• Controleer vooraleer u begint aan de
montage of alle onderdelen onbeschadigd
zijn en alle materialen aanwezig zijn. Het
ontbreken van onderdelen, dan wel de
omstandigheid dat bepaalde onderdelen
beschadigd zijn, dient steeds onmiddellijk
na ontdekking te worden gemeld aan uw
verkoper. Algarve®Canvas mag niet geïn-
stalleerd worden indien niet alle onderde-
len aanwezig zijn of wanneer onderdelen
beschadigd zijn.
• Zorg ervoor dat u de handleiding begre-
pen heeft vooraleer u start met de montage.
• Montage aanbevolen met minimum 2
personen en montagelift.
• Installateurs moeten zowel mentaal als
fysiek geschikt zijn om de installatie uit te
voeren, ze dienen ook steeds alle veilig-
heidsvoorschriften te respecteren.

6
Algarve®Canvas
L
SPEAKERS
R
L
OUT
ANALOG IN
R
1. Important safety and
assembly instructions
(continued1)
• Ensure that no person or obstacle can inter-
rupt a moving screen covering. Moving
parts (such as a screen covering) could
pose a danger.
• Do not place fingers in a lateral guide
while the screen covering is moving.
• Faulty installations or irregularities in the
installation could have serious consequen-
ces when using the product.
• Only use the components delivered by the
RENSON®company with your product;
otherwise, the guarantee terms and condi-
tions could be nullified.
• Any change to the product, by the custo-
mer or installer, can result in the warranty
lapsing.
• All fixing elements for walls/floors are
not included. These must be stipulated by
the installer because these depend on the
material to which it will be affixed.
• The wall, floor and fixing elements must
be suitable to bear this terrace covering
and to have it affixed to them under the
weather conditions that the terrace cove-
ring is meant to withstand (see “wind
class”). Contact a stability engineer in case
of doubt/if necessary.
• Work safely and always wear the required
personal protective equipment.
• Dispose of the packaging waste (e.g.
sorting) according to local regulations.
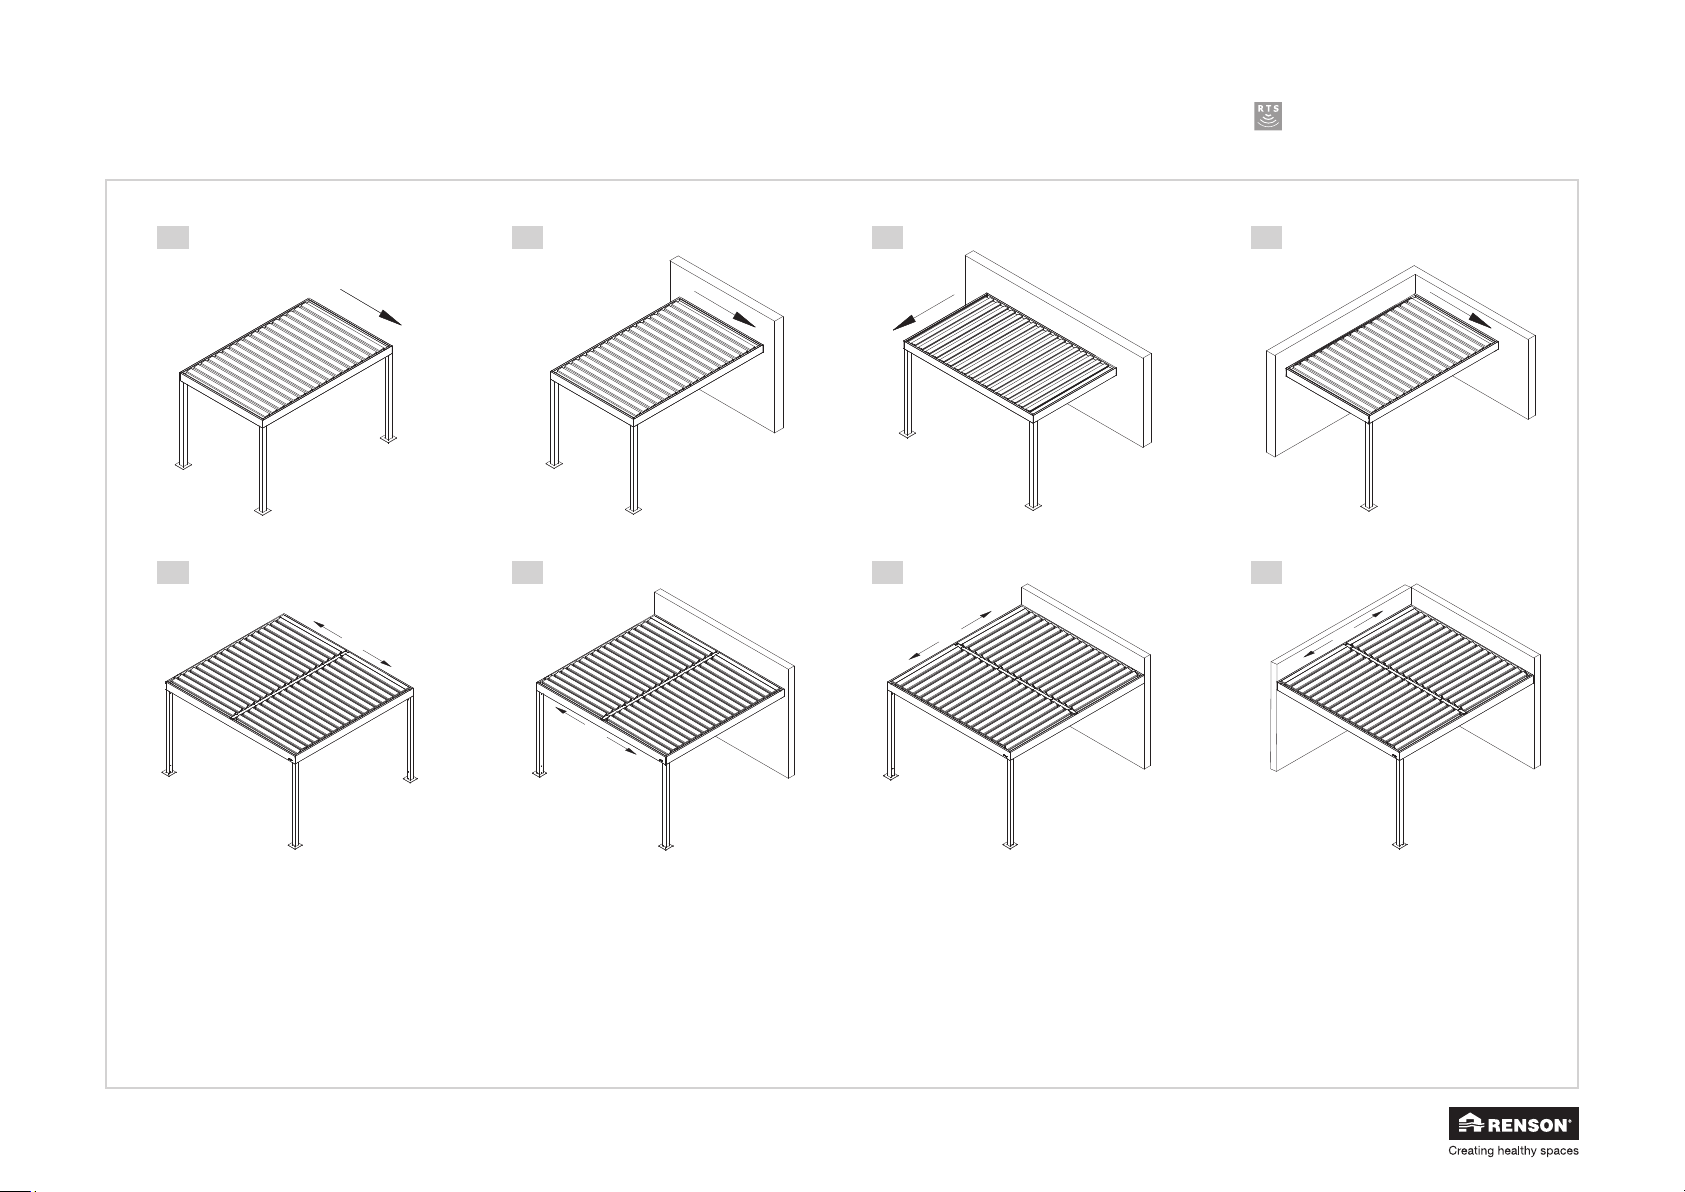
• The sequence of installation can vary
depending on the situation on site.
• Nothing may be attached either to the
columns or to the lateral guides of the roof
since this can be harmful to the proper
operation of the product.
• Always take care when opening the cap
on the box.
• Check the cables for damage at regular
intervals.
• Be sure the structure is grounded properly.
1. Wichtige Sicherheits-
und Montagehinweise
(Fortsetzung1)
• Kontrollieren Sie, ob Personen oder Hinder-
nisse eine sich bewegende Markise nicht
unterbrechen können. Bewegliche Teile
(wie eine Markise) können eine Gefahr
darstellen.
• Stecken Sie nie einen Finger in eine Seiten-
führung, wenn sich die Markise bewegt.
• Eine verkehrte oder unsachgemäße Instal-
lation kann gravierende Folgen für den
Gebrauch des Produkts haben.
• Verwenden Sie nur die mitgelieferten Teile
der Firma RENSON®. Andernfalls verfallen
die Garantieansprüche.
• Jede vom Kunden oder vom Installateur
vorgenommene Änderung am Produkt
kann den Ausschluss der Garantie zur
Folge haben.
• Befestigungsmittel für Mauer, Wand oder
Boden sind nicht im Lieferumfang enthal-
ten. Diese muss der Installateur selbst
auswählen, da sie von der Art des Unter-
grunds abhängen.
• Die Wand, der Boden und das Befesti-
gungsmaterial müssen geeignet sein, um
diese Terrassenüberdachung zu tragen und
daran/damit zu befestigen und zwar unter
den Witterungsbedingungen, gegen die
die Terrassenüberdachung beständig ist
(siehe ‚Windklasse’). Kontaktieren Sie bei
Zweifeln/ bei Bedarf einen Statiker.
• Achten Sie bei der Arbeit auf die Sicher-
heit, tragen Sie immer die benötigte Sicher-
heitskleidung.
• Verarbeiten Sie den Verpackungsabfall
(z. B. getrennt) entsprechend den lokalen
Vorschriften.
• Die Reihenfolge der Installation kann vari-
ieren abhängig von der Situation auf die
Baustelle.
1. Instructions importantes
de sécurité et de montage
(suite1)
• Contrôlez qu’aucune personne ou obstacle
ne puisse interrompre le mouvement d’une
partie mobile. Les parties mobiles peuvent
constituer un danger.
• Ne placez pas de doigts entre les lames
pendant le mouvement de la toiture.
• Les installations fautives ou les irrégulari-
tés lors de l’installation peuvent avoir des
conséquences graves lors de l’utilisation du
produit.
• Utilisez uniquement des pièces de
rechange de la société RENSON®, sinon
votre garantie n’est plus valable.
• Toute modification au produit, par le client
ou l’installateur peut entraîner la non vali-
dité de la garantie.
• Les fixations pour le mur/le sol ne sont pas
fournies. Celles-ci doivent être déterminées
par l’installateur en fonction du type de
support.
• Le mur, le sol et le matériel de fixation
doivent être aptes à pouvoir supporter le
poids de la toiture de terrasse et à la fixer,
ceci sous les conditions climatiques pour
lesquelles elle est prévue (voir ‘classe de
vent’). Contactez un ingénieur spécialisé
en études de stabilité en cas de doute/si
nécessaire.
• Travaillez en sécurité et portez toujours les
vêtements de protection nécessaires.
• Triez et traitez les déchets d’emballage
selon le règlement local.
• L’ordre de l’installation peut varier en fonc-
tion de la situation sur le chantier.
• On ne peut rien fixer aux colonnes ni aux
coulisses de la toiture car cela pourrait
gêner le bon fonctionnement du produit.
• Soyez toujours attentifs lorsque vous ouvrez
la partie supérieure du caisson.
• Inspectez régulièrement le câblage pour
voir s’il n’y a pas de dégâts.
• Assurez-vous que la structure est mise à la
terre.
1. Belangrijke veiligheids- en
montage-instructies
(vervolg 1)
• Check vooraleer u begint aan de installatie
alle bevestigingswanden op gas-, water- of
elektrische leidingen om beschadiging te
voorkomen.
• Hou kinderen, huisdieren en andere niet
gemachtigde personen op een afstand!
• Controleer dat geen persoon of obstakel
een bewegend deel kan onderbreken.
Bewegende delen kunnen een gevaar
vormen.
• Plaats geen vingers tussen de lamellen
terwijl het dak beweegt.
• Foutieve installaties of onregelmatigheden
bij het installeren kunnen ernstige gevolgen
hebben bij het gebruik van het product.
• Gebruik enkel de meegeleverde onderde-
len van de firma RENSON®, zoniet verval-
len de garantievoorwaarden.
• Elke wijziging aan het product, door de
klant of installateur, kan tot gevolg hebben
dat de garantie vervalt.
• Bevestigingen naar muur/grond of wand
toe zijn niet meegeleverd. Deze dienen
bepaald te worden door de installateur
daar deze afhankelijk zijn van het type
ondergrond.
• Werk veilig en draag altijd de nodige
veiligheidskledij.
• Verwerk het verpakkingsafval (bv. geschei-
den) volgens de lokale regelgeving.
• De installatievolgorde kan variëren naar-
gelang de situatie ter plekke op de werf.
• Er mag niets bevestigd worden noch aan
de kolommen, noch aan de zijgeleiders
van het dak aangezien dit de goede
werking van de het product kan schaden.
• Wees steeds aandachtig bij het openen
van de buitenkap van de kast.
• Inspecteer regelmatig de bekabeling op
beschadiging.
• Zorg ervoor dat de structuur geaard is.

7
Algarve®Canvas
L
SPEAKERS
R
L
OUT
ANALOG IN
R
1. Important safety and
assembly instructions
(continued2)
Electrical connections
• See motor installation document.
Starting
• Check that all items match the installation
instructions.
• Check that the electrical connections are
in good condition and that no cables can
become entwined in the system (if appli-
cable).
• In case of Fixscreens, fold the fabric in and
out once (adjust the electric motor if neces-
sary).
Warranty
• Warranty conditions, see user manual.
• The guarantee period starts on the date of
manufacture and refers only to the product
itself, not to its installation.
• Please always quote the serial number
when reporting problems.
1. Wichtige Sicherheits-
und Montagehinweise
(Fortsetzung2)
• Weder an den Pfosten noch an den Seiten-
führungen des Dachs darf etwas befestigt
werden, da dies das ordnungsgemäße
Funktionieren des Produkts beeinträchtigen
könnte.
• Gehen Sie beim Öffnen der äußeren
Kassettenabdeckung stets vorsichtig vor.
• Kontrollieren Sie die Verkabelung regel-
mäßig auf Beschädigung.
• Sorgen Sie dafür das die Struktur geerdet
ist.
Elektrischer Anschluss
• Siehe Dokument zur Einstellung des
Motors.
Inbetriebnahme
• Kontrollieren Sie, ob die nötigen Befesti-
gungen den Montagehinweisen entspre-
chen.
• Kontrollieren Sie, ob die elektrischen
Anschlüsse in Ordnung sind und ob sich
im System keine Kabel mitdrehen können
(falls zutreffend).
• Lassen Sie, mit der Verwendung von
Fixscreens, das Tuch einmal ab- und
wieder aufrollen (falls nötig den Elektro-
motor nachregeln).
Garantie
• Garantiebestimmungen, siehe die
Gebrauchsanleitung.
• Die Garantiefrist beginnt mit dem Herstel-
lungsdatum und bezieht sich ausschließ-
lich auf das eigentliche Produkt, nicht auf
dessen Anbringung.
• Bitte teilen Sie bei der Meldung von
Problemen stets die Seriennummer des
Produkts mit.
1. Instructions importantes
de sécurité et de montage
(suite2)
Commande électrique
• Voir notice technique du moteur approprié.
Mise en service
• Contrôlez si les fixations nécessaires sont
conformes aux instructions de pose.
• Contrôlez que les raccordements élec-
triques sont en ordre et qu’il n’y a pas de
câbles qui pourraient s’accrocher dans le
système (si d’application).
• Déroulez et enroulez le système complè-
tement en cas d’utilisation de Fixscreens.
Ajustez les fins de course du moteur si
nécessaire.
Garantie
• Conditions de garantie, voir manual d’uti-
lisation.
• La période de garantie démarre à partir
de la date de production et concerne seule-
ment le produit et non pas l’installation.
• Lors d’un problème, veillez toujours à
transmettre le numéro de série.
1. Belangrijke veiligheids- en
montage-instructies
(vervolg 2)
Elektrische aansluiting
• Zie document instelling motor.
In bedrijf stellen
• Controleer of de nodige bevestigingen
conform zijn aan de plaatsingsinstructies.
• Controleer of de elektrische aansluitingen
in orde zijn en of er geen kabels kunnen
meedraaien in het systeem (indien van
toepassing).
• Laat bij gebruik van Fixscreens het doek
eenmaal in- en uitvouwen (stel indien
nodig de elektrische motor bij).
Garantie
• Volledige garantievoorwaarden, zie
gebruikershandleiding.
• De garantieperiode start vanaf de produc-
tiedatum en heeft uitsluitend betrekking op
het eigenlijke product, niet op de plaatsing
ervan.
• Gelieve bij het melden van problemen
steeds het serienummer door te geven.

8
Algarve®Canvas
L
SPEAKERS
R
L
OUT
ANALOG IN
R
2. TYPES OF INSTALLA-
TION & DIMENSIONS
A. Single types of installation
A1. Free-standing – single
A2. Façade mounted Span – single
A3. Façade mounted Pivot – single
A4. Façade mounted AND Pivot – single
B. Coupled installation types
B1 Free-standing – coupled
B2. Façade mounted Span – coupled
B3. Façade mounted Pivot – coupled
B4. Façade mounted AND Pivot – coupled
2. BAUARTEN UND
ABMESSUNGEN
A. Einzelne Bauarten
A1. Freistehend – einzeln
A2. Fassadenmontage Span – einzeln
A3. Fassadenmontage Pivot – einzeln
A4. Fassadenmontage Span UND Pivot –
einzeln
B. Gekoppelte Bauarten
B1. Freistehend – gekoppelt
B2. Fassadenmontage Span – gekoppelt
B3. Fassadenmontage Pivot – gekoppelt
B4. Fassadenmontage Span UND Pivot –
gekoppelt
2. TYPES D’INSTALLATION
& DIMENSIONS
A. Type d’installation simple
A1. Autoportante – simple
A2. Montage sur la façade côté span –
simple
A3. Montage sur la façade côté pivot –
simple
A4. Montage sur la façade côté span ET
pivot – simple
B. Type d’installation double
B1. Autoportante – couplée
B2. Montage sur la façade côté span –
couplée
B3. Montage sur la façade côté pivot –
couplée
B4. Montage sur la façade côté span ET
pivot – couplée
2. BOUWTYPES &
AFMETINGEN
A. Enkelvoudige bouwtypes
A1. Vrijstaand - enkel
A2. Gevelmontage span – enkel
A3. Gevelmontage pivot – enkel
A4. Gevelmontage span EN pivot –
enkel
B. Gekoppeld bouwtypes
B1. Vrijstaand – gekoppeld
B2. Gevelmontage span – gekoppeld
B3. Gevelmontage pivot – gekoppeld
B4. Gevelmontage span EN pivot –
gekoppeld

9
Algarve®Canvas
L
SPEAKERS
R
L
OUT
ANALOG IN
R
A1
B1
A2
B2
A3
B3
A4
B4
➝
= waterafvoerrichting / direction d’évacuation d’eau / Entwässerungsrichtung / water drainage direction

10
Algarve®Canvas
L
SPEAKERS
R
L
OUT
ANALOG IN
R
3. MOUNTING BASES
A1 Visible mounting base
A2 Visible mounting base
(2 side capped – corner)
A3 Invisible mounting base
3. MONTAGEFÜSSE
A1 Sichtbarer Montagefuß
A2 Sichtbarer Montagefuß
(2 Seiten verkürzt – Ecke)
A3 Unsichtbarer Montagefuß
3. PIEDS DE MONTAGE
A1 Pied de montage visible
A2 Pied de montage visible
(2 côtés découpés – angle)
A3 Pied de montage invisible
3. MONTAGEVOETEN
A1 Zichtbare montagevoet
A2 Zichtbare montagevoet
(2 zijden afgekapt – hoek)
A3 Onzichtbare montagevoet

11
Algarve®Canvas
L
SPEAKERS
R
L
OUT
ANALOG IN
R
A1 A2 A3
110 mm 65 mm65 mm
240 mm

12
Algarve®Canvas
L
SPEAKERS
R
L
OUT
ANALOG IN
R
4. BASE PLATE ASSEMBLY
• The internal mounting bases are already
secured in the column.
Mount the correct base plate to the correct
column. Take into account the fact that the
2 completely smooth sides of the column
are the 2 outside column surfaces.
With the visible mounting base, which is
cut off on 2 sides, you have several assem-
bly options (see previous page). A
• If you use an invisible mounting base, you
must disassemble and remove the internal
mounting base from the column.
Then secure the invisible base plate to the
internal mounting base (M8 x 40). B
5. POSITION OF THE
MOUNTING BASES
Mark where the mounting base(s) will be
fitted, according to the type of installation.
Ensure there is a stable surface underneath
the mounting bases. Put the mounting bases
in their positions. Make sure the open end is
in the direction of the water drainage.
5.1 Free-standing type of
installation
• When installing the Algarve Canvas with
visible mounting bases, the overall size of
the bases is 13 cm more than the Pivot and
Span dimensions.
Consult the drawings in chapter 3 ‘Mount-
ing bases’, if you are using other mounting
bases.
4. MONTAGE DER
FUSSPLATTE
• Die internen Montagefüße sind bereits in
der Pfosten befestigt.
Montieren Sie die korrekte Fußplatte an die
richtige Pfosten. Achten Sie bitte darauf,
dass die zwei vollständig flachen Seiten
der Pfosten die Außenseite darstellen.
Beim sichtbaren Montagefuß, der an
zwei Seiten abgeschnitten ist, haben Sie
verschiedene Befestigungsmöglichkeiten
(siehe vorherige Seite). A
• Wenn Sie einen unsichtbaren Montagefuß
verwenden, müssen Sie der interne Monta-
gefuß in der Pfosten demontieren.
Befestigen Sie dann die unsichtbare
Fußplatte am internen Montagefuß (M8 x
40). B
5. POSITION DER
MONTAGEFÜSSE
Markieren Sie, wo der Montagefuß bzw. die
Montagefüße je nach Bautyp angebracht
werden sollen.
Sorgen Sie für einen stabilen Untergrund
unter den Montagefüßen. Platzieren Sie die
Montagefüße an ihrer Position. Positionieren
Sie sie mit der offenen Seite in Richtung der
Entwässerung.
5.1 Freistehende Bauart
• Bei der Platzierung der Algarve Canvas mit
sichtbaren Montagefüßen ist der äußere
Abstand der Füße 13 cm größer als das
Pivot- und Span-Maß.
Beachten Sie die Zeichnungen in Kapitel 3
“Montagefüße”, wenn Sie andere Monta-
gefüße verwenden.
4. MONTAGE DU SOCLE
DU PIED
• Les pieds de montage internes sont déjà
fixés dans la colonne.
Montez le socle correspondant à la bonne
colonne. Tenez compte que les deux côtés
plats de la colonne correspondent au côté
extérieur.
Pour le pied de montage visible qui est
découpé à 2 côtés, il existe plusieurs possi-
bilités de montage (voir page précédente).
A
• Si vous utilisez un pied de montage invi-
sible, vous devez démonter le pied de
montage interne de la colonne.
Fixez ensuite le socle invisible au pied de
montage interne. (M8 x 40). B
5. POSITION DES PIEDS
DE MONTAGE
Dessinez l’emplacement du(es) pieds de
montage en fonction du type d’installation.
Prévoyez un support stable sous les pieds de
montage. Placez les pieds de montage à leur
emplacement. Placez-les avec le côté ouvert
orienté vers l’évacuation d‘eau.
5.1 Type d’installation
autoportante
• En cas de montage de l’Algarve Canvas
avec des pieds de montage visibles, la
dimension hors-tout des pieds doit être
supérieure de 13 cm à la dimension pivot
et span.
Consultez les dessins dans le chapitre 3
‘Pieds de montage’ si vous utilisez d’autres
pieds de montage. C
4. MONTAGE VAN DE
VOETPLATEN
• De interne montagevoeten zijn reeds in de
kolom bevestigd.
Monteer de juiste voetplaat aan de juiste
kolom. Hou er rekening mee dat de 2 volle-
dig vlakke zijden van de kolom de buiten-
zijde is.
Bij de zichtbare montagevoet welke aan 2
zijden afgekapt is, heb je diverse montage-
mogelijkheden (zie vorige pagina). A
• Als u gebruik maakt van een onzichtbare
montagevoet, dient u de interne montage-
voet te demonteren uit de kolom.
Maak daarna de onzichtbare voetplaat
vast aan de interne montagevoet (M8 x
40). B
5. POSITIE VAN DE
MONTAGEVOETEN
Teken af waar de montagevoet(en) zullen
geplaatst worden, in functie van het bouw-
type.
Voorzie een stabiele ondergrond onder de
montagevoeten. Plaats de montagevoeten
met kolom op hun positie.
5.1 Vrijstaand bouwtype
• Bij plaatsing van de Algarve Canvas met
zichtbare montagevoeten is de overmeten
maat van de voeten 13 cm groter dan de
pivot- en spanmaat. Raadpleeg de teke-
ningen uit hoofdstuk 3 ‘Montagevoeten’,
indien u andere montagevoeten gebruikt.
C

13
Algarve®Canvas
L
SPEAKERS
R
L
OUT
ANALOG IN
R
A
C
B
Pivot P + 14 cm
Span S + 14 cm
13 cm
PIVOT (P)
SPAN (S)
13 cm
OUTSIDE
OUTSIDE
M8 x 40
(G6025204)
M8 x 40
(G6025204)

14
Algarve®Canvas
L
SPEAKERS
R
L
OUT
ANALOG IN
R
5. Position of the mounting
bases (continued)
5.2 Façade mounted
installation type
• In case of façade mounting, the overall size
from the wall to the visible mounting bases
is 6,5 cm more than the Pivot or Span size.
In the direction parallel to the wall, the
overall size of the mounting bases is 13
cm more.
Consult the drawings in chapter 3 ‘Mount-
ing bases’, if you are using other mounting
bases. A
• Marking the line (laser or chalk line) to
position the frame profiles that will be
mounted on the wall, in the height relative
to the BASELINE.
Draw plumb lines, the span and pivot (laser
or chalk line). Check its perpendicularity to
the BASELINE.
Position the frame profiles that will be
mounted on the façade against the wall.
Mark the drill holes of the frame profiles
and then remove the profiles. B
5. Position der Montagefüße
(Fortsetzung)
5.2 Bauart Fassadenmontage
• Bei Fassadenmontage ist der äußere
Abstand von der Wand zu den sichtba-
ren Montagefüßen 6,5 cm größer als das
Pivot- oder Span-Maß.
In der Richtung parallel zur Wand ist der
äußere Abstand der sichtbaren Montage-
füße 13 cm größer.
Beachten Sie die Zeichnungen in Kapitel 3
“Montagefüße”, wenn Sie andere Monta-
gefüße verwenden. A
• Markieren Sie die Linie (Laser oder Schlag-
schnur) für die Positionierung der Rahmen-
profile, die an der Wand montiert werden
sollen, in der Höhe in Bezug auf das Null-
niveau.
Markieren Sie die Senkrechten, den Span
und den Pivot (Laser oder Schlagschnur).
Prüfen Sie die Rechtwinkligkeit in Bezug
auf das Nullniveau.
Positionieren Sie die Rahmenprofile, die an
der Wand montiert werden sollen, an der
Wandseite.
Markieren Sie die Bohrlöcher der Rahmen-
profile und entfernen Sie die Rahmenpro-
file. B
5. Position des pieds de
montage (suite)
5.2 Type d’installation
montage sur la façade
• En cas de montage sur la façade, la dimen-
sion hors-tout du mur jusqu’aux pieds de
montage visibles doit être supérieure de
6,5 cm à la dimension pivot ou span.
Dans la direction parallèle au mur la
dimension hors-tout des pieds de montage
visibles est supérieure de 13 cm.
Consultez les dessins dans le chapitre 3
‘Pieds de montage’ si vous utilisez d’autres
pieds de montage. A
• Tracez une ligne (au laser ou cordeau)
pour le positionnement des profils cadre
qui seront montés sur le mur, en hauteur
par rapport au POINT ZERO.
Tracez les lignes perpendiculaire, le span
et le pivot (au laser ou cordeau). Contrôlez
la perpendicularité par rapport au POINT
ZERO.
Positionnez les profils cadre contre le mur
sur lequel ils seront montés.
Indiquez les trous de perforation des profils
cadre et enlevez-les. B
5. Positie van de
montagevoeten (vervolg)
5.2 Gevelmontage bouwtype
• Bij gevelmontage is de overmeten maat
van de muur tot aan de zichtbare monta-
gevoeten 6,5 cm groter dan de pivot- of
spanmaat.
In de richting evenwijdig met de muur is de
overmeten maat van de zichtbare monta-
gevoeten 13 cm groter.
Raadpleeg de tekeningen in hoofdstuk 3
‘Montagevoeten’, indien u andere monta-
gevoeten gebruikt. A
• Aftekening lijn (laser of smetkoord) ter posi-
tionering van de kaderprofielen die aan
de muur gemonteerd zullen worden, in de
hoogte t.o.v. de NULPAS.
Teken de loodlijnen, de Span en de Pivot
(laser, smetkoord). Controleer de haaks-
heid t.o.v. de NULPAS.
Positioneer de kaderprofielen die aan de
muur gemonteerd zullen worden tegen de
muurzijde.
Teken de boorgaten van de kaderprofielen
af en verwijder de kaderprofielen. B

15
Algarve®Canvas
L
SPEAKERS
R
L
OUT
ANALOG IN
R
AB
13 cm
6,5 cm
6,5 cm
13 cm
50
50
50
50
50
50
50
50
50
50
50
50
50
50
50
50
50
50
50
50
Pivot ≤ 2000 mm
Pivot ≤ 3000 mm
Pivot ≤ 4000 mm
Pivot ≤ 5000 mm
Pivot ≤ 6055 mm
30
30
30
30
30
30
30
30
30
30
30
30
30
30
30
30
30
30
30
30
Pivot ≤ 2000 mm
Pivot ≤ 3000 mm
Pivot ≤ 4000 mm
Pivot ≤ 5000 mm
Pivot ≤ 6055 mm
50
50
50
50
50
50
50
50
50
Span ≤ 2000 mm
Span ≤ 3000 mm
Span ≤ 4000 mm

16
Algarve®Canvas
L
SPEAKERS
R
L
OUT
ANALOG IN
R
6. INSTALLING THE
MOUNTING BASES
• If LED lighting is provided, you will need
to feed a power cable through the column.
A
• Insert the cable through the mounting base
if the cable has to be concealed in the
ground. B
• Mark the positions where the mounting
bases have to be placed. Put the mount-
ing bases in their positions (see chapter 5
‘Position of the mounting bases’).
Check the diagonals (D1 = D2) and the
distance between the columns, and verify
that the columns form an angle of 90°with
respect to the frame. C
• The columns with water drainage are
already equipped with an integrated
water drainpipe. There are 2 types of these
columns:
– Corner column with water drainage
– Additional column with water drainage
These 2 types may not be used inter-
changeably. In an additional column, the
internal water drainpipe runs all the way
up to the top of the column.
In a corner column, the end of the internal
water drainpipe is situated lower than the
top of the column. You must mount a water
drainpipe funnel onto this type of drain-
pipe. D
6. PLATZIEREN DER
MONTAGEFÜSSE
• Wenn eine LED-Beleuchtung vorgesehen
ist, müssen Sie auch ein Stromkabel durch
den Pfosten führen. A
• Führen Sie das Kabel durch der Montage-
fuß, wenn das Kabel unter der Erde verlegt
werden soll. B
• Markieren Sie, wo die Montagefüße ange-
bracht werden sollen. Platzieren Sie die
Montagefüße an ihrer Position (siehe Kapi-
tel 5 ‚Position der Montagefüße‘).
Überprüfen Sie die Diagonalen (D1 = D2)
und den Abstand zwischen den Pfosten
und kontrollieren Sie, ob die Pfosten einen
Winkel von 90° mit dem Rahmen bilden.
C
• Die Pfosten mit Wasserablauf sind bereits
mit einer integrierten Entwässerungsrinne
ausgestattet. Es gibt zwei Arten:
- Eckpfosten mit Wasserablauf
- Zwischenpfosten mit Wasserablauf
Diese zwei Typen können nicht synonym
verwendet werden. Bei einer Zwischen-
pfosten läuft die interne Entwässerungs-
rinne bis oben in die Pfosten.
Bei einer Eckpfosten liegt die Entwässe-
rungsrinne niedriger als die obere Kante
der Pfosten. An dieser Rinne müssen Sie
noch einen Wasserablauftrichter montie-
ren. D
6. INSTALLATION DES
PIEDS DE MONTAGE
• Si vous prévoyez d’installer de l’éclairage
led, il faut prévoir un câble d’alimentation
dans la colonne. A
• Prévoyez le câble par le pied de montage
si le câble doit être dissimulé dans le sol.
B
• Marquez la position des pieds de montage.
Placez-les à leur position (voir chapitre 5
‘Position des pieds de montage’).
Contrôlez les diagonales (D1= D2) et la
distance entre les colonnes et vérifiez que
les colonnes forment bien un angle de 90°
par rapport au cadre. C
• Les colonnes conçues pour l’évacuation
de l’eau sont équipées d’un conduit d’éva-
cuation d’eau incorporé. Il y a 2 types de
colonnes :
- Colonne d’angle avec évacuation d’eau
- Colonne intermédiaire avec évacuation
d’eau
Ces 2 types ne peuvent pas être inter-
changés. Pour la colonne intermédiaire, le
conduit d’évacuation d’eau incorporé va
jusqu’en haut de la colonne.
Pour la colonne d’angle, le conduit d’éva-
cuation d’eau interne est situé plus bas
que le haut de la colonne. Il faut placer un
entonnoir d’écoulement sur ce conduit. D
6. PLAATSEN VAN DE
MONTAGEVOETEN
• Indien er led-verlichting wordt voorzien,
dient u ook een voedingskabel door de
kolom te voorzien. A
• Voorzie de kabel door de montagevoet
indien de kabel onder de grond dient
weggewerkt te worden. B
• Teken af waar de montagevoeten zullen
geplaatst worden. Plaats de montagevoe-
ten op hun positie (zie hoofdstuk 5 ‘Positie
van de montagevoeten’).
Controleer de diagonalen (D1 = D2) en de
afstand tussen de kolommen en ga na of
de kolommen een hoek van 90° vormen
t.o.v. het kader. C
• De kolommen met waterafvoer zijn reeds
voorzien van een geïntegreerde water-
afvoerbuis. Er zijn echter 2 types:
- Hoekkolom met waterafvoer
- Tussenkolom met waterafvoer
Deze 2 types kan je niet door elkaar
gebruiken. Bij een tussenkolom zit de
interne waterafvoerbuis tot bovenaan de
kolom.
Bij een hoekkolom zit de interne water-
afvoerbuis lager dan de bovenkant van
de kolom. Op deze buis dien je nog een
waterafvoertrechter te monteren. D

17
Algarve®Canvas
L
SPEAKERS
R
L
OUT
ANALOG IN
R
A
D
POWER
CABLE
230V
Hoekkolom
Colonne d’angle
Eckpfosten
Corner column
Tussenkolom
Colonne intermédiaire
Zwischenpfosten
Intermediate column
B C
90°
90°
90°
90°
D1
D2

18
Algarve®Canvas
L
SPEAKERS
R
L
OUT
ANALOG IN
R
6. Installing the mounting
bases (continued)
• Screw one mounting base tight in its
position. Use suitable mounting materials
for the surface you are installing on (not
included). A
Remark: make sure the column is prop-
erly vertical in both directions.
The surface you are installing on and
fastenings must be suitable for bearing
this terrace covering and securing it,
and should be able to do that under any
weather conditions that the terrace cover-
ing can withstand (see warranty).
If in doubt, consult a stabilisation engineer.
You can fit the other mounting bases firmly
in place later.
• All of the invisible mounting bases must be
secured to the substrate. B
6. Platzieren der Montagefüße
(Fortsetzung)
• Schrauben Sie einen Montagefuß an
seiner Position fest. Verwenden Sie hierfür
für den Untergrund geeignete Befestigungs-
materialien (nicht mitgeliefert). A
Hinweis: Stellen Sie sicher, dass der Pfos-
ten in beiden Richtungen senkrecht steht.
Der Untergrund und das Befestigungsmate-
rial müssen geeignet sein, um diese Terras-
senüberdachung zu tragen und daran/
damit zu befestigen und zwar unter den
Witterungsbedingungen, gegen die die
Terrassenüberdachung beständig ist (siehe
Garantiebedingungen).
Kontaktieren Sie bei Zweifeln/bei Bedarf
einen Statiker.
Die anderen Montagefüße können später
befestigt werden.
• Sämtliche unsichtbaren Montagefüße
müssen am Boden befestigt werden. B
6. Installation des pieds de
montage (suite)
• Fixez 1 pied de montage à son empla-
cement. Utilisez du matériel de fixation
adapté au sous-sol (non fourni). A
Remarque : veillez à ce que la colonne
soit bien verticale dans les deux directions.
Le sous-sol et le matériel de fixation doivent
pouvoir supporter le poids de la toiture
de terrasse et sa fixation et ceci dans les
circonstances climatiques auxquelles elle
peut résister (voir conditions de garantie).
Contactez un ingénieur en stabilité en cas
de doute ou si nécessaire.
Les pieds de montage suivants peuvent être
fixés ultérieurement.
• Les pieds de montage invisibles doivent
tous être fixés au sous-sol. B
6. Plaatsen van de
montagevoeten (vervolg)
• Schroef één montagevoet vast op zijn
positie. Gebruik hiervoor bevestigings-
materialen geschikt voor de ondergrond
(niet meegeleverd). A
Opmerking: zorg dat de kolom mooi
verticaal staat in de beide richtingen.
De ondergrond en het bevestigingsma-
teriaal dienen geschikt te zijn om deze
terrasoverkapping te dragen en aan/mee
te bevestigen, dit tevens onder de weers-
omstandigheden waartegen de terras-
overkapping bestand is (zie garantie).
Contacteer een stabiliteitsingenieur bij twij-
fel/indien nodig.
De overige montagevoeten kunnen later
vastgezet worden.
• De onzichtbare montagevoeten dien je
wel allemaal vast te maken aan de onder-
grond. B

19
Algarve®Canvas
L
SPEAKERS
R
L
OUT
ANALOG IN
R
A
B

20
Algarve®Canvas
L
SPEAKERS
R
L
OUT
ANALOG IN
R
7. POSITIONING FRAME
PROFILES
• Lay the Pivot and Span profiles in their
position on the ground. A
• Pivot profiles are profiles on which the
double brackets are already fitted.
The steel sheets will be fastened on top of
these brackets at a later time.
With the two pivot profiles, pay attention
to the different positions of these brackets.
This concerns the slope of the roof.
The pivot profile where the lowest bracket
is located is on the water drainage side.
With the coupled version, the two pivot
profiles where the brackets are the highest
are located in the middle. B
• Span profiles are other profiles where a
single bracket is fitted. C
7. POSITIONIEREN DER
RAHMENPROFILE
• Legen Sie die Pivot- und Span-Profile an
ihren Platz auf dem Boden. A
• Pivot-Profile = Profile, auf denen die
doppelten Bügel bereits montiert sind.
An der Oberseite dieser Bügel werden
später die Stahlplatten befestigt.
Achten Sie bei den 2 Pivot-Profilen auf die
unterschiedliche Position dieser Bügel. Dies
hängt mit der Dachneigung zusammen.
Das Pivot-Profil, bei dem die Bügel am
niedrigsten sind, ist die Wasserabflussseite.
Bei gekoppelten Bautypen kommen die
2 Pivot-Profile, bei denen die Bügel am
höchsten stehen, in die Mitte. B
• Span-Profile = sonstige Profile, auf denen
die einfachen Bügel bereits montiert sind.
C
7. POSITIONNEMENT DES
PROFILS CADRE
• Positionnez les profils cadre Span et Pivot
à leur emplacement par terre. A
• Les profils Pivot = les profils où les équerres
doubles sont déjà montées.
Sur le côté supérieur de ces équerres on
fixe les plaques en acier.
Faites attention à la position différente de
ces équerres pour les 2 profils pivot. Ceci
concerne l’inclinaison du toit.
Le profil Pivot où les équerres sont les plus
basses est le côté de l’évacuation d’eau.
En cas de situation de montage couplée,
les 2 profils pivot où les équerres sont les
plus hautes se trouvent au milieu. B
• Les profils Span = les profils restants sur
lesquels les équerres simples sont montées.
C
7. POSITIONEREN
KADERPROFIELEN
• Leg de pivot- en spanprofielen op hun
plaats op de grond. A
• Pivot profielen = de profielen waarop de
dubbele beugels reeds zijn gemonteerd.
Op de bovenkant van deze beugels
worden later de staalplaten vastgemaakt.
Let op verschillende positie van deze
beugels bij de 2 pivot profielen. Dit heeft
te maken met de helling van het dak.
Pivot profiel waar de beugels het laagst
staan is de waterafvoerzijde.
Bij gekoppelde bouwtypes komen de 2
pivot profielen waar de beugels het hoogst
staan, in het midden. B
• Span profielen = overige profielen, waarop
de enkele beugels zijn gemonteerd. C
Table of contents
Other Renson Outdoor Furnishing manuals

Renson
Renson Linarte User manual

Renson
Renson Algarve User manual

Renson
Renson Ellice User manual

Renson
Renson Camargue Skye 2.0 io User manual

Renson
Renson Camargue User manual

Renson
Renson Camargue Skye 2.0 io User manual

Renson
Renson Aero User manual

Renson
Renson Outdoor Loggia User manual

Renson
Renson Ellice User manual

Renson
Renson Linius Camargue User manual