Ricoh DDP 92 User manual

Finisher
User’s Guide
© 2005 Ricoh Printing Systems, Ltd.
May, 2005
N905360

i
Revision Table for manual
Rev. for
manual
Machine
Rev. Page No. (Contents) Date
00 - First Edition May, 2005

ii DDP92/184 Finisher User’s Guide

O G L 0 0
© Copyright 2005 Ricoh Printing Systems, Ltd. All rights reserved.
No part of this document may be reproduced without the express permission of Ricoh
Printing Systems, Ltd.
The material in this document is for informational purposes and is subject to change
without notice. Ricoh Printing Systems, Ltd. assumes no responsibility for errors or
omissions in this document. No liability is assumed for any damages resulting from the
use of the information it contains.
NOTICE TO USER
In an effort to meet the demands of a rapidly changing technology, the manufacturer is
continually developing new features and functions to meet your changing printing or
printer needs. Please be sure to consult all manual updates or addenda when using
this product’s documentation.

i
Contents
Chapter 1. Introduction . . . . . . . . . . . . . . . . . . . . . . . . . . . . . . . . . . . . . . . . . . . . . 1-1
1.1. Finisher Configuration . . . . . . . . . . . . . . . . . . . . . . . . . . . . . . . . . . . . . . . . . . . 1-1
1.1.1. External View of the Finisher . . . . . . . . . . . . . . . . . . . . . . . . . . . . . . . . . . 1-1
1.1.2. Opening the Finisher Front Cover . . . . . . . . . . . . . . . . . . . . . . . . . . . . . . 1-2
1.1.3. Internal View of the Finisher. . . . . . . . . . . . . . . . . . . . . . . . . . . . . . . . . . . 1-3
1.1.4. Specifications . . . . . . . . . . . . . . . . . . . . . . . . . . . . . . . . . . . . . . . . . . . . . . 1-5
Chapter 2. General Information. . . . . . . . . . . . . . . . . . . . . . . . . . . . . . . . . . . . . . . 2-1
2.1. Powering on the Finisher. . . . . . . . . . . . . . . . . . . . . . . . . . . . . . . . . . . . . . . . . 2-1
Chapter 3. Replacing Consumables . . . . . . . . . . . . . . . . . . . . . . . . . . . . . . . . . . . 3-1
3.1. When to Replace Consumables . . . . . . . . . . . . . . . . . . . . . . . . . . . . . . . . . . . 3-1
3.2. Replacing the Staple Cartridge . . . . . . . . . . . . . . . . . . . . . . . . . . . . . . . . . . . . 3-2
Chapter 4. Troubleshooting. . . . . . . . . . . . . . . . . . . . . . . . . . . . . . . . . . . . . . . . . . 4-1
4.1. Clearing Paper Jams . . . . . . . . . . . . . . . . . . . . . . . . . . . . . . . . . . . . . . . . . . . . 4-1
4.2. Clearing Wedged Staples . . . . . . . . . . . . . . . . . . . . . . . . . . . . . . . . . . . . . . . . 4-3
Chapter 5. Others . . . . . . . . . . . . . . . . . . . . . . . . . . . . . . . . . . . . . . . . . . . . . . . . . . 5-1
5.1. Load the Cover Sheet (Cover Sheet Feeder only) . . . . . . . . . . . . . . . . . . . . . 5-1
5.2. Extend the Tray . . . . . . . . . . . . . . . . . . . . . . . . . . . . . . . . . . . . . . . . . . . . . . . . 5-1
5.3. Cancel of Staple Job . . . . . . . . . . . . . . . . . . . . . . . . . . . . . . . . . . . . . . . . . . . . 5-2

1-1
O G L 0 0
Chapter 1. Introduction
1.1. Finisher Configuration
1.1.1. External View of the Finisher
The figure below shows an external view of the finisher and descriptions of the main
parts.
1. Finisher Front Cover Open to change the staple cartridge or clear paper jams.
2. Main Tray It receives printed paper.
3. Sub Tray It receives printed paper.
4. Booklet Tray It receives printed paper.
(Booklet Finisher only)
5. Cover Sheet Feeder Hold cover sheet for use in cover sheet output mode.
(Option)
Finisher
Fi
f ffff ff
Fi
F
kk llll
Finisher
1. Finisher
Front Cover
5. Cover Sheet
Feeder (Option)
2. Main Tray 3. Sub Tray
4. Booklet Tray
(Booklet Finisher
only)

1-2 O G L 0 0
1.1.2. Opening the Finisher Front Cover
Open the finisher front cover according to the following figure.
Finisher
Fi
Finisher Front Cover

1-3
O G L 0 0
1.1.3. Internal View of the Finisher
The following figure shows an internal view of the finisher with the front cover open.
Main Tray
Book let Tray
Sub Tray
lines: Booklet Finisher
3. Folding Unit
4. Cover Sheet Feeder (Option)
1. Stacker Unit
2. Stapler Unit
Area within dotted
only
(1) Staple R
(2) Staple F
Staple Cartridge
Operator’s
Side

1-4 O G L 0 0
1. Stacker Unit Clear stacked paper when the Operator’s Panel of the
printer indicates.
2. Stapler Unit
(1) Staple F Replace the staple cartridge in the Staple F on the opera-
tor’s side.
(2) Staple F Replace the staple cartridge in the Staple R on the oppo-
site side of the operator’s.
3. Folding Unit Clear stacked paper when the Operator’s Panel of the
printer indicates.
(Booklet Finisher only)
4. Cover Sheet Feeder
Clear stacked paper when the Operator’s Panel of the
printer indicates.
(Option)

1-5
O G L 0 0
1.1.4. Specifications
Finishing speed 92 pages /minute (Letter, A4/LEF)
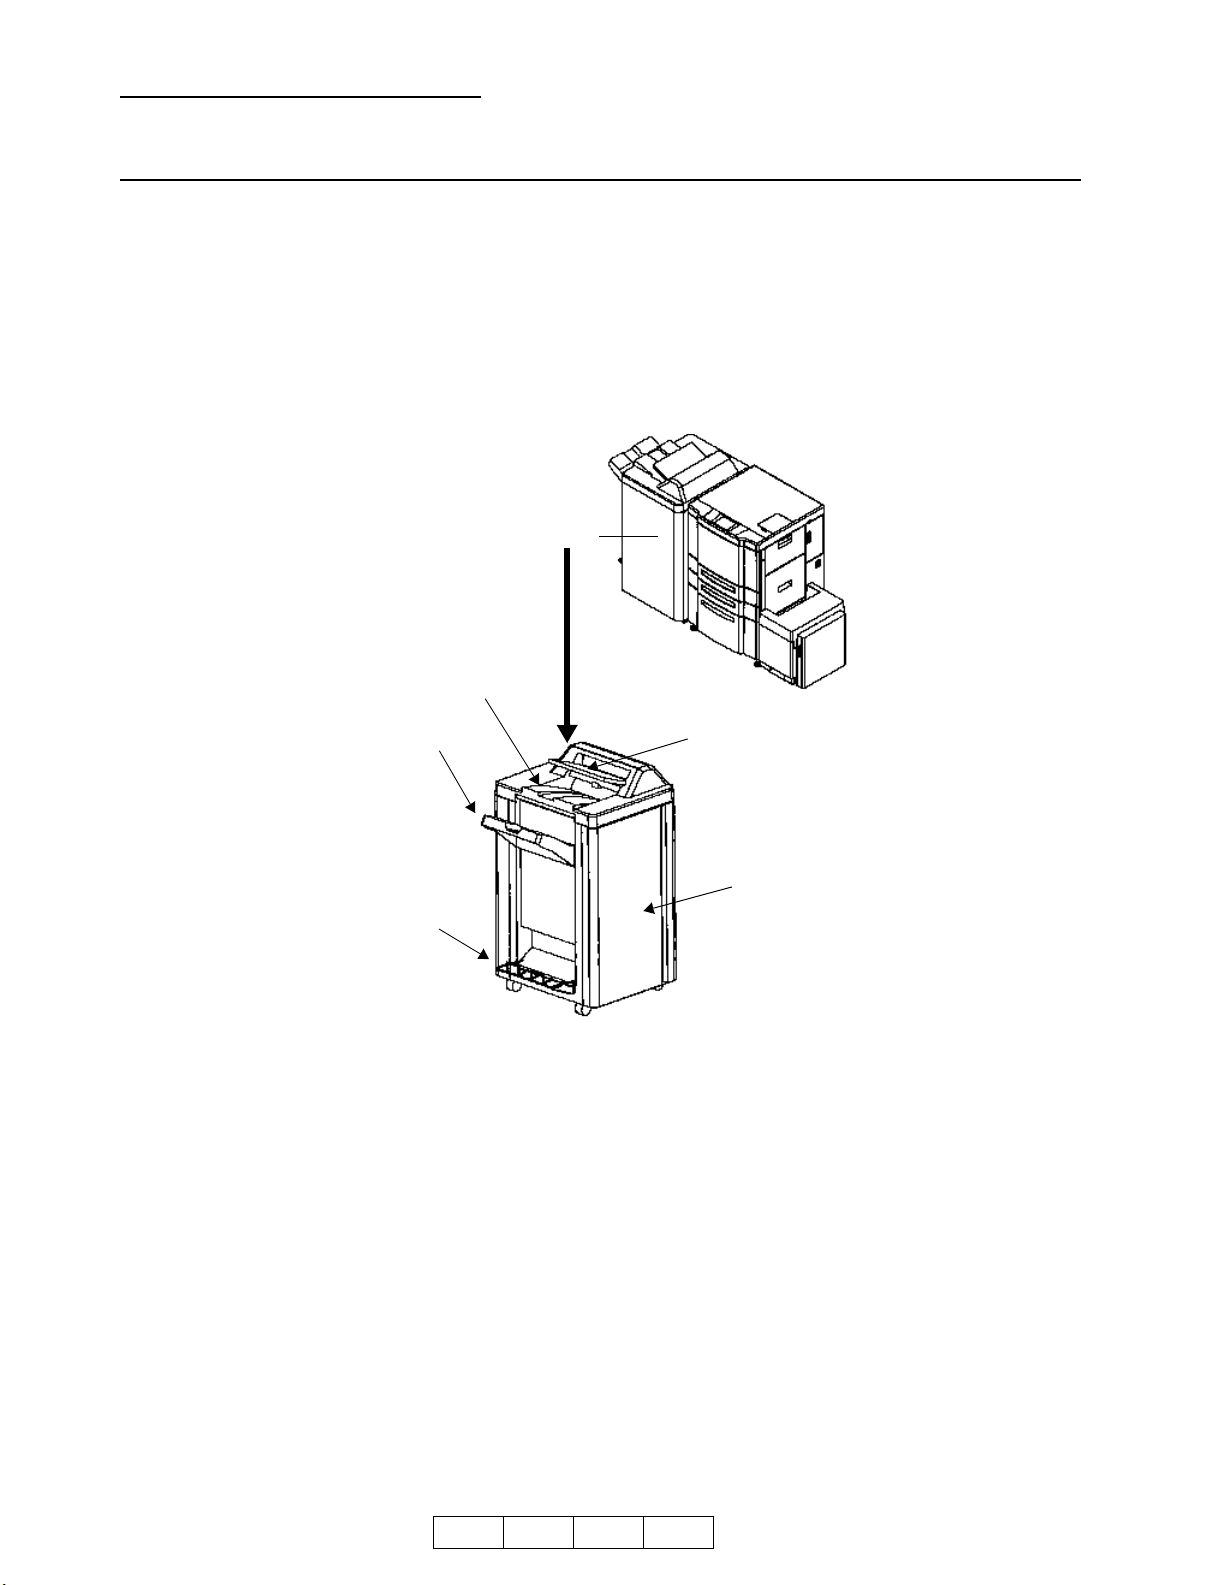
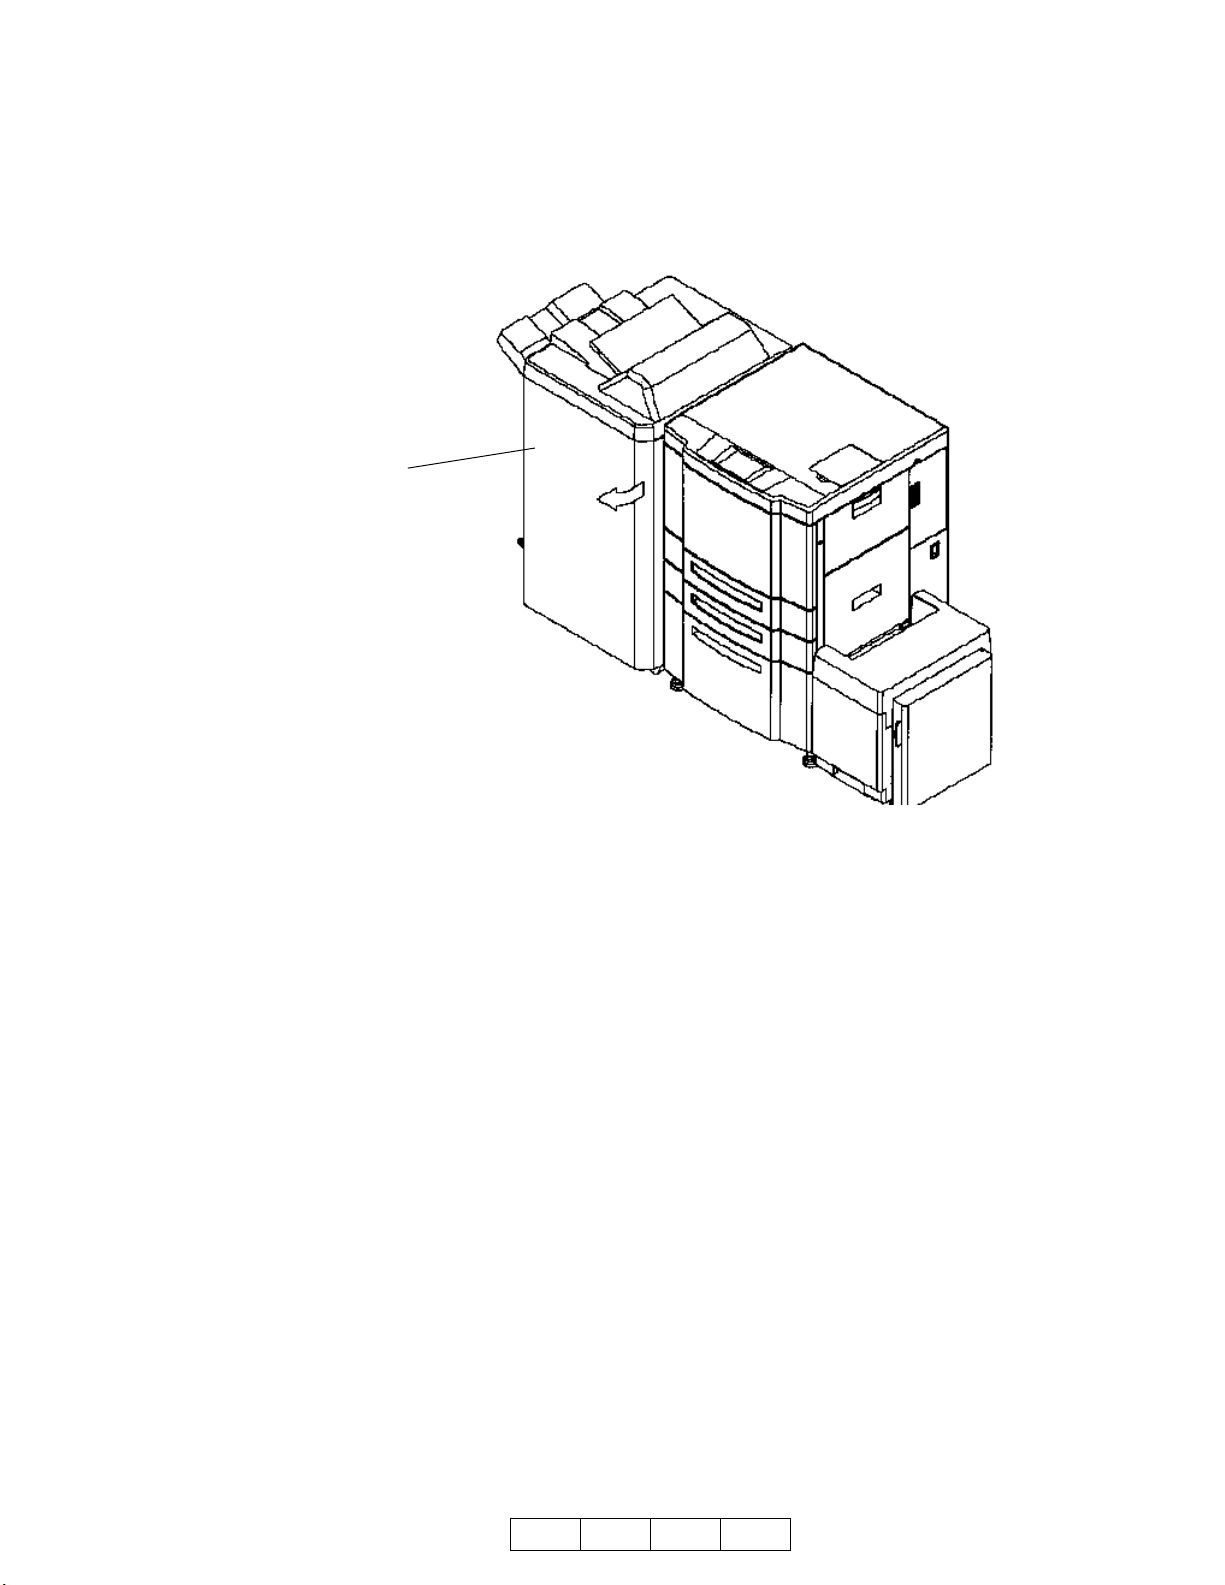
Dimensions 781 x 1151 x 656 mm: Include the main tray
Weight 55 kg : Not include the cover sheet feeder
80 kg (Booklet model): Not include the cover sheet feeder
7 kg (cover sheet feeder)
Paper
1. Non-staple mode / Offset mode / Sub-tray exit mode
A3 SEF, B4 SEF, A4 LEF, A4 SEF, B5 LEF, A5 SEF, 12 x 18 SEF,
11 x 17 SEF, 8.5 x 14 SEF, 8.5 x 13 SEF, 8.5 x 12.4 SEF, 8.5 x 11 LEF,
8.5 x 11 SEF
2. Staple mode
A3 SEF, B4 SEF, A4 LEF, A4 SEF, B5 LEF, 12x18 SEF,11 x 17 SEF,
8.5 x 14 SEF, 8.5 x 13 SEF, 8.5 x 12.4 SEF, 8.5 x 11 LEF, 8.5 x 11 SEF
3. Center stapling/folding mode (Option)
A3 SEF, B4 SEF, A4 SEF, 11 x 17 SEF, 8.5 x 14 SEF, 8.5 x 11 SEF
4. Cover sheet feeder (Option)
A3 SEF, B4 SEF, A4 LEF, A4 SEF, B5 LEF, 11 x 17 SEF, 8.5 x 14 SEF,
8.5 x 11 LEF, 8.5 x 11 SEF
Weight 16 to 110 (Index) lbs.
Stacking capacity
Each stacking capacity is specified for normal operating environment with
xerography 75g/m2paper.
1. Sub-tray exit mode * Limited to the same size
200 sheets equivalent
2. Non-staple / Offset mode * Limited to the same size
Maximum 2,500 sheets---- A4, B5, 8.5 x 11
Maximum 1,500 sheets---- B4, A3, 8.5 x 14, 8.5 x 13, 8.5 x 12.4, 11 x 17,
12 x 18
Maximum 500 sheets---- A5 SEF
3. Staple mode---- Maximum 1,000 sheets
4. Center stapling/folding mode (Option)
Booklets can be stacked until the sensor detects the stacker tray full in
the booklet mode. The referential stacking capacities are shown below.
Center stapling mode---- 5-sheet-folded booklet of ledger size paper x
20 set
Center folding mode----- 3-sheet-folded booklet of ledger size paper x 33 set
5. Cover sheet feeder (Option)
200 sheets equivalent (34 lbs. paper ), within 40mm in height
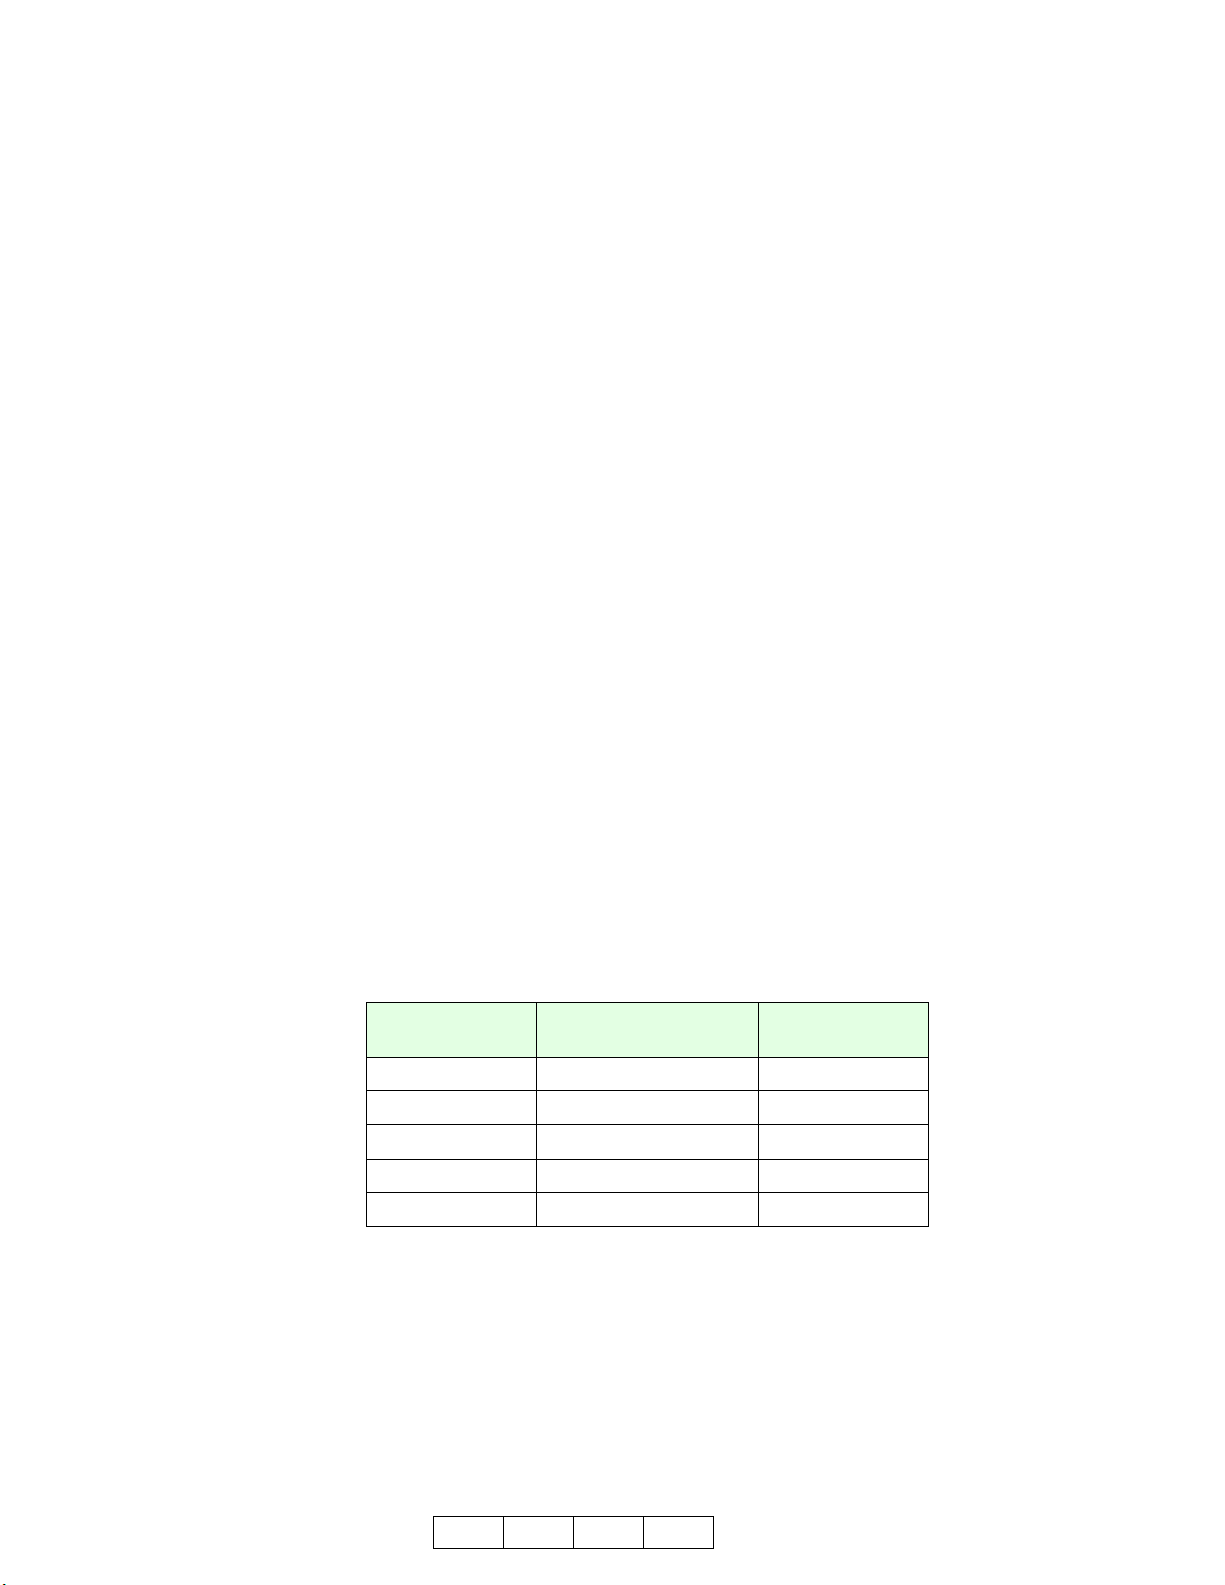
Number of
stapled sheets
Other than A3 SEF, 11 x
17,12x18 , A5
A3 SEF, 11 x 17,
12x18 , A5
2 to 9 100 stacks 50 stacks
10 to 20 50 stacks 50 stacks
21 to 30 30 stacks 30 stacks
31 to 40 25 stacks 25 stacks
41 to 50 20 stacks 20 stacks
Table 1-1. Stacking Mode and Capacity

1-6 O G L 0 0
The allowable amount of paper curl with the following way is 10mm
maximum
Amount of offset 30 mm Note: Non-staple mode only
Stapling capability Maximum 50 sheets (75 g/m2, 5.0 mm and below)
Stapling position A = 8.5 mm C = 82.5 mm E = 14 mm B = 8.5 mm D = 8.5 mm
Stapling capacity5,000 staples / cartridge
Power source 24V/5V (Supplied from the printer)
Temperature and (1) Operation
Humidity Temperature : 10 to 32 °C (50 to 89.6 °F)
Humidity : 20 to 80 %
Wet Bulb 26 deg.C (78.8 °F) max.
(2) Recommended condition
Temperature : 19 to 25 °C (66.2 to 77 °F)
Humidity : 40 to 60 %
Amount of paper curl 5 sheets of printed paper
1 place (Rear side) 2 places 1 place (Front side)
Paper feed direction
Booklet mode (stapling and folding)

2-1
O G L 0 0
Chapter 2. General Information
2.1. Powering on the Finisher
If your Finisher is connected to a DDP 92, turn the finisher on and off using the switch
on the printer. The mark on the switch represents the binary characters “O”for off and
“I”for on.
If your Finisher is connected to a DDP 184, turn the finisher on and off using the Main
Power Switch. The mark on the switch represents the binary characters “O”for off and
“I”for on.
When the printer is powered on, the printer and the finisher go through a power-up
sequence that takes approximately 5 minutes. During the power-up sequence, the
printer will run a series of internal tests.
Power Switch Power SwitchPP
Po
POPow er
FinishFiniFIer
Power
Finisher FFinis
F
Finisher Power Switch
CAUTION:
Wait at least 5 seconds to power on the printer after powering off.
When the printer cannot be powered on, POWER OFF the printer and wait at least
30 seconds. Then power on the printer again.
WARNING:
In the event of an emergency, POWER OFF the printer by turning the Power
Switch to’O’ side. The printer can be always powered off by turning the Power
Switch to ’O’ side.
Main Power Switch
Finisher

2-2 O G L 0 0

3-1
O G L 0 0
Chapter 3. Replacing Consumables
3.1. When to Replace Consumables
The Operator’s Panel on the printer displays a message informing you when a supply
needs to be replaced. However, the following item will help you anticipate when to
replace consumables.
Note:
•Waste materials should be disposed of or incinerated under conditions
which meet all federal, state and local environmental regulations. Since
regulations may vary from one region to another, check with the agency
that governs waste disposal in your area for proper procedures.
•Confirm that staples comply with the specifications of the finisher.
Consumable Replace every...
Staple 5,000 times

3-2 O G L 0 0
3.2. Replacing the Staple Cartridge
Replace the staple cartridge when LOW STAPLE (R) or LOW STAPLE (F) is dis-
played on the Operator’s Panel.
1. Open the finisher front cover.
2. Pull out the stacker unit by holding the stacker unit
handle.
3. Pull up the cartridge
housing, then remove it
while sliding it along the
stapler rail.
4. Remove the empty cartridge from the cartridge housing.

3-3
O G L 0 0
5. Insert the new
cartridge into the
housing.
Note:
Do not remove the
remaining staples inside
the housing; otherwise,
the first sheet output
after the replenishment
will not be stapled.
6. Insert the cartridge
housing while sliding it
along the stapler rail,
then push in and down to
secure it in place.
7. Return the stacker unit to its original position.
8. Close the Finisher door.

3-4 O G L 0 0

4-1
O G L 0 0
Chapter 4. Troubleshooting
4.1. Clearing Paper Jams
The finisher stops when a misfeed occurs and PAPER JAM is displayed on the Oper-
ator’s Panel of the printer.
Follow the steps below to clear paper from the finisher.
Move the blue tab and remove paper.
Turn the blue knob, move the blue tab, then remove paper.
Move the blue tab and remove paper.
Remove the paper of a delivery tray.
Pull out the stacker unit, then remove paper.

4-2 O G L 0 0
Move the blue knob and remove paper
Turn the blue knob, then remove
paper from the Booklet Tray
(Booklet Finisher only).
Remove paper from the Cover Sheet
Feeder (Cover Sheet Feeder only).
7

4-3
O G L 0 0
4.2. Clearing Wedged Staples
Follow the steps below to clear wedged staples.
Pull out the stacker unit by holding the stacker unit handle.
Pull up the cartridge housing, then
remove it while sliding it along the
stapler rail.
Pull the lever of cartridge, then open the cover.
Remove the wedged staples.
Other manuals for DDP 92
3
This manual suits for next models
1
Table of contents
Other Ricoh Finisher manuals

Ricoh
Ricoh SR790 User manual

Ricoh
Ricoh SR4120 Quick start guide

Ricoh
Ricoh DDP70 User manual

Ricoh
Ricoh SR5090 Quick start guide

Ricoh
Ricoh SR4110 Quick start guide

Ricoh
Ricoh Rh 100 User manual

Ricoh
Ricoh SR400 User manual

Ricoh
Ricoh SR3020 Quick start guide

Ricoh
Ricoh A763 User manual

Ricoh
Ricoh SR3270 Quick start guide