Ricoh Rh 100 User manual

1
Operating Instructions
Introduction
For safe and correct use, be sure to read Safety Information before using the
machine.
How to Read the Manuals
Symbols
This manual uses the following symbols:
Indicates points to pay attention to when using the functions, be sure to read
these explanations.
Indicates supplementary explanations of the machine’s functions, and instructions
on resolving user errors.
[ ]
Indicates the names of keys on the machine’s display or control panels.
Disclaimer
Contents of this manual are subject to change without prior notice.
To the maximum extent permitted by applicable laws, in no event will the
manufacturer be liable for any damages whatsoever arising out of failures of this
machine, losses of the registered data, or the use or non-use of this product and
operation manuals provided with it.
In no event will the manufacturer be responsible for any documents created by
you using this machine or any results from the data executed by you.
Notes
The manufacturer shall not be responsible for any damage or expense that might
result from the use of parts other than genuine parts from the manufacturer with
your office products.
Some illustrations in this manual might be slightly different from the machine.

2
Model-Specific Information
This section explains how you can identify the region your machine belongs to.
There is a label on the rear of the machine, located in the position shown below.
The label contains details that identify the region your machine belongs to. Read
the label.
DSB062
The following information is region-specific. Read the information under the sym-
bol that corresponds to the region of your machine.
(mainly Europe, Asia, and China)
If the label contains the following, your machine is a region A model:
220-240 V•
(mainly North America)
If the label contains the following, your machine is a region B model:
110-127 V•
Dimensions in this manual are given in two units of measure: metric and inch.•
If your machine is a Region A model, refer to the metric units. If your machine
is a Region B model, refer to the inch units.

3
Precautions when using the machine
When installing the machine, provide a gap of at least 5 cm (about 1.9 inches)•
between each of the left and right sides and the rear and other objects.
Do not put anything on top of the machine (except for the printer Ri 100).•
If the temperature inside the machine rises, a malfunction will result. Do not block•
the vents (left, right, and back sides of the machine) by placing or leaning objects
against them.
DSA132
Do not surround the finisher with inflammables with the ignition point of 200 °C•
(392 °F) or lower.
This machine has a heater auto-off function. If you do not open the front cover•
or operate the mode switching lever for 15 minutes after the set temperature is
reached by the heating operation, the heater power is automatically turned off.
Use this machine indoors.•
Use this machine in a place where sufficient ventilation is available.•
When using multiple units, do not stack them.•
Remove the protective cover before inserting the cassette into the finisher.•
DSA065
Before heat processing starts, do not touch with your hands the surface where•
ink is applied.
When you leave from the finisher for an hour or longer after using it or when you•
do not use it, make sure to turn the power switch (red) off and unplug the cord.
As the A4 standard tray and A5 tray becomes hot when continuously used on the•
finisher, give an interval of five minutes or longer to set them after they are pulled out.
Take out the cassette from the finisher soon after pressing (smoothing wrinkles/flatten-•
ing fibers) or fixing ink is completed. Leaving the cassette in the hot finisher for a long
time may cause the cassette to malfunction.

4
Precautions for Washing
Note the following handling precautions for T-shirts and sweatshirts:•
Turn garments inside out before washing them.•
When washing T-shirts and other garments by hand, dissolve some neutral•
detergent in lukewarm water of about 30°C (86°F) and wash them with-
out rubbing the printed areas. After that, spin them dry for about 1 minute
in a washing machine, smooth wrinkles, and then hang them to dry.
DSA541
Do not rub the printed surfaces. Doing so may cause discoloration due to•
friction.
DSA542
When washing T-shirts and other garments in a washing machine, turn•
them inside out so the printed side is inside and put them in a laundry net.
After washing them, shake out as much water as possible, smooth out
wrinkles, and hang them in the shade to dry.
DSA543
Do not use a dryer or bleach.•
Avoid ironing the printed surfaces.•
Do not dry-clean garments.•

5
Note the following handling precautions for tote bags:•
Do not machine wash tote bags. Doing so may cause the tote bag to lose•
its shape or cause its colors to fade.
When washing tote bags by hand, dissolve some neutral detergent in•
lukewarm water of about 30°C (86°F) and wash them without rubbing
their printed areas. After washing a tote bag, shake it out to remove as
much water as possible. Then, flatten it to remove wrinkles and dry it in
the shade.
Laws and Regulations
User Information on Electrical & Electronic
Equipment
Users in the countries where this symbol shown in this section has been
specified in national law on collection and treatment of E-waste
Our Products contain high quality components and are designed to facilitate
recycling.
Our products or product packaging are marked with the symbol below.
The symbol indicates that the product must not be treated as municipal waste. It
must be disposed of separately via the appropriate return and collection systems
available. By following these instructions you ensure that this product is treated
correctly and help to reduce potential impacts on the environment and human
health, which could otherwise result from inappropriate handling. Recycling of
products helps to conserve natural resources and protect the environment.
For more detailed information on collection and recycling systems for this product,
please contact the shop where you purchased it, your local dealer or sales/service
representatives.
All Other Users
If you wish to discard this product, please contact your local authorities, the shop
where you bought this product, your local dealer or sales/service representatives.

6
For Users in India
This product including components, consumables, parts and spares complies with
the “India E-waste Rule” and prohibits use of lead, mercury, hexavalent chro-
mium, polybrominated biphenyls or polybrominated diphenyl ethers in concentra-
tions exceeding 0.1 weight % and 0.01 weight % for cadmium, except for the
exemptions set in the Rule.
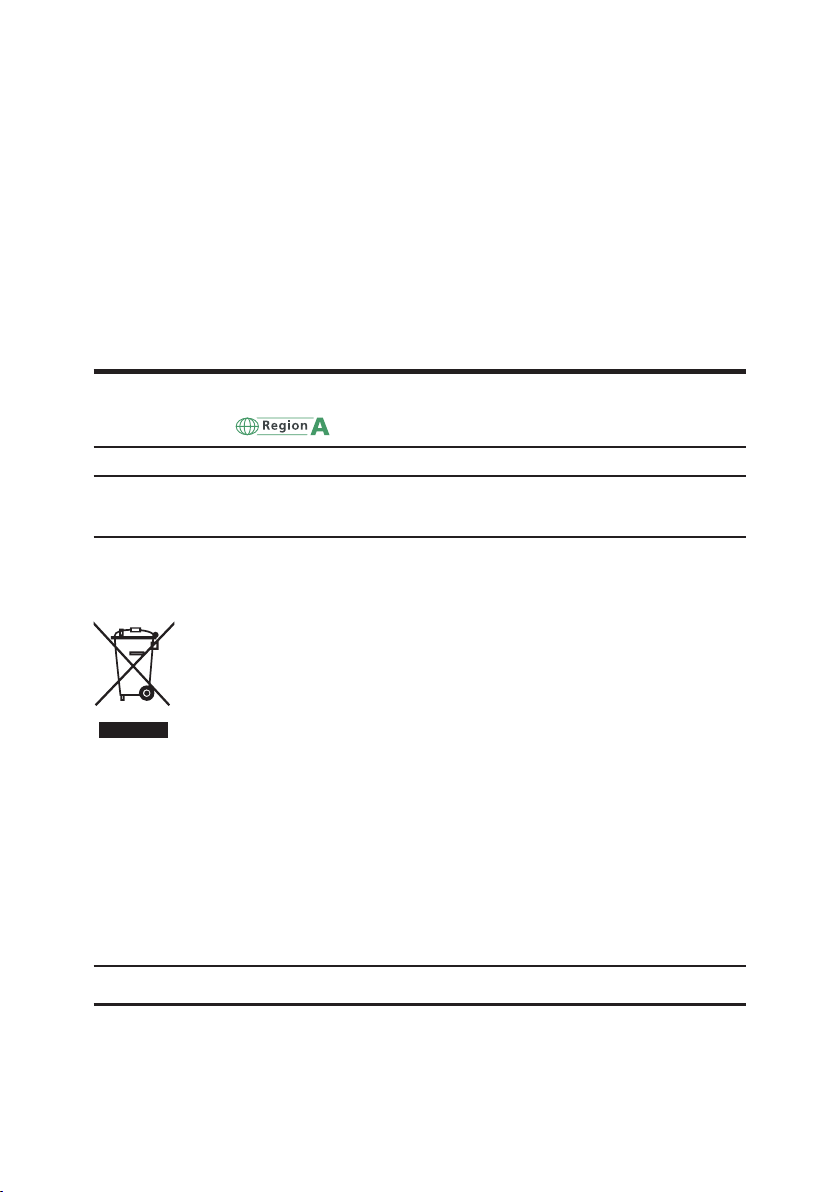
Note for the Battery and/or Accumulator Symbol (For EU countries only)
In accordance with the Battery Directive 2006/66/EC Article 20 Information for
end-users Annex II, the above symbol is printed on batteries and accumulators.
This symbol means that in the European Union, used batteries and accumulators
should be disposed of separately from your household waste.
In the EU, there are separate collection systems for not only used electrical and
electronic products but also batteries and accumulators.
Please dispose of them correctly at your local community waste collection/recy-
cling centre.
Notes to Users in the United States of America
FCC Rules
NOTE:
This equipment has been tested and found to comply with the limits for a Class B
digital device, pursuant to Part 15 of the FCC Rules. These limits are designed to
provide reasonable protection against harmful interference in a residential installa-
tion. This equipment generates, uses and can radiate radio frequency energy and,
if not installed and used in accordance with the instructions, may cause harm-
ful interference to radio communications. However, there is no guarantee that
interference will not occur in a particular installation. If this equipment does cause
harmful interference to radio or television reception, which can be determined by
turning the equipment off and on , the user is encouraged to try to correct the
interference by one or more of the following measures:
Reorient or relocate the receiving antenna.•
Increase the separation between the equipment and receiver .•
Connect the equipment into an outlet on a circuit different from that to which•
the receiver is connected.
Consult the dealer or an experienced radio/TV technician for help.•
Caution:
Changes or modifications not expressly approved by the party responsible for
compliance could void the user’s authority to operate the equipment.

7
Notes to users in the state of California
Perchlorate Material - special handling may apply. See: www.dtsc.ca.gov/hazard-
ouswaste/
perchlorate
Guide to Components
2
1
3
4
5
6
5
DSA134
1. Brace to prevent falling
2. Control Panel
3. Front Cover
4. Mode Switching Lever
5. Vents (on the left, right, and back sides of the machine)
6. Handles for Transporting and Moving (on the left and right sides of the
machine)

8
Names of Control Panel
DSB511
12 3 4 56 7 8 9
1. High temperature caution indicator
Lights up when the machine is hot.
2. Unlock indicator
The front cover will not open when locked.
3. Mode indicator
Lights up during pressing (smoothing wrinkles/flattening fibers) or fixing (fixing ink).
4. Time/temperature indicator
Displays the set temperature and the time remaining until processing is completed.
5. [Temperature] key
See "Smoothing Wrinkles/Flattening Fibers (Press )" or "Fixing Ink (Fix )".
6. [Fixing Time] key
See "Smoothing Wrinkles/Flattening Fibers (Press )" or "Fixing Ink (Fix )".
7. [Preheat] key
When the [Preheat] key is lit, press the [Preheat] key to start preheating.
When the [Preheat] key is unlit, preheating is completed.
When the [Preheat] key is flashing, preheating is under way.
8. [Stop/Unlock] key
When this key is pressed while preheating is under way, preheating stops.
In standard mode, press the [Stop/Unlock] key for at least 1 second to unlock
the front cover.
9. [Power] key
Turns the power on and off.
To turn off the power, press and hold the [Power] key for 1 second or more.

9
When Attaching the Finisher to the Printer
Attach the finisher to the printer so that the support on the finisher
and the hole on the bottom of the printer align.
DSA133
Make sure that the support and the hole on the back of the printer match.

10
Turning On the Power
Plug the power cord fully into the machine.
DSA135
Plug the power cord fully into the wall outlet.
DSA518
Press the [Power] key.
DSB512
To turn off the machine's power, press the [Power] key for 1 second or more.•

11
Operating Mode of the Finisher
CAUTION:
If children use this machine, their parents must be with them and•
they should be very careful in using this machine. Otherwise, injury or
burns may result.
The finisher has "Standard mode" and "Professional mode".
To switch between these modes, press the [Temperature] key and the [Fixing Time]
key simultaneously for 2 seconds or more.
DSB547
Standard mode
The factory-default setting is standard mode. The finisher has the following
functions to prevent children from touching the inside of the finisher acciden-
tally when it is very hot.
When the inside of the finisher exceeds 70 °C (158 °F), the front cover•
locks. To open the front cover, press the [Stop/ Unlock] key for at least 1
second.
DSA143
Professional mode
To use this mode, switch from standard mode.
As this mode is for users who are accustomed to using the finisher, the front
cover does not lock even when the temperature of the inside of the finisher
exceeds 70 °C (158 °F).
However, during press processing and fixing processing, the front cover locks
regardless of whatever mode is used to prevent erroneous operations.
DSA144

12
Set Temperature and Time
The temperature and time are set at the factory, but you can change the settings
according to how you use the finisher.
To set the temperature and time, press the [Temperature] key or the [Fixing Time]
key.
You can select either "Low" or "High" for the temperature.•
You can select "Short", "Medium", or "Long" for the time.•
It is set to a fixed number for each.
You can set any number. Press the [Temperature] key or the [Fixing Time] key for
2 seconds or more, and use the [Temperature] key or the [Fixing Time] key to
set the temperature and time. To confirm the settings, press the [Preheat] key. To
cancel the settings, press the [Stop/Unlock] key.
You can set the temperature in units of 5°C (41°F) between 140°C (284°F)•
and 180°C (356°F).
You can set the time in units of 30 seconds between 30 seconds and 6 min-•
utes.

13
Smoothing Wrinkles/Flattening Fibers (Press )
CAUTION:
Do not touch the inside of the finisher when you open the front cover.•
The surface of the heater will be as high as about 180 °C (356 °F).
Especially never touch the black heater on the upper part of the inside•
of the machine.
When taking a T-shirt out of the cassette after a print image has been•
fixed to it, do not touch the front side or metal plate (black) on the back
side of the casette's table because it is hotter than 100 ° C (212 °F ).
If children use this machine, their parents must be with them and•
they should be very careful in using this machine. Otherwise, injury or
burns may result.
Before installing the cassette to the finisher, do not spray any liquid on the•
fabric or cassette. If you heat a wet cloth or cassette in the finisher, the color of
the cassette table may stain the back side of the fabric.
You can unlock the front cover manually if the power is shut off due to a•
power failure or other causes while the front cover is locked. Insert a piece of
cardboard or a card between the front cover and the operation panel and slide
it from the right to the left as you pull the front cover towards you.
DSA145

14
Standard mode
Press the [Power] key to turn
on the power.
DSB512
Slide the mode switching lever
to the center.
DSA136
Set the heater temperature
with the [Temperature] key.
Set the temperature according to
the fabric on which you print. The
default setting is "High".
DSB514
When the [Preheat] key is lit,
press the [Preheat] key to start
preheating. When the [Preheat]
key is unlit, no operation is nec-
essary because preheating is
completed.
When preheating is completed, an
alarm sounds and the set tem-
perature of the time/temperature
indicator flashes.
DSB513
Press the [Stop/Unlock] key for
1 second or more to open the
front cover.
DSA137
Load the cassette.
DSA138

15
Close the front cover.
DSA139
Slide the mode switching lever
to the left.
The remaining time is displayed on
the time/temperature indicator.
DSA140
Processing is completed and an
alarm sounds.
Slide the mode switching lever
to the center and confirm that
the mode indicator turns off.
DSA136
Press the [Stop/Unlock] key for
1 second or more to open the
front cover.
Because the inside of the finisher
is very hot, do not touch anything
inside the finisher.
DSA146
Take out the cassette.
Remove the cassette, and then
close the front cover. If you leave
it open more than 10 seconds, an
alarm sounds to warn you of risks
such as injury or burns.

16
Professional mode
Press the [Power] key to turn
on the power.
DSB512
Switch to professional mode.
See "Operating Mode of the
Finisher".
Slide the mode switching lever
to the center.
DSA136
Set the heater temperature
with the [Temperature] key.
Set the temperature according to
the fabric on which you print. The
default setting is "High".
DSB514
When the [Preheat] key is lit,
press the [Preheat] key to start
preheating. When the [Preheat]
key is unlit, no operation is nec-
essary because preheating is
completed.
When preheating is completed, an
alarm sounds and the set tem-
perature of the time/temperature
indicator flashes.
DSB513
Open the front cover.
DSA137
Load the cassette.
DSA138

17
Close the front cover.
DSA139
Slide the mode switching lever
to the left.
The remaining time is displayed on
the time/temperature indicator.
DSA140
Processing is completed and an
alarm sounds
Slide the mode switching lever
to the center and confirm that
the mode indicator turns off.
DSA136
Open the front cover.
Because the inside of the finisher
is very hot, do not touch anything
inside the finisher.
DSA146
Take out the cassette.
Remove the cassette, and then
close the front cover. If you leave
it open more than 10 seconds, an
alarm sounds to warn you of risks
such as injury or burns.

18
Fixing Ink (Fix )
CAUTION:
Do not touch the inside of the finisher when you open the front cover.•
The surface of the heater will be as high as about 180 °C (356 °F).
Especially never touch the black heater on the upper part of the inside•
of the machine.
When taking a T-shirt out of the cassette after a print image has been•
fixed to it, do not touch the front side or metal plate (black) on the back
side of the casette's table because it is hotter than 100 ° C (212 °F ).
If children use this machine, their parents must be with them and•
they should be very careful in using this machine. Otherwise, injury or
burns may result.
Default settings are as follows:•
Temperature: “High” (170 °C, 338°F)•
Fixing Time: “Medium” (3 minutes)•
Ink might not fix properly or fabric color might change depending on usage•
conditions. After checking for the garment you use, set the temperature and
time.
Before installing the cassette to the finisher, do not spray any liquid on the•
fabric or cassette. If you heat a wet cloth or cassette in the finisher, the color of
the cassette table may stain the back side of the fabric.
You can unlock the front cover manually if the power is shut off due to a•
power failure or other causes while the front cover is locked. Insert a piece of
cardboard or a card between the front cover and the operation panel and slide
it from the right to the left as you pull the front cover towards you.
DSA145

19
Standard Mode
Slide the mode switching lever
to the center.
DSA136
Set the heater temperature
with the [Temperature] key.
Set the temperature according to
the fabric on which you print. The
default setting is "High".
DSB514
Set the amount of time with
the [Fixing Time] key.
Set the time according to the fab-
ric on which you print. The default
setting is "Medium".
DSB515
When the [Preheat] key is lit,
press the [Preheat] key to start
preheating. When the [Preheat]
key is unlit, no operation is nec-
essary because preheating is
completed.
When preheating is completed, an
alarm sounds and the set tem-
perature of the time/temperature
indicator flashes.
DSB513
Press the [Stop/Unlock] key for
1 second or more to open the
front cover.
DSA137
Load the cassette.
DSA142

20
Close the front cover.
DSA139
Slide the mode switching lever
to the right.
The remaining time is displayed on
the time/temperature indicator.
DSA141
Processing is completed and an
alarm sounds.
Slide the mode switching lever
to the center and confirm that
the mode indicator turns off.
DSA136
Press the [Stop/Unlock] key for
1 second or more to open the
front cover.
Because the inside of the finisher
is very hot, do not touch anything
inside the finisher.
DSA146
Take out the cassette.
Remove the cassette, and then
close the front cover. If you leave
it open more than 10 seconds, an
alarm sounds to warn you of risks
such as injury or burns.
Other manuals for Rh 100
1
Table of contents
Other Ricoh Finisher manuals

Ricoh
Ricoh SR4120 Quick start guide

Ricoh
Ricoh FS-108R User manual

Ricoh
Ricoh SR5090 Quick start guide

Ricoh
Ricoh SR3290 Quick start guide

Ricoh
Ricoh SR400 User manual

Ricoh
Ricoh DDP 92 User manual

Ricoh
Ricoh SR3300 Quick start guide

Ricoh
Ricoh DDP70 User manual

Ricoh
Ricoh SR790 User manual

Ricoh
Ricoh A763 User manual