Riello RIELLOtech CLIMA TOP User manual

INSTALLATION, OPERATION AND
MAINTENANCE MANUAL
CONTROL PANEL
RIELLOtech
CLIMA TOP
CLIMA COMFORT

2
RIELLOtech control panels conform to:
• Low Voltage Directive 2006/95/EC (ex-Directive 73/23/EEC)
• Electromagnetic Compatibility Directive 2004/108/EEC (ex-Directive 89/336/EEC)
• EN 61000-6: 2001 parts 1-2-3-4
• EN 60730-1: 2000
• EN 60730-2-9: 2000
• EN 50090-2-2: 1996
CONFORMITY
RANGE
MODEL CODE
RIELLOtech CLIMA TOP (horizontal installation) 4031065
RIELLOtech CLIMA TOP (vertical installation) 4031070
RIELLOtech CLIMA COMFORT (horizontal installation) 4031064
RIELLOtech CLIMA COMFORT (vertical installation) 4031069

3
Dear heating engineer,
Congratulations on having chosen a RIELLOtech control panel. You have selected a modern,
quality product that is designed to give dependable, efficient and safe service and to provide
comfort in the home for many years to come. This manual provides information that is essential to
the installation of the appliance. Used in conjunction with your own knowledge and expertise it will
enable you to install the appliance quickly, easily, and correctly.
Once again, please accept our thanks and our congratulations on your choice of product.
Riello S.p.A.

4
This manual, Code 20013508 - Rev. 2 (10/10) is made
up of 60 pages.
The following symbols are used in this manual:
b = Identifies actions that require caution and ade-
quate preparation.
a = Identifies actions that you MUST NOT do.
CONTENTS
General safety information 5
Precautions 5
Product description 6
Safety devices 7
Identification 7
Technical specifications 8
Accessories 8
Unpacking the product 9
Dimensions and weight 9
Assembly 10
Access to internal components 12
Electrical connections 12
Positioning the sensors 15
Connecting the outdoor temperature sensor 16
Wiring diagrams 18
Layout 22
Description of functions 23
Mode selection 25
User levels 28
Error/maintenance codes 30
List of parameters 33
Useful information 59

5
The operation of any appliance that uses electrical power demands that a number of fundamental safety precautions
be respected. In particular:
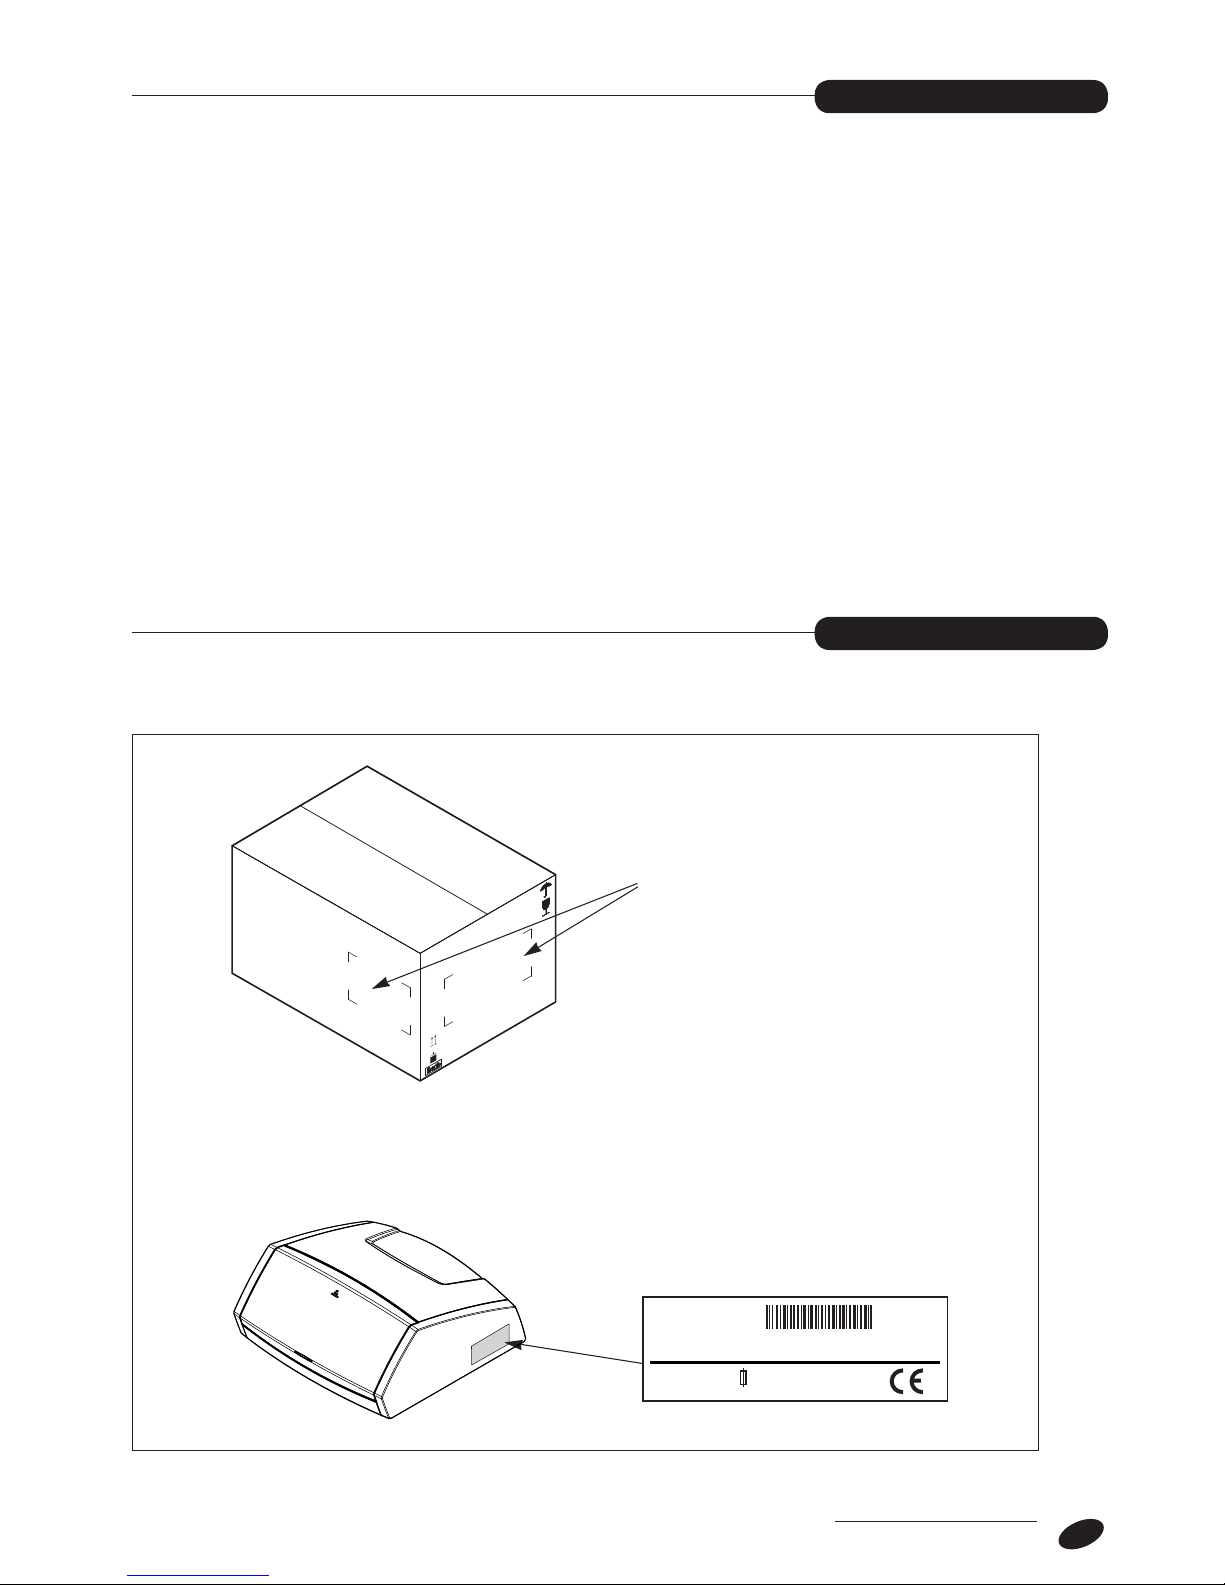
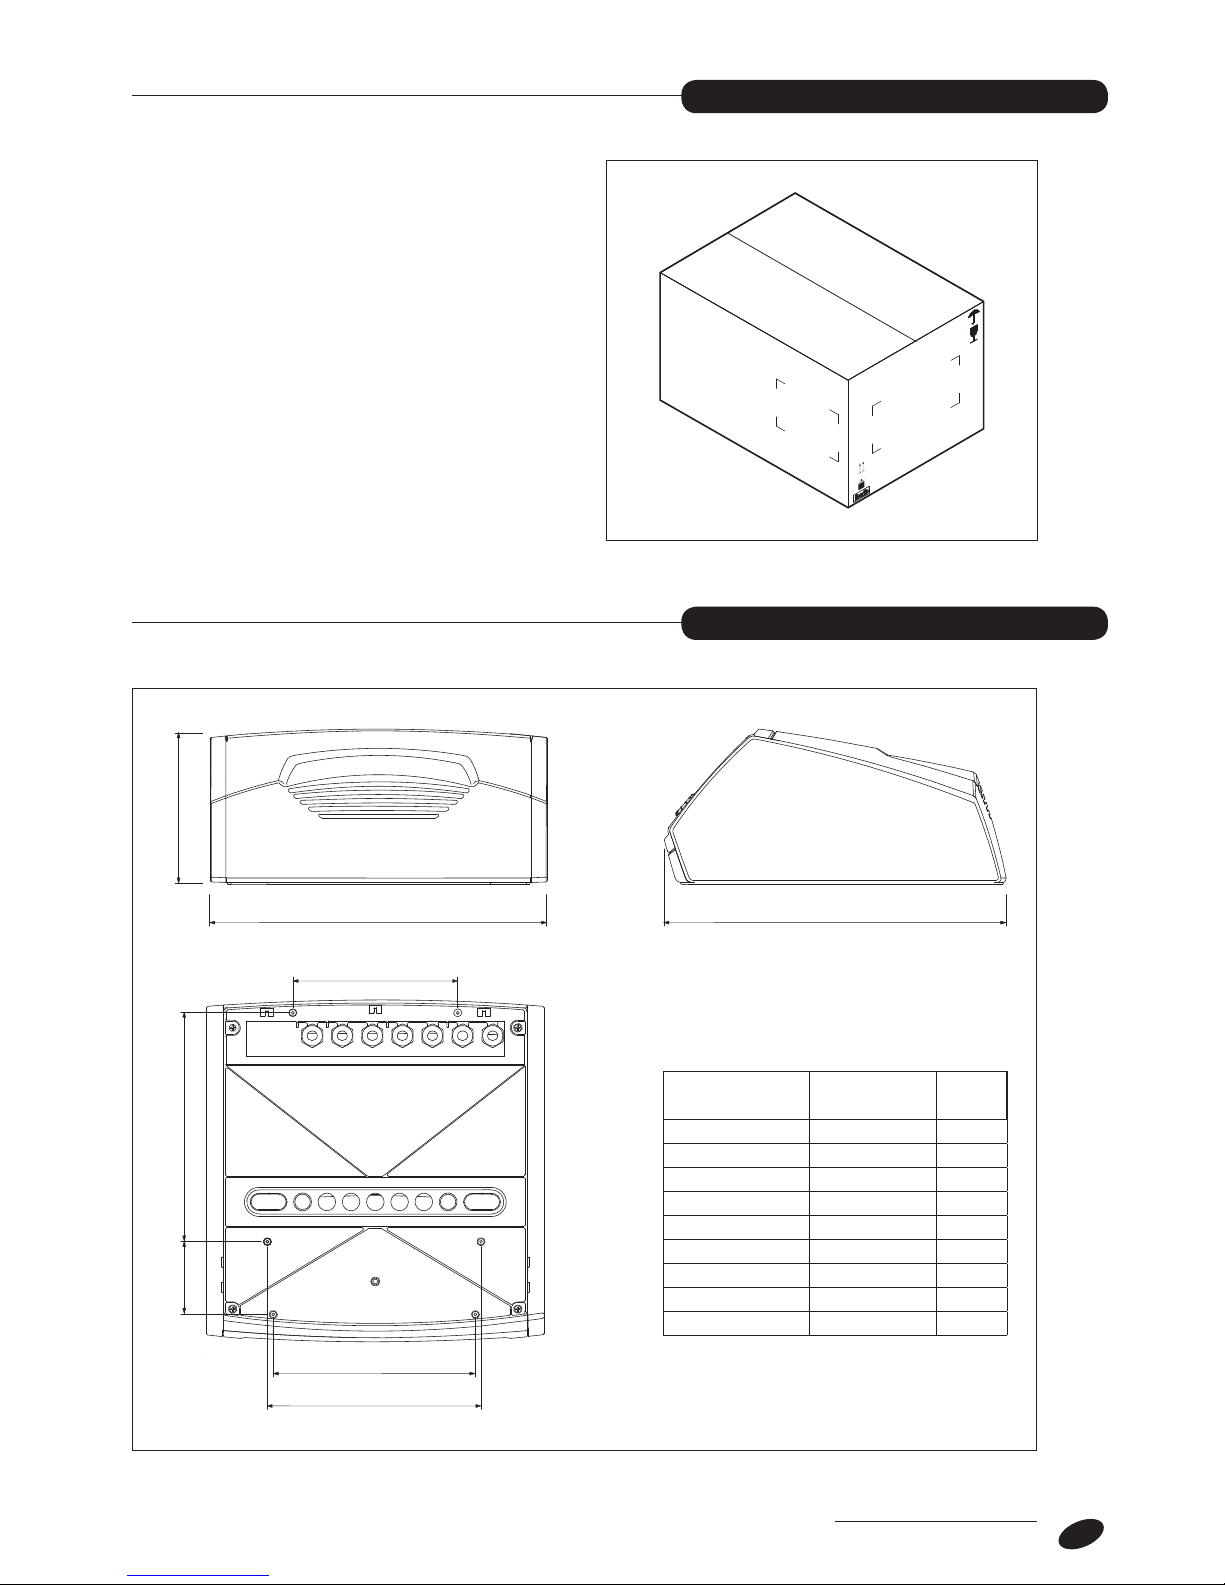
bCheck that the product is complete and undama-
ged as soon as you remove it from its packaging.
Contact the rreseller from whom you purcha-
sed the product if you notice any problems.
bThis product must be installed by a legally quali-
fied heating engineer. (In Italy heating engineers
are regulated by law no. 37 of the 22/01/2008.) On
completion of the installation, the installer must issue
the owner with a declaration of conformity confir-
ming that the installation has been completed to the
highest standards in compliance with the instructions
provided by rin this instruction manual, and that
it conforms to all applicable laws and standards.
bThis control panel is designed and made for use with
boilers generating hot water up to 110°C, and must
be used exclusively for this purpose and within its
specified performance limits.
bThe manufacturer declines all responsibility, con-
tractual or other, for damage to property or injury to
persons or animals caused by improper installation,
adjustment, maintenance or use.
bThis instruction manual is an integral part of the
product. It must be kept safe and must ALWAYS
accompany the product, even if it is sold to another
owner or transferred to another user or to another
installation. If you damage or lose this manual, order
a replacement immediately from your local r
Technical Assistance Centre.
GENERAL SAFETY INFORMATION
PRECAUTIONS
aAlways turn the electrical power supply OFF at the
main switch before commencing any cleaning or
maintenance.
aDo not tamper with or adjust the safety or control
devices without prior authorisation and instructions
from the boiler’s manufacturer.
aNever pull, disconnect, or twist the electrical cables
coming from the appliance even if it is disconnec-
ted from the mains electricity supply.
aDispose of packaging materials in compliance with
applicable standards and legislation governing the
disposal of urban, domestic and industrial waste.
aNever switch the control panel on even for a short
period if the safety devices are not functioning cor-
rectly or have been tampered with.
aAll maintenance and repairs must be carried out by
a legally qualified heating engineer.
aDo not use water to extinguish fire in the control
panel. Switch power OFF at the mains power switch
to isolate the control panel electrically first. Then
use a class E fire extinguisher (marked “SUITABLE
FOR LIVE ELECTRICAL ITEMS”) to extinguish the
flames.

6
RIELLOtech CLIMA COMFORT and CLIMA TOP control
panels are designed to perform indoor climate control
functions. They combine in the same physical unit an
electronic controller and a manual reset safety thermostat
for monitoring maximum boiler temperature in the event
of a controller malfunction.
RIELLOtech CLIMA TOP control panels are designed
for use in complex and multi-apartment systems. They
are capable of controlling modulating burners, cascaded
boilers, complex solar water heating systems and central
heating systems comprising different heat generating
devices. These control panels can manage 1 direct and
2 mixed central heating zones, as well as domestic hot
water production.
RIELLOtech CLIMA COMFORT control panels are desi-
gned for use in single apartment systems, including
complex ones. They can control single and multi-stage
burners (with adapter kit), cascaded boilers, solar water
heating systems and central heating systems comprising
different heat generating device. These control panels
can manage 1 direct and 1 mixed central heating zones
(or 2 mixed zones with the addition of a n accessory kit),
as well as domestic hot water production.
APPLICATION CHART
The microprocessor technology of the electronic control-
ler makes these control panels ideal for use with various
types of boiler, even with different minimum and maximum
temperatures, and also enables them to meet the needs
of various types of central heating and domestic hot
water production systems. The units are programmed by
means of parameter settings on the built-in display that
are only accessible to trained and authorised personnel.
All thermostatic/electric/electronic control devices com-
ply with applicable technical and safety standards, and
are housed in an ABS box.
All the control and safety devices in RIELLOtech CLIMA
COMFORT and CLIMA TOP control panels are factory
tested in compliance with applicable technical stan-
dards. Both types of control panel are available in two
versions for horizontal installation (e.g. in the top panel of
a floor standing boiler) or vertical installation (e.g. in the
side panel of a wall mounted boiler). A kit for separate
wall mounting is also available on request.
PRODUCT DESCRIPTION
Burner type Cascaded
boilers
Biomass
fuelled
boilers
Solar water
heating
systems
DHW storage
cylinders
Direct
zone
1st mixed
zone
2nd mixed
zone
RIELLO tech
CLIMA TOP
M M
RIELLO tech
CLIMA COMFORT
1
2 1
2-stage
with kit
M
With additional
mixed zone kit
bTo make the electrical connections to the various system components and to the burner, refer to the instructions on
pages 19 and 21 as well as to the specific instructions supplied with each item and with the burner.

7
RIELLOtech control panels are identified by:
TABLEAU DE CONTROLE
CONTROL PANEL
PAN NELLO DI CONTROLLO SCHALTTA FEL CUADRO DE MANDO
20Kgmax
- the code number on the box
- the technical data label
Cod. : xxxxxxx
Made in Italy
Mod. : RIELLO TECH CLIMA ....
(installazione ..............)
230 V AC - 50 Hz - 6.3 (A) T
IDENTIFICATION
SAFETY DEVICES
RIELLOtech CLIMA COMFORT and CLIMA TOP control panels are fitted with the following safety devices:
- A safety thermostat that forces the boiler to perform a
safety shutdown if temperature rises above the safety
threshold (110°C). Fuel supply to the burner is shut off
under these conditions.
bThe operation of a safety device indicates a poten-
tially dangerous malfunction in the system, and
means that you must contact r’s Technical
Assistance Service immediately.
You may nevertheless attempt to restart the boiler after a
short delay (see the boiler’s own instruction manual).
aNever start the boiler up even for a short period if
the safety devices are not functioning correctly or
have been tampered with.
bSafety devices must only be replaced by r’s
Technical Assistance Service using original spare
parts. Refer to the spare parts catalogue supplied
with the control panel.
Always check that the control panel and the boiler it
is associated with are functioning correctly after any
repairs.

8
TECHNICAL SPECIFICATIONS
ACCESSORY
Description
RIELLOtech CLIMA COMFORT
RIELLOtech CLIMA TOP
Power supply 230 (+/-10%) - 50 V - Hz
Main power switch (two pole) 250 - 10(4) V - A
Burner reset button 250 - 10(4) V - A
Fuse (on internal terminal block) 250 - 6,3 T V - A
Max power input (electronic controller) 9 VA
Electronic controller relay contacts for burner and pumps 250 - 2(2) V - A
Manual reset safety thermostat (TS1) 110 (+0/-6) °C
Index of protection 20 IP
Length of safety thermostat cable 3 m
The following accessories are available, to be ordered separately.
ACCESSORY CODE
Pipe thermostat, NTC 10 kΩfor RVS (QAD36/101) 20008753
Outdoor temperature sensor, NTC 1 kΩfor RVS (QAC34/101) 4047947
Immersion type boiler flow and return temperature sensor, NTC 10 kΩfor RVS (L = 5m) 20010068
Storage cylinder temperature sensor, NTC 10 kΩfor RVS (L = 5m) 20010103
DHW temperature sensor, NTC 10 kΩfor RVS (L=5m) 20010302
Immersion type solar heating system temperature sensor, NTC 10 kΩfor RVS (QAZ36.481/101)
4031913
Room temperature sensor 20012456
RC2 Remote Control – programmable 4334410
Wall mounting kit (for use only with vertical installation versions) 20010056
Two-stage burner control kit (for RIELLOtech CLIMA COMFORT) 4031067
Additional mixed zone control kit (for RIELLOtech CLIMA COMFORT) 20011194
Modulating burner relay kit (for RIELLOtech CLIMA TOP) 20013035

9
UNPACKING THE PRODUCT
DIMENSIONS AND WEIGHT
RIELLOtech control panels come in a cardboard box that
also contains the following accessories:
- Self-tapping fixing screws
- Instruction manual.
TABLEAU DE CONTROLE
CONTROL PANEL
PAN NELLO DI CONTROLLO SCHALTTA FEL CUADRO DE MANDO
20Kgmax
BA
D
C
G
E
F
H
Description
A348 mm
B356 mm
C161 mm
D170 mm
E
236
mm
F
75
mm
G
208
mm
H
218
mm
Weight
3
kg

10
VERTICAL installation
to sensor socket
in boiler
311
170
41
218
208
75
TOP of boiler
FRONT of boiler
TOP of boiler
FRONT of boiler FRONT of boiler
SIDE panels
TOP panels
FRONT of boilerSIDE of boiler
SIDE of boiler
RIELLOtech control panels can be installed either on the top of the boiler or on one of its side panels.
Per l'installazione verificare il tipo di foratura predisposta sul pannello superiore o laterale della caldaia.
Once you have identified the right holes for the type of
installation required, proceed as follows.
- Push out the pre-formed slots on the boiler casing cor-
responding to the oval cable grommets in the control
panel.
- Perforate the membranes of the control panel cable
grommets. Pull out the thermostat cable and route it
through the slot in the top panel.
- Fix the control panel to the boiler casing using the
screws provided.
ASSEMBLY

11
to sensor socket
in boiler
to sensor socket
in boiler
FRONT of boiler
HORIZONTAL installation
FRONT of boiler
b
Take care when unwinding thermostat cables. Insert the
thermostat sensors in the corresponding sockets in the
boiler and storage cylinder. Fix the sensors in place with
the spring clips provided. Use the cable straps provided
to secure the sensor cables.
A dedicated kit is available for wall mounting. Refer to the instructions provided with the kit for details on installation.
Spring clip
Cable
Sensor
r
r ≥20 mm
Sensor socket

12
Only personnel from r’s Technical Assistance Service
or professionally qualified heating engineers are allowed
to access components inside the control panel.
Proceed as follows if you need to access components
inside the control panel:
- Turn the system OFF at the mains power switch.
- Tilt the panel (1) forwards. Remove the 2 fixing screws
(2) and remove the top cover (3).
3
2
1
b The following instructions are mandatory.
1 - Use a multi-pole magnetic thermal trip switch
and disconnector conforming to IEC-EN stan-
dards (with a contact gap of at least 3 mm).
2 - Respect the L (Phase) - N (Neutral) polarity.
Keep the ground wire about 2 cm longer than the
power wires.
3 - Use cables with a cross section of 1.5 mm2 or
more, complete with end terminals.
4 - Always refer to the electrical wiring diagrams
in this manual when performing any electrical
work.
5 - Make sure the appliance is connected to an
effective ground.
- Proceed as instructed in the “ACCESSING INTERNAL
COMPONENTS” section above to access the terminals
inside the control panel.
- Route the control panel power cables and all the cables
to be connected to the ‘load side’ of the main board
through the cable grommets (A) in the bottom of the
control panel.
- Route the cables to be connected to the ‘sensor side’
of the main board through the cable grommets (B) and
(C) in the bottom of the control panel.
- Route all these cables through the cable grommets in
the casing of the boiler, or use the cable holes for PG
type cable clamps or spiral cable duct fittings.
- Connect up the 230V mains power, using the fixed
‘Mamut’ terminals, referring to the wiring diagram on
the next page and to the WIRING DIAGRAMS chapter.
- Connect up the individual 230V and +12Vdc devices,
referring to the mounting diagram on the next page and
to the WIRING DIAGRAMS chapter.
- Secure the cables to the casing of the boiler so that
they cannot be accidentally pulled out.
a
It is strictly forbidden to use fuel and/or water pipes
to ground the appliance.
a
Do not route the power cable or room thermostat
cables near hot surfaces (like heating circuit flow
pipes). Use a suitable class of cable if there is any
possibility of contact with parts at temperatures
above 50°C.
The manufacturer declines all responsibility for dama-
ge caused by failing to ground the appliance adequa-
tely or by failure to respect the wiring diagrams pro-
vided in this manual.
All electrical connections must be made by a legally qualified heating engineer according to the following instructions.
(In Italy heating engineers are regulated by law no. 37 of the 22/01/2008).
ACCESSING INTERNAL COMPONENTS
ELECTRICAL CONNECTIONS

13
Power supply
Cable grommets “A”
INTERNAL
TOP VIEW
Safety thermostat sensor
to socket in boiler
PENL
Burner
reset
SENSOR side
LOAD side
Cable grommets “B”
Cable guides “C”Cable guides “C”
CH CIRCUIT 1
temp. sensor
STORAGE CYLINDER temp. sensor
10V input /
Room thermostat
0-10V input /
Room thermostat 0-10 V digital / analog
programmable output
(modulating burner)
OUTDOOR temp. sensor
I.S.P. ** I.S.P. **
** Programmable
SENSOR inputs
MBX2MBX1 MBX3 MBX4 MUXMB1
CH CIRCUIT 2 temp. sensor
MB12M
H1 M
H3
MB9MB3
Sonda
CALDAIA
ROOM UNIT 1
ROOM UNIT 2
12 V room unit power supply
LPB data communications*
* For connecting up to 16
cascaded boilers. Lmax between
each controller = 250 metres
MB2
MB
DB
CL-CL+CL-CL+
ROOM UNIT 3
CL-CL+
G+
CH CIRCUIT 1 mixer valve
CH CIRCUIT 1 pump
STORAGE
CYLINDER pump
BURNER
Safety chain
QX1 RELAY programmable output
QX1
N
Q2N
CH CIRCUIT 2 pump
Q6NQ3
SK2SK1
4
S3T2T1
NNL1
LL1S3 N Y2Y1 N
CH CIRCUIT 2 mixer valve
Y6Y5 N
2-stage burner
QX2 RELAY programmable output
QX2
N
QX3 RELAY programmable output
QX3
N
Main board
QX4FX4EX2 QX4
RIELLOtech CLIMA TOP

14
Power supply
Cable grommets “A”
INTERNAL
TOP VIEW
Safety thermostat sensor
to socket in boiler
PENL
Burner reset
CH CIRCUIT 1 mixer valve
CH CIRCUIT 1 temp. sensor
SENSOR side
LOAD side
STORAGE CYLINDER temp. sensor
BOILER
temp. sensor
ROOM UNIT 1
ROOM UNIT 2
0-10V input / Room thermostat
OUTDOOR temp. sensor
CH CIRCUIT 1 pump
STORAGE CYLINDER
pump
Main board
BURNER
Safety chain
QX1 RELAY programmable output
Programmable SENSOR inputs
12 V room unit power supply
LPB data communications*
* For connecting up to 16
cascaded boilers. Lmax between
each controller = 250 metres
QX1
MBX2MBX1MB1M
H1
MB9MB3MB2
MB
DB
CL-CL+CL-CL+
G+
N
Q2NQ3
SK2SK1
4
S3T2T1
NNL1
LL1S3 NY2
Y1 N
Cable grommets “B”
Cable guides “C”Cable guides “C”
RIELLOtech CLIMA COMFORT

15
Correct positioning of the temperature sensors is essential to proper indoor climate control.
b
To ensure correct functioning, use separate cable ducts for the power cables (230 Vac) and for the non-polarised
terminals.
SM (flow temperature sensor)
Insert in the socket above the flow pipe outlet from
the boiler.
SB (storage cylinder temperature sensor)
Insert in the top socket on the storage cylinder.
SR (return temperature sensor)
Insert in the socket to be provided on the boiler return
pipe.
To measure effective water return temperature and to
control the temperature stabilisation function, the socket
for the return temperature sensor must be positioned
at a distance of 3 to 5 times the diameter of the water
return pipe upstream from any water fittings (condensate
prevention pump or recirculation pump). If the boiler
provides no socket for an immersion type sensor, use
the accessory external pipe sensor, to be ordered sepa-
rately.
D
3÷5 D
Correspondence table
FLOW TEMP. SENSOR – STORAGE CYLINDER TEMP. SENSOR – RETURN TEMP. SENSOR
(Available as accessories, to be ordered separately.)
Measured temperature (°C) – Resistance of temperature sensor (Ω).
T (°C) R (Ω) T (°C) R (Ω) T (°C) R (Ω) T (°C) R (Ω)
-30 175203 30 8059 90 915 150 183
-25 129289 35 6535 95 786 155 163
-20 96360 40 5330 100 677 160 145
-15 72502 45 4372 105 586 165 130
-10 55047 50 3605 110 508 170 117
-5 42158 55 2989 115 443 175 105
0 32555 60 2490 120 387 180 95
5 25339 65 2084 125 339 185 85
10 19873 70 1753 130 298 190 77
15 15699 75 1481 135 262 195 70
20 12488 80 1256 140 232 200 64
25 10000 85 1070 145 206
Maximum permitted sensor cable lengths (copper)
Cable size 0,25 0,50 0,75 1,0 1,5 mm2
Max. length 20 40 60 80 120 m
POSITIONING THE SENSORS

16
Correct positioning of the outside temperature sensor is essential to proper indoor climate control. The sensor must be
installed outside the building to be heated, about 2/3 of the way up a NORTH or NORTH-WEST facing wall, well clear of
any flues, doors, windows and out of direct sunlight.
Fixing the outdoor temperature sensor to the wall
- Unscrew the cover from the sensor casing to access
the sensor terminals and fixing holes.
- Use the sensor casing as a template to mark the drilling
points on the wall.
- Remove the sensor casing and drill 5x25 holes for the
expansion plugs.
- Fix the sensor casing to the wall using the two expan-
sion plugs provided.
- Route a two-core cable from the sensor to the boiler.
- Fit the cover on the sensor casing.
- Open the control panel and connect the sensor up
as instructed in the “Electrical connections” section.
Polarity is irrelevant.
- Once you have made all the necessary connections,
close the control panel, reversing the steps followed to
open it.
bPosition the outdoor temperature sensor on a smooth area of wall. Prepare a smooth contact area for the sensor
casing if the wall is made from exposed brick or other rough material.
bAvoid joins in the cable between the outdoor temperature sensor and the control panel. If different cable lengths
have to be joined, make sure that the joins are sealed and adequately protected.
bIf cable ducts are used to route the sensor connection cable, keep these well clear of any power cables (230Vac).
Maximum permitted sensor cable lengths (copper)
Cable size 0,25 0,50 0,75 1,0 1,5 mm2
Max. length 20 40 60 80 120 m
CONNECTING THE OUTDOOR TEMPERATURE SENSOR

17
Correspondence table
Measured temperature (°C) – Resistance of outdoor temperature sensor (Ω).
T (°C) R (Ω) T (°C) R (Ω) T (°C) R (Ω) T (°C) R (Ω)
-30.0 13'034 -9.0 4'358 12.0 1'690 33.0 740
-29.0 12'324 -8.0 4'152 13.0 1'621 34.0 713
-28.0 11'657 -7.0 3'958 14.0 1'555 35.0 687
-27.0 11'031 -6.0 3'774 15.0 1'492 36.0 663
-26.0 10'442 -5.0 3'600 16.0 1'433 37.0 640
-25.0 9'889 -4.0 3'435 17.0 1'375 38.0 617
-24.0 9'369 -3.0 3'279 18.0 1'320 39.0 595
-23.0 8'880 -2.0 3'131 19.0 1'268 40.0 575
-22.0 8'420 -1.0 2'990 20.0 1'218 41.0 555
-21.0 7'986 0.0 2'857 21.0 1'170 42.0 536
-20.0 7'578 1.0 2'730 22.0 1'125 43.0 517
-19.0 7'193 2.0 2'610 23.0 1'081 44.0 500
-18.0 6'831 3.0 2'496 24.0 1'040 45.0 483
-17.0 6'489 4.0 2'387 25.0 1'000 46.0 466
-16.0 6'166 5.0 2'284 26.0 962 47.0 451
-15.0 5'861 6.0 2'186 27.0 926 48.0 436
-14.0 5'574 7.0 2'093 28.0 892 49.0 421
-13.0 5'303 8.0 2'004 29.0 859 50.0 407
-12.0 5'046 9.0 1'920 30.0 827
-11.0 4'804 10.0 1'840 31.0 796
-10.0 4'574 11.0 1'763 32.0 767

18
L
Electrical connections
to be made by the
heating engineer
NPE
230 V~50 Hz
Burner
reset
Power supply
SCH1
FU S1
6.3A-T
0
1
IP
TS
H2 H3
X50-1/5
T1
T2 T3
T4
T5
T6
T7 T8
SCH2
H1
MO1
open
Y1
close
Y2
BSB-4p BSB
NA/0-10V H1
CH1 pump
Q2
QX1
QX1
St.cyl. pump
Q3
St.cyl. pump
L1
PE
PE
T1
T1 N
N
T2
T2
X30-10p X30
L1
L1
S3
S3
N
N
CH1 snsr B1
BX1 BX1
M
Boiler snsr B2
DHW 1 snsr B3
Outdoor snsr B9
ground
ground
ground
ground
M
BX2 BX2
LPB-4p LPB
M
X50-5p X50
X60-6p X60
LPB DB
ground MB
L
L
PE
PE
S3
S3
4
4
SK2
SK2 SK1
SK1
N
N
N
N
N
N
N
N
PE
PE
PE
PE
PE
PE
PE
PE
MM
MM
MM
MM
CL+ CL+
CL+ CL+
CL- CL-
CL- CL-
G+ G+
open
Y5
close
Y6
CH2 pump
Q6
N
N
N
N
PE
PE
PE
PE
QX2
QX2
N
N
PE
PE
QX3
QX3
N
N
PE
PE
EX2
EX2
QX4
QX4
FX4
FX4
QX41
BX4 BX4
UX UX
B12 B12
H3 H3
BX3 BX3
M
MM
MM
MM
MM
FU Fuse (6.3 A-T)
IP Main switch
SCH1 Main board
SCH2 Display and control card
TS Safety thermostat (110°C +0/-6)
H1 Electrical power indicator
H2 Safety thermostat trip indicator
H3 Burner lockout indicator
S1 Remote burner reset button
MO1 Connection terminals
FUNCTIONAL ELECTRICAL DIAGRAM FOR RIELLOtech CLIMA TOP CONTROL PANEL
WIRING DIAGRAMS

19
L
Electrical connections
to be made by the
heating engineer
NPE
230 V~50 Hz
Burner
reset
U1 U1 0-10V
signal to
modulating burner
M
Power supply
SCH1
FU S1
6.3A-T
0
1
IP TS
H2 H3
X50-1/5
T1
T2 T3
T4
T5
T6
T7 T8
SCH2
H1
MO1
open
Y1
close
Y2
BSB-4p BSB
NA/0-10V H1
CH1 pump
Q2
QX1
QX1
St.cyl. pump
Q3
1st stage
L1
PE
PE
T1
T1 N
N
T2
T2
X30-10p X30
L1
L1
S3
S3
N
N
CH1 snsr B1
BX1 BX1
ground M
Boiler snsr B2
DHW 1 snsr B3
Outdoor snsr
B9
ground M
BX2 BX2
LPB-4p LPB
ground M
X50-5p X50
X60-6p X60
LPB DB
ground MB
L
L
PE
PE
S3
S3
4
4
SK2
SK2 SK1
SK1
N
N
N
N
N
N
N
N
PE
PE
PE
PE
PE
PE
PE
PE
MM
MM
MM
MM
CL+ CL+
CL+ CL+
CL- CL-
CL- CL-
G+ G+
open
Y5
close
Y6
CH2 pump
Q6
N
N
N
N
PE
PE
PE
PE
QX2
QX2
N
N
PE
PE
QX3
QX3
N
N
PE
PE
EX2
EX2
QX4
QX4
FX4
FX4
QX41
BX4 BX4
UX UX
B12 B12
H3 H3
BX3 BX3
ground M
MM
MM
MM
MM
L1 N
N
PE
L1
1
N
2
PE T1 B5 T6 T7 T8
T2 S3 B4
SC SB
PI1BR VM1 BR1
Tsi
SE SI1 SI2
TA
N
PE
L1
1
N
2
PI2 VM2
Tsi
N
PE
L1
PB
Components to be provided by the installer
TA Room thermostat
SC Boiler temperature sensor
SB Storage cylinder temperature sensor
SE Outdoor temperature sensor
SI1 CH circuit 1 temperature sensor
SI2 CH circuit 2 temperature sensor
BR Burner
PB Storage cylinder pump
PI1 CH circuit 1 pump
VM1 CH circuit 1 mixer valve
PI2 CH circuit 2 pump
VM2 CH circuit 2 mixer valve
Tsi CH system safety thermostat
NB. Connect up the various components to suit the type of boiler and the confi-
guration of the individual central heating system. Check the electrical con-
nections to the components and to the burner, referring to the instructions
provided with each item. A special interface kit must be installed with a
modulating burner with a three position controller (dry contact for increasing
heat output and dry contact for reducing heat output).
TYPICAL COMPONENT CONNECTION DIAGRAM FOR SYSTEM WITH RIELLOtech CLIMA TOP
CONTROL PANEL

20
L
Electrical connections
to be made by
the heating engineer
NPE
230 V~50 Hz
Burner
reset
Power supply
open
Y1
close
Y2
BSB-4p BSB
NA/0-10V H1
CH1 pump
Q2
QX1
QX1
St.cyl. pump
Q3
1st stage
L1
PE
PE
T1
T1 N
N
T2
T2
X30-10p X30
L1
L1
S3
S3
N
N
CH1 snsr B1
BX1 BX1
ground M
Boiler snsr B2
DHW 1 snsr B3
Outdoor snsr B9
ground M
BX2 BX2
LPB-4p LPB
ground M
X50-5p X50
X60-6p X60
LPB DB
ground MB
L
L
PE
PE
S3
S3
4
4
SK2
SK2 SK1
SK1
N
N
N
N
N
N
N
N
PE
PE
PE
PE
PE
PE
PE
PE
TA-M M
MM
MM
MM
CL+ CL+
CL+ CL+
CL- CL-
CL- CL-
G+ G+
SCH1
FU S1
6.3A-T
0
1
IP
TS
H2 H3
X50-1/5
T1
T2 T3
T4
T5
T6
T7 T8
SCH2
H1
MO1
FU Fuse (6.3 A-T)
IP Main switch
SCH1 Main board
SCH2 Display and control card
TS Safety thermostat (110°C +0/-6)
H1 Electrical power indicator
H2 Safety thermostat trip indicator
H3 Burner lockout indicator
S1 Remote burner reset button
MO1 Connection terminals
FUNCTIONAL ELECTRICAL DIAGRAM FOR RIELLOtech CLIMA COMFORT CONTROL PANEL
This manual suits for next models
1
Table of contents
Other Riello Control Panel manuals

Riello
Riello CPD 35 User manual

Riello
Riello CBD 35 User manual

Riello
Riello RIELLOtech PRIME User manual

Riello
Riello CBD 25 User manual

Riello
Riello CPD 35 User manual

Riello
Riello 20147241 User manual

Riello
Riello 20081467 User manual

Riello
Riello 4030011 User manual

Riello
Riello Touchscreen N User manual

Riello
Riello CBD 20 PLUS User manual
Popular Control Panel manuals by other brands

Sensitron
Sensitron MULTISCAN++/S1-16 Installation and use manual

TTK
TTK FG-SYS quick start guide

AQUA SPA
AQUA SPA T Control 1H Operation and maintenance manual

Frick
Frick QUANTUM maintenance

Ness
Ness D-8 owner's manual

CSI Controls
CSI Controls Fusion Single Phase Simplex Installation and operation manual