Riello NexSirius User manual

www.riello.it
NexSirius control
Doc-0079023 rev. 0 2/2016
USER MANUAL

NEXSIRIUS
2
Compliance
The unit complies with the following Standards:
Machinery Directive 2006/42/CE
Low Voltage Directive 2006/95 EC
Electromagnetic Compatibility Directive 2004/108 EC and subsequent modifica-
tions
Pressure Equipment Directive 97/23/EC
Ecodesign Requirements Directive 2009/125/EC
Warranty
RIELLO products are covered by a SPECIFIC WARRANTY (valid for Italy, the Republic of
San Marino, and the Vatican City), that comes into force from the date of activation
by the Technical Assistance Service RIELLO for your area.
We recommend that you contact your local Technical Assistance ServiceRIELLO to
arrange for them to put the product into service FREE OF CHARGE and under the
conditions specified in the WARRANTY CERTIFICATE supplied with the product. Please
read the Warranty Certificate thoroughly.
Dear customer,
Thank you for purchasing a RIELLO
product, which is an innovative, high
quality appliance that will provide you
long-lasting well-being.
This manual contains information we
deem necessary for correct and easy
use.
Thanks again.
RIELLO S.p.A.

NEXSIRIUS
3
The following symbols are used in
this publication:
WARNING = actions requiring spe-
cial care and appropriate train-
ing.
DO NOT = actions that MUST ON NO
ACCOUNT be carried out.
Index
General Notices
p. 4
Safety precautions
p. 5
Identifying the keys
p. 6
Display
p. 7
Description
p. 9
Initial settings
p. 12
User interface standard use
p. 13
User interface advanced use
p. 17
Advanced functions
p. 22
Alarms
p. 23
Disposal
p. 23

NEXSIRIUS
4
General Notices
This RIELLO product must be installed
by a legally qualified heating engi-
neer. On completion of the installa-
tion, the installer must issue the
owner with a declaration of conform-
ity confirming that the installation
has been completed to the highest
standards in compliance with the in-
structions provided in this instruction
manual, and that it conforms to all
applicable laws and standards.
This instruction manual is an integral
part of the product. It must be kept
safe and must ALWAYS accompany the
product, even if it is sold to another
owner or transferred to another user
or to another installation. If you
damage or lose this manual, order a
replacement immediately from your
local Technical Assistance Service.
In the event of malfunctioning or
leakage, switch the unit “OFF” at the
main power switch and close all
shut-off cocks. Call RIELLO’s Technical
Assistance Service immediately. Do
not attempt to repair the product
yourself.
All maintenance and repairs must be
carried out by the personnel of
RIELLO’s Technical Assistance Service
in compliance with the instructions
given in this manual. Do not modify
or tamper with the product as doing
so could create hazardous situations.
The manufacturer declines all re-
sponsibility for injury or damage re-
sulting from unauthorised tamper-
ing.
Comply with the legislation in force
on the country of deployment with
regard to the use and disposal of
packaging, of cleaning and mainte-
nance products and for the manage-
ment of the unit’s decommissioning.
NEXSIRIUS
5
This unit contains fluorinated green-
house gases covered by the Kyoto
protocol. Maintenance and disposal
activities must be carried out exclu-
sively by skilled personnel.
Safety precautions
Do not allow children or unassisted
disabled people to use the unit.
Do not open the access covers and
carry out technical or cleaning activi-
ties before disconnecting the unit
from the power grid by positioning
the system’s main switch in the “off”
position.
It is forbidden to modify the safety or
regulation devices without the au-
thorisation and directions of the
manufacturer.
Do not stand, sit and/or place objects
on the unit.
Do not pull, detach or twist the elec-
trical wires coming out of the unit,
even when the unit is disconnected
from the power grid.
Do not spray or throw water directly
on the unit.
The packaging material, a potential
hazard, must be disposed of correct-
ly, and not abandoned or left within
the reach of children.
It is strictly forbidden to touch any
moving parts, interfere with them or
introduce pointed objects through
the grids.
Do not touch the unit while barefoot
and/or partially wet.

NEXSIRIUS
6
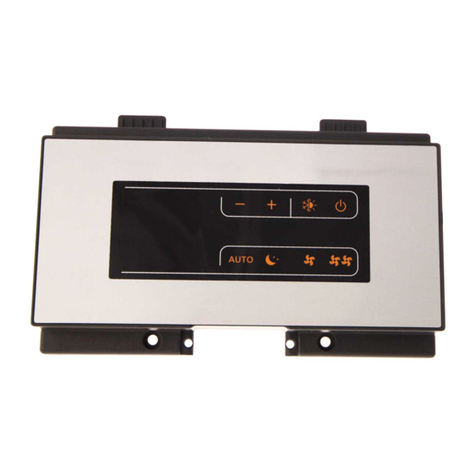
Identifying the keys
1 Functions
A ZONE: selects the zone to be con-
trolled (available zones 0 and 3).
B LOCK: starts the hourly program or
keeps the temperature currently set
C MODE: Selects the operating mode
among heating, cooling or off.
2 Navigation
D UP: Raises the temperature or in-
creases the number of elements se-
lected on the display when adjusting
the advanced programming settings.
E DOWN: Lowers the temperature or
decreases the number of elements
selected on the display when ad-
justing the advanced programming
settings.
F OK: Saves the settings once set-up or
a programming step have been com-
pleted.
3 Touch “N” Go
G NIGHT: Enables the programmed do-
mestic hot water and cooling set-
tings for the home period at night.
H AWAY: Enables the programmed
heating and cooling settings for the
“away” period.
I HOME: Enables the programmed do-
mestic hot water and cooling set-
tings for the home period during the
day.
4 Programming
J SET TIME AND DAY: Enables the mode
for setting the time and day of the
week.
K PERIOD START: Enables the program-
ming menu, displaying the start of
the six programmed time periods.
L PERIOD: Enables the program-
ming menu, displaying the six pro-
grammed time periods.
M DAYS: Enables the programming
menu, displaying three options -
from 1 to 7 (every day), from 1 to 5
(weekdays), from 6 to 7 (weekends)
and day by day (1,2,3,4,5,6,7).
OK
M
P
12
3
4

NEXSIRIUS
7
Display
Functions and condition
1 Boiler
2 Domestic hot water warning (disin-
fection not performed)
3 Three-way valve for domestic hot
water
4 Compressor ON / Silent mode
5 Backup electric heater
6 Solar
7 Boiler heater (Booster)
8 Thermostat set to anti-freeze tem-
perature
9 Disinfection cycle
10 Hourly program enabled
11 Keypad locked
12 Alarm
13 Zone
14 System off
31
14 8
9
10
11
13
12
2 4 5 6 7

NEXSIRIUS
8
Functioning mode and hourly
programming
1 Cooling mode
2 Domestic hot water mode
3 Not used
4 Not used
5 Not used
6 Heating Mode
7 Maintenance / Installer mode
8 The system is using the “Night” set-
tings
9 The system is using the “Away” set-
tings
10 The system is using the “Home” set-
tings
11 Day of the week
12 Time
31
11
10 9 8
2 4 5 6
12
7
Temperature and humidity
1 Domestic hot water/indoor air tem-
perature
2 Outdoor temperature
3 Relative humidity *
*Provided by a sensor mounted on the
indoor unit that detects the environ-
men humidity.
3
1
2

NEXSIRIUS
9
Description
The User interface allows all system
functions for keeping the indoor tem-
perature and the DHW temperature to
be controlled.
The control includes several functions,
such as separate heating and cooling
set points, DHW management, keyboard
lock, backlighting and hourly program-
ming for all days in the week with 2, 4
or 6 periods.
The User interface is supplied in-
stalled and wired on the indoor unit;
however, it can be installed directly
in the room, too.
In this case, before any operation the
closing door must be opened and
closed again after finishing the oper-
ations on the User interface.

NEXSIRIUS
10
Pre-settings
The User interface is configured with
pre-settings for a simplified use and
max. control of the indoor comfort.
To change the pre-set values for the
Touch ‘N’ Go functions and the time
bands, see chapter “User interface
advanced use”
p. 17
.
Touch ‘N’ Go functions
Touch ‘N’ Go keys are pre-set on typi-
cal temperatures according to the home
use, differentiated by heating, cooling
and DHW.
Three use types are possible:
HOME
AWAY
NIGHT
The pre-set temperature values for the
Touch’N’Go functions are indicated in
the table below.
Touch ‘N’ Go function Heating Cooling Domestic hot water
Home 20 °C 24 °C 60 °C
Away 15 °C 28 °C 50 °C
Night 18 °C 26 °C Not available

NEXSIRIUS
11
Bands
The time bands (periods) are pre-set
with typical times for the standard use
at home; each time band is associated
with a Touch ‘N’ Go function defining
the temperature value.
The time bands can be set for 2 zones:
Zone 0 Climate control using the User
Interface on the unit or remoted
in the room.
Zone 3 Domestic hot water.
The zones 1 and 2 are not available.
The pre-set Touch ‘N’ Go functions and
the time values pre-set for the zone
time bands are indicated in the tables
below.
Zone 0
Pre-set period start time Period
number
Pre-set functions
Touch ‘N’ Go for each
period Silent mode
6:00 AM 1Home OFF
8:00 AM 2Away OFF
12:00 PM 3 Home OFF
14:00 PM 4 Night OFF
18:00 PM 5 Home OFF
22:00 AM 6Night OFF
Zone 3
Pre-set
period
start
time
Pre-set
functions
Touch ‘N’
Go for each
period
Booster
6:00 AM 1Home NO
8:00 AM 2Away NO
18:00 PM 3 Home NO
24:00 PM 4 Home YES

NEXSIRIUS
12
Initial settings
Setting the date and time
You need to set the time and date be-
fore using any of the Control panel set-
tings.
Press the key.
Press the UP or DOWN keys until ob-
taining the wished value.
Press the key again and the min-
utes will start flashing on the display.
Press the UP or DOWN keys until ob-
taining the wished value.
Press the key again and the day
will start flashing on the display
Press the UP or DOWN to set the day (7
numbers corresponding to each day
of the week are displayed).
Stop at the correct number.
Press the OK key to confirm.

NEXSIRIUS
13
User interface standard use
The User interface has been factory-set
for an automatic operation by time
bands and the settings of the Touch ’N’
Go functions.
To start, you just need:
To select the zone 0 (if not selected
already by default).
To set the wished functioning mode.
To activate the hourly programming
(if not active already by default).
Selecting the zone
Press in sequence the ZONE key and
select the zone 0.
The number appearing on the icon cor-
responds to the selected zone.
Setting the functioning mode
Press in sequence the MODE M key
and select the wished one among:
Cooling , Heating or Domestic Hot
Water .
Wait for a few seconds between
pressing the key so that the control
can switch to the next mode.
The symbol of the selected function will
start flashing. After a few seconds, the
symbol will stop flashing and the unit
starts in the selected mode.
Activating the hourly programming
Press the LOCK key .
The hourly programming activates, the
icon activates.
Now the User interface operates au-
tomatically using the pre-set param-
eters.

NEXSIRIUS
14
Temporarily changing the pre-
settings
The User interface is pre-set for operat-
ing automatically. Sometimes a tempo-
rary change of the settings can be nec-
essary to suit unexpected conditions,
such as during a holiday, when travel-
ling or when at home unexpectedly.
In this case you can intervene manually:
Temporarily changing the temperature
To change the temperature:
Press the UP or DOWN keys until ob-
taining the wished value.
If the hourly programming is active:
The new temperature value is kept until
the next programmed period.
The icon indicating that the hourly pro-
gram has been activated will be dis-
played.
To lock the setting:
Press the LOCK key .
The hourly programming deactivates,
the icon deactivates.
The set temperature is locked and does
not change when the next programmed
period starts.
To restore the pre-set temperature
value:
Press the LOCK key .
The hourly programming activates, the
icon activates.
The temperature returns to the pre-set
value.
Temporarily changing the Touch’N’Go
function
Press one of the Touch ‘N’ Go keys
HOME , AWAY and NIGHT .
If the hourly programming is active:
The new function is kept until the next
programmed period.
The icon indicating that the hourly pro-
gram has been activated will be dis-
played.

NEXSIRIUS
15
To lock the new setting:
Press the LOCK key .
The hourly programming deactivates,
the icon deactivates.
The Touch ‘N’ Go function is locked and
does not change when the next pro-
grammed period starts.
To restore the pre-set function:
Press the LOCK key .
The hourly programming activates, the
icon activates.
The pre-set Touch ‘N’ Go function is re-
stored.

NEXSIRIUS
16
Off mode
In the case of long absences from home
it is advisable to set the off mode in the
User interface.
In this way, the DHW and heating/cool-
ing system will not operate but the unit
frost protection will anyway be guaran-
teed in winter.
To switch the unit off:
Press in sequence the MODE M key to
select the off icon .
Warning: the power supply must be
connected and water must circulate
inside the unit; check whether the
shut-off valves are open. In especial-
ly harsh climates, we recommend the
use of solutions with glycol an-
ti-freeze.
Keypad lock
To lock all the control keys and func-
tions:
Hold down for 3 seconds the keys
DAYS , PERIOD and PERIOD START
.
All keys will be disabled, and the pad-
lock icon is activated.
To unlock the keyboard:
Hold down for 3 seconds the keys
DAYS , PERIOD and PERIOD START
.
The padlock icon is deactivated.

NEXSIRIUS
17
User interface advanced use
Programming the Touch ‘N’ Go
functions
The three Touch ‘N’ Go keys are pre-set
on typical temperatures differentiated
by heating, cooling and DHW.
The pre-set values can anyway be
changed to suit your own lifestyle.
Modifying the pre-set values
Hold down for about 3 seconds the
Touch ‘N’ Go key you want to change
among those that follow: HOME ,
AWAY or NIGHT .
Press in sequence the ZONE to select
the zone 0 (if not selected already).
Press the MODE M key to scroll among
Heating, Cooling or DHW.
The set temperature flashes together
with the symbol chosen among heating
, Cooling or DHW .
Press the UP or DOWN keys until ob-
taining the wished value.
The triangle icon flashes above the
selected key.
Press one of the other Touch ‘N’ Go, keys
to repeat the above steps.
Press the OK key to confirm.
For zone 3, repeat the steps above.
For zone 3, you can program only for
the DHW mode.

NEXSIRIUS
18
Programming the time bands
The User interface has six pre-set hourly
bands, called periods, identified on the
display with P1, P2, P3, P4, P5 and P6.
Each hourly band can be associated
with the following parameters:
Zone 0 Touch ‘N’ Go function for am-
bient temperature, Silent mode
(ON/OFF).
Zone 3 Touch ‘N’ Go function for DHW,
Booster (ON/OFF).
The pre-set values can anyway be
changed to suit your own lifestyle.
Changing the hourly band settings
To select the wished time option:
Press the DAYS key .
The numbers 1 to 7 will flash on the dis-
play.
Press in sequence the DAYS key to
select the wished option.
Select one of these time options: from
1 to 7, from 1 to 5, from 6 to 7 or day
by day. (Select the option from 1 to 7 if
the hourly settings of weekdays are the
same as those on weekends).
The settings made next will be ap-
plied on all days of the selected time
option.
To change the start time of period 1:
Press the PERIOD key .
P1 flashes on the display. P1 is period 1,
starting at 6:00 AM.
Press the PERIOD START key for time
.
6:00 AM flashes on the display.
Press the UP and DOWN keys until ob-
taining the wished value.

NEXSIRIUS
19
To change the minutes:
Press the PERIOD START key for time
.
Minutes in 6:00 AM flash on the display.
Press the UP and DOWN keys until ob-
taining the wished value.
The end time for period 1 (P1) is also
the start time for period 2 (P2). To
change the end time of period 1
change the start time of period 2.
To associate the Touch ‘N’ Go function
to period 1:
Press one of the Touch ‘N’ Go keys
HOME , AWAY and NIGHT .
The triangle icon flashes above the
selected key.
To change the settings of another pe-
riod:
Press in sequence the PERIOD key
until selecting the wished period.
The period name flashes on the display
(P1, P2, P3...).
Repeat the steps used for program-
ming period P1.
Press OK to confirm.

NEXSIRIUS
20
Associating the other parameters
For zone 0:
Press the LOCK key .
If the Silent mode icon is displayed,
the Silent mode is activated, otherwise
it is deactivated.
For zone 3:
Press the LOCK key .
If the Booster mode icon is displayed,
the Booster mode is activated, other-
wise it is deactivated.
When programming is ended:
Press the OK key to confirm.
Other manuals for NexSirius
1
Table of contents
Other Riello Control Panel manuals

Riello
Riello CBD 35 User manual

Riello
Riello CBD 35 User manual

Riello
Riello RIELLOtech CLIMA TOP User manual

Riello
Riello RIELLOtech PRIME User manual

Riello
Riello 20147241 User manual

Riello
Riello 4030011 User manual

Riello
Riello CBD 20 PLUS User manual

Riello
Riello CPD 30 User manual

Riello
Riello Touchscreen N User manual

Riello
Riello CPD 35 User manual
Popular Control Panel manuals by other brands

Panasonic
Panasonic AK-HRP1000G operating instructions

Nortek Security & Control
Nortek Security & Control 2GIG e Series Installation and programming guide

microguard
microguard 414 troubleshooting manual

DSC
DSC WP8010 Installer's guide

Cooper Security
Cooper Security Menvier300 Quick user guide

LS
LS XP40-TTA installation guide