Riso KZ30 User manual

1
Riso shall not be responsible for any damage or expense that might result from the use of
this manual.
Riso shall not be liable for any direct, incidental, or consequential damages of any nature,
or losses or expenses resulting from the use of this product or included manuals.
Riso shall not be responsible for any damage or expense that might result from the use of
information contained in this manual.
BCaution:
• Make sure to read the important operational safety information.
• Store this manual close-by, and fully acquaint yourself with the printing machine.
is a registered trademark of RISO KAGAKU CORPORATION in Japan and other
countries.
is a trademark of RISO KAGAKU CORPORATION.
• As we are constantly improving our products, the machine may differ in some respects
from the illustrations used in this manual.
• The information contained in this document is subject to change without notice.
Copyright © 2010 RISO KAGAKU CORPORATION
KZ30_UG.book Page 1 Monday, December 21, 2009 11:11 AM

Contents
2
Contents
Welcome to the RISO KZ30 ................................................................................................ 5
About the notations in the explanatory note .........................................................................5
Before Starting to Use 6
Safety Guide - Installation ................................................................................................... 6
Installation ............................................................................................................................6
Power connection .................................................................................................................6
Safety Guide - Handling and Operation............................................................................... 7
Operating environments .......................................................................................................7
Machine Handling.................................................................................................................7
Consumables........................................................................................................................8
Ink Handling..........................................................................................................................8
Connection with a Computer (Option) ................................................................................. 9
Paper Recommendations.................................................................................................. 10
Size and Weight Restrictions..............................................................................................10
Tips for Better Paper Feeding ............................................................................................11
Storing Environment ...........................................................................................................11
Originals ............................................................................................................................ 12
Size and Weight Restrictions..............................................................................................12
Maximum Printing Areas and Margins................................................................................12
Materials Not to Be Printed.................................................................................................13
Getting Acquainted............................................................................................................ 14
Function and Name of Each Part .......................................................................................14
Control Panel..................................................................................................................... 16
Basic Process.................................................................................................................... 18
Basic Operations 20
Preparing to Print............................................................................................................... 20
Setting the Original Tray.....................................................................................................20
Setting up the Paper Feed Tray and Loading Paper ..........................................................20
Adding or Replacing Paper.................................................................................................21
Setting up the Paper Receiving Tray..................................................................................22
Printing from a Paper Document ....................................................................................... 23
Printing Data You Have Created on a Computer (Optional Kit Required)......................... 24
KZ30_UG.book Page 2 Monday, December 21, 2009 11:11 AM

Contents
3
Functions for Master-Making 26
Selecting the Image Processing Mode
[Line/Photo/Duo]................................................................................................................26
Scanning Originals Written with Pencils [Pencil] ............................................................... 27
Enlarging or Reducing Originals by Standard Ratios [Enlargement/Reduction]................ 28
Scanning Originals Having Faint or Dark Contents [Scanning Level Adjustment] ............ 29
Printing Originals Side-by-Side [2-Up Printing].................................................................. 30
Single-Original Printing and Two-Original Printing .............................................................30
Restrictions on 2-Up Printing..............................................................................................31
Operational Procedure .......................................................................................................32
Automatic Printing [Auto-Process]..................................................................................... 33
Functions for Printing 34
Producing Proof Copies [Proof]......................................................................................... 34
Adjusting the Print Position [Print Position Adjustment] .................................................... 35
Adjusting the Vertical Position ............................................................................................35
Adjusting the Horizontal Position........................................................................................35
Changing the Print Speed [Print Speed Adjustment]......................................................... 36
Advanced Features 38
Automatic Sorting into Groups [Program].......................................................................... 38
Setting Up for Programed Printing (When Printing Without Registering) ...........................39
Saving Programs ................................................................................................................41
Retrieving a Program..........................................................................................................42
Making Changes to Stored Programs ................................................................................43
Clearing Programs..............................................................................................................44
Protecting Confidential Documents [Confidential] ............................................................. 45
Changing the Initial Settings [Custom Setting Mode] ........................................................ 46
Items You Can Change ......................................................................................................46
Changing Procedure...........................................................................................................49
Replacing and Disposing Consumables 50
Replacing the Ink Cartridge............................................................................................... 50
Replacing the Master Roll ................................................................................................. 52
Emptying the Master Disposal Box.................................................................................... 54
Disposal of Used Consumables ........................................................................................ 56
KZ30_UG.book Page 3 Monday, December 21, 2009 11:11 AM

Contents
4
Maintenance 58
Safety Guide - Cleaning .................................................................................................... 58
Cleaning ............................................................................................................................ 58
Thermal Print Head ............................................................................................................58
Scanner Glass and White Sheet of the DF Unit .................................................................60
Pressure Roller...................................................................................................................61
The Exterior ........................................................................................................................62
Troubleshooting 64
Check & Error Display ....................................................................................................... 64
Checking with the Check & Error Display...........................................................................64
Troubleshooting Tips......................................................................................................... 73
Appendixes 78
Specifications .................................................................................................................... 78
Index.................................................................................................................................. 80
About the notations used on This Manual
The specifications of this machine are represented either by the unit of mm or inch. When this machine is installed,
the service personnel sets the unit for the machine to either mm or inch.
Depending on the specifications, the enlargement / reduction ratio and printing area differ. If you want to change the
current settings, consult your dealer.
For the word with different spelling between US English and UK English, US spelling is basically used on this manual.
Exception: Drum (Cylinder)
A unit of linear measure is shown in both metric and inch formats as follows.
Ex: 297 mm (11 11/16")
A unit of weight is shown in both g/m2and lb bond as follows.
Ex: 50 g/m2to 128 g/m2(14-lb bond to 34-lb bond)
The paper size is shown as follows.
Ex: A4 (Letter) B4 (Legal)
KZ30_UG.book Page 4 Monday, December 21, 2009 11:11 AM

Welcome to the RISO KZ30 5
Welcome to the RISO KZ30
Thank you for purchasing this printing machine that produces clear prints with easy key operations.
Besides many useful functions as a printer, the machine provides you with various conveniences.
This manual contains detailed instructions concerning the operation and maintenance of the machine. In order to
optimise the use of the machine, all operators should carefully read and follow the instructions contained in this man-
ual. This manual also contains a troubleshooting guide for easy reference. Read this manual before using the
machine. Open this manual when you have any question or any time necessary, and use the manual together with
your machine.
About the notations in the explanatory note
The following caution markings and symbols are used throughout this manual.
About the notations for operations and machine functions
This manual describes the machine functions and operations using the following notations.
About Terminologies used on This Manual
Master Making: Operation to scan an original page and to make a master
Print: Operation to use a master of an original and to print it on paper
Default Setting: The setting values when the machine is turned on
AWARNING Failure to follow WARNING instructions could result in severe injury or death to the person
who handles or services the machine.
BCAUTION Indicates that incorrect handling by ignoring this symbol may cause human injury or
damage to properties.
Important! Provides information that should be carefully heeded and inhibited operations.
Carefully read the Important information and follow its instructions.
Note Provides you useful information.
Tip Gives you additional hints for more convenience.
Shows a reference page.
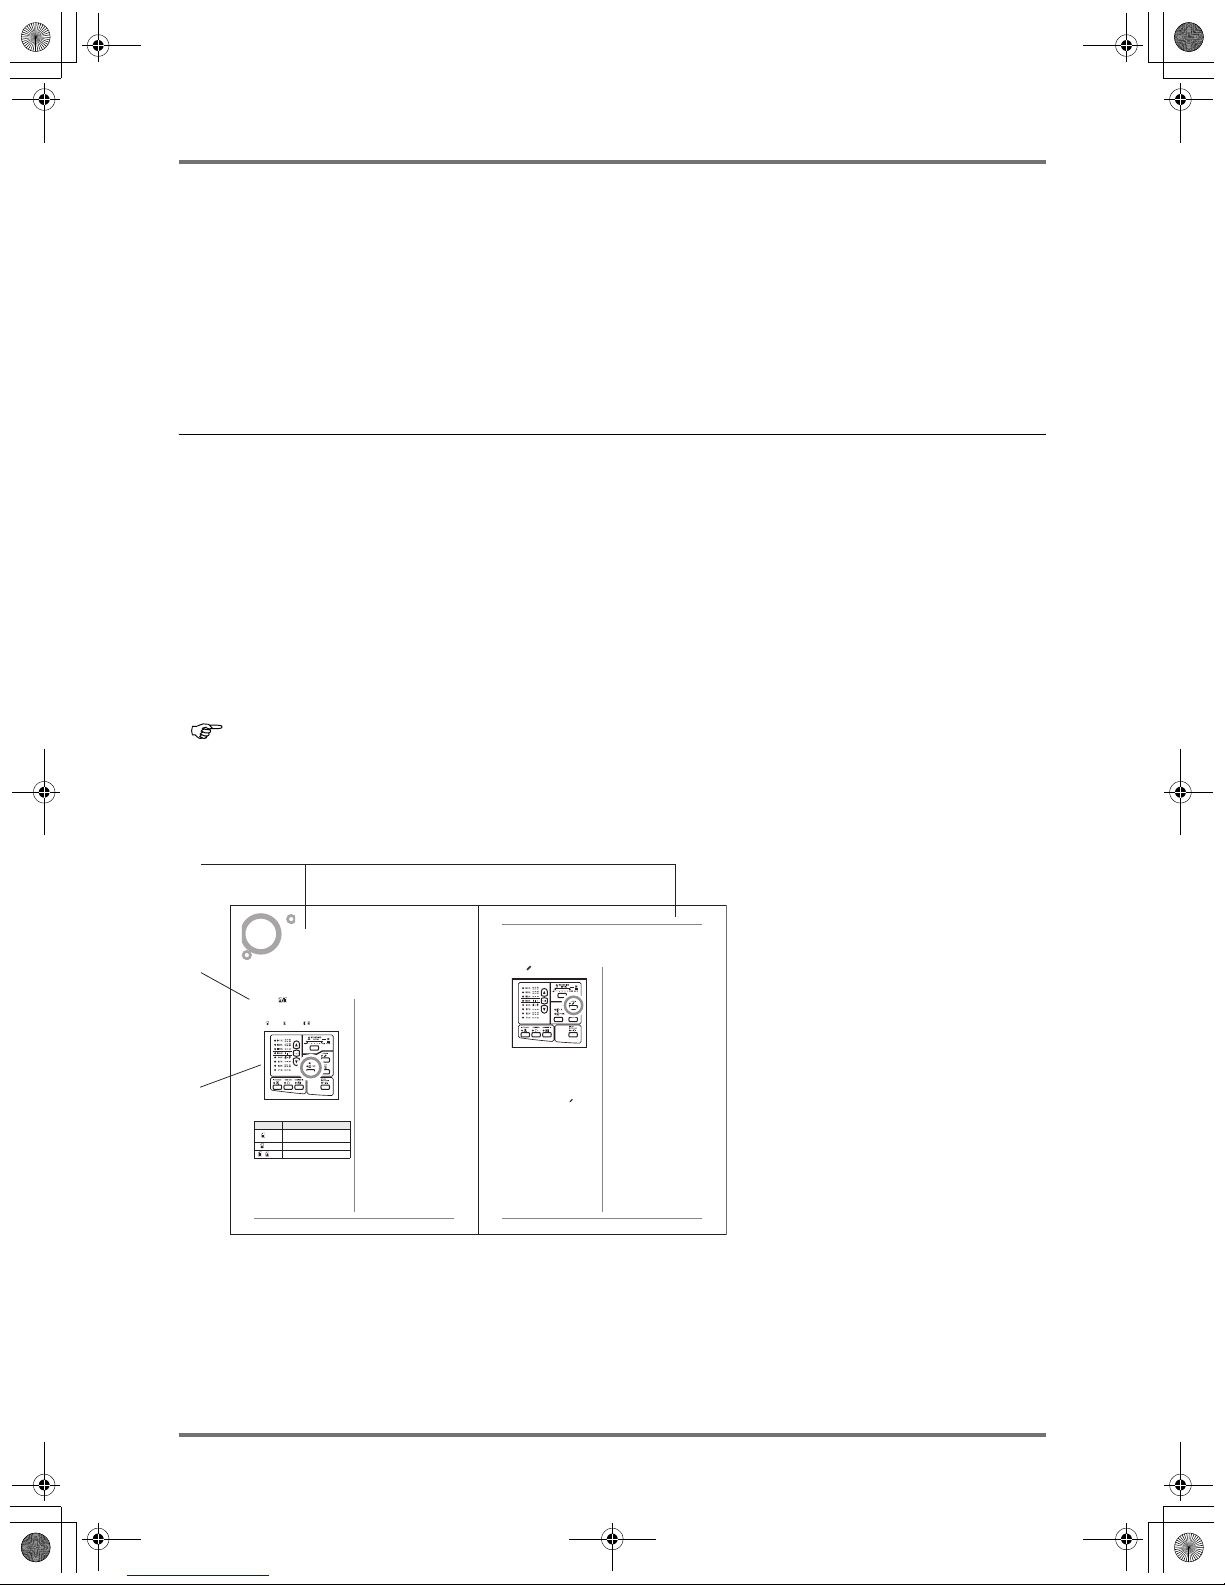
1) Chapter Title
2) Operation procedure
The machine operations are
described in the step-by-step
sequence. Operate the machine by
following the steps sequentially.
3) Illustrated operations
Shows the location or the control
panel related to each step.
Selecting the Image Processing Mode [Line/Photo/Duo]
26
Functions for Master-Making
Selecting the Image Processing Mode
[Line/Photo/Duo]
In order to make a quality master, select an appropriate mode depending on whether originals contain only Line
(text), photos, or both of them.
Press the key to select the Image
Processing mode.
Each time you press the key, the indicator lights in the
order: Line Photo Duo
The table shows which type of originals is appropriate
for each mode.
Important!:
• With the Photo mode or Duo mode selected, you
cannot select “Auto” for the scanning level. Perform
manual adjustment.
p.29
• You cannot use the Image Processing mode and
Pencil mode together.
Note:
• Select the Pencil mode when printing from an original
written with a pencil.
p.27
Mode Type of Originals
Line Only text contained; e.g., word
processing file printout, newspaper
Photo Only photos contained
Duo Both text and photos contained
Functions for Master-Making
Scanning Originals Written with Pencils [Pencil] 27
Scanning Originals Written with Pencils
[Pencil]
This function allows clearer printing from such originals containing faint contents such as those written with pencils.
Press the key to turn on its indicator.
Important!:
• You cannot use the Pencil mode and Image Process-
ing mode at the same time.
• When in the Pencil mode, adjust the scanning level
manually. You cannot select “Auto”.
p.29
Note:
• To clear the Pencil mode, press the key again to
turn off its indicator or select another type of image
processing mode.
1
2
3
KZ30_UG.book Page 5 Monday, December 21, 2009 11:11 AM

Safety Guide - Installation
6
Before Starting to Use
Safety Guide - Installation
This section describes precautions to be observed when installing the machine. Read this section before
installing the machine.
Note:
• Your dealer will help you to determine a proper location for the machine at the time of delivery.
Installation
AWARNING:
• Place the machine on a flat and stable surface. Injury might occur if the machine falls.
• Install the machine in a well-ventilated area. Failure to do so may result in serious health problems.
BCaution:
• Keep the machine away from dusty environments. Failure to do so may result in fire.
• Install the machine near the electrical outlet to avoid using an extension cord between the machine and the elec-
trical outlet. If an extension cord is necessary, do not use one longer than 5 meters (15 feet).
Important!:
• Select the installation location where the machine can be placed in horizontal. (Levelness of floor: Up to 10 mm
(3/8inches) in both longitudinal and traverse directions)
• Avoid installing the machine in the locations listed below. Failure to observe this precaution may lead to machine failure.
– Locations with exposure to direct sunlight, such as locations close to windows (Curtain all windows that might
expose the machine to direct sunlight.)
– Locations that are subject to sudden changes in temperature
– Extremely hot and humid locations or cold and dry locations
– Heated locations
– Locations exposed to direct cold air, direct hot air, or direct radiant heat
• When installing the machine on a stand (such as a desk), use the one which is larger than the machine.
Power connection
AWARNING:
• Do not overload the electrical outlet or extension cord, or damage the power cord by placing heavy objects on it or
pulling or bending it. This can result in fire or electric shock.
• Do not pull the power cord but hold the plug itself when unplugging it. This can damage the cord and result in fire
or electric shock.
• Do not plug or unplug the power cord if your hands are wet. This can result in electric shock.
BCaution:
• Pull out the power cord plug from the electrical outlet more than once a year and clean the prongs of the plug and
their surroundings. Dust that collects in these areas can result in fire.
Important!:
• Check the power cord and plug for poor connections. Plug the power cord securely into a nearby electrical outlet.
• Be sure to turn off the POWER switch when connecting or disconnecting a cable.
KZ30_UG.book Page 6 Monday, December 21, 2009 11:11 AM

Before Starting to Use
Safety Guide - Handling and Operation 7
Safety Guide - Handling and Operation
This section describes the precautions to be observed and the information the user should be aware of when oper-
ating the machine.
Operating environments
Important!:
• Operate the machine under the following appropriate environment conditions.
Temperature range: 15°C to 30°C (59°F to 86°F)
Humidity range: 40% to 70% (noncondensing)
Machine Handling
AWARNING:
• Do not place water containers or metallic objects on the machine. Fire or electric shock may occur if water or metal-
lic objects fall into the machine.
• Do not insert any metallic material or flammable substance into the machine through any opening. This can result
in fire or electric shock.
• Do not remove machine covers. Exposing internal parts may result in electric shock.
• Do not disassemble or rebuild the machine by yourself. This can result in fire or electric shock.
• If the machine emits excessive heat, smoke or foul odor, immediately turn off the POWER, unplug the power cord
and contact your service representative. Failure to do so can result in fire or electric shock.
• If something has dropped inside the machine, immediately turn off the POWER, unplug the power cord, and con-
tact your service representative. Failure to do so can result in fire or electric shock.
• Never stick your hands or fingers in the openings of the machine during operation.
• Keep loose clothing or long hair away from moving parts to avoid becoming entangled.
• Do not place heavy objects on the machine. The objects might fall and cause injury.
• Contact your service representative when moving the machine.
BCaution:
• Do not open any cover or move the machine during operation.
• Unplug the power cord from the receptacle if you do not use the machine for a long time.
• Screws, etc. protrude from the paper feed tray and paper receiving tray connection area. Do not insert your hand
or fingers in this area while it is in use. Also take care of the metal parts on the base when carrying the machine.
• When putting your hand into the unit, take care not to touch the paper separation hook or surrounding parts (espe-
cially the metal plate parts). The sharp tip of the hook and the cut surface of the metal can hurt your hand.
• The machine has precision parts and driving mechanism inside. Do not handle the machine in ways other than
those described in this guide.
• Do not apply any shock to the machine.
Important!:
• Do not unplug the power cord or turn off the power during operation.
• Be sure to open and close all machine covers gently.
KZ30_UG.book Page 7 Monday, December 21, 2009 11:11 AM

Before Starting to Use
Safety Guide - Handling and Operation
8
Consumables
Important!:
• For ink and Master Roll, it is recommended to use the products specified by RISO.
• Store the consumables such as paper, Master Roll and ink properly.
Do not store consumables in the following places:
– Locations that are subject to direct sunlight or bright locations that are close to windows (if there is no other
choice, pull the curtains across the windows.)
– Locations that are subject to rapid changes in temperature
– Extremely hot and humid locations or extremely cold and dry locations
Ink Handling
BCaution:
• If ink gets into your eyes, flush it out immediately with plenty of water.
• If ink comes into contact with your skin, wash it off thoroughly using soap.
• Allow plenty of ventilation during printing.
• If you feel unwell during use, seek medical advice.
• Only use the ink for printing purposes.
• Keep the ink out of the reach of children.
KZ30_UG.book Page 8 Monday, December 21, 2009 11:11 AM

Before Starting to Use
Connection with a Computer (Option) 9
Connection with a Computer (Option)
With an optional interface card (RISO PC Interface Card USB 2.0) installed, you can directly send data from a con-
nected computer to the machine as an original for printing. Because digital data itself is used for making a master, the
finish of prints becomes outstanding.
Important!:
• The maximum allowable voltage for USB 2.0 connector input and output is 5 V.
• Use a commercially available USB cable (that conforms to the USB 2.0 standard / Length within 3m (10ft)).
USB cable
KZ30_UG.book Page 9 Monday, December 21, 2009 11:11 AM

Before Starting to Use
Paper Recommendations
10
Paper Recommendations
Size and Weight Restrictions
The table shows the specifications of usable print paper.
Important!:
• Be sure to load printing paper larger than the images to be created. If printing paper is smaller than the images, the
inner rollers may be stained and it may result in smudges on the prints.
• Be sure to confirm the maximum printing area and margins before printing ()p.12).
• Even when using paper whose sizes and weights are supported by the machine, it may not pass through the
machine depending on such factors as paper finish, ambient conditions, and storage conditions. Keep this in mind
when using the machine. For more information, consult your dealer.
Do not use the following types of paper, as they can cause jams or misfeeds:
• Extremely thin paper (less than 50 g/m2(14-lb bond))
• Extremely thick or heavy paper (greater than 128 g/m2(34-lb bond))
• Wrinkled, curled, folded, or torn papers
• Chemically treated paper (such as thermal or carbon paper)
• Paper coated on its face or back surface
• Paper having a sticky section or holes (such as an envelop and label paper)
Note:
• Paper with a horizontal grain direction can cause problems with paper feeding. Use paper with a vertical grain
direction.
• Images are not output onto the entire area of usable print paper.
If paper with a size exceeding the limit of specifications is used, the paper feeding and print quality on such paper are
not warranted.
Usable Printing Paper
Unit Size Weight
mm 182 mm ×257 mm to 297 mm ×420 mm 50 g/m2to 128 g/m2
inch 7 3/16" ×10 1/8" to 11 11/16" ×16 17/32" 14-lb bond to 34-lb bond
KZ30_UG.book Page 10 Monday, December 21, 2009 11:11 AM

Before Starting to Use
Paper Recommendations 11
Tips for Better Paper Feeding
To prevent paper jams and misfeeds, follow the directions below:
• Set the Paper Feed Pressure Adjustment Lever to the position according to the thickness of the printing paper.
()p.20)
Standard paper: Standard position 1 ( 1), Standard position 2 ( 2)
Thin paper: Thin paper ( )
Thick paper (such as card stock): Thick paper ( )
• Adjust the position of the Paper Jump Wing according to the size of the printing paper. ()p.22)
• Always set the Feed Tray Paper Guide and the Receiving Tray Paper Guide according to the print paper
size.()p.20)
• Use flat printing paper that is free of folds. If the use of curled paper is unavoidable, place the printing paper so that
the curl faces down.
• Paper may stick to the Print Drum (Cylinder) surface if the top margin is too narrow on the original or if the upper
portion of the original uses a large amount of ink. To solve this problem, lower the print position to provide a wider
top margin or reverse the top and bottom of the original. Restart master making and printing from the beginning
when you rotate the original.
Storing Environment
Store printing paper in a level, dry area. Storing the paper in an excessively humid area can result in paper jams or
poor print quality.
After unpacking the printing paper, keep the remaining paper wrapped and store it in a moisture-proof box. It is highly
recommended to put silica gel in the paper storage box.
KZ30_UG.book Page 11 Monday, December 21, 2009 11:11 AM

Before Starting to Use
Originals
12
Originals
Size and Weight Restrictions
Usable originals are as follows.
• The maximum printing area is 249 mm × 352 mm ( 8 3/16" ×13 17/32" ). If the original image size is larger than this
limit, you need to reduce the original when making a master.
Note:
• When printing the following kinds of originals, copy to paper of an available size.
– Patched or worn originals
– Wrinkled, curled, folded, or torn originals
– Transparent originals (such as tracing paper or OHP transparencies)
– Chemically treated originals (such as thermal or carbon paper)
– Originals with correction fluid or glue
– Extremely thin originals (less than 50 g/m2(14-lb bond))
• You cannot use the following originals on this machine.
– Multi-layered originals, or multiple originals stapled or clipped
– Extremely thick originals (greater than 107 g/m2(28-lb bond))
Maximum Printing Areas and Margins
The maximum printing areas are as follows.
The maximum printing area is read and the originals are printed regardless of the original size and the paper size in
the printer.
No matter which size of originals, be sure to make some margins around the original. Especially a 10 mm (3/8") mm
margin on the top side is required for originals. The printing area that is larger than print paper stains the Pressure
Roller and smudges the paper.
Unit Size Weight
mm 182 mm ×257 mm to 257 mm ×364 mm 50 g/m2to 107 g/m2
inch 7 3/16" ×10 1/8" to 10 1/8" ×14 5/16" 14-lb bond to 28-lb bond
Unit Maximum Printing Area Usable Print Paper Size
mm 249 mm x 352 mm 182 mm x 257 mm to 297 mm x 420 mm
inch 8 3/16" ×13 17/32"7
3/16" X 10 1/8" to 11 11/16" ×16 17/32"
DF feeding direction
Top margin
10 mm (3/8") and more
2
mm (1/16")
4
mm (3/20")
4
mm (3/20")
KZ30_UG.book Page 12 Monday, December 21, 2009 11:11 AM

Before Starting to Use
Originals 13
Important!:
• A 10 mm (3/8") margin on the top side cannot be read when a master is made. If any letter is placed in the margin,
a master cannot be made.
• If the original area is larger than the print paper, always reduce the original to fit it inside of the margins.
• If the printing paper sticks to the Print Drum (Cylinder) or if you find a blur in a 10 mm (3/8") position from the top
end, move the print position towards the bottom end.
Materials Not to Be Printed
Do not use the machine in any manner which violates the law or infringes on established copyrights, even when
making copies for personal use. Consult your local authorities for further details. In general, use discretion and
common sense.
Top
Bottom
10 mm (3/8")
Output direction
Printed Paper
The images may be blurred
on the area.
KZ30_UG.book Page 13 Monday, December 21, 2009 11:11 AM

Before Starting to Use
Getting Acquainted
14
Getting Acquainted
Function and Name of Each Part
1) Original Tray ()p.20)
Place an original face down.
2) DF Unit
Feeds the original from the Original Tray to the Scanner.
3) Master Disposal Unit (Receiving Originals)
The scanned original is ejected.
4) Master Disposal Box Handle ()p.54)
Push down the lever when pulling out the Master Dis-
posal Box when the box is filled with discarded masters.
5) Master Disposal Box ()p.54)
Holds discarded masters.
6) Master Disposal Unit Release Lever
Grasp the lever to open the Master Disposal Unit when
the master jams or others.
7) Feed Tray Paper Guide ()p.20)
Holds and guides paper. Slide to fit to the sides of paper.
8) Paper Feed Tray ()p.20)
Load print paper on this tray.
9) Feed Tray Paper Guide Lock Lever ()p.20)
Locks the Feed Tray Paper Guides.
10) Feed Tray Lock Lever ()p.20)
Use the lever to lower or lift the Paper Feed Tray.
11) Paper Feed Pressure Lever ()p.21)
Adjust the lever according to the paper weight.
12) Sub Control Panel ()p.17)
13) Main Control Panel ()p.16)
14) Original Release Lever
Use the lever to open the Scanner Unit if paper jams or
originals need to be repositioned.
15) White Sheet
16) Scanner Glass
17) Original Guide
Holds and guides original on the Original Tray. Slide to fit
to the sides of original.
1
1514 16
17
2
3
4
5
6
7
89
10
11
12
13
KZ30_UG.book Page 14 Monday, December 21, 2009 11:11 AM

Before Starting to Use
Getting Acquainted 15
1) Print Drum (Cylinder) ()p.61)
2) Ink Cartridge Holder
3) Print Drum (Cylinder) Lever ()p.50)
Pull out the Print Drum (Cylinder) by holding this lever.
4) Ink Cartridge ()p.50)
5) Paper Receiving Tray ()p.22)
The printed copies are output to this tray.
6) Paper Stopper ()p.22)
Stops paper printed and ejected into the Paper Receiv-
ing Tray.
Fit up according to the length of paper to be printed.
7) Receiving Tray Paper Guides ()p.22)
Aligns printed paper neatly. Slide according to the width
of paper before printing.
8) Paper Jump Wing ()p.22)
Adjust according to the size of paper in order to align
printed paper.
9) Power Switch ()p.23)
Turns the machine power ON or OFF.
10) Separation Fan
Pull this out to remove paper jammed on the paper out-
put side.
11) Master Roll ()p.52)
12) Master Making Unit Lever ()p.52)
Unlock the lever to open the Master Making Unit.
13) Master Making Unit Cover ()p.52)
Open the cover to mount the Master into position.
14) Master Roll Lock Lever ()p.52)
Locks the Master Roll in position.
2 1
43
9
5
6
8
7
11
121314
10
KZ30_UG.book Page 15 Monday, December 21, 2009 11:11 AM

Before Starting to Use
Control Panel
16
Control Panel
1) Check & Error Display ()p.64)
Indicates error locations and status.
2) Energy Saving Indicator
Lights when the machine is in the Sleep (energy saving)
Mode.
Print operations cannot be performed when this indicator
is lit. Press the Start/Wake-up key to activate the
machine.
3) Indicator ()p.64)
4) Print Quantity Keys (0 to 9 Keys)
Use to enter the number of pages to be printed or to
enter other numeric values.
5) Print Quantity Display (Error number display)
Shows the number of printed pages, numeric values
entered for various settings, and error numbers.
6) P Key/Indicator ()p.39)
Use to set up and retrieve programs.
(programed printing)
When activated, the indicator above the key lights.
7) Key
Use when setting up for programed printing.
8) Auto-Process Key/Indicator ()p.33)
Performs non-stop operation from master-making
through printing.
When activated, the indicator above the key lights.
9)
Master-Making/Print Change over Key/Indicator
Changes over the machine operation between Master-
Making and Print modes. The indicator on the left side of
the key shows the current mode.
10) Proof Key ()p.34)
Use when you want to check print result after adjusting
the print position, for example.
This allows you to print sample copies without affecting
the value on Print Quantity Display.
11) Reset Key
Returns all settings to the initial settings.
12) Key
Use when setting up for programed printing or when
changing the initial settings.
13) Print Speed Adjustment Key/Indicator ()p.36)
Selects the print speed from two levels.
The indicator above the key shows the current speed
level.
14) Vertical Print Position Adjustment Keys/
Indicator ()p.35)
Adjusts the print position in vertical direction (within 10
mm (3/8")) after making a master.
The indicator above the keys shows the offset amount
from the center.
To clear the offset amount, press .
15) Key
Use to perform programed printing or to display the error
number if an error occurred.
16) C Key
Cancels entered numeric values or resets the counter to
zero.
17) Start/Wake-up Key/Indicator
Starts master-making or printing process, or executes
specified operations.
The key is lighted only when the key is active.
Use to cancel the sleep mode.
18) Stop Key
Stops operation in progress.
KZ30_UG.book Page 16 Monday, December 21, 2009 11:11 AM

Before Starting to Use
Control Panel 17
1) Reproduction Size Selection Key ()p.28)
When selecting from among the standard reproduction
sizes, press / to switch the selection. The corre-
sponding indicator lights to indicate the current selection.
To restore 100%, press .
2) Scanning Level Adjustment Key/Indicator
()p.29)
Selects an original scanning level.
The indicator above the key shows the current scanning
level.
3) Auto Scanning Level Adjustment Indicator
()p.29)
Lights when you select the automatic scanning level
adjustment.
4) Pencil Mode Key/Indicator ()p.27)
Select for an original written using a pencil.
Each time you press the key, the function is switched on
and off.
When activated, the indicator above the key lights.
5) 2-UP Key/Indicator ()p.32)
Allows side-by-side printing with a single paper.
Each time you press the key, the function is switched on
and off.
When activated, the indicator above the key lights.
6) Image Processing Selection Key/Indicator
()p.26)
Each time you press the key, the Image Processing
mode is changed.
When the Line mode is selected, lights. When the
Photo mode is selected, lights. When the Duo (text /
photo) mode is selected, both and light.
7) Interface Key/Indicator ()p.24)
Selects the Online or Offline mode when interfaced with
a computer (an interface option is required).
The Online and Offline modes are switched over each
time the key is pressed.
The indicator above the key lights when Online mode is
selected.
8) Custom Key/Indicator ()p.49)
Use when changing the initial settings.
When activated, the indicator above the key lights.
9) Confidential Key/Indicator ()p.45)
Prevents confidential documents from being copied.
Each time you press the key, the function is switched on
and off.
When activated, the indicator above the key lights.
10) Print Drum (Cylinder) Release Key/Indicator
()p.50)
Press the key and when the indicator lights, you can pull
out the Print Drum (Cylinder) manually. When not lit up,
press the key to light up the indicator. And you can pull
out the Print Drum (Cylinder).
KZ30_UG.book Page 17 Monday, December 21, 2009 11:11 AM

Before Starting to Use
Basic Process
18
Basic Process
The machine presents the following two basic operational processes:
• Master-making process: to make a master by scanning an original (Master-Making mode)
• Printing process: to actually print the master data on paper (Printing mode)
Process for printing from a paper document
A placed original is scanned by the scanner, and a generated master is rolled around the Print Drum (Cylinder).
After a while, sample copy is performed. After checking the print result, enter the number of pages to be printed
and start printing.
Process for printing with data generated using a computer
Data sent from a computer is transformed into images, and a generated master is rolled around the Print Drum
(Cylinder).
You can send instructions for printing from the computer (through the printer driver).
Important!:
• The interface option is required for connection with a computer. )p.9
KZ30_UG.book Page 18 Monday, December 21, 2009 11:11 AM

Before Starting to Use
Basic Process 19
KZ30_UG.book Page 19 Monday, December 21, 2009 11:11 AM

Preparing to Print
20
Basic Operations
Preparing to Print
Setting the Original Tray
Open the Original Tray to the outer side.
Setting up the Paper Feed Tray and Loading Paper
1
Lower the Feed Tray Lock Lever to
lower the tray.
2
Load paper.
Slide and adjust the Feed Tray Paper Guides
according to the sides of paper as follows.
1) Adjust the “right” Feed Tray Paper Guide to
the scale of Paper Feed Tray, and lock the
guide using Feed Tray Paper Guide Lock
Lever. Before sliding the Feed Tray Paper
Guides, release their lock levers.
2) Place paper in the printing orientation.
Note:
• See “Paper Recommendations” ()p.10)
for appropriate print papers.
3) Fit the “left” Feed Tray Paper Guide to the
side of paper, and lock the guide using the
lock lever.
A: Unlock
B: Lock
Important!:
• Do not use paper of inappropriate sizes or mix
paper of different sizes.
• Be sure to fit the Feed Paper Tray Guides to the
sides of paper.
If not, the paper feeding may fail.
KZ30_UG.book Page 20 Monday, December 21, 2009 11:11 AM
Table of contents
Other Riso Printer manuals

Riso
Riso GR 3770 User manual

Riso
Riso MZ970 User manual

Riso
Riso RZ9 Series User manual

Riso
Riso HC FINISHER Service manual

Riso
Riso 9450 User manual

Riso
Riso ComColor 9150 Service manual

Riso
Riso MZ870 User manual

Riso
Riso HC5500 User manual

Riso
Riso VALEZUS T1200 Service manual

Riso
Riso ComColor FT Series User manual

Riso
Riso VALEZUS T1200 User manual

Riso
Riso CZ180 Series User manual

Riso
Riso HC5500 User manual

Riso
Riso Comcolor X1 Series User manual

Riso
Riso SF Series User manual

Riso
Riso VALEZUS T2100 User manual

Riso
Riso Comcolor Series User manual

Riso
Riso HC5500T User manual

Riso
Riso ComColor GL Series User manual

Riso
Riso SF EII Series User guide