Roma Medical Alcora User manual

Alcora
S740
USER MANUAL
Please ensure that this manual is read and understood before using
the scooter.
Dec 09

Contents Page
Introduction 3
Intended Use 3
Technical Specification 3
Feature Guide 4
Safety Advice 5
Adjustments
• Tiller angle 6
• Folding the tiller (for transportation) 6
• Seat removal 7
• Seat height 7
• Arm width adjustment 7
Tiller Controls 8
Brake Release / Freewheel Operation 9
Starting to Drive
• Getting Started 10
• Moving Off 10
• Steering 10
• Reversing 10
• Ramps / Slopes 10
• Surfaces 11
• Transferring 11
Transport and Storage 11
Batteries and Battery Charger 11 & 12
Maintenance 13
Troubleshooting
• Circuit Breaker 13
• Fuses 13
• CheckList 13
Further Information 15 - 16
Warranty
2

Introduction
Congratulations on your purchase of the ROMA scooter. This scooter
incorporates the latest innovative designs. in
confined spaces both indoors and out. Direct drive rear transaxles and
electromagnetic brakes give a safe and efficient ride. The scooter can be easily
disassembled without tools and will fit into the boot of most vehicles for easy
transport. The detachable battery pack allows convenient charging wherever
necessary.
Intended Use
Alcora
The ROMA Alcora can be used
The ROMA oor or outdoor use in pedestrian
areas by a single individual with limited mobility up to a maximum weight of 100kg
(16st). The acute manoeuvrability prohibits the use by persons who are severely
physically impaired or those who have balance difficulties. Your
assessor/healthcare professional will determine the suitability of the scooter for
each individuals intended use.
Technical Specification
Alcora is carefully designed for ind
Note: Persons with lower body amputations should not use this
device unless evaluated with artificial limbs fitted, as stability may be
compromised due to an irregular centre of gravity.
Class 1 Medical Device
Class 2 Indoor/Outdoor Vehicle
Overall Size Seat
Dimensions
Length 955mm Width 410mm
Width 545mm Depth 340mm
Height 920mm Seat to floor
pan
430-480mm
Battery 2 x 10Ah Backrest height 320mm
Height (Folded) 425mm Range 10km 6(m)*
Maximum user
weight
100kg / 16st Seat to floor 550-600mm
Safe working
slope
6º Battery charger
(off board)
1.8 Amp
Weight with
batteries
44kg Battery Pack
Weight
7.5kg
Max. Speed 6km/h (4mph)
*Passenger weight, rough ground conditions, low temperatures and battery
condition can affect maximum range.
3

Feature Guide
‘Alcora’
7
1
2
1. Tiller control head
2.Detachable padded seat with fold down back
3.Detachable basket
4.Detachable battery pack
5.Tiller angle adjustment knob
6.Front lift handle
7. Anti-tip wheels
8.Puncture proof non-marking wheels
3 4
5
6
8
4

Safety Advice
DO:
• Read this manual carefully before using your scooter
Turn the power off when transferring to and from the scooter
Select a slow speed when going down gradients (max 6°) or over uneven
ground
Keep your feet on the scooter whilst driving
Ensure the seat is in a fixed position facing forwards before driving
Ensure the tiller is secure
Ensure the batteries are fully charged before your journey
Avoid rough or soft terrain and long grass wherever possible
Be aware of other road users and pedestrians
Turn the power off when not in use
Follow the maintenance guide to ensure safe operation of the scooter
Always remove the keys if leaving the scooter unattended. Unauthorised
persons/children may use the scooter resulting in injury.
Carry passengers
Exceed inclines over 6°
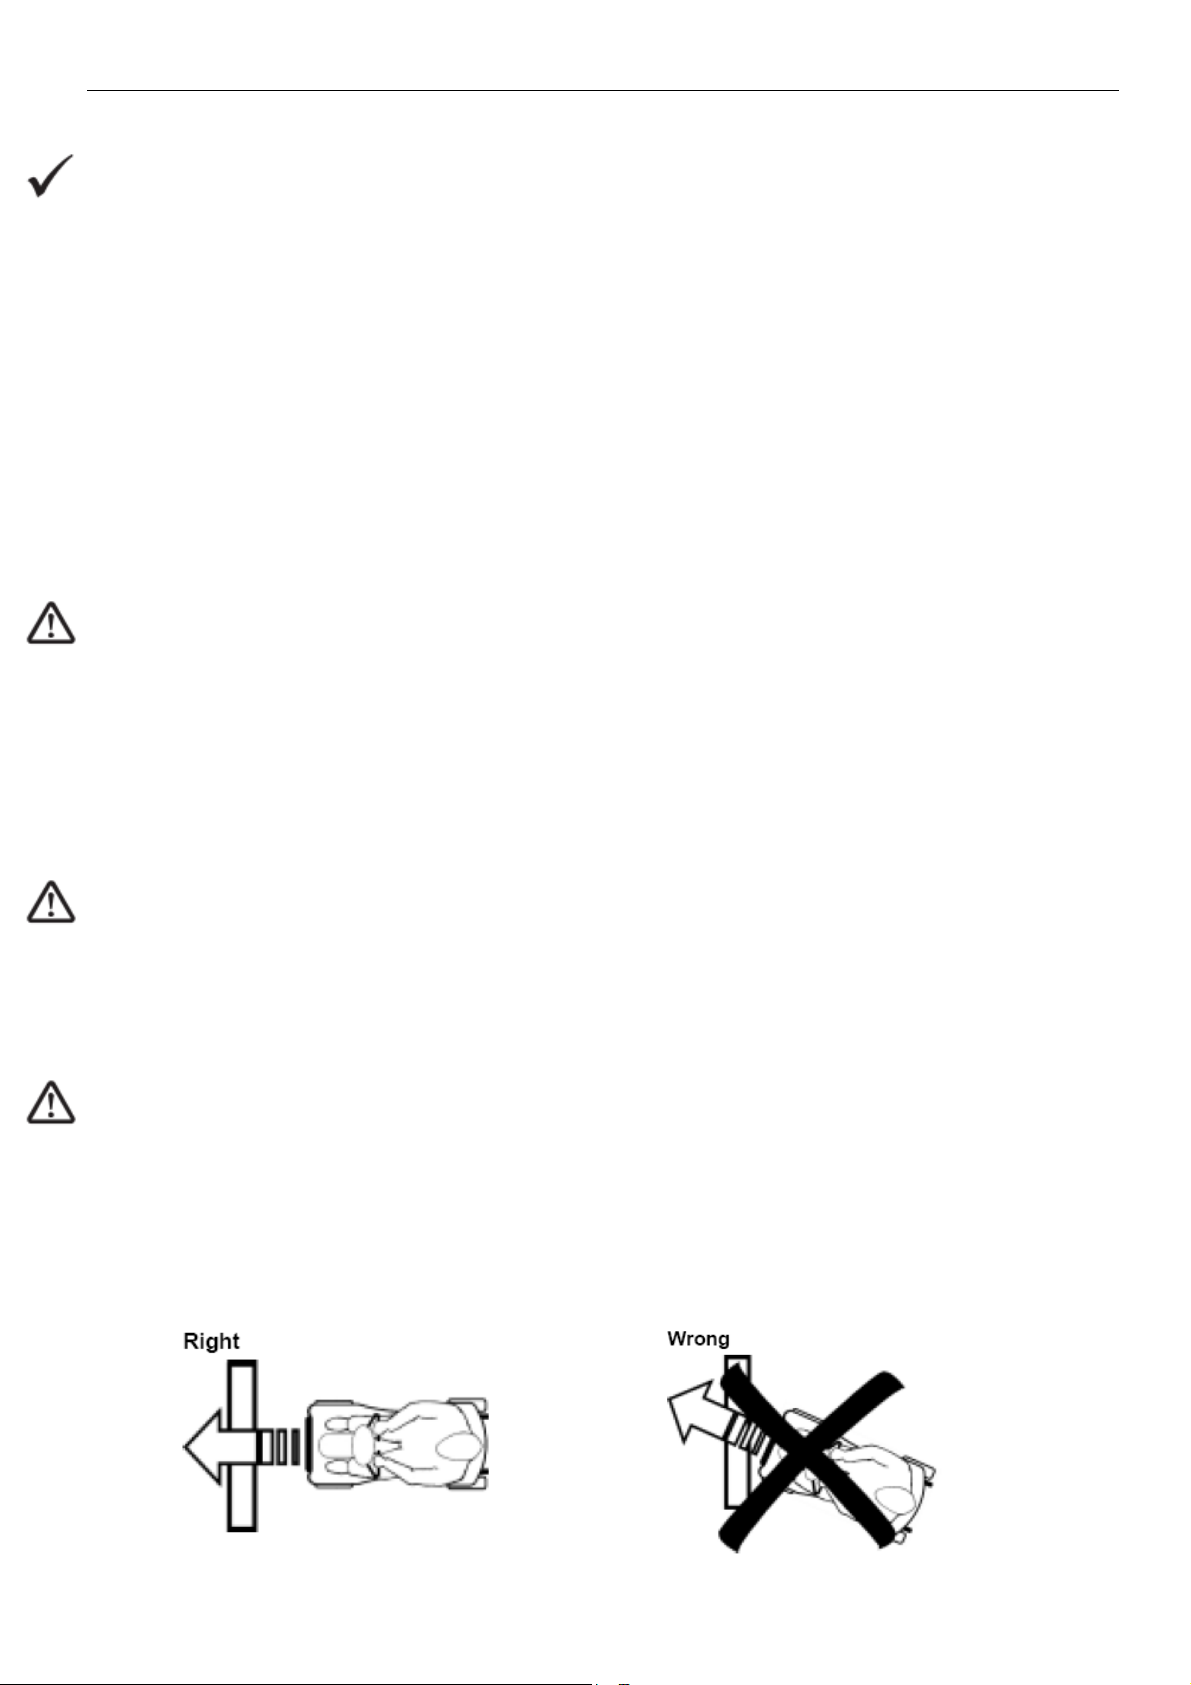
Traverse inclines
Attempt inclines if the surface is slippery
Turn sharply at full speed
Exit or enter the scooter unless the power is switched off
Switch off the power whilst driving – this will cause the scooter to stop
abruptly (see emergency procedures – page 15)
Use the scooter where you cannot safely or legally walk
Attempt to climb kerbs except drop down kerbs
Use the scooter if under the influence of alcohol or any medication
Use a mobile phone whilst driving
Attempt to negotiate steps or escalators
Sit on the scooter if being transported in a vehicle
Attempt to tow any other devices
Exceed the stated weight limit
Connect any other devices to the batteries as this could cause permanent
damage and void your warranty
Use any other batteries/charger other than those supplied by
Travel through water or over soft terrain (mud, sand etc.) Avoid cobbles.
Travel on the road except when crossing between pavements
Lift the scooter by the shroud assembly or any plastic part
Sharply shift your centre of gravity as this could make the scooter unstable
Every care has been taken to ensure that your scooter will give you safe, reliable
service provided you adhere to the advice given above.
•
•
•
•
•
•
•
•
•
•
•
DO NOT:
•
•
•
•
•
•
•
•
•
•
•
•
•
•
•
•
• ROMA
•
•
•
•
5

Adjustments
Tiller Angle Adjustment
At the base of the tiller is a handknob. Rotate the handknob anti-clockwise to
open the joint (DO NOT FULLY UNDO THE HANDKNOB). Select the desired tiller
angle and re-tighten the handknob. Ensure the tiller is fully secure before using
the scooter.
Release the adjustment mechanism as above and fold the tiller down fully until it
reaches the position shown below and re-tighten the handknob to secure the
tiller in this position. The battery can also be easily lifted out of the chassis for
transportation.
Folding the Tiller Assembly
(For transport purposes)
Do not carry the scooter by the tiller stem in the area indicated below.
6

Continued…..
Seat Removal
To remove the seat, fold down the back of the seat. Slacken knob ‘A’ – the seat
can then be lifted clear of the scooter. Simply re-insert the seat post into the
receiver and tighten ‘A’ to re-fit.
Do not hang baggage or other objects on the back of the seat as this
may affect stability.
Seat Height Adjustment
Remove the seat as previously described. Fully undo knob ‘B’ and pull pin ’C’
from the seat post. Adjust to the desired height and re-insert the pin and re-
tighten knob ‘B’. Re-fit the seat as above.
Arm Adjustments
On each side of the seat towards the back there are two hand knobs (Just
above the letter ‘A’ in the image above). These are to adjust the width of the
armrests or to remove then for transport.
Turn the knobs anti-clockwise to loosen. Once the knobs are loose you will be
able to adjust the armrests in or out to the desired width. Re-tighten when a
comfortable width has been achieved or remove the armrests completely for
transport.
The higher the seat is adjusted; stability may be affected due to the
higher centre of gravity.
If removing the armrests for transport, ensure that the knobs are re-
tightened to avoid them rattling loose and falling out.
Do not apply full body weight to the armrests for transferring. Lift the
arm up out of the way to transfer to another seat.
7

Tiller Controls
Finger Lever Controls
The finger lever controls the reverse and forward motion of the scooter. Pulling
the right lever will drive the scooter forward, pulling the left lever will reverse the
scooter. The amount of pressure applied to the levers will determine the speed
the scooter travels up to the maximum speed selected. More pressure = more
speed. Release the finger lever and the scooter will automatically come to a safe
stop as the electromagnetic brake is applied.
Horn Button
The red button operates the scooters horn.
Battery Level Indicator Gauge
This gauge gives you a guide to the amount of charge left in the scooters
batteries. This will give the truest reading when the scooter is in motion.
On/Off Key
Insert the key plug supplied with the scooter. The battery gauge needle will
move. There may be a slight delay before the thumb levers operate as the
controller checks the scooters circuits.
This should only be used to
warn others of your presence and not as a rebuke of any form.
Always
fully charge the batteries before driving your scooter and never let
the batteries become completely drained, as this may cause
permanent damage to the batteries.
Never leave the key in the switch
unattended to prevent unauthorised use. Do not switch the power off
to stop the scooter unless it is an emergency. The scooter will stop
very abruptly if stopped in this way.
8

Continued…..
Speed Control Dial
The speed control enables you to set the maximum speed of the scooter. Turn
clockwise to increase the maximum speed and anti-clockwise to decrease.
Brake Release / Freewheel Operation
Always start at a slow speed until accustomed with the
characteristics of your scooter. Do not put excessive pressure on the
dial. Only turn as far as the stops.
The brake release lever is situated at the right rear of the scooter. This lever
allows you to disengage the drive mechanism and push the scooter in
‘freewheel’ mode. To disengage the drive, pull the lever upward to the
‘disengaged’ position. The scooter can now be pushed.
Simply push the lever back down to re-engage the drive mechanism (the scooter
can now be driven). The scooter will not operate when the lever is in the
disengaged position. The scooter must be turned off and on by the key switch to
reset the circuits before it will resume normal operation. The status led will flash
continually if the brake is disengaged when it is switched on.
When in freewheel mode the scooter may be pushed on level ground
at a walking pace. The scooter will ‘auto-brake’ if this speed is
exceeded.
Caution! Never leave the scooter unattended whilst in freewheel
mode as it will roll away down an incline. ‘Freewheel’ mode should
only be used in an emergency to move the scooter due to power
failure. NEVER move the scooter in this mode whilst it is occupied.
9

Starting to Drive
Getting Started
Select an area with plenty of space.
Mount the scooter by lifting the arm and sliding onto the seat.
Adjust
the tiller and seat if necessary (
Moving Off
Push the key fully into to the tiller head to turn on the power.
Initially set the speed control to a low setting. Pull your right finger lever and the
scooter will move forward slowly. The further you pull the lever the faster the
scooter will travel, but only to the maximum speed that has been selected.
Release the lever and the scooter will come to a smooth controlled stop.
cause the transmission to lock and the scooter will come to a sharp
stop, which could possibly cause injury. This procedure should only
be used in an emergency.
Steering
Steering the scooter is light and easy. Ensure you give obstacles a wide
clearance to avoid the rear wheels catching. When steering through limited
spaces, turn the tiller in the direction that you wish to go and apply power gently.
The scooter can turn very tightly with complete stability at slow speeds.
Reversing
Before reversing ensure the area behind the scooter is free from any obstacles
or hazards. Adjust the speed setting to low before you reverse. Pull the left
thumb lever, and steer wide of all corners and obstacles.
Ramps / Slopes
The stability of your scooter depends on several factors such as seat height,
angle of gradient and the users height and weight. When approaching an incline,
do so directly and not at an angle and avoid making turns where possible.
Note: You must fully charge the batteries prior to first use (see
‘Batteries and Charging’)
Ensure the seat
is securely locked in the forward facing position before driving.
see ‘Adjustments’). DO NOT use the tiller to
fully support you during transfers.
Caution! DO NOT switch off the power to stop the scooter as this will
Caution! NEVER turn sharply at high speeds as it can make the
scooter unstable. The maximum speed should be set at 50%.
Caution! Do not reverse onto a main thoroughfare.
10

Continued…..
Surfaces
Your scooter will perform well over many surfaces. However, avoid long grass,
loose gravel, sand, mud and ice.
Transferring
Lift up the armpad from the side you wish to leave or sit on the scooter. Use an
aid for balance if required. DO NOT use the tiller or armrests to support the full
weight during transfers.
Transport and Storage
The ROMA is designed to be quickly and easily disassembled without
tools into sections for transportation and storage:
Guidelines for Disassembly
Follow the following for the easy disassembly of your scooter:
(
1. Lift the basket up and off the bracket.
2. Remove the seat as described earlier.
3. Remove the battery pack by lifting the handle.
4. Loosen the tiller adjustment knob and lower the tiller and re-tighten the
knob.
Assembly is the reverse of the above procedure.
The ROMA is now separated into four components for easy
transportation or storage.
If the scooter is not to be used for periods of more than a few weeks, fully
charge the batteries but leave the battery pack disconnected from the scooter.
Batteries and Battery Chargers
Alcora
Ensure the scooter is switched off before disassembling)
Do not carry the chassis by the tiller stem as shown
previously.
Alcora
Batteries
The ROMA is supplied with a closed battery pack which contains two
10Amp, 12 Volt sealed lead acid batteries. The battery pack is situated under the
front of the seat and can be removed by lifting it away from the chassis.
Low temperatures, rough terrain and the weight of the user can affect battery
performance. Your battery gauge is a guide only to the level of charge remaining
in your batteries and will give its best indication while the scooter is moving.
Charge the batteries completely (8-12 hours) prior to first use.
Alcora
Note: Batteries recommended by ROMA MUST be used if they need to
be replaced. An authorised ROMA dealer must carry out battery
replacement. Anti-Tipping Wheels
11

Continued…..
Battery Charger
The battery charger is a 1.8-amp switch type off board. The battery charging port
is located on the battery pack. This special feature allows the batteries to be
charged independently of the main scooter.
Before using your scooter for the first time be sure to fully charge the batteries,
this may take up to 12 hours.
To charge the batteries connect the 3-pin male charger plug into the charging
socket on the battery pack. Plug the 3-pin mains plug into a wall socket and
switch on. A constant red light will show when the battery charger is connected
and charging is underway (this will flash if there is a break in the connection). The
red light indicates that the batteries are receiving charge, this will change to solid
green when the charging cycle is complete. Always turn off mains power to the
charger before disconnecting the plug from the battery box.
D
Batteries must always be recycled correctly. Do not dispose of them with your
domestic refuge.
For further information regarding your nearest recycling facility please contact
your local authority.
Caution! Do not charge the batteries for longer than 12 hours. Always
charge the batteries in a well-ventilated indoor area. You must still
maintain charging the batteries even if the scooter is not to be used
for a prolonged period of time (2 to 3 weeks). Failure to do so could
result in permanent damage and render the batteries unusable.
Wherever possible do not interrupt the charge cycle until the batteries
are fully charged. Continual interruption can permanently damage the
batteries. If the charging lead should get damaged discontinue use
immediately and seek a replacement from your dealer. ONLY USE THE
CHARGER SUPPLIED WITH YOUR SCOOTER. Do not leave the charger
plugged into to the charger port after the charge is complete.
ALWAYS remove the keys from the scooter when charging.
isposing and recycling of used batteries
12

Maintenance
Product Life Expectancy
Your scooter has been designed to provide the user with a long, reliable life
provided it is correctly maintained and regularly serviced by an authorised dealer.
However, due to inevitable wear and tear and technological improvements it is
recommended that the average useable life of this scooter is five years.
Cleaning
The shrouds and seat of the scooter should be cleaned using a damp cloth and
gentle detergent. Do not use abrasive cleaners or solvents, as this will damage
the plastic components. Do not spray water (
scooter as this may cause damage to the electronics.
Routine Maintenance
We suggest that your scooter should undergo a full service at least once a year
by an authorised ROMA dealer.
Please check the following on a weekly basis:
Tyres are in good condition
Wheels spin freely
Moving parts, pivots and frame fixings are not damaged or worn
All hand knobs and levers are secure
Troubleshooting
hose or pressure washer) onto the
•
•
•
•
Circuit Breaker
Your scooter is fitted with the latest in electronic controls that are programmed
to protect the electrical system from abnormal overloads. Fitted for extra
protection is a circuit breaker, which is located on the battery pack. Should there
be a situation where your scooter stops for no apparent reason please check
that the circuit breaker has not tripped. Simply press the button to reset the
circuit breaker.
Fuses
There are two 40 amp blade type fuses inside the battery pack to give protection
against possible overload on the wiring.
Check List
If your scooter fails to operate, please check the following:
The unit is switched on.
All plugs and connections are firmly fixed.
Battery level shows full charge.
Freewheeling device is in the drive position
Circuit breaker has not tripped.
Note: Should the circuit breaker continue to trip turn off the scooter
immediately and consult your dealer.
Caution! Do not attempt to open the battery pack to replace the
fuses. Please take the battery pack to an authorised ROMA dealer to
replace any blown fuses.
•
•
•
• .
•
13

Continued…..
If the freewheel device has been operated with the scooter switched on, the
scooter will not operate until the key switch has been turned off and on again.
Should a fault occur, the status led on the tiller head will indicate a flash
sequence which relates to the fault in the table below.
Note: Should your scooter fail to operate after checking these
possible problems, consult your local ROMA dealer immediately.
14

Further Information
Safety Information Regarding Electromagnetic Interference (EMI)
Scooters and powerchairs are designed to operate under certain conditions.
However, radio waves or electromagnetic fields may affect the operation of the
scooter. The source of EMI could be radio or television transmitters or portable
devices such as mobile phones, portable CB radios etc.
Should any unintentional movement occur turn the scooter off as soon as safely
possible.
Solar Energy
During periods of sunny weather, it is possible that surfaces of your scooter may
reach high temperatures (as with motor vehicles). Please take precautions if
leaving the scooter in direct sunlight for any period of time. Seek shade or cover
the seat and hand controls to keep any temperature increases to a minimum.
Health Factors
Suitability for this product has been assessed on the user’s current state of
health. It is essential that the user regularly monitor their ability to use the
scooter safely.
General Use
Take heed of the information given in this manual regarding safety and the
maintenance of your scooter. If adhered to, your scooter should give you years
of reliable mobility.
Storage and General Care
We recommend that the scooter is always stored in a dry environment such as a
garage or shed to protect the chassis and other components from corrosion. Do
not leave the scooter outside during rainstorms. If the scooter is wet, wipe with a
dry cloth to ensure there is no ingress of water into the internal components of
the scooter.
During everyday use, do not use in rain showers or travel through puddles. Avoid
use in areas where the scooter could become contaminated with sand or
abrasive materials.
Emergency Procedures
Should your scooter behave erratically or become unresponsive whilst driving,
release the wig-wag lever so it may return to it’s neutral position and switch off
the power at the key / switch. These procedures will stop the scooter and
activate the braking system, preventing any further uncontrolled manoeuvres.
Note: Switching the power off at the key / switch can cause the scooter to stop
abruptly and should only be used to stop the scooter during an emergency as
this can damage the drive unit.
15

Continued…..
Product Stability
Scooters and powered wheelchairs are designed to allow the user flexibility of
movement in restricted areas. Driving at maximum speed and attempting sharp
turns can create a situation where the product becomes unstable. Therefore it is
essential that the user pay attention to the guidance set out in this manual.
For maximum stability the speed setting should be set up to 50% of
the maximum available (halfway between the tortoise and the hare or
just entering the red sector on the speed indicator depending on the
model.)
The main factors affecting stability are:
Maximum speed setting
Seat height
User movement
User’s manoeuvres
Gradients or slopes
Please keep your speed to a level where you can safely stop without having to
make any erratic turns.
Do not load bags etc. on the back of the seat as this will affect the centre of
gravity and could increase instability.
Do not lean outside of the ‘footprint’ of the product, especially whilst moving.
Avoid making turns on gradients or slopes.
•
•
•
•
•
16

Notes
17

Notes
18

Notes
19

Warranty Terms and Conditions
This is to certify that your Roma Medical product is warranted for a period of 12
months from the date of original purchase. This warranty is not transferable.
Should a defect or operating fault arise within this period the Dealer
from where the product was originally purchased should be notified
immediately. Failure to register the fault may invalidate the warranty.
The Dealer from where the product was purchased is responsible for
any warranty repairs.
Roma Medical warrants that if a fault occurs within this period due to faulty
workmanship or materials that the product will be repaired (or replaced at the
Companys discretion) free of charge.
Any unauthorised modifications will invalidate the warranty.
Parts which are subjected to normal wear and tear, accidental damage, neglect
or misuse are excluded from this warranty. Normal wear and tear includes tyres,
chassis covers, bulbs, seat coverings etc.
Component parts replaced outside this period carry a six-month warranty.
(Standard terms and conditions apply for this period).
Model:
Serial No:
Purchase Date:
Dealer Stamp
Roma Medical Aids Ltd
York Road, Bridgend Industrial Estate,
Bridgend
CF31 3TB
Tel: 01656 674488 Fax: 01656 674499
www.romamedical.co.uk
Roma Medical reserve the right to change specifications without prior notice
KB&SXXXXX
This manual suits for next models
1
Table of contents
Other Roma Medical Scooter manuals

Roma Medical
Roma Medical Tulsa S245 User manual

Roma Medical
Roma Medical Vegas 2 R100 User manual

Roma Medical
Roma Medical Murcia User manual

Roma Medical
Roma Medical Dallas DX S125 User manual

Roma Medical
Roma Medical Shoprider Cordoba User manual

Roma Medical
Roma Medical Shoprider Paris GK9 User manual

Roma Medical
Roma Medical Shoprider S-889SL User manual

Roma Medical
Roma Medical Denver S130 User manual

Roma Medical
Roma Medical Granada S743 User manual

Roma Medical
Roma Medical Cameo GK8 User manual