manuals.online logo
Brands
  1. Home
  2. •
  3. Brands
  4. •
  5. Russound
  6. •
  7. Keypad
  8. •
  9. Russound DAN User manual

Russound DAN User manual

LIMITED WARRANTY
The Russound DAN and DSC are both fully guaranteed for Two (2) years from the date of purchase
against all defects in materials and workmanship. During this period, Russound will replace any defec-
tive parts and correct any defect in workmanship without charge for either parts or labor. For this war-
ranty to apply, the unit must be installed and used according to its written instructions. If service is nec-
essary, it must be performed by Russound. The unit must be returned to Russound at the owner’s
expense and with prior written permission. Accidental damage and shipping damage are not considered
defects under the terms of the warranty. Russound assumes no responsibility for defects resulting from
abuse or servicing performed by an agency or person not specifically authorized in writing by
Russound. Damage to or destruction of components due to improper use voids the warranty. In these
cases, the repair will be made at the owner’s expense. To return for repairs, the unit must be shipped to
Russound at the owner’s expense, along with a note explaining the nature of the service required. Be
sure to pack in a corrugated container with at least 3 inches of resilient material to protect the unit
from damage in transit.
5 Forbes Rd. Newmarket, NH 03857, USA
☎ 603.659.5170 • Fax 603.659.5388
e-mail: [email protected]
Come visit us at:
CLEAR PROCEDURE INSTRUCTIONS
To Clear Individual Commands:
1) Press the Clear button. The Program Indicator will be illuminated. CAU-
TION: Do not press the Clear button for more than 1 second. Holding the
Clear button for more than 1 second will cause all stored commands to
be deleted.
2) Select the layer in which the command resides by selecting the source
input on the main keypad.
3) Press the command key to be cleared.
4) To continue to delete commands, repeat steps 2 and 3.
5) To exit the Clear mode, press the Clear button twice or wait 5 seconds for
the DSC or DAN to exit the Clear mode automatically.
To Clear All Commands:
1) Press and hold the Clear button for more than 1 second.
2) The Program, Stored and Error indicators will all light in sequence.
3) All commands previously stored in the DSC or DAN Keypad are now
deleted.
4) The DSC or DAN Keypad is now ready to be re-programmed (see
Programming instructions).
Reset Procedure Instructions:
The Reset button is used to restart the DSC or DAN Keypad if any problem
occurs during programming. If the DSC or DAN Keypad locks up for any rea-
son, follow the procedure below.
1) Press the Reset button (shown in Figure 2).
2) The Program indicator will illuminate momentarily.
3) The DSC or DAN Keypad will now operate properly. No stored information
will be lost.
OPERATION INSTRUCTIONS
1) Read the Control Features section of the Multi-Zone Controller manual.
2) Select the source that you wish to control on the main keypad (this will
also select the source for listening).
3) Press the command key(s) on the DSC or DAN which have been pro-
grammed with the commands that you wish to execute.
4) The Program indicator will flash as the command is outputted. If the
Program indicator does not flash when the command key is pressed, the
command was not stored properly. Direct Source
Control Keypads
DSC AND DAN
Instruction Manual
Russound
FOR HOME OR OFFICE USE
Tested to Comply
with FCC Standards
Conforms to
UL 6500
Certified to
CAN/CSA
E65-94
DSC & DAN
DIRECT ACCESS
NUMERIC SOURCE KEYPAD
897
564
231
0ENTER
DIRECT SOURCE CONTROL
SEEK
MODE
SELECT
SCAN
REV2
040502
DAN & DSC manual 4/16/02 9:22 AM Page 1
PRODUCT OVERVIEW
The DSC and DAN Keypads are state-of-the-art accessories to the Russound
PR-4Z and CA-LCD multi-zone systems. The DSC (Direct Source Control)
Keypad is programmable, allowing up to 12 stored functions for each of 6
pieces of source equipment. The DAN (Direct Access Numeric) source keypad
allows specific numeric selections of the source equipment to be made, ideal
for 100-disc players, satellite receivers, etc.
The DSC and DAN Keypads connect to the main control keypads (PCK-IR,
PCK, or CA-LCD Keypads) via a 16-pin header located on the side of the key-
pad. No extra wiring is needed. Infrared commands can be stored directly
into the DSC and DAN Keypads using a simple programming procedure and
the source equipment’s remote. Commands are executed by simply pressing
the keypad buttons to which the infrared commands were previously stored.
Save time using the IKP-1 Programmer. Store and download DAN and DSC
configurations.
CONNECTION INSTRUCTIONS
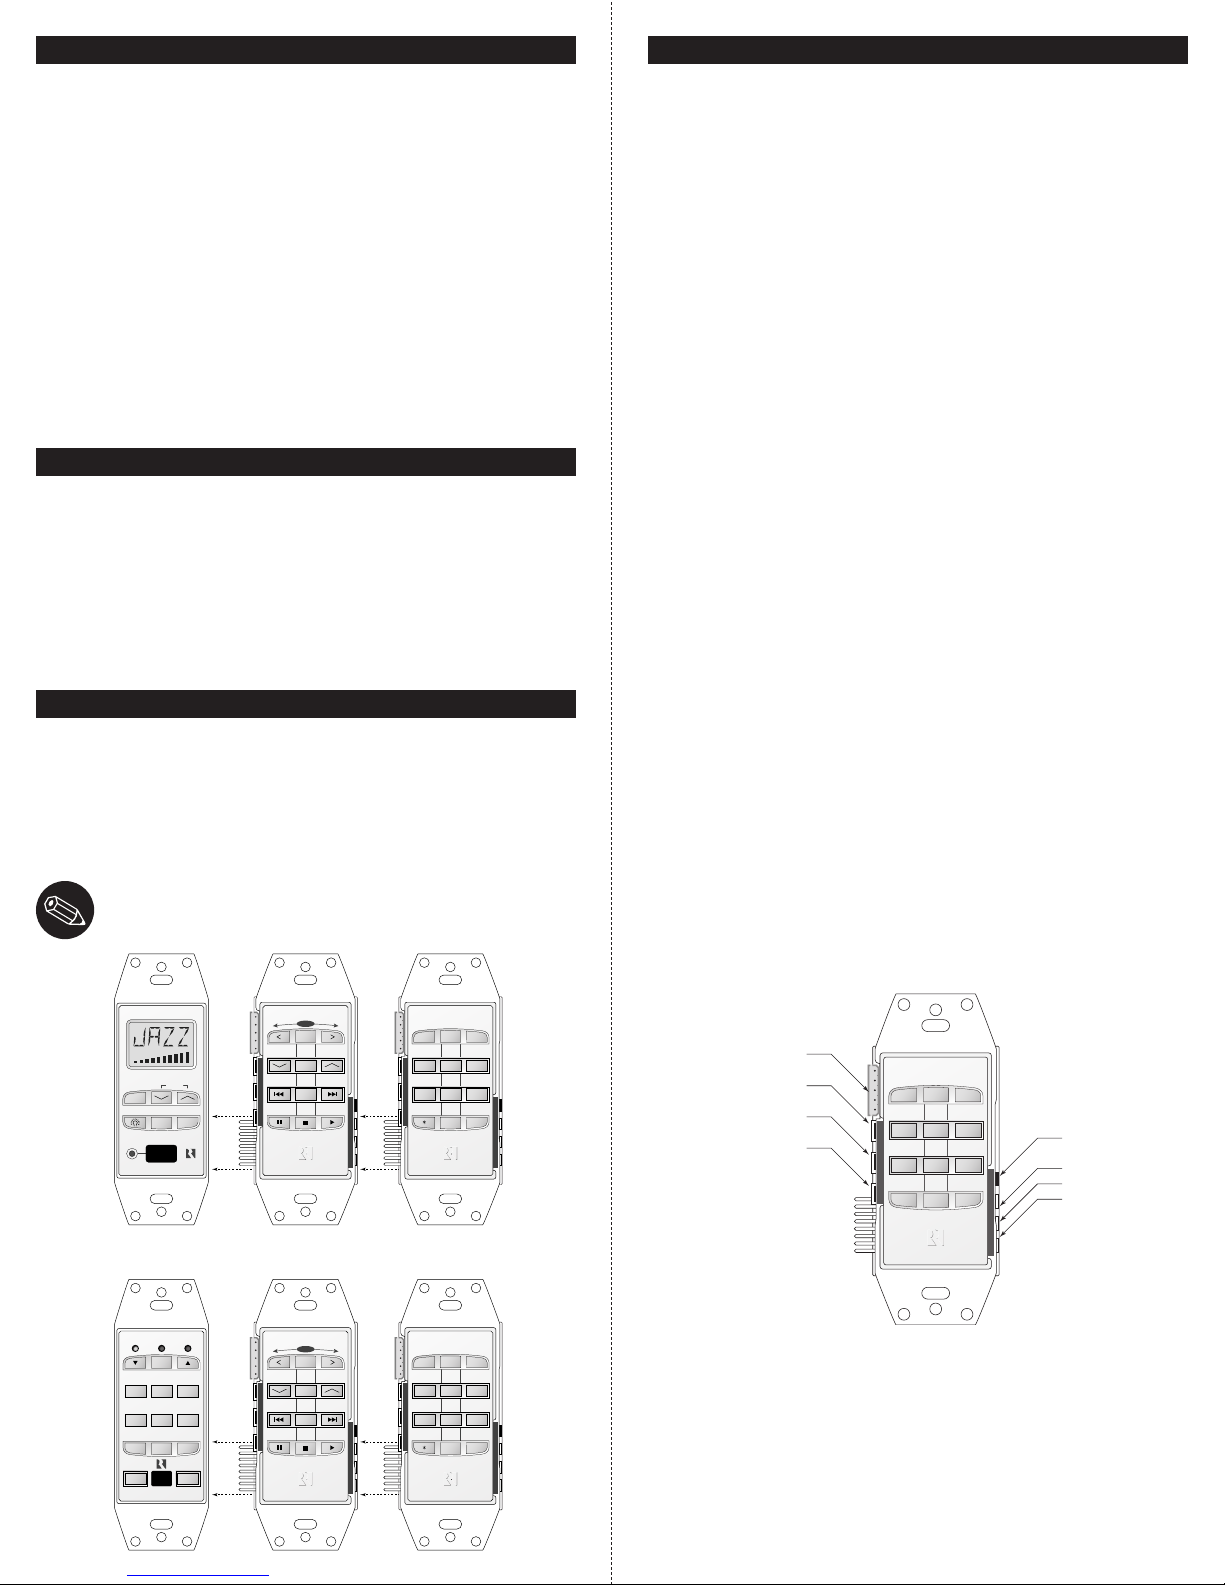
If the multi-zone system’s main keypads (PCK-IR, PCK, or CA-LCD keypads)
have not already been connected, refer to the instruction manual for that
specific keypad. Once the main keypads have been wired, connect the DSC
keypad’s 16-pin header to the 16-pin receptacle on the side of the main
keypad (see Figure 1a and 1b). Be sure to keep the correct pin alignment. If
you are using a DAN keypad with the system, connect it to the input recep-
tacle on the side of the DSC keypad.
INSTALLATION INSTRUCTIONS
1) Using the provided 3/4” flat-head screws, install the connected keypads
into the junction box or plaster ring.
2) Do not install the cover-plate yet, as you will need access to the DSC or
DAN Keypad during programming.
3) Once all keypads are connected and installed, turn on the Multi-Zone
Controller to power the keypads.
NOTE: Use only UL/CSA approved junction box.
PROGRAMMING INSTRUCTIONS
The command keys on the DSC or DAN Keypad are labeled for reference
only. You may program any IR command onto any command key.
1) Read the Keypad Control Features section of the Multi-Zone Controller
manual.
2) Turn on the zone using the main keypad.
3) Press the Program button on the left hand side of the DSC or DAN
Keypad (Button locations are shown in Figure 2).
4) The Program Indicator will light continuously (indicator light locations
are shown in Figure 2).
5) Select the layer by selecting the source input on the main keypad (i.e., if
you want to program CD player functions, select the CD source on the
main keypad).
6) Press the command key that you wish to program into, on the DSC or
DAN front plate (i.e., if you wish to program the play function for your
CD player, press the PLAY button on the DSC Keypad). The Program indi-
cator will now blink rapidly.
7) Hold your hand-held remote control so that the IR-emitting end faces
the IR receiving diode located on the right side of the DSC Keypad. See
Figure 2 for IR receiving diode location. The hand-held remote should be
held 1 - 4 inches away from the IR receiving diode during command
transfer.
8) Press and hold the command key on the hand-held remote that you
wish to program into the DSC Keypad’s command key.
9) While the command is being transferred, the Program Indicator will light
continuously.
10) After the command is successfully captured, the Stored Indicator will
light momentarily, and the Program indicator will remain lit.
11) If you wish to continue programming command keys, repeat steps 5-10.
12) If the Error Indicator is illuminated, there was a problem processing the
last command. Repeat steps 5-10 for that command.
13) To exit the Program mode, press the Program button. All indicators will
no longer be illuminated, and DSC Keypad will be ready for operation
(see Operation instructions).
14) Program the DAN Keypad the same way the DSC Keypad was pro-
grammed.
PRG CLR RST
IR IN PRG STO ERR
ERROR INDICATOR
RESET BUTTON
CLEAR BUTTON
PROGRAM BUTTON
PROGRAM PORT FOR IKP-1
STORED INDICATOR
PROGRAM INDICATOR
IR RECEIVER DIODE
TREBLE VOLUMEBASS
PR-4Z SYSTEM CONTROLLER
SELECT
CD TAPETUNER
VID2 DVDVID1
ZONE
ON/OFF PRESETLOUD
SYSTEM
OFF
SYSTEM
ON
PRG CLR RST
IR IN PRG STO ERR
DIRECT ACCESS
NUMERIC SOURCE KEYPAD
897
564
231
0ENTER
PRG CLR RST
IR IN PRG STO ERR
DIRECT SOURCE CONTROL
SEEK
MODE
SELECT
SCAN
REMOTE SENSOR
VOLUME
SOURCE
STORE POWER
PRG CLR RST
IR IN PRG STO ERR
DIRECT ACCESS
NUMERIC SOURCE KEYPAD
897
564
231
0ENTER
PRG CLR RST
IR IN PRG STO ERR
DIRECT SOURCE CONTROL
SEEK
MODE
SELECT
SCAN
Figure 1b
Figure 1a
PCK-IR or PCK DSC DAN
CA-LCD DSC DAN
Figure 2
DAN & DSC manual 4/16/02 9:22 AM Page 2

This manual suits for next models

1

Other Russound Keypad manuals

Russound A-K3 User manual

Russound

Russound A-K3 User manual

Russound CA-LCD2 User manual

Russound

Russound CA-LCD2 User manual

Russound MDK-C6 User manual

Russound

Russound MDK-C6 User manual

Russound Sphere E Series User manual

Russound

Russound Sphere E Series User manual

Russound KPSC User manual

Russound

Russound KPSC User manual

Russound UNO-S2 User manual

Russound

Russound UNO-S2 User manual

Russound ISK1 User manual

Russound

Russound ISK1 User manual

Russound KP4 User manual

Russound

Russound KP4 User manual

Russound IPK-1 User manual

Russound

Russound IPK-1 User manual

Russound SPG User manual

Russound

Russound SPG User manual

Russound ISK2 User manual

Russound

Russound ISK2 User manual

Russound UNO-S1 User manual

Russound

Russound UNO-S1 User manual

Russound V-KP-1 User manual

Russound

Russound V-KP-1 User manual

Russound CA Manual

Russound

Russound CA Manual

Russound A-K4 User manual

Russound

Russound A-K4 User manual

Russound Sphere E Series User manual

Russound

Russound Sphere E Series User manual

Russound UNO-S2 User manual

Russound

Russound UNO-S2 User manual

Russound KPSC User manual

Russound

Russound KPSC User manual

Russound CA 6.4 LRN User manual

Russound

Russound CA 6.4 LRN User manual

Russound CA-LCD User manual

Russound

Russound CA-LCD User manual

Russound KP4-KP6 User manual

Russound

Russound KP4-KP6 User manual

Russound A-K3 User manual

Russound

Russound A-K3 User manual

Russound SaphIR K2 User manual

Russound

Russound SaphIR K2 User manual

Russound MDK-C5 Operating manual

Russound

Russound MDK-C5 Operating manual

Popular Keypad manuals by other brands

Aritech ATS1110 Instruction

Aritech

Aritech ATS1110 Instruction

ESPRIT 642BL installation guide

ESPRIT

ESPRIT 642BL installation guide

B&K CK2.2 Guide to installation

B&K

B&K CK2.2 Guide to installation

Ryobi GDA401 user manual

Ryobi

Ryobi GDA401 user manual

Arrowhead KP600F/KP600L owner's manual

Arrowhead

Arrowhead KP600F/KP600L owner's manual

Honeywell 6280W Features & specifications

Honeywell

Honeywell 6280W Features & specifications

CYP CR-KP4-B Operation manual

CYP

CYP CR-KP4-B Operation manual

Viking HD-1 Technical practice

Viking

Viking HD-1 Technical practice

DMP Electronics Thinline Series Installation and programming guide

DMP Electronics

DMP Electronics Thinline Series Installation and programming guide

Honeywell 6280 Series user guide

Honeywell

Honeywell 6280 Series user guide

Climax KP-23B-EL user manual

Climax

Climax KP-23B-EL user manual

Abus FUBE35000A manual

Abus

Abus FUBE35000A manual

GARDINER TECHNOLOGY Gardtec 800 User instructions

GARDINER TECHNOLOGY

GARDINER TECHNOLOGY Gardtec 800 User instructions

Safeline MX2 manual

Safeline

Safeline MX2 manual

KeySonic KSK-N100RF manual

KeySonic

KeySonic KSK-N100RF manual

Model Train Technology 16 Port DCC LED Scene Controller II user manual

Model Train Technology

Model Train Technology 16 Port DCC LED Scene Controller II user manual

NetworX NX-8V2 user manual

NetworX

NetworX NX-8V2 user manual

NAPCO Magnum Alert RP2000LCD installation instructions

NAPCO

NAPCO Magnum Alert RP2000LCD installation instructions

manuals.online logo
manuals.online logoBrands
  • About & Mission
  • Contact us
  • Privacy Policy
  • Terms and Conditions

Copyright 2025 Manuals.Online. All Rights Reserved.