manuals.online logo
Brands
  1. Home
  2. •
  3. Brands
  4. •
  5. Saxby Lighting
  6. •
  7. Outdoor Light
  8. •
  9. Saxby Lighting EL-40062 Manual

Saxby Lighting EL-40062 Manual

Instruction leaflet
Canon PIR Wall
EL-40062 (57337), EL-40063 (57338)
www.saxbylighting.com
For your safety, always switch off the supply before changing lightbulbs, or cleaning.
Safety information
Saxby Lighting Ltd. LS9 0SE
This bulb is protected by a shade. This part must be replaced immediately should the shade become
cracked or damaged. This fitting must not be used without the shade in place.
Replace Cracked
Shade Iss.2 05082015
When changing a bulb, always switch off at the mains and
allow the bulb to cool before handling. Dispose of used
bulbs carefully. Do not exceed the wattage stated or use a
different shape bulb from that indicated on the fitting.
Fitting/replacing bulbs
Care and Cleaning
Waste electrical products should not be disposed of with household waste. Please recycle where facilities exist.
Check with your Local Authority or retailer for recycling advice.
Recycling advice
Do not use solvents or abrasive cleaners as these could
damage the finish.
In normal circumstances, stainless steel is very resistant to
corrosion. It does however require maintenance to preserve
the high quality appearance. Wash the product with warm
soapy water, removing all surface deposits. Rinse with clear
water and with a soft cloth, wipe dry.
In some cases, surface corrosion may arise after installation.
This is normally caused by tiny iron particles left behind
after the brushing process when finishing.
Wash and dry as detailed above. Then with a soft cloth
soaked with a protective oil, wipe all over.
However if the product is subject to extreme environmental
conditions such as marine locations, industrial pollution
and acid rain these maintenance procedures should be
carried out around four times a year. For severe corrosion,
non-abrasive cream cleaners or proprietary stainless steel
cleaners should be used to remove the corrosion. Wash and
dry as detailed above. Then with a soft cloth soaked with a
protective oil, wipe all over.
Do not clean the units with a pressure washer.
Use a soft cloth to handle bulbs,
avoid directly touching the bulbs as
this will shorten their life.
until the light level drops.
• To adjust Time On. By adjusting the timer dial, the unit
will stay on (once activated) from 5 seconds to 5 minutes.
• To adjust range level: By adjusting the Range level dial,
the unit will activate from 4 metres to 8 metres. The angle of
detection is approximately 110°.
• To adjust the light level: By adjusting the Light level dial,
the unit will activate either in daylight or at night.
• For optimum detection range a mounting height of 1.8M to
2.5M metres is recommended.
+
+
+
TIME RANGE DAY / NIGHT
Thank you for purchasing this light fitting. Please read the instructions carefully before use to ensure safe and satisfactory
operation of this product. Please retain these instructions for future reference.
Warning
This is a Class 1 product and must be earthed.
Please read these instructions carefully before
commencing any work.
This unit must be fitted by a competent and qualified
electrician.
Install in accordance with IEE Wiring regulations and
current Building Regulations.
To prevent electrocution switch off at mains supply
before installing or maintaining this fitting. Ensure other
persons cannot restore the electrical supply without
your knowledge. If you are in any doubt, please consult a
qualified electrician.
This light fitting should be connected to a circuit with a
30mA RCD fitted.
If replacing an existing fitting, make a careful note of the
connections.
Always use the correct type and wattage bulb. Never
exceed the wattage stated.
When changing a bulb, always switch off at the mains and
allow the old bulb to cool down before handling. Dispose
of used bulbs carefully and responsibly.
Waste electrical products should not be disposed of with
household waste. Please recycle where facilities exist.
Check with your local authority or retailer for recycling
advice.
This product is rated at IP44.
This product is not suitable for location in or near a
marine or sea environment.
The entire unit gets hot whilst on for a period of time.
This type of light fitting may be connected to a dimmer if
a Tungsten incandescent bulb is used (as supplied). If a
CFL type bulb is fitted then these cannot (generally) be
controlled by a dimmer.
Specification
Voltage: 240V 50Hz a.c.
Lamp: EL-40062: 2x Max. 35W GU10 EL-40063: 1x Max. 35W GU10
IP rating: 44
Layout
Installation
• Plan the desired layout of this fitting carefully, ensuring
the cables will reach the distance between the junction
box and the light fitting.
• Avoid locating any cables in positions that would cause
a hazard. Position cables and outdoor rated junction
boxes (not supplied) away from areas where they may
be at risk from being cut, trapped or damaged.
• We recommend that you use H05RN-F specification
cable (not supplied) which is an outdoor grade, rubber
sheathed cable. The mains supply cable must have a
minimum cross sectional area of 1.0mm²
• Cables must be protected using suitable conduit or
plastic trunking.
• Attach the backplate to the wall using the appropriate
fittings (Fig 2).
• Use a sharp object such as a screwdriver to pierce the
rubber grommet in the back plate. Feed the incoming
cable through the rubber grommet and attach the back
plate to the wall. Wire as detailed below.
• You have correctly identified the wires
• The connections are tight
• No loose strands have been left out of the connection
block.
SUPPLY
NEUTRAL
LIGHT FITTING
BLUE (N)
EARTH (GREEN/YELLOW) GREEN/YELLOW
BROWN (L)
SWITCHED LIVE
Having correctly identified the wiring from your existing light
fitting, pull the wire through the hole and connect to the
connection block inside the product in the following way:
Wiring Check that...
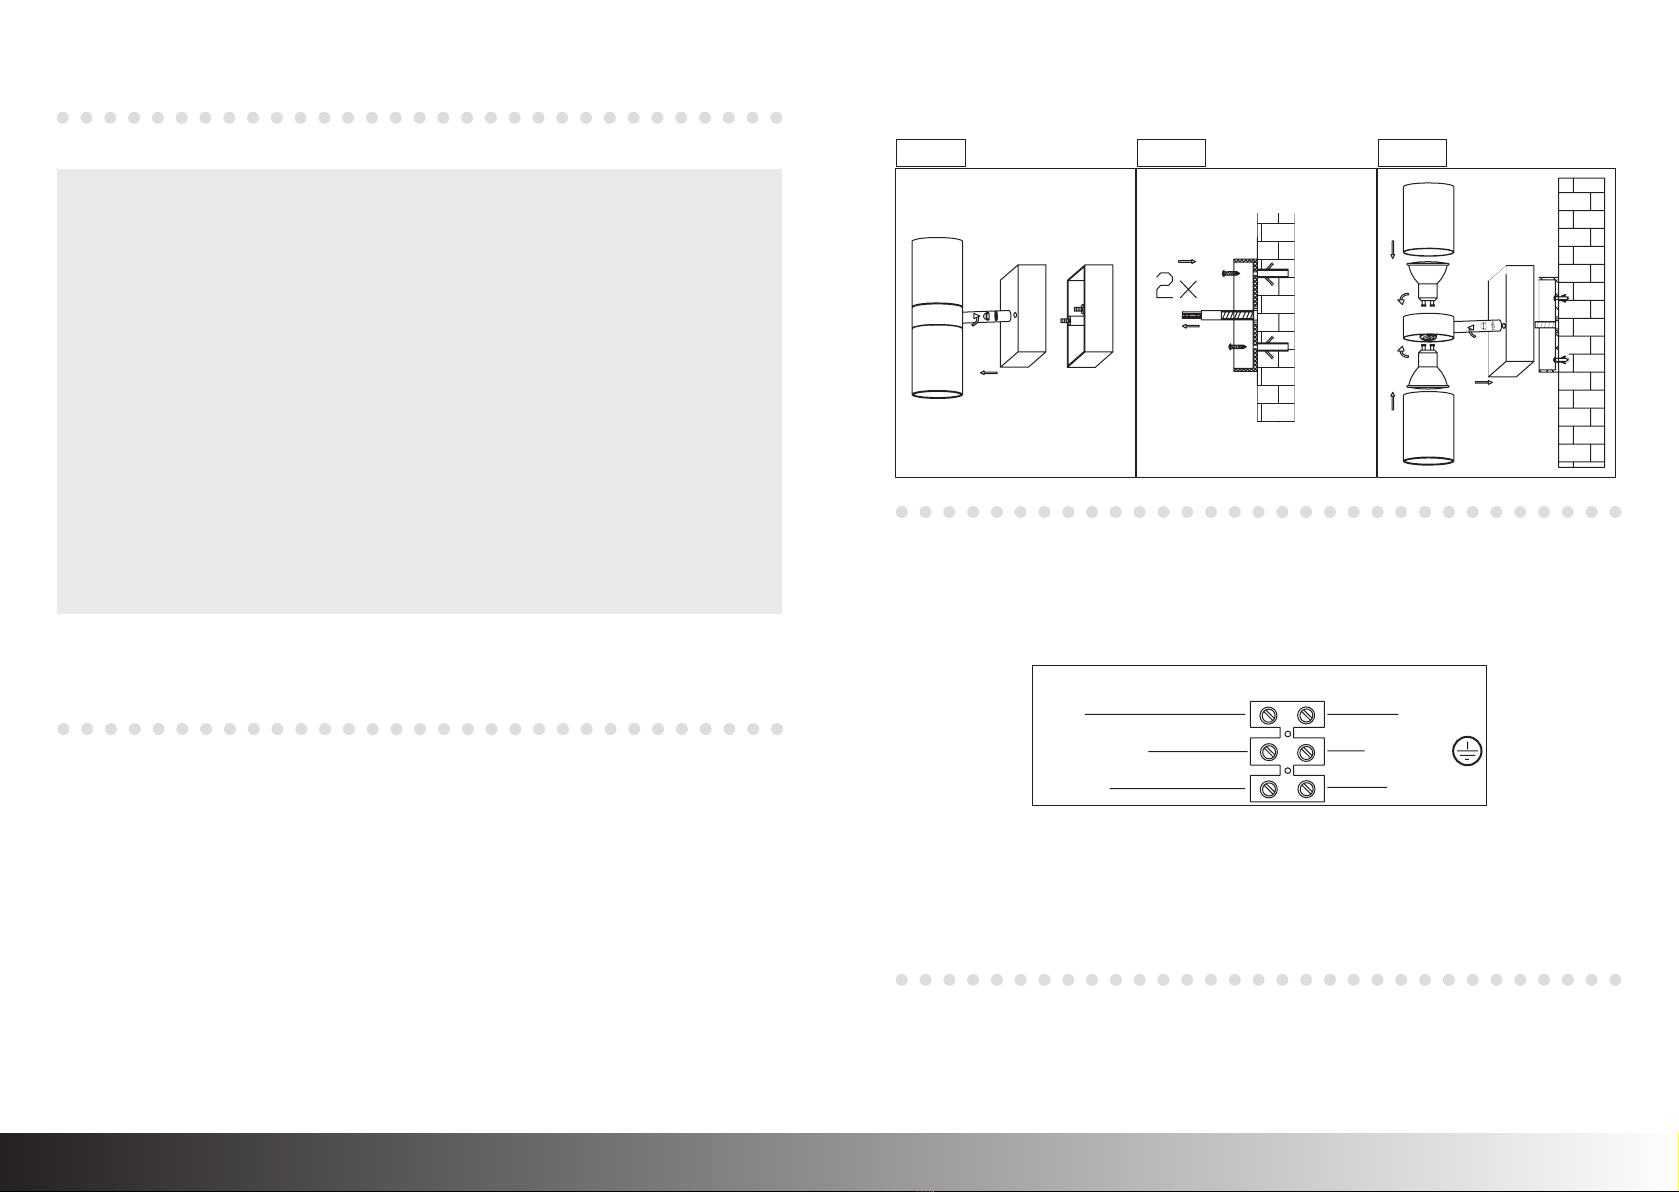
Fig 1. Fig 2. Fig 3.
Existing fittings must be completely removed before
installation of a new product. Before removing the existing
fitting, carefully note the position of each set of wires.
• Separate the plastic back plate from the fitting by
removing the two domed nuts / washers on the front of
the fitting. Leave the threaded bolts in the back plate
(Fig 1).
• Use the back plate as a template to mark the screw
holes. Make sure the back plate is correctly aligned with
the drain hole at the lowest position.
Commissioning
• Place the fitting over the back plate, ensuring that the
bolts in the back plate are aligned with the holes in the
front of the fitting. Replace the domed nuts/ washers to
secure the fitting. Do not over tighten.
• Fit the bulbs into the lamp holders, and refit the bulb
covers.
• Replace fuse or circuit breaker and switch on. Your light
is now ready for use.
PIR Adjustment
• To test the PIR unit in daylight, pull the lens cover down
to expose the dials- then turn the timer dial gently fully anti-
clockwise and turn the Day/ Night dial gently fully clockwise.
Lift the lens cover and activate the PIR by covering the PIR
lens with your hand. The unit will light and should stay on
for approximately 5-10 seconds then go off. It will remain off

This manual suits for next models

3

Other Saxby Lighting Outdoor Light manuals

Saxby Lighting 75270 Manual

Saxby Lighting

Saxby Lighting 75270 Manual

Saxby Lighting 75434 User manual

Saxby Lighting

Saxby Lighting 75434 User manual

Saxby Lighting Luminatra Spike 78635 User manual

Saxby Lighting

Saxby Lighting Luminatra Spike 78635 User manual

Saxby Lighting Ikon Pro CCT Series Manual

Saxby Lighting

Saxby Lighting Ikon Pro CCT Series Manual

Saxby Lighting EL-40094 Manual

Saxby Lighting

Saxby Lighting EL-40094 Manual

Saxby Lighting Canillo 67699 User manual

Saxby Lighting

Saxby Lighting Canillo 67699 User manual

Saxby Lighting Seina User manual

Saxby Lighting

Saxby Lighting Seina User manual

Saxby Lighting Bianco LED CCT PIR User manual

Saxby Lighting

Saxby Lighting Bianco LED CCT PIR User manual

Saxby Lighting 91963 User manual

Saxby Lighting

Saxby Lighting 91963 User manual

Saxby Lighting Aretz GU10 Recessed User manual

Saxby Lighting

Saxby Lighting Aretz GU10 Recessed User manual

Saxby Lighting Pimlico Bollard Manual

Saxby Lighting

Saxby Lighting Pimlico Bollard Manual

Saxby Lighting Bayswater 40045 User manual

Saxby Lighting

Saxby Lighting Bayswater 40045 User manual

Saxby Lighting Louvre Outdoor Wall Fitting User manual

Saxby Lighting

Saxby Lighting Louvre Outdoor Wall Fitting User manual

Saxby Lighting Severus Manual

Saxby Lighting

Saxby Lighting Severus Manual

Saxby Lighting Panther Wall 52016 Manual

Saxby Lighting

Saxby Lighting Panther Wall 52016 Manual

Saxby Lighting Inova PIR Wall Manual

Saxby Lighting

Saxby Lighting Inova PIR Wall Manual

Saxby Lighting Severus EL-40108 Manual

Saxby Lighting

Saxby Lighting Severus EL-40108 Manual

Saxby Lighting ALBA User manual

Saxby Lighting

Saxby Lighting ALBA User manual

Saxby Lighting Midi Wall Manual

Saxby Lighting

Saxby Lighting Midi Wall Manual

Saxby Lighting BLISS 13799 User manual

Saxby Lighting

Saxby Lighting BLISS 13799 User manual

Saxby Lighting Solaris 76925 Manual

Saxby Lighting

Saxby Lighting Solaris 76925 Manual

Saxby Lighting 73716 User manual

Saxby Lighting

Saxby Lighting 73716 User manual

Saxby Lighting Ware Outdoor Wall Manual

Saxby Lighting

Saxby Lighting Ware Outdoor Wall Manual

Saxby Lighting Luminatra Smart RGB User manual

Saxby Lighting

Saxby Lighting Luminatra Smart RGB User manual

Popular Outdoor Light manuals by other brands

Kichler Lighting HELEN 37536 instructions

Kichler Lighting

Kichler Lighting HELEN 37536 instructions

Thorn OXANE L installation instructions

Thorn

Thorn OXANE L installation instructions

esotec Solar Globe Light multicolor 20 operating instructions

esotec

esotec Solar Globe Light multicolor 20 operating instructions

mitzi HL200201 ELLIS Assembly and mounting instructions

mitzi

mitzi HL200201 ELLIS Assembly and mounting instructions

HEPER TILA S AFX 3 Module Installation & maintenance instructions

HEPER

HEPER TILA S AFX 3 Module Installation & maintenance instructions

Designplan TRON 180 installation instructions

Designplan

Designplan TRON 180 installation instructions

Sealey LED37 instructions

Sealey

Sealey LED37 instructions

nordlux VEJERS Mounting instruction

nordlux

nordlux VEJERS Mounting instruction

SImx ELITE LED LHTC637 installation instructions

SImx

SImx ELITE LED LHTC637 installation instructions

GEV CAROLINE 10833 manual

GEV

GEV CAROLINE 10833 manual

WE-EF PFL540 LED Installation and maintenance instructions

WE-EF

WE-EF PFL540 LED Installation and maintenance instructions

HEPER DOGO Side LW6048.585-US Installation & maintenance instructions

HEPER

HEPER DOGO Side LW6048.585-US Installation & maintenance instructions

BEGA 84 253 Installation and technical information

BEGA

BEGA 84 253 Installation and technical information

HEPER LW8034.003-US Installation & maintenance instructions

HEPER

HEPER LW8034.003-US Installation & maintenance instructions

HEPER MINIMO Installation & maintenance instructions

HEPER

HEPER MINIMO Installation & maintenance instructions

LIGMAN BAMBOO 3 installation manual

LIGMAN

LIGMAN BAMBOO 3 installation manual

Maretti TUBE CUBE WALL 14.4998.04 quick start guide

Maretti

Maretti TUBE CUBE WALL 14.4998.04 quick start guide

Maxim Lighting Carriage House VX 40428WGOB installation instructions

Maxim Lighting

Maxim Lighting Carriage House VX 40428WGOB installation instructions

manuals.online logo
manuals.online logoBrands
  • About & Mission
  • Contact us
  • Privacy Policy
  • Terms and Conditions

Copyright 2025 Manuals.Online. All Rights Reserved.