Sealey PW2000PA User manual

140BAR PULL ALONG PRESSURE WASHER
WITH TSS 1800W
MODEL NO: PW2000PA
Thank you for purchasing a Sealey product. Manufactured to a high standard, this product will, if used according to these
instructions, and properly maintained, give you years of trouble free performance.
IMPORTANT: PLEASE READ THESE INSTRUCTIONS CAREFULLY. NOTE THE SAFE OPERATIONAL REQUIREMENTS, WARNINGS & CAUTIONS. USE
THE PRODUCT CORRECTLY AND WITH CARE FOR THE PURPOSE FOR WHICH IT IS INTENDED. FAILURE TO DO SO MAY CAUSE DAMAGE AND/OR
PERSONAL INJURY AND WILL INVALIDATE THE WARRANTY. KEEP THESE INSTRUCTIONS SAFE FOR FUTURE USE.
1. SAFETY
1.1. ELECTRICAL SAFETY
WARNING! It is the user’s responsibility to check the following:
Check all electrical equipment and appliances to ensure that they are safe before using. Inspect power supply leads, plugs and
all electrical connections for wear and damage. Sealey recommend that an RCD (Residual Current Device) is used with all electrical
products. You may obtain an RCD by contacting your local Sealey Stockist.
if the product is used in the course of business duties, it must be maintained in a safe condition and routinely PAT (Portable
Appliance Test) tested.
Electrical safety information, it is important that the following information is read and understood.
1.1.1. Ensure that the insulation on all cables and on the appliance is safe before connecting it to the power supply.
1.1.2. Regularly inspect power supply cables and plugs for wear or damage and check all connections to ensure that they are secure.
1.1.3. Important: Ensure that the voltage rating on the appliance suits the power supply to be used and that the plug is tted with the
correct fuse - see fuse rating in these instructions.
8DO NOT pull or carry the appliance by the power cable.
8DO NOT pull the plug from the socket by the cable. Remove the plug from the socket by maintaining a rm grip on the plug.
8DO NOT use worn or damaged cables, plugs or connectors. Ensure that any faulty item is repaired or replaced immediately by a
qualied electrician.
1.1.4. This product is tted with a BS1363/A 13 Amp 3 pin plug.
If the cable or plug is damaged during use, switch the electricity supply and remove from use.
Replace a damaged plug with a BS1363/A 13 Amp 3 pin plug. If in doubt contact a qualied electrician.
Class II products are wired with live (brown) and neutral (blue) only, and are marked with the
Class II symbol;
A) Connect the BROWN live wire to the live terminal ‘L’.
B) Connect the BLUE neutral wire to the neutral terminal ‘N’.
C) After wiring, check that there are no bare wires and ensure that all wires have been correctly
connected.
Ensure that the cable outer sheath extends inside the cable restraint and that the restraint is tight.
8DO NOT connect either wire to the earth terminal.
Sealey recommend that repairs are carried out by a qualied electrician.
1.2. GENERAL SAFETY
WARNING! RISK OF FLUID INJECTION. This washer operates at uid pressures and velocities high enough to penetrate human
and animal esh. If there is an occurrence of uid injection seek medical help immediately
WARNING! Stop the engine and disconnect the mains water supply before changing accessories or performing any maintenance.
WARNING! DO NOT operate the washer if damaged. Replace or repair using recommended parts only. Unauthorised parts may be
dangerous and will invalidate your warranty. Use authorised Service agent only.
WARNING! DO NOT direct jet against yourself or others in order to clean clothes or foot-wear.
9Keep the washer in good condition. Regular maintenance will give the best and safest performance.
9Ensure you comply with the water supply company regulations before connecting to the mains. If you are connecting to the mains
drinking water supply ensure you have a back ow preventer valve installed.
9 The water supply hose must be reinforced and have an internal diameter of 13mm (1/2”). The minimum water supply rate must be at
least equal to the cleaner capacity. The water temperature must not exceed 50°C and the pressure must not exceed 10bar.
WARNING! DO NOT operate the washer without the water supply connected. To do so will damage the machine.
9Position the washer as near as possible to the mains water supply.
9Only use recommended washing detergents. Failure to do so may cause corrosion to equipment and hoses.
WARNING! Use the washer on a at, level surface, in a horizontal position. Failure to do so will invalidate your warranty.
9 Wear safety goggles and adequate protective clothing and anti-slip rubber soled footwear.
WARNING! The high pressure jet must be used with caution. Ensure you aim the lance correctly at the work surface. Failure to do so
may scatter loose particles at the same force as the water pressure, resulting in possible damage or personal injury.
9 Keep all persons and animals at a safe distance from the hose working area. It is dicult to give an exact safe distance as it will
depend upon your circumstances. We recommend at least 15 metres (16 yards). Also ensure other persons are aware before you
start to depress the washer trigger.
9 Hold the gun rmly for it will tend to “kick” backwards when you rst pull the trigger.
Recommended fuse rating
13 Amp
PW2000PA Issue 2 (2) 10/02/21
Original Language Version
© Jack Sealey Limited
Refer to
instructions
DO NOT direct jet
against yourself,
other persons,
animals, electrical
equipment or the
machine itself
Wear eye
protection
Wear protective
gloves
Wear ear
protection
Wear safety
footwear
Wear protective
clothing
Electrical shock
hazard

8DO NOT allow children or untrained persons to operate the washer.
8DO NOT connect other appliances to the washer inlet or outlet. Only use the supplied or recommended outlet nozzle.
8DO NOT use the washer if the water supply hose is damaged. Also check that the hose is laid out straight and safely.
8DO NOT jam the operating trigger in the operating position, and DO NOT pull the trigger without holding and aiming the gun
correctly.
WARNING! DO NOT attempt to alter the pressure regulating valve as this may cause serious damage.
8DO NOT move the washer by pulling on the high pressure hose or the mains water supply hose. Use the machine handle.
8DO NOT direct jet against yourself, other persons or animals, electrical equipment or the machine itself.
WARNING! DO NOT leave the engine running for more than 2 minutes without operating the trigger, as temperature/pressure
increase may damage the sealing system.
8DO NOT use the washer if you are tired or under the inuence of alcohol, drugs or intoxicating medication.
9Ensure that the hose pressure is discharged before disconnecting the mains water hose.
9 When not in use, disconnect from the water supply. Clean and dry the washer and store in a safe, dry, frost protected, childproof
area.
8DO NOT allow the machine to become frozen.
1.3. ENGINE SAFETY
WARNING! Check the engine oil level before each start up. Only use an approved oil and never operate the engine with insucient
oil.
WARNING! DO NOT touch spark plug or plug lead whilst the engine is running; severe, potentially fatal, electric shock may result.
9For safety instructions relative to the maintenance and use of the petrol engine refer to the engine instruction manual.
9Ensure that only the correct fuel type and grade is used.
8DO NOT check ignition system by removing the spark plug or spark plug lead. Use specic tester or contact service agent.
8DO NOT use combustion engine powered machines indoors unless adequate ventilation is assessed by national labour authority.
8DO NOT use the washer with ammable, toxic or corrosive liquids. Use Sealey detergents recommended in section 4.8.7.
8DO NOT leave the washer unattended whilst operating and DO NOT remove the fuel cap whilst the engine is running.
8DO NOT refuel the engine whilst it is running. Stop the engine and allow it to cool for two minutes before attempting to refuel.
8DO NOT refuel in a closed or poorly ventilated environment as there is a danger of explosion or re. Refuel outdoors.
8DO NOT smoke or place the washer near any naked ames whilst re-fuelling.
8DO NOT operate washer if there is a fuel leak. Move the unit and avoid using until the leak has been xed and the machine is dry.
8DO NOT start the engine if there are any ammable materials near the exhaust system or in the path of the exhaust gases.
8DO NOT block the engine ventilation grilles.
9Ensure engine fuel is stored in an approved container.
9For long term storage ensure the fuel is drained and that the washer is adequately protected against frost.
8DO NOT operate the engine with either the silencer or air lter removed.
8DO NOT touch the engine during or after use. To avoid burns allow it to cool before handling.
WARNING! The warnings referred to in this guide cannot cover all possible conditions and situations that may occur. It must be
understood that common sense and caution are factors which cannot be built into this product, but must be applied by the operator.
NOTE: This appliance is not intended for use by persons (including children) with reduced physical, sensory or mental capabilities or
lack of experience and knowledge, unless they have been given supervision or instruction concerning the use of the appliance by a
person responsible for their safety. Children should be supervised to ensure that they do not play with the appliance.
2. INTRODUCTION
Lightweight and powerful unit, designed for domestic and light trade use. Ideal for a range of applications including cleaning vehicles, patios,
decking, motorbikes and barbecues. Fitted with a powerful 1800W motor with 400 litre water ow per hour and a maximum pressure output of
140bar. Includes Total Stop System. Fitted with accessory storage to ensure unit stays clutter-free and mobile. Supplied with 5m hose, spray
gun, lance and detergent bottle. Sits on two castor wheels and two xed wheels for easy manoeuvrability.
3. SPECIFICATION
MODEL NO:....................................................... PW2000PA
Electrical Fuse Rating: .....................................................13A
Electrical Plug Type: ................................................3-Pin BS
Hose Length:..................................................................... 5m
Maximum Pressure: ..................................... 140bar(2030psi)
Motor Power:...............................................................1800W
Rated Pressure: ..........................................................100bar
Supply:................................................................. 230V - 13A
Total Stop System: ........................................................... Yes
Vibration/uncertainty: .......................................... ah ≤2.5m/s²
Water Flow:................................................................ 400L/hr
4. ASSEMBLY
4.1. Fit loose parts delivered with appliance prior to start-up
4.2. INSTALLING THE HANDLE WITH SCREWS FIG.1
g.1
Original Language Version
© Jack Sealey Limited PW2000PA Issue 2 (2) 10/02/21

4.3. INSTALLING THE SPRAY WAND FIG 2
4.3.1. Fit the spray wand into the gun and rotate it until the two parts are completely locked.
4.3.2. Snap the desired nozzle onto the quick-connect collar until it clicks into place.
4.3.3. Connect the high pressure hose to the trigger gun
4.3.4. Connect the sliver end of the high-pressure hose to the trigger gun and twist the nut as indicated to secure the
connection.
4.3.5. Connect the high-pressure hose to the water outlet.
4.3.6. Connect the other end of the high-pressure hose to the water outlet on the washer and twist the black rotatable end-
piece as indicated to secure the connection.
4.3.7. Connect the garden hose to the water inlet.
4.3.8. Connect the garden hose adaptor (female coupler) to the water inlet of the pressure washer, then thread your garden
hose (male end) into the garden hose adaptor.
5. OPERATION
5.1. Position the appliance on an even surface.
Insert the mains plug into the socket.
5.2. WATER SUPPLY
NOTE: For connection values, see type plate.
WARNING! Impurities in the water can damage the high-pressure pump and the accessories.
5.2.1. Attach garden hose to water supply
8DO NOT connect to potable water system.
5.3. The water supply must not exceed 0.7MPa.
5.4. The washer must only be used with clean water, use of unltered water containing corrosive chemicals will damage the washer.
5.5. Bleed the device as follows prior to operation:
5.5.1. Turn on the appliance “OFF/ON”
5.5.2. Unlock the lever of the trigger gun.
5.5.3. Push the lever of the trigger gun, the device will switch on.
5.5.4. Let the device run (max. 2 minutes) until the water exits the trigger gun without bubbles.
5.5.5. Release the lever of the trigger gun.
5.5.6. Lock the lever of the trigger gun.
WARNING! Dry running of more than 2 minutes leads to damage of the high-pressure pump. If the appliance does not build up
pressure within 2 minutes, switch the appliance o and proceed in accordance with the instructions in section 7 “Troubleshooting”
5.6. HIGH PRESSURE OPERATION
5.6.1. Keep a distance of at least 30 cm when using the jet for cleaning painted surfaces to avoid damage.
5.6.2. Make sure the on/o switch is set to “OFF/O” (g.7) and insert the plug into a properly installed socket.
5.6.3. The washer must be used on a secure and stable surface in a standing, upright position.
5.6.4. Connect the product to power and water supply as described.
5.6.5. Open the water supply
5.6.6. Hold the spray gun with both hands.
5.6.7. Direct the nozzle of the chosen accessory away from you towards the surface to be cleaned.
5.6.8. Unlock the trigger and press it until a constant amount of water ows through the nozzle, to allow air trapped in the hose to escape.
5.6.9. Release the trigger.
5.6.10. Turn on the switch “OFF/ON”.
5.6.11. Hold the spray gun with both hands. Direct the water jet to the object to be cleaned and press the trigger. Release the lever of the
trigger gun; the device will switch o again and stop the water jet. High pressure remains in the system.
WARNING! Beware of kickback when pressing the trigger!
g.3 g.4 g.5
g.6
g.7
Original Language Version
© Jack Sealey Limited
g.2
PW2000PA Issue 2 (2) 10/02/21

5.7. OPERATION WITH DETERGENT
5.7.1. Detergent can only be added when the device is operated in low pressure mode.
▲DANGER When using detergents, the material data safety sheet issued by the detergent
manufacturer must be adhered to, especially the instructions regarding personal protective
equipment.
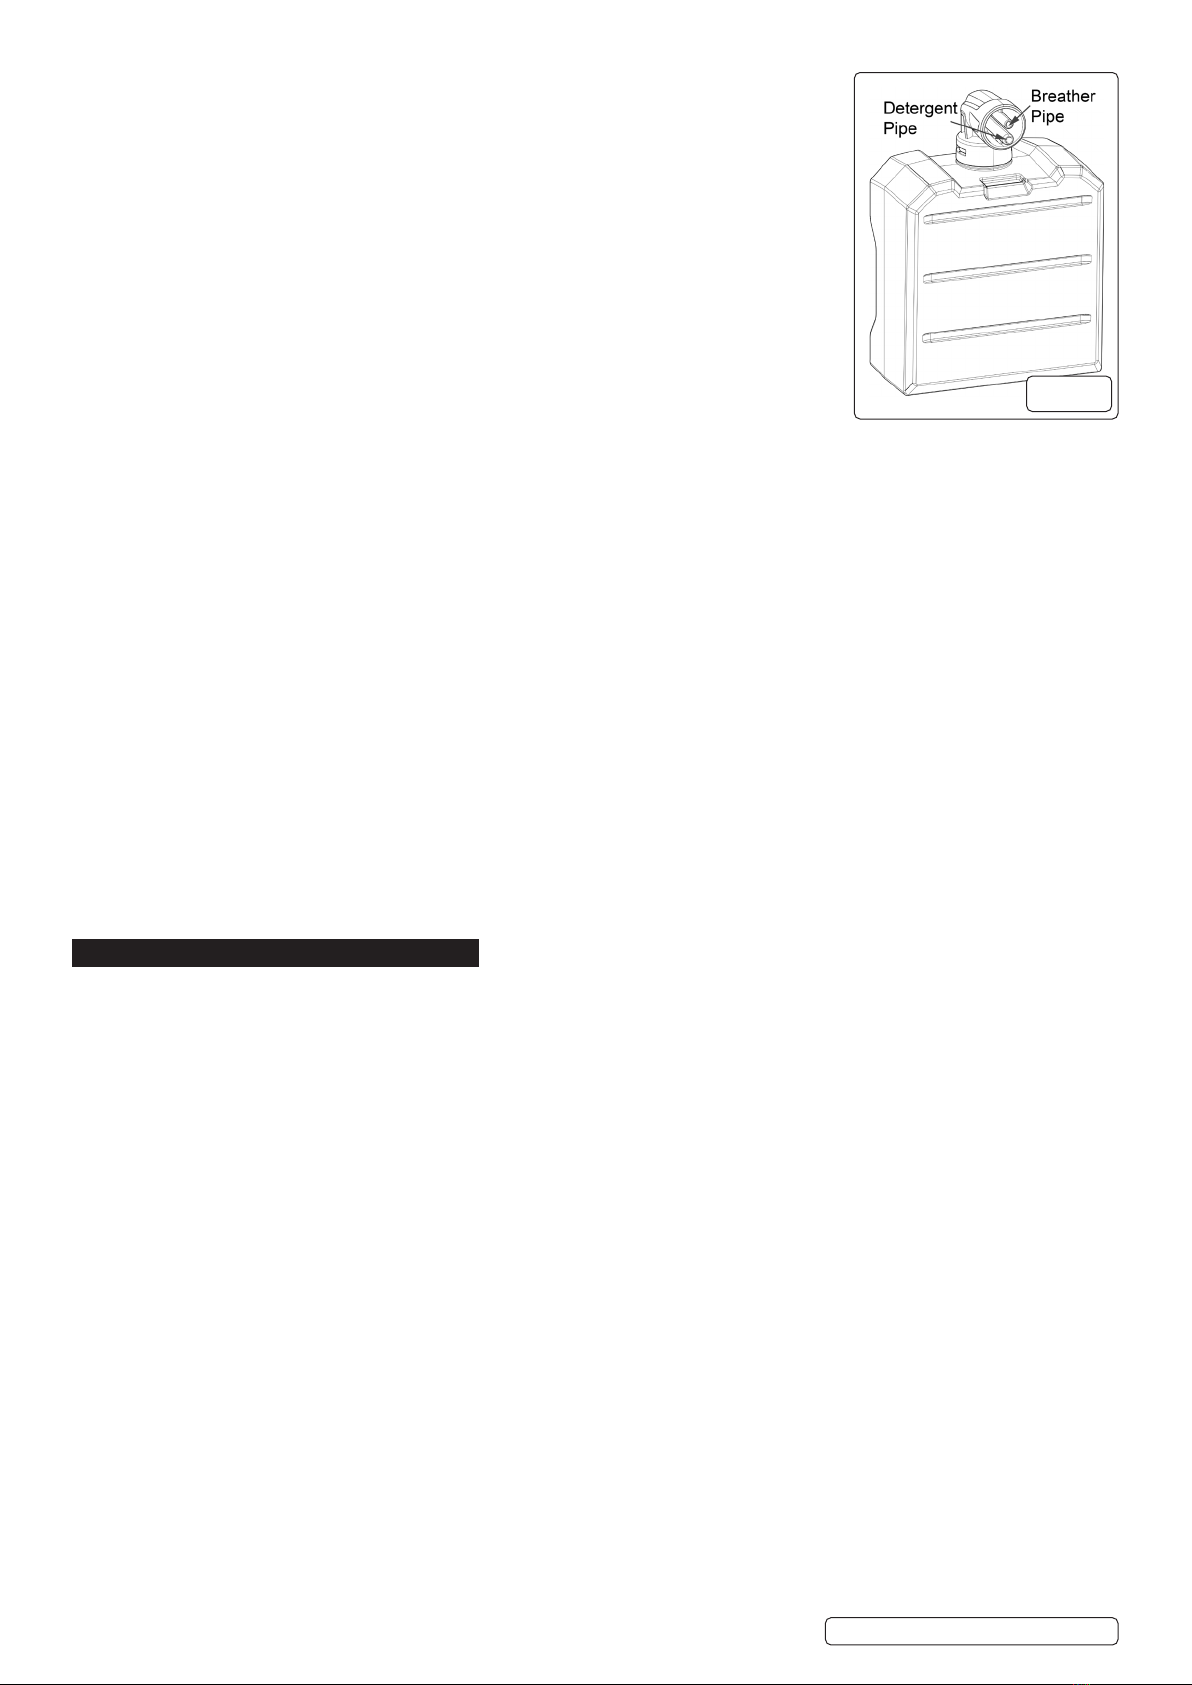
5.7.2. Remove the cap of the clean detergent bottle. Gently pull the on board detergent tank out of its
storage position.
5.7.3. Fill the tank with detergent designed specically for use with pressure washers.
5.7.4. Push the detergent bottle with the opening pointing downwards into the connection for the hose
clean detergent. Make sure you connect the detergent hose to the detergent pipe (g.8).
5.8. RECOMMENDED CLEANING METHOD
5.8.1. Spray the detergent sparingly on the dry surface and allow it to react, but not to dry.
5.8.2. Spray o loosened dirt with the high pressure Met.
5.8.3. After operation with detergent
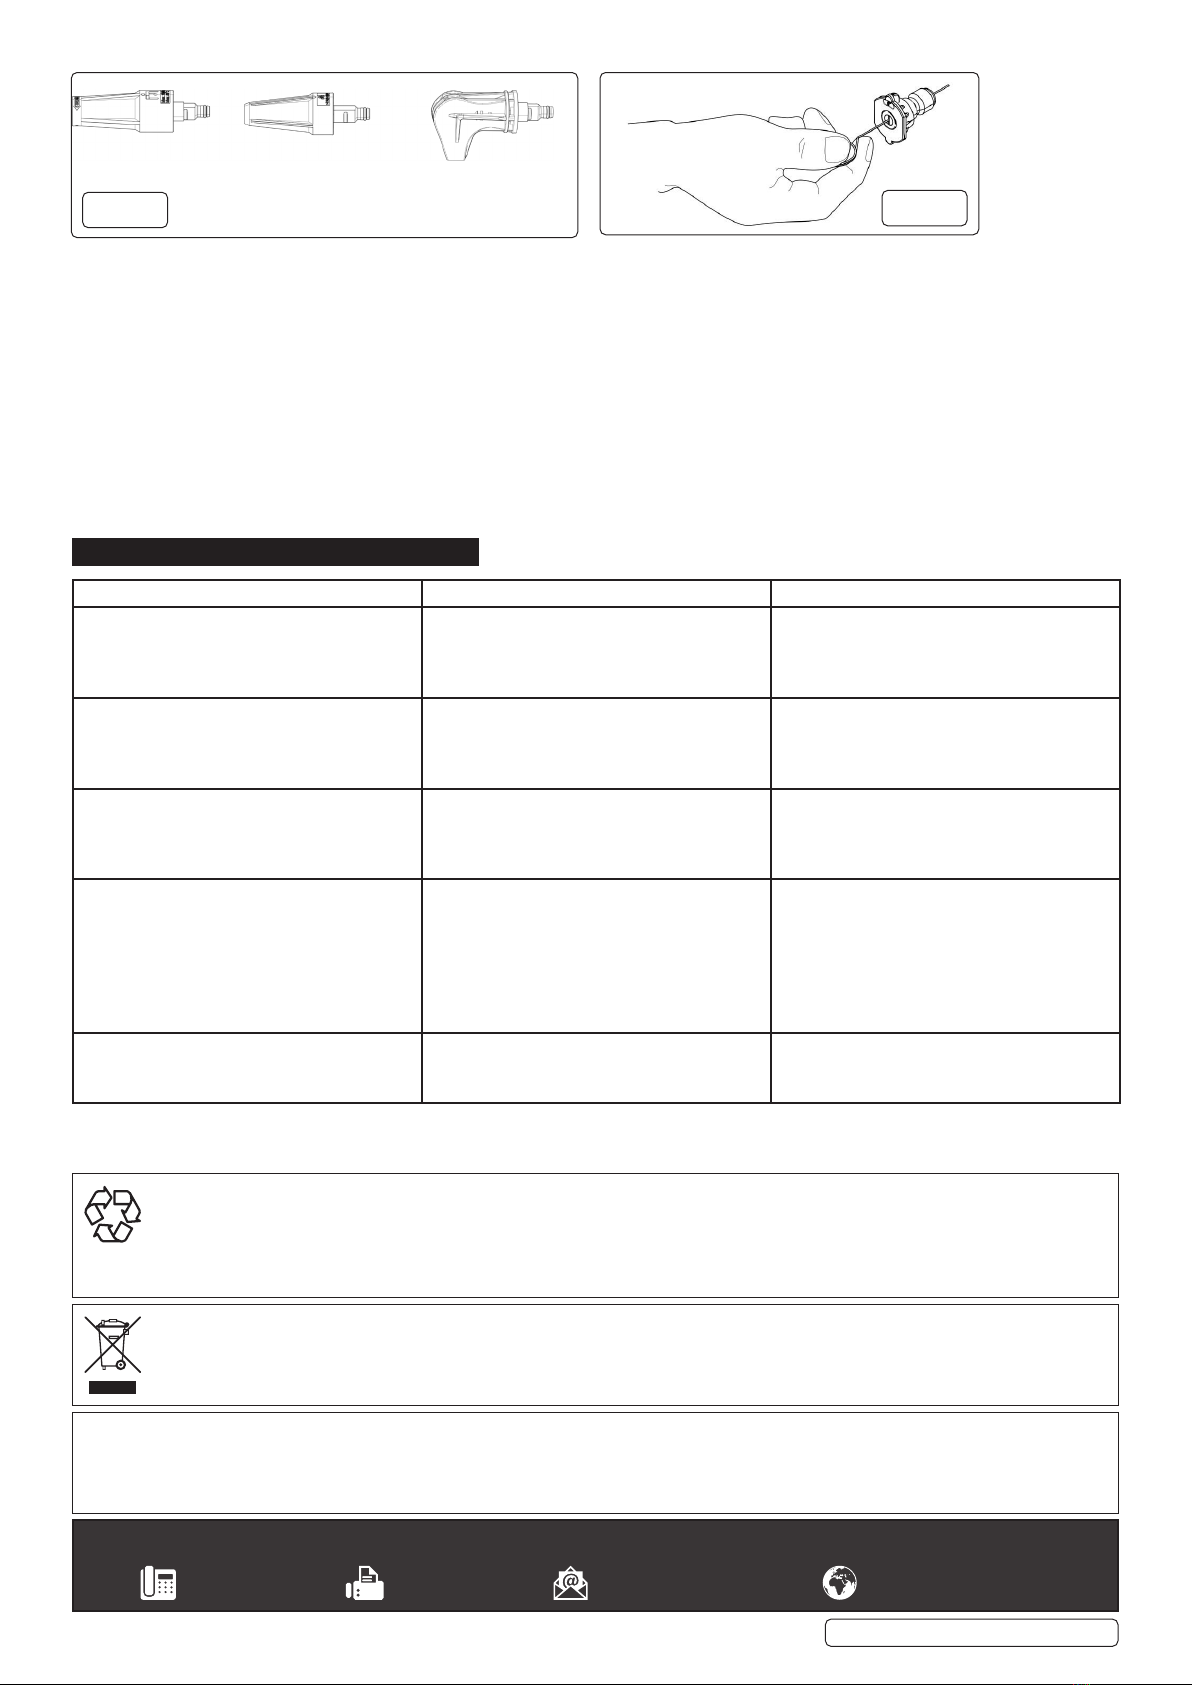
5.8.4. Remove the hose clean detergent bottle from the intake and close it with the lid.
5.8.5. For storage, put the detergent bottle into the retainer with the cap pointing up.
5.9. INTERRUPTING OPERATION
5.9.1. Release the lever of the trigger gun.
5.9.2. Lock the lever of the trigger gun.
5.9.3. Put the trigger gun with the spray lance into the parking position.
5.9.4. During longer breaks(more than 5 minutes), also turn the appliance o using the “OFF/ON” switch.
5.10. FINISH OPERATION
5.10.1. Release the lever of the trigger gun.
5.10.2. Turn o the appliance “ OFF/ON”.
5.10.3. Disconnect the mains plug from the socket.
5.10.4. Only separate the high-pressure hose from the trigger gun or the device when there is no pressure in the system.
5.11. TURN OFF TAP
5.11.1. Pressure the lever of the trigger gun to release any remaining pressure in the system.
5.11.2. Release the lever of the trigger gun.
5.11.3. Lock the lever of the trigger gun.
WARNING! When disconnecting the supply or high pressure hose, warm water may leak from the connection after operation.
5.11.4. Detach the appliance from the water supply.
5.12. WHEN TRANSPORTING BY HAND
5.12.1. Switch the product o and disconnect it from the water and power supply.
5.12.2. Pull out the transport handle until it audibly snaps into place. Attach transportation guards, if applicable.
5.12.3. Pull the appliance by its transport handle.
5.13. WHEN TRANSPORTING IN VEHICLES
5.13.1. Prior to horizontal transport: close the cap of clean detergent bottle.
5.13.2. Tilt the product towards you until it balances on the wheels. Then move it by its transportation handle.
5.13.3. Protect the product from any heavy impact or strong vibrations which may occur during transportation in vehicles.
5.13.4. Secure the appliance against shifting and tipping over
6. MAINTENANCE
6.1. Consider the weight of the appliance when storing it.
6.2. STORING THE APPLIANCE
6.2.1. Park the machine on an even surface.
6.2.2. Detach spray lance from the trigger gun.
6.2.3. Push the disconnect button on the trigger gun and pull the high-pressure hose out of the trigger gun.
6.2.4. Place the trigger gun into the storage for the trigger gun.
6.2.5. Put both spray lances into the storage for the spray lance.
6.2.6. Dirt grinder spray lance: Nozzle towards the bottom.
6.2.7. Coil the high-pressure hose and hang it over the hose storage.
6.2.8. Store the mains connection in the accessory compartment.
6.2.9. Prior to extended storage periods, as during the winter, also observe the instructions in the care section.
6.2.10. Always store the pressure cleaner, parts, and accessories in a place that is inaccessible to children. The ideal storage temperature is
between 10 °C and 30 °C. Store the power washer indoors to prevent the water in the unit from expanding under freezing conditions.
6.2.11. We recommend using the original package for storage or covering the product with a suitable cloth or enclosure to protect it against
dust.
6.3. FROST PROTECTION
WARNING! Appliance and accessories that are not completely drained can be destroyed by frost.
6.3.1. Completely drain appliance and accessories and protect them against frost. To avoid damage:
6.3.2. Detach the appliance from the water supply.
6.3.3. Detach spray lance from the trigger gun.
6.3.4. Turn on the appliance “ON/OFF”.
6.3.5. Push the lever of the trigger gun until no more water is escaping .
6.3.6. Release the lever of the trigger gun.
6.3.7. Lock the lever of the trigger gun.
6.3.8. Turn o the appliance “ON/OFF”.
6.3.9. Store the appliance and the entire accessories in a frost free room.
6.3.10. The high pressure hose is specially constructed with reinforced walls it can be easily damaged and should be stored carefully.
8DO NOT kink the hose.
8DO NOT drive vehicles over the hose.
8DO NOT expose the hose to sharp edges or corners. Misuse will lead to ballooning or premature failure and will invalidate warranty.
g.8
Original Language Version
© Jack Sealey Limited PW2000PA Issue 2 (2) 10/02/21

6.4. NOZZLES (FIG.11)
6.4.1. Disconnect a nozzle from the spray wand once the cleaning job is complete.
8DO NOT expose the nozzle in corrosive liquid.
6.4.2. Clean the sieve in the water connection
6.4.3. Clean the sieve in the water connection regularly.
6.4.4. Remove coupling from the water connection, and rinse with warm water to prevent any foreign matter from clogging the pump.
6.4.5. Clean the nozzle with the needle clean-out tool provided (g.12). Remove the spray wand from the gun. Remove any dirt from the
nozzle hole and rinse.
6.5. MAINTAINING THE SIEVE
6.5.1. The sieve must not be damaged.
6.5.2. Pull the sieve out using at pliers.
6.5.3. Clean the sieve under running water.
6.5.4. Reinsert the sieve into the water connection.
7. TROUBLESHOOTING
Symptom Cause Recommended action
Machine refuses to start Machine not plugged in
Defective socket
Fuse has blown
Defective extension cord
Plug in machine
Try another socket.
Replace fuse. Switch o other machines.
Try without the extension cord.
Fluctuating pressure Pump sucking air
Valves dirty, worn out or stuck
Pump seals worn out
Check that hoses and connections are
airtight.
Clean and replace or refer to Sealey stockist.
Machine stops Incorrect mains voltage
Thermal sensor activated
Nozzle partially blocked
Check that the mains voltage corresponds to
specication on the model tag.
Leave the washer for 5 minutes to cool down.
Clean the nozzle
Machine pulsating Air in inlet hose
Inadequate supply of mains water
Nozzle partially blocked
Water lter blocked
Hose kinked
Allow machine to run with open trigger until
regular working pressure resumes.
Check that the water supply corresponds to
specications required
NB! Avoid using long, thin hoses (min. 1/2”).
Clean the nozzle /Clean the lter
Straighten out hose.
Machine starts, but no water comes out Pump/hoses or accessory frozen
No water supply
Water lter blocked /Nozzle blocked
Wait for pump/hoses or accessory to thaw.
Connect inlet water.
Clean the lter /Clean the nozzle
g.9
Sealey Group, Kempson Way, Suffolk Business Park, Bury St Edmunds, Suffolk. IP32 7AR
01284 757500 01284 703534 sales@sealey.co.uk www.sealey.co.uk
ENVIRONMENT PROTECTION
Recycle unwanted materials instead of disposing of them as waste. All tools, accessories and packaging should be sorted, taken to
a recycling centre and disposed of in a manner which is compatible with the environment. When the product becomes completely
unserviceable and requires disposal, drain any fluids (if applicable) into approved containers and dispose of the product and fluids
according to local regulations.
WEEE REGULATIONS
Dispose of this product at the end of its working life in compliance with the EU Directive on Waste Electrical and Electronic Equipment
(WEEE). When the product is no longer required, it must be disposed of in an environmentally protective way. Contact your local solid
waste authority for recycling information.
Note: It is our policy to continually improve products and as such we reserve the right to alter data, specifications and component parts without prior
notice.
Important: No Liability is accepted for incorrect use of this product.
Warranty: Guarantee is 12 months from purchase date, proof of which is required for any claim.
Original Language Version
© Jack Sealey Limited
g.10
PW2000PA Issue 2 (2) 10/02/21
Table of contents
Other Sealey Pressure Washer manuals

Sealey
Sealey CP20VPW User manual

Sealey
Sealey PWM1300.V2 User manual

Sealey
Sealey PW2000HW User manual

Sealey
Sealey PW1860 User manual

Sealey
Sealey PWDM3600 User manual

Sealey
Sealey PWM2500SP.V2 User manual

Sealey
Sealey PWM2500 User manual

Sealey
Sealey PC2351 User manual

Sealey
Sealey PC2901 User manual

Sealey
Sealey PW1850 User manual

Sealey
Sealey PC2100 User manual

Sealey
Sealey PC2150 User manual

Sealey
Sealey PC3401.V2 User manual

Sealey
Sealey PW1850 User manual

Sealey
Sealey PW2512 User manual

Sealey
Sealey PC1950 User manual

Sealey
Sealey PW1500 User manual

Sealey
Sealey PCM2500SP.V2 User manual

Sealey
Sealey PC2950 User manual

Sealey
Sealey PC3451 User manual