Seca 954 User manual


46 •
English
CONTENTS
1. Full certification . . . . . . . . . . . . . 48
2. Description of device. . . . . . . . . 49
2.1 Congratulations! . . . . . . . . . . . 49
2.2 Intended use. . . . . . . . . . . . . . 49
3. Safety information . . . . . . . . . . . 50
3.1 Basic safety precautions . . . . . 50
Handling the instrument. . . . . . 50
Use of measured results . . . . . 51
3.2 Safety information in this
manual . . . . . . . . . . . . . . . . . . 51
3.3 Handling (rechargeable)
batteries . . . . . . . . . . . . . . . . . 52
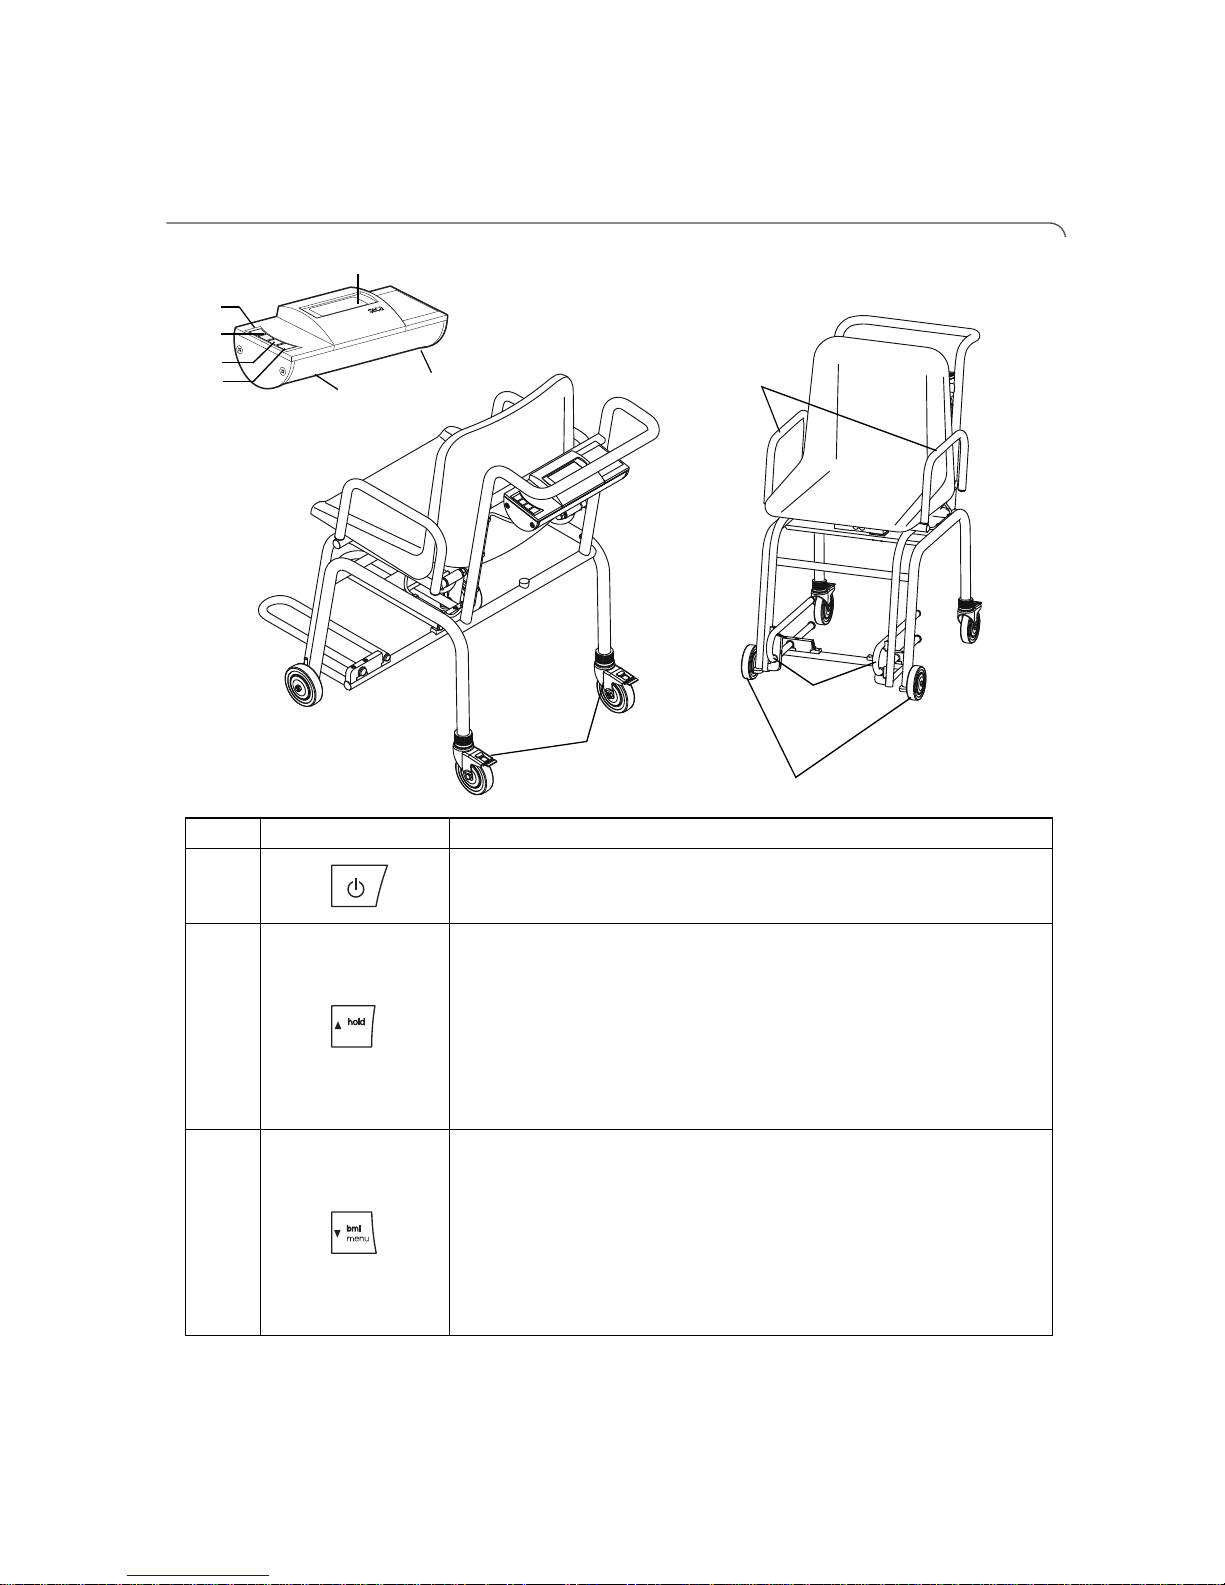
4. Overview . . . . . . . . . . . . . . . . . . . 53
4.1 Controls/Features . . . . . . . . . . 53
4.2 Symbols in display . . . . . . . . . 54
4.3 Information on rating plate. . . . 55
4.4 Menu structure . . . . . . . . . . . . 56
5. Before you get started … . . . . . 57
5.1 Scope of delivery . . . . . . . . . . 57
5.2 Assembling the instrument . . . 58
Assembling the push handle . . 58
Assembling the display housing 58
Fastening the weighing cell
cable . . . . . . . . . . . . . . . . . . . . 59
Assembling the seat . . . . . . . . 60
Assembling the armrests . . . . . 60
5.3 Establishing the power supply. 61
Insert the rechargeable battery
block. . . . . . . . . . . . . . . . . . . . 61
Connect the power supply unit 62
6. Operation . . . . . . . . . . . . . . . . . . 63
6.1 Weighing. . . . . . . . . . . . . . . . . 63
Switching on the scale. . . . . . . 63
Start weighing . . . . . . . . . . . . . 64
Tare off additional weight
(TARE). . . . . . . . . . . . . . . . . . . 65
Continuous display of
measured result (HOLD) . . . . . 65
Determine and evaluate body
mass index (BMI). . . . . . . . . . . 66
Transmit measured results to
aradioreceiver............ 67
Calculate and print out BMI
automatically. . . . . . . . . . . . . . 67
Switch off scales . . . . . . . . . . . 68
6.2 Additional functions (menu) . . . 68
Navigate in the menu . . . . . . . 69
Clear stored values
automatically (AClr) . . . . . . . . . 69
Permanently store additional
weight (Pt). . . . . . . . . . . . . . . . 70
Activate Autohold function
(Ahold) . . . . . . . . . . . . . . . . . . 70
Activate acoustic signals
(BEEP) . . . . . . . . . . . . . . . . . . 71
Select attenuation (Fil) . . . . . . . 71
Switch weight unit (Unit) . . . . . 72
Restore factory settings
(RESET) . . . . . . . . . . . . . . . . . 72
7. seca 360° wireless Network . . . 73
7.1 Introduction . . . . . . . . . . . . . . 73
seca wireless groups. . . . . . . . 73
Channels. . . . . . . . . . . . . . . . . 74
Detection of equipment devices74
7.2 Operate scales in a wireless
group (menu). . . . . . . . . . . . . . 75
Activate wireless module (SYS) 75
Set up wireless group (Lrn) . . . 75
Activate automatic transmission
(ASend). . . . . . . . . . . . . . . . . . 77
Select print option (APrt) . . . . . 78
Set time (Time) . . . . . . . . . . . . 78
8. Cleaning . . . . . . . . . . . . . . . . . . . 79
9. What to do if …? . . . . . . . . . . . . 79
10. Maintenance . . . . . . . . . . . . . . . 81
11. Technical data . . . . . . . . . . . . . . 81
12. Accessories . . . . . . . . . . . . . . . . 83

• 47
English
13. Spare parts . . . . . . . . . . . . . . . . . 83
14. Disposal . . . . . . . . . . . . . . . . . . . 83
14.1 Disposal of device . . . . . . . . . 83
14.2 Batteries (including
rechargeables). . . . . . . . . . . . . 83
15. Warranty . . . . . . . . . . . . . . . . . . . 84

48 •
1. FULL CERTIFICATION
With products from seca you are not only purchasing
technology developed over a century, but also quality
that has been validated by official bodies, the legal sys-
tem and relevant institutes. seca products comply with
European directives, standards and national laws. With
seca you are buying into the future.
Products bearing this symbol fulfill the applicable regu-
latory requirements of the European Community, espe-
cially the following:
•directive93/42/EECgoverning medical devices
seca's professionalism is also recognized by official
testing agencies. TÜV Süd Product Service, the agency
responsible for medical products, confirms with this
certificate that seca adheres consistently to the strict
legal requirements as a medical product manufacturer.
seca’s quality assurance system includes the areas of
design, development, production, sales, and service of
medical scales and height measurement systems as
well as software and measurement systems for the
assessment of the state of health and nutrition.
seca contributes to environmental protection. We are
anxious to preserve our natural resources. This is why
we strive to save packagingmaterial where practical.
And what is left over can be conveniently disposed of
locally via Germany's Dual System recycling pro-
gramme.
0123

Description of device • 49
English
2. DESCRIPTION OF DEVICE
2.1 Congratulations!
With the seca 954 electronic scale, you have just
purchased a highly precise and simultaneously robust
weighing instrument.
seca has put its experience at the service of health care
for over 170 years and as a market leader in many
countries, is constantly setting new standards with its
innovative developments for weighing and measure-
ment.
2.2 Intended use
The seca 954 electronic scale is mainly used at hospi-
tals, medical practices and inpatient care facilities in
accordance with national regulations.
The scale is for conventional determination of weight
and establishment of general state of nutrition; it assists
the physician supervising treatment in making a diag-
nosis or deciding on a course of treatment.
To make an accurate diagnosis, however, other speci-
fic examinations have to be ordered by the physician
and their results taken into account in addition to deter-
mining a weight value.
Some versions of these scales allow you to switch the
weight display between kilos (kg), pounds (lbs) and
stones (sts). The result of weighing is available within a
few seconds.
Besides conventional weight measurement the
seca 954 also features a function to calculate the body
mass index. The keypad is used to enter the height,
and this is followed by automatic calculation of the
body mass index from the weighing value. Height
measuring instruments from the seca 360° wireless
system can transmit the body size wirelessly to the
seca 954.
Via the wireless network, seca 360° wireless measur-
ing instruments can be connected wirelessly to a seca
wireless printer or to a PC equipped with
seca analytics PC software and the secaUSB wireless
adapter.

50 •
The seca 954 is provided with rollers to allow it to be
moved about and thanks to its low power consump-
tion, it will offer hours of battery operation for mobile
applications.
The seca 954 is not intended for the transport of
people or objects. Use the scale only for the purpose
named in this section.
3. SAFETY INFORMATION
3.1 Basic safety precautions
Handling the instrument •Pleasetakenoteoftheinformation in this user
manual.
• Keep the user manual with the declaration of
conformity in a safe place.
•Makesurethatthescalesarepositionedsecurelyon
a flat and stable surface.
• Make sure before each use that the wheel brakes
are working.
•Securethescaleagainstunintentional rolling away.
Set the wheel brakes.
•Donottransportanypeopleorobjectswiththe
scale.
• Move the scale only with released wheel brakes.
•Makesureyoudonotdropthescales.Protectthe
scales from violent impacts.
•Ifyouoperatethescalewithabatterypowerpack,
make sure that when you route the power cable, no
one can trip over it.
•Ifyouoperatethescalewithabatterypowerpack,
make sure that when you route the power cable, it
cannot be crushed or come into contact with hot
objects.
• Have the scales serviced regularly (see
"Maintenance" on page 81).
• Make sure that maintenance and repair are only
carried out by an authorised service partner. You
can find your local service partner at www.seca.com

Safety information • 51
English
• Make sure you only use genuine seca accessories
and spare parts. Otherwise the warranty provided
by seca will become null and void.
• Make sure RF equipment such as mobile phones is
kept at a minimum distance of approx. 1 metre to
prevent incorrect measurements or interference with
radio transmission.
Use of measured
results
• Before you save and re-use values measured with
the seca 954 (e.g. in the seca analytics 105 PC
software or in a hospital information system), make
sure that the measured values are plausible and that
they correspond to the display on the measuring
instrument.
3.2 Safety information in this manual
DANGER!
Used to identify an extremely hazardous situa-
tion. If you fail to take note of this information,
serious irreversible or fatal injuries will result.
WARNING!
Used to identify an extremely hazardous situa-
tion. If you fail to take note of this information,
serious irreversible or fatal injuries may result.
CAUTION!
Used to identify a hazardous situation. If you fail
to take note of this information, minor to moder-
ate injuries may result.
ATTENTION!
Used to identify possible incorrect usage of
device. If you fail to take note of this information,
you may damage the device or the measured
results may be incorrect.
NOTE:
Includes additional information about use of the
device.

52 •
3.3 Handling (rechargeable) batteries
This instrument is delivered with a rechargeable battery
block. Heed the following safety instructions.
WARNING!
Personal injury with improper handling
Batteries contain harmful substances which
may explode if not handled properly.
–Donottrytorechargesuchbatteries.
– Do not expose (rechargeable) batteries to
heat.
–Donotburn(rechargeable)batteries.
–Ifacidisleakingout,avoidcontactwiththe
skin, eyes and mucous membranes. Rinse
affected areas with plenty of clean water and
seek medical help at once.
ATTENTION!
Damage to device and malfunctions with
improper handling
–Onlyusethetypeof(rechargeable)battery
specified see "Insert the rechargeable battery
block" on page 61.
–Whenreplacing(rechargeable)batteries,
always replace a complete set at a time.
–Donotshort-circuit(rechargeable)batteries.
–Ifyoudonotusethedeviceforalongperiod
of time, remove the batteries (incl.
rechargeables). This will prevent acid from
leaking into the device.

Overview • 53
English
4. OVERVIEW
4.1 Controls/Features
5
6
1
2
4
3
7
8
9
10
11
No. Control/Feature Function
1To switch scales off and on
2
Arrow key
•Whileweighing:
-Shortpress:Activateholdfunction
-Longpress:Activatetarefunction
•Onthemenu:
-Selectsubmenu,selectmenuelement
-Increasevalue
3
Arrow key
• During weighing:
-Pressbriefly:ActivateBMIfunction
-Holddown:Callupmenu
•Inmenu:
-Selectsubmenu,selectmenuitem
- Reduce value
tare

54 •
4.2 Symbols in display
4
Enter key
While weighing (if wireless network is set up):
- Short press: Send measurement result to receive-
ready instruments (PC with USB wireless adapter)
-Longpress:Printoutmeasurement result (wireless
printer)
•Onthemenu:
- Confirm selected menu element
-Savesetvalue
5Display Display element for measured results and for device
configuration
6Battery
compartment Accommodation for the rechargeable battery block
7Power pack
connection Serves to connect the included power pack
8Transport rollers
• Steerable
• Height adjustable
•Withwheelbrakes
The scale can be moved on these rollers.
The scale can be aligned precisely with these rollers
9Armrests Swivel, so that it is easier for the patient to sit down
10 Footrests
•Swivel
•Canbepulledout
For correct measurement, the patient’s feet must be on
the footrests
11 Transport rollers The scales can be moved about with these rollers
No. Control/Feature Function
A
B
C
Symbol Meaning
ARechargeable battery block is weak
BOperation with power supply unit
CNon-calibratable function active

Overview • 55
English
4.3 Information on rating plate
Text/Symbol Meaning
Model Model number
Type Type designation
Ser. No. Serial number
Refer to user manual
Type B electromedical device
Class II totally insulated appliance
FCC ID
For USA:
Device licensing number issued by US authority FCC
(Federal Communications Commission)
IC
For Canada:
Device licensing number issued by authority Industry
Canada
Device complies with EC standards and directives
Symbol for FCC (USA)
Only operate device with DC. Note the polarity of the
device plug.
Do not discard with household waste
-+

56 •
4.4 Menu structure
Other functions are available in the menu of the device.
This enables you to configure the device perfectly to
suit the conditions in which you use it (details from
page 68).
Reg. Devices (Mo)
•Channel 1 (C1)
•Channel 2 (C2)
•Channel 3 (C3)
StoprF* Group (ID)Learn
Autosend
•on
•off
Autoprint
•HI
•MA
•HI_MA
•off
Time
•Year
•Month
•Day
•Hour
•Minute
Reset
Autohold
•on
•off
Fil
•0
•1
•2
Beep •on
•off
•on
•off
Press
Hold
Unit
•kg
•lbs
•sts
Erkannte Geräte (Mo):
-1: Personenwaage
-2: Längenmessstab
-3: Funkdrucker
-4: PC mit USB-Funkmodul
-7: Babywaage
Raum (ID):
Max. drei seca Funkräume: 0, 1, 2
Maximal-Konfiguration pro Funkraum:
-1 Babywaage
-1 Personenwaage
-1 Längenmessstab
-1 Funkdrucker
-1 PC mit USB-Funkmodul
Kanal (C1, C2, C3):
-Drei Kanäle pro Funkraum ( insg. 9 Kanäle)
-Kanalzahlen: 0-99
-Jede Kanalzahl für nur jeweils einen Kanal
-Empfohlener Abstand: 30
Beispiel-Konfiguration:
-Raum 0: C1__0, C2_30, C3_60
-Raum 1: C1_10, C2_40, C3_70
-Raum 2: C1_20, C2_50, C3_80
(Hinweis: Im Display keine Leerzeichen)
System •on
•off
PT Weight
PT Net Weight
*Funknetzwerk seca 360° Wireless:
•on
•off
Autoclear
tare
Navigation:
Call up menu:
*Wireless network seca 360°
wireless:
Group (ID):
Max. 3 seca wireless groups: 0, 1, 2
Maximum configuration per
wireless group:
-1setofbabyscales
-1setofpersonalscales
- 1 length measuring device
- 1 wireless printer
- 1 PC with USB wireless module
Channel (C1, C2, C3):
-Threechannelsperwireless
group (in total 9 channels)
-Channelnumbers:0-99
- Only use each channel number
once
-Recommendedspacing:30
Example of configuration:
-Group0:C10,C230,C360
-Group1:C110,C240,C370
-Group2:C120,C250,C380
(Note: no spaces in display)
Devices detected (Mo):
-1:Personalscale
-2:Lengthmeasuringdevice
- 3: Wireless printer
- 4: PC with USB wireless module
-7:Babyscales

Before you get started … • 57
English
5. BEFORE YOU GET STARTED …
5.1 Scope of delivery
a
b
c
de
f
g
h
i
mk
l
j
n
No. Components Pcs.
a
Base frame, complete
-Seatframe
-Displayhousingwiredtoweighingcell
- Weighing cell cable with cable clips
-Footrests
1
bArmrest, left 1
cArmrest, right 1
dSeat 1
ePush handle 1
fHexagon screw M6 x 16 2
gWasher 6.4 mm 2
hHexagon nut M4 self-locking 2
iSheet metal screw, hexagon socket, 6.3 x 38 4
jBox nut, M10 2
kWasher 10.5 mm 2
lPower pack carrier pouch seca 471 1
mPower pack 1
nRechargeable battery block 1
Allen wrench, SW5 mm, not shown 1
Instructions for use, not shown 1

58 •
5.2 Assembling the instrument
Assembling the push
handle
1. Put the push handle on the pins of the lower frame.
2. Screw the handle to the lower frame (2 x hexagon
screw M6x16 with washer 6.4 mm).
Assembling the display
housing 1. Insert the fastening bolts of the display housing
through the holes in the handle.
2. Screw the display housing to the handle (2 x hexa-
gon nut M4, self-locking).
1.
2.
2.

Before you get started … • 59
English
Fastening the weighing
cell cable
ATTENTION!
Malfunction due to assembly error
If the cables are assembled so that they are
under voltage, e.g. if they are bent sharply or
plugs are snapped off, this can cause faulty dis-
plays and failure of the display.
–Layallcablessothatthey are not too sharply
bent and so that plugs are not snapped off.
–Ensurethatthereisstrainreliefbylayingall
cables in the appropriate harnesses.
Press the cable clips (fastened at the factory to the
weighing cell cable) into the holes on the lower
frame and on the handle until they snap in audibly.

60 •
Assembling the seat
1. Position the seat on the seat frame.
2. Screw the seat to the seat frame (4x sheet metal
screw, hexagon socket, 6.3 x 38).
Assembling the
armrests
1.
2.
1.
1.
2.

Before you get started … • 61
English
ATTENTION!
Malfunction due to assembly error
If the armrest is positioned incorrectly before
assembly, it cannot be folded down after
assembly.
–Positionthearmrestasdepictedinthefigure.
1. Insert the bolt for the armrest through the hinge
sleeve of the seat frame.
2. Screw the armrest to the seat frame (1x box nut
M10 with washer 10.5 mm).
3. Repeat steps 1. and 2. for the second armrest.
5.3 Establishing the power supply
Power is supplied to the scale with a rechargeable bat-
tery block or a power pack (both included in the scope
of delivery).
Insert the rechargeable
battery block
1. Press on latch of battery compartment.
2. Move down lid of battery compartment.
3. Remove the connector cable from the battery
compartment.
4. Connect the connector cable to the rechargeable
battery block.
5. Insert the rechargeable battery block into the
battery compartment.
6. Close the battery compartment.

62 •
Connect the power
supply unit
The rechargeable battery compartment is charged with
the included power pack.
WARNING!
Personal injury and damage to device if
incorrect power supply unit is used
The voltage provided by standard power supply
units may be higher than their indicated rating.
This may cause the scales to overheat, catch
fire, melt or short-circuit.
–Onlyusegenuinesecaplug-inpowersupply
units with 9 V or a controlled 12 V output
voltage.
1. Insert the power plug necessary for your power
supply in the power supply unit.
2. Insert the connector plug of the power supply unit
in the connecting socket of the scales.
3. Plug the power supply unit into a mains socket.
4. Allow the scale to charge on the network for at least
24 hours when it is first charged so that the re-
chargeable battery block is completely charged.

Operation • 63
English
6. OPERATION
6.1 Weighing
CAUTION!
Patients can be injured if they fall
People with limited mobility can fall if they try to
sit down on the scale.
– Make sure that the scale’s wheel brakes are
set.
–Assistpeoplewithlimited mobility when they
are sitting down.
–Leavethefootrestsfolded up and pushed in
until the patient is sitting on the scale.
CAUTION!
Patients can be injured if their limbs get pinched
The patient’s hands and arms can be pinched
between the seat and the lower frame or
between the seat and the armrests.
– Make sure that the patient’s hands and arms
are on the armrests or in his lap during the
weighing process.
ATTENTION!
Incorrect measurement due to force shunts
If accessories (e.g. the power pack pouch) or
articles of clothing get caught between the seat
and the frame, the weight will not be measured
correctly.
If the patient’s feet are not on the footrests, the
weight will not be measured correctly.
– Make sure that there are no accessories or
articles of clothing between the seat and
frame.
–Makesurethatthearmrestsarefoldeddown
during the weighing process.
–Makesurethatthepatient’s feet are on the
footrests during the weighing process.
Switching on the scale Press the Start key.
The display will read se[A and then quickly run
through all elements of the display.
The scales are ready for operation when the display
reads 0.00.
If the device is being operated with a power supply
unit, the symbol will appear in the display.

64 •
Start weighing 1. Set the wheel brakes of the rear transport rollers.
2. Fold the armrest toward the back in order to make
it easier for the patient to sit down.
3. Make sure that the scale has no load.
4. Switch the scale on.
5. Ask the patient to sit down on the scale.
6. Fold the footrests down.
7. Pull the footrests down until they stop.
8. Ask the patient to put his feet on the footrests.
9. Fold the armrests down.
10. Read the measurement result.
1.
2.
Other manuals for 954
3
Table of contents
Other Seca Scale manuals