manuals.online logo
Brands
  1. Home
  2. •
  3. Brands
  4. •
  5. Sharp
  6. •
  7. Electronic Dictionary
  8. •
  9. Sharp PW-TC980 User manual

Sharp PW-TC980 User manual

Using the PW-TC980 for the first time
First, insert the rechargeable batteries, and ensure that they are charged before use.
①②
1
Remove the battery cover on the
reverse side of the unit.
To remove the battery cover, slide it in the
direction indicated by the arrow ①while
pressing the symbol on the battery
cover, and then pull it up in the direction
indicated by the arrow ②.
2
Insert the supplied rechargeable
battery (EA-BL14).
Insert the rechargeable battery into the battery
housing at an angle, and then slightly press
the terminal end of the battery and completely
press down the opposite side.
• Do not touch the terminals of the rechargeable battery or the unit.
• Do not insert the rechargeable battery reversely. Confirm orientation. Do
not force the battery. This can cause problems such as breakage.
3
Replace the battery cover.
4
Connect the (EA-80A) AC adapter in the order of ①and then ②.
When the charge lamp will light red, the charging has started.
Ĭ
ĭ
AC adapter connector
Charge lamp Power outlet
(AC)
5
When charging is complete, the charge lamp will turn off.
• A complete charge will normally take approximately 5.5 hours (the
charging time can change depending on operating temperature and
conditions).
6
Remove the AC adapter from the connector and the outlet.
7
Open the unit and press
入/切 to turn on the
power.
After a while, the calibration screen
for the touch pad appears on the
display (main display).
8
Pull out the stylus and use it to accurately touch each center
of the four “+” characters displayed on the touch pad on
the display (main display). Then do the same to the four “+”
characters displayed on the handwriting pad.

Stylus
Pull out the
stylus to use.
Back of
the unit
•
When calibration is finished the LCD contrast adjustment screen is displayed.
9
Adjust the LCD contrast of the handwriting pad by touching
or on the pad.
10
After these adjustments, press 検索/決定 .
The key sound (beep) on/off screen appears.
11

Press
Y
or
N
to turn the key sound on/off.
The kana entry screen appears.
12
Press Yto select alphabet character input or press Nto
select Japanese input.
The date/time settings screen is displayed.
13
Select the date items using or , and then enter “年”
(year), “月” (month) and “日” (day) (e.g. June 8th, 2009 →09
06 08) using the number buttons on the handwriting pad.
Confirm that the cursor is on “AM
(午前)
” or “PM
(午後)
”,
and then select one of them using or .
Press , select the time items using or and then
enter “時” (hour) and “分” (minute) (e.g. 3:25 →03 25).
14
Confirm that the information entered is correct and press
検索/決定 .
The menu display appears.
Viewing 1Seg TV contents
First, set channels for which there is reception (channel selection list
settings).
Example: Setting up channels in “関西エリア/大阪府/大阪”
(Kansai area/Osaka pref./Osaka).
1
Extend the antenna.
●
Fully extend the
antenna. If the antenna
is not fully extended,
it may not stand up
straight because it is
not locked in position.
2
Press .
Channel setting confirmation
window is displayed.
3
Press Y.
4
Press the numeric key
to select the area.
5
Then, press to select
the prefecture.
6
Finally, select the region by
pressing .
Channel select list set-up
confirmation window is displayed.
7
Press Y. Channel selection
starts.
8
When done, channel
selection list is displayed,
and the region name “大阪”
is registered.
9
Select a channel by using the numeric keys ( to ), or
by touching the channel name.
The selected TV program is displayed.
●
Channels can also be selected by using or and pressing
検索/決定 .
Using 1Seg TV
1
Fully extend the antenna.
2
Press .
The TV content is displayed.
●Use the numeric keys ( to ), or and to select a
channel.
●To adjust the volume, use 音量小 and/or 音量大 .
Perform channel selection list settings on the dictionary screen.
1
Fully extend the antenna.
2
Press .
The TV content is displayed.
3
Press メニュー .
The TV settings menu is displayed.
4
Select “channel selection
list settings” and press
検索/決定 (or touch the
menu item to select it).
The channel selection settings list appears.
5
Select the settings and edit menu items from the on the right
side of the screen to adjust the settings (For details, refer to
the Instruction Manual).
Using the channel selection list
1
While in the TV viewing
mode, press .
The channel selection list appears.
2
Use and to select
an area.
3
Select a channel by using the numeric keys ( to ), or
by touching the channel name.
The selected TV program is displayed.
Adjusting the display size
1
While in the TV viewing
mode, press メニュー .
2
Select “画面設定” and
press 検索/決定 (or
touch the menu item to
select it).
Touching the screen in the TV viewing mode will also switch the display size.
3
Use and to select the display size and press
検索/決定 (or touch the menu item to select it).
The window configuration screen appears.
QUICK REFERENCE
PW-TC980
ELECTRONIC DICTIONARY
Layout
PRINTED IN CHINA 08LSP(TINSE1466EHZZ) 0GS9702620////
Display (Main display) / touch pad
Charge lamp
Selection keys for contents/functions
Global search keys
Antenna (side)
Power ON/OFF key
Function key
Earphone jack (side)
Page scroll keys
Speaker
Volume control keys (volume up/down)
Audio key
S-jump key
Character size change keys
Example/explanation key Handwriting pad
Card slot (Front)
Escape key
Search/enter key
Speaker
USB connector (side)
AC adapter connector (side)
Dictionary/TV switch keys
Stylus holder (side)
Menu key
Cursor keys
Back space key
Clear key
Library key
Utility keys for
dictionaries/functions
Using the mark on the screen
Appearance of the
 
例,
 
解説 ,
 
NOTE
,
 
図,
 
表, or 動画
mark on the details screen indicates more information related to the entry is
available, such as example sentences, explanations, notes, illustrations, diagrams,
tables, and videos.
By pressing 例/解説 in screens where this mark is displayed, the mark will
display inverted.
When there are multiple marks, move to the desired mark by using , ,
, or . By pressing 検索/決定 , the contents are displayed.Contents
can also be displayed by touching the mark itself.
To exit, press 戻る twice.
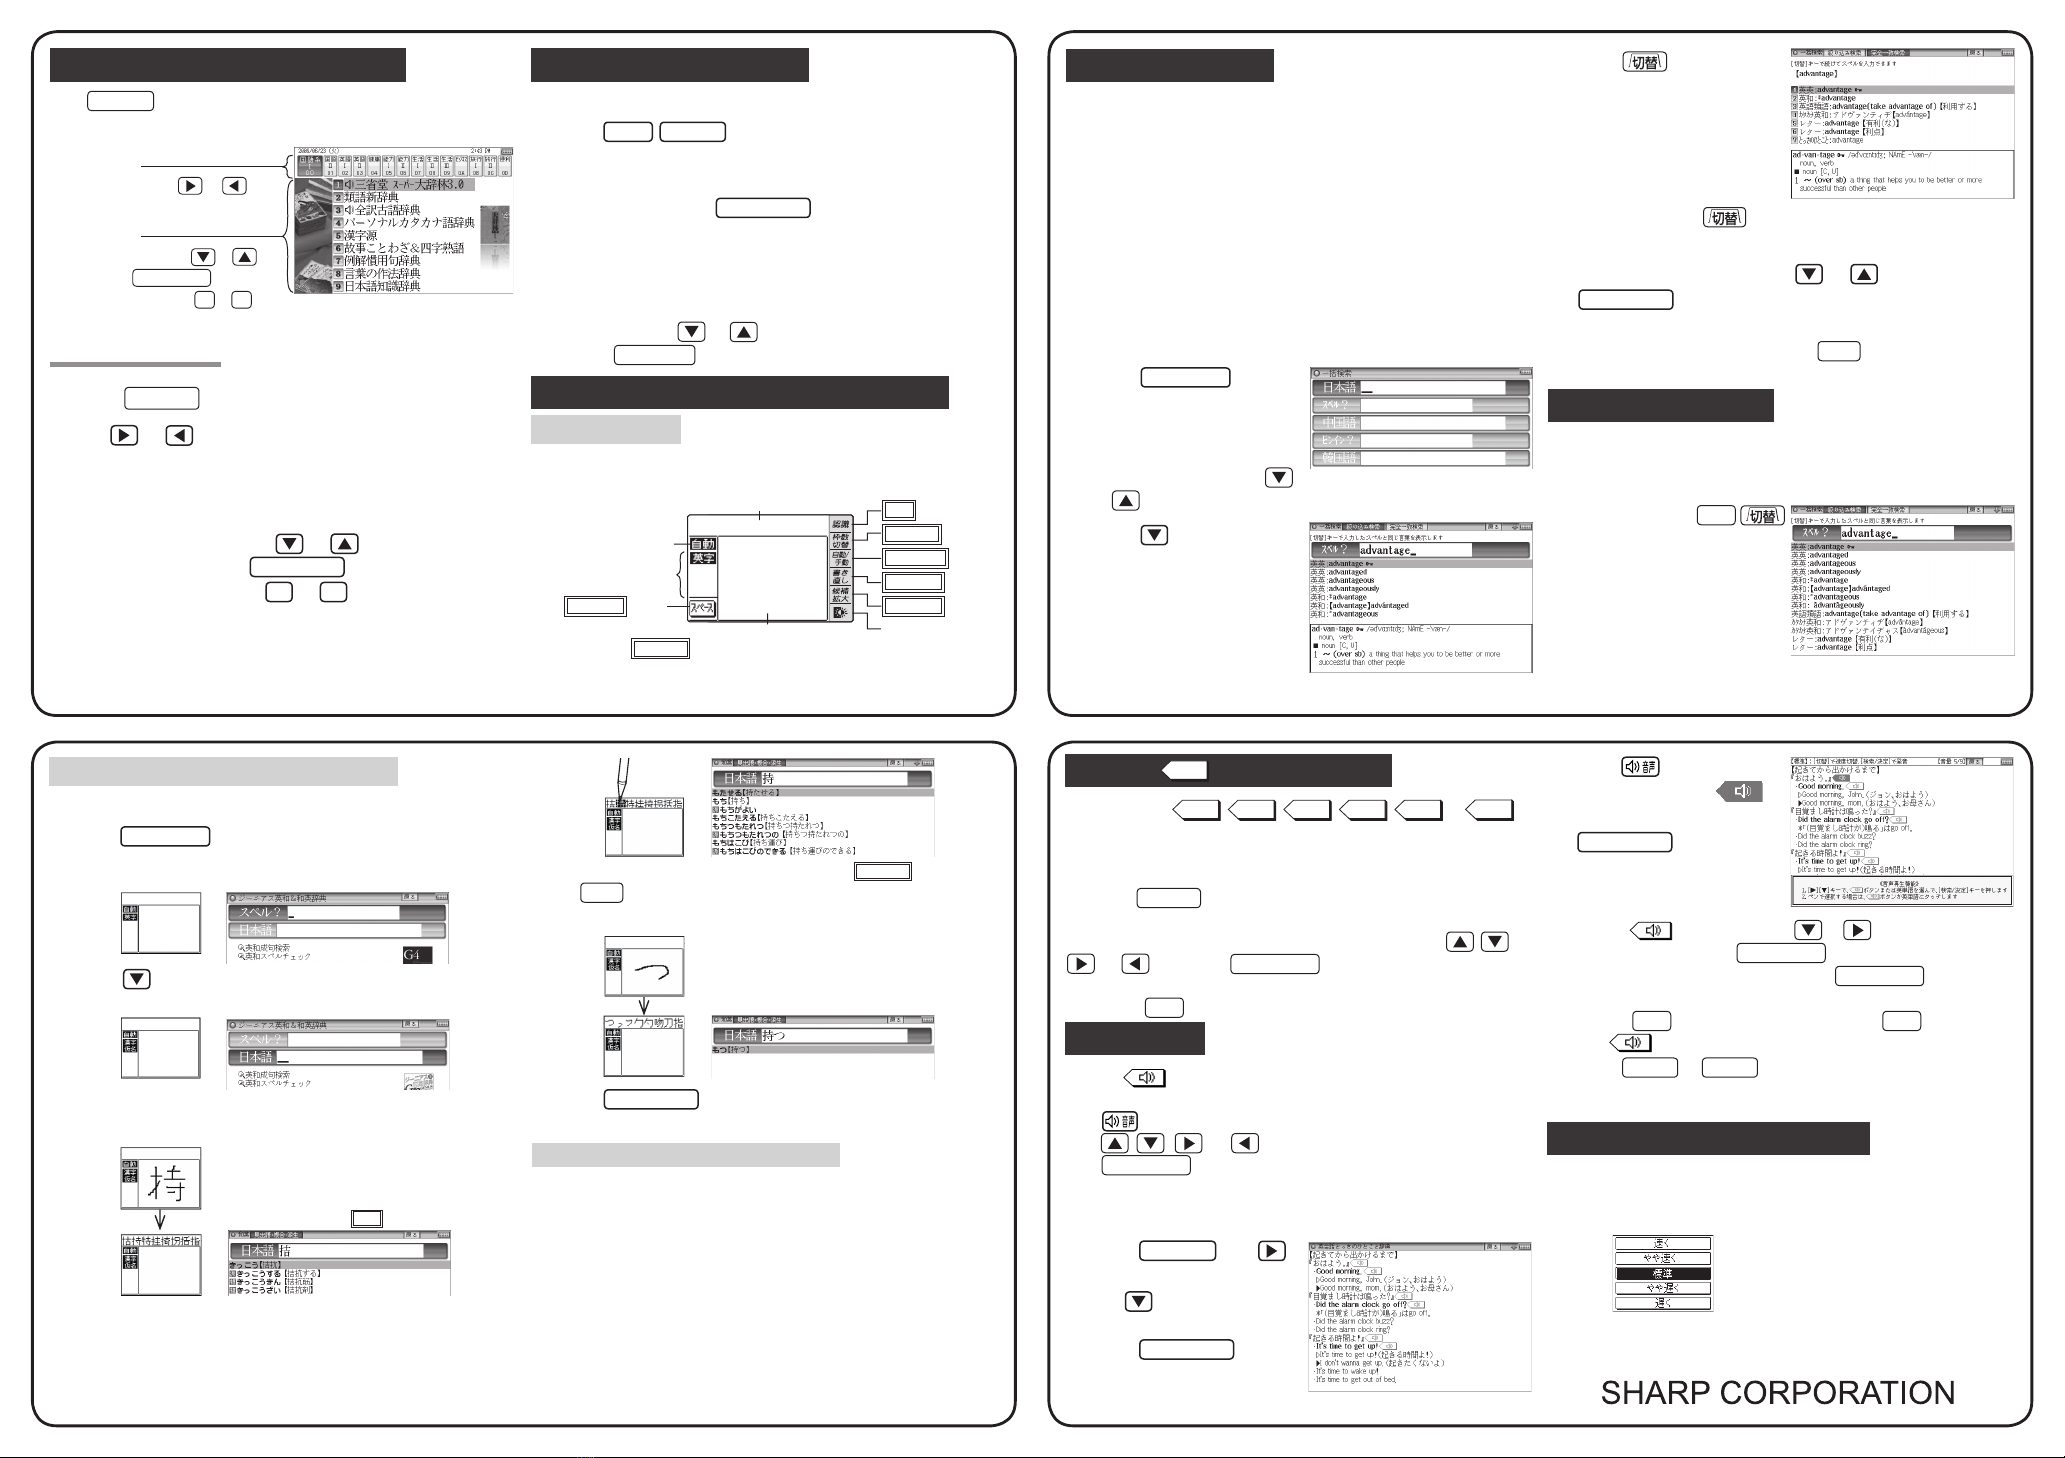
Listen to audio
When the mark appears, audio of the displayed information can be played
back.
Press to select the first mark, and the color of the mark is inverted.
Press , , , or to move the highlight to the desired mark and
press 検索/決定 (or touch the mark) to play back the contents.
Example: Play back the audio using “英会話とっさのひとこと
辞典”.
1
Press メニュー , use to
select “英語系Ⅰ”, and then
use to select “英会話
とっさのひとこと辞典”.
Press 検索/決定 until the
details screen is displayed.
2
Press and the mark
becomes inverted ( ).
Each time you press
検索/決定 , the audio
plays.
If several marks appear, press or to move the cursor to
the desired mark and press 検索/決定 .
By highlighting an English word and pressing 検索/決定 , you can look
up the word in English-Japanese dictionary and play back the audio.
◆
Press 戻る to stop the audio during play. Press 戻る and the color
of reverts to non-inverted.
◆Use 音量小 or 音量大 to first set the volume to low, then adjust it
to the desired level.
Adjusting the audio playback speed
After audio playback, the audio playback speed setting button shown below is
displayed on the handwriting pad. You can change the audio playback speed by
touching the desired button.

(The playback speed is set to “標準(normal)” in the default setting.)
Entering characters using the single-frame pad
Example: Enter a Japanese word “持つ” from a Japanese-English dictionary.
1

Press
英和/和英
.
The ジーニアス英和 & 和英辞典 entry/selection screen appears.
The handwriting pad is set to the English character entry mode.
2
Press to move the cursor to the Japanese entry area.
The handwriting pad is now switched to enter kanji and kana.

3
Use the stylus to draw “持” in the handwriting area.
The character shown in the candidate list display area
is also placed in the entry area so that the dictionary
search can proceed.
• When the manual recognition is used or when you
want to have the entry recognized soon after you
finished writing, press 認識 .

4
If the character in the entry area is not the one you desired,
use the stylus to touch and select the desired character in
the list.
The character in the entry area changes.

• If you cannot find the character in the list, touch 書き直し or press
後退 to erase it and redraw it on the pad.
5
Likewise, enter “つ” in the entry area.
• When you start drawing, the previous entry is confirmed
and then erased.
6

Press
検索/決定
.
The details screen appears.
Points on Writing Handwritten Characters
Paying attention to the following points will ensure that handwritten characters are
easily recognized.
●Write each individual stroke clearly. Ensure that characters have the correct
number of strokes.
●Write clearly and do not use short or conventional forms.
●Avoid writing sloping characters.
●Be careful to distinguish between character size where required. E.g. Upper
case “C” and lower case “c”, or regular “つ” and small “ っ”.
Note that all characters written in the dual-frame pad are recognizes as large
characters – small characters must be selected from the candidate list.
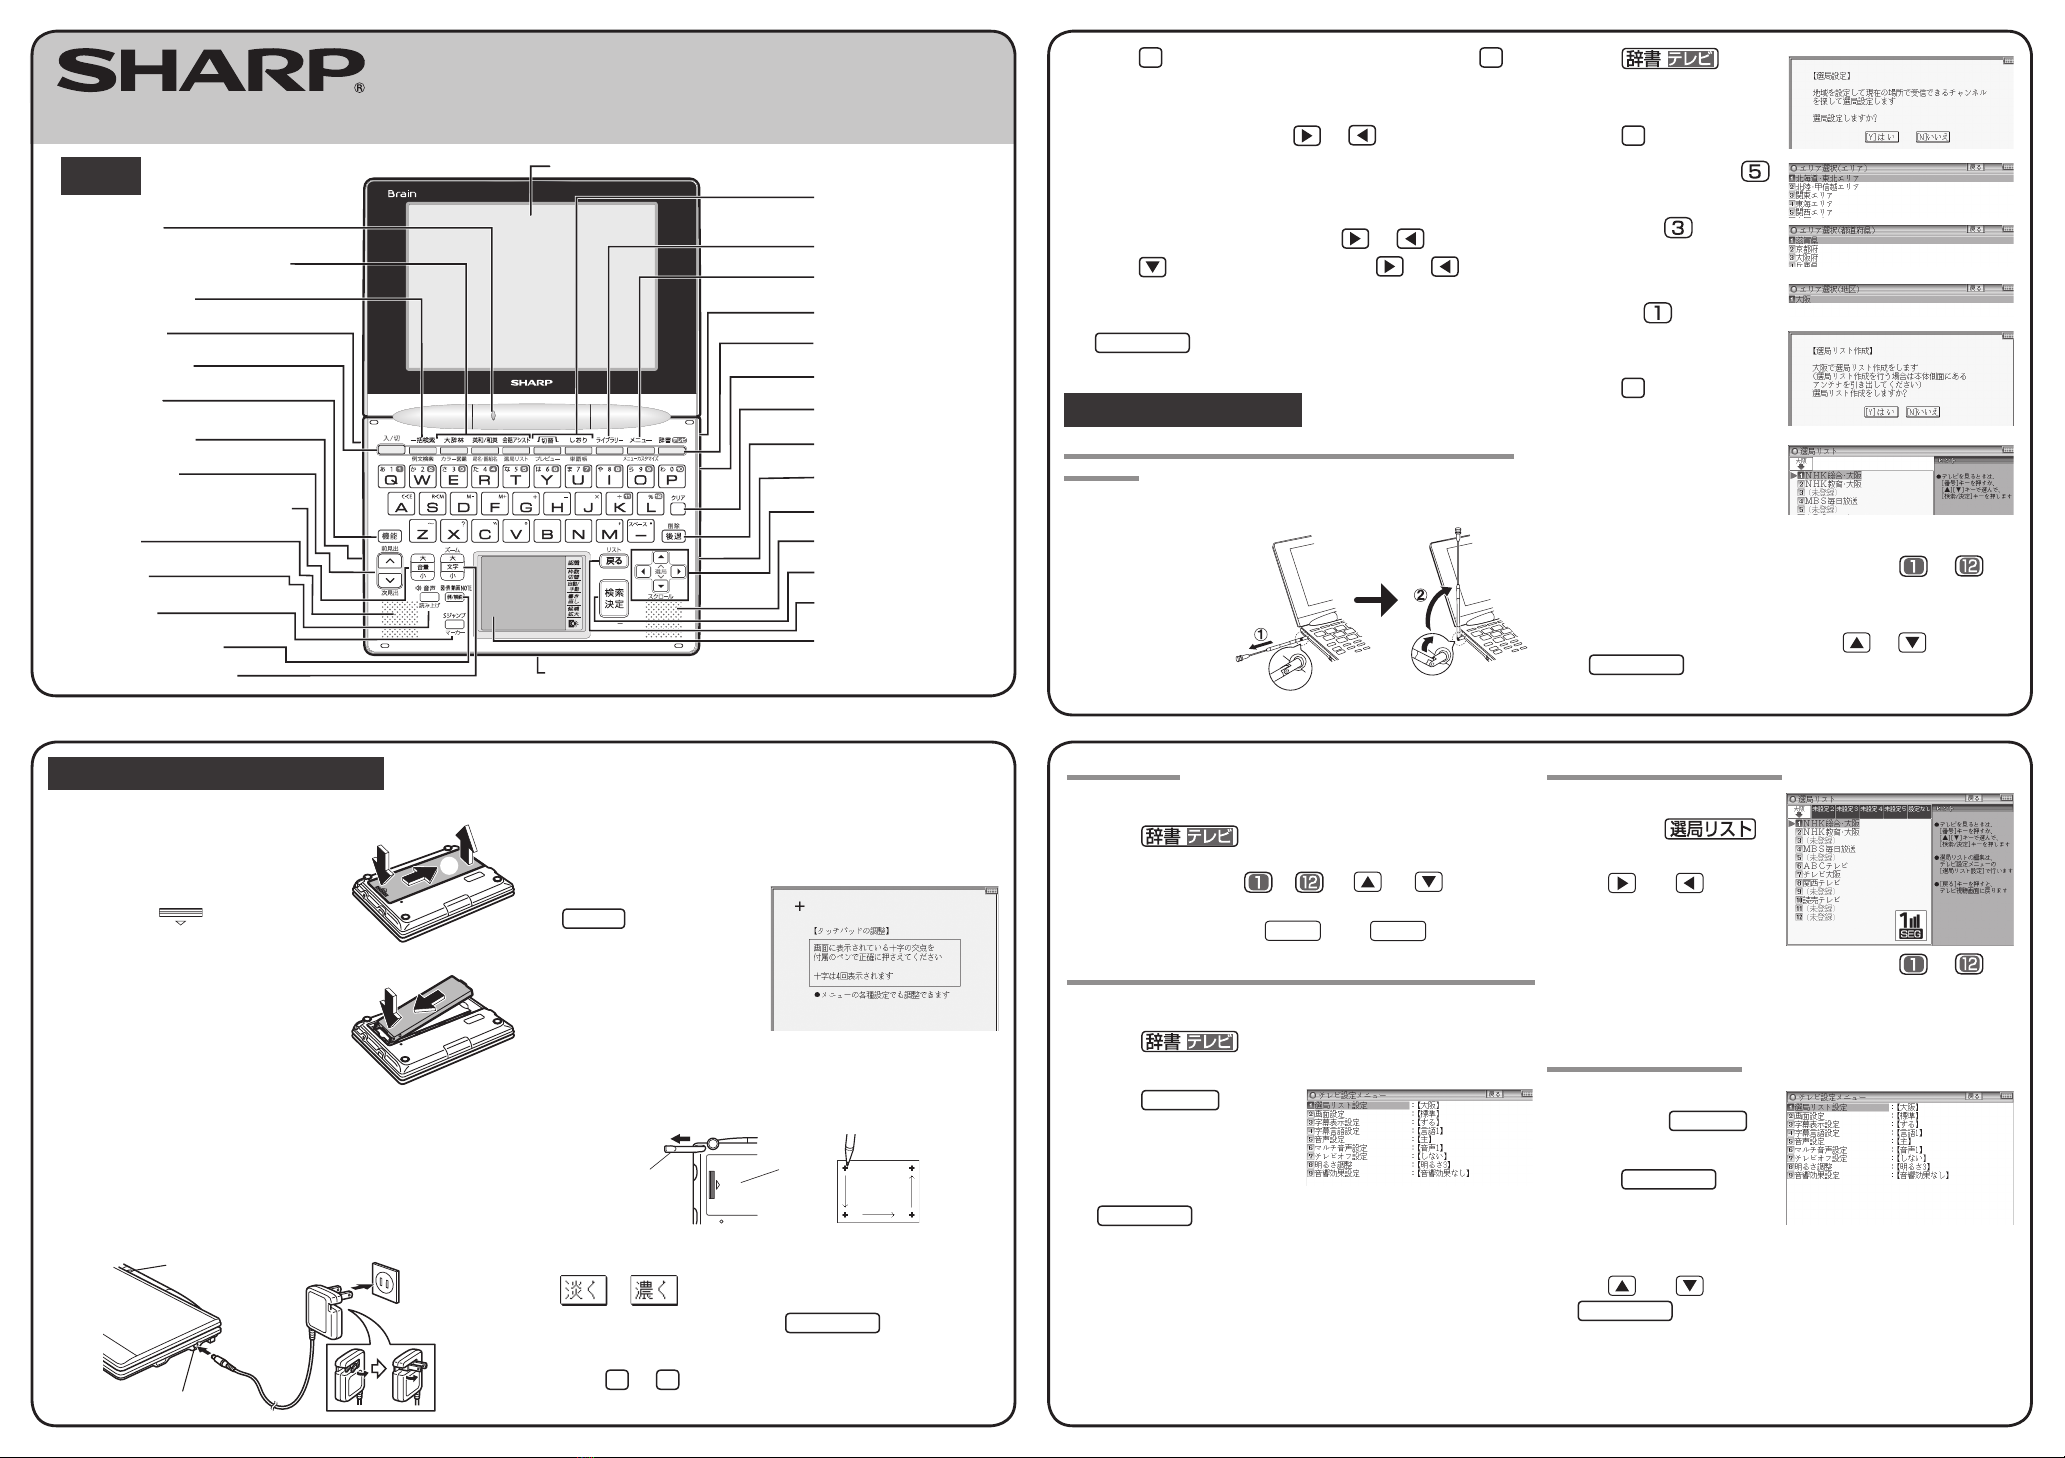
Global search function
You can search for a word in multiple contents/dictionaries.
Enter a word into any of the “日本語” (Japanese), “スペル” (English spelling),
“中国語” (Chinese),“ピンイン” (Pinyin), and “韓国語”(Korean) fields to search
within the target dictionary.
As you type, the candidates for matching narrow (filter search). If there are still
many candidates after entering the whole word, you can switch to “exact search”
to browse only the exact word you wish to have defined (Except for the search
using Pinyin).
• Japanese kanji, Chinese (Simplified characters), and Korean (Hangul) characters
have to be entered by hand.
Example: Global search for the word “advantage.”
1
Press 一括検索 .
The global search entry screen
appears.
Select the text field according the
entry character type by using
or .
2
Press andenter
“advantage” in the “スペル?”
field.
As you type, the candidates for
matching narrow.
3
Press to search by
“exact search”.
The list of words corresponding to
your entry appears.
To change the entry, press to return to the filter search screen and enter
again.
4
Select the desired word using or and press
検索/決定 .
The details screen of the word appears along with its definitions.
• To return to the previous screen, press 戻る .
Preview display function
If many candidates are listed for a word and it is difficult to decide which word is
the correct one, the preview display will help you by providing a brief note about
each word.
Each time you press 機能
“プレビュー ”(preview) while
candidates are listed, the preview
display will be shown on the bottom,
shown on the right, or turned off in
this order.
(The preview display is turned on in
this screen example.)
Selecting a content in the menu display
Press メニュー on the electronic dictionary screen.
The following menu display appears.
Menu display
(contents/functions selection display)
Select an item by pressing or .
Select an item by pressing or 
and then press
検索/決定
.
Or, select an item by typing
1
to
9
.
Category menu
Individual menu
Selecting a menu item
1
Press メニュー .
2
Use or to select a category menu item.
Or, use the numeric keys to enter the category number to
select the item.
The individual menu for the selected category menu item is displayed.
3
In the individual menu, use or to select the content/
function and then press 検索/決定 .
Or, use the numeric keys ( 1to 9) to enter the number
in front of the content/function ( 1 to 9 ).
The selected content/function screen is displayed
.
●The selected content/function screen can also be selected by touching the
relevant item on the category menu or the individual menu.
Viewing the color picture book
You can search for information about the photos, maps and videos.
1
Press 機能 大辞林 “カラー図鑑” (Color picture book).
The color picture book selection screen is displayed.
2
Select the search method such as “動画を見る” (Watch
video) and then press 検索/決定 .
The field selection screen is displayed.
3
Select the fields and items in the same way as step 2.
When the final item has been selected, the video playback will start.
• In the “画像から探す” (Search using images) function, after an image
is displayed, use or to search for the desired image and then
press 検索/決定 to display the description.
Entering characters using the handwriting pad
Parts and functions
The handwriting pad is set to enter characters when the cursor is in any part of
the character entry area.
[
Single-frame pad]
●Pressing the 枠数切替 button switches the single-frame pad to the dual-frame pad.
スペース button
認識 button
枠数切替 button
自動/手動 button
書き直し button
候補拡大 button
Backlight button
Handwriting area (frame)
Candidate list display area
Character entry type
indicator
Automatic/manual
recognition indicator
〈Continued below〉

Other Sharp Electronic Dictionary manuals

Sharp PW-V9550 User manual

Sharp

Sharp PW-V9550 User manual

Sharp PW-E500A User manual

Sharp

Sharp PW-E500A User manual

Sharp PW-AC900 User manual

Sharp

Sharp PW-AC900 User manual

Sharp PW-AC890 User manual

Sharp

Sharp PW-AC890 User manual

Sharp PW-AT780 User manual

Sharp

Sharp PW-AT780 User manual

Sharp PW-A8410 User manual

Sharp

Sharp PW-A8410 User manual

Sharp PW-AC920 User manual

Sharp

Sharp PW-AC920 User manual

Sharp PW-AT760 User manual

Sharp

Sharp PW-AT760 User manual

Sharp PW-E510 User manual

Sharp

Sharp PW-E510 User manual

Sharp PW-GT570 User manual

Sharp

Sharp PW-GT570 User manual

Sharp PW-GC590 User manual

Sharp

Sharp PW-GC590 User manual

Sharp PW-B1 User manual

Sharp

Sharp PW-B1 User manual

Sharp PW-E350 User manual

Sharp

Sharp PW-E350 User manual

Sharp PW-E260 User manual

Sharp

Sharp PW-E260 User manual

Sharp PW-AC880 User manual

Sharp

Sharp PW-AC880 User manual

Sharp PW-E560 User manual

Sharp

Sharp PW-E560 User manual

Sharp PW-N8100 User manual

Sharp

Sharp PW-N8100 User manual

Sharp PW-E550 User manual

Sharp

Sharp PW-E550 User manual

Sharp PW-A7200 User manual

Sharp

Sharp PW-A7200 User manual

Sharp PW-E500A User manual

Sharp

Sharp PW-E500A User manual

Sharp PW-AT790 User manual

Sharp

Sharp PW-AT790 User manual

Sharp PW-AT750 User manual

Sharp

Sharp PW-AT750 User manual

Sharp PW-V8910 User manual

Sharp

Sharp PW-V8910 User manual

Sharp PW-E260 User manual

Sharp

Sharp PW-E260 User manual

Popular Electronic Dictionary manuals by other brands

Franklin Professor PRO user guide

Franklin

Franklin Professor PRO user guide

Franklin DMQ-118N user guide

Franklin

Franklin DMQ-118N user guide

Resolution Products RE224DH quick start guide

Resolution Products

Resolution Products RE224DH quick start guide

Casio xd-sf series quick guide

Casio

Casio xd-sf series quick guide

Casio EW-B100C user guide

Casio

Casio EW-B100C user guide

Sencor SDN 440T user manual

Sencor

Sencor SDN 440T user manual

LEXIBOOK COLLINS POCKET ELECTRONIC DICTIONARY DL601 manual

LEXIBOOK

LEXIBOOK COLLINS POCKET ELECTRONIC DICTIONARY DL601 manual

Ectaco Partner AzER430T user manual

Ectaco

Ectaco Partner AzER430T user manual

Franklin LWB-216 user guide

Franklin

Franklin LWB-216 user guide

Franklin TMQ-106 user guide

Franklin

Franklin TMQ-106 user guide

Casio EW-G3500 Quick reference guide

Casio

Casio EW-G3500 Quick reference guide

evertz 570NAT-HW-X19 user manual

evertz

evertz 570NAT-HW-X19 user manual

Creative Knowledge HansVision PX 2201 user guide

Creative Knowledge

Creative Knowledge HansVision PX 2201 user guide

Franklin German/English Dictionary DBD-4028DL user guide

Franklin

Franklin German/English Dictionary DBD-4028DL user guide

Franklin SPQ-200 user guide

Franklin

Franklin SPQ-200 user guide

Axcera Innovator LX Series instruction manual

Axcera

Axcera Innovator LX Series instruction manual

Franklin BOOKMAN SED-2050 user guide

Franklin

Franklin BOOKMAN SED-2050 user guide

Nyrius ENTOURAGE7 instructions

Nyrius

Nyrius ENTOURAGE7 instructions

manuals.online logo
manuals.online logoBrands
  • About & Mission
  • Contact us
  • Privacy Policy
  • Terms and Conditions

Copyright 2025 Manuals.Online. All Rights Reserved.