Sharp UX-E800 User manual

OPERATION MANUAL
MODEL( )
UX-E800
1. Installation
2. Sending and Receiving E-mail
3. Sending Faxes to Fax Machines
4. Receiving Faxes
5. Using Auto Dial Numbers
6. Making Copies
7. Making Telephone Calls
8. Answering Machine Hookup
9. Special Functions
10. Printing Lists
11. Maintenance
12. Troubleshooting
INTERNET FAX
UX-E800 INTERNET FAX

1
Introduction
*Based on ITU-T Test Chart #1 at standard resolution in Sharp special mode,
excluding time for protocol signals (i e , ITU-T phase C time only)
Automatic dialling One Touch Dialling: 2 fax numbers and/or
e-mail addresses
Speed Dialling: 97 fax numbers and/or e-mail
addresses
Imaging film Initial starter roll (included with machine):
10 m (approx 30 A4-size pages)
Replacement roll:
UX-3CR 30 m (two rolls in
package, one roll yields approx 95
A4-size pages)
Memory size* 512 KB (approx 30 average pages)
Modem speed Fax: 9600 bps with automatic fallback to
lower speeds
E-mail: 33,600 bps
Transmission time* Approx 15 seconds per fax page
Welcome, and thank you for
choosing a Sharp Internet fax!
The features and specifications
of your new Internet fax are
shown below.
To use the e-mail features of your Internet fa , you must have an
account with an Internet Service Provider. For information on
establishing an account with a provider, see the pamphlet that
accompanied your Internet fa . To configure your Internet fa
for service with your provider, see Chapter 2 of this manual.
all.book Page 1 Monday, August 28, 2000 3:55 PM

2
Resolution Horizontal: 8 pels/mm
Vert ic al :
Standard: 3 85 lines/mm
Fine /Halftone: 7 7 lines/mm
Super fine: 15 4 lines/mm
Recording system Thermal transfer recording
Automatic document
feeder
10 pages max (80 g/m2 paper)
Halftone (greyscale) 64 levels
Display 2-line LCD display, 16 digits per line
Paper tray capacity
(60 to 75 g/m2 paper)
A4 size: 60 sheets
Compression scheme MR, MH, Sharp (H2)
Applicable telephone line Public switched telephone network
Compatibility ITU-T (CCITT) G3 mode
Input document size Automatic feeding:
Width: 148 to 216 mm
Length: 140 to 279 mm
Manual feeding:
Width: 148 to 216 mm
Length: 140 to 600 mm
Effective scanning width 210 mm max
Effective printing width 204 mm max
Contrast control Automatic/Dark selectable
Fa reception modes TEL, FAX, TEL/FAX, A M (Note: A M
mode is for connecting an answering
machine)
Copy function Single/Multi/Sort (99 copies/page)
Telephone function Yes (cannot be used if power fails)
all.book Page 2 Monday, August 28, 2000 3:55 PM

3
As a part of our policy of continuous improvement, SHARP reserves the right to make
design and specification changes for product improvement without prior notice The
performance specification figures indicated are nominal values of production units
There may be some deviations from these values in individual units
Power requirements 220-240 V AC, 50/60 Hz
Operating temperature 5 - 35°C
Humidity Maximum: 85% RH
Power consumption Standby: 6 5 W
Maximum: 100 W
Dimensions Width: 343 mm
Depth: 256 mm
Height: 182 mm
Weight Approx 3 3 kg
Important safety information
• Do not disassemble this machine or attempt any procedures not
described in this manual Refer all servicing to qualified service
personnel
• Do not install or use the machine near water, or when you are wet
For example, do not use the machine near a bath tub, wash bowl,
kitchen sink or laundry tub, in a wet basement, or near a swimming
pool Take care not to spill any liquids on the machine
• Unplug the machine from the power outlet and telephone socket
and consult a qualified service representative if any of the following
situations occur:
- Liquid has been spilled into the machine or the machine has been
exposed to rain or water
- The machine produces odors, smoke, or unusual noises
- The power cord is frayed or damaged
- The machine has been dropped or the housing damaged
• Do not allow anything to rest on the power cord, and do not install
the machine where people may walk on the power cord
all.book Page 3 Monday, August 28, 2000 3:55 PM

4
• This machine must only be connected to a 220-240 V, 50/60 Hz,
earthed (3-prong) outlet Connecting it to any other kind of outlet
will damage the machine and invalidate the warranty
• Never insert objects of any kind into slots or openings on the
machine This could create a risk of fire or electric shock If an
object falls into the machine that you cannot remove, unplug the
machine and consult a qualified service representative
• Do not place this machine on an unstable cart, stand or table The
machine could be seriously damaged if it falls
• Never install telephone wiring during a lightning storm
• Never install telephone sockets in wet locations unless the socket is
specifically designed for wet locations
• Never touch bare telephone wires or terminals unless the telephone
line has been disconnected at the network interface
• Use caution when installing or modifying telephone lines
• Avoid using a telephone (other than a cordless type) during an
electrical storm There may be a remote risk of electric shock from
lightning
• Do not use a telephone to report a gas leak in the vicinity of the
leak
• The power outlet must be installed near the equipment and must be
easily accessible
Important:
• This fax machine is not designed for use on a line which has call
waiting, call forwarding, or certain other special services offered by
your telephone company If you attempt to use the fax machine in
conjunction with any of these services, you may experience errors
during transmission and reception of facsimile messages
• This fax machine is not compatible with digital telephone systems
all.book Page 4 Monday, August 28, 2000 3:55 PM

5
Table of Contents
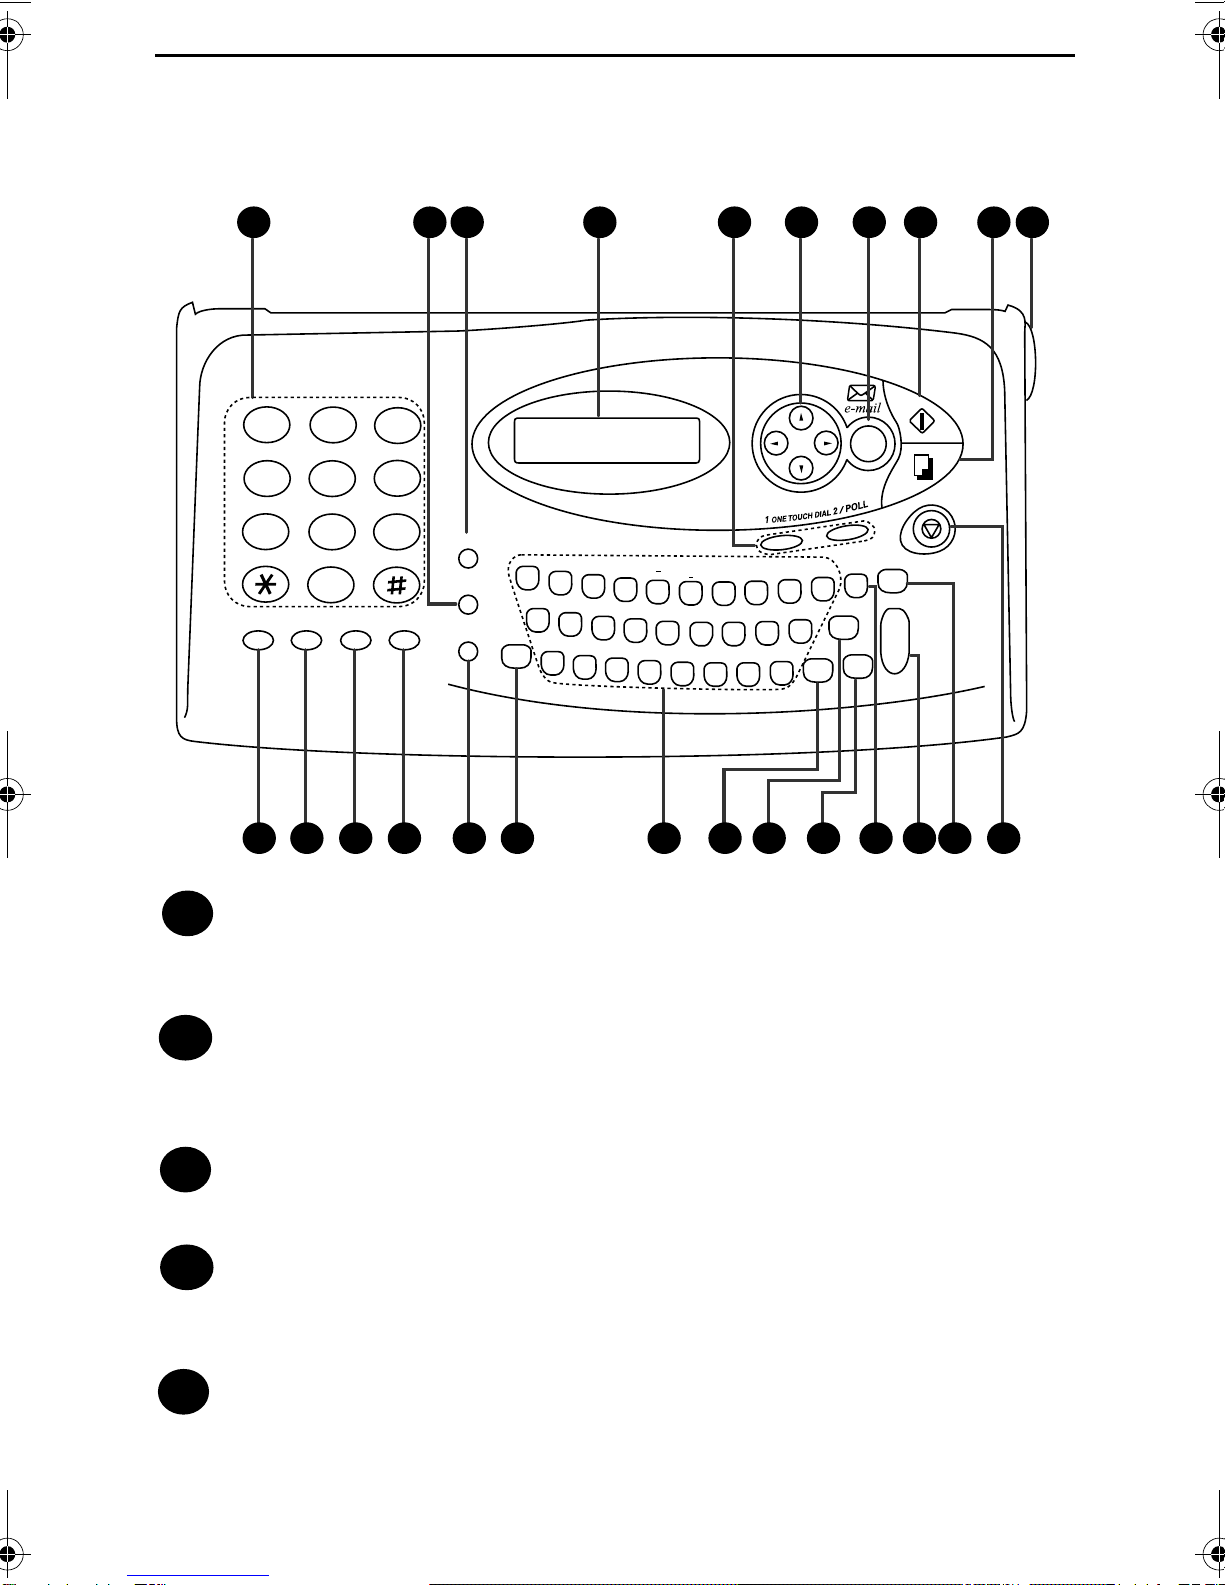
A Look at the Operation Panel 7
1. Installation 10
Unpacking Checklist . . . . . . . . . . . . . . . . . . . . . . . . . . . . . . . . . . . . . 10
Connections . . . . . . . . . . . . . . . . . . . . . . . . . . . . . . . . . . . . . . . . . . . 11
Loading the Imaging Film . . . . . . . . . . . . . . . . . . . . . . . . . . . . . . . . . 17
Loading Printing Paper . . . . . . . . . . . . . . . . . . . . . . . . . . . . . . . . . . . 23
Entering Your Name and Fax Number . . . . . . . . . . . . . . . . . . . . . . . 26
Setting the Date and Time . . . . . . . . . . . . . . . . . . . . . . . . . . . . . . . . 30
Setting the Reception Mode for Incoming Calls . . . . . . . . . . . . . . . . 33
Volume Adjustment . . . . . . . . . . . . . . . . . . . . . . . . . . . . . . . . . . . . . 35
2. Sending and Receiving E-mail 37
Configuring Your Internet Fax with Auto Setup . . . . . . . . . . . . . . . . 37
Manually Configuring Your Internet Fax . . . . . . . . . . . . . . . . . . . . . . 41
Other Internet Settings . . . . . . . . . . . . . . . . . . . . . . . . . . . . . . . . . . . 51
Sending an E-mail Message or an Internet Fax . . . . . . . . . . . . . . . . 54
Receiving E-mail Messages . . . . . . . . . . . . . . . . . . . . . . . . . . . . . . . 61
Searching for an E-mail Address . . . . . . . . . . . . . . . . . . . . . . . . . . . 72
3. Sending Faxes to Fax Machines 77
Transmittable Documents. . . . . . . . . . . . . . . . . . . . . . . . . . . . . . . . . 77
Loading the Document . . . . . . . . . . . . . . . . . . . . . . . . . . . . . . . . . . . 79
Adjusting the Resolution and Contrast . . . . . . . . . . . . . . . . . . . . . . . 82
Sending a Fax to a Traditional Fax Machine . . . . . . . . . . . . . . . . . . 85
4. Receiving Faxes 88
Using TEL/FAX Mode. . . . . . . . . . . . . . . . . . . . . . . . . . . . . . . . . . . . 88
Using FAX Mode . . . . . . . . . . . . . . . . . . . . . . . . . . . . . . . . . . . . . . . 90
Using A.M. Mode . . . . . . . . . . . . . . . . . . . . . . . . . . . . . . . . . . . . . . . 92
Using TEL Mode. . . . . . . . . . . . . . . . . . . . . . . . . . . . . . . . . . . . . . . . 93
Substitute Reception to Memory . . . . . . . . . . . . . . . . . . . . . . . . . . 101
5. Using Auto Dial Numbers 102
Storing Fax Numbers and E-mail Addresses for Auto Dialling. . . . 102
all.book Page 5 Monday, August 28, 2000 3:55 PM

Table of Contents
6
Sending a Fax to a Fax Machine by Automatic Dialling . . . . . . . . . 108
Sending an E-mail Message or Internet Fax by Automatic Dialling 114
6. Making Copies 125
7. Making Telephone Calls 129
8. Answering Machine Connection 132
Connecting an Answering Machine . . . . . . . . . . . . . . . . . . . . . . . . 132
Optional A.M. Mode Settings . . . . . . . . . . . . . . . . . . . . . . . . . . . . . 135
9. Special Functions 137
Caller ID (Requires Subscription to Service) . . . . . . . . . . . . . . . . . 137
Duplex Ringing (Requires Subscription to Service) . . . . . . . . . . . . 143
Fax Broadcasting . . . . . . . . . . . . . . . . . . . . . . . . . . . . . . . . . . . . . . 145
Cover Sheet . . . . . . . . . . . . . . . . . . . . . . . . . . . . . . . . . . . . . . . . . . 147
Batch Page Numbering. . . . . . . . . . . . . . . . . . . . . . . . . . . . . . . . . . 150
Blocking Reception of Unwanted Faxes . . . . . . . . . . . . . . . . . . . . . 152
Sending Documents From Memory . . . . . . . . . . . . . . . . . . . . . . . . 154
Fax polling (Requesting a Fax Transmission). . . . . . . . . . . . . . . . . 156
Timer Operations . . . . . . . . . . . . . . . . . . . . . . . . . . . . . . . . . . . . . . 160
10. Printing Lists 163
11. Maintenance 173
12. Troubleshooting 177
Problems and Solutions . . . . . . . . . . . . . . . . . . . . . . . . . . . . . . . . . 177
Messages and Signals . . . . . . . . . . . . . . . . . . . . . . . . . . . . . . . . . . 183
Clearing Paper Jams . . . . . . . . . . . . . . . . . . . . . . . . . . . . . . . . . . . 186
Quick Reference Guide 189
Index 191
all.book Page 6 Monday, August 28, 2000 3:55 PM

7
Number keys
Use these keys to dial fax and phone numbers, and enter numbers
when storing auto-dial numbers and e-mail addresses
RESOLUTION key
Press this key to adjust the resolution for faxing, copying, or sending a
document as an e-mail attachment
FUNCTION key
Press this key to select various special functions
Display
This displays messages and prompts during operation and
programming
ONE TOUCH DIAL keys
Press either of these keys to automatically dial a fax/phone number or
specify an e-mail address
A Look at the Operation Panel
1
2
3
4
ABC
2
1
DEF
TEL FAX
VOLUME COPY
SPEED
DIAL REDIAL HOLD/
SEARCH
SPEAKER
FUNCTION
RESOLUTION
RECEPTION MODE
STOP
START
A.M.
3
JKL
5
4
GHI MNO
6
TUV
8
7
PQRS WXYZ
9
0
QWERTYUIOP
L
K
J
H
G
F
D
S
ZXCVBNM .
@
A
SPACE
SHIFT
.com
ENTER
ALT
DEL
!$%&+=()
\
"
'
:
;
^
]
[
~
{}<>,/?|
1
11 12 13 14 15 17 22 23211918 2016 24
4 5 6 78 10932
5
all.book Page 7 Monday, August 28, 2000 3:55 PM

8
Arrow keys
Move cursor: Press these keys to move the cursor when entering an
e-mail address, e-mail message, name, or fax/phone number
FUNCTION key settings: Press the up or down arrow keys after
pressing the FUNCTION key to move through the FUNCTION key
settings
Adjust volume: Press the left or right arrow keys to adjust the
speaker volume after pressing the SPEAKER key, or the ringer
volume at any other time
e-mail key
Use this key to send and receive e-mail
START key
Press this key to send an e-mail message or a fax
COPY key
Press this key to make a copy of a document that has been loaded in
the document feeder
Panel release
Grasp this finger hold and pull toward you to open the operation
panel
SPEED DIAL key
Press this key to dial a fax/voice number or enter an e-mail address
using an abbreviated 2-digit Speed Dial number
REDIAL key
Press this key to automatically redial the last number dialled
HOLD/SEARCH key
Press this key to search for a fax number or an e-mail address During
a phone conversation, press this key to put the other party on hold
SPEAKER key
Press this key to listen to the line and fax tones through the speaker
when faxing a document
Note: This is not a speakerphone. You must pick up the handset to
talk with the other party
7
8
9
10
11
6
12
13
14
all.book Page 8 Monday, August 28, 2000 3:55 PM

9
1. Installation
RECEPTION MODE key
Press this key to select the reception mode for faxes An arrow in the
display will point to the currently selected reception mode
SHIFT key
Press this key (do not hold it down) and then press a letter key to enter
an uppercase letter
Letter keys
Use these keys to enter e-mail addresses, e-mail messages, and names
of auto-dial destinations
SPACE key
Press this key to enter a space
.com key
Press this key to conveniently enter “ com” at the end of an e-mail
address To enter “ com hk”, “ net”, “ org”, “ org hk”, “ edu”,
“ gov”, or “ hk”, continue to press the key
ALT key
Press this key (do not hold it down) and then press a letter key to enter
the symbol marked above the letter key
@ key
Press this key to enter “@” in an e-mail address (or elsewhere)
ENTER key
When entering multiple e-mail addresses or fax numbers, press the
ENTER key when you have finished entering one address or number
and are ready to begin entering the next address/number A semicolon
will appear to separate the addresses/numbers
DEL key
Press this key to clear a letter or number
STOP key
Press this key to cancel an operation before it is completed
17
18
19
20
16
15
21
22
24
23
all.book Page 9 Monday, August 28, 2000 3:55 PM

10
1. Installation
Unpacking Checklist
If any are missing,
contact your dealer
or retailer.
Before setting up,
make sure you
have all of the
following items.
Original
document
support
Handset
Handset
cord
Gears (4)
Imaging film
(initial starter
roll)
Paper tray
extension
Operation
manual
Telephone
line cord
Imaging
film
cartridge
Quick Reference
Guide
all.book Page 10 Monday, August 28, 2000 3:55 PM

Connections
11
1. Installation
Connections
Points to keep in mind when setting up
Do not place the machine in
direct sunlight.
Do not place the machine near
heaters or air conditioners.
Keep dust away from the
machine.
Keep the area around the
machine clear.
About condensation
If the machine is moved from a cold to a warm place, it is possible
that condensation may form on the scanning glass, preventing proper
scanning of documents for transmission To remove the condensation,
turn on the power and wait approximately two hours before using the
machine
all.book Page 11 Monday, August 28, 2000 3:55 PM

Connections
12
Connecting the Handset
Connect the handset as shown and place it on the handset rest
♦The ends of the handset cord are identical, so they will go into
either socket
Make sure the handset
cord goes into the
socket marked with a
handset symbol on the
side of the machine!
Use the handset to
make ordinary phone
calls, or to transmit and
receive faxes manually.
all.book Page 12 Monday, August 28, 2000 3:55 PM

Connections
13
1. Installation
Connecting the power cord
Plug the power cord into a 220-240 V, 50/60 Hz, earthed AC (3-prong)
outlet
Caution!
Do not plug the power cord into any other kind of outlet This will
damage the machine and is not covered under the warranty
Note: If your area experiences a high incidence of lightning or power
surges, we recommend that you install surge protectors for the power and
telephone lines Surge protectors can be purchased at most telephone
specialty stores
The machine does not have
a power on/off switch, so
the power is turned on and
off by simply plugging in or
unplugging the power cord.
all.book Page 13 Monday, August 28, 2000 3:55 PM

Connections
14
Connecting the telephone line cord
Insert one end of the line cord into the socket on the back of the
machine marked TEL. LINE Insert the other end into a standard wall
telephone socket
Note: The fax machine is set for tone dialling If you are on a pulse
dial line, you must set the fax machine for pulse dialling Press the
keys on the operation panel as follows:
1Press these keys:
The display will show:
4
2Press 1 to select tone dialling, or 2 to
select pulse dialling
1
2
or
TONE PULSE
3Press the STOP key to return to the
date and time display
FUNCTIO
N
Be sure to inser t the
line into the TEL.
LINE socket. Do
not insert it into the
TEL. SET socket.
DIAL MODE
1=TONE, 2=PULSE
STO
P
VOLUME
Press
10 times
TEL. SET TEL. LINE
all.book Page 14 Monday, August 28, 2000 3:55 PM

Connections
15
1. Installation
Attaching the tray extension and document support
Attach the paper tray extension
♦Pull the paper release plate forward Insert the paper tray extension
horizontally into the notches in the paper tray Rotate the paper tray
extension up until it snaps into place
Attach the original document support
Note: The original
document support
has a top side and a
bottom side. If you
cannot insert the
tabs on the support
into the holes, turn
the support over.
all.book Page 15 Monday, August 28, 2000 3:55 PM

Connections
16
Extension phone (optional)
If desired, you can connect an extension phone to the TEL. SET
socket on the fax
♦To connect an answering machine to your fax, see Chapter 8,
Answering Machine Hookup (page 132)
2Connect the extension phone line to
the TEL. SET socket
TEL. SET TEL. LINE
1Remove the seal covering the TEL.
SET socket
all.book Page 16 Monday, August 28, 2000 3:55 PM

Loading the Imaging Film
17
1. Installation
Loading the Imaging Film
Your fax uses a roll of imaging film to create printed text and images
The print head in the fax applies heat to the imaging film to transfer
ink to the paper Follow the steps below to load or replace the film
Note: If there is paper in the paper tray, pull the paper release plate
forward and remove the paper before loading the imaging film
When replacing the film, use a
roll of Sharp UX-3CR imaging
film. One roll can print about 95
A4-size pages.
The initial starter roll of
imaging film included with
your fax can print about 30
A4-size pages.
1Open the operation panel by grasping
the finger hold and pulling up
2Pull the green release on the right side
of the machine forward, and open the
print compartment cover
all.book Page 17 Monday, August 28, 2000 3:55 PM

Loading the Imaging Film
18
4Remove the used film from the
cartridge
5Remove the four green gears from the
used film DO NOT DISCARD THE
FOUR GREEN GEARS!
3Remove the imaging film cartridge
from the print compartment (grasp the
handle at the front of the cartridge)
and turn it over
If you are installing the imaging film for the
first time, go to Step 6.
all.book Page 18 Monday, August 28, 2000 3:55 PM

Loading the Imaging Film
19
1. Installation
7Insert the large gear into the green end
of the empty spool Make sure the two
protrusions on the large gear fit firmly
into the slots in the end of the spool
Insert the remaining three gears into
the spools, making sure the protrusion
on each gear fits firmly into one of the
slots in the end of each spool
•If needed, pull the spools apart
slightly to allow the gears to fit (the
band will stretch)
6Remove the new roll of imaging film
from its packaging
•Do not yet remove the band that
holds the rolls together
Slot Protrusion
Large gear
all.book Page 19 Monday, August 28, 2000 3:55 PM
Table of contents
Other Sharp Fax Machine manuals