SNBC BT-UC156 User manual

User’s Manual
BT-UC156
Embedded Printer
V1.0
Shandong New Beiyang Information Technology Co., Ltd.
BT-UC156 User’s Manual
- 1 -
Declaration
Information in this document is subject to change without notice. Shandong New Beiyang Info-Tech Co.,
Ltd. (Hereinafter referred to as “SNBC”) reserves the right to improve products as new technology,
components, software, and firmware become available. If users need the further data about these products,
please feel free to contact our market department or your local distributor.
No part of this document may be reproduced or transmitted in any form or by any means, electronic or
mechanical, for any purpose without the express written permission of SNBC
Copyright
This manual was published in 2007 and SNBC owns the copyright.
Made in China.
Version: 1.0.
Trademark
Our registered trademark is
Safety warning
Warning: Items shall be strictly followed to avoid damages to body and equipment;
Caution: Items with important information and prompts for operating the printer.
Certification
The quality control system of SNBC has been approved of the following certification.
DNV ISO9001: 2000
The environment control system of SNBC has been approved of the following certification.
DNV ISO14001:2004

BT-UC156 User’s Manual
- 2 -
Safety Information
Before installing and using the printer, please read the following items carefully.
1. Safety instructions
The print head and step motor are calorific and their temperatures are high when printing or just
after operation, so please don’t touch them and their peripherals for safety purpose.
The thermal head is ESD sensitive device. Don’t touch its printing parts and connecting parts to
keep it from damages.
2. Caution
1) Install the printer on a flat and stable place.
2) Reserve adequate space around the printer so that the operation and maintenance can be performed
conveniently.
3) Keep the printer far away from water source and do not expose the printer to direct sunlight, strong light
and heater.
4) Do not use or store the printer in a place exposed to heat of fire, moisture and serious pollution.
5) Do not place the printer on a place exposed to vibration and impact.
6) No dew condensation is allowed to the printer. In case of such condensation, do not turn on the power
until it has completely gone away.
7) Disconnect the AC adapter when the printer is deemed to spare for a long time.
8) Don’t spill water or other electric materials on the printer. In case that this happens, shut down the
power immediately.
9) Do not allow the printer to start printing when there is no recording paper in, otherwise the print head
will be damaged.
10) To ensure quality print and normal lifetime, use recommended paper or paper roll with same quality.
11) Shut down the printer before connecting or disconnecting interfaces connectors to protect control
board from damages.
12) Set the print darkness to a lower grade as long as the print quality is acceptable. This will help to keep
the print head durable.
13) Do not disassemble the printer without permission of a technician, even for repairing purpose.
14) Keep this manual carefully at hand for ready reference.

BT-UC156 User’s Manual
- 3 -
CONTENT
1.Overview...................................................................................................................................................- 1 -
1.1Outline.................................................................................................................................................- 1 -
1.2 Main features.....................................................................................................................................- 1 -
2.Main specifications...................................................................................................................................- 2 -
2.1 Technical specifications.....................................................................................................................- 2 -
2.2 Media specifications..........................................................................................................................- 2 -
2.2.1 Paper roll Spec...................................................................................................................................- 2 -
2.2.2 Continuous paper specification:.........................................................................................................- 2 -
2.2.3 Label specification..............................................................................................................................- 3 -
2.3 Print and tear-off position ..................................................................................................................- 3 -
2.3.1 Print position.......................................................................................................................................- 3 -
2.3.2 Tear-off position .................................................................................................................................- 3 -
3.Appearance and Parts..............................................................................................................................- 4 -
3.1Appearance and parts .......................................................................................................................- 4 -
3.2 LED and Buzzer explanation.............................................................................................................- 5 -
4.Printer mount............................................................................................................................................- 6 -
4.1 Unpacking..........................................................................................................................................- 6 -
4.2 Fixing the printer................................................................................................................................- 6 -
4.3 Earthing .............................................................................................................................................- 9 -
4.4 Connecting interface cable................................................................................................................- 9 -
4.5 Loading media...................................................................................................................................- 9 -
4.5.1 Check media specification.................................................................................................................- 9 -
4.5.2 Media loading way .............................................................................................................................- 9 -
4.5.3 Loading media..................................................................................................................................- 10 -
4.6 Printer self-test.................................................................................................................................- 14 -
5. Routine maintenance............................................................................................................................- 15 -
5.1 Cleaning Printhead..........................................................................................................................- 15 -
5.2 Cleaning sensors.............................................................................................................................- 15 -
5.3 Cleaning platen................................................................................................................................- 16 -

BT-UC156 User’s Manual
- 4 -
5.4 Printout adjustment..........................................................................................................................- 16 -
6.Interface Signal ......................................................................................................................................- 18 -
6.1 Serial interface.................................................................................................................................- 18 -
7. Troubleshooting.....................................................................................................................................- 19 -
7.1 Print doesn’t function.......................................................................................................................- 19 -
7.2 Error LED and Buzzer .....................................................................................................................- 19 -
7.3 Problems during printing..................................................................................................................- 19 -

BT-UC156 User’s Manual
- 1 -
1. Overview
1.1Outline
BT-UC156 printer is an embedded printer equipped with an auto-peel off module and a rewinder. It can
support thermal label and thermal continuous paper up to 56mm printable width. This product is mainly
used in applications where real-time label or receipt printing is necessary, like label scale, electric scale
and so on.
BT-UC156 is connected with other devices via serial interface.
1.2 Main features
Low noise and direct thermal printing
Label peel-off and rewinding
Open paper path design (easy media load)
Support thermal label and thermal continuous paper
Label checkout
Update firmware on-line
User can download FLASH bitmap

BT-UC156 User’s Manual
- 2 -
2. Main specifications
2.1 Technical specifications
Item Spec.
Print mode Direct thermal line
Print speed Max.75mm/s
Print width Max.56mm
Paper
Type Thermal label and continuous paper
Paper width 30mm to 62mm
Thickness 0.06 mm to 0.16mm
Barcode Sort UPC-A, UPC-E, EAN-13, EAN-
8, ITF, CODE39,
CODE93, CODE128, CODABAR
Characters
Type FONTA: 12×24 FONTB: 9×17
SIMPLE CHINAESE:24×24
Characters/line (CPL) FONTA 37
FONTB 49
Data buffer
Receiving buffers 1KB or 45bytes
NV image data 64KB
RAM image
data 8KB
Communication interface RS-232C
Power supply DC 24V±5%, average current 2.5A
Print head lifetime 50Km
Operating temperature and humidity 5 to 45℃,20 to 90%RH (40℃)
Storage temperature and humidity -40 to 60℃,20% to 93%RH(40℃)
Overall size 255(L)ⅹ119(W)ⅹ116(H)
Weight About 1.7Kg
2.2 Media specifications
2.2.1 Paper roll Spec.
Type: Thermal labels and continuous paper
Roll outer diameter: Maximum 85 mm
Paper thickness: 0.06 mm to 0.16mm
Thermal surface: Outside
Core shaft inner diameter: φ25.4mm
Paper width:30mm-62 mm
2.2.2 Continuous paper specification:

BT-UC156 User’s Manual
- 3 -
C
ode Meanings Max.
(mm) Min.
(mm)
a Paper width 62 30
b Paper thickness 0.16 0.06
2.2.3 Label specification
Code Meanings Max. (mm) Min. (mm)
a Paper width 62 30
b Paper thickness 0.16 0.06
c Label width 60 28
d Label
height Tear-off mode 90 25
Peel-off mode 90 25
e Mark height 10 2
Caution:
Do not paste paper to the paper supply hanger or base paper rewinder.
2.3 Print and tear-off position
2.3.1 Print position
Paper is located by margin, the location of paper and TPH is as figure below showed. The distance
between effective print start point and paper margin is about 3mm.
Figure 2.3.1 Printing Position
2.3.2 Tear-off position
No tear-off bar is equipped with this printer.

BT-UC156 User’s Manual
- 4 -
3. Appearance and Parts
3.1 Appearance and parts
●The appearance of the printer is shown as figure 3.1.1.
Figure 3.1.1 Appearance
●Its structure is shown as figure 3.1.2 and include parts as below:
1. base cover of control board
2. Paper roll shaft
3 Middle board
4. retraction shaft
5. paper guide ring
6. motor protection panel
7. motor module
8. press adjustment knob Figure 3.1.2 Structure
9. Mechanism
10. Top cover limit
11. Key LED
12. Keyboard
13. Top cover of control board
●Some parts’ function
1) Paper guide ring (5)
It is a paper guide organ which can be adjusted according to paper width.
2) Pressure adjusting knob(8)
It is a Printhead pressure adjusting organ in stepless mode ranged from 15N to 22N. The Printhead
BT-UC156 User’s Manual
- 5 -
pressure can be increased when rotating the knob in clockwise, otherwise the Printhead pressure shall
be decreased.
Notice:
In order to increase Printhead lifetime we suggest that users should select lower Printhead
pressure in case of satisfied use.
Paper guide ring is an accessory which can help the printer adjust different paper width. Users
should keep it carefully.
3.2 Key Function Button
In continuous paper mode
In standby status, printer feed paper after pressing this key.
Press this key and power the printer, printer will print configuration sample.
In label paper mode
In standby status, printer will locate next label to printing position after pressing this key.
Press this key and power the printer, printer will perform paper checkout.
Press this key to get rid of error status under paper location error or paper checkout failure status.
3.3 LED and Buzzer Explanation
The table as below shows the relations among errors, buzzer and LED.
Error Buzzer Error LED
Printhead overheated Six sounds 6 flashes
Voltage abnormal
Five sounds
5 flashes
Paper end
Two sounds
2 flashes
Adequate paper
/
1 flash
Paper checkout error One sound 1 flash
Paper orientation error One sound 1 flash
Notice:
The printer uses thermal resistance to test Printhead temperature. If Printhead is overheated,
protecting circuit shall shut off Printhead power and stop printing at the temperature of 65℃.
Paper checkout error shall happen only when the checkout fails.
BT-UC156 User’s Manual
- 6 -
4. Printer mount
4.1 Unpacking
When unpacking, check if parts are short or damaged according to packing list. Once this case happens,
please contact with your local distributor or SNBC.
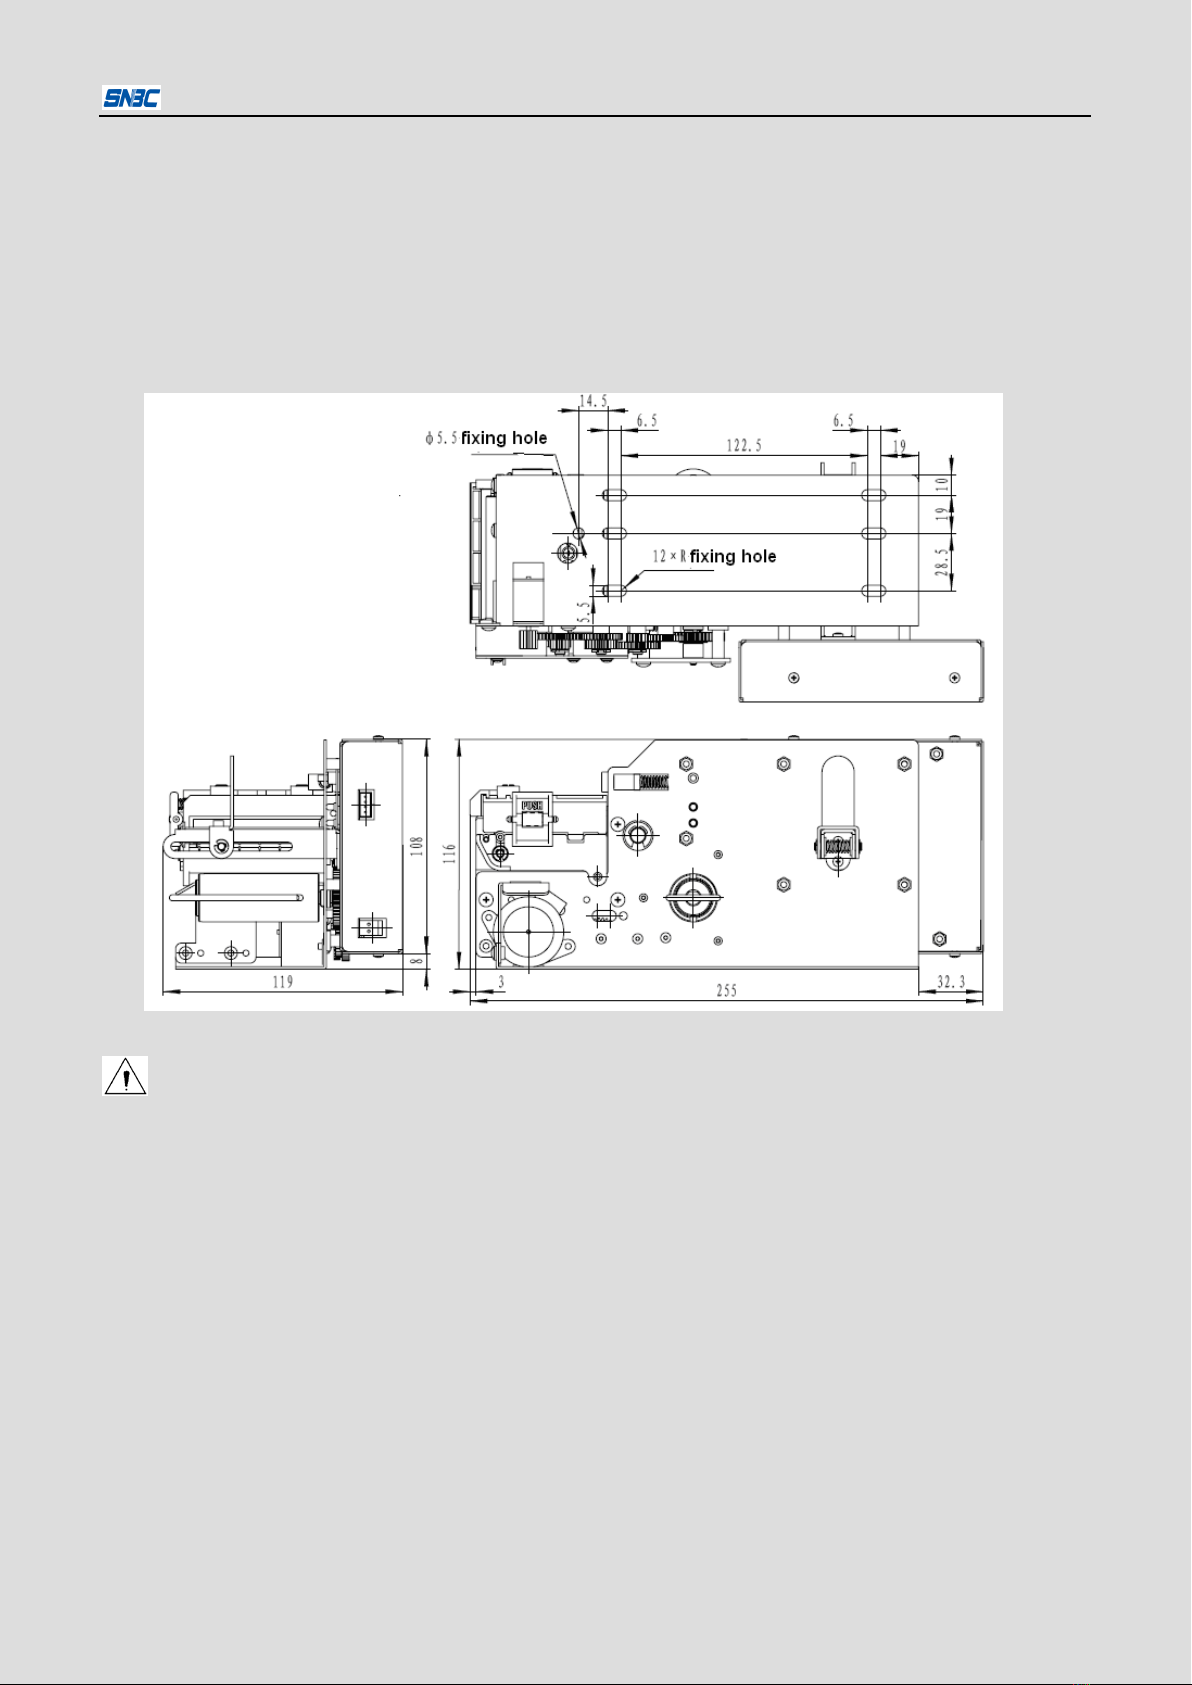
4.2 Fixing the printer
This printer has fixing hole and side cover fixing hole. You should select suitable space and fixing
position of the printer referred to figure 4.2.1
Figure 4.2.1 Dimension
Caution:
The printer should be mounted on a fixed plane less than 0.5mm flatness;
It is recommended that the slanting range for horizontal mount should be -10º≤B≤10º;
Do not place the printer on a surface exposed to vibration or risk from impact;
The part of screws entering the printer shall not be longer than 5 mm;

BT-UC156 User’s Manual
- 7 -
Enough space should be reserved around the printer for easy paper load, key operation, daily
maintenance, printing pressure adjustment and cable connection/disconnection.
Figure 4.2.2 Operating Space—paper loading
Figure 4.2.3 Operation Space—TPH Maintenance
Figure 4.2.4 Operation Space——pressure adjustment
BT-UC156 User’s Manual
- 8 -
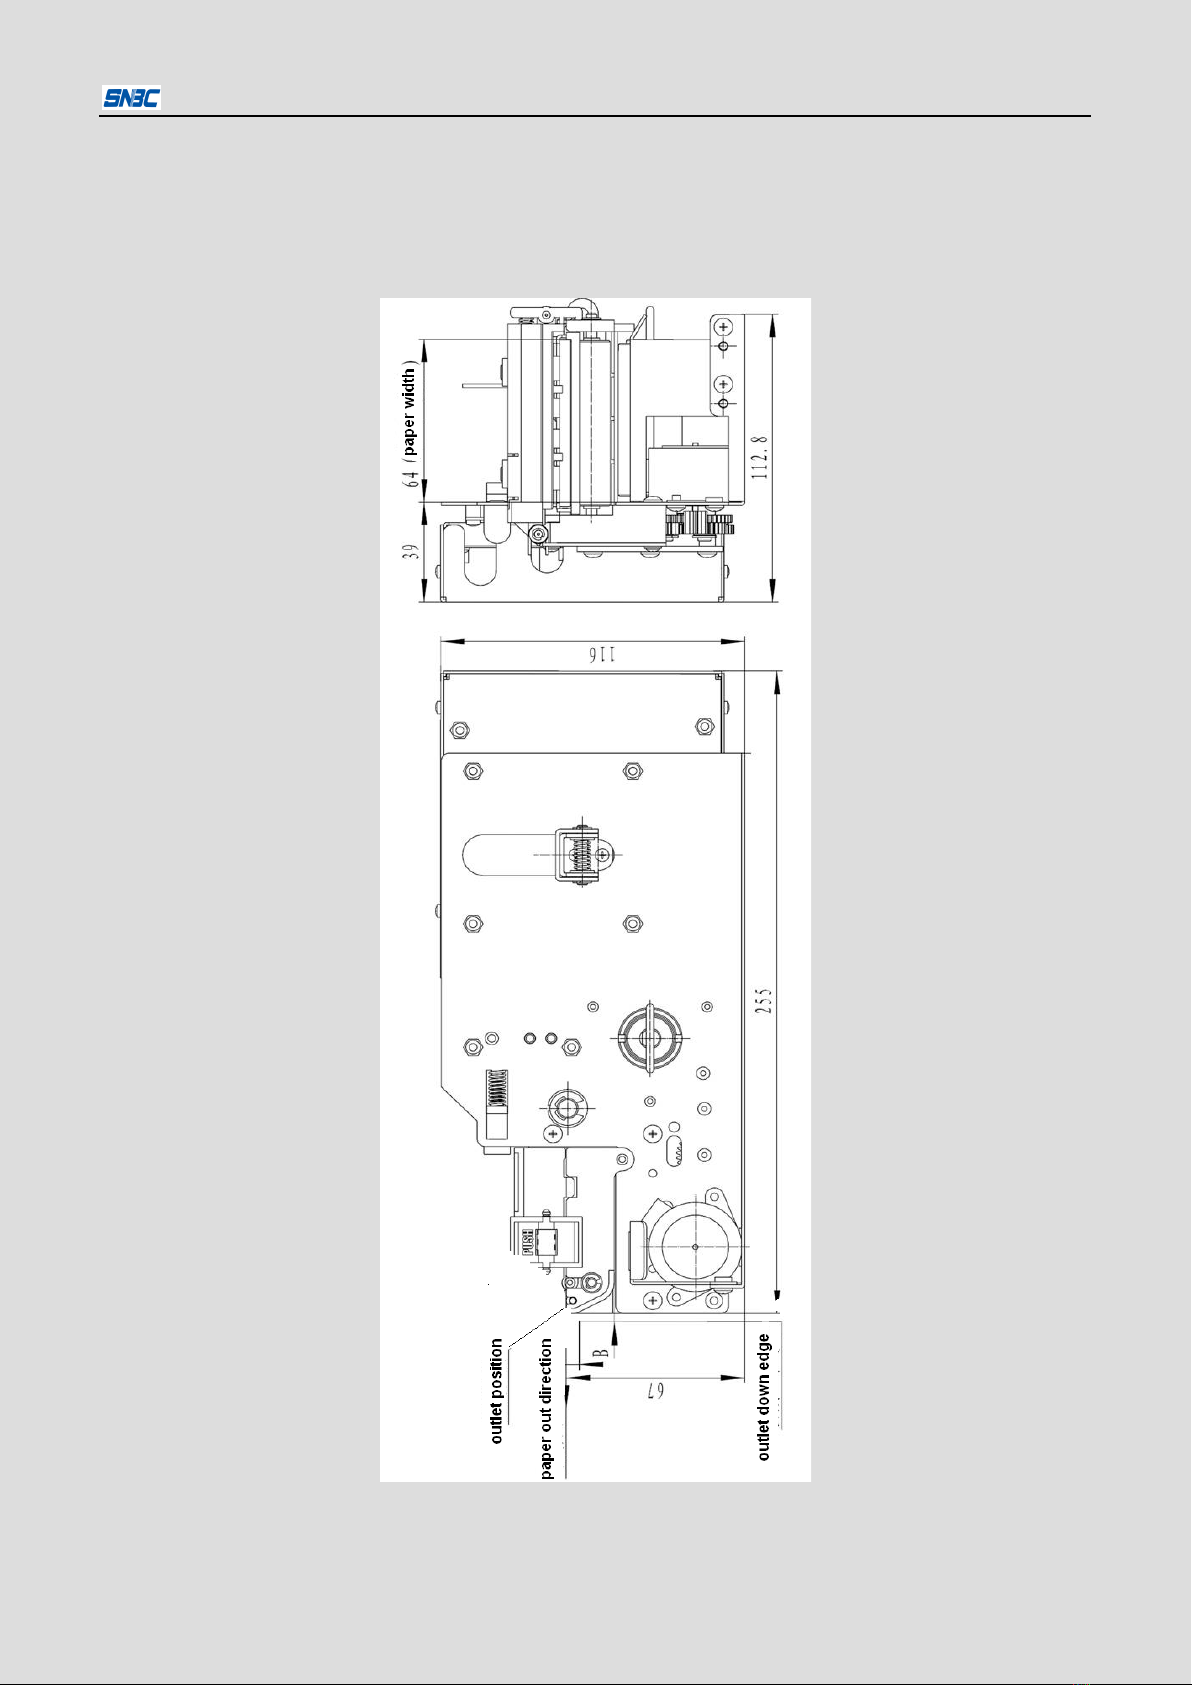
Outlet position and width are shown in Figure 4.2.5. To ensure paper feed smooth, the outlet of printer
casing shall be aligned with the printer outlet and reserve suitable space to avoid paper impacting the
outlet edge of the casing. Due paper is somewhat curl, dimensionA should be set reasonable to avoid
paper impacting outlet down edge; in addition, space B between outlet down edge and printer case
should assure the load of paper.
Figure 4.2.5 Outlet position
BT-UC156 User’s Manual
- 9 -
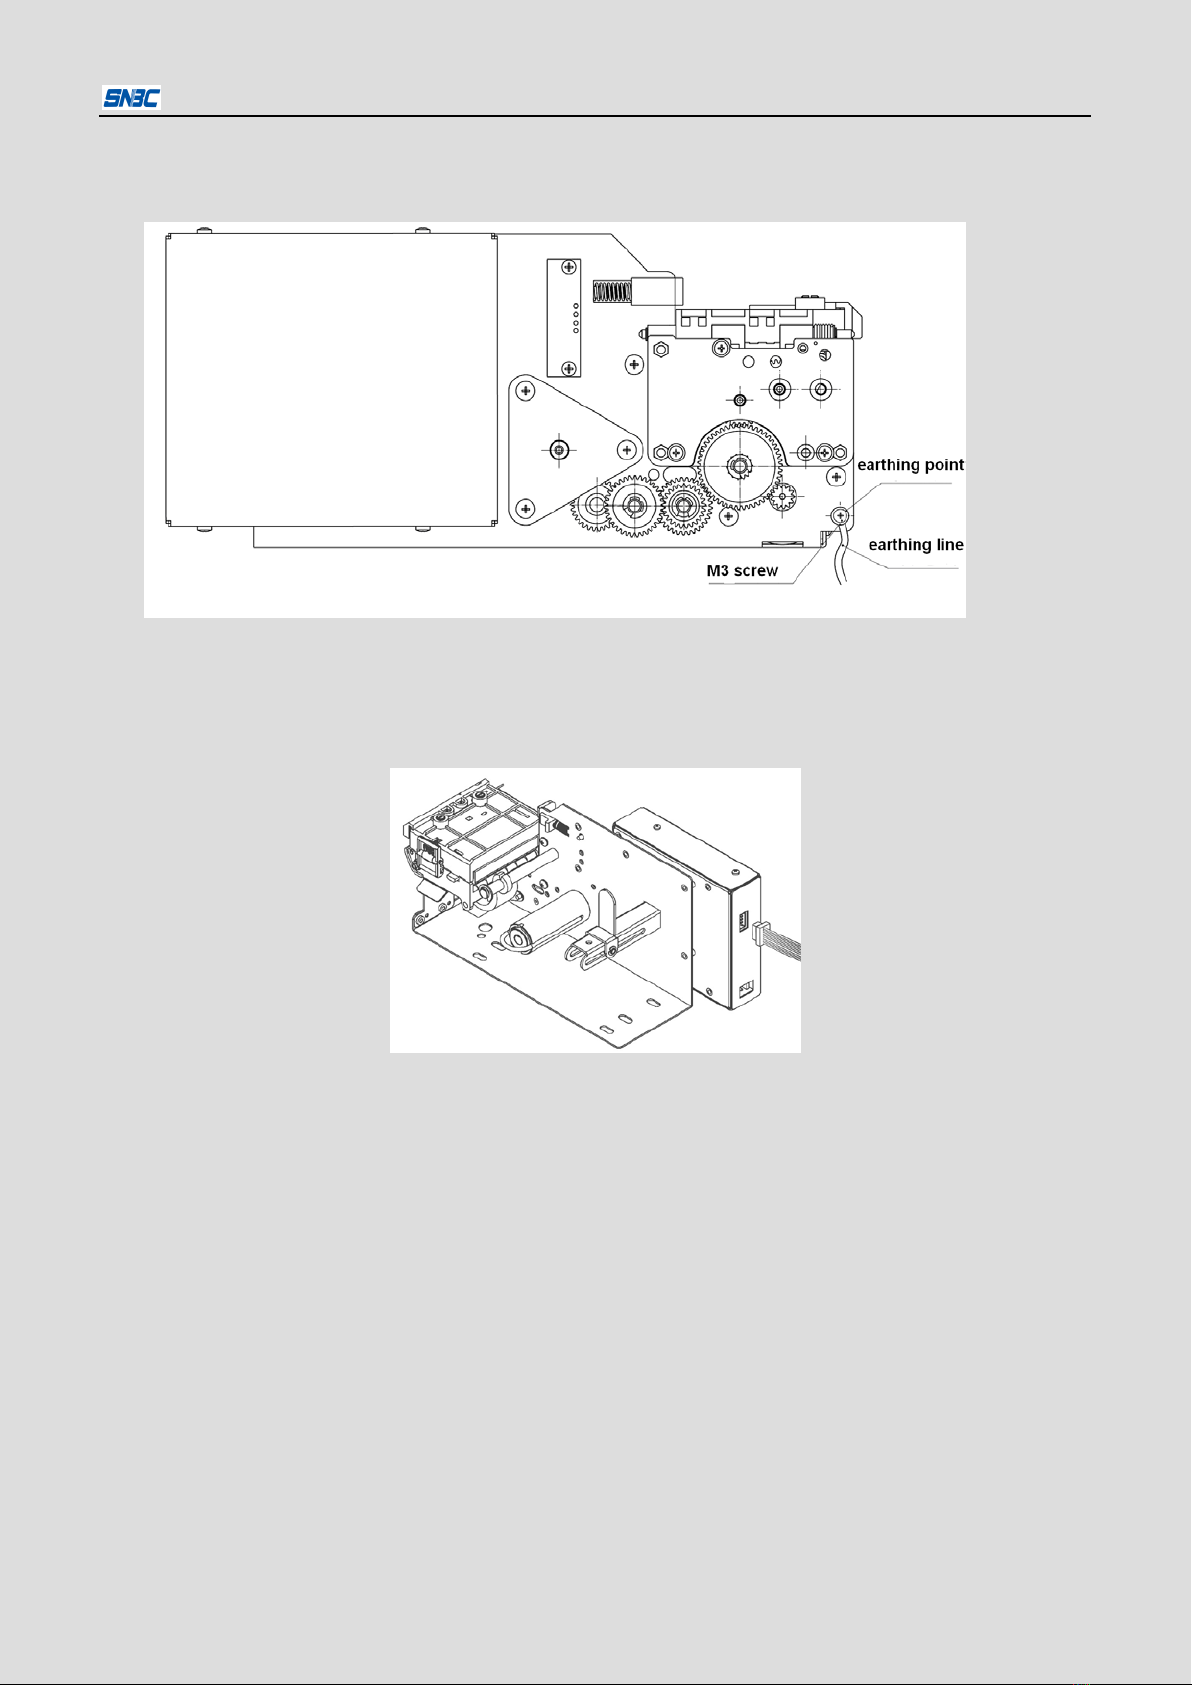
4.3 Earthing
The printer has one M3 earthing hole (figure 4.3.1). We suggest that the printer shall
be earthed for safety and reliable operation.
Figure 4.3.1 Earthing
4.4 Connecting interface cable
1) Make sure the printer power is off;
2) Put matched interface cable into corresponding socket (figure 4.4.1).
Figure 4.4.1 Connecting Cable
4.5 Loading media
4.5.1 Check media specification
Media type:BT-UC156 printer supports thermal label and continuous paper. Please check the media type
used by the printer and select peel-off mode or tear-off mode;
Media specification: The roller of BT-UC156 printer is simple structure. Outer bushing diameter of paper
roll shaft is 23.5 mm, only paper roll with inner diameter over φ24mm can be used.
4.5.2 Media loading way
A paper load mark is made on printer holding plate for user to load media easily (see figure 4.5.1). Before
loading media, please first familiar with the loading way referred to paper load label.

BT-UC156 User’s Manual
- 10 -
Figure 4.5.1 Media load path
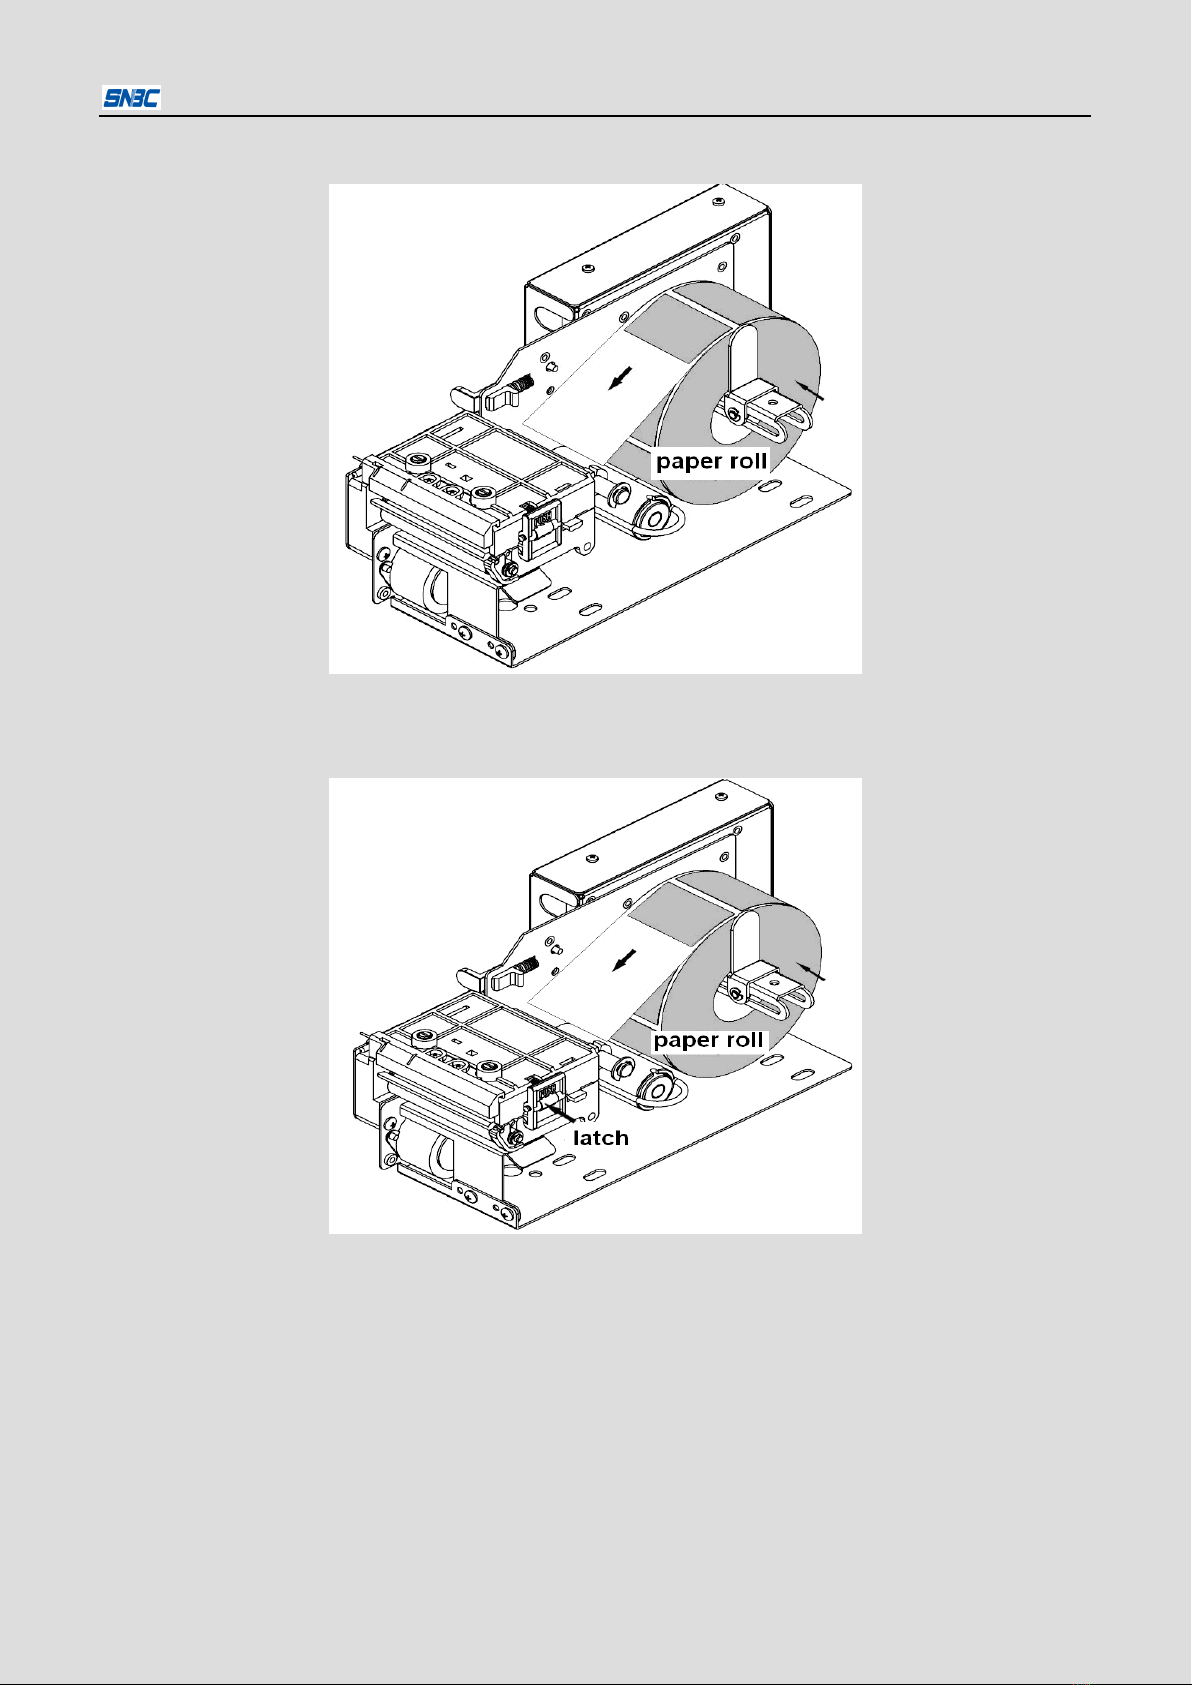
4.5.3 Loading media
Thermal label load
It has peel-off mode and tear-off mode.
1. Peel-off mode
1) Load the selected thermal label onto paper roll shaft.
Notice: Paper roll should drop to the end of paper roll shaft. Paper shall move according to above
figure during the print. Pay attention to paper roll direction when loading.

BT-UC156 User’s Manual
- 11 -
2) Press the latch to open top cover of TPH.
3) Tear off several front labels to make front mount long about 200 mm. Then according to the figure
below, put thermal label round paper guide shaft to enter paper path and press the first label head on
the platen.
Notice: Be sure that the lower edge of label should reach the holding surface and the end of first label
shall not exceed the tear-off bar of the platen.
4) Close top cover of the printer.According to thermal label width, adjust the paper guide ring up and
down until a suitable position. It is recommended that paper guide path should be 0.5 ~1 mm wider
than paper.

BT-UC156 User’s Manual
- 12 -
5) Let the mount of thermal label round the tear-off bar, the platen and mount shaft according to the
figure as below. Then fix the mount on rewinding shaft with the clip and turn the rewinding shaft to
tight the mount according to the direction in the figure as below.
Notice: There is a matched groove of paper rewinding clip which should be put in.
BT-UC156 User’s Manual
- 13 -
2. Tear-off mode
1) Load thermal label roll onto paper roll shaft.
Notice: Paper roll should drop to the end of paper roll shaft. Paper shall run according to above figure
during the print. Pay attention to paper roll direction when loading.
2) Press the latch to open top cover of TPH.
3) Put thermal label round paper guide shaft to enter paper path and press the first label head on the
platen.

BT-UC156 User’s Manual
- 14 -
Notice: Be sure that the lower edge of label should reach the holding surface and the end of first label
shall not exceed the tear-off bar of the platen.
4) Close top cover of the printer. According to thermal label width, adjust the paper guide ring up and
down until a suitable position. It is recommended that paper guide path should be 0.5 ~1 mm wider
than paper.
Loading thermal continuous paper
The way of thermal continuous paper load is same with that of thermal label in tear-off mode.
4.6 Printer self-test
1) Be sure that a paper roll is loaded in the printer and top cover is closed;
2) Send checkout command, then the printer shall start paper checkout operation.

BT-UC156 User’s Manual
- 15 -
5. Routine maintenance
5.1 Cleaning Printhead
When one or more of the following cases occur, clean the Print head.
Printout is not clear.
Paper feeds or backs with large noises.
Print head sticks with dirt.
To clean the print head, follow steps given below. (See figure 5.1.1)
1) Turn off the power, glide top cover limitation block and open top cover module to be vertical.
2) Allow a few minutes for print head to cool down if it has just finished printing.
3) Wipe off stains and dust on the heating element of the print head by using a cotton swab dipping with
ethyl alcohol.
4) Wait for 5 ~ 10 minutes until alcohol volatilize completely, then close top cover of the printer.
Figure 5.1.1 Cleaning TPH
5.2 Cleaning sensors
When one or more of the following cases occur, clean the sensors.
During printing, the printer sometimes stops printing and alarms paper end when there is paper in fact.
Doesn’t alarm paper end when paper is used out.
Marks cannot be identified correctly.
Doesn’t alarm when paper is near end.
To clean sensors, follow steps given below. (See figure 5.2.1)
1) Turn off the power, glide top cover limitation block and open top cover module to be vertical.
2) With a cotton swab dipping with ethyl alcohol, wipe off stains and dust on the surface of sensors.
3) Wait for 5 ~ 10 minutes until alcohol volatilize completely, then close top cover of the printer.
Table of contents
Other SNBC Printer manuals


SNBC
SNBC BTP-R880NPI User manual

SNBC
SNBC BTP-2002NP User manual

SNBC
SNBC BT-T080 Owner's manual

SNBC
SNBC BTP-M300 Owner's manual

SNBC
SNBC KIOSK Series User manual

SNBC
SNBC BTP-R180II User manual

SNBC
SNBC BTP-L580IIC User manual

SNBC
SNBC BTP-R180II User manual

SNBC
SNBC BTP-R580 User manual

SNBC
SNBC BTP-R880NP Owner's manual


