Snom 715 User manual

1
snom 710, 715, 720, 760 manual
A. General information
1. Introduction
This manual helps you to optimize the usage of the IP telephone in combination with the PBX. Please
use this manual at initial operation. Some features differ from the features described in the
manufacturer's documentation.
The following pages describe the snom 710, 715, 720 and 760 system telephones.
snom 710
snom 715
snom 720

2
snom 760
We wish you success and joy in working with your new telephone and this manual!
Subject to alterations.
Version 1 / 10.2016 (en)
1. Basic functions
1.1. Overview of keys
1.2. Outgoing call
1.3. Incoming call
1.4. Hold
1.5. Call waiting and toggling calls
1.6. Call transfer
1.7. 3-way calls
1.8. Accessing voicemail
1.9. Call forwarding
1.10. Callback
2. Advanced telephone functions

3
2.1. Overview
2.2. Function keys & codes
2.3. Telephone lock
3. Voicemail
3.1. Initial set-up
3.2. Accessing voicemail
4. IP adress
4.1. How can I find the telephone’s IP address?
D. Operation
E. Where can you find help with your telephone system?
2. Used symbols
Type Icon Description
Notice Important information and notices that you
have to pay attention to.
Hint Useful hints that provide additional
information.
Action - is marked with a dash
Result of an
action ⇒ is marked with an arrow
List
•
is marked with a bullet point

4
B. Initial operation
1. Requirements and Information
Using this snom IP telephone with your nfon telephone system merely requires a sound
broadband connection.
There can be delays with incoming and outgoing calls when using the snom 7xx series in
combination with a Plantronics DECT headset and a APU-71 EHS adapter.
The snom 715 is End of Life (EOL) since January 28, 2015.
To operate a snom D7 expansion module an update to firmware v 8.7.5.17 is necessary.
A total of three D7 modules can be daisy-chained. The chain is operated via USB cable.
From the second module onwards, an extra power supply unit is needed.
Please note: Telephones with the firmware 8.9.3.x should not be downgraded to a
firmware lower than 8.7.5.44, otherwise problems may occur if you try to upgrade again.
See the manufacturer's notice here.
2. Adding an extension
All telephones you receive are preconfigured and connected to the telephone system.
Find further information on how to install an extension in the administration portal
manual.
C. Notices
1. Encryption
You have the option of voice encrypting (SRTP) your telephone calls. You can activate this function
for your customer account via the administration portal at any time.
Activation of this function is subject to fees.

5
You can activate the function Voice Traffic encryption (SRTP) on the administration
portal under ADMINISTRATION / Profile.
- Activate the function on the administration portal.
- Restart all telephones. Restarting may take a few minutes. During a conversation a lock icon on
the telephone display indicates encryption is activated.
⇒ The active call is now encrypted.
2. “Hot desking”
The basic function of “Hot desking” allows cancelling the registration of existing users and
registering new users to your end device. This is useful when employees frequently change their
work station without taking along their end devices. After completing the registration process your
configuration is automatically transferred to the new telephone.
Cancelling the registration of the current extension
- Proceed as follows when in menu:
Menu -> Telephone settings -> Cancelling an extension -> Confirm
⇒ The extension is now cancelled and the telephone is restarted. This may take some time.
Registering the new extension
- Proceed as follows when in menu:
Menu -> Enter the extension number -> Confirm -> Enter voice mail PIN -> Confirm
⇒ The new extension is now registered. This may take some time.

6
On snom 710, the second function key is by default preconfigured as a menu key. Press
this key to enter the phone menu. Once you are in the menu, all Hot Desking settings are
the same as on other snom telephones.
D. Operation
1. Basic functions
1.1. Overview of keys
snom 710, snom 715
1 Telephone status
2 LED call indicator
3 Display
4 Soft keys
5 Confirm key
6 Navigation key
7 Navigation key
8 VoiceMai key with LED
9 Freely programmable function keys with LEDs
10 Freely programmable function keys with LEDs
11 Speaker key with LED
12 Volume key
13 Mute key with LED / DND key when in idle mode
14 Alphanumeric keypad
15 Receiver microphone
16 Receiver speaker

7
snom 720
1 Telephone status
2 LED call indicator
3 Display
4 Soft keys
5 Confirm key
6 Navigation key
7 End key
8 VoiceMai key with LED
9 Freely programmable function keys with LEDs
10 DnD key (do not disturb)
11 Phone book key
12 Menu key
13 Transfer key
14 Hold key
15 Microphone for speaker function
16 Headset key with LED
17 Speaker key with LED
18 Volume key
19 Mute key with LED
20 Alphanumeric keypad
21 Receiver microphone
22 Receiver speaker
snom 760
1 Display

8
2 LED call indicator
3 Not programmable line keys
4 Soft keys
5 Confirm key
6 Navigation key
7 End key
8 VoiceMai key with LED
9 Freely programmable function keys with LEDs
10 DnD key (do not disturb)
11 Phone book key
12 Menu key
13 Transfer key
14 Hold key
15 Microphone for speaker function
16 Headset key with LED
17 Speaker key with LED
18 Volume key
19 Mute key with LED
20 Alphanumeric keypad
21 Receiver microphone
22 Receiver speaker
Keys in detail:
Key Description
Use the toggle key to browse through the display.
On the home screen:
Down: Settings
Up: Call lists
Confirms an action, selection or entry

9
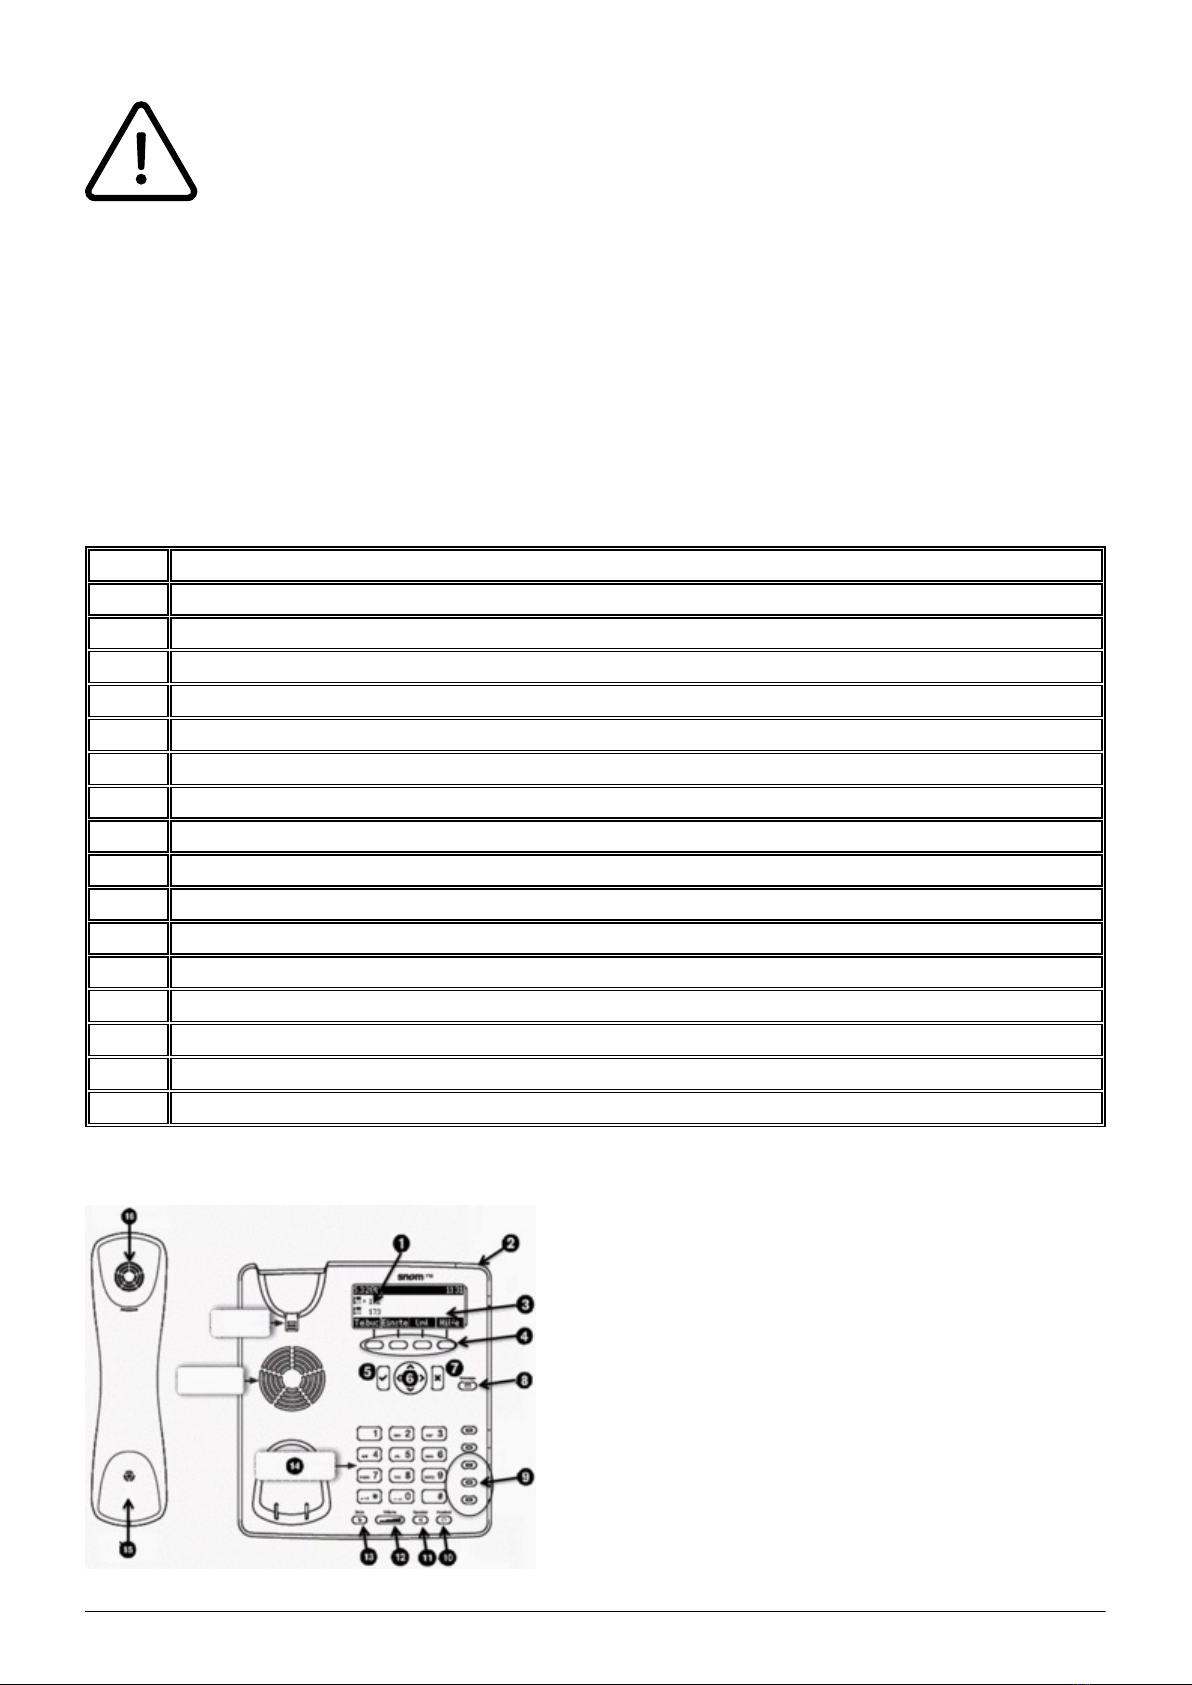
Cancels an action, selection or entry
Mutes the microphone during a call
Adjusts the receiver volume or the ring tone volume
Hands-free mode (answering possible)
Headset mode
Access voicemail
Do not Disturb mode on / off. Extension works as in “Delayed call
forwarding”.
Phone book (Set up via the administration portal)
Menu
Transfer call
Hold call
LED indicators
1. Call LED*:
Rapidly flashes red with an incoming call.
Continuous, bright red while dialling, during a call and when a call is placed on hold.
Continuous somewhat less intensive red indicates a missed call.
2. Function keys LED:
The standard setting is “Line”. I.e., if the first four freely programmable function keys are not
programmed, the function keys with LEDs can be used as line keys.
Rapidly flashing green when the respective line has an incoming call.
Continuous green when the line is in use.
Slowly flashing green when the line has a call on hold
3. Voicemail LED:
A continuous red light indicates a new message has been saved in voicemail.
*The LED indicator of snom 710 flashes solely in green color.
1.2. Outgoing call
Note:
When dialling an internal telephone number, only the extension needs to be entered.
When dialling external telephone numbers, you must first dial ‘0’, then enter the external
number.

10
Selecting the audio component
1.) Receiver
- Pick up receiver, enter number and press .
- Enter number and pick up receiver.
2.) Headset
- Enter number and press .
3.) Speaker / microphone
- Press the speaker key to activate the speaker or the microphone respectively.Enter the number
and press .
Dialling a number from the call lists
- Go to “Lists” and select the respective list. Press to open the desired list.
- Select the number you would like to phone and confirm with .
Calling from the phone book
- Press the phone book key.
- Enter the initial letter of the name or additional letters as necessary. You can also use the arrow
keys.
- Press to select the respective number.
You will find the directory key on snom 710 on the upper function key. Please notice that
the handling is identical to snom 720/D725 and 760/D765.
1.3. Incoming call
There are various options for answering an incoming call:

11
With the receiver
- Pick up the receiver.
With the headset
- Press .
With the speaker / microphone
- Press the speaker key to activate the speaker / microphone and answer the call.
1.4. Hold
- Press the hold key / (on snom D735 and D785) to place the active call on hold.
Calls on hold are indicated in three ways:
by the display text
the slowly flashing green/red line LED (i.e., when the first four freely programmable function
keys are not programmed; on snom D735 and D785 the LED flashes red only
and with the continuous red call LED.
Calls on hold can now be transferred or other calls can be made or put on hold.
- Press the hold key / (on snom D735 and D785) or the respective line key, to return to
the call on hold. If the party on hold hangs up while on hold, the connection is terminated.
Please click on the soft key "Hold" under the display to use "Hold" with snom 710.
1.5. Call waiting and toggling calls
If a call comes in while you are on a call, the display shows an icon with a ringing receiver and a
double call waiting tone (double beep) can be heard.
Options
You can answer the incoming call, which automatically places the active call on hold.
Ignore the incoming call with . The caller hears a busy tone.
You can also transfer the incoming call without announcing it.

12
If another call comes in during an active call, you can ignore it by pressing and holding
the X key for several seconds. To end the active call first, briefly press the X key. You can
then answer the incoming call.
On snom 710, press the "Trans" soft key to transfer the current call. You can then answer
an incoming call.
1.6. Call transfer
There are two options for transferring a call:
Attended call transfer
- Press the hold key , on snom D735 and D785 the hold key is different and looks like this
.
- Dial the number of the other extension
- Confirm with .
When the call is answered, announce the call being transferred.
- Press the transfer key .
- To perform an announced call transfer with the snom 710, push the soft key Hold
during an active conversation.
- Dial the desired number and press the soft key Trans to transfer the call.
- To perform an unannounced call transfer with the snom 710, push the soft key Trans to
transfer the call directly.
- The remaining procedure is equal to snom 720 und 760.
1.7. 3-way calls
In order to start a three way conference, proceed as follows:
- Place the two other parties on hold.
- Next, press the “Conf. on” button to initiate a 3-way call. On snom D735 and D785 confirm with
the soft key "Conference On" .
- To hold a 3-way call, press the "Hold" button , on snom D735 and D785 press the key .
- To end a 3-way call, press the softkey button „Conf. on“, on snom D735 and D785 press the key .
Both parties are then placed on “hold” and you can decide whether you wish to continue speaking
with a single party or hang up.

13
1.8. Accessing voicemail
Proceed as follows to retrieve the messages on your mailbox:
- Press the voicemail key / . It lights up, when you have received a new message.
- Enter your voicemail PIN.
- Then press 1 to listen to messages. After listening to the message press:
7 to delete
5 to replay the message
6 to go to the next message
- To end, hang up or press the Cancel key .
1.9. Call forwarding
You can configure various call forwarding scenarios. For this purpose you can use the call
forwarding profiles.
Under the telephone menu you can only edit the default profle (catch all / always) to be found under
the call forwarding profiles. You can edit the remaining call forwarding profiles via Ncontrol or via
the administration portal. For more information, refer to the administration portal manual and the
Ncontrol manual.
The following call forwarding options are available. You can activate or deactivate call forwardings
via the telephone menu's call settings.
Permanent call forwarding (always)
All incoming calls will be forwarded directly to the predefined telephone number.
Forward if busy (busy)
New calls will be forwarded immediately, when coming in during an active call. This call forwarding
option functions only, if the Call Waiting function is deactivated.
Delayed call forwarding (no answer)
Call forwarding condition: You do not answer the incoming call within a defined time period
(timeout). The timeout can be set to 5, 10, 15 or 20 seconds. Where should the incoming call be

14
forwarded after the specified time has elapsed? The caller receives a call waiting signal and is then
forwarded to the defined destination.
If unavailable (not registered)
The option functions only if the end device is not registered to the telephone system:
When the Internet connection fails or there is no LAN connection.
and
If “call forwarding …if unavailable” is programmed for a direct extension (e.g. extension 123 -
John Doe) and a caller calls the direct dial number for the extension directly, call forwarding
applies. If the extension is a member of a queue or a group and the queue or group receives a
call, call forwarding for the individual extension no longer applies! In general, the destination
should always be an available destination number. I.e., make sure that no voicemail or
announcement comes on.
Call forwarding codes
Call forwardings can alternatively be activated through * codes:
*10 Activation of the call forwarding profile
*11 + destination Permanent call forwarding to telephone number
**11 Cancel permanent call forwarding
*12 + destination If no answer after a specific time, delayed call forward
to telephone number
**12 Cancel delayed call forwarding
*13 + destination If busy, forward to telephone number
**13 Cancel call forwarding if busy
*14 + destination Call forwarding if unavailable
**14 Cancel call forwarding if unavailable
When disconnecting the connection between the end device and the telephone system, it
can take up to 60 seconds for the call forwarding to work. Once the end device is
reconnected to the telephone system, it can take up to 60 seconds for it to register.
The snom 710/D710 does not have a menu key. Access the menu by pressing the the
second function key. Refine your call forwarding options via nControl.

15
1.10. Callback
The Completion of Calls on No Reply (CCNR) creates a callback in case a person cannot be reached
(e.g. the person is not on its desk or busy) at the moment.
To use this function, the CCNR function has to be enabled in the administration portal
and in the phone extension. Click on the CCNR check box under Administration / Profile
to activate the function.
Erase Callbacks
- If the callback is no longer needed, all call backs can be erased by entering the **5 code into the
key pad. An acoustic confirmation finalises the erase.
2. Advanced telephone functions
2.1. Overview
You can use various features of the telephone system via the end device as well as via
Ncontrol or the administration portal (also refer to the administration portal manual).

16
After pressing the "menu" key you have the following options:
Call settings
Call waiting indication: define whether this function should be activated.
(optional, depending on settings on the administration portal) Timeout: set the ringing
time.
(optional, depending on settings on the administration portal) Intercom: the intercom
function enables speaking directly to a linked extension through the system, without dial tone
and ring tone.
Caller ID block: set your entire number to be shown to the party being called, the
switchboard number to be displayed or all caller ID information to be blocked.
Call forwarding: activate the function Call forwarding
Parallel call: configure another telephone or your mobile phone to ring in addition to your
telephone when a call comes in. You can then answer the call with one of the two telephones.
Call forwarding: profiles
Here you can select your preconfigured call forwarding profiles.
For details, please refer to the Ncontrol manual.
You can edit the default profile directly via your device.

17
For details, please click here.
Telephone settings
Automatic redialling
Suggests number (if necessary, remove function)
Ring tone
Define as primary device
Logoff
Queues
Queues can be enabled or disabled; for set-up see administration portal manual)
Use the “Toggle key ↑↓” to mark the desired selection and press the Confirm key .
The snom 710 does not have a menu key. Access the menu by pressing the the second
function key. Refine your call forwarding options via Ncontrol.
2.2. Function keys & codes
The administration portal allows you to program function keys. For more detailed information,
please refer to the administration portal manual.
Assignment of the function keys
Standard settings (i.e. no programming): Local Loop
Incoming calls are indicated respectively by the first LED (set to local loop) flashing.
When the call is answered the LED stays lit.
If a second call comes in during this call, the second LED flashes.
By pressing the key next to the flashing LED, the first call is automatically placed on hold and
the second call answered.
You can now toggle between the calls by pressing the key next to the flashing or steady lit
LED. In this manner, you can make a total of five calls at the same time.
Extension / telephone number
You can add any extension or telephone number to the busy lamp field.
- You can start a call by pressing the respective busy lamp key. If an internal extension is
programmed, you can see whether that extension is currently busy:

18
If the LED next to the key flashes, the party receives a call.
If the LED is consistently lit, the party has answered a call and is currently busy.
If the LED next to the respective key flashes, you can take the call by pressing the respective
key next to the flashing LED.
Intercom
You can add any extension in the PBX system and then use this function key to directly communicate
with this extension through the intercom. The other party must have the intercom activated on their
device. Intercom refers to a conventional intercom system (similar to walkie-talkies) directly
connecting you to the other party’s speaker by pressing the assigned function key.
Additional functions via * codes
Entering various codes (as listed on the following page) allows you to additionally program functions
such as call transfer to the keys.To do so, simply enter the code with the desired number in the entry
field.
Control codes allow direct access to the telephone system’s functions. The following codes apply:
Code Description
**## Restart devices, only for snom devices!
#+n Use outside line "n" to call the telephone number ("n" replaces the “0”
otherwise required to access an outside line)
*1 Start and end voice recording (if this function is enabled for the
extension)
*10+profile number Activation of the call forwarding profile
*11+TN Permanent call forwarding to telephone number (TN)
**11 Cancel permanent call forwarding
*12+TN If not available, forward to telephone number (TN)
**12 Cancel call forwarding if no answer
*13+TN If busy, forward call to telephone number (TN)
**13 Cancel call forwarding if busy
*14+TN If not registered, forward to telephone number (TN)
**14 Cancel forward if unregistered
*2+Speed dial Directly dial the extension/telephone number via speed dial
*3 Pick up the last call ringing in the pick-up groupe
*3+EXT Pick up call coming in to the extension (EXT)
*490 Activate call waiting
**490 Deactivate call waiting
*5 If busy, automatic callback activated
**5 If busy, automatic callback deactivated
*55 Specify primary device within a premium extension (Premium
Package)
*72+nnnn1 Call skill service nnnn

19
*73+nnnn1 Call eFax additional costs will occur
*74+nnnn1 Call time control nnnn
*75+nnnn1 Call group nnnn
*76+nnnn1 Call announcement nnnn
*77+nnnn1 Call queue nnnn
*78+nnnn1 Call conference service nnnn
*791 *791 - Access voice mail for this extension with password
*791158 - Access voice mail for extension 158, with the password for
158!
*11*791 - Transfer your calls to your voice mail
*11*791158 - Transfer your calls to the voice mail of the extension 158
*792 Access voice mail entering extension number, e.g. for remote enquiry
*80 Activate intercom
**80 Deactivate intercom
*80+NST Intercom to extension (EXT)
*84+nnnn1 Become member of the queue with service ID nnnn
**84+nnnn1 Leave queue with service ID nnnn
*85 Echo extension
*86 Block caller ID (CLIR)
*860 Show main number as telephone number
**86 Show telephone number incl.direct dial (CLIP)
*87 Subscribe to Skill-set
**87 Unsubscribe to Skill-set
*9+Project Number Define a project number for outbound calls. (Note: The project number
is only valid for the very next outbound call)
Function codes for conference rooms during an active conference.
** Help
*2 Activate or deactivate mute.
*3 Express your needs.
*5 Activate or deactivate mute of all participant.
*6
Lock the conference.
1) nnnn is the four digit Service ID with leading zeros (0). For example, in a callgroup, IVR, eFax,
etc. This means: is the Service ID "1", "0001" must be entered when entering the function code.
Example:
Call forwarding to your mobile device number 0171 12345 with the function key 1
Push the Add-symbol.
Select function-key 1.
Enter *110017112345. (*11 for call forward, then 0 or 9 depending on the call number for external

20
calls!).
Then confirm the line with the function-symbol.
Push the Confirm-symbol.
You can set another function key with *11 to deactivate the call forward.
2.3. Telephone lock
You have the option to protect your telephone from improper use by locking its keypad. I.e. with the
keypad locked, no outgoing calls can be dialed. However, the keypad lock can be deactivated at any
time.
To lock your snom telephone, press and hold the key for several seconds. A “lock icon” in the
display of your snom telephone indicates the telephone is locked.
To deactivate the keypad lock, press and hold the key again for several seconds. By default the
keypad lock does require the VoiceMail-PIN.
To cancel the keypad lock entirely, please go to the web interface for your end device, by entering
the device's IP adresse in any browser, and enter your personal PIN under Settings Preferences
Keypad Lock.
You can also change and deactivate your PIN there.
To set a PIN for unlocking, please go to the web interface for your end device and enter your
personal PIN under:
Settings Preferences Keypad Lock
There, you can also change or deactivate your PIN.
3. Voicemail
3.1. Initial set-up
Text
When accessing the voicemail system for the first time, you should also set up your personal
voicemail
1. Press the “Retrieve” key on the snom telephone itself or by dialing the extension assigned
on the service site to access the voice menu of the voicemail system.
2. Then select “0 Mailbox Options” to set up your voice mailbox.
Other manuals for 715
3
This manual suits for next models
3
Table of contents
Other Snom IP Phone manuals

Snom
Snom 4S Media Server Use and care manual

Snom
Snom 320 User manual

Snom
Snom 870 User manual

Snom
Snom M9 Instruction Manual

Snom
Snom D305 User manual

Snom
Snom 300 Quick start guide

Snom
Snom D862 Product information sheet

Snom
Snom 100 Use and care manual

Snom
Snom D865 User manual

Snom
Snom Vodafone 821 User manual