Stahlwille multipower MP100-1500 User manual
7
GB Instructions for use
1. Intended use
The MULTIPOWER torque multiplier may only be used
for tightening and loosening screw joints. It is not to be
used for lifting loads or for applying a permanent torque,
for example as a tensioning device. We shall not be
held liable for any damage, injury or interruptions
in operations resulting from non-observance of this
operating manual or improper use.
2. Description of the product
and intended use
The MP100-1500 is a compact torque multiplier tool that
enables screw joints to be tightened and loosened when
higher torques (up to 1500 N m) are required and simple
manual force is no longer effective. The MP100-1500
features a torque multiplier ratio of 1:5 and is particularly
well suited to use with fastener sizes between M20
and M30.
This MULTIPOWER tool is constructed symmetrically and
will generate a constant rotary drive motion in 8° steps if
oscillating 60° drive input is applied.
Angle controlled tightening of joints is easily achieved
thanks to the angle scale printed on the tool.
The directions of rotation for tightening and loosening
are marked on the MULTIPOWER tool. To reverse the
direction of rotation, simply turn the MULTIPOWER over.
3. Technical specifications
Max. output torque: 1500 N m
Max. driving torque: 300 Nm
Torque transmission ratio: 1:5
Gearbox ratio: 5,62:1
Drive: mechanical via
1/2" square drive
Take-off: internal hex drive, size 41
Torque monitoring: with torque wrench
Angle monitoring: angle scale; 8° per
rocking input action
Change of direction: clockwise/anticlockwise
by turning the tool over
Non-return lock: ratchet pawl
Adjustment mechanism: continuous; ratchet
Hex inserts: sizes 30, 32, 36
+1" outer square drive
Max. weight of MULTIPOWER: 1,890 g
Weight of torque absorption arm: 550 g
Max. head radius: R35
Dimensions: 165x105x30 mm
Torque absorption arm: 400 mm
(when attached)
4. Safety regulations
This tool has been manufactured in accordance
with all applicable safety regulations. Always use the
MP100-1500 in conjunction with a torque wrench to
provide power input.
The maximum input torque of 300 N m must never be
exceeded as otherwise the tool, in particular its ratchet
and lever mechanisms, may be damaged. Before using
the tools, check carefully to see that it is ready for use
and functioning correctly (refer to Section 6.3):
Warning: Using accessories and inserts other than those
recommended in this operating manual may lead to
malfunctioning of the tool and even cause injury.
Note: Repairs must always be carried out by qualified
experts using only original spares as otherwise there
may be an increased risk of injury to the user.
Never use MULTIPOWER tools or reduction adapters that
are worn or damaged. They must always perfectly fit the
nut or bolt to be tightened or loosened.
Danger: When using the MP100-1500, always wear
protective goggles.
5. Torque absorption
For the torque to be effectively transferred, the
MULTIPOWER must always be steadied. The steadying
action for the MULTIPOWER may be provided by the tool
itself or, for greater distances, using a torque absorption
arm.
Important: Note that the torque wrench will always rotate
in the opposite direction to that of the MULTIPOWER.
Warning: Never steady the MULTIPOWER against parts
that are loose or likely to give. The reactive force from the
MULTIPOWER might cause such parts to break off and
cause injury to people in the vicinity or damage to other
objects.

6. Using the MULTIPOWER
6.1 Analysing the tightening job:
•Tighten or loosen the joint?
•Clockwise or anticlockwise?
•What size is the fastener (M...)?
•What size spanner or insert is needed?
•Is there a suitable steady point for the torque
absorption arm?
•Measure the length of the arm required
6.2 Get the required accessories together:
•Torque wrench with permanent 1/2" square drive
•Reduction adapter, if size < 41.
•O-ring to secure the adapter
•Torque absorption arm, if steady distance
exceeds 140 mm.
•If necessary, additional spanner or wrench.
for the other end of a two-ended fastener.
6.3 Functional check of the MP100-1500:
•Check general state of the MP100-1500 torque
multiplier
➩Any cracks, deformations, wear are not permitted.
•Using a torque wrench, move the drive back and
fore between the endstops (approx. 70°).
➩Check that take-off wheel action and steps are
smooth.
➩Oscillating, clearly audible pawl and ratchet
action.
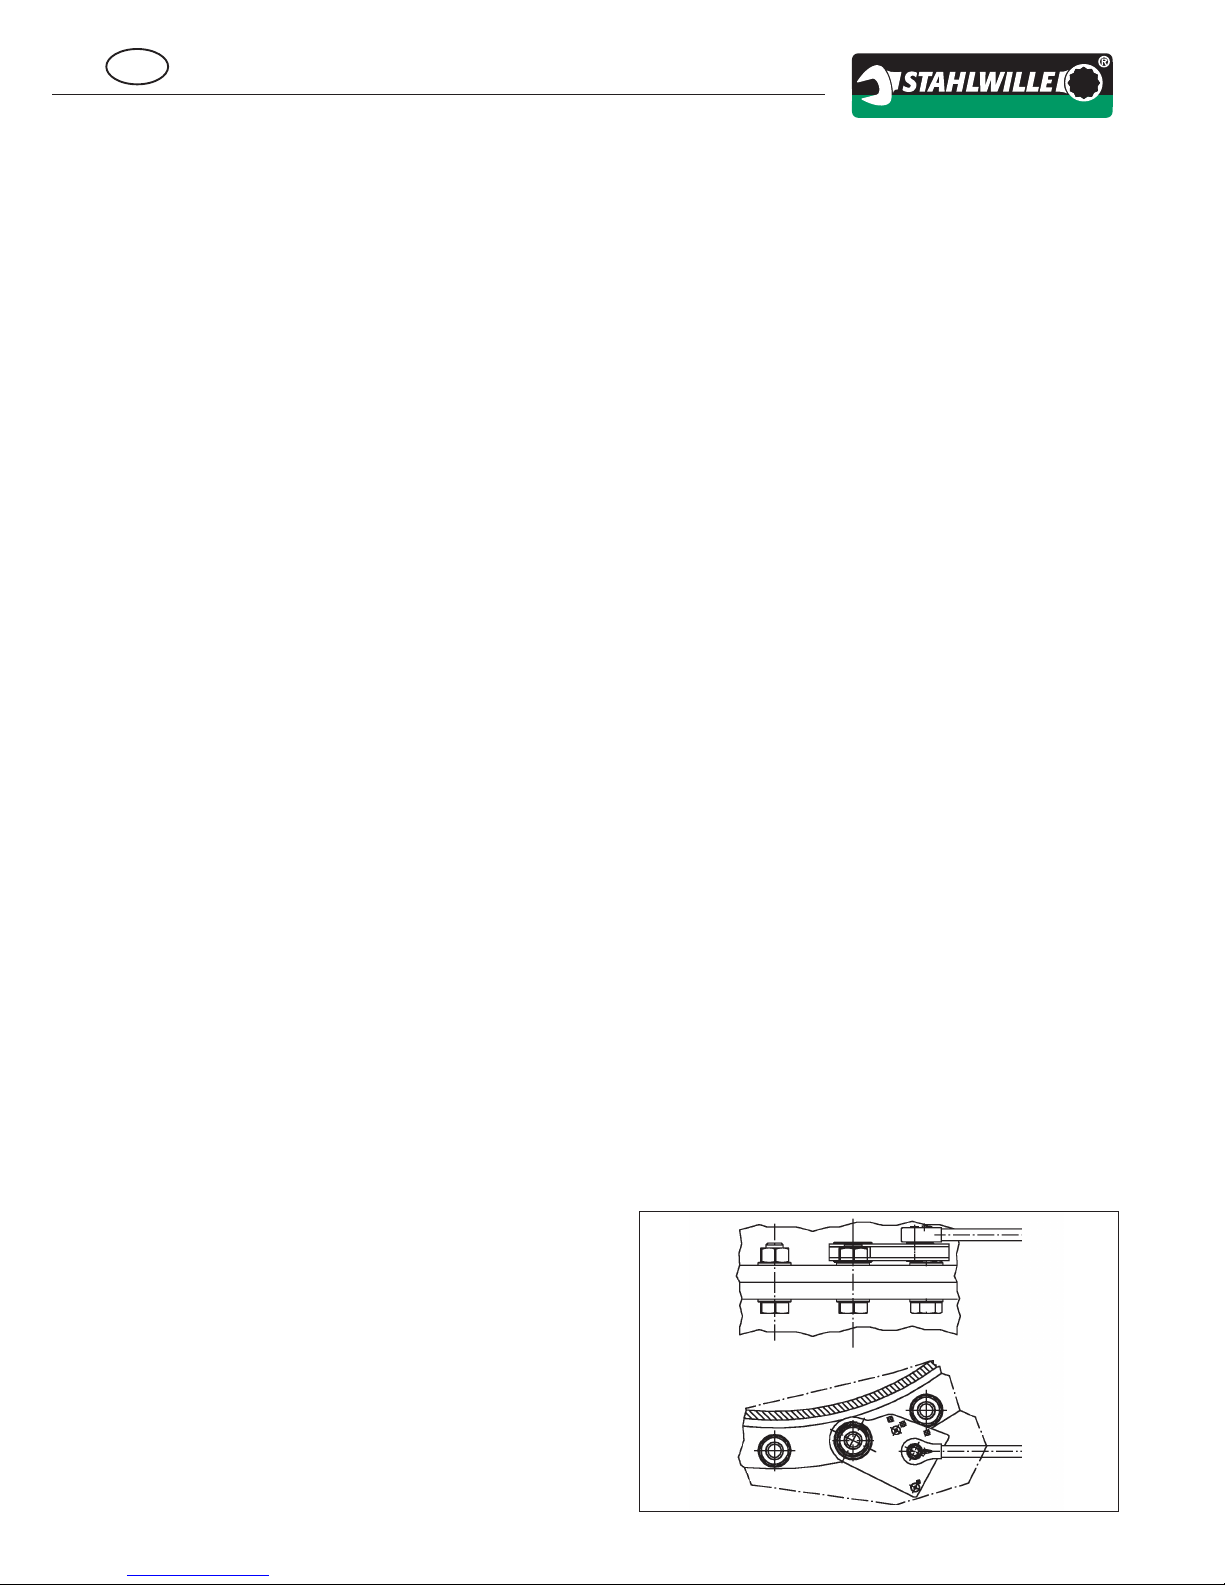
6.4 Fitting the torque absorption arm:
•The arm is only necessary if the steady point is
more than 140 mm from the fulcrum.
➩Put the torque absorption arm on as shown
and secure with the two M6 screws.
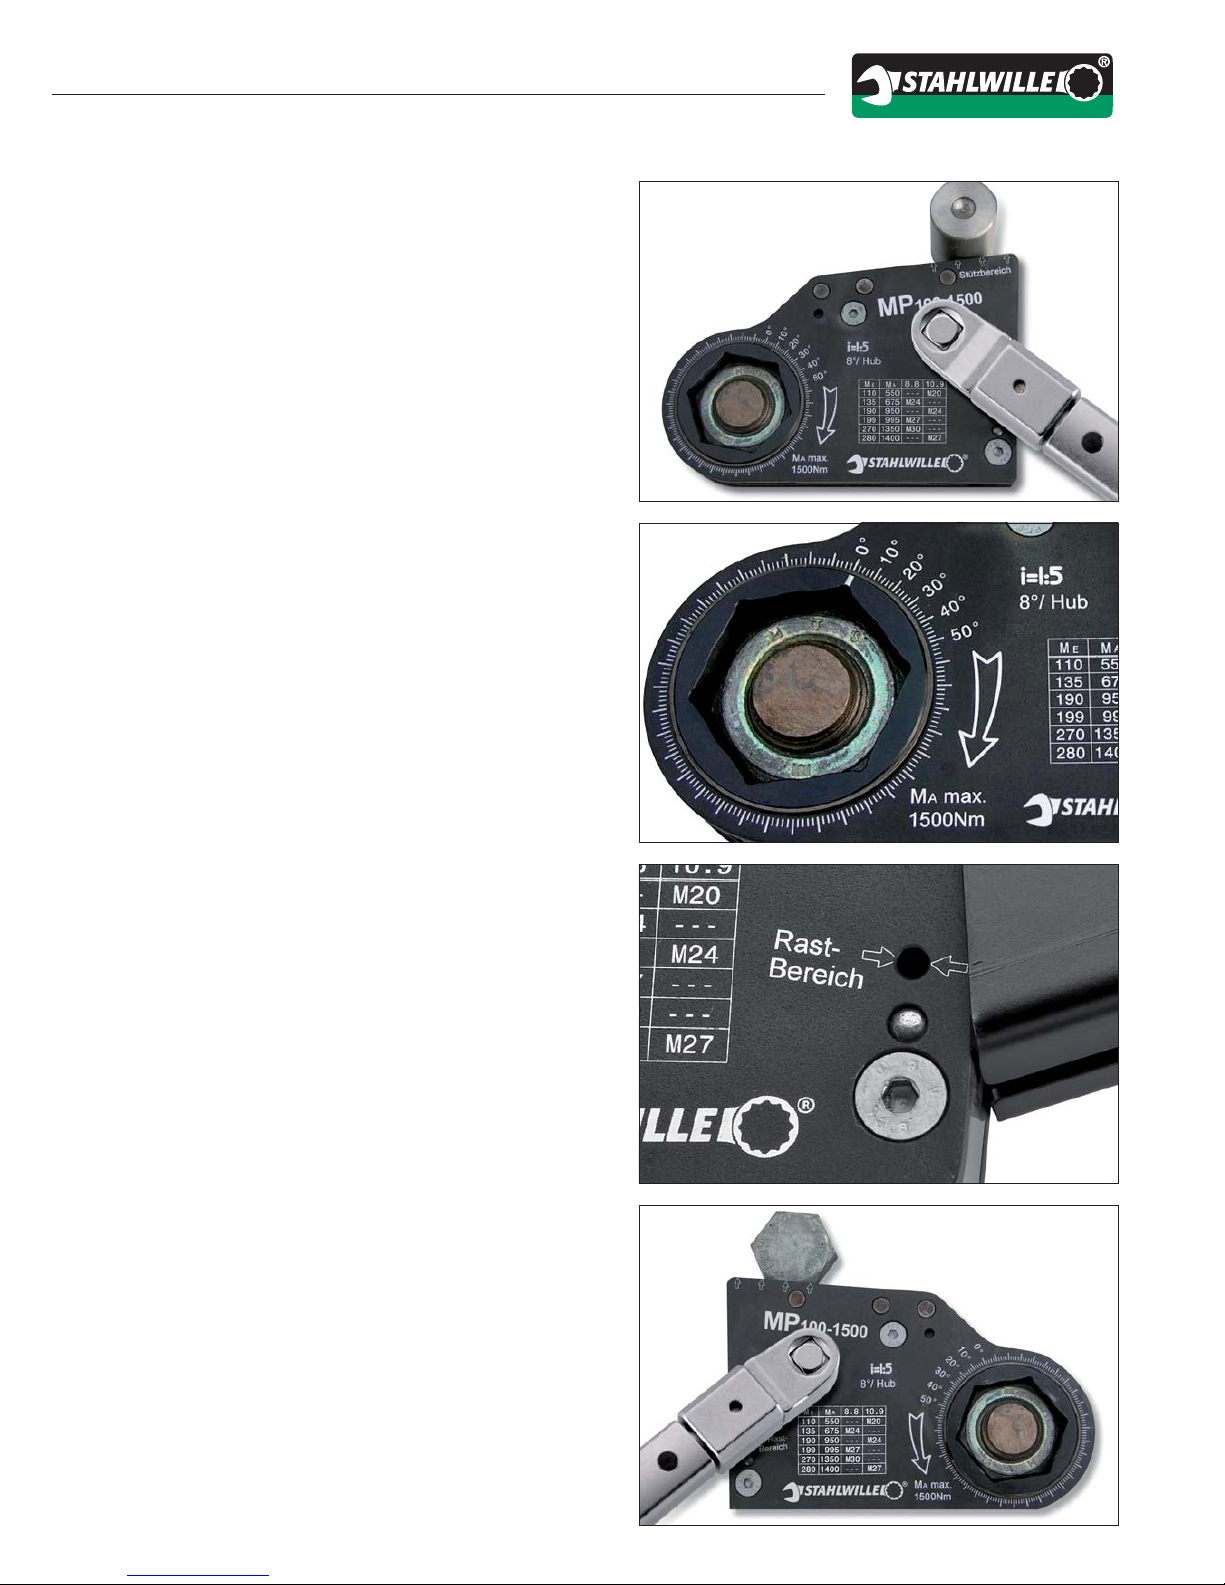
6.5 Positioning the MP100-1500 for
tightening/loosening:
•Place the MULTIPOWER on the fastener the right
way round for the required direction of rotation
(see arrows on housing).
•Swing the MULTIPOWER as far as the absorption arm
endstop (audible click as the ratchet re-engages).
•Set the cut-out value for the torque wrench in
accordance with the printed scale on the MP or the
table in Section 9.
➩Input torque must be ≤300 N m.
•Fit the torque wrench into the input square drive and
fix it in the required position.
Fastener can be
tightened/loosened without
torque absorption arm
Fastener can be
tightened/ loosened without
torque absorption arm
8
GB Instructions for use
6.6 Torquing the fastener:
•Using the torque wrench, move the input lever back
and fore between the endstops (approx. 70°).
➩Ensure you always move the tool through the
entire pivot range.
➩Apply oscillating motion and listen for the clearly
audible pawl and ratchet action.
•As soon as the torque wrench cuts out, the required
torque level has been reached.
➩Do not continue to move the drive after the wrench
has cut out.
➩Input torque must be ≤300 N m.
6.7 Tightening a fastener by angle:
•Mark the starting position of the hexagonal socket
opposite the mark.
➩Use a strip of adhesive tape or a light coloured
marker.
•Using the torque wrench, move the input lever back
and fore between the endstops (approx. 70°).
➩Ensure you always move the tool through the
entire pivot range.
➩Apply oscillating motion and listen for the clearly
audible pawl and ratchet action.
•Apply oscillating movements to the wrench until the
required angle has been reached as seen on the
scale.
➩Alternatively, it is possible to count the number
of oscillating motions (8° angle).
➩Input torque must be ≤300 N m.
6.8 Releasing tension after completing the tightening
action:
•After the torque wrench has cut out, it is possible that
the MULTIPOWER will remain in the tensioned state
between the joint and the absorption arm endstop.
To enable the MULTIPOWER to be removed from the
fastener, it is necessary to move the drive through
approx. half a stroke, however not further than the
lock position (marked on the tool as “Rast-Bereich”),
and then release it.
➩The edge of the lever must only be visible as far
as the tips of the arrows to prevent the pawls from
re-engaging.
6.9 Loosening a joint:
•Set the torque wrench to the maximum permitted
input torque of 300 N m.
•Insert the torque wrench and gently apply ratcheting
motion until the fastener has been released.
•If the torque wrench cuts out before the fastener has
broken free, the maximum permissible release torque
has been reached.
➩Continuing to torque the fastener will damage the
MULTIPOWER.
•Put the MP100-1500 to one side and use some other
suitable means to release the fastener.
➩A more powerful driver or heavy duty, striking
face spanner will be needed.
9

10
GB Instructions for use
7. Maintenance and service
The rod bearing is equipped with special, low-
maintenance plain bearing bushes that guarantee con-
stant, low coefficients of friction. All the remaining moving
parts in the MP100-1500 are greased before delivery to
the customer with an MoS2 paste. Under normal working
conditions, this lubrication will last for several years of
use without failing. If the tool is used very intensively
or if the functional check in accordance with
Section 6.3 indicates that lubrication is insufficient,
8. Malfunctions and their rectification
Note: Malfunctions in the MULTIPOWER can result in consequential damage that may seriously limit the tools lifetime and
accuracy. If you are unsure, please contact STAHLWILLE staff, who will be pleased to assist.
9. Tightening torques and setting torques
The following table shows the tightening torques (MA) for standard metric threads and the corresponding setting torques (ME) for the
torque wrench for use with the MP100-1500 MULTIPOWER torque multiplier.
Weight Weight Weight Weight incl. Head Length Breadth Height Steady Breadth Width Height
Output Input Output Input MP100-1500 Torque absorption arm Radius RK L0 B0 H0 LR BR WR HR
Nm Nm SW AK kg kg mm mm mm mm mm mm mm mm
1500 300 41-hex. 1/2"sq. 1.89 2.44 35 160 105 32 400 143 87 20
10. Specifications and dimensions of the MP100-1500
Strength category 8.8 Strength category 10.9 Strength category 12.9
MA Nm ME Nm MA Nm ME Nm MA Nm ME Nm
M18 275 55 390 78 470 96
M20 390 78 550 110 660 132
M22 530 106 745 149 890 178
M24 675 135 950 190 1140 228
M27 995 199 1400 280 1680 –
M30 1350 270 1900 – 2280 –
Fault
Not possible to turn the take-off
(pawl wheel) continuously.
No audible signal when the pawl
ratchet engages.
The eccentric lever is stiff or jammed.
When torque is applied, it
suddenly drops off (before the end-
stop is reached).
Check
Run a function check as given in Section 6.3.
Is there an audible signal when the pawl / ratchet
pairs engage with no working load?
Measure driving torque ME with no working load
⇨should be less than 20 N m.
Run a function check as given in Section 6.3.
Check the toothing of the pawl wheel and ratchets to
see if there are any oil or grease residues there.
Remedy
Have the tool serviced as described in
Section 7.
Check the pawls, ratchets and leaf springs and
have them replaced if necessary.
Lubricate the bearing surfaces of the ratchet
wheel and eccentric lever in both parts of the
housing with MoS2 paste.
Have the tool serviced as described in
Section 7.
Have the toothing of the ratchet wheel, pawls
and ratchets degreased.
or if the pawl/ratchet mechanism fails, the tool will need
servicing. We recommend returning the tool to STAHL-
WILLE for servicing. This will ensure the highest standard
of service at a reasonable price and guarantees that
only original spare parts are used. In addition, every
reconditioned MULTIPOWER is subjected to intensive
checks on a specially designed torque measuring device
before being returned to the customer.
The values assume 90 % exploitation of
the yield point and a total friction
of μ = 0.125.
⇨The maximum permitted input torque
MEmax. must not exceed 300 N m under
any circumstances!
LR
B0
L0
RK
SW
AK
BR
WR
H0
HR
Other manuals for multipower MP100-1500
1
Other Stahlwille Tools manuals

Stahlwille
Stahlwille SENSOTORK 712R/6 User manual

Stahlwille
Stahlwille perfectControl 7794-2 User manual

Stahlwille
Stahlwille TORSIOTRONIC TT 120 User manual

Stahlwille
Stahlwille multipower MP100-1500 User manual

Stahlwille
Stahlwille MULTIPOWER MP300 User manual

Stahlwille
Stahlwille MANOSKOP 755R/1 Manual

Stahlwille
Stahlwille Sensotork 713 User manual

Stahlwille
Stahlwille MANOSKOP 730D User manual

Stahlwille
Stahlwille SMARTCHECK USB/DAPTIQ User manual

Stahlwille
Stahlwille Manoskop 730N User manual


