manuals.online logo
Brands
  1. Home
  2. •
  3. Brands
  4. •
  5. Sunlighten
  6. •
  7. Plumbing Product
  8. •
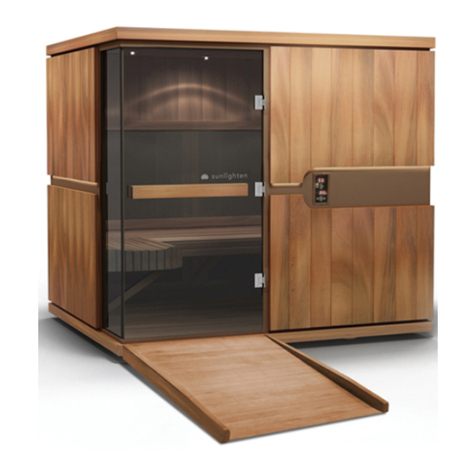
  9. Sunlighten Signature I User manual

Sunlighten Signature I User manual

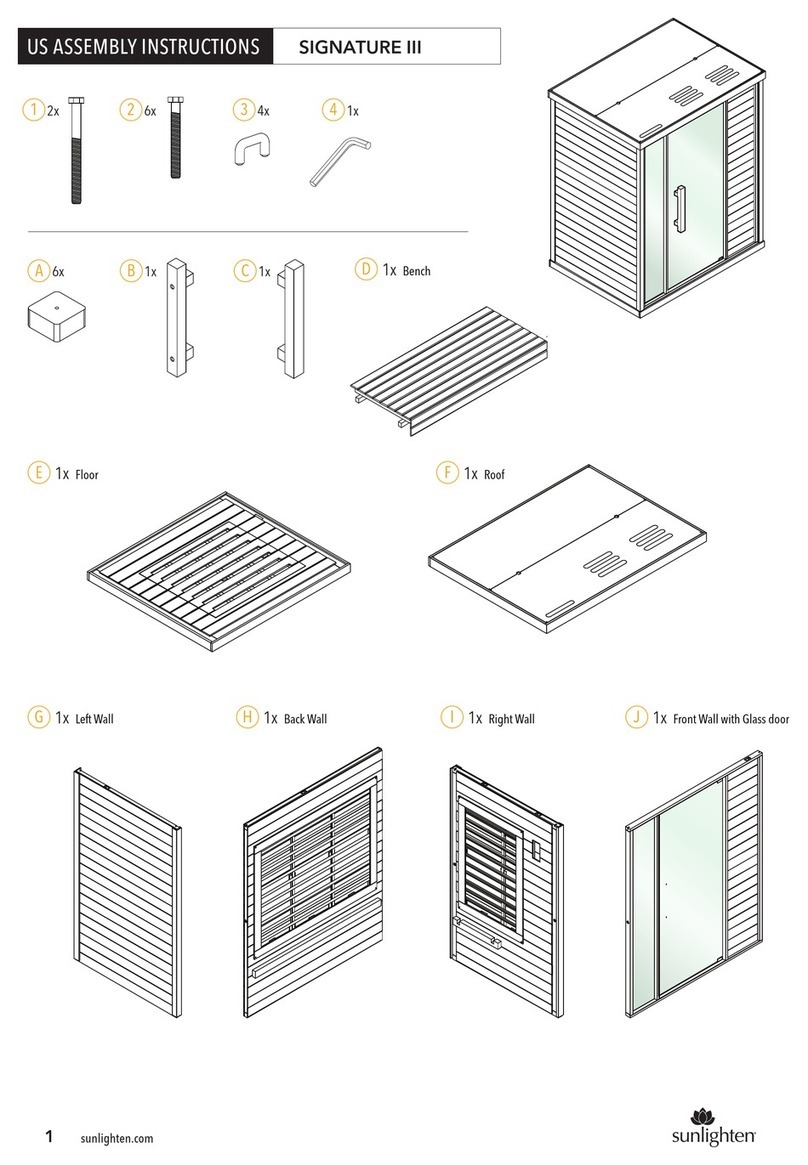
E1x Floor
G1x Left Wall H1x Back Wall I1x Right Wall J1x Front Wall with Glass door
F1x Roof
2x
14x
24x
3
4x
A1x
B1x
C
1x
4
D1x Bench
SIGNATURE I
1sunlighten.com
1sunlighten.com
US ASSEMBLY INSTRUCTIONS
1.1 Attach the feet pegs with
supplied Allen wrench and bolts to
the underside of floor .
1.2 Cut the zip ties holding the floor
grate. The fabric will adhere to the
Velcro on the underside of the grate.
TIP: One side of the fabric adheres
better.
NOTE: Make sure the floor panel is on a
surface that is perfectly level and
relatively smooth. Failure to do so can
cause the door to not close all the way in
the later steps.
2
E
A
You will want two or more people to assemble your
sauna. Unpack each wall segment from the shipping
material. Stage each wall segment in the room you will
be assembling the unit.
* Failure to do so will void your sauna's warranty
and customer will assume liability for any electrical
damages to the sauna itself or the residence/business
in which the sauna is installed.
120V, 1350 W. Dedicated 20 A circuit,*
without GFCI or AFCI, and NEMA 5-20 power
socket. 10 ft cord exists from back left of roof.
See USER MANUAL or spec sheet for
additional specs.
STEP 1
Place the back wall on the back of the
floor panel . Be sure you have two people
assisting with this step. This is the side with
the sauna information label on the bottom
edge.
STEP 2
PRE-STEPS
A
2
4
1.1
1.2
H
E
NOTE: Before you begin installing the walls,
be sure you have at least:
• 6 in between the back of the sauna and
the outlet wall.
• 12 in gap from the top of the sauna to the
ceiling.
• Place the sauna next to the wall power
outlet to ensure you have access to the
wall power socket outlet to cut the power
to the unit if required.
In this step, make sure one person is
holding the wall while the other helps
balance it and press it in place.
E
E
E
H
2sunlighten.com
2sunlighten.com
STEP 3
As you insert each wall segment, you will
insert the U-clips in the pre-drilled
holes in the corner. This will keep the
walls sealed together.
The front wall will be inserted next.
Be careful of the glass door and panel
as you insert the wall.
Place right wall on the right side of floor
panel . This wall panel should sit flush
once properly seated. Make sure no gaps
are visible in the corner of the two walls as
you insert it. It should be inserted flush.
STEP 4
J
I
E
3
3
I
J
1sunlighten.com
3sunlighten.com
STEP 5
Once all the U-clips have been
inserted in the corners, the next
step will be to place the roof
on top. Make sure the side the
main power cord receptacle faces
the back.
After securing the U-clip , the left wall
will be the last to be inserted. Make sure
it is flush and no gaps are showing in the
corners.
NOTE: If you ever have trouble getting a
U-clip to slide in, this can be resolved by
tapping it with a hammer.
STEP 6
3 G
3
3
3
F
F
G
1sunlighten.com
4sunlighten.com
STEP 7
Please make all connections on roof of
sauna as illustrated. To do this, you will
first need to remove the dust cover by
removing many screws.
Before the bench is placed,
make sure the heater frames are
taken out to allow the bench to
be placed on its support.
Left Wall Heaters
Back Wall Heaters
Right Wall Heaters
Control Panel
Blaupunkt Receiver/
Sound Therapy Receiver
D
D
heater frame
NOTE: The right wall of the sauna includes
wire connections underneath which will
lead into the floor panel (see illustration 7.2
on the right). 7.2 Connect floor
heaters
The floor heaters will need to be connected
to the right wall wires. The diagram to the
right shows where the connection is made.
You will need to remove the floor grate and
a small hatch covering the harness. E
1sunlighten.com
5sunlighten.com
C
B
1
4
STEP 8
With the bench installed, the
heater panel frames can be
inserted back into their
respective walls.
The door handles come with
the hardware and can easily be
screwed right in.
A second person should hold
the handle while the other
screws the bolts in with the
Allen wrench. The dust cover
should also be replaced.
heater frame
CONGRATULATIONS, your sauna is now ready to enjoy!
If you have any questions, please call
Sunlighten Customer Support at 877.292.0020.
09082023
1sunlighten.comsunlighten.com
6

Other manuals for Signature I

4

Other Sunlighten Plumbing Product manuals

Sunlighten Signature II User manual

Sunlighten

Sunlighten Signature II User manual

Sunlighten Signature III User manual

Sunlighten

Sunlighten Signature III User manual

Sunlighten Signature I User manual

Sunlighten

Sunlighten Signature I User manual

Sunlighten Signature II User manual

Sunlighten

Sunlighten Signature II User manual

Sunlighten Signature III User manual

Sunlighten

Sunlighten Signature III User manual

Sunlighten SIGNATURE EURO 1 User manual

Sunlighten

Sunlighten SIGNATURE EURO 1 User manual

Sunlighten Amplify III User manual

Sunlighten

Sunlighten Amplify III User manual

Sunlighten mPulse User manual

Sunlighten

Sunlighten mPulse User manual

Sunlighten mPulse cONQUER User manual

Sunlighten

Sunlighten mPulse cONQUER User manual

Sunlighten mPulse Aspire User manual

Sunlighten

Sunlighten mPulse Aspire User manual
Sunlighten Signature Series User manual

Sunlighten

Sunlighten Signature Series User manual

Sunlighten Signature I User manual

Sunlighten

Sunlighten Signature I User manual

Sunlighten Solo System User manual

Sunlighten

Sunlighten Solo System User manual

Sunlighten ADA User manual

Sunlighten

Sunlighten ADA User manual

Sunlighten Signature Power Box User manual

Sunlighten

Sunlighten Signature Power Box User manual

Sunlighten mPulse eMPOWER User manual

Sunlighten

Sunlighten mPulse eMPOWER User manual

Sunlighten Solo System User manual

Sunlighten

Sunlighten Solo System User manual

Sunlighten mPulse Aspire User manual

Sunlighten

Sunlighten mPulse Aspire User manual

Sunlighten Solo System User manual

Sunlighten

Sunlighten Solo System User manual

Sunlighten mPulse 3-in-1 Series User manual

Sunlighten

Sunlighten mPulse 3-in-1 Series User manual

Sunlighten Amplify II User manual

Sunlighten

Sunlighten Amplify II User manual

Sunlighten Signature III User manual

Sunlighten

Sunlighten Signature III User manual
Sunlighten Solo System User manual

Sunlighten

Sunlighten Solo System User manual
Sunlighten mPulse Discover User manual

Sunlighten

Sunlighten mPulse Discover User manual

Popular Plumbing Product manuals by other brands

Glacier bay HD67211W-6201 Installation and care guide

Glacier bay

Glacier bay HD67211W-6201 Installation and care guide

MAINLINE Prediction Elite Series Installation

MAINLINE

MAINLINE Prediction Elite Series Installation

Toto MERCER TL756DD owner's manual

Toto

Toto MERCER TL756DD owner's manual

JADO GLANCE 831/075/000/000 installation instructions

JADO

JADO GLANCE 831/075/000/000 installation instructions

BEJOAN X7-US Series instructions

BEJOAN

BEJOAN X7-US Series instructions

Black & Decker Price Pfister Series instructions

Black & Decker

Black & Decker Price Pfister Series instructions

agape ASEN0912H Instructions for installation

agape

agape ASEN0912H Instructions for installation

Triton T70si Installation and operating instructions

Triton

Triton T70si Installation and operating instructions

Hans Grohe Vivenis 75050 Series Instructions for use/assembly instructions

Hans Grohe

Hans Grohe Vivenis 75050 Series Instructions for use/assembly instructions

Radaway NES +20mm Assembly instruction

Radaway

Radaway NES +20mm Assembly instruction

Aqua SAHARA quick start guide

Aqua

Aqua SAHARA quick start guide

Lacava ARCH 13013 owner's manual

Lacava

Lacava ARCH 13013 owner's manual

Ronbow Contempo LEONIE 034723-F08 Installation sheet

Ronbow

Ronbow Contempo LEONIE 034723-F08 Installation sheet

Schier GB-1000-L installation guide

Schier

Schier GB-1000-L installation guide

Luxart Poydras PO411TO18 Installation

Luxart

Luxart Poydras PO411TO18 Installation

Canvas BROOKS 063-6341-2 Assembly instructions

Canvas

Canvas BROOKS 063-6341-2 Assembly instructions

Gessi 32849 manual

Gessi

Gessi 32849 manual

Hans Grohe Logis 71074000 Instructions for use/assembly instructions

Hans Grohe

Hans Grohe Logis 71074000 Instructions for use/assembly instructions

manuals.online logo
manuals.online logoBrands
  • About & Mission
  • Contact us
  • Privacy Policy
  • Terms and Conditions

Copyright 2025 Manuals.Online. All Rights Reserved.