Sygonix UH-730 User manual

Operating instructions
Outdoor 360° Surveillance camera 1080p
Item No. 1674346

Table of contents
Page
1. Introduction..........................................................................................................................3
2. Explanation of symbols .......................................................................................................3
3. Intended use........................................................................................................................4
4. Delivery content...................................................................................................................5
5. Safety instructions...............................................................................................................5
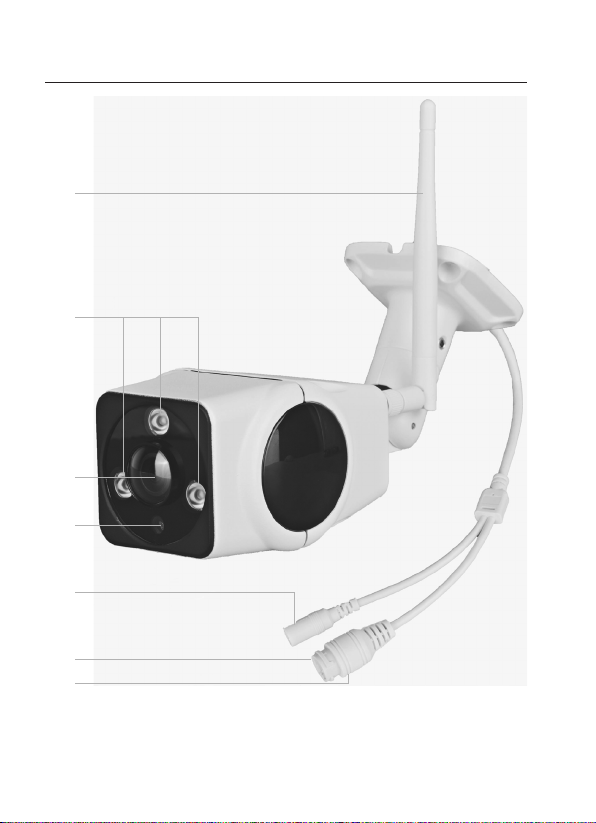
6. Product overview.................................................................................................................7
7. Installation and start-up.......................................................................................................9
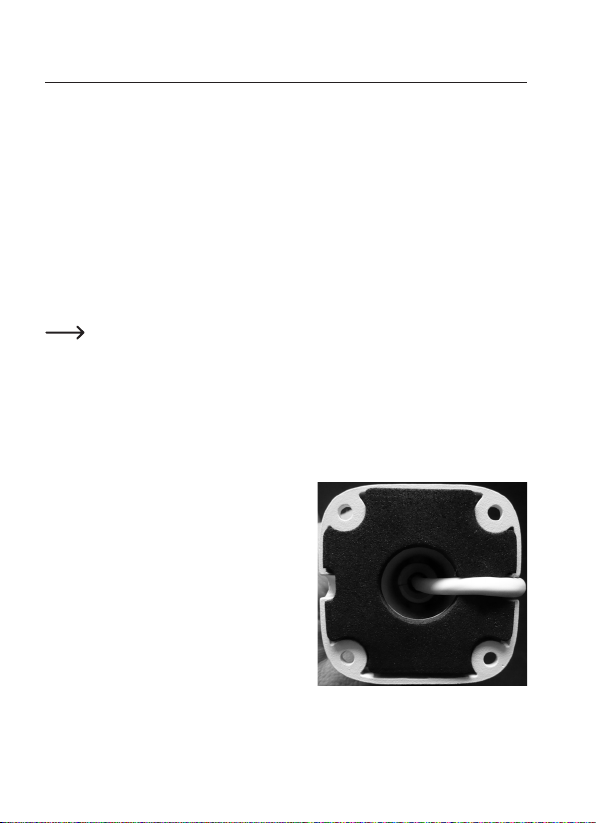
a) Mounting the camera....................................................................................................9
b) Inserting the SD card..................................................................................................11
c) Installing the camera ..................................................................................................11
8. Setting up the app .............................................................................................................12
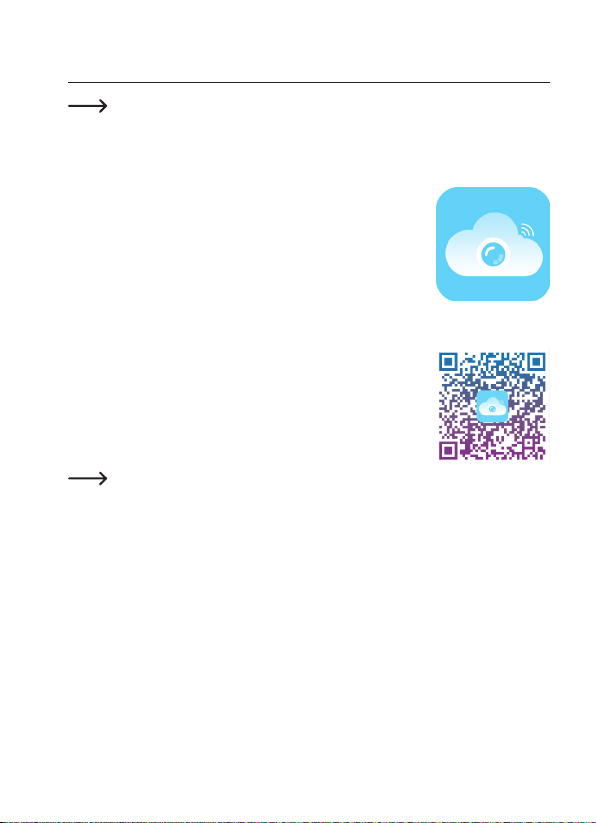
a) Installing the app ........................................................................................................12
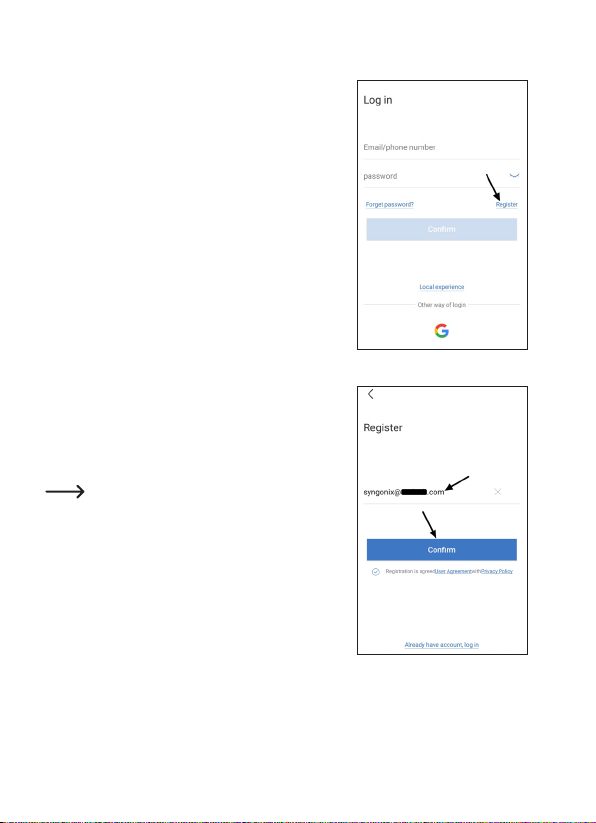
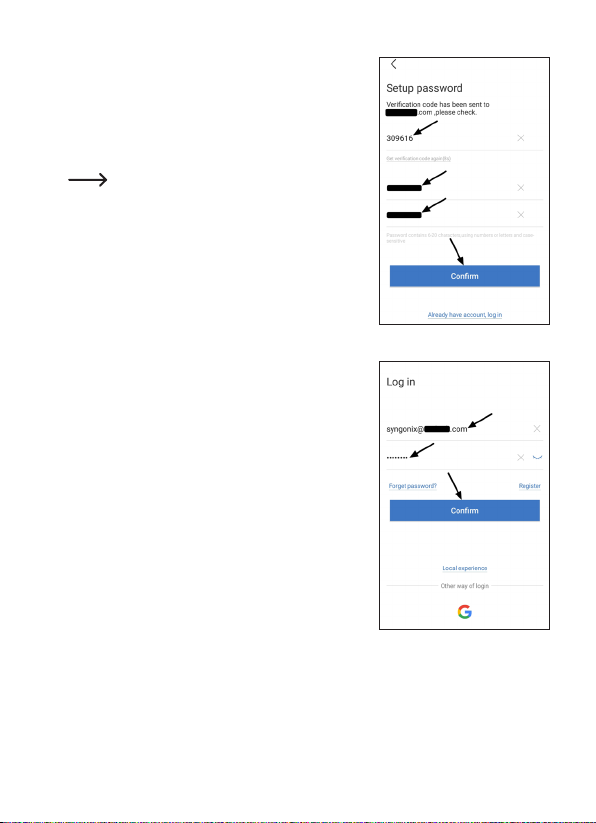
b) Conguringtheappandcreatinganaccount.............................................................13
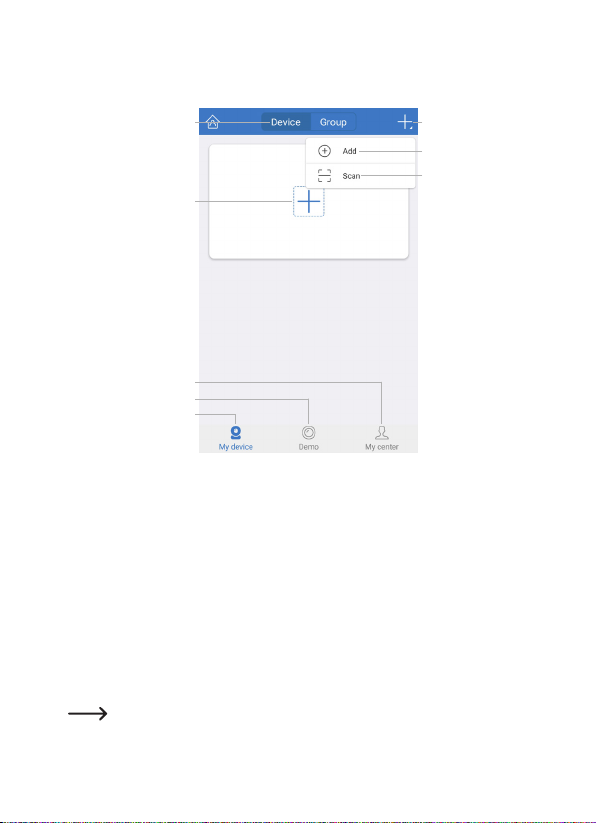
c) Functions on the home page of the app.....................................................................16
9. Setting up the camera in the app ......................................................................................17
a) Setting up via network................................................................................................17
b) Setting up via WLAN ..................................................................................................23
c) Alternative method for setting up the camera.............................................................28
d) Removing the set up camera from the app ................................................................30
e) Adding an already set up camera in the app..............................................................32
10. Advanced settings.............................................................................................................35
a) App and account settings...........................................................................................35
b) Camera settings .........................................................................................................36
11. Operation...........................................................................................................................40
a) In-app options.............................................................................................................40
b) General touch control.................................................................................................41
c) Overview of the automatic recording playback...........................................................42
d) Functions and operation in Play mode.......................................................................44
12. Troubleshooting.................................................................................................................45
13. Resetting factory settings..................................................................................................46
14. Care and cleaning .............................................................................................................46
15. Disposal.............................................................................................................................47
16. Declaration of Conformity (DOC).......................................................................................47
17. Technical data ...................................................................................................................48
2

1. Introduction
Dear customer,
Thank you for purchasing this product.
This product complies with statutory national and European regulations.
To ensure that the product remains in this state and to guarantee safe operation, always follow
the instructions in this manual.
These operating instructions are part of this product. They contain important informa-
tion on setting up and using the product. Do not give this product to a third party
without the operating instructions. Therefore, retain these operating instructions for
reference!
If there are any technical questions, please contact:
International: www.conrad.com/contact
United Kingdom: www.conrad-electronic.co.uk/contact
2. Explanation of symbols
The symbol with the lightning in a triangle indicates that there is a risk to your health,
e.g. due to an electric shock.
The symbol with an exclamation mark in a triangle is used to highlight important infor-
mation in these operating instructions. Always read this information carefully.
The arrow symbol indicates special information and advice on how to use the product.
3

3. Intended use
The product is used to monitor and protect blind or critical areas (such as entrances, courtyard
entrances, underground garages, staircases).
The camera is only intended to be used with a stabilised direct current of 12 V/DC.
The product is designed for operation indoors and outdoors (IP66).
The video and image data are transmitted to your smartphone or tablet via WLAN or LAN.
Alternatively, these can also be stored directly on a micro SD card (not included in delivery, can
be ordered separately, up to 128 GB).
The operation or programming is done via the app “IP PRO3”. This can be installed on an
AndroidTM-smartphone or tablet or an iPhone or iPad.
For the use, a free account is necessary. It must be created during the initial setup of the app.
There are built-in infrared LEDs for shooting in the dark.
Please bear in mind that it is prohibited by law to observe strangers with a camera without their
knowledge and consent. Always observe the rules and regulations of the country where you
use the camera.
Please observe the safety instructions at all times!
For safety and approval purposes, you must not rebuild and/or modify this product. Using the
product for purposes other than those described above may damage the product. In addition,
improperusecancausehazardssuchasashortcircuit,reorelectricshock.Readtheinstruc-
tions carefully and store them in a safe place. If you pass the product on to a third party, please
hand over these operating instructions as well.
This product complies with statutory, national and European regulations. All company and prod-
uct names are trademarks of their respective owners. All rights reserved.
4

4. Delivery content
• Surveillance camera
• Antenna
• Thicknesses
• Mounting material
• Operating instructions
Up-to-date operating instructions
Download the latest operating instructions via the link www.conrad.com/
downloads or scan the QR code. Follow the instructions on the website.
5. Safety instructions
Read the operating instructions and safety information carefully. If you do not
follow the safety information and information on proper handling in these op-
erating instructions, we will assume no liability for any resulting personal in-
jury or damage to property. Such cases will invalidate the warranty/guarantee.
• The surveillance camera is only intended to be used with a stabilised direct current
of 12 V/DC. The inner contact of the round low-voltage plug should be plus/+, the
outer contact minus/-.
• The device is not a toy. Keep out of the reach of children and pets.
• Do not leave packaging material carelessly lying around, since it could become a
dangerous plaything for children.
• The product is designed for operation indoors and outdoors (IP66). However, it must
never be used in or under water, as this may destroy the interior components.
• The connector plugs on the surveillance camera's connection cable are not wa-
terproof or watertight and must therefore be placed in a dry indoor area or be
protected accordingly.
• Ensure that the connection cable does not get pinched, kinked or damaged by
sharp edges.
5

• Protecttheproductfromextremetemperatures,directsunlight,strongjolts,am-
mable gases, vapours and solvents.
• Please handle the product carefully. Jolts, impacts or a fall even from a low height
may damage the product.
• Never expose the product to mechanical stress.
• Always observe the safety information and operating instructions of any other
devices which are connected to the product.
• The IR light is invisible to the human eye. It is therefore not possible to tell whether
an IR LED is on or not. Due to the intensity of the in-built IR LEDs, there is a risk
of damage to the eye if you look at it from a short distance (<2 m).
Attention: IR LED light! Do not look directly into the IR LED light! Do not look into
the beam directly or with optical instruments!
• The use of this surveillance camera does not replace the personal supervision of
children or people with special needs but serves onlyto support this supervision.
• If it is no longer possible to operate the product safely, take it out of operation and
protect it from any accidental use. Safe operation can no longer be guaranteed
if the product:
- is visibly damaged,
- is no longer working properly,
- has been stored for extended periods in poor ambient conditions or
- has been subjected to any serious transport-related stress.
• Always comply with the accident prevention regulations for electrical equipment
when using the product in commercial facilities.
• Consult an expert when in doubt about the operation, safety or connection of the
appliance.
• Maintenance,modicationsandrepairsmustbecarriedoutbyatechnicianora
specialist repair centre.
• If you have any questions that are not answered in these operating instructions,
please contact our technical customer service or other professionals
6

6. Product overview
A1
A2
A3
A7
A6
A5
A4
7

A8 A9 A10
A1 WLAN antenna
A2 IR-LEDs (3x High-Power-LED-Array)
A3 Camera lens
A4 Light sensor
A5 Connection for the power supply 12 V/DC
A6 Network connection RJ45
A7 Status LED (it is independent of a connected network cable, but only applies to the
WLAN connection!)
LEDashesapprox.every0.5sec.-thecameraisinpairingmode
LEDashesapprox.every2sec.-thecameraisinAPmode
LED is on permanently - the camera is set up and online
A8 Cover for the SD card slot
A9 Reset button
A10 SD card slot
8

7. Installation and start-up
The camera can be used both indoors and outdoors. It has the degree of protection IP66, i.e. it
can also be mounted outdoors without protection against the weather.
Nevertheless, we recommend that you install the camera in a protected place as far as possible.
a) Mounting the camera
As a rule, the wall bracket is disconnected from the camera during the delivery. If this is not the
case, loosen the two set screws of the wall bracket, which are located directly on the camera,
and pull the wall bracket away from the camera.
Nowmountthewallbracketrst.
• Ifdowelsarerequiredtoxthewallbrackettoyourwall(dependingonthecondition),mark
the exact position of the mounting holes through the holes in the wall bracket.
Mount the camera only on a stable surface, but not on metal surfaces or near other
electrical/electronic devices.
When drilling mounting holes or screwing into place, ensure that no existing cables or
pipes are damaged.
Select the installation site so that it is protected against attempts to tamper with the
surveillance camera. For this reason, the surveillance camera should be mounted at
a minimum height of 2.5 m.
• If necessary, insert the dowels into the mounting holes.
• Take the black sponge out of the box, remove the
yellow protective foil and stick it in the holder as
shown in the picture.
The side recess in the sponge must be aligned
so that it faces one of the two recesses (for the
cable) in the wall bracket. Depending on which
side you want to lead out the cable.
• The small, round part of the sponge is not
needed.
9

• Attach the wall bracket with the enclosed screws.
Tighten the two screws on the side where you pulled the cable out, so that the cable is still
movable for you to push it.
Also pay attention to the mounting direction. The cable should preferably be led out down-
wards.
If you later want to change the inclination in a different direction, simply loosen the two set-
screws directly on the wall bracket and on the camera, then you can rotate the joint as you
like.
• Beforeattachingthecamera,rstattachtheWLANantenna(A1) to the corresponding con-
nector on the back of the camera.
• Push the cable through the wall bracket until you can insert the camera.
• Insert the camera and secure it with the two set screws of the wall bracket, which are located
directly on the camera.
Direct the camera so that the light sensor (A4) is down.
• Finally, tighten the two remaining screws of the wall bracket.
Make sure that the connecting cable is clean in one of the two recesses and not
squeezed from the edge of the holder.
Warning! The plug connections of the camera are not waterproof!
If you cannot pass the camera's connectors through the wall and connect them in the
protected indoor area, you must protect the outdoor connections against moisture.
You can do this, for example, through a connection box. Depending on where the
camera is mounted, this connection box must be suitable for outdoor installation.
The cable connection for the network or the power supply can then be placed in the
connection box. Incidentally, the network connection must also be protected against
moisture even when not in use!
Also make sure that, in this case, the power adapter, AC adapter cable and network
cable are suitable for outdoor use.
Lay the cables so that they are protected against manipulation, for example in a cable
duct, a pipe or similar.
For a better mechanical connection at the network connection, you can use a cable
with “RJ45 M16” plug.
10

b) Inserting the SD card
If you want to save pictures taken with the camera on an SD card, insert them before
proceeding with the commissioning.
Ifyouwanttoinsertorchangethecardlater,besuretorstdisconnectthepowerto
the camera, otherwise the SD card and the camera may be damaged!
• Unscrew the two screws of the SD card slot cover (A8) and remove the cover along with
the gasket.
• InserttheSDcard(withthecontactsrst)intotheSDcardslot(A10) until the card snaps
into place.
The SD card must be aligned so that the contacts point away from the camera lens and
towards the connection cable of the camera.
• Remount the SD card slot cover (A8) along with the gasket and secure the cover with both
screws.
IfyouwanttoremovetheSDcard,rstpressthecardsothatitejectsmechanically.
Then pull the card out of the card slot (A10).
c) Installing the camera
• Ifyoualsowanttooperatethecameraviaanetworkcable,rstconnectthenetworkcableto
the RJ45 socket of the camera (A6).
• The other side of the cable connects to your router or network switch.
• Then connect the low-voltage plug of your mains adapter (DC voltage, 12 V/DC) to the power
supply socket (A5) of the camera. The connection requires a suitable round plug with the
outer diameter 5.5 mm, and inner diameter 2.1 mm. The outer contact of the round plug
should be Minus/“-”, the inner contact Plus/“+”.
Improper connection or connecting to the wrong voltage may damage the camera;
loss of warranty!
If you install and use the camera in outdoor areas, the two connectors must be placed
in a location that is protected from moisture. Please note the previous subchapter. If
this is not observed, the connectors will corrode!
• Plug your power adapter into a power outlet.
The IR LEDs of the surveillance camera are automatically activated at night. However,
the IR light is not visible to the human eye. Note that at night the image is not displayed
in colour but in black and white.
11

8. Setting up the app
These instructions refer to a smartphone. But this always means an AndroidTM smart-
phone or tablet or iPhone or iPad.
a) Installing the app
• Open the respective App Store on your smartphone. For example, it
is “Google Play Store” for Android™. If you're using an Apple device,
open Apple's “iTunes Store”.
• Search for the app “IP PRO3” (light blue background with cloud
symbol) and install it.
• Alternatively, scan the QR code on this page. You will be directed to
the page of the appropriate store. The QR-code works on AndroidTM
and iOS devices.
Refertothesystemrequirementsspeciedinthetechnicaldatasectionandtheapp
store description.
Please note that the following instructions may change for future app versions.
12

b) Conguring the app and creating an account
• Open the previously installed “IP PRO3”.
• If you have not yet created an account, tap the “Register”
button.
If you have already created an account, skip the
registration and continue with the fourth image.
• Enter the e-mail address with which you want to register.
It will automatically become your username.
• Tap the blue button to register.
• Anautomatice-mailmessagewithavericationcodewill
besenttothee-mailaddressyouhavespecied.
If you do not receive this e-mail message within
a few minutes, please check the spam folder of
your e-mail inbox.
13

• Enterthevericationcodeinthetopeld.
• Then enter a secure password twice. We recommend
a password with at least 8 characters, consisting of
uppercase and lowercase letters as well as numbers and
special characters.
• Tap the blue button to complete the registration.
The settings are only saved in the cloud when the
registration is completed.
• Normally, you will be automatically logged in after the
registration. If this is not the case, tap the arrow in the
top left corner to return to the home page and log in.
• Enter your e-mail address and the assigned password
here.
• Then tap the blue button to log in.
14

• After you have logged in, the app’ s home page will be
displayed.-
Resetting the password
• If you have forgotten your password, tap the “Forget
password?”buttonontheloginpage(rstimageofthis
chapter).
• Enter your e-mail address again and tap the blue button.
• Then follow the instructions.
15

c) Functions on the home page of the app
Here is a brief overview of the controls on the home page of the app.
B1 B2
B3
B7
B6
B5
B4
B8
B1 The big “+” adds a device over the selection; this item has the same function as B3
B2 The “+” on the top right opens a small menu for adding a new device
B3 The encircled “+” in the small menu adds a device via the selection; this item has the
same function as B1
B4 This item adds a device using the QR code scanner
B5 Switches the app mode between home and away
B6 Switches between the view for a device or an entire group
B7 This button opens the settings for the app and your account. In addition, recordings
andnoticationscanbeviewedhere.
B8 Opens the demo mode
B9 This button switches to the app’s home page (this view).
To refresh, simply swipe down in the app view
16

9. Setting up the camera in the app
a) Setting up via network
For the following description, the camera must be connected to your router/network
switch via a network cable. In addition, a DHCP server must be active in your network.
ThestatusLEDmustashslowly.
Ifyouhavealreadysetupthecamera,resetittothefactorysettingsrstorgotothe
description in chapter “9. e) Adding an already set up camera in the app”.
• Tap “+” on the app’s home page.
17

• Tap “LAN scan”.
• The app will search for new devices.
• When the camera has been found, it will be displayed
again with its ID number (see arrow). The same number
is also printed on the camera.
• Tap it.
18

• Enter a name for the camera.
You do not need to enter a password during
initial setup. The “Password”eldmusttherefore
remain empty.
• Then tap on the button in the top right corner (upper arrow
in the picture).
• Once the settings are saved, the camera will now also be
displayed on the home page of the app.
• Now assign a password to the camera to protect it from
unauthorised access.
• For this purpose, tap the “Setup”button of the corre-
sponding camera.
19

• Scroll down in the device settings and tap the “Password
”
button.
You can also change the password of the camera
later.
• Nowenterasecurepasswordinthetopeld.
The password should contain at least eight characters
and consist of uppercase and lowercase letters as well
as numbers and special characters.
• Then tap the red button below.
20
Table of contents
Other Sygonix Security Camera manuals

Sygonix
Sygonix 1911204 User manual

Sygonix
Sygonix WF 90 User manual

Sygonix
Sygonix 754273 User manual

Sygonix
Sygonix Starlight 720P User manual

Sygonix
Sygonix 420TVL User manual

Sygonix
Sygonix SY-4548736 User manual

Sygonix
Sygonix 752002 User manual

Sygonix
Sygonix 1420408 User manual

Sygonix
Sygonix 2544174 User manual

Sygonix
Sygonix 1594379 User manual

Sygonix
Sygonix 2203065 User manual

Sygonix
Sygonix 540 TVL User manual

Sygonix
Sygonix 1882083 User manual

Sygonix
Sygonix 1486625 User manual

Sygonix
Sygonix 2269265 User manual

Sygonix
Sygonix 1533808 User manual

Sygonix
Sygonix 2380479 User manual

Sygonix
Sygonix 540 TVL User manual

Sygonix
Sygonix SY-4479734 User manual

Sygonix
Sygonix 43596D User manual