Tacx Flow Smart User manual

Flow Smart
Assembly
EN |NL |DE |FR |IT |ES |PT |DK
CZ |HU |RO |SK |SL |HR |BG |GR
|NO |SE |FI |
|TR |CH |JP
PL
Flow Smart
Assembly
EN |NL |DE |FR |IT |ES |PT |DK
CZ |HU |RO |SK |SL |HR |BG |GR
|NO |SE |FI |
|TR |CH |JP
PL

1 x
T2179
1 x T2240.95 1 x T2241
1 x T1005.031 x T1402 2 x T2605.02
1. Check if everything is in the package
NL Controleer of de inhoud van het pakket compleet is | DE Prüfen Sie, ob der
Inhalt der Verpackung vollständig ist | FR Vérifiez que tout se trouve dans
l’emballage | IT Verificare che la confezione contenga tutto|ES Compruebe si
está todo en el paquete |PT Verifique se está tudo na embalagem | DK
Kontroller, at det hele er i pakken | NO Du må kontrollere at alle komponenter
befinner seg ipakken |SE Kontrollera att allt finns med i paketet |FI Tarkista,
että kaikki osat ovat pakkauksessa | PL Sprawdź czy wszystkie części znajdują
się w opakowaniu |CZ Zkontrolujte, zda je balení kompletní |HU Ellenőrizze, hogy
a csomag hiánytalanul tartalmaz-e mindent | RO Verificați conținutul pachetului
pentru articole lipsă |SK Skontrolujte balenie, či nechýbajú nejaké súčasti |SL
Preverite vsebino embalaže, če manjkajo deli |HR Provjerite nedostaju li
predmeti u paketu |BG Проверете съдържанието на пакета за липсващи
елементи | GR Ελέγξτε εάν περιέχονται όλα τα αντικείμενα στη συσκευασία |TR
Eksik parçalar için ambalaj içeriklerini kontrol edin |CH 检查包装内物品是否齐
全 |JP すべての部品がパッケージに入っていることを確認してください。

2. Unfold the trainer and place it on a firm, level surface
NL Klap de trainer uit en plaats deze op een stevige en vlakke ondergrond |
DE Klappen Sie den Trainer auseinander und stellen Sie ihn auf einen festen,
ebenen Untergrund | FR Dépliez le trainer et placez-le sur une surface stable
et plate |IT Estrarre il trainer e disporlo su una superficie stabile e piana |ES
Despliegue la máquina de entrenamiento y colóquela sobre una superficie
firme y nivelada |PT Abra o simulador de treino e coloque-o numa superfície
firme e plana | DK Klap træneren ud, og anbring den på et fast, plant underlag
|NO Fold ut sykkelrullen, og plasser den på et jevnt og solid underlag |SE
Fäll upp din trainer och placera den på ett fast, jämnt underlag | FI Avaa
harjoitusvastus ja aseta se kiinteälle, tasaiselle pinnalle |PL Rozpakuj rower
stacjonarny i umieść go na twardej, równej powierzchni | CZ Rozložte trenažér
a umístěte jej na pevnou a rovnou podložku |HU Hajtsa ki az oktatógépet,
és helyezze szilárd, sík felületre |RO Depliați trainerul și așezați-l pe o
suprafață fermă și uniformă |SK Rozložte trenažér a umiestnite ho na
pevnú a rovnú podložku |SL Razklopite trenažerja in ga postavite na
čvrsto, ravno površino |HR Rasklopite trenažer i stavite ga na tvrdu,
ravnu površinu |BG Разгънете тренажора и го поставете върху
стабилна и равна повърхност |GR Αναπτύξτε το προπονητήριο και
τοποθετήστε το σε μια σταθερή, επίπεδη επιφάνεια |TR Antrenman cihazını
açın ve sabit, düz zemin bir yüzeye yerleştirin | CH 打开训练器,将其固定
在牢固、平整的表面 | JPトレーナーを開き、硬く水平な場所に置きます。

Ø
Position Wheeldiameter ( )
1
2
650 - 700
600 - 650
Race / ATB 29”
ATB 26”
Ø
3. Determine the position of the resistance unit
NL Bepaal de positie van de rem unit | DE Legen Sie die Position für die
Widerstandseinheit fest |FR Déterminez la position de l’unité de résistance |
IT Decidere la posizione dell’unità di resistenza | ES Determine la posición de
la unidad de resistencia | PT Determine a posição da unidade de resistência |
DK Bestem, hvor modstandsenheden skal placeres |NO Bestem posisjonen til
motstandsenheten |SE Faststäl placeringen för motståndet |FI Määritä
vastusyksikön paikka |PL Określ pozycję mechanizmu oporowego |CZ Určete
polohu odporové jednotky | HU Határozza meg az ellenállásegység helyét |RO
Determinați poziția unității de rezistență |SK Určte polohu odporovej jednotky
|SL Določite položaj uporovne enote |HR Odredite položaj jedinice za otpor |
BG Определете позицията на възела за съпротивление |GR Εξακριβώστε τη
θέση της μονάδας αντίστασης | TR Direnç biriminin pozisyonunu belirleyin |CH
确定阻力装置的位置 |JP 抵抗器の位置を決めます。

Pos 1
Pos 2
4. Place the resistance unit on the frame, in the right position
NL Plaats de remunit op het frame, in de juiste positie | DE Stellen Sie die
Widerstandseinheit in der gewünschten Position auf den Rahmen | FR Placez
l’unité de résistance sur le cadre, en position correcte |IT Collocare l’unità di
residenza sul telaio, nella posizione giusta |ES Coloque la unidad de resistencia
sobre el armazón, en la posición correcta | PT Coloque a unidade de resistência
no quadro, na posição correta | DK Anbring modstandsenheden på stellet i den
rigtige position |NO Plasser motstandsenheten i riktig posisjon på rammen | SE
Placera motståndet på ramen i rätt position |FI Aseta vastusyksikkö runkoon
oikeaan paikkaan |PL Umieść mechanizm oporowy na ramie w odpowiedniej
pozycji | CZ Odporovou jednotku umístěte do správné polohy na držák |HU
Szerelje fel az ellenállásegységet a vázra a megfelelő helyzetbe |RO Așezați
unitatea de rezistență pe cadru în poziția corectă |SK Odporovú jednotku
umiestnite do správnej polohy na držiak |SL Montirajte uporovno enoto na okvir
na pravilni položaj |HR Postavite jedinicu za otpor u njezin ispravan položaj na
okvir |BG Поставете възела за съпротивление върху рамката в правилната
позиция |GR Τοποθετήστε τη μονάδα αντίστασης στο πλαίσιο στη σωστή θέση |TR
Direnç birimini doğru pozisyonda, şase üzerine yerleştirin | CH 将阻力装置装于
框架右侧 |JP フレーム上の正確な位置に抵抗器を置きます。

5. Secure the resistance unit on the frame
NL Bevestig de remunit op het frame | DE Befestigen Sie die
Widerstandseinheit am Rahmen | FR Fixez l’unité de résistance sur le cadre |
IT Fissare l’unità di resistenza sul telaio | ES Fije la unidad de resistencia
sobre el armazón | PT Fixe a unidade de resistência ao quadro | DK Fastgør
modstandsenheden til stellet | NO Fest motstandsenheten på rammen | SE
Fäst motståndet på ramen | FI Kiinnitä vastusyksikkö runkoon | PL Zamocuj
mechanizm oporowy na ramie | CZ Upevněte odporovou jednotku na držák |
HU Rögzítse az ellenállásegységet a vázon |RO Fixați unitatea de rezistență
pe cadru |SK Upevnite odporovú jednotku na držiak |SL Pritrdite uporovno
enoto na okvir |HR Pričvrstite jedinicu za otpor na okvir |BG Закрепете
възела за съпротивление върху рамката | GR Ασφαλίστε τη μονάδα
αντίστασης στο πλαίσιο |TR Direnç birimini şase üzerinde sağlamlaştırın | CH
将阻力装置固定在框架上。| JP フレームに抵抗器を固定します。

6 - 8 bar
6. Replace the blockage and put 6-8 bars in your tyre
NL Vervang de uitvalnaaf en pomp de band op tot 6 - 8 bar | DE Bringen Sie
die Sperrung an und pumpen Sie Ihren Reifen auf 6-8 bar auf | FR Replacez la
fixation et gonflez le pneu à 6-8 bars | IT Riposizionare il blocco e immettere
6-8 bar nel pneumatico | ES Sustituya el bloqueo y coloque de 6 a 8 barras en
el neumático | PT Substitua o bloqueio e encha o pneu com 6-8 bar | DK
Udskift blokeringen, og fyld 6-8 bar i dit dæk | NO Skift ut blokkeringen og fyll
6-8 bar i dekket | SE Ta bort blockeringen och pumpa däcket till 6–8 bar | FI
Poista esto ja aseta 6-8 barin paine renkaaseen | PL Zwolnij blokadę i umieść
6-8 sztabek w kole | CZ Vraťte blok na místo a nahustěte pneumatiku na 6–8
barů | HU Helyezze vissza a rögzítést, és fújja fel az abroncsokat 6-8 barra |
RO Înlocuiți blocarea și umflați cauciucul la 6-8 bari |SK Vráťte blok na miesto
a nafúkajte pneumatiku na 6 – 8 barov |SL Namestite blokado in pnevmatiki
napolnite s 6-8 bari |HR Zamijenite blokadu i napunite gumu do tlaka od 6 do
8 bara |BG Върнете блокировката на място и напомпайте гумата до 6-8 bar
| GR Επανατοποθετήστε το blockage και εισάγετε 6-8 bar στο λάστιχο |TR
Blokajı yeniden yerleştirin ve lastiğinize 6-8 bar koyun | CH 更换密封装置,并
将车胎气压充至 6-8 bars | JP 妨害物を交換し、タイヤに6~8 bar 入れます。

2
3
1
6
4
5
7. Ensure that the cylinder presses firmly against the tyre
NL Zorg ervoor dat de rol stevig tegen de fietsband aan drukt | DE Überzeugen
Sie sich, dass der Zylinder fest gegen den Fahrradreifen drückt | FR Vérifiez que
le cylindre est appuyé fermement contre le pneu du vélo | IT Controllare che il
cilindro prema saldamente sul pneumatico della bici | ES Asegúrese de que el
cilindro presiona firmemente contra el neumático de la bicicleta | PT
Certifique-se de que o cilindro está firmemente em contacto com o pneu da
bicicleta | DK Kontroller, at cylinderen sidder trykket godt fast mod
cykeldækket | NO Sikre at sylinderen trykker godt mot sykkelhjulet | SE
Kontrollera att cylindern pressar stadigt mot cykeldäcket |FI Varmista, että
sylinteri on tukevasti pyörän rengasta vasten | PL Upewnij się, że siłownik
mocno naciska na koło roweru | CZ Zajistěte, aby válec pevně přiléhal k
pneumatice bicyklu |HU Győződjön meg róla, hogy a munkahenger erősen
szorul a keréknek |RO Asigurați-vă că cilindrul apasă cu putere pe cauciuc |
SK Zaistite, aby valec pevne priliehal na pneumatiku |SL Zagotovite, da valj
čvrsto pritiska ob pnevmatiko |HR Uvjerite se da cilindar čvrsto stišće gumu |
BG Уверете се, че цилиндърът притиска добре гумата | GR Βεβαιωθείτε ότι ο
κύλινδρος πιέζει με δύναμη το λάστιχο του ποδηλάτου | TR Silindirin lastiğe sıkı
şekilde baskı uyguladığından emin olun | CH 确保气筒牢牢压住自行车车胎 |
JP シリンダーがバイクのタイヤを確実に押していることを確認して下さい。

6
8. The resistance unit is functioning properly when the LED is
flashing green
NL Als de groene LED knippert, functioneert de rem goed | DE Die
Widerstandseinheit funktioniert vorschriftsmäßig, wenn die LED grün blinkt | FR
L’unité de résistance fonctionne correctement quand le voyant clignote en vert |
IT L’unità di resistenza funziona correttamente se il LED lampeggia con la luce
verde | ES La unidad de resistencia funciona correctamente cuando el LED
parpadea en verde | PT A unidade de resistência está a funcionar corretamente
quando o LED pisca a verde | DK Modstandsenheden fungerer korrekt, når LED-
lampen blinker grønt | NO Motstandsenheten fungerer riktig når LED-lampen
blinker grønt | SE Motståndet fungerar korrekt när LED-lampan blinkar grönt |
FI Vastusyksikkö toimii oikein, kun LED-merkkivalo vilkkuu vihreänä | PL Jeśli
mechanizm oporowy działa poprawnie, dioda LED miga na zielono | CZ Trenažér
se zapojí po zahájení jízdy | HU Az ellenállásegység akkor működik megfelelően,
ha a LED zölden villog | RO Unitatea de rezistență funcționează corespunzător
când LED-ul se aprinde intermitent în culoarea verde |SK Odporová jednotka
funguje správne, keď kontrolka LED bliká zeleno | SL Uporovna enota pravilno
deluje tedaj, ko LED-lučka utripa zeleno | HR Jedinica za otpor radi ispravno
kada LED svjetlo treperi zelenom bojom | BG Възелът за съпротивление
функционира правилно, когато LED индикаторът мига в зелено | GR Η μονάδα
αντίστασης λειτουργεί σωστά όταν η ένδειξη LED αναβοσβήνει πράσινη | TR LED
yeşil renkte yanıp söndüğünde, direnç birimi doğru şekilde işlev görüyor
demektir | CH 当 LED 显示器闪绿色时,即表明阻力装置功能正常。| JP LEDがグ
リーンで点滅している場合、抵抗器は正常に動作しています。

English
• The rear wheel of the bicycle rotates at high speed whilst the trainer is in use.
• Tests have revealed that the unit will not overheat, even when subject to extreme use. However, when
subject to prolonged and intensive use, the enclosure around the brake may become very hot. Always
allow the brake to cool down after use before touching it.
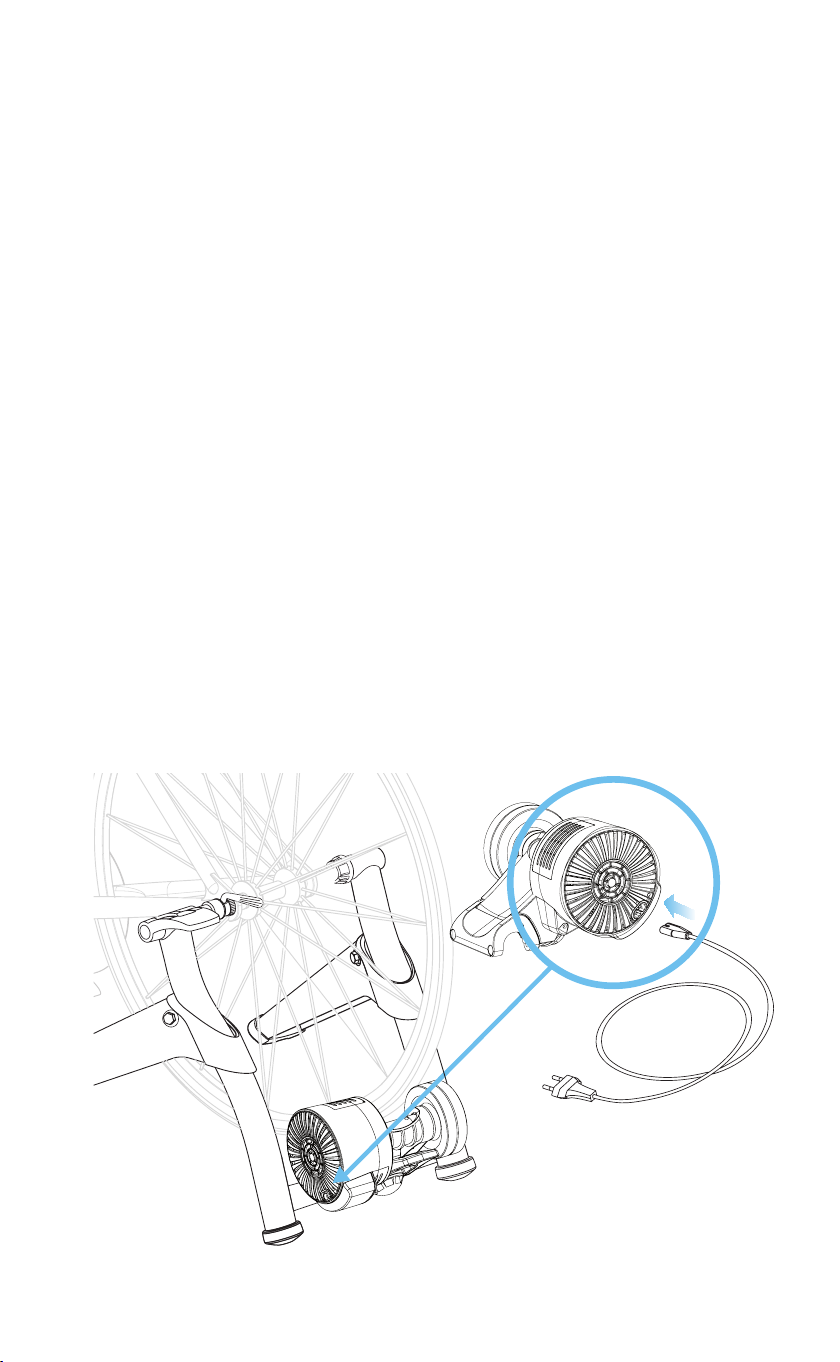
• Always remove the cylinder from the bicycle tyre when the trainer is not in use.
• Never brake abruptly when training. When braking the rear wheel, the flywheel continues to rotate
which may cause unnecessary wear to the cylinder and the rear tyre.
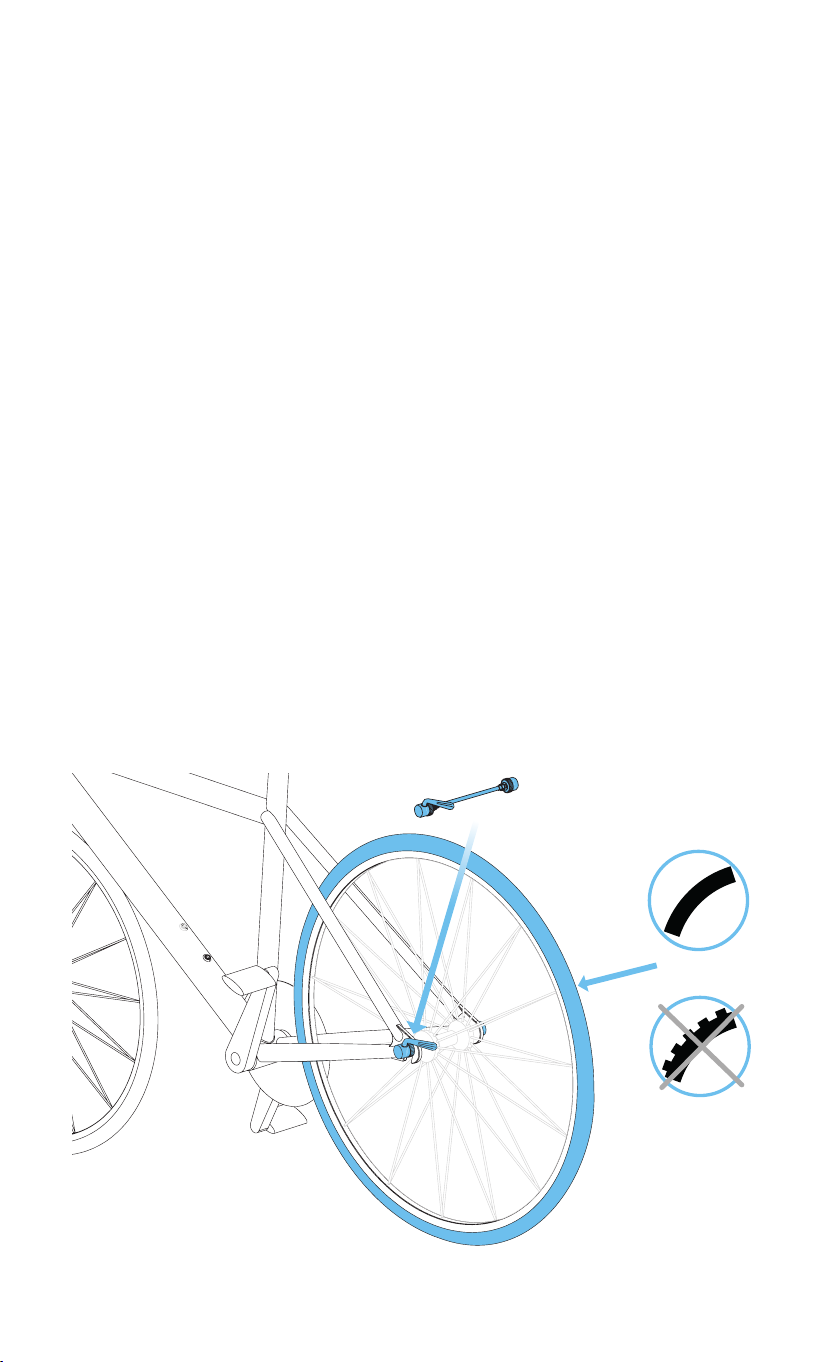
• Ensure not to drop the brake during assembly as this can lead to an imbalance which may cause vibrati-
on.
• Never open the brake unit as this may cause damage.
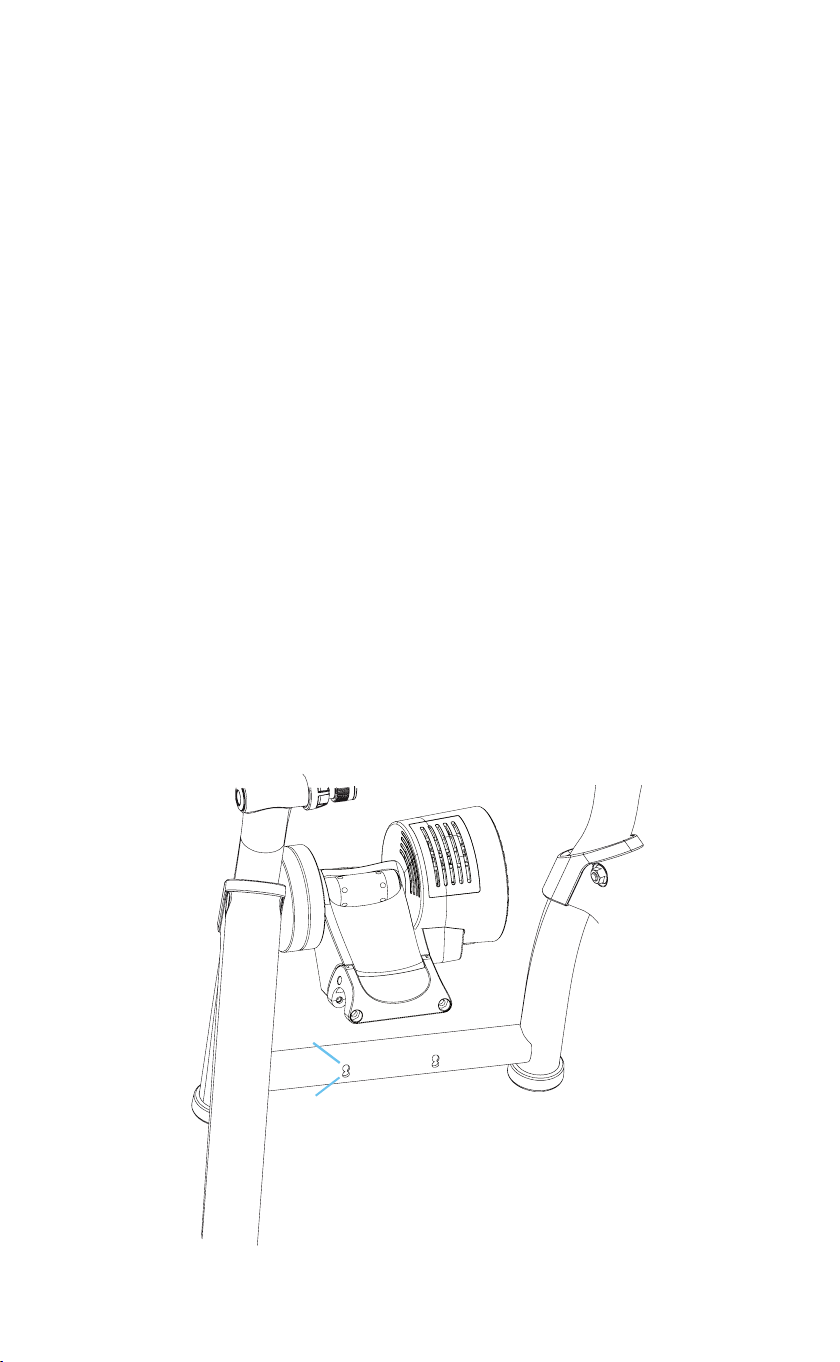
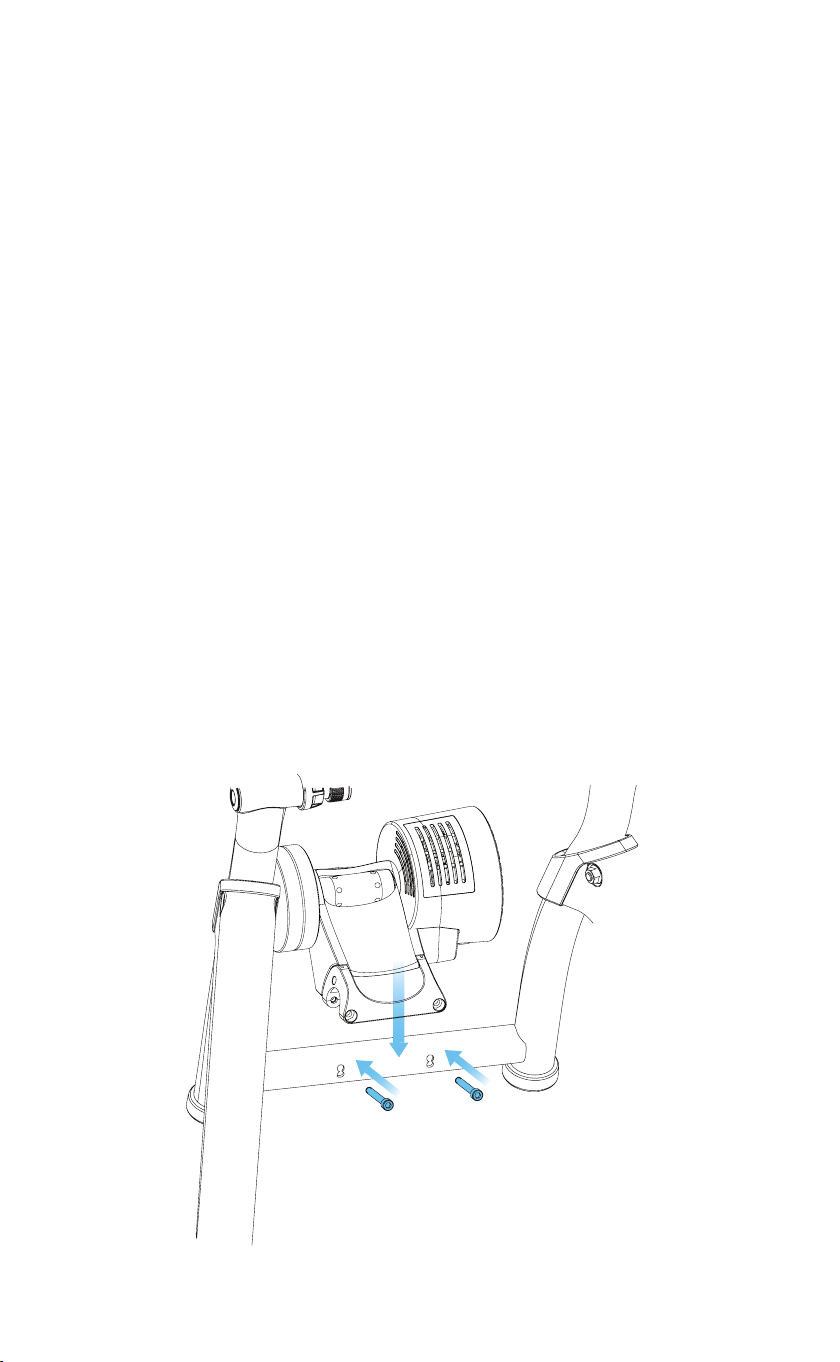
• Inspect the nuts and bolts on the trainer on a regular basis, and retighten if necessary.
• Perspiration moisture and condensation can harm the electronics. Do not use the trainer in damp are-
as. Incorrect use and/or maintenance will void the warranty.
• This appliance can be used by children aged from 8 years and above and persons with reduced physical,
sensory or mental capabilities or lack or experience and knowledge if they have been given supervision
or instruction concerning use of appliance in a safe way and understand the hazards involved.
• Children being supervised are not to play with the Tacx trainer.
• This device is not designed for industrial, commercial or medical applications.
• Do not expose the product to water or moisture.
• Clean only with a dry cloth. Do not use cleaning solvents or abrasives.
Nederlands
• Tijdens het gebruik van de trainer, draait het achterwiel van de fiets met een hoge snelheid.
• Testen hebben uitgewezen dat de unit bij extreme prestaties nooit oververhit kan raken. Wel kan bij
langdurig en intensief gebruik de omhulling van de rem behoorlijk warm worden. Laat de rem na ge-
bruik altijd even afkoelen voordat je deze aanraakt.
• Klap de rol wanneer de trainer niet gebruikt wordt los van de fietsband.
• Rem nooit abrupt tijdens het trainen. Bij het remmen op het achterwiel draait het vliegwiel door waar-
door onnodige slijtage van de rol en de achterband wordt veroorzaakt.
• Zorg er voor dat de rem tijdens het monteren niet valt. Er zou onbalans kunnen ontstaan die trillingen
veroorzaakt.
• Open nooit de rem om beschadigingen te voorkomen.
• Controleer regelmatig of de bouten en moeren van de trainer nog goed vast zitten.
• Transpiratievocht en condens kunnen de elektronica aantasten. Gebruik de trainer niet in vochtige
ruimtes. Bij onjuist gebruik en/of onderhoud vervalt de garantie.
• Dit apparaat kan gebruikt worden door kinderen vanaf 8 jaar en personen met een verminderd fysiek,
zintuiglijk of mentaal vermogen of gebrek aan ervaring en kennis wanneer ze onder supervisie staan of
instructies gekregen hebben over veilig gebruik van het apparaat en de bijbehorende risico’s begrijpen.
• Kinderen onder toezicht dienen niet te spelen met de Tacx trainer.
• Dit apparaat is niet geschikt voor industrieel, commercieel of medisch gebruik.
• Niet blootstellen aan water of vocht.
• Alleen schoonmaken met een droge doek. Gebruik geen oplosmiddelen of schuurmiddelen.
Deutsch
• Das Hinterrad des Fahrrades dreht sich beim Training mit hoher Geschwindigkeit.
• Durchgeführte Tests bestätigen, dass die Einheit selbst bei intensivem Training nicht überhitzt. Al-
lerdings kann das Gehäuse der Bremseinheit nach längerem, intensivem Training sehr heiß werden.
Lassen Sie die Bremse unbedingt abkühlen, ehe Sie sie anfassen.
• Entfernen Sie grundsätzlich den Zylinder vom Fahrradreifen, wenn Sie den Trainer nicht benutzen.
• Vermeiden Sie plötzliches Abbremsen. Wenn das Hinterrad abgebremst wird, dreht sich das Sch-
wungrad weiter und Zylinder und Hinterreifen werden unnötig strapaziert. • Lassen Sie die Bremse bei
der Montage nicht fallen; andern- falls kann eine Unwucht entstehen, die zu Vibrationen führt.
• Öffnen Sie die Bremseinheit nicht. Die Bremseinheit kann beschädigt werden, wenn sie geöffnet wird.
• Kontrollieren Sie die Muttern und Schrauben am Trainer regelmäßig und ziehen Sie sie bei Bedarf fest.
• Schweiß und Kondenswasser können die Elektronik beschädigen. Benutzen Sie den Trainer nicht in
feuchten Umgebungen. Falsche Benutzung und/oder Wartung lassen die Garantie ungültig werden.
• Dieses Gerät kann von Kindern ab 8 Jahren und Personen mit eingeschränkten körperlichen, geistigen
oder sensorischen Fähigkeiten bzw. fehlender Erfahrung oder Kenntnis verwendet werden, wenn sie
für den sicheren Gebrauch des Geräts angeleitet oder beaufsichtigt werden und die damit verbundenen
Risiken kennen.

Specifications
Wireless Protocol: Bluetooth 4.0 & ANT+
Frequency range 2400-2483,5 MHz
RF Output Power -5 dBm (typical)
Temperature Range Operational -20 °C to + 55 °C
Transmit Range 10 m
FCC and IC Declarations
Your device contains a low power transmitter. When device is transmitting it sends out
Radio Frequency (RF) signals.
Compliance statement (part 15)
This device complies with Part 15 of the FCC Rules and to the licence -exempt RSS stan-
dards(s) of Industry Canada. Operation is subject to the following two conditions:
(1) This device may not cause harmful interference.
(2) This device must accept any interference received, including interference that may
cause undesired operation.
FR | Déclaration de conformité
Le présent appareil est conforme aux CNR d’Industrie Canada applicables aux appareils
radio exempts de licence. L’exploitation est autorisée aux deux conditions suivantes:
(1) l’appareil ne doit pas produire de brouillage, et
(2) l’utilisateur de l’appareil doit acceptertout brouillage radioélectrique subi, même si le
brouillage est susceptible d’en compromettre le fonctionnement.
Under Industry Canada regulations, this radio transmitter may only operate using an
antenna of a type and maximum (or lesser) gain approved for the transmitter by Industry
Canada. To reduce potential radio interference to other users, the antenna type and its
gain should be so chosen that the equivalent isotropically radiated power (e.i.r.p.) is not
more than that necessary for successful communication.
Warning (part 15.21)
Changes or modifications not expressly approved party responsible for compliance could
void the user’s authority to operate the equipment. Unauthorized modification, or attach-
ments could damage the transmitter and may violate FCC regulations.
CE Declaration of Conformity
Tacx bv hereby declares that the this Vortex Smart (T2180) conforms to the essential
requirements set out in the Council (European parliament) Directive and other
relevant provisions of directive R&TTE 1999/5/EC and RoHS 2011/65/EU. A copy of this
decleration is available on the Tacx website: www.tacx.com

T2240.25B | 2017-3

Flow Smart T2240
Spare parts
T1005.03
T1402
T1403
T1410.06
T1465.08
T1852.08
T1852.13
T1852.15
T1852.18
T1853.06
T1854.06
T1895.02
T1961.61
T1964
T1964.03
T1965
T1981.24
T2021.22
T2023.05
T2023.16
T2026.03
T2170.95
T2179
T2240.20
T2240.50
T2241
T2241.35
T2605
T2605.02
Allen Key 5 mm
Quick release
Quick release adapter M20, left
Spacer M8
Hinge lock ring
Rubber cap, rear
Quick release adapter M20, right
Slider for quick release adapter
Screen capsule M20
Rubber foot, front left
Rubber foot, front right
Skyliner foot (rubber)
Power cable
Left front leg
Leg holder Vortex
Right front leg
Screw, 5 x 14
Resistance unit lever, Flow Smart
Lock lever, blue
Lock knob M20x2
Skyliner handlebar, Flow Smart
Rear leg
Skyliner, Flow smart
Flow Smart packaging
Manual set
Brake complete , Flow Smart
Resistance unit, Flow Smart
Assembly kit, Flow smart
Bolt M6x50
T2605.02
T1852.15
T2023. 05
T1853.06
T19 65
T1852.13
T2023.16
T1852.18
T1964. 03
T1852.08
T1895.02
T2179
T1005.03
T2029.03
T1410.06
T1402
T1981.24
T1465.08
T2021.22
T1854.06
T2170.95
T1403
T1964
T2241.35
T2241
T1961.61
Spare parts Flow Smart T2240 | 03-2017

Quick Start
Smart
trainers
acx

The possibilities
For
an
interactive
ride
on a Tacx
Smart
trainer
you
may
use
the
Tacx apps,
but
you can
also
opt
for
Zwift,
Tra1nerRoad,
K1nomap
and
Bkool
software
.
As
the
trainer
communicates
over
ANT+
and
Bluetoolh
it's
possible
to
read
out
your
performance
data
on a 2nd device on
top
of
controlling
il
with
the
previous
ly
mentioned
software
.
To
ride
with
the
Tacx
Trainer
software.
or
other
compu
t
er
software
.
you'll
need
an
ANT+
antenna
to
enable
the
communication
between
your
trainer
and
the
computer
.
•,

Control of
trainers
resistance

Compatibility
Tacx
Training
app
for
smart
p
hones
Bluetooth
4.0
integrated
smartphones:
iPhone4s and newer,
Android
4.3
and
newer
Tacx
Training
app
tor tab
lets
ANT+
or
Bluetooth
4.0
integrated
tablets:
iOS
•
iOS
•t
iPad 3 and
newer
[BT only).
Android
4.3 and
newer
[ANT+
or
BT]
T3CX
Training
app
for
desk
tops
Window
s
and
Mac
desktops
with
ANT+
antenna
No ANT+
or
Bluetooth 4.0 integrated?
Android tab
le
t with
mic
ro
1Pad:
use
W
ahoo
ANT+
USB
input
: use t
he
Tacx Dongle
an
d Apple
ANT+ Don
gle
micro
USS l
ightn
ing ad
ap
t
er
iPad 2 is
not compatible
..•
,
...
Desktops
·
use
USB ANT+ a
nt
enna,
like
T2028

Tacx
Software
Workout
library
Iri
cl.
u
cJ
Ing
t.
hc n ,o
'=·
t
po
pulJ r clIm bs.
st.rue!ur1:d
vvcJJ·kout:.
and
much
more
Training plans*
100+
Training
plans
to prepare
every
athlete
for
his
goals
Tacx
films*
D
1~:,cuvpr
fi-Hnu
us
cl.a
s~;1
C'::,,
slc-!t~p
climbs.
u t,es
and
other
bec1ut1ful
places
around
the
globe
GPS
Tracks
Import
GPS
data
ancJ
recon
your
race
or
re-r
idE~
your favuur1IP holiday
track

•
~. .:o.
..
C?Y-'~fq!ld
.r
~rn
't_he:
..
,,
,:
\..J:.A
'.
pp
'.
:
$.to.re
::
EB
. ·.:
Ger
it
from
· .
Microsoft

Read
performance data
on
2
nd
device
You
may
control
the
trainer
with
your
phone,
tablet
or
desktop
and
connect
a 2nd device to read
your
power, speed and cadence.
,
Power
Speed
Cadence
Other manuals for Flow Smart
1
Table of contents
Other Tacx Fitness Equipment manuals

Tacx
Tacx Vortex Smart T2180 User manual

Tacx
Tacx i-Vortex User manual

Tacx
Tacx NEO Smart T2800 User manual

Tacx
Tacx Flow Smart User manual

Tacx
Tacx NEO Smart User manual

Tacx
Tacx BlackTrack T2420 User manual

Tacx
Tacx Blue Matic User manual

Tacx
Tacx Vortex T1967 User manual

Tacx
Tacx FLUX 2 User manual

Tacx
Tacx NEOBIKE User manual

Tacx
Tacx Bushido Smart User manual

Tacx
Tacx FLUX 2 Smart User manual

Tacx
Tacx Vortex T1960 User manual

Tacx
Tacx i-Vortex User manual

Tacx
Tacx Booster User manual

Tacx
Tacx i-Vortex T2170 User manual

Tacx
Tacx Bushido T1980 User manual

Tacx
Tacx Satori User manual

Tacx
Tacx CF Swing User manual

Tacx
Tacx i-Magic Installation guide