TCL ALCATEL PIXI 4-5 4G Technical manual

L2 Repair Document TCLCommunication Ltd.
Rev.
5045X/D/A/J/G/T/Y Level 2 Repair Document
Page
1.0
1/53
All rights reserved. Transfer, copy, use or communication of this file is prohibited without authorization.
Pixi4-5 4G
ALCATEL PIXI 4 (5)
5045X/D/A/J/G/T/Y
Note: this manual is non-contractual and TCL Communication Ltd. can modify it without prior
notice on the characteristics of described equipments.

L2 Repair Document TCLCommunication Ltd.
Rev.
5045X/D/A/J/G/T/Y Level 2 Repair Document
Page
1.0
2/53
All rights reserved. Transfer, copy, use or communication of this file is prohibited without authorization.
1.0
2015-03-14
Draft creation
Xiaolong Yang
Claire Lin
Rev.
Date
Modification description
Prepared By
Checked By
Approved By

L2 Repair Document TCLCommunication Ltd.
Rev.
5045X/D/A/J/G/T/Y Level 2 Repair Document
Page
1.0
3/53
All rights reserved. Transfer, copy, use or communication of this file is prohibited without authorization.
Content
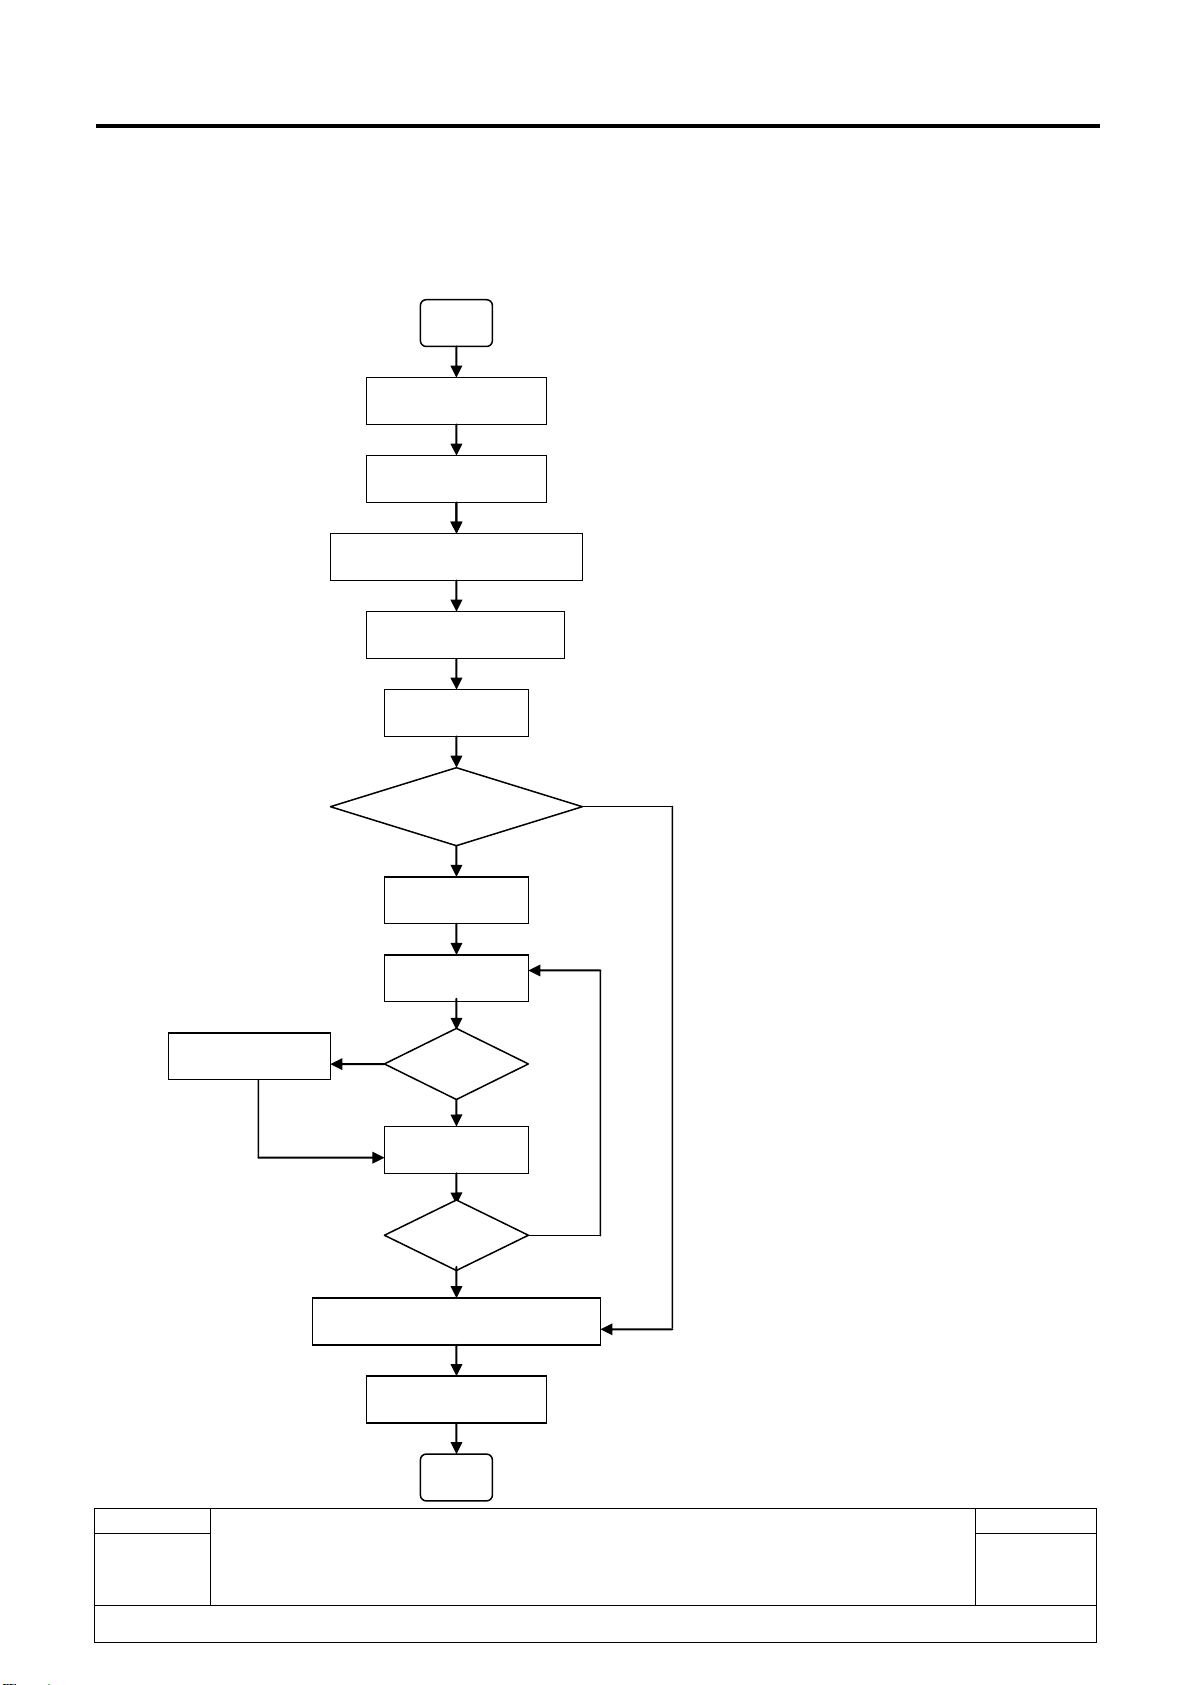
1Level 2 repair process ..............................................................................................4
2Warranty Check and Visual Inspection ...................................................................5
2.1 Warranty confirmation of L1..............................................................................................................5
2.2 Visual mechanical check...................................................................................................................6
2.3 Pretest...............................................................................................................................................7
3Software download .................................................................................................13
3.1 Equipments requested when download:......................................................................................13
3.2 Install driver.....................................................................................................................................14
3.3 SW download process....................................................................................................................16
4. Disassembly and assembly 5045...........................................................................24
4.1. ESD Safety......................................................................................................................................24
4.2. Disassembly tool.............................................................................................................................25
4.3. Disassembly process......................................................................................................................25
4.4. Reassembly Process......................................................................................................................34
4.5. Disassembly process evaluation ....................................................................................................35
5. Disassembly Complete...........................................................................................36
6. Level 2 repair...........................................................................................................36
6.1. power on issue.................................................................................................................................37
6.2. Charge issue....................................................................................................................................38
6.3. Display issue....................................................................................................................................39
6.4. Vibrator issue..................................................................................................................................40
6.5. Touch panel issue...........................................................................................................................41
6.6. SIM recognize issue........................................................................................................................42
6.7. TF card recognized issue................................................................................................................43
6.8. Main camera issue..........................................................................................................................44
6.9. Sub camera issue...........................................................................................................................45
6.10.MIC issue........................................................................................................................................46
6.11.Speaker issue..................................................................................................................................47
7. PCBA exchange.......................................................................................................47
8. Other component exchange...................................................................................48
9. Final test ..................................................................................................................48
APPENDIX 1 Packaging Requirements ........................................................................49

L2 Repair Document TCLCommunication Ltd.
Rev.
5045X/D/A/J/G/T/Y Level 2 Repair Document
Page
1.0
4/53
All rights reserved. Transfer, copy, use or communication of this file is prohibited without authorization.
1 Level 2 repair process
Reassembly
Record in BIG
End
OK
Retest
OK
OK
Start
Visual Inspection
Warranty Check
Pretest & Failure confirm
SW Upgrade
Disassembly
L2 Repair
Retest
Function test
PCBA Replace
NG
NG
NG
Restore User Information
Back up user data

L2 Repair Document TCLCommunication Ltd.
Rev.
5045X/D/A/J/G/T/Y Level 2 Repair Document
Page
1.0
5/53
All rights reserved. Transfer, copy, use or communication of this file is prohibited without authorization.
2 Warranty Check and Visual Inspection
2.1 Warranty confirmation of L1
1) IMEI sticker check:
a) Power on the handset, enter *#06#
b) If the IMEI sticker in the back casing is not lost:
We should make sure that the IMEI number must be the same with the one on the IMEI sticker; if
not, it’s out of warranty policy
2) Humidity sensitive label
If humidity sensitive label is not good, the cell phone will be considered as out of guarantee.
a) Liquid was detection by humidity sensitive label
b) Position of humidity sensitive sticker.
Humidity sensitive sticker is on the furnished frame.

L2 Repair Document TCLCommunication Ltd.
Rev.
5045X/D/A/J/G/T/Y Level 2 Repair Document
Page
1.0
6/53
All rights reserved. Transfer, copy, use or communication of this file is prohibited without authorization.
2.2 Visual mechanical check
Mechanical warranties check items:
1) Corrosion
Corrosion on the USB connector, SIM connector, and other metal surfaces。
2) Hole (diameter > 1mm)
Holes on any surface, including the front casing, furnished frame, battery cover, touch Lens,
keypad…
3) Bump
Bumps (diameter > 1mm) on any surface, including front casing, decorate frame, battery
cover, touch Lens, keypad, etc.
4) Scratch
Scratches (length > 3mm) on any surface, including the front casing, decorate frame, battery
cover, touch Lens, keypad, etc.
Here is the
humidity sensitive
sticker.

L2 Repair Document TCLCommunication Ltd.
Rev.
5045X/D/A/J/G/T/Y Level 2 Repair Document
Page
1.0
7/53
All rights reserved. Transfer, copy, use or communication of this file is prohibited without authorization.
5) Distortion
Bend, twisted or crushed on the h/s, cover/casing or connectors, etc.
6) Broken
Touch broken, casing/cover broken, etc.
7) Dropped
Keypad tear off, touch lens, connectors dropped, etc.
8) Gap
External physical damage relating to abnormal use, like front case and frame opened
9) Others
Damage caused by disassembly ,wrong part assembly, loss of components
Use in abnormal environment like high temperature causing plastic melts
2.3 Pretest
1) Check that the SIM card is set correctly.
2) Power on the cell phone.
3) If the cell phone asks to input NCK code, this means it is SIM locked and can only be worked
with dedicated SIM card. Use the correct SIM card.
4) Enter the phone code if necessary.
5) After the phone power on, test step by step with the auto test code:

L2 Repair Document TCLCommunication Ltd.
Rev.
5045X/D/A/J/G/T/Y Level 2 Repair Document
Page
1.0
8/53
All rights reserved. Transfer, copy, use or communication of this file is prohibited without authorization.
Press *#2886# in dial screen and then you will see the interface displaying the SW version. Select
“Auto” to start the auto test, or select “MANU”to do the MMI test manually.
If one of the tests failed during “Auto”test mode, it will show “Failed: XXX”, press “Next”to go on test,
press “END”to power off and press ”RTEST”to retest.
TRACEABILITY
I. (1) “Auto”test mode: You can get some information such as PT,PFT, BW, MMI, FT and
Data Code;
(2) “MANU”mode: You can get information such as IMEI, CU-REF, WIFI, BT address,
Data Code, etc.
II. Press “Pass” to continue.
TOUCH PANEL
I. “Please draw on the yellow area”according to instructions;
II. Press “Pass” to continue.
LCD
I. You will see the LCD display three colors: RED, GREEN and BLUE if it functions well;
II. Press “Pass” to continue;
III. You will see the LCD displays black if it functions well;
IV. Press “Pass” to continue;
V. You will see the LCD displays grey if it functions well;
VI. Press “Pass” to continue;

L2 Repair Document TCLCommunication Ltd.
Rev.
5045X/D/A/J/G/T/Y Level 2 Repair Document
Page
1.0
9/53
All rights reserved. Transfer, copy, use or communication of this file is prohibited without authorization.
VII. You will see the LCD displays grey level if it functions well;
VIII. Press “Pass” to continue;
IX. You will see the LCD displays white if it functions well;
X. Press “Pass” to continue.
KEYPAD
I. Press the key displayed on the screen. The key on the screen will turn grey when you
press it if it functions well;
II. Press “Pass” to continue.
LCD BACKLIGHT
I. The screen backlight will be flashing if it functions well;
II. Press “Pass” to continue.
MAIN CAMERA
Press “Pass”to continue if the main camera functions well.
FRONT CAMERA
Press “Pass”to continue if the front camera functions well.
MAIN FLASH
I. Main camera LED will turn on if it functions well;
II. Press “Pass”to continue.
FRONT FLASH

L2 Repair Document TCLCommunication Ltd.
Rev.
5045X/D/A/J/G/T/Y Level 2 Repair Document
Page
1.0
10/53
All rights reserved. Transfer, copy, use or communication of this file is prohibited without authorization.
I. Front camera LED will turn on if it functions well;
II. Press “Pass”to continue.
CHARGER LED
I. The charge LED will turn on if it functions well;
II. Press “Pass”to continue.
RECEIVER
I. You will hear a voice prompt which introduces some emergency call numbers from the
receiver if it functions well;
II. Press “PASS”to continue;
SPEAKER
I. You will hear a voice prompt which introduces some emergency call numbers from the
speaker if it functions well;
II. Press “Pass”to continue;
MIC
I. Make a noise near the main mic, you will hear it from the receiver if it functions well;
II. Press “Pass”to continue;
VIBRATOR
I. You can feel the phone’s vibrating if it functions well;
II. Press “Pass”to continue.

L2 Repair Document TCLCommunication Ltd.
Rev.
5045X/D/A/J/G/T/Y Level 2 Repair Document
Page
1.0
11/53
All rights reserved. Transfer, copy, use or communication of this file is prohibited without authorization.
HEADSET
I. Insert headset according to the instruction and you will hear a voice prompt which
introduces some emergency call numbers through the headset left if it functions well;
II. Press “Pass”to continue;
III. You will hear a voice prompt which introduces some emergency call numbers through the
headset right if it functions well;
IV.Press “Pass”to continue;
V. Make a noise near the headset mic, you will hear it from headset if it functions well;
VI.Press “Pass”to continue;
VII. You will hear FM playing and FM frequency will be displayed on the screen if it functions
well;
VIII.Press “Pass”to continue;
IX. Remove headset according to instruction and press “Pass”to continue.
USB
I. Insert USB cable according to instruction and it will say “USB: OK”, “Current: xx mA”if it
functions well;
II. Remove USB cable according to instruction and press “Pass”to continue;
CHARGER
I. Insert charger cable according to instruction, it will detect it and say “Charger: OK. Current:
xx mA”if it functions well;

L2 Repair Document TCLCommunication Ltd.
Rev.
5045X/D/A/J/G/T/Y Level 2 Repair Document
Page
1.0
12/53
All rights reserved. Transfer, copy, use or communication of this file is prohibited without authorization.
II. Remove charger cable according to instruction and press “Pass”to continue.
G-SENSOR
III. Put the handset towards up according to instruction;
IV. Press “Pass”to continue;
V. Put the handset “FACE DOWN”, “DOWN”, “LEFT”, “RIGHT”and “FACE UP”according to
instruction, and then the instruction will disappear if it functions well;
VI. Press “Pass”to continue.
PROXIMITY SENSOR
I. Please shadow the sensor with your hand and move away, then it will say “near -> far:1”
and “far->near:1”if it functions well;
II. Press “Pass”to continue.
SIM CARD
I. Insert SIM card and the phone will detect it if it functions well;
II. Press “Pass”to continue.
MEMORY CARD
I. Insert SD card and the phone will detect it if functions well;
II. Press “Pass”to continue.
BATTERY TEMP
I. It will display the value of battery temperature, battery content and battery voltage if it

L2 Repair Document TCLCommunication Ltd.
Rev.
5045X/D/A/J/G/T/Y Level 2 Repair Document
Page
1.0
13/53
All rights reserved. Transfer, copy, use or communication of this file is prohibited without authorization.
functions well;
II. Press “Pass”to continue.
BLUETOOTH
I. Bluetooth will search automatically and it will display device address if it functions well;
II. Press “Pass”to continue.
WIFI
I. It will search for WIFI hotspot and it will display searched result on the screen if it functions
well;
II. Press “Pass”to continue.
GPS
I. It will run GPS and search for satellite, and then it will display info such as “PRN”, “SNR”,
etc. on the screen if it functions well;
II. Press “Pass”to continue.
3 Software download
It is authorized to download software for the handset which needs to be updated. This downloading tool
is called “Sugar MTK_SP”. Thus internet access is necessary. TS Website: https://css.tclmobile.cn/.
3.1Equipments requested when download:
1) A handset with full power;
2) PC with windows system;
3) A USB cable.

L2 Repair Document TCLCommunication Ltd.
Rev.
5045X/D/A/J/G/T/Y Level 2 Repair Document
Page
1.0
14/53
All rights reserved. Transfer, copy, use or communication of this file is prohibited without authorization.
3.2Install driver
At the final step of SUGAR setup procedure, it will remind you to install driver.
Please select “Install driver”and press “Finish”; then the driver will be installed automatically.

L2 Repair Document TCLCommunication Ltd.
Rev.
5045X/D/A/J/G/T/Y Level 2 Repair Document
Page
1.0
15/53
All rights reserved. Transfer, copy, use or communication of this file is prohibited without authorization.

L2 Repair Document TCLCommunication Ltd.
Rev.
5045X/D/A/J/G/T/Y Level 2 Repair Document
Page
1.0
16/53
All rights reserved. Transfer, copy, use or communication of this file is prohibited without authorization.
3.3SW download process
Ⅰ. Open “Sugar MTK_SP3.4.1”(you can get the latest version from TS website: https://css.tclmobile.cn/).
“Sugar MTK_SP”login window looks like follow picture;
Input ‘User name’and ‘Password’, and then press “OK”to log on.

L2 Repair Document TCLCommunication Ltd.
Rev.
5045X/D/A/J/G/T/Y Level 2 Repair Document
Page
1.0
17/53
All rights reserved. Transfer, copy, use or communication of this file is prohibited without authorization.
Ⅱ. Use “Get version”function to check current SW vision, available version from server and handset info
such as IMEI, PTM, CU ref, data code, etc.
1) Select the product models –“5045”;

L2 Repair Document TCLCommunication Ltd.
Rev.
5045X/D/A/J/G/T/Y Level 2 Repair Document
Page
1.0
18/53
All rights reserved. Transfer, copy, use or communication of this file is prohibited without authorization.
2) Select Com port which created by your installed cable;

L2 Repair Document TCLCommunication Ltd.
Rev.
5045X/D/A/J/G/T/Y Level 2 Repair Document
Page
1.0
19/53
All rights reserved. Transfer, copy, use or communication of this file is prohibited without authorization.
3) Press “Get Version”button, power off the handset and connect it with PC by USB cable.

L2 Repair Document TCLCommunication Ltd.
Rev.
5045X/D/A/J/G/T/Y Level 2 Repair Document
Page
1.0
20/53
All rights reserved. Transfer, copy, use or communication of this file is prohibited without authorization.
This manual suits for next models
8
Table of contents
Other TCL Cell Phone manuals

TCL
TCL 40 XE 5G User manual

TCL
TCL TCLFLIP2 User manual

TCL
TCL Alcatel POP4-5 User manual

TCL
TCL Alcatel Neon Technical manual

TCL
TCL 30XL User manual

TCL
TCL onetouch 4041 User manual

TCL
TCL 205 User manual

TCL
TCL onetouch 4042S User manual

TCL
TCL Pixi4-6 3G Technical manual

TCL
TCL Alcatel Neon Technical manual