TCL 30 XE 5G User manual

USER MANUAL

1 2
About this Manual .....................................
Thank you for choosing the TCL 30 XE 5G.In order to maintain your device in
optimal condition, please read this manual and keep it for future reference.
Table of Contents
About this Manual ............................................................................................... 1
1 Getting Started............................................................................................ 4
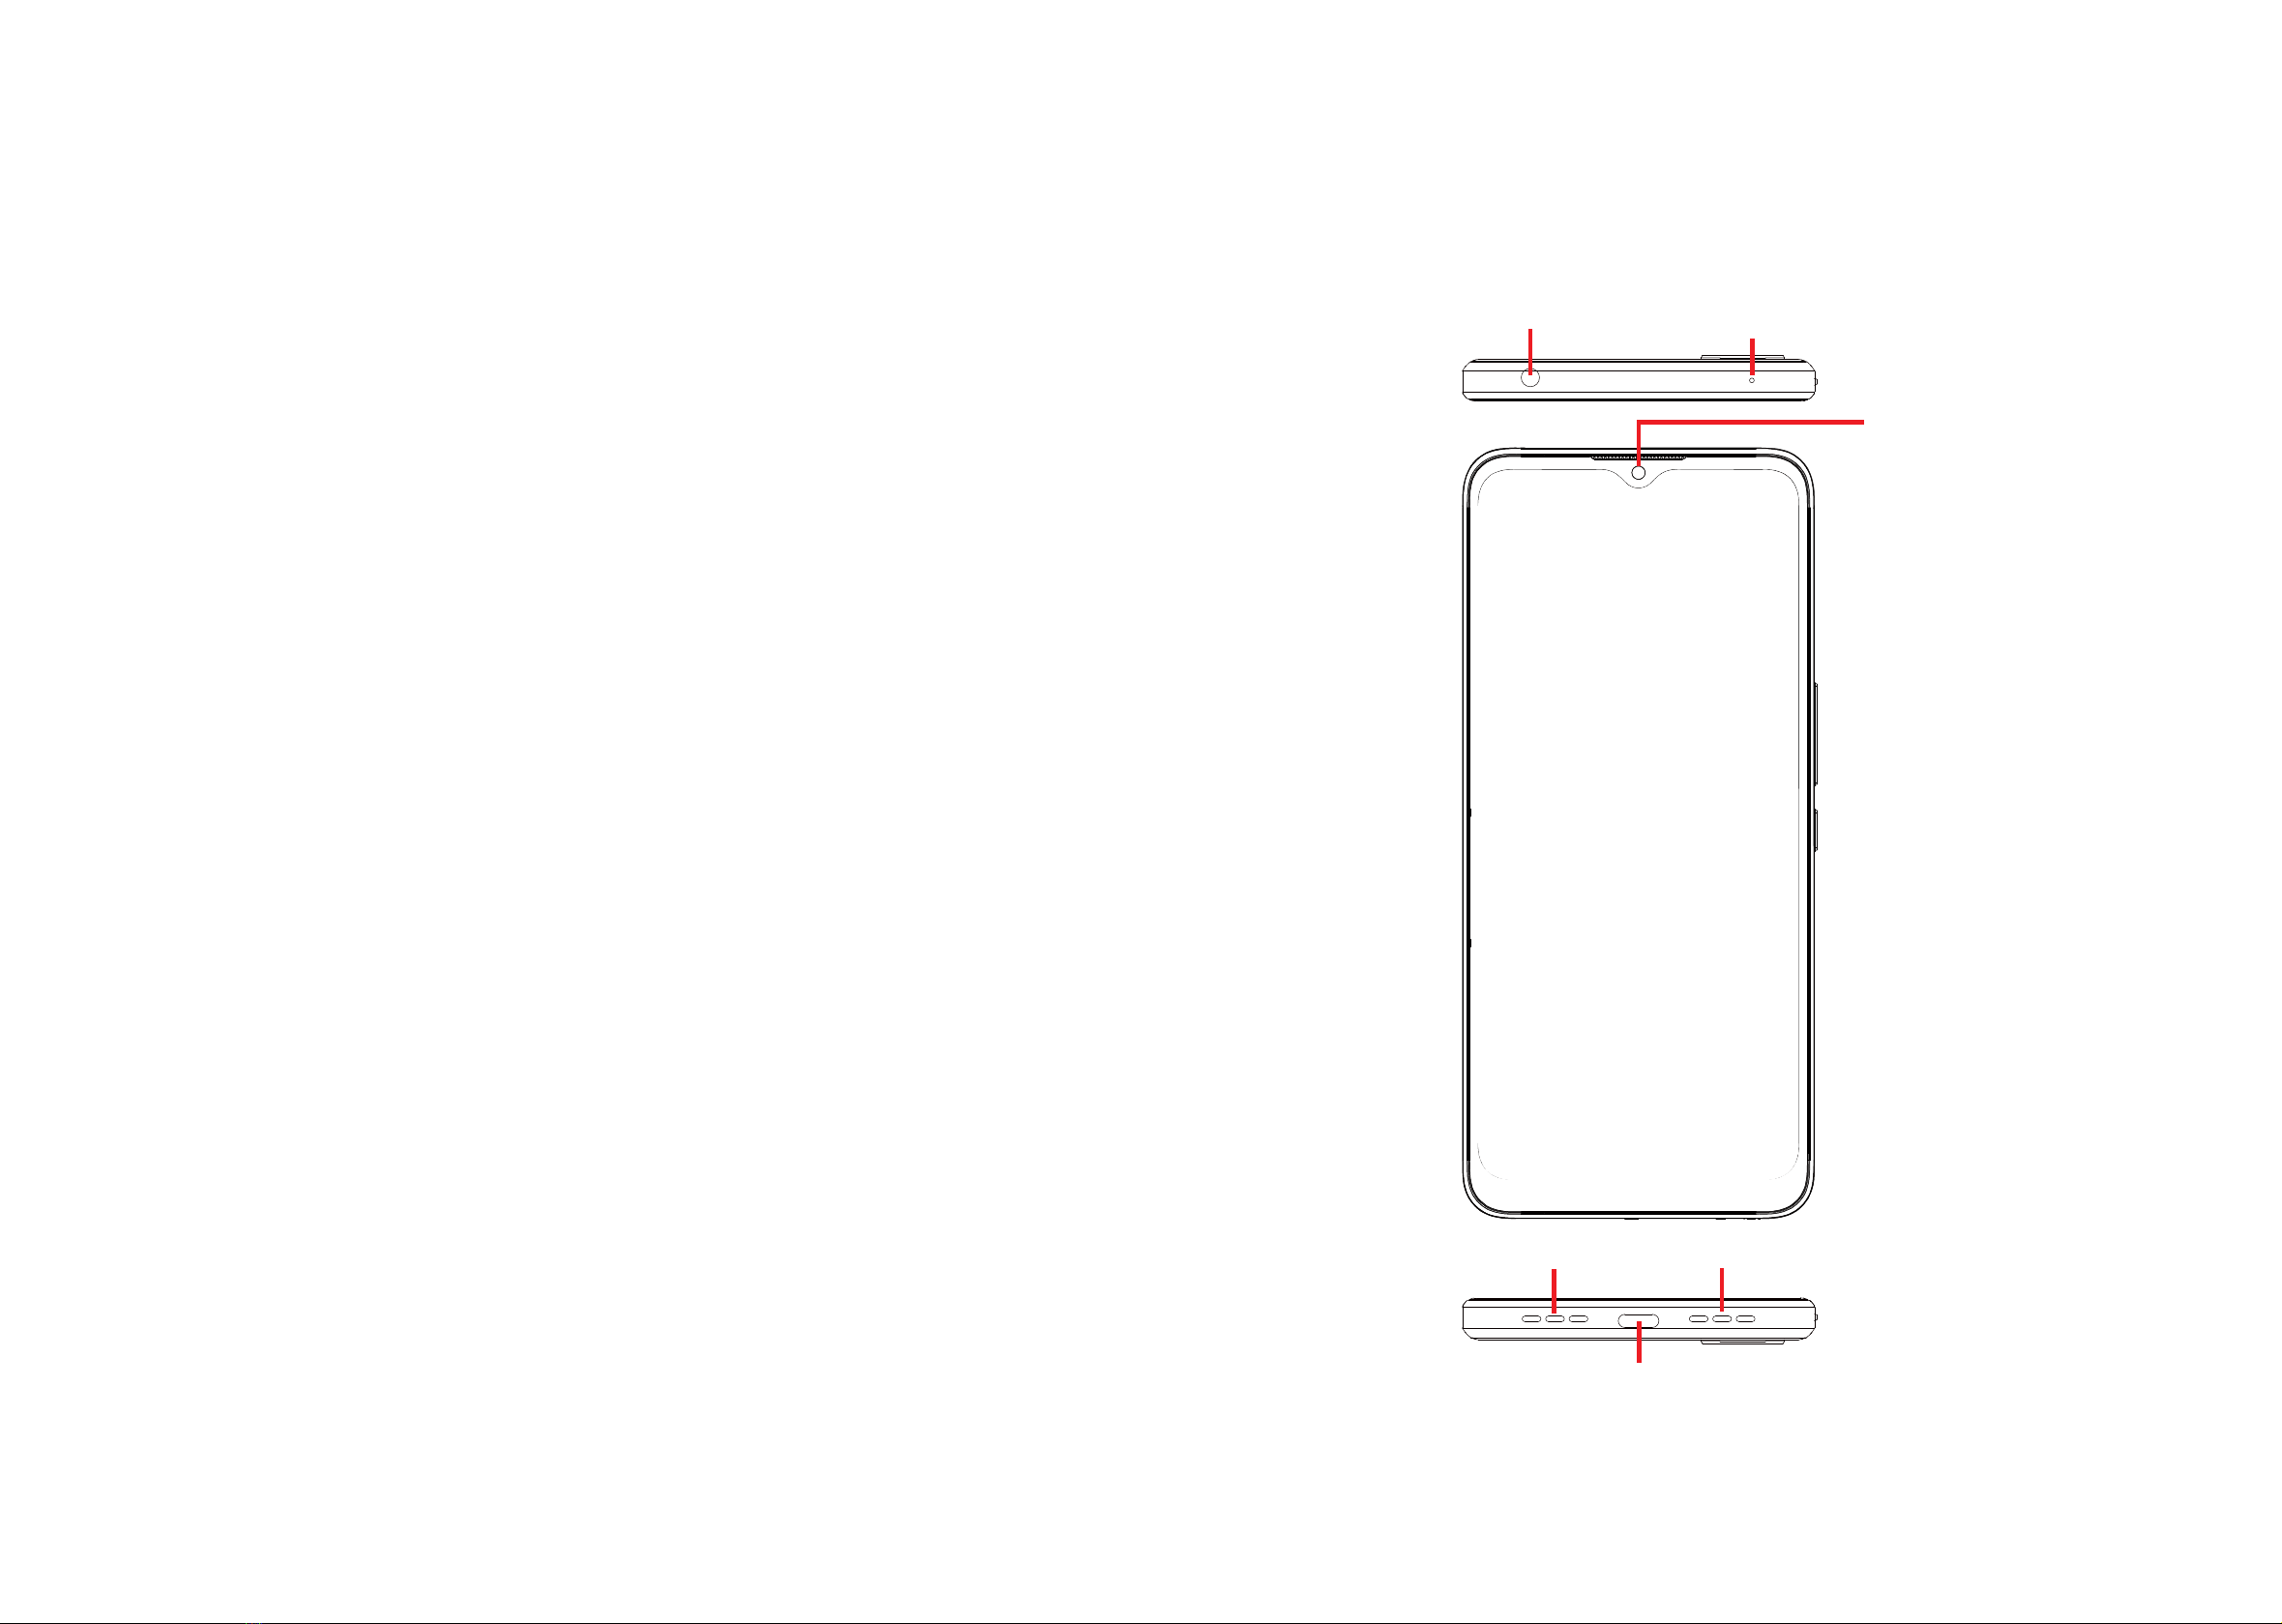
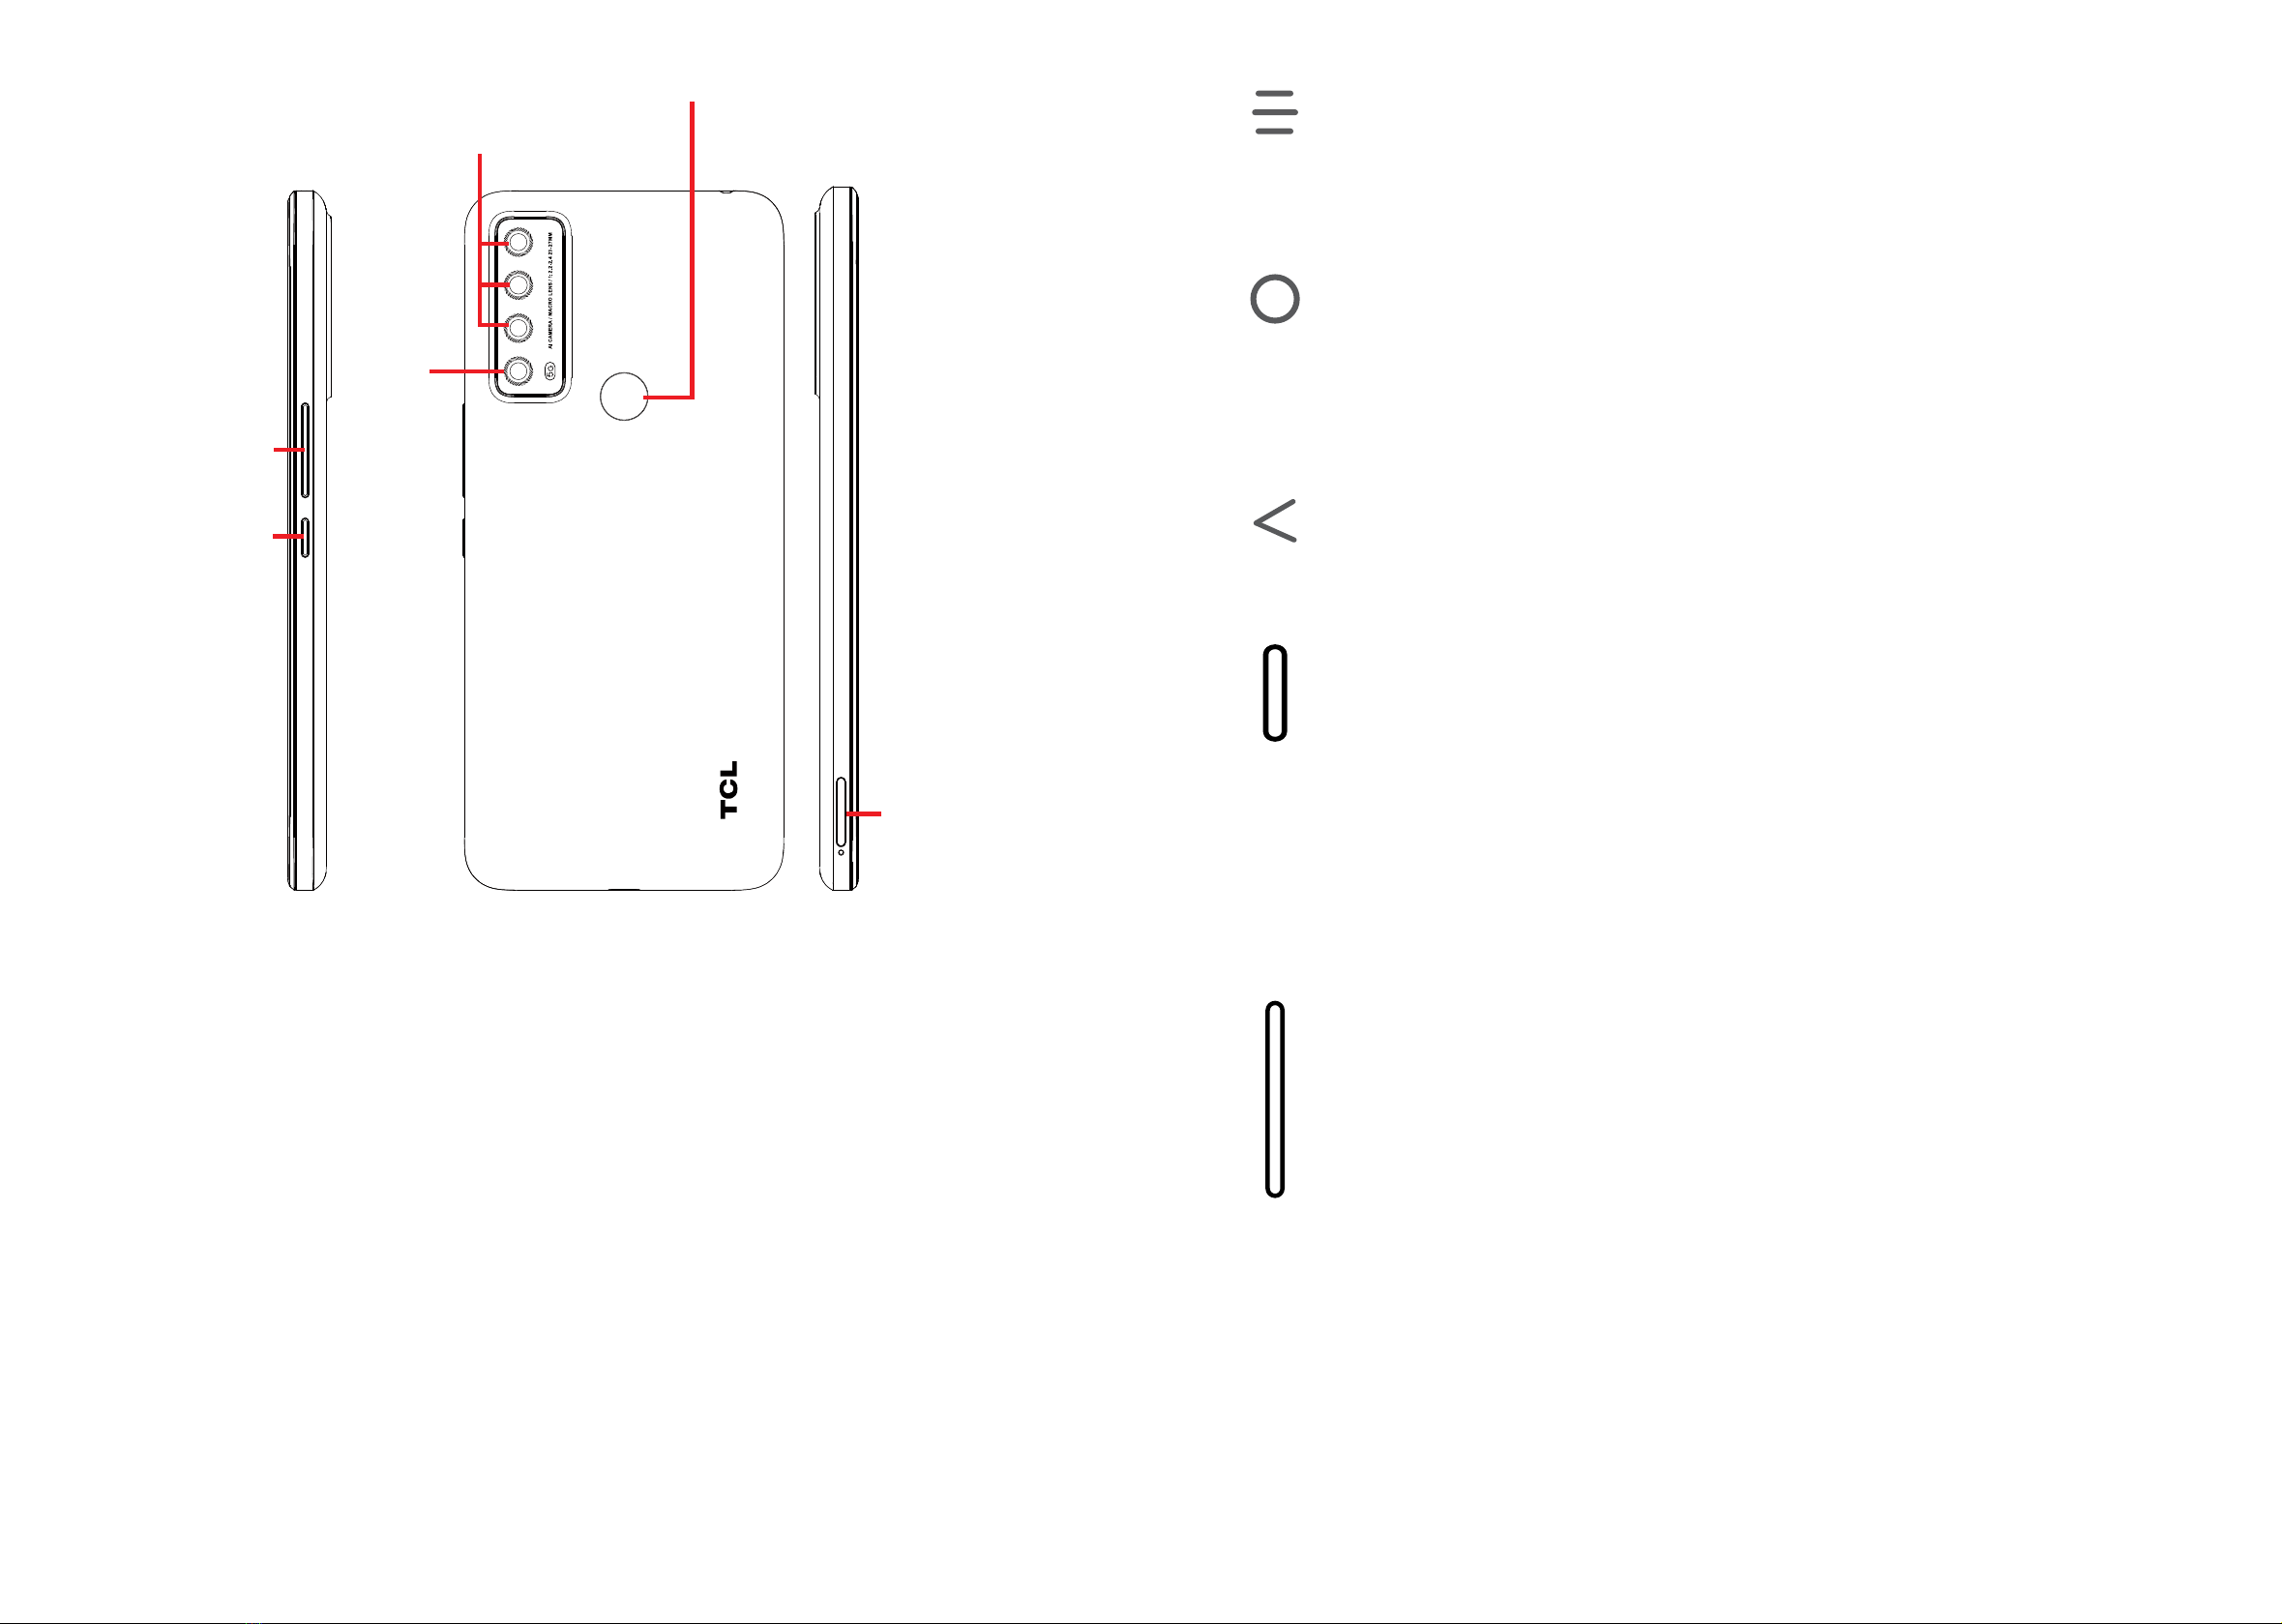
1.1 Overview ............................................................................................... 4
1.2 Setup...................................................................................................... 7
1.3 Home Screen ......................................................................................... 8
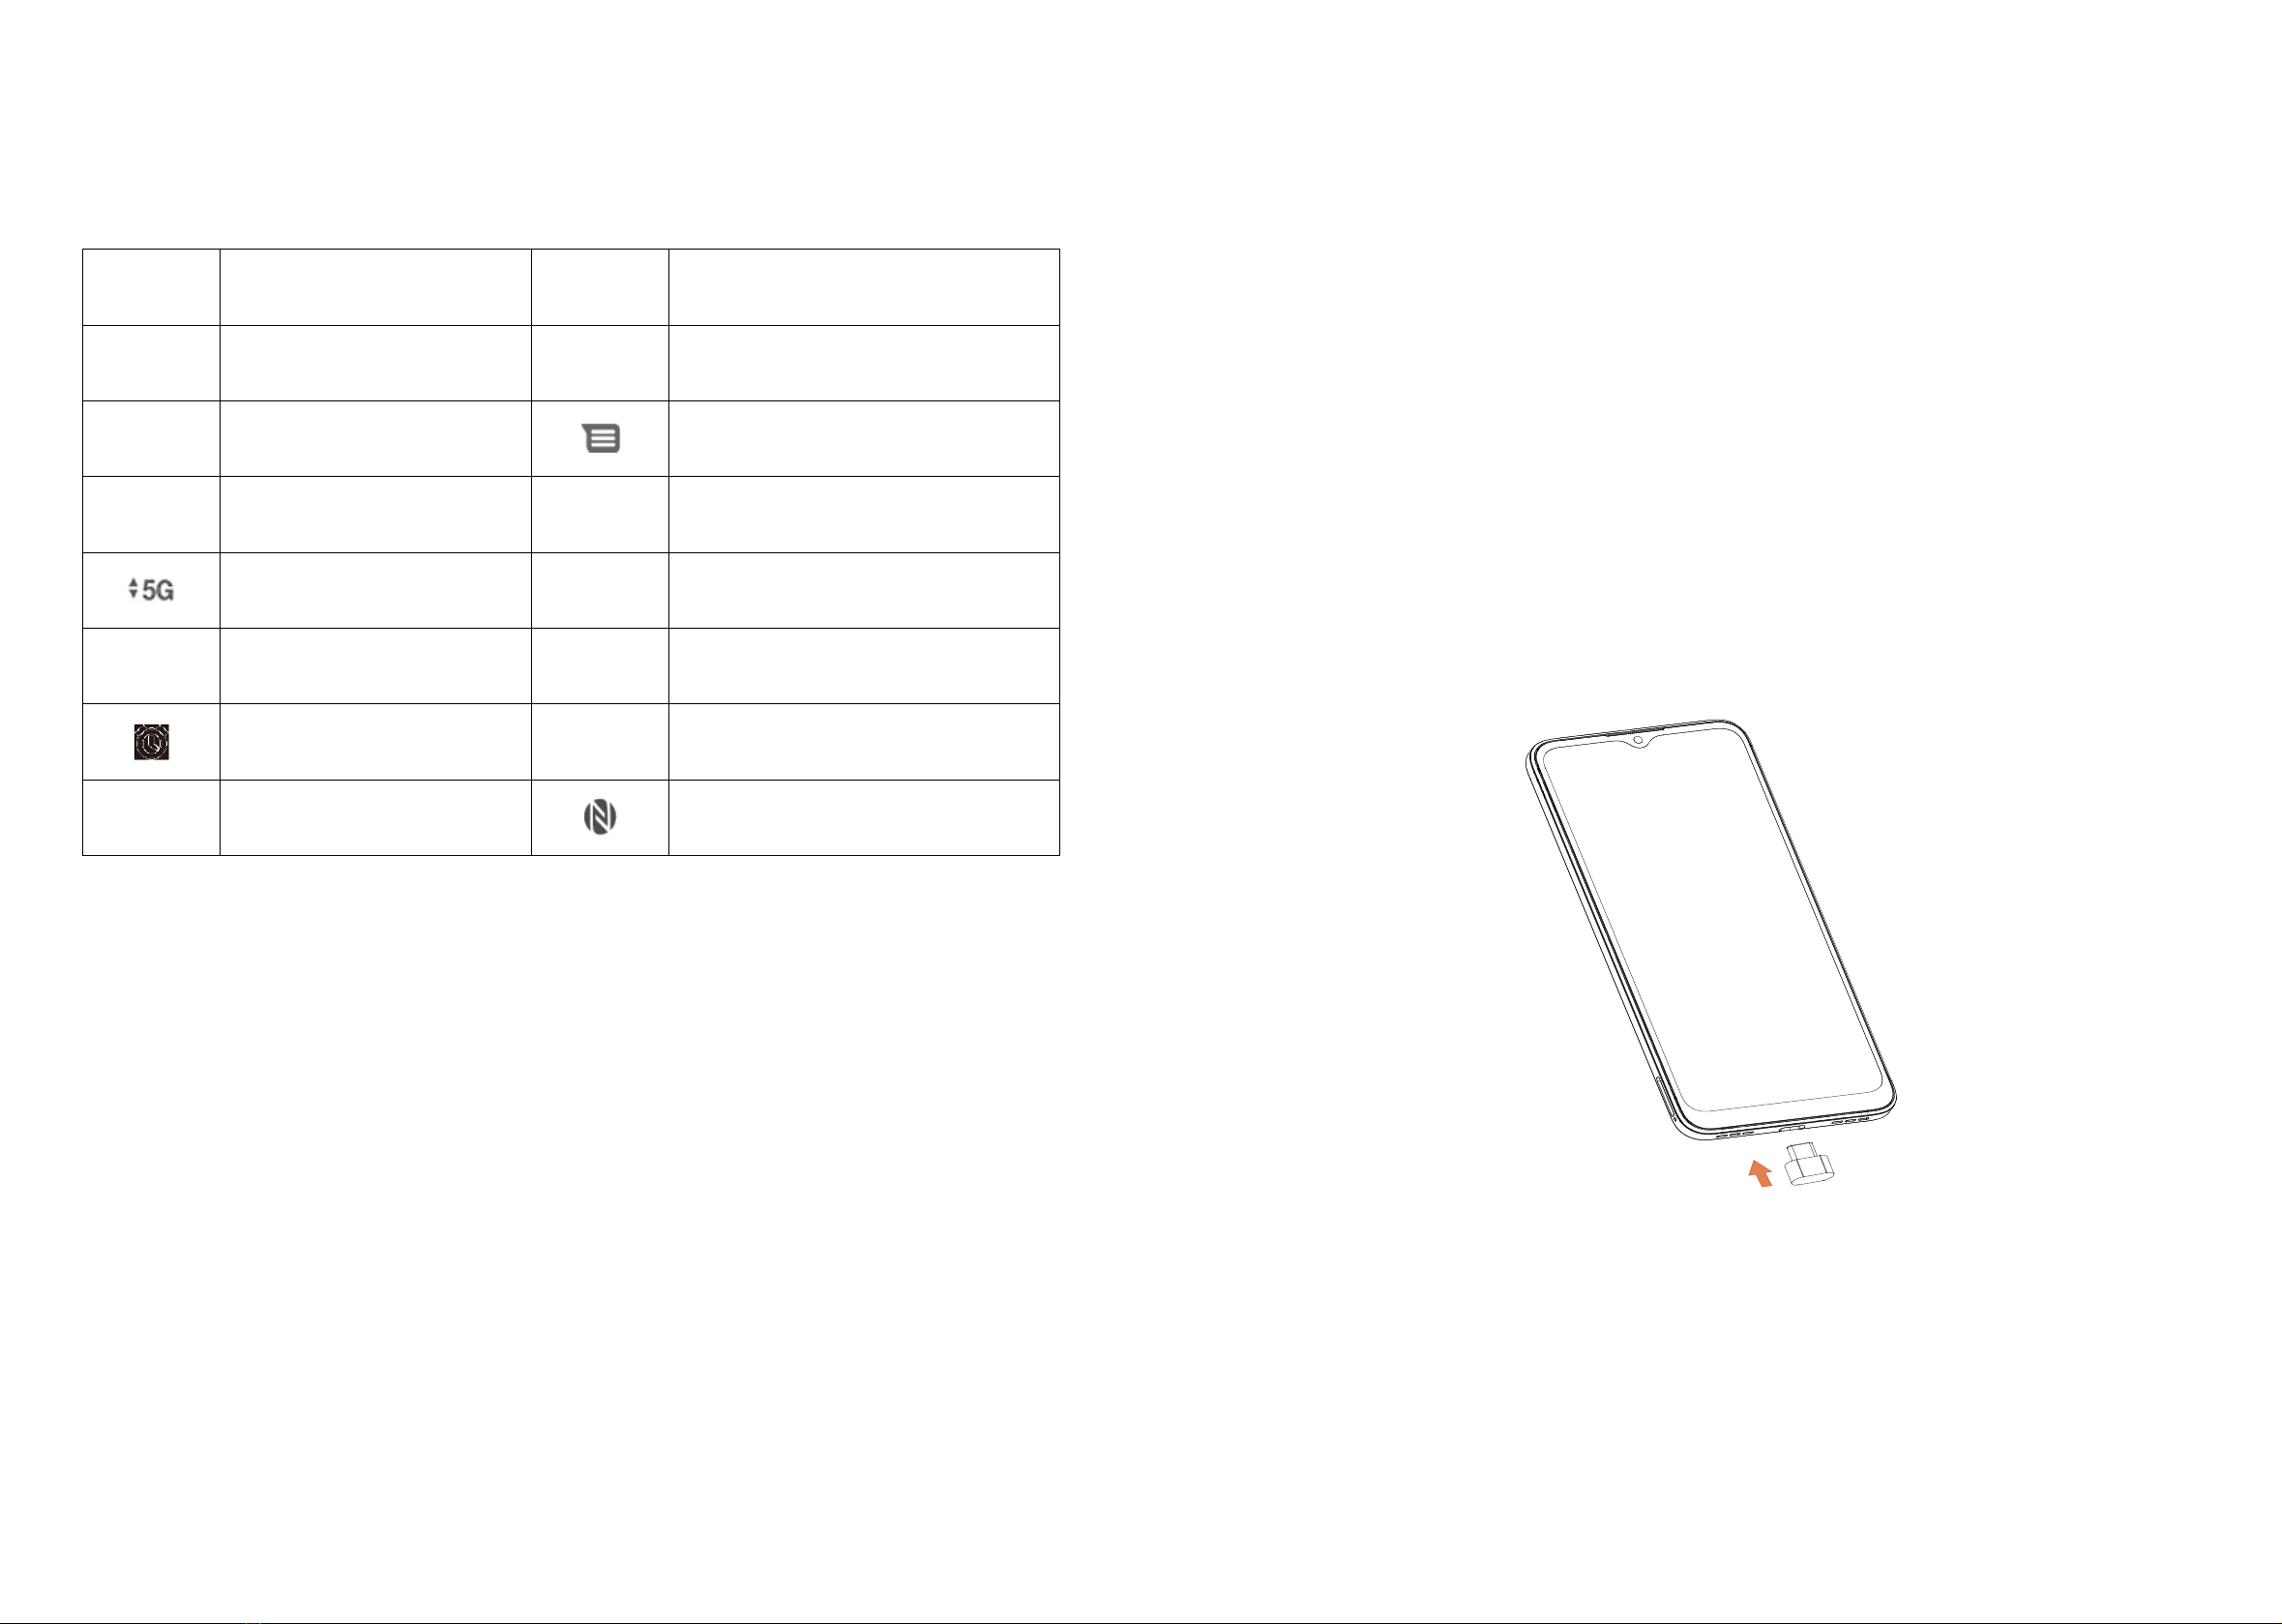
1.4 Status Bar .............................................................................................. 9
2 About Your Phone .................................................................................... 10
2.1 Power On/Off ...................................................................................... 10
2.2 Battery...................................................................................................11
3 Personalize Your Phone........................................................................... 12
3.1 Language ............................................................................................. 12
3.2 Date & Time ......................................................................................... 12
3.3 Display ................................................................................................. 13
3.4 Sound................................................................................................... 13
3.5 Digital Wellbeing & Parental Controls.................................................. 14
4 Application ................................................................................................ 15
4.1 Call ....................................................................................................... 15
4.2 Contacts ............................................................................................... 18
4.3 Messages............................................................................................. 21
4.4 Calendar............................................................................................... 23
4.5 Camera ................................................................................................ 25
4.6 Gallery.................................................................................................. 28
4.7 Clock .................................................................................................... 30
4.8 Gmail.................................................................................................... 31

3 4
4.9 Chrome ................................................................................................ 33
5 Google Applications................................................................................. 34
6 Security...................................................................................................... 36
6.1 Screen Lock ......................................................................................... 36
6.2 Fingerprint ........................................................................................... 36
6.3 Face Unlock ......................................................................................... 36
6.4 Smart Lock........................................................................................... 36
6.5 Remote Lock........................................................................................ 36
6.6 Apps Lock ............................................................................................ 37
6.7 Encryption & Credentials ..................................................................... 37
6.8 Screen Pinning..................................................................................... 37
7 Safety and Regulatory Information......................................................... 38
8 Troubleshooting........................................................................................ 44
1 Getting Started ...................................
1.1 Overview
Microphone
USB Type-C
Headset connector
Front camera
Microphone Speaker

5 6
Recent Apps button
• Touch to open a card view of applications you've worked with recently.
Swipe up on the screen to remove a specific thumbnail from the list, or
touch CLEAR ALL to remove all thumbnails from the list.
Home button
• From any application or screen, touch to return to the Home screen.
• Touch and hold to open Google Assistant. Through this function, you
can search for information online, open apps on your phone, send
messages, etc.
Back button
• Touch to go back to the previous screen, or close a dialog box, options
menu, the Notification panel, etc.
Power key
• Press: Lock the screen/Light up the screen.
• Press and hold: Show the popup menu to select from Power off,
Restart, Airplane mode or Cast.
• Press and hold the Power key and Volume down key to take a
screenshot and save it.
• Press and hold the Power key for at least 11 seconds to force reboot.
Volume Keys
• Adjust the call volume during a phone call.
• Adjust the media volume while listening to music, watching a video, or
streaming content.
• Adjust the ringtone volume.
• Mutes the ringtone of an incoming call.
• While using the Camera, press the Volume up or down key to take a
photo, or touch and hold to take several photos.
Flash
Power key
Volume keys
SIM and
microSDTM
tray
Back camera
Fingerprint sensor

7 8
1.2 Setup
Inserting Nano SIM card
You must insert your Nano SIM card to make phone calls using your network.
Your phone only supports Nano SIM cards. In order to avoid damaging your
phone, do not attempt to insert other SIM types, such as Mini or Micro
cards.
Note: Even if no SIM card is installed, your phone will still power on and you will
be able to connect to a Wi-Fi network and use some of the phone's features.
Setup your phone for the first time
The first time you power on the phone, you should set the following options:
language, mobile data, fingerprint, Google service, and date & time, etc.
1.3 Home Screen
You can bring all of the items that you use most frequently (applications, shortcuts,
widgets, folders) to your Home screen for quick access. Touch the Home button to
switch to the Home screen.
Status bar
• Status/Notification indicators
• Swipe down to open the Notification panel
Swipe left or right to view more screens
Touch to open an application, folder, etc.
Favorite apps tray
• Touch to open the application.
• Touch and hold to move or change applications
Search bar
Enter text search screen.
Enter voice search screen.

9 10
1.4 Status Bar
The Status bar appears at the top of your Home screen. Icons indicating your
phone's status and new notification alerts appear in the Status bar.
Icon Status Icon Status
Bluetooth®active Battery (fully charged)
Wi-Fi®active New message
Network (full signal) Vibrate mode
5G data service Screenshot captured
Airplane mode Connected via USB cable
Alarm set New Gmail message
Battery (charging) NFC is on
2 About Your Phone..............................
2.1 Power On/Off
Hold down the Power key until the phone powers on, unlock your phone (Swipe,
Pattern, PIN, Password or Fingerprint) if necessary, once unlocked, Home screen
is displayed.
If you don't know your PIN code or if you have forgotten it, contact Customer Care.
For Safety, please do not store PIN code in your phone.
Press and hold the Power key until options appear, then select Power off.
Charging
Insert the small end of the charging cable into the charge port and plug the charger
into an electrical outlet.

11 12
2.2 Battery
To optimize your battery life, you may do the following:
Turn on power saving mode
• Go to Settings > Smart Manager > Battery > Battery detail > Battery saver
• Touch TURN ON NOW to activate the battery saving mode.
Lower screen brightness
• Go to Settings > Display > Brightness level
• Lower the brightness by sliding to the left.
Screen timeout
• Go to Settings > Display > Sleep
• Select the screen timeout duration.
3 Personalize Your Phone ....................
3.1 Language
Your device supports multiple languages. To change your phone language:
• Go to Settings > System > Languages & input > Languages.
• Touch + Add a language to select a language from the language list.
• Touch and hold next to your desired language and drag it to the top of the list.
3.2 Date & Time
Go to Settings > System > Date & time.
Use network-provided time
Turn on to enable the network-provided time.
Use network-provided time zone
Turn on to enable the network-provided time zone.
If Automatic Data&Time is turned off, you will have the following two options to
manually set the date and time:
• Setdate
Touch to open a dialog in which you can manually set the date.
• Settime
Touch to open a dialog in which you can manually set the time.
If Use network-provided time zone is turned off, you will have the following
option to manually set the time zone:
• Timezone
You can select the time zone and region manually.
• Timeformat
You can also set the time format as locale default or 24-hour format.

13 14
3.3 Display
Dark mode
Your screen will become black in this mode, which makes it easier to look at your
screen or read in dim light.
Eye comfort mode
Eye comfort mode can effectively reduce blue light radiation and adjust the color
temperature to relieve eye fatigue. You can also create a custom schedule to turn
it on.
Auto-rotate screen
Select whether the screen rotates automatically or not.
Note: Using your device in landscape mode with polarized sunglasses on may
cut light from the screen. Take your polarized sunglasses off or use your device in
portrait orientation to continue use.
3.4 Sound
Adjusting volume
• Press the volume keys that are located on the right side of the device to adjust
the Ringtone & Notification volume.
• You can also go to Settings > Sound & vibration to adjust the volume for call,
ring, media and alarm.
Adjusting tones
• Go to Settings > Sound & vibration > Phone ringtone & vibrate.
• You may select ringtones for phone, notification, alarm as well as other sounds.
Adjusting other sounds
All other sounds that are related to Dial Pad, Screen locking and Charging can be
adjusted by doing the following:
• Go to Settings > Sound & vibration > More sound settings.
3.5 Digital Wellbeing & Parental Controls
Use this menu to find out how much time you have spent on the phone and even
on each app. You can customize the time limit for using the phone.
In addition, parents can restrict their children's usage time and manage their
browsing habits.

15 16
4 Application .........................................
4.1 Call.................................................................
Making a call
To make a call, touch .
Touch to send a
message, block the
number or view call
details
Show the dial pad
Suggested numbers are displayed as you enter numbers on the dial pad.
Touch and hold to
access voicemail
Enter the desired number from the dial pad and touch to place the call. You
can also select a contact from Favorites , Recents or Contacts by
touching the tabs.
The number you entered can be saved to Contacts by touching Create new
contact.
If you make a mistake, you can delete the incorrect digits by touching .
To hang up a call, touch .
International call
To make an international call, touch and hold to enter “+”, then enter the
international country prefix followed by the full phone number and touch .
Emergency call
If your phone has network coverage, dial the emergency number and touch to
make an emergency call. This works even without a SIM card and without typing
the PIN code.

17 18
Answering or rejecting a call
When you receive a call:
• Slide up to answer;
• Slide down to reject;
• Touch to reject the call by sending a preset message.
To mute the ringtone of an incoming call, press the Volume key.
Voicemail
Your voicemail is provided to avoid missing calls. It works like an answering
machine that you can consult at any time.
To access your voicemail, touch and hold .
To set your voicemail number: touch Phone and go to menu > Settings >
Voicemail > Advanced Settings > Setup > Voicemail number.
If you receive a voicemail, appears in the Status bar. Open the Notification
panel and touch Voicemail.
4.2 Contacts.........................................................
Contacts enables quick and easy access to the contact you want to reach.
You can view and create contacts on your phone and synchronize them with your
Gmail contacts or other applications on the web or on your phone.
Adding a contact
Touch in the contact list to create a new contact.
Enter the contact's name and other contact information. By scrolling the screen up
and down, you can move from one field to another
Select a picture or take
a photo for the contact
When finished, touch SAVE to save
Touch to open available labels
When finished, touch SAVE to save.
To exit without saving, you can touch and then touch DISCARD.
Editing your contacts
Touch in the contact details screen to edit. When finished, touch SAVE to
save.

19 20
Add to/remove from Favorites(1)
Touch a contact to view details then touch to add the contact to favorites.
Touch the star to remove a contact from favorites.
Deleting a contact
From the contact list screen:
• Touch and hold the contact you want to delete, then touch and confirm to
delete.
• Mark the checkbox of all contacts, then touch and confirm to delete all
contacts.
The contact you have deleted will also be removed from other applications
on the phone or web the next time you synchronize your phone.
Sharing a contact
You can share a single contact with others by sending the contact's vCard to them
via Email, Messages, and Bluetooth. Select a contact you want to share, touch
and then select Share.
Available options
From the contact list, you may also make further settings by touching .
(1) Only phone contacts can be added to Favorites.
Settings
• My info Touch to set up your profile
• Accounts Touch to add account and configure related info.
• Default account for
new contacts
Touch to choose the default place to save a new
contact.
• Sort by Touch to sort the list by the first name or last name.
• Name format Touch to choose whether to display first name first, or
last name first.
• Phonetic name Touch to choose display or hide phonetic name.
• Import/Export Import or export contacts between phone, SIM card,
microSD card and phone storage, etc.
• Block numbers Add numbers here so that you won't receive calls or
texts from them.
• About Contacts Touch to view the build version, open source licenses
and so on.

21 22
4.3 Messages ..............................................................
Use the messaging app to send and receive text (SMS) and multimedia
(MMS) messages.
Creating a message
On the Messaging list screen, touch to write text/multimedia messages.
Type the text message
Insert emoticons
Add recipients
Sending a text message
• Enter the name or the phone number of the recipient in the To bar or touch
to add recipients.
• Touch the Add text bar to enter the text of the message.
• Touch to insert emoticons.
• When finished, touch to send the text message.
An SMS message of more than 160 characters will be charged as several SMS.
A counter will be on the right of the text box to remind you how many characters
can be entered in one message.
Specific letters (accented) will also increase the size of the SMS, this may
cause multiple SMS to be sent to your recipient.
Sending a multimedia message
MMS enables you to send video clips, images, audios and Vcard to other
compatible mobile devices and e-mail addresses.
• Enter the recipient's phone number in the To bar.
• Touch the Add text bar to enter the text of the message.
• Touch to attach a picture, video, audio or contact.
• When finished, touch to send the multimedia message.
Managing messages
When receiving a message, will appear in the Status bar as a notification.
Drag down the Status bar to open the Notification panel, touch the new message
to open and read it. You can also access the Messaging application and touch the
message to open it.
Messages are displayed as a conversation.
Touch a message to enter the message composing screen:
• Touch to call the number.
• Touch to launch a video call.
• To reply to a message, enter the text. When finished, touch .
• If you touch and hold a message, the following options will be available: delete
, turn off notification , archive , etc. Touch to add contact.

23 24
4.4 Calendar........................................................
You can use Calendar to keep track of important meetings, appointments, etc.
To access the function, touch Google folder from the Home screen, then touch
Calendar.
Viewing calendars
You can display the Calendar in Schedule, Day, 3 days, Week or Month view.
Touch and select your desired calendar view.
Day view
Schedule view
Week view
Month view
3-day view
Creating a new event
You can add new events from any Calendar view.
• Touch .
• Fill in all required information for this new event. If it is a whole-day event, you
can turn on next to All-day.
• Invite guests to the event. Enter the email addresses of the guests you want
to invite with commas to separate. The guests will receive an invitation from
Calendar and Email.
• When finished, touch Save from the top of the screen.
To quickly create an event from the Day, 3 Day, or Week views, touch an empty
spot to select a target area which will then turn into , and touch the icon to
create the new event.
Deleting or editing an event
• To delete or edit an event, touch the event to enter its details screen, touch
to edit the event.
• Touch and Delete to remove the event.
Event reminder
If a reminder is set for an event, the upcoming event icon will appear in the
Status bar as a notification when the reminder time arrives.
• Touch and drag down the Status bar to open the Notification panel.
• Touch an event name to view the Calendar notification list.

25 26
4.5 Camera .........................................................
Before using the camera, make sure that you remove the protective lens cover to
avoid it affecting your picture quality.
Launch Camera
There are multiple ways to open the Camera app.
From the Home Screen
Touch Camera .
From the Lock Screen
When the screen is locked, press the Power key once to light up the screen, then
swipe left on the camera icon in the lower right corner to open the camera.
Using a shortcut key
Simply double-press the Power key to open the camera.
1
2
3
4
5
6
7
8
9
10
11
12
1Select filter
2Flash mode
Touch to turn on/off the camera flash
WARNING: Keep a safe distance when using the flash. Do not point the flash
toward people’s or animals’ eyes.
3Take a timed photo
4Take HDR photos
5Zoom in/out
6Switch between front/back camera
7Take a photo
8Touch to access settings
9Picture size
10
Pinch fingers together to zoom out, or spread fingers apart to zoom in
11
View the photos or videos you have taken
12
Google Lens
Google Lens(1)
Google Lens is a free tool that can help you to:
• Copy text
• Search for similar products
• Identify plants and animals
• Discover books & media
• Scan codes
…and more.
(1) Note that Google Lens only works when you are logged in to your Google Account.
Your phone must also be connected to a network.

27 28
To take a photo
The screen acts as the viewfinder. First, position the object or landscape in the
viewfinder, touch the screen to focus if necessary. Touch to capture. The
photo will be automatically saved. You can also touch and hold to take burst
shots, the maximum number is 20.
To take a video
Touch VIDEO to change the camera mode to video. Touch to start video
recording. Touch the left part of this icon to take a picture during video
recording.
Touch the right part of this icon to pause video recording and touch
to continue. Touch to stop recording. The video will be automatically saved.
Further operations when viewing a photo/video you have taken
• Slide left or right to view the photos or videos you have taken.
• Touch , then Gmail/Bluetooth/MMS/etc. to share the photo or video.
• Touch Back button to return to Camera.
4.6 Gallery ............................................................
Photos acts as a media player for you to view photos and play videos.
Pictures and videos are displayed by moments and albums in Gallery.
• Touch the picture/video directly to view or play.
• Slide left/right to view previous or next pictures/videos.

29 30
Working with pictures
You can work with pictures by rotating or cropping them, sharing them with friends,
setting them as a contact photo or wallpaper, etc.
Find the picture you want to work on, and touch the picture in the full-screen
picture view.
• Touch to share the picture.
• Touch to edit the picture.
Choose picture effect.
Set as Dehaze or Sky.
Crop, Straighten, Rotate the picture.
Adjust the picture colour.
• Touch to set the picture as your favourite.
• Touch to delete the picture.
• Touch >Set as to set the picture as a Contact photo or Wallpaper.
4.7 Clock................................................................
To access clock, swipe up from the Home screen, touch Tools folder and select
Clock.
Setting world clocks
• Touch Clock on the clock screen.
• Touch to add a time zone.
Setting alarms
From the Clock screen, touch Alarm to enter.
• Turn on to enable the alarm.
• Touch to add a new alarm, touch to save.
• Touch a currently existing alarm to enter the alarm editing screen.
• Touch to delete the selected alarm.
Setting timer
Touch Timer on the clock screen.
• Enter time in the sequence of hours, minutes, and seconds.
• Touch to activate Countdown.
• Touch to add another timer in panel.
• Touch to deactivate Countdown.
• Touch to reset.
Setting stopwatch
Touch Stopwatch on the clock screen.
• Touch to start the timer.
• Touch to show a list of records according to the updated time.
• Touch to halt the total and lap times.
• Touch to start a new timer.

31 32
4.8 Gmail .............................................................
Setting up Gmail
To set up your email account, touch Google folder from the Home screen, then
select Gmail .
Select to add an email address.
An email setup process will guide you through the steps to set up an email account.
• Select the type of email account that you have and enter the email address and
password of the account you want to set up.
• If the account you entered is not provided by your service provider in the device,
touch Other and then MANUAL SETUP after entering the email address, select
an account type and enter password of your email, then correctly fill in server
and port in both Incoming server settings and Outgoing server settings
interfaces. Finally, touch FINISH to complete setup.
• To add another email account, you can touch on the upper left corner, select
Settings, and then touch Add account. Or you can touch the account name
on the upper right corner and select Add another account to implement this
function.
Sending an email
• Touch from the Inbox screen.
• Enter recipient(s) email address(es) in the To field.
• If necessary, touch > Cc/Bcc to add a copy or a blind carbon copy to the
message.
• Enter the subject and the content of the message.
• Touch to add an attachment.
• If you do not want to send the mail right away, you can touch and Save draft
or touch the Back key to save a copy.
• Touch to send.
If you do not want to send or save the email, you can touch and then select
Discard.
To add a signature that will appear on all of your emails, touch and select
Settings, then choose the account that you want to create or modify the signature,
touch Mobile Signature to edit.
Note: If you are seeing a “password incorrect” error when setting up your Gmail
Account in the Gmail app, please review the following options:
Option 1: Generate an App password
An App password is a 16-digit passcode that gives an app or device permission
to access your Google Account. If you use 2-Step-Verification and are seeing a
“password incorrect” error when trying to access your Google Account, an App
password may solve the problem.
Steps to generate an App password:
• Visit your App passwords page
https://myaccount.google.com/security/signinoptions/two-step-verification.
You may be asked to sign in to your Google Account.
• At the bottom, click Select app and choose the app you’re using.
• Click Select device and choose the device you’re using.
• Select Generate.
• Follow the instructions to enter the App password (the 16-character code in the
yellow bar) on your device.
• Select Done.
• Once you are finished, you won’t see that App password code again. However,
you will see a list of apps and devices you’ve created App passwords for.

33 34
If generate an app password does not fix the “Password incorrect” issue, please
proceed to Option 2 or Option 3.
Option 2: Change your settings to allow less secure apps
• Go to the "Less secure apps" https://www.google.com/settings/security/
lesssecureapps section in My Account.
• Next to "Access for less secure apps," select Turn on.
• You can now setup your email using your username and password. If you
continue to see a “password incorrect” error, please proceed to Option 3.
Option 3: Access Gmail through browser
If you don’t want to change your security settings, please follow these steps to
access your Gmail:
• From the home page, press the OK button and press on the Browser.
Enter https://www.google.com/gmail/ on the browser URL tab.
• Enter your username and password to log in.
4.9 Chrome...........................................................
Using the Chrome browser, you can enjoy surfing the Web.
To access this function, touch Chrome from the Home screen.
5 Google Applications ..........................
Google apps are preinstalled on your phone to improve work efficiency and help
you enjoy life.
This manual briefly introduces the apps. For detailed features and user guides,
refer to related websites or the introduction provided in the apps.
You are recommended to register with a Google Account to enjoy full functionality.
Google
Your bookmarks, browsing history, and settings across all devices on which
the browser is installed can be synchronized with your Google Account.
Gmail
As Google's web-based email service, Gmail is configured when you first
set up your phone. With this application, you can send and receive emails,
manage emails by labels, archive them, etc. Emails can be automatically
synchronized with your Gmail account.
Maps
Google Maps offers satellite imagery, street maps, 360° panoramic views
of streets, real-time traffic conditions, and route planning for travelling by
foot, car, or public transportation. By using this application, you can find
your own location, search for a place, and get suggested route planning for
your trips.
YouTube
YouTube is an online video-sharing application where users can upload,
view, and share videos. Available content includes video clips, TV clips,
music videos, and other content such as video blogging, short original
videos, and educational videos. It supports a streaming function that allows
you to start watching videos almost as soon as they begin downloading
from the internet.

35 36
Drive
A file storage and synchronization service created by Google, which allows
users to store files in the cloud, share and edit files. Files in Drive are kept
secure and can be accessed from any device by logging in to your Google
Account. Files or folders can be shared privately with other Google Account
users.
Play Movies & TV
Google Play Movies & TV allows you to watch movies and TV shows
purchased or rented on Google Play.
Play Store
Serves as the official app store for the Android operating system, allowing
users to browse and download applications and games. Applications are
either free of charge or at a cost.
In Play Store, search for the app you need, download it and then follow the
installation guide to install the app. You can also uninstall, update an app,
and manage your downloads.
Duo
This is a video chat mobile app that allows users to make video calls to
people in their contact list once their phone numbers are verified.
Photos
Google Photos stores and backs up your photos and videos. It also
automatically analyzes photos and organizes them into groups, so that you
can quickly find the photos you need.
Notes
You can insert images, lists, and make voice recordings in your notes.
You can also set time or location-based reminders for notes. Google Keep
allows you to categorize notes by labels, and notes are searchable based
on their color, whether they have reminders, audio, images, or lists.
6 Security...............................................
From the Home screen, touch Settings > Security & biometrics to do following
security settings.
6.1 Screen Lock
Screen lock allows you to set a screen lock option to secure your phone from
being used by others without your permission, activate the following security
options: Pattern, PIN, Password or Fingerprint. Whoever turns on your phone
will be required to unlock the screen in order to access your device. Your device
can be unlocked by anyone if you select None or Swipe.
6.2 Fingerprint
Use your Fingerprint to unlock the screen or take a photo/video.
Access Settings > Security & biometrics > Fingerprint to activate these
functions.
6.3 Face Unlock
Face unlock allows you to unlock your device with your facial data. Set it according
to the on-screen steps.
Ensure that you are facing the phone screen when using face recognition.
NOTE: you need to set a pattern, PIN, or password before using Face unlock.
6.4 Smart Lock
Smart Lock keeps your device unlocked when it's safe with you and locked when
it detects that it's been put down.
6.5 Remote Lock
If your phone is lost, you can lock the phone remotely by sending a text message.

37 38
6.6 Apps Lock
Apps lock can effectively protect your privacy by locking some apps with a pattern
or fingerprint. Go to Settings > Security & biometrics > Apps lock to set the lock
format, lock time and choose the apps you want to lock.
6.7 Encryption & Credentials
Touch to view your device encryption status and the credentials items. You can
modify and clear all of the stored credentials.
6.8 Screen Pinning
When this setting is turned on, you can use screen pinning to keep the current
screen in view until you unpin.
7 Safety and Regulatory Information ..
Safety and Use
We recommend that you read this chapter carefully before using your mobile
device. The manufacturer disclaims any liability for damage, which may result as a
consequence of improper use or use contrary to the instructions contained herein.
Use of connected devices subject to your wireless carrier's Terms and Conditions.
Traffic Safety
Always obey the local laws and regulations addressing the use of wireless
mobile devices and their accessories in the areas where you drive. The use of
mobile devices while driving may be prohibited or restricted in certain areas.
Conditions of Use
You are advised to switch off your mobile device from time to time to optimize its
performance.
Operational Warnings: Only use your mobile device in accordance with local
laws and regulations and obey all posted notices in public areas.
Do not attempt to disassemble your mobile device. If you disassemble your
mobile device, the warranty will not apply.
Always handle your mobile device with care and keep it in a clean and dust-free
place.
Do not allow your mobile device to be exposed to adverse weather or
environmental conditions (moisture, humidity, rain, infiltration of liquids, dust, sea
air, etc.). The manufacturer’s recommended operating temperature range is 0°C
(32°F) to +50°C (122°F)
Use only batteries, battery chargers, and accessories which are recommended
by Device manufacturer and its affiliates and are compatible with your mobile
device model. Device manufacturer and its affiliates disclaim any liability for
damage caused by the use of other chargers or batteries.
Please check local laws and regulations in your jurisdiction to learn how to best
dispose of your mobile device.
Other manuals for 30 XE 5G
2
Table of contents
Other TCL Cell Phone manuals