Telstra T110 User manual

Telstra T110 Telephone
User Guide
If you have any problems with your phone, firstly refer to
the Help section of this User Guide or call the TecHelp line
on 1300 36 1 3.

A
B
C
D
E
F
J
K
L
G
H
I
M
N
O
T
U
V
P
Q
R
S
W
X
Y
Z
l
l
l
l
l
l
l
l
l
l
l
l
l
l
l
l
l
l
l
l
l
l
l
l
l
l
l
l
l
l
l
l
l
l
1 2 3
4 5 6
7 8
0
Store
Re all
Mute
Redial
123
456
789
*0#
M1 M2
M3
Telstra T110
Memory
Introduction
to your Telstra T110 Telephone
3 one-touch memories
Allows one tou h a ess to your 3 most frequently used numbers.
10 additional memories
Allows two tou h a ess to a further 10 most frequently used
numbers.
Call indicator light
Visually alerts you to an in oming all.
Last num er redial
Redials the last number you dialled
Adjusta le ringer volume and pitch
The ringer volume level and pit h an be adjusted to levels
appropriate for you.
Wall mounta le
Can be easily mounted on the wall using the wall-mounting
bra ket supplied.
12 month warranty
This User Guide provides you
with the information you need
to get the most from your
phone.
Before you make your first all
you will need to set up your
phone. Follow the simple
instru tions, on the next few
pages.
Need help?
If you have any problems
setting up or using your Telstra
T110 please onta t the
Te Help line on 1300 369 193.
Alternatively, you may find
the answer in ‘Help’ at the
ba k of this guide.
Got everything?
● Telstra T110 Telephone
● Telephone Line Cord
● Telephone Adaptor Plug
● Wall Mounting Bra ket

Installing your Telstra T110 4
Plug one end of the Handset Cord into the end
of the Handset and the other end into the
small so ket at the end of the base.
Conne t one end of the Telephone Line Cord
into the so ket at the bottom of the base.
Conne t the other end of the Telephone Line
Cord into the telephone wall so ket.
Make sure all the onne tions are firmly in
pla e. Your telephone is now ready to use.
Phone so ket
In this guide
3
Introduction to your Telstra T110 Telephone 1
In this guide 3
Installing your Telstra T110 4
Wall mounting your Telstra T110 5
Getting to know your Telstra T110 6
Using your Telstra T110 7
Making and ending alls 7
Mute 7
To adjust ringer volume 8
To set the ringer pit h 8
One-Touch memories 9
To store a one-tou h number 9
To dial a one-tou h number 9
To insert a pause in a memory number 10
Memories 10
To store a number in the memory 10
To dial a number in the memory 11
To delete stored numbers 11
Help 12
If the Telstra T110 will not operate 12
Important Safety Instru tions 12
General Information 12
Product warranty & Customer service 13
Wall mounting template 14
Depending on your wall
so ket,you may need to
use the telephone adaptor
plug supplied.

Getting to know your Telstra T110 6
A
B
C
D
E
F
J
K
L
G
H
I
M
N
O
T
U
V
P
Q
R
S
W
X
Y
Z
l
l
l
1 2 3
4 5 6
7 8
0
Store
Re all
Mute
Redial
123
456
789
*0#
M1 M2
M3
Telstra T110
Memory
One-Touch memory
Buttons (M1-M3)
Allows you to store
and automati ally dial
3 phone numbers at
the tou h of a button.
Memory Button
Allows you to dial up
to ten phone numbers
stored in the memory
at the tou h of two
buttons.
Call Indicator Light
Flashes to indi ate an
in oming all. Also
flashes when storing
numbers, using mute
or setting the ringer.
Store Button
Use to store numbers
in the memory and to
hange the ringer and
pit h volume
Recall Button
For use with Telstra
network servi es and
PABX’s
Redial Button
Redials the last
number alled. Also,
press to enter a pause
when storing a number
in the memory.
Mute Button
Lets you talk to
someone in the same
room without the
person you are alling
hearing you.
Wall mounting your Telstra T110
5
Ensure that you do not
drill into any hidden
wiring or pipes
Your TelstraT110 an be wall mounted by
s rewing dire tly onto a wall.
Before you an wall mount your T110, you will
need to fit the wall mounting bra ket supplied.
1. Lo ate the lugs and mount the wall bra ket
provided onto the
holes under the
base unit as
shown.
2. Swing the wall
bra ket down to
lip into the top
hole.
Screwing onto a wall
1. Using the template on page 14, drill 2 holes
25mm deep using a 3mm drill.
2. Insert the wall plugs and insert a s rew into
ea h hole. Leave 2-3mm
between the head of the
s rew and the wall.
3. Position the produ t onto
the s rews.
4. Slide down to se ure.
Handset Hook
This hook keeps the handset in pla e when the
T110 is wall mounted.
Revolve the handset at h on the base unit. The
handset will now be able to
rest on the hook when wall
mounted.

Using your Telstra T110 8
If the ringer is set to OFF, the
all indi ator light will still
flash to indi ate someone is
alling you.
To adjust the ringer volume
There are 3 volume settings to hoose from:
HIGH, LOW or OFF. The default setting is
HIGH.
1. Lift the handset and press the
button.
The all indi ator light will flash.
2. Press the button.
3. Press either, for HIGH, 2 for LOW
or for OFF.
4. Press the STORE button.
You will hear a onfirmation tone.
5. Repla e the handset.
To set the ringer pitch
The ringer pit h an be set to High or Low.
The default setting is High.
1. Lift the handset and press the
button.
The all indi ator light will flash.
2. Press the button.
3. Press either, for HIGH or for LOW.
4. Press the button.
You will hear a onfirmation tone.
5. Repla e the handset.
Store
A
B
C
2
1
#
Store
Store
D
E
F
3
A
B
C
2
1
Store
Using your Telstra T110
7
During all storing
operations the all indi ator
light will flash.
A redial number an be no
longer than 32 digits.
Making and ending calls
To make a call
1. Lift the handset and wait for the dial tone.
Dial the telephone number.
To receive a call
When the telephone rings the all indi ator
light will also flash to indi ate that there is
an in oming all. Simply pi k up the
handset.
To redial the last num er called
1. Lift the handset. Press the
button. The last number alled is dialled.
Mute
When on a all you an talk to someone in
the same room, without your aller hearing
you.
To switch mute on and off
1. During a all press and release the
button. The all indi ator light will flash to
show that mute is on.
Your aller will be put on hold. You an
now talk to someone in the room without
your aller hearing you.
2. Press and release the button again to
return to your aller.
Mute
Mute
Redial

Using your Telstra T110
9
Whilst storing a number in
the memory you an an el
the operation by repla ing
the handset on the radle.
One-Touch memories
You an store your three most frequently
used telephone numbers in the One-Tou h
memories (M1, M2 or M3). Please note that
the number an be no longer than 18 digits.
To store a One-Touch num er
1. Lift the handset.
2. Press the button. The all indi ator
light will flash.
3. Press the memory lo ation number
, under whi h you want to
store the number.
4. Enter the telephone number you want to
store in luding the area ode if appli able.
5. Press the button.
You will hear a onfirmation tone.
6. Repla e the handset.
To dial a One-Touch num er
1. Lift the handset and wait for the dial tone.
2. Press the memory lo ation number,
, under whi h the number is
stored.
The number is dialled automati ally.
M1 M2 M3
Store
M1 M2 M3
Store
Using your Telstra T110 10
There is a memory label on
your telephone.Lift the
plasti plate up and you
an write on the label to
keep a re ord of whi h
memory lo ation number
you have used for ea h
telephone number.
You an mix manual and
memory dialling as
required, for example, you
an dial the area ode 02
8304 from the memory and
then omplete the number
manually.
To insert a pause in a memory num er
Sometimes you may need to enter a pause
when storing a number, e.g. with an overseas
number you may need to enter a pause after
storing the international ode.
1. Press the button in the pla e
where you want to enter a pause. When
you dial the number your T110 will
automati ally insert the pause where you
stored it.
Memories
You an store a further 10 telephone
numbers in the memories. Please note that
the numbers an be no longer than 18 digits
long.
To store a num er in the memory
1. Lift the handset.
2. Press the button. The all indi ator
light will flash.
3. Press the memory lo ation number
between 0and 9under whi h you want to
store the number.
4. Enter the telephone number you want to
store in luding the area ode if appli able.
5. Press the button.
You will hear a onfirmation tone.
6. Repla e the handset.
Store
Store
Redial

Help 12
If the Telstra T110 will not operate
Che k the telephone installation.See page 5.
Che k that the Ringer Swit h is set ON.
Unplug the Telstra T110 and onne t a telephone that is known to be
working.
Important safety instructions
Read and understand all instru tions.
Follow all warnings and instru tions marked on this produ t.
Do not use this produ t during an ele tri al storm, as it is possible to get a
sho k.
Do not use this produ t when near water, or when wet.
Make sure the line ords are prote ted from damage.
Keep the produ t away from heaters and away from sunlight.
Do not use this telephone near flammable gases or liquids.
Slots and openings in the abinet are provided for ventilation, to prote t it
from overheating. Ensure these are not blo ked or overed.
Do not open the unit. There are no user servi eable parts inside. Warranty
onditions will not apply if the unit has been opened.
Unplug this unit before leaning. Do not use detergents or sprays. To
lean the outside plasti parts, use only a damp loth.
Do not push obje ts into ventilation openings. This ould ause an
ele tri al sho k.
General information
This Unit omplies with Australian Communi ations Authority Te hni al
Standards.
If the quantity of ringing devi es onne ted to the telephone line ex eeds
a REN of 3, it may result in some devi es not ringing in response to an
in oming all. To he k the REN of ea h devi e, refer to the base label.
Using your Telstra T110
11
If any error o urs in the
storing mode you will hear
three short beeps,then the
produ t will return to talk
mode.If you unplug your
T110 the numbers stored in
the memory will be saved.
However, the last number
redial memory will be lost.
To dial a num er in the memory
1. Lift the handset and wait for the dial tone.
2. Press the button.
3. Press the memory lo ation number
between 0and 9, under whi h the number
is stored.
The number is dialled automati ally.
To delete stored num ers
1. Lift the handset.
2. Press the button. The all indi ator
light will flash.
3. Press the memory lo ation number (0-9)
or under whi h you have
stored the number you wish to delete.
4. Press the button.
You will hear a onfirmation tone.
5. Repla e the handset.
Alternatively, any existing number stored
in memory or One-Tou h memories an be
overwritten by entering a new number
under the same memory lo ation. Simply
follow the instru tions under the storing
numbers se tions previously shown.
Store
M1 M2 M3
Store
Memory

14
Produ t warranty & Customer servi e
13
Product Warranty
Telstra Guarantees your produ t for 12
months from date of pur hase against any
defe t in materials or workmanship under
onditions of normal use and servi e and
subje t to proof of the date of pur hase
being provided and subje t to the
onditions spe ified below.
The benefits onferred by this warranty are
in addition to all other rights and remedies
in respe t of the produ t that the onsumer
has under the Trade Pra ti es A t and
similar State and Territory laws.
Warranty Service Conditions
Subje t to your statutory rights referred to
above, Telstra expressly limits its liability
with respe t to its produ ts to the person
who pur hases the Produ t from the Telstra
authorised retailer.
Subje t to your statutory rights referred to
above, Telstra expressly limits its liability
with respe t to its produ ts to whi hever is
the lowest amount out of:
A. The ost of having the goods repaired
B. The ost of repla ing the goods: or
C. The ost of obtaining equivalent goods.
Subje t to your statutory rights referred to
above, in the event of the goods requiring
servi e under warranty, the owner is
responsible for the ost of transportation to
the authorised servi e organisation. Whilst
in transit the goods are at the owner’s risk.
Subje t to your statutory rights referred to
above, should the goods be found to be in
sound working order by the authorised
servi e organisation the owner may be
harged a servi e fee.
Subje t to your statutory rights referred to
above, the goods will not be eligible for
servi e under this warranty if:
A. Proof of date of pur hase annot be
provided:
B. The goods are not branded Telstra:
C. The goods have been rented to another
person;
D.The defe t was aused by an a ident,
misuse, abuse, improper installation or
operation, la k of reasonable are,
unauthorised modifi ation,loss of parts,
tampering or attempted repair by a
person not authorised by Telstra.
E. The produ t has been damaged by
lightning or a mains power surge.
Do you really need service?
Before alling for servi e under this
warranty have you :
Che ked that all ables are se urely
onne ted as detailed in the User Guide.
Referred to the User Guide to ensure that
the features are being used orre tly.
If you are trying to a ess a network servi e
su h as Call Waiting, onfirmed with your
network provider that you have a ess to
this feature.
If You Require Warranty Service
To obtain servi e during the terms of this
warranty:
Call the Produ t Information Line (1300 369
193) for advi e and assistan e on the repair
of your produ t, or onta t us by E-mail at:
After onsulting our operators, should it be
deemed ne essary to have the produ t
servi ed, the operator will inform you of
your nearest authorised servi e
organisation and provide a Return
Authority Number.
Please ensure that :
A. You provide proof of the date of pur hase
B. That your produ t is suitably pa kaged
(Preferably in original pa kaging)
C. That you have in luded all omponents
from the original pur hase:
D.That you provide details of the Return
Authority Number
IMPORTANT
Please retain this booklet with your sales
re eipt as proof of the date of pur hase.
© COPYRIGHT 2003 Telstra Corporation Limited
This work is opyright. All rights reserved.Other than for purposes and subje t to onditions pres ribed
under the Copyright A t, no part of it may in any form or by any means (ele troni , me hani al, photo
opying, mi ro opying, s anning,re ording or otherwise) be reprodu ed,stored in a retrieval system or
transmitted without prior permission from Telstra Corporation Limited ABN 33 051 775 556
™ Trade Mark of Telstra Corporation Limited
® Registered Trade Mark of Telstra Corporation Limited
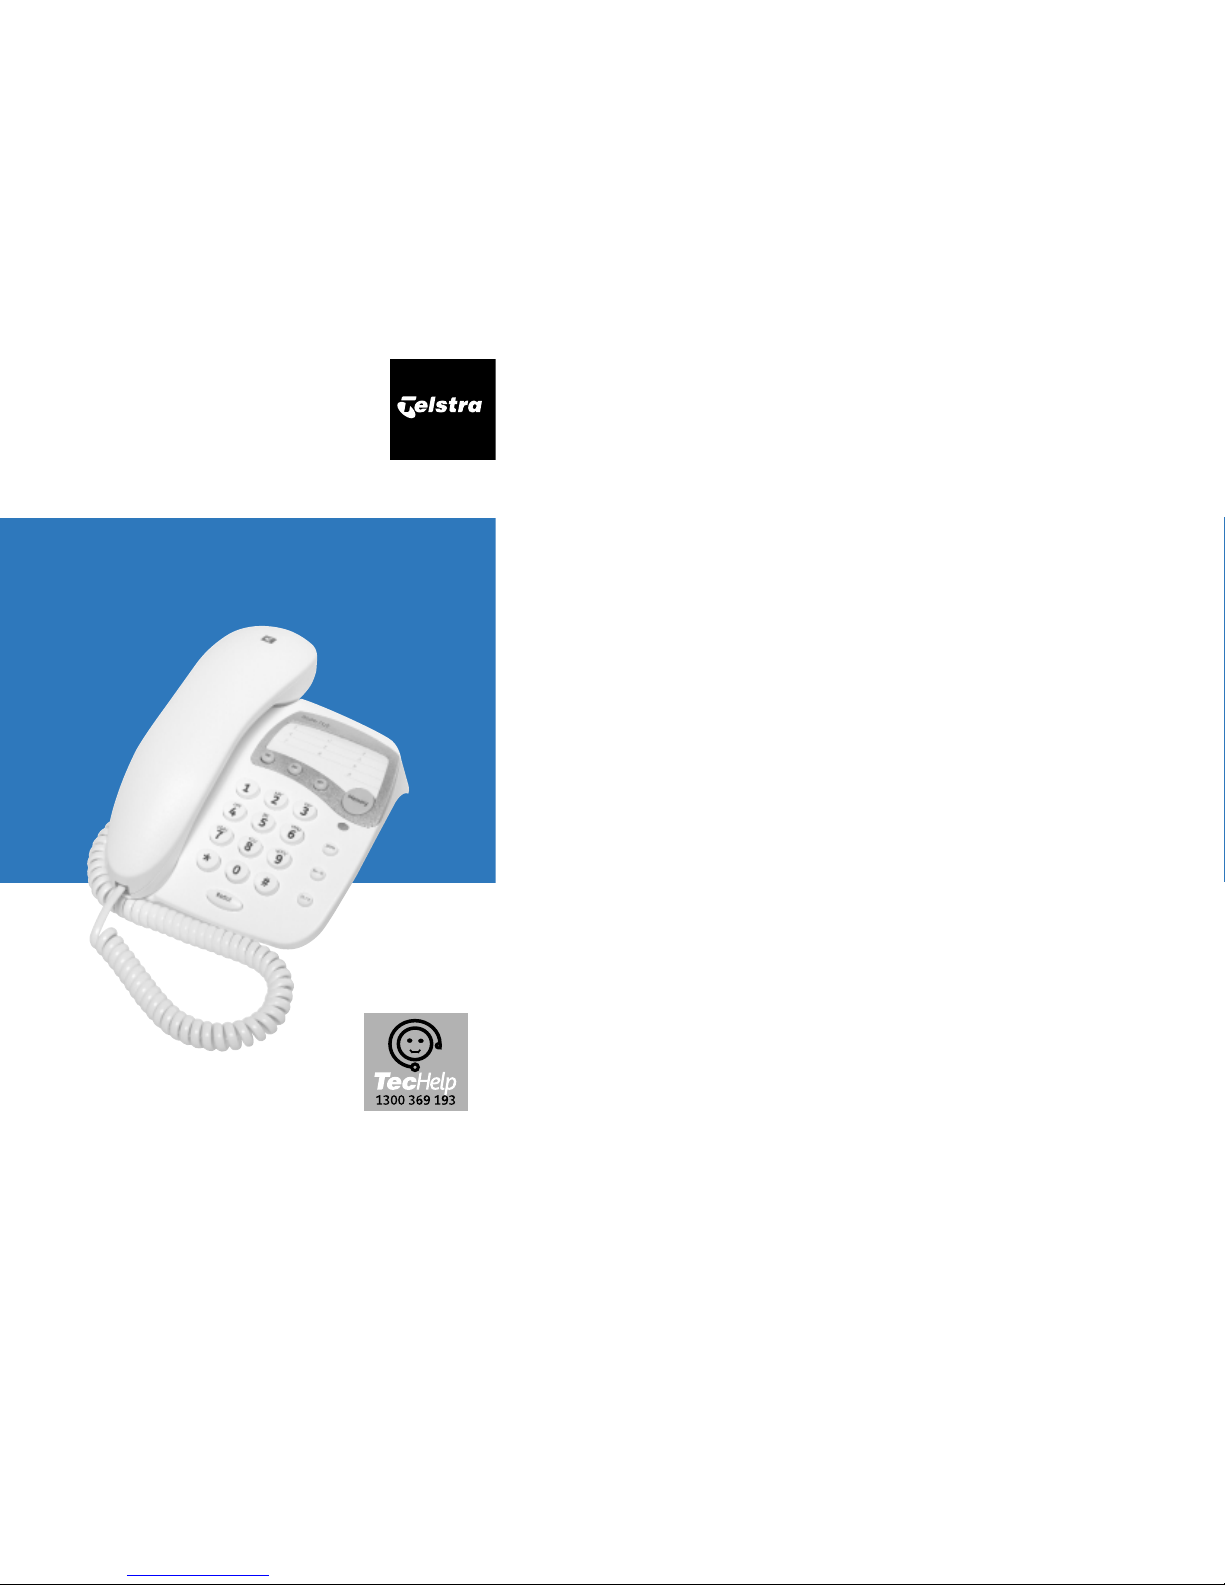
Te Help is your guarantee of superior ustomer servi e for these produ ts. Your ustomer
servi e options are:
• Produ t Information Line 1300 369 193
• 12 Month Produ t Warranty
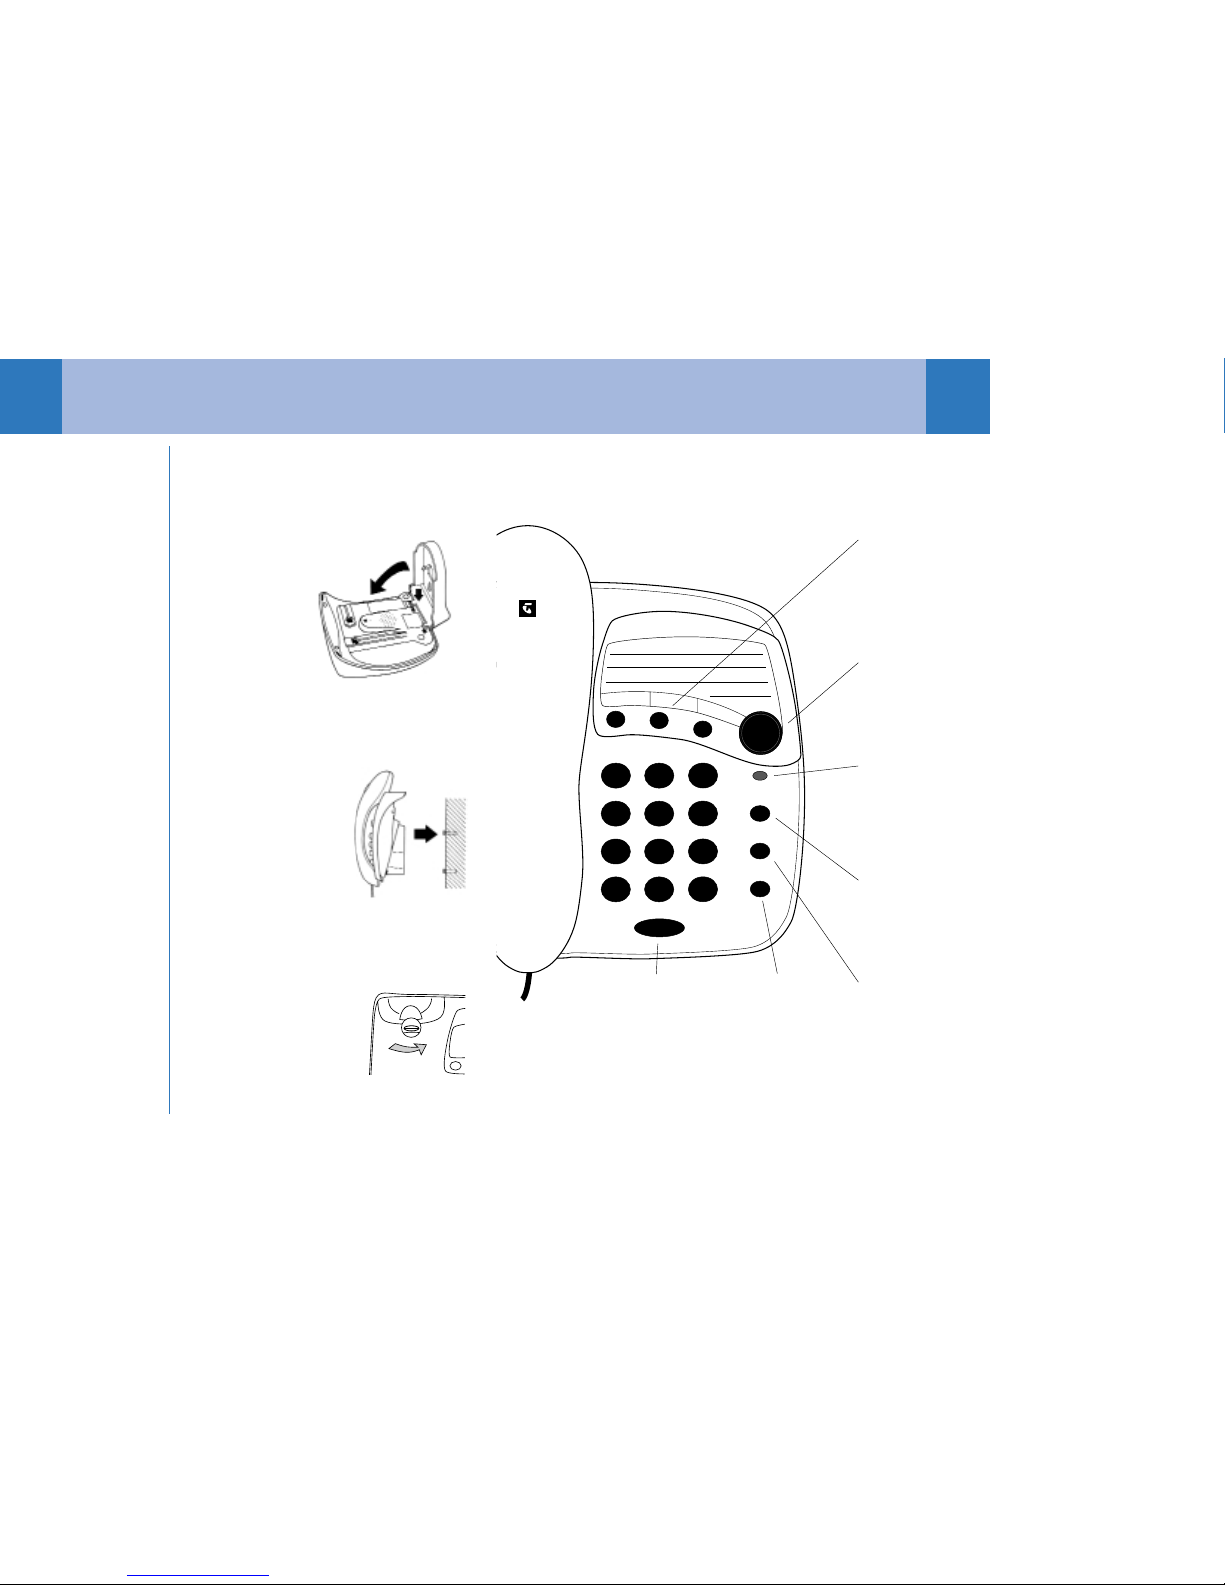
69 mm drill template,hole dia. 3mm

www.telstra.com
Table of contents
Other Telstra Telephone manuals

Telstra
Telstra Access 200 User manual

Telstra
Telstra T48G User manual

Telstra
Telstra 8950 User manual

Telstra
Telstra Touchfone 400 User manual

Telstra
Telstra T1000S User manual

Telstra
Telstra VVX410 User manual

Telstra
Telstra SP817BB User manual

Telstra
Telstra Priority Assist Phone User manual

Telstra
Telstra SP817BB User manual

Telstra
Telstra 13450 User manual

Telstra
Telstra S60 User manual

Telstra
Telstra VVX 1500 User manual

Telstra
Telstra T700 User manual

Telstra
Telstra T310 User manual

Telstra
Telstra A248 User manual

Telstra
Telstra T1000S User manual

Telstra
Telstra Access 200 User manual

Telstra
Telstra T800 User manual

Telstra
Telstra Slimline 25 User manual

Telstra
Telstra VVX500 User manual