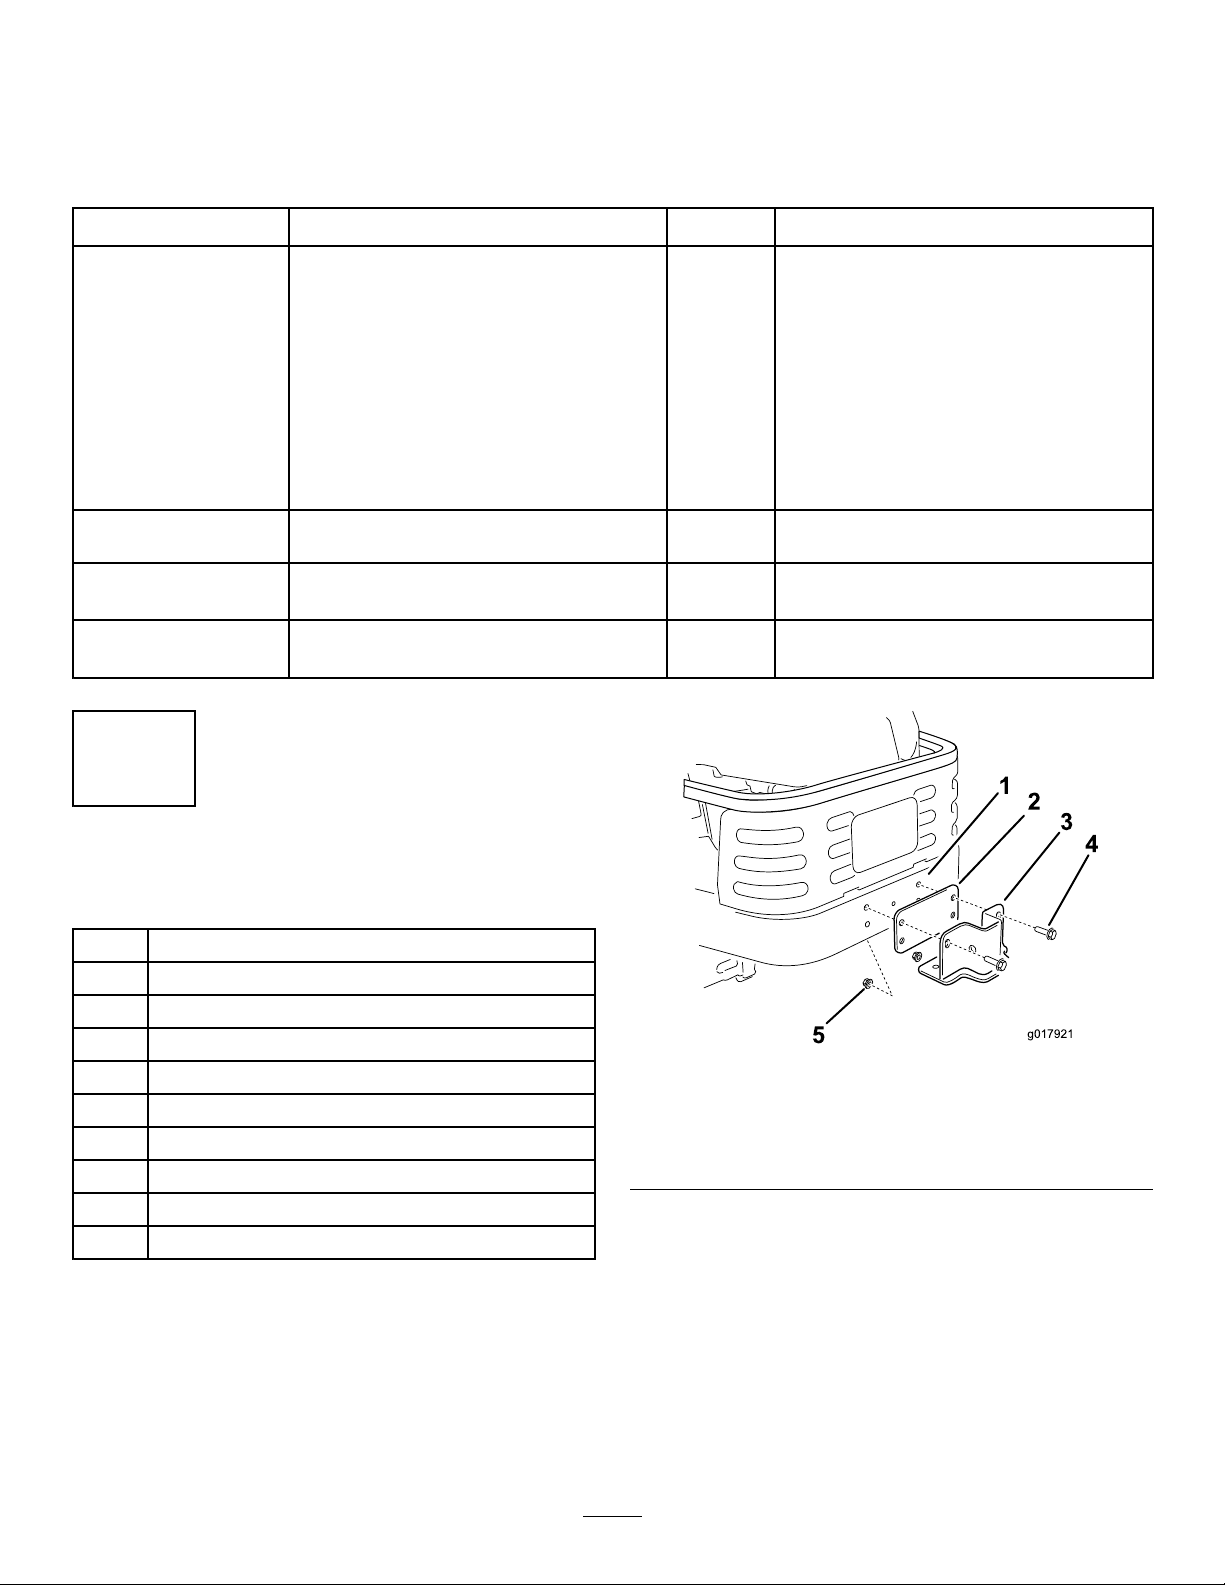
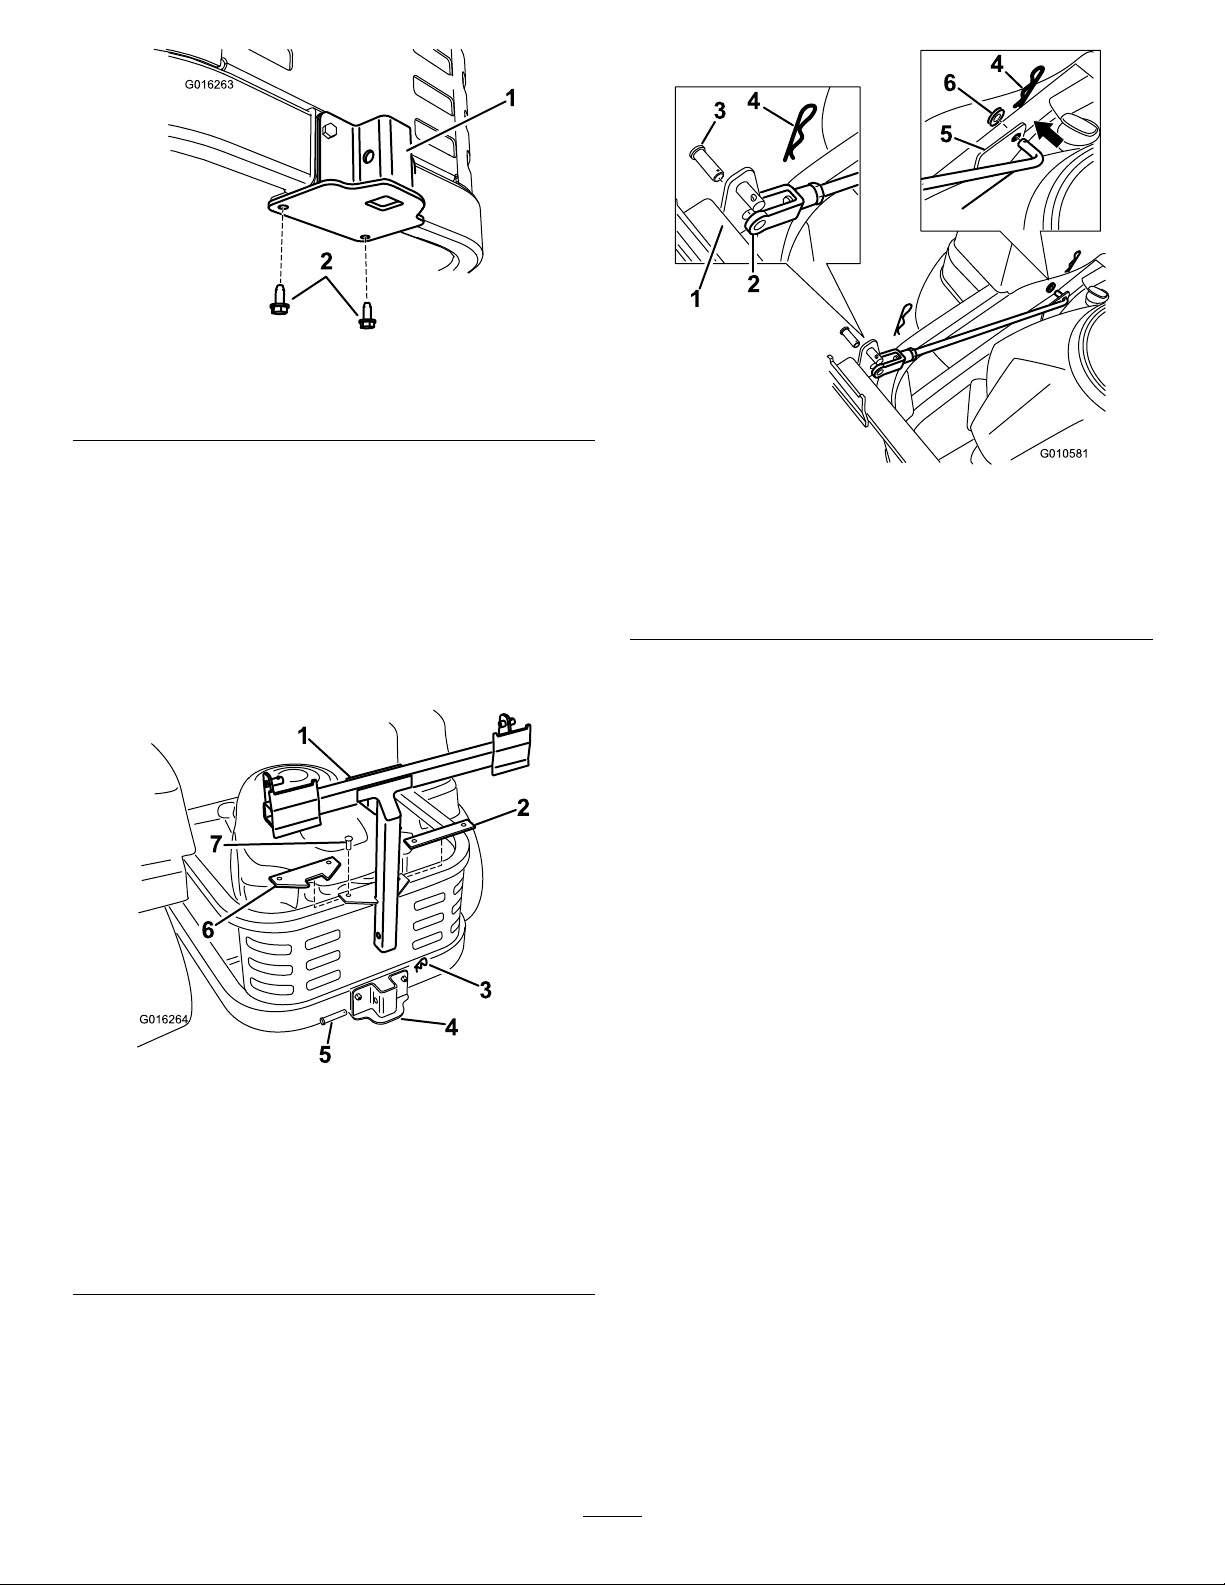
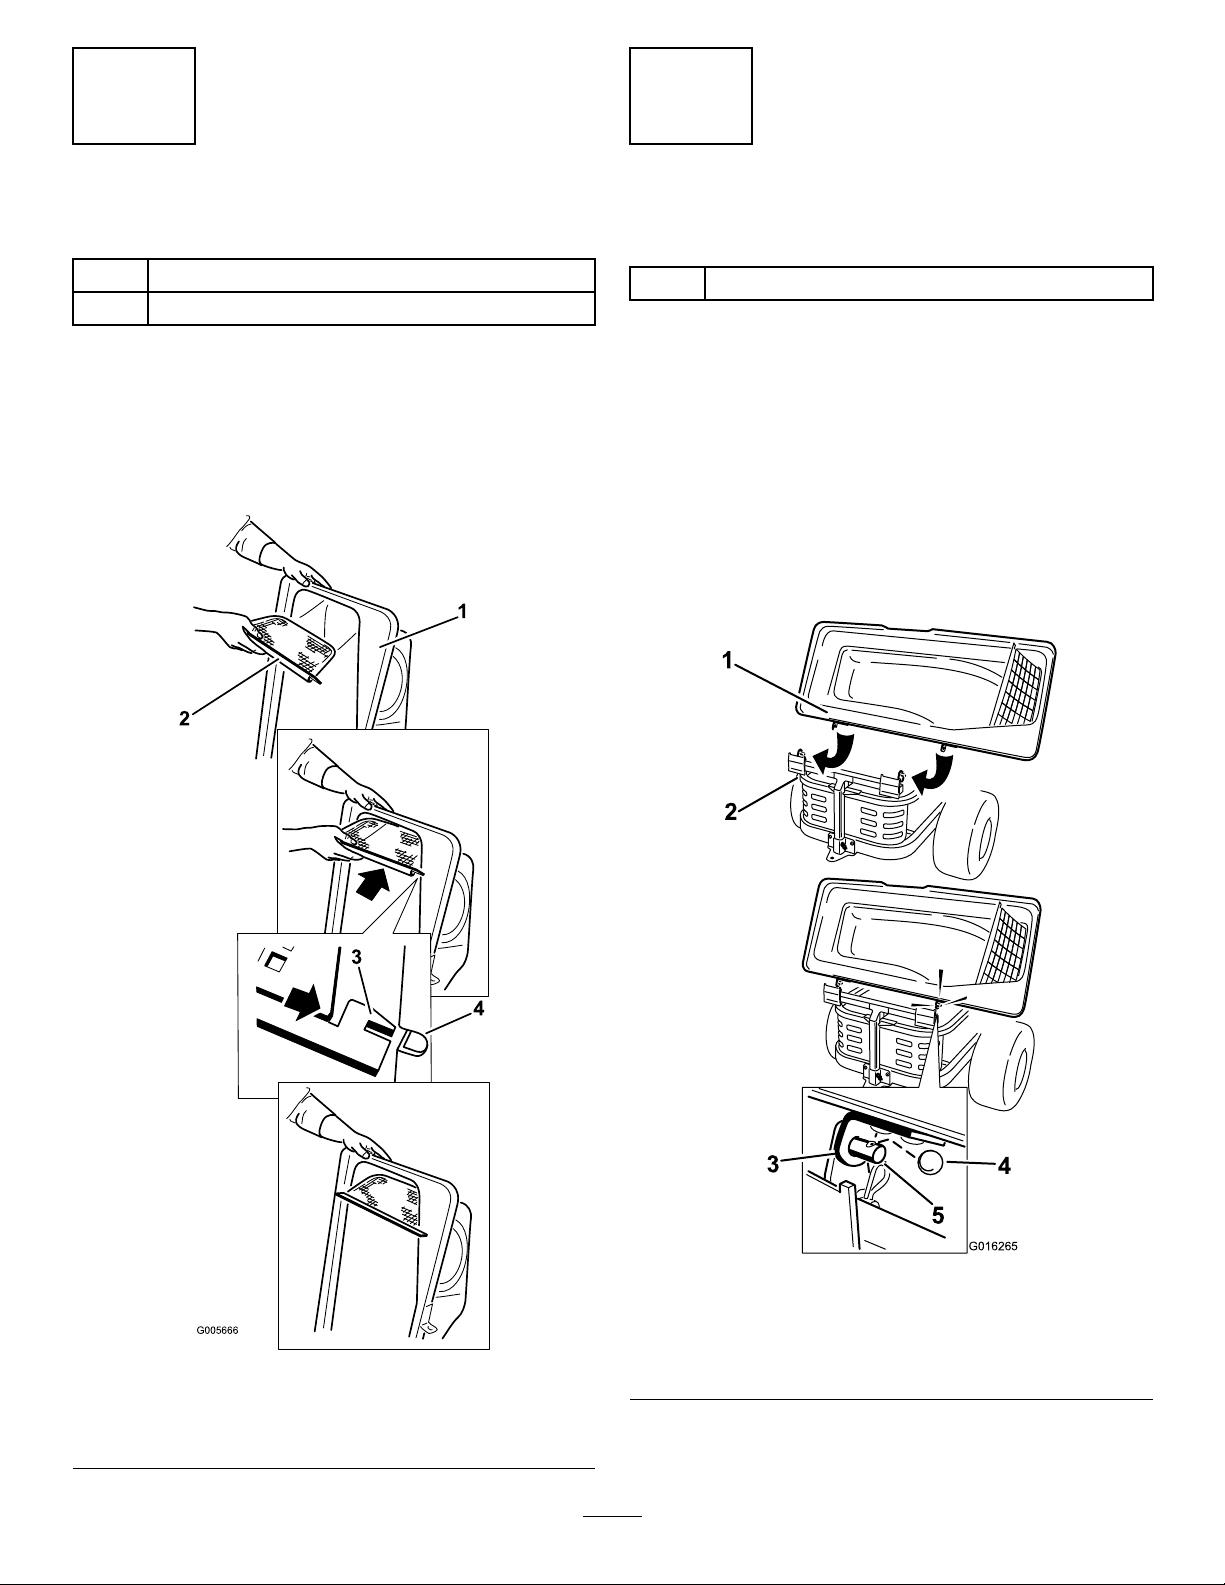
Toro TITAN ZX Series User manual

FormNo.3372-320RevA
Bagger
TITAN®ZXandMXSeriesRidingMower
ModelNo.79328—SerialNo.312000001andUp
Thiskitrequiresthesimultaneousinstallation
ofotherkitstofunctionproperly.Contact
yourAuthorizedServiceDealertoobtainthe
correspondingnecessaryparts.Formore
information,visitusatwww.Toro.com.
ToregisteryourproductordownloadanOperator'sManualorPartsCatalogatnocharge,gotowww.Toro.com.OriginalInstructions(EN)

Introduction
Readthisinformationcarefullytolearnhowtooperate
andmaintainyourproductproperlyandtoavoidinjury
andproductdamage.Youareresponsibleforoperating
theproductproperlyandsafely.
YoumaycontactTorodirectlyatwww.Toro.comfor
productandaccessoryinformation,helpndingadealer,
ortoregisteryourproduct.
Wheneveryouneedservice,genuineToroparts,
oradditionalinformation,contactanAuthorized
ServiceDealerorToroCustomerServiceandhave
themodelandserialnumbersofyourproductready.
Figure1identiesthelocationofthemodelandserial
numbersontheproduct.Writethenumbersinthe
spaceprovided.
Figure1
1.Modelandserialnumberlocation
ModelNo.
SerialNo.
Thismanualidentiespotentialhazardsandhassafety
messagesidentiedbythesafetyalertsymbol(Figure2),
whichsignalsahazardthatmaycauseseriousinjury
ordeathifyoudonotfollowtherecommended
precautions.
Figure2
1.Safetyalertsymbol
Thismanualuses2otherwordstohighlightinformation.
Importantcallsattentiontospecialmechanical
informationandNoteemphasizesgeneralinformation
worthyofspecialattention.
Contents
Introduction.................................................................2
Safety...........................................................................3
TowingSafety.......................................................3
SafetyandInstructionalDecals.............................3
Setup...........................................................................4
1InstallingtheBaggerFrame................................4
2AssemblingtheBaggerTop................................5
3InstallingtheBaggerTop...................................6
4CompletingtheInstallation................................7
Operation.....................................................................8
EmptyingtheGrassBags......................................8
ClearingObstructionsfromtheBagger.................8
RemovingtheBagger...........................................9
OperatingTips.....................................................9
Maintenance...............................................................10
RecommendedMaintenanceSchedule(s)................10
InspectingtheBaggerAttachment......................10
InspectingtheMowerBlades..............................11
CaringfortheGrassBags...................................11
CleaningtheBaggerAttachment.........................11
Storage.......................................................................11
StoringtheBaggerAttachment...........................11
©2011—TheToro®Company
8111LyndaleAvenueSouth
Bloomington,MN554202
Contactusatwww.Toro.com.
PrintedintheUSA.
AllRightsReserved

Safety
DANGER
Enginescanbecomehotwhentheyareoperating.
Severeburnscanoccurfromcontactinghot
surfaces.
Allowengines,especiallythemufer,tocoolbefore
touching.
DANGER
Debris,suchasleaves,grass,orbrushcancatch
re.Areintheengineareacancausepersonal
injuryandpropertydamage.
•Keeptheengineandmuferareafreeofdebris
accumulation.
•Takecarewhenopeningthebaggercoverto
keepdebrisfromfallingontotheengineand
muferarea.
•Allowthemachinetocoolbeforestoringit.
TowingSafety
•Donotattachtowedequipmentexceptatthehitch
point.
•Followtheattachmentmanufacturer's
recommendationforweightlimitsfortowed
equipmentandtowingonslopes.
•Neverallowchildrenorothersinorontowed
equipment.
•Onslopes,theweightofthetowedequipmentmay
causelossoftractionandlossofcontrol.Reduce
towedweightandslowdown.
•Stoppingdistanceincreaseswiththeweightofthe
towedload.Travelslowlyandallowextradistance
tostop.
•Makewideturnstokeeptheattachmentclearofthe
machine.
•Donottowaloadthatweighsmorethanthetowing
machine.
SafetyandInstructionalDecals
Safetydecalsandinstructionsareeasilyvisibletotheoperatorandarelocatednearanyareaof
potentialdanger.Replaceanydecalthatisdamagedorlost.
109-6809
1.Crushinghazardofhand—donotremovethewholebaggerfromthemachine;openthebaggertopandthenremovethebag(s)
fromthebagger.Donotremovethebaggertopwhenitisclosed;openthebaggertopandthenremoveit.
3

Setup
LooseParts
Usethechartbelowtoverifythatallpartshavebeenshipped.
ProcedureDescriptionQty.Use
Baggerframesupportbracket1
Supportspacerplate1
Selftappingscrew(5/16x3/4inch)2
Bolt(5/16x2-1/2inch)2
Locknut(5/16inch)2
Baggerframe1
Clevispin(1/2x2-1/4inch)1
Hairpincotter5
Rod2
1
Washer4
Installthebaggerframe.
Baggertop1
2Baggerscreen1Assemblethebaggertop.
3Circularcotterpin1Installthebaggertop.
4Nopartsrequired–Completetheinstallation.
1
InstallingtheBaggerFrame
Partsneededforthisprocedure:
1Baggerframesupportbracket
1Supportspacerplate
2Selftappingscrew(5/16x3/4inch)
2Bolt(5/16x2-1/2inch)
2Locknut(5/16inch)
1Baggerframe
1Clevispin(1/2x2-1/4inch)
5Hairpincotter
2Rod
4Washer
Procedure
1.Locatethebaggerframesupportspacerplateand
bracketinlooseparts.Installtheplateandbracketto
themachineframeasshowninFigure3.Securethe
plateandbrackettotheframeusingtwobolts(5/16
x2-1/2inch)andtwolocknuts(5/16inch).
g017921
Figure3
1.Machineframe4.Bolt(5/16x2-1/2inch)
2.Supportspacerplate5.Locknut(5/16inch)
3.Supportbracket
2.Securethesupportbrackettothebottomofthe
machineframefrombelowusingtwoselftapping
screws(5/16x3/4inch)asshowninFigure4.
4

G016263
Figure4
1.Supportbracket2.Selftappingscrews(5/16
x3/4inch)
3.Removethefastenerssecuringtheexisting
rectangularspacerplatefromthetopoftheengine
frameandremovetheplate,ifsoequipped.
4.Installthenewanglespacerplateasshown
inFigure5usingthefastenersremovedpreviously.
5.Installthebaggerframetothesupportbracket.
Securethebaggerframewithaclevispin(1/2x
2-1/4inch)andhairpincotter(Figure5).
G016264
Figure5
1.Baggerframe5.Clevispin(1/2x2-1/4
inch)
2.Existingrectangular
spacerplate(ifso
equipped)
6.Spacerplate,angle(new)
3.Hairpin7.Fasteners,existing
4.Supportbracket
6.Installtwosupportrods,onetoeachsideofthe
baggerframe.Locatetheexistingbracketbetween
thereardrivewheelandframe(Figure6).
G010581
12
34
5
6
4
Figure6
Leftsideshown
1.Baggerframe4.Hairpin
2.Clevisend5.Bracketonframe
3.Clevispin6.Washer
7.Insertthebentendsoftherodintothebaggerframe
asshowninFigure6.Securetheendoftherodwith
awasherandhairpin.
8.Adjustthesupportrodssothatbaggerframeisheld
securetothemachineframeandseatsinthenotch
oftheanglespacerplateinstalledpreviously.Repeat
thesestepsforeachsupportrod:
A.Loosenthejamnutatthebaseoftheclevisend
oftherod.
B.Rotatetheclevisendoftherodtoadjusttherod
tothedesiredlength.
C.Aligntheholesintheclevisendwiththeholein
thebaggerframeattheattachmentpoint.
D.Securetheclevisendoftherodstothebagger
frameusingaclevispinandhairpincotter
(Figure6).
E.Tightenthejamnut.
9.Withbothrodsinstalledandattached,checkthe
baggerframeforplay.Thebaggerframeshouldbe
heldtighttothemachineframe.Ifnecessary,repeat
theprevioussteptosecurethebaggerframe.
5

2
AssemblingtheBaggerTop
Partsneededforthisprocedure:
1Baggertop
1Baggerscreen
Procedure
Turnthebaggertopover.Installthescreenasshownin
Figure7soitslopesdowntowardthecollectionbags.
Makesurethescreenssnapintoplaceandthetabs
engagethebaggertop.
G005666
1
2
3
4
Figure7
1.Baggertop3.Screentab
2.Screen4.Slotinbaggertop
3
InstallingtheBaggerTop
Partsneededforthisprocedure:
1Circularcotterpin
Procedure
1.Installthebaggertoptothebaggerframe.Slide
thebracketsoverthepostsinthebaggerframeand
installthecircularcotterintotheholeintheright
handpost(Figure8).Rotatethebaggertopdownto
theoperatingposition.Thebaggertopiseasierto
installiftwopeopleworktogether.
Note:Toremovethecircularcotter,continueto
rotateitinthesamedirectionasinstalled.
G016265
Figure8
1.Baggertop4.Circularcotterpin
2.Baggerframe5.Post
3.Bracket,baggertop
6

2.Liftthebaggertopandinstallthebagsbysliding
thebagframehooksontotheretainingbrackets
(Figure9).
G005672
1
2
3
4
Figure9
1.Bag3.Retainingbracket
2.Baggerframe4.Bagframehook
3.Lowerthebaggertopontothebag(Figure10).
G005757
Figure10
4
CompletingtheInstallation
NoPartsRequired
Procedure
Thiskitrequiresthesimultaneousinstallationofother
nishingkitstofunctionproperly.Contactyour
AuthorizedServiceDealertoobtainthecorresponding
necessaryparts.Formoreinformation,visitusat
www.Toro.com.
OncetheFinishingKitisinstalled,usethefollowing
OperationandMaintenancesectionsforuseandcareof
theentirebaggerattachment.
7

Operation
Note:Determinetheleftandrightsidesofthe
machinefromthenormaloperatingposition.
WARNING
Toavoidpersonalinjury,followtheseprocedures:
•Becomefamiliarwithalloperatingandsafety
instructionsinthe
Operator's Man ual
forthe
mowerbeforeusingthisattachment.
•Neverremovethedischargetube,bags,bagger
top,orthechutewhiletheengineisrunning.
•Alwaysshuttheengineoffandwaitforall
movingpartstostopbeforeclearingan
obstructionfromthebaggingsystem.
•Neverdomaintenanceorrepairswhilethe
engineisrunning.
EmptyingtheGrassBags
Becarefulwhenliftingorhandlingagrassbagthatis
full.Toemptythegrassbags:
1.Parkthemachineonalevelsurfaceanddisengage
thebladecontrolswitch.
2.Movethemotioncontrolleversoutwardtothe
neutrallockposition,stoptheengine,removethe
key,settheparkingbrakeandwaitforallmoving
partstostopbeforeleavingtheoperatingposition.
3.Open(raise)thebaggertop(Figure11).
G005758
Figure11
4.Compressdebrisintothebags.Withbothhands,
liftuponthebagandunhookitfromtheretaining
bracket.Emptythebag.Repeattheprocedurefor
theotherbag.
5.Installthebagsbyslidingthebagframehooksonto
theretainingbrackets(Figure12).
G005672
1
2
3
4
Figure12
1.Bag3.Retainingbracket
2.Baggerframe4.Bagframehook
6.Lowerthebaggertopontothebags.
ClearingObstructionsfrom
theBagger
1.Parkthemachineonalevelsurfaceanddisengage
thebladecontrolswitch.
2.Movethemotioncontrolleversoutwardtothe
neutrallockposition,stoptheengine,removethe
key,settheparkingbrakeandwaitforallmoving
partstostopbeforeleavingtheoperatingposition.
3.Checkthegrassbagsandemptythemiftheyarefull.
4.Removeandseparatethedischargetubeandchute
fromthebaggertopandmower.Usingastick
orsimilarobject,carefullyremoveandclearthe
obstructionfromthemower,dischargetube,chute,
andthebaggertop.
5.Afteryouremovetheobstruction,installthe
completebaggersystemandresumeoperation.
8

RemovingtheBagger
CAUTION
Failingtoremovethefrontbaggerweights
andoperatingthemachinewithoutthebagger
attachmentmaycauseanunstableconditionwhich
couldresultinalossofcontrol.
•Alwaysremovethefrontweightswhen
removingthebaggerattachment.
•Neveroperatethemachinewithoutthebagger
attachmentandthefrontweightsstillinstalled.
ThebaggercanberemovedbyrepeatingtheSetup
sectionsfromallinstalledbaggerrelatedkitsinreverse
order.Ifweightsareinstalled,alwaysremovethefront
baggerweightswhenremovingthebaggerattachments.
Note:Itisonlynecessarytoremovethecutoffbafe
wheninstallingamulchingkit.
OperatingTips
TipsforBagging
Size
Rememberthatthemowerislongerandwiderwiththis
attachmentinstalled.Byturningtoosharplyinconned
placesyoumaydamagetheattachment.
Trimming
Alwaystrimwiththeleftsideofthemower.Donot
trimwiththerightsideofthemowerbecauseyoucould
damagethebagger'schuteanddischargetube.
CuttingHeight
Donotsetthemowercuttingheighttoolowbecause
longgrasssurroundingthemowercanpreventairfrom
gettingunderthemowerandenteringthebagging
system.Ifenoughairdoesn'tgetunderthemower,the
baggingsystemwillplug.
CuttingFrequency
Cutthegrassoften,especiallywhenitgrowsrapidly.
Youwillhavetocutyourgrasstwiceifitgetsexcessively
long.
CuttingTechnique
Forbestlawnappearance,besuretoslightlyoverlap
themowerintothepreviouslycutarea.Thishelps
reducetheloadontheengineandreducesthechance
ofpluggingthechuteanddischargetube.
BaggingSpeed
Mostoftenyouwillbagwiththemowerthrottlein
theFastpositionanddriveatanormalgroundspeed.
However,inextremelydryanddustygrass,youmay
wanttoslightlyreducethethrottlespeedandincrease
thegroundspeedofthemower.Thebaggingsystem
mayplugifyoudrivetoofastandtheenginespeed
getstooslow .Onhillsitmaybenecessarytoslowthe
mowergroundspeed.Thishelpsmaintaintheengine
speedandbaggingefciency.Mowdownhillwhenever
possible.
CAUTION
Asthebaggerlls,extraweightisaddedtothe
backofthemachine.Ifyoustopandstartsuddenly
onhills,youmaylosesteeringcontrolorthe
machinemaytip.
•Donotstartorstopsuddenlywhengoinguphill
ordownhill.Avoiduphillstarts.
•Ifyoudostopthemachinewhengoinguphill,
disengagethebladecontrol.Thenbackdown
thehillusingaslowspeed.
•Donotchangespeedsorstoponslopes.
•Neveroperatethemachinewithoutthebagger
attachmentandthefrontweightsstillinstalled.
BaggingLongGrass
BaggingLongGrassExcessivelylonggrassisheavyand
maynotbepropelledcompletelyintothegrassbags.If
thishappens,thedischargetubeandchutemayplug.
Toavoidpluggingthebaggingsystem,mowthegrass
atahighheightofcut,thenlowerthemowertoyour
normalcuttingheightandrepeatthebaggingprocess.
BaggingWetGrass
Alwaystrytocutgrasswhenitisdrybecauseyour
lawnwillhaveaneatappearance.Ifyoumustcutwet
grass,usetheconventionalsidedischargefeatureofthe
mower.Severalhourslater,whentheclippingsaredry,
installthecompletebaggerattachmentandvacuumup
thegrassclippings.
SignsofPlugging
Asyouarebagging,asmallamountofgrassclippings
normallyblowoutthefrontofthemower.Anexcessive
amountofclippingsblowingoutindicatesthatthebags
arefullorthesystemisplugged.
9

Maintenance
Note:Determinetheleftandrightsidesofthemachinefromthenormaloperatingposition.
RecommendedMaintenanceSchedule(s)
MaintenanceService
IntervalMaintenanceProcedure
Aftertherst10hours•Inspectthebagger
Beforeeachuseordaily•Cleanthebagger
Beforestorage•Inspectthebagger
•Cleanthebagger
CAUTION
Ifyouleavethekeyintheignitionswitch,someonecouldaccidentlystarttheengineandseriouslyinjure
youorotherbystanders.
Removethekeyfromtheignitionanddisconnectthewirefromthesparkplugbeforeyoudoany
maintenance.Setthewireasidesothatitdoesnotaccidentallycontactthesparkplug.
DANGER
Enginescanbecomehotwhentheyareoperating.Severeburnscanoccurfromcontactinghotsurfaces.
Allowengines,especiallythemufer,tocoolbeforetouching.
DANGER
Debris,suchasleaves,grass,orbrushcancatchre.Areintheengineareacancausepersonalinjury
andpropertydamage.
•Keeptheengineandmuferareafreeofdebrisaccumulation.
•Takecarewhenopeningthebaggercovertokeepdebrisfromfallingontotheengineandmuferarea.
•Allowthemachinetocoolbeforestoringit.
InspectingtheBagger
Attachment
ServiceInterval:Aftertherst10hours
Beforestorage
Inspectthebaggerattachmentaftertherst10hoursof
operation,andmonthlythereafter.
1.Checkthechute,dischargetube,andthebaggertop.
Replacethesepartsiftheyarecrackedorbroken.
2.Tightenallnuts,bolts,andscrews.
3.Inspectallfastenersandlatches;replaceanymissing
ordamaged.
4.Inspectthegrassbagsfordeterioration.
WARNING
Youorbystanderscouldbeseverelyinjuredby
yingdebrisorthrownobjectsthatmaypass
throughtorn,worn,ordeterioratedgrassbags.
•Checkthegrassbagsforholes,rips,wear,
andotherdeterioration.
•Donotwashthegrassbags.
•Ifthebaghasdeteriorated,installnewgrass
bagssuppliedbythemanufacturerofthis
baggerattachment.
10

InspectingtheMowerBlades
Inspectthemowerbladesregularlyandwhenevera
bladestrikesaforeignobject.
Ifthebladesarebadlywornordamaged,installnew
blades.RefertoyourmowerormowerOperator'sManual
forcompleteblademaintenance.
CaringfortheGrassBags
Washingthegrassbagsisnotrecommended.
Topreventrapiddeteriorationofthebagmaterial,store
thebagswheretheywilldrycompletelyaftereachuse.
CleaningtheBagger
Attachment
ServiceInterval:Beforeeachuseordaily
Beforestorage
1.Aftereachuse,removeandwashtheinsideand
outsideofthebaggertop,dischargetube,chute,and
theundersideofthemower,usingwatersprayed
fromagardenhose.Useamilddetergenttoremove
stubborndirt.
2.Makesureyouremovemattedgrassfromallparts.
3.Flushthegrassbagswithwaterusinggardenhoseto
removeanydebris.
4.Afterwashing,letallofthepartsdrythoroughly.
Storage
StoringtheBaggerAttachment
1.Cleanthebaggerattachment;refertoCleaningthe
BaggerAttachment.
2.Inspectthebaggerattachmentfordamage;referto
InspectingtheBaggerAttachment.
3.Makesurethegrassbagsareemptyandthoroughly
dry.
4.Storethebaggerinaclean,dryplace,outofdirect
sunlight.Thisprotectstheplasticpartsandextends
thelifeofthebagger.Ifyoumuststorethebagger
outside,coveritwithaweatherproofcover.
11

TimeCutter
TheToroTotalCoverageWarranty
and
TITAN
Mowers
LimitedWarranty(seewarrantyperiodsbelow)
ConditionsandProductsCovered
TheT oroCompanyanditsafliate,T oroWarrantyCompany,pursuantto
anagreementbetweenthem,jointlypromisetotheoriginalpurchaser
torepairtheToroProductslistedbelowifdefectiveinmaterialsor
workmanship.
Thefollowingtimeperiodsapplyfromthedateofpurchasebytheoriginal
owner:
ProductsWarrantyPeriod
TimeCutterandMXMowersResidentialuse2–3years
•Engines1—ResidentialuseKawasaki–3years
Kohler–3years
Toro–3years
TimeCutterandMXMowersCommercialuse30days
•Engines1—CommercialuseKawasaki–3years
Kohler–90days
Toro–90days
TITANMowers–Residentialor
Commercialuse
3yearsor240hours3
•Engines1—Residentialor
Commercialuse
Kawasaki–3years
Kohler–2years
•FrameLifetime(originalowneronly)4
TITANMXMowers–Residentialor
Commercialuse
3yearsor400hours3
•Engines1—Residentialor
Commercialuse
Kawasaki–3years
Kohler–2years
•FrameLifetime(originalowneronly)4
AllMowers
•Attachments1year
•Battery90daysPartsandLabor
1yearPartsonly
•BeltsandTires90days
1SomeenginesusedonT oroProductsarewarrantedbytheenginemanufacturer.
2Residentialusemeansuseoftheproductonthesamelotasyourhome.Useatmorethanone
locationisconsideredcommercialuseandthecommercialusewarrantywouldapply.
3Whicheveroccursrst.
4LifetimeFrameWarranty-Ifthemainframe,consistingofthepartsweldedtogethertoformthe
tractorstructurethatothercomponentssuchastheenginearesecuredto,cracksorbreaksin
normaluse,itwillberepairedorreplaced,atT oro'soption,underwarrantyatnocostforparts
andlabor.Framefailureduetomisuseorabuseandfailureorrepairrequiredduetorustor
corrosionarenotcovered.
Thiswarrantyincludesthecostofpartsandlabor,butyoumustpay
transportationcosts.
Warrantymaybedeniedifthehourmeterisdisconnected,altered,or
showssignsofbeingtamperedwith.
OwnerResponsibilities
YoumustmaintainyourToroProductbyfollowingthemaintenance
proceduresdescribedintheOperator'sManual.Suchroutine
maintenance,whetherperformedbyadealerorbyyou,isatyourexpense.
InstructionsforObtainingWarrantyService
IfyouthinkthatyourT oroProductcontainsadefectinmaterialsor
workmanship,followthisprocedure:
1.ContactanyAuthorizedToroServiceDealertoarrangeserviceattheir
dealership.Tolocateadealerconvenienttoyou,refertotheYellow
Pagesofyourtelephonedirectory(lookunder“LawnMowers”)or
accessourwebsiteatwww.T oro.com.Youmayalsocallthenumbers
listedinitem#3tousethe24-hourT oroDealerlocatorsystem.
2.Bringtheproductandyourproofofpurchase(salesreceipt)tothe
ServiceDealer.Thedealerwilldiagnosetheproblemanddetermine
ifitiscoveredunderwarranty.
3.IfforanyreasonyouaredissatisedwiththeServiceDealer’s
analysisorwiththeassistanceprovided,contactusat:
CustomerCareDepartment,RLCDivision
ToroWarrantyCompany
8111LyndaleAvenueSouth
Bloomington,MN55420-1196
Tollfreeat866-216-6029(U.S.customers)
Tollfreeat866-216-6030(Canadiancustomers)
ItemsandConditionsNotCovered
Thereisnootherexpresswarrantyexceptforspecialemissionsystem
coverageandenginewarrantycoverageonsomeproducts.Thisexpress
warrantydoesnotcoverthefollowing:
•Costofregularmaintenanceserviceorparts,suchaslters,fuel,
lubricants,oilchanges,sparkplugs,airlters,bladesharpening/worn
bladeonmowers,cable/linkageadjustments,orbrakeandclutch
adjustments
•Componentsfailingduetonormalwear
•Anyproductorpartwhichhasbeenalteredormisusedandrequires
replacementorrepairduetoaccidentsorlackofpropermaintenance
•Repairsnecessaryduetoimproperbatterycare,failuretousefresh
fuel(lessthanonemonthold),orfailuretoproperlypreparetheunit
priortoanyperiodofnon-useoveronemonth
•Pickupanddeliverycharges
•Operationalmisuse,neglect,oraccidents
•RepairsorattemptedrepairsbyanyoneotherthananAuthorized
ToroServiceDealer
GeneralConditions
Allrepairscoveredbythesewarrantiesmustbeperformedbyan
AuthorizedT oroServiceDealerusingT oroapprovedreplacementparts.
NeitherTheToroCompanynorToroWarrantyCompanyisliablefor
indirect,incidentalorconsequentialdamagesinconnectionwiththe
useoftheToroProductscoveredbythiswarranty,includingany
costorexpenseofprovidingsubstituteequipmentorserviceduring
reasonableperiodsofmalfunctionornon-usependingcompletion
ofrepairsunderthiswarranty.
Allimpliedwarrantiesofmerchantability(thattheproductistfor
ordinaryuse)andtnessforuse(thattheproductistforaparticular
purpose)arelimitedtothedurationoftheexpresswarranty.
Somestatesdonotallowexclusionsofincidentalorconsequential
damages,orlimitationsonhowlonganimpliedwarrantylasts,so
theaboveexclusionsandlimitationsmaynotapplytoyou.
Thiswarrantygivesyouspeciclegalrights,andyoumayalsohaveother
rightswhichvaryfromstatetostate.
CountriesOtherthantheUnitedStatesorCanada
CustomerswhohavepurchasedToroproductsoutsidetheUnitedStatesorCanadashouldcontacttheirT oroDistributor(Dealer)toobtainguarantee
policiesforyourcountry,province,orstate.IfforanyreasonyouaredissatisedwithyourDistributor'sserviceorhavedifcultyobtainingguarantee
information,contacttheT oroimporter.Ifallotherremediesfail,youmaycontactusatToroWarrantyCompany.374-0258RevC
This manual suits for next models
2
Table of contents
Other Toro Lawn Mower Accessories manuals

Toro
Toro 110-2026 User manual

Toro
Toro 108-1381 User manual

Toro
Toro 161-4520 User manual

Toro
Toro Wheel Horse 78305 User manual

Toro
Toro 22324 Manual

Toro
Toro HoverPro 450 User manual

Toro
Toro Groundsmaster 360 Series User manual

Toro
Toro 72144 Quick start guide

Toro
Toro 08719 User manual

Toro
Toro 13-32G Wheel Horse User manual

Toro
Toro 04259 User manual

Toro
Toro 31351 User manual

Toro
Toro 79390 User manual

Toro
Toro Groundsmaster 300 Series User manual

Toro
Toro 136-5850 User manual

Toro
Toro Groundsmaster 5900 Series User manual

Toro
Toro 41614 User manual

Toro
Toro 133-0575 User manual

Toro
Toro Greensmaster TriFlex 3300 Series User manual

Toro
Toro 30555 User manual