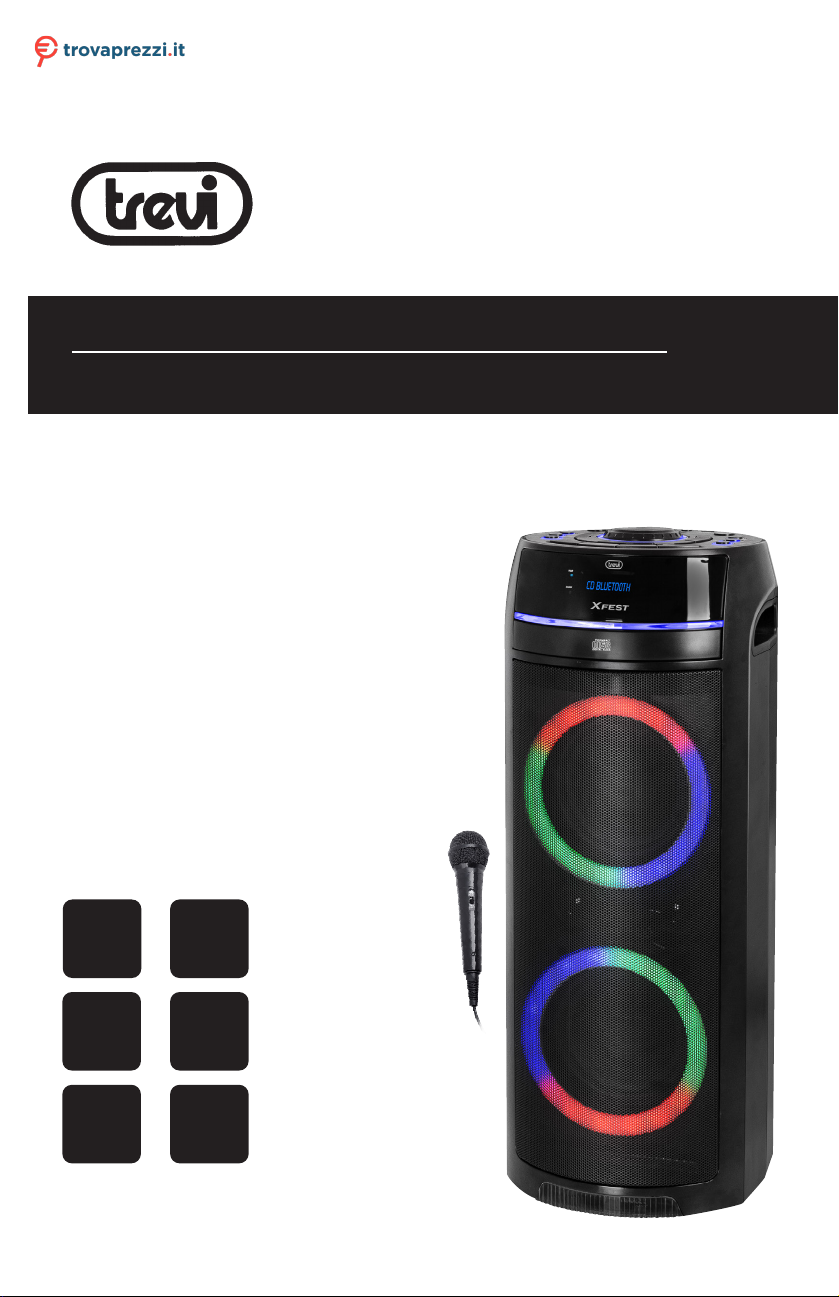
Trevi XF 900 CD User manual

ALTOPARLANTE AMPLIFICATO
con
BLUETOOTH/ LETTORE CD MP3-USB/ DISCO LIGHT
Manuale d'uso
PORTABLE AMPLIFIED SPEAKER
with
BLUETOOTH/ CD PLAYER MP3-USB PLAYER/ DISCO LIGHT
Operation Manual
HAUT-PARLEUR AMPLIFIÉ PORTABLE
avec
BLUETOOTH/ LECTEUR CD MP3-USB/ LUMIÈRE DISCO
Mode d'emploi
BEWEGLICHER LAUTSPRECHER
mit
BLUETOOTH/ CD PLAYER MP3-USB PLAYER/ DISCO-LICHT
Bedienungsanleitung
ALTAVOZ AMPLIFICADO PORTATIL
con
BLUETOOTH/ REPRODUCTOR DE CD MP3-USB/ LUZ DE DISCO
Manual para el uso
XF 900 CD
Guida d’uso
User guide
Per informazioni integrative ed aggiornamenti su questo prodotto visita www.trevi.it
For additional information and updates of this product see www.trevi.it
USB
READER AUX IN
BLUETOOTH
CONNECTION
DISCO
LIGHT
90W
MAX
BT
CD
PLAYER
Questo manuale d’istruzione è fornito da trovaprezzi.it. Scopri tutte le offerte per Trevi XF 900 CD o cerca il
tuo prodotto tra le migliori offerte di Hi Fi


3
XF 900 CD
ATTENZIONE
RISCHIO DI SCOSSE ELETTRICHE!
NON ESPORRE A PIOGGIA E
UMIDITÀ
ATTENZIONE:NON APRITEL'APPARECCHIO.ALL'INTERNONON
VI SONO COMANDI MANIPOLABILI DALL'UTENTE NE PARTI DI
RICAMBIO.PERTUTTELE OPERAZIONIDI SERVIZIORIVOLGERSI
AD UN CENTRO DI ASSISTENZA AUTORIZZATO TREVI
WARNING!
WARNING: DO NOT OPEN THE SET. NEITHER CONTROLS OR
SPARE PARTS TO BE USED BY THE USER ARE TO BE FOUND
INSIDEIT.APPLYTOAUTHORISEDTREVICENTERSFORSERVICE
OPERATIONS.
DANGER OF ELECTRIC SHOCK!
DO NOT EXPOSE TO
RAIN OR HUMIDITY
ATTENTION
ATTENTION:NE PAS OUVRIR L’APPAREIL, A L’INTERIEUR IL N’Y
A PAS DE COMMANDES A MANIPULER PAR L’UTILISATEUR OU
DE PIECES DE RECHANGE.POUR TOUTES LES OPERATIONS DE
SERVICE IL FAUT S’ADRESSER A UN SERVICE D’ASSISTANCE
AUTORISE TREVI.
RISQUE DE DECHARGES
ELECTRIQUES
NE PAS EXPOSER A LA PLUIE
ET A L’HUMIDITE
ACHTUNG
ACHTUNG:DAS GERÄT NICHT ÖFFNEN.IM INNERN BEFINDEN
SICHKEINEVOMBENUTZER SELBSTINSTANDSETZBARENTEILE
UND AUCH KEINE ERSATZTEILE. FÜR JEGLICHE
SERVICEARBEITEN, WENDEN SIE SICH BITTE AN EINE TREVI
AUTORISIERTEN KUNDENDIENSTSTELLE.
GEFAHR ELEKTRISCHER
SCHLÄGE
NICHT DER FEUCHTIGKEIT UND
DEM REGEN AUSSETZEN
ATENCION
ATENCION: NO ABRIR EL APARATO, EN SU INTERIOR NO HAY
MANDOS QUE PUEDAN SER MANIPULADOS POR EL USUARIO
NI PARTES DE REPUESTO.PARA TODAS LAS OPERACIONES DE
SERVICIO DIRIGIRSE A UN CENTRO DE ASISTENCIA
AUTORIZADO TREVI.
PELIGRO DE CHOQUES
ELECTRICOS
NO EXPONER A LLUVIA Y
HUMEDAD
UK PLUG ONLY
WIRES CONNECTIONS TO A UK THREE-PIN PLUG
The wires in this mains lead are coloured in accordance with
the following wiring codes:
Blue:...............................................Neutral
Brown:...........................................Live
Thewiresinthismainsleadmustbeconnectedtotheterminals
in the plug as follows:
Blue wire:.....................................N or Black
Brown wire:.................................L or Red
Neither wire is to be connected to the earth (E or W) terminal
of three-pin plug.
Should the fuse fail in the plug remove the plug form the wall
socket and replace the fuse with a 3 Amp. ASTA approved
BS 1362 fuse.
WARNING!

4
XF 900 CD
Per evitare possibili danni all’udito, limitare il tempo di ascolto a volumi elevati
NOTE D'USO
Ascoltare a volume alto per lungo tempo,potrebbe danneggiare il vostro udito.
Evitare di posizionare il riproduttore:
• Vicino a campi magnetici.
• Vicino a fonti di calore come caloriferi e stufe.
• In luoghi molto umidi come stanze da bagno, piscine, ecc...
• In luoghi molto polverosi.
• In luoghi soggetti a forti vibrazioni.
• Non avvicinare l’orecchio all’altoparlante durante le fasi di messa a punto e regolazioni del volume, in
particolare, tenere il volume al minimo nella fase di accensione.
• Posizionare l’apparecchio in modo che ai suoi lati ci sia sempre abbastanza spazio per la libera circolazione
di aria (almeno 5 cm).
• Se dei liquidi penetrano all’interno dell’apparecchio scollegare immediatamente la spina dalla presa e
portare l’apparecchio al più vicino centro assistenza autorizato TREVI.
• Il cavo di alimentazione deve essere collegato a una presa vicino al dispositivo e deve essere facilmente
accessibile.
• Prima di accendere/ricaricare l’apparecchio,controllare sempre che i cavi di alimentazione e di collegamento
siano installati correttamente.
• Se si nota un calore eccessivo sul dispositivo, scollegare immediatamente la spina dalla presa di corrente
principale.
• Nessunasorgentediammanuda,qualicandeleaccese,dovrebbeesserepostasull’apparecchio.
• L’apparecchio non deve essere esposto a stillicidio o a spruzzi d’acqua e nessun oggetto pieno di liquido,
quali vasi, deve essere posto sull’apparecchio.
• Non tirare il cavo di alimentazione.
• Istruire al corretto utilizzo bambini e persone con scarse conoscenze del prodotto.
• Conservare il presente manuale per futuri riferimenti.
CURA E MANUTENZIONE
Per la pulizia si consiglia l’uso di un panno morbido, leggermente inumidito. Evitate solventi o sostanze abrasive.
IMPORTANTE
Questodispositivoe' progettato per uso domestico non professionale.Labuona costruzionediquestoapparecchio
ne garantisce per lungo tempo il perfetto funzionamento.Se tuttavia dovesse presentarsi qualche inconveniente,
sarà opportuno consultare il più vicino Centro Assistenza autorizzato TREVI.
TREVI persegue una politica di continua ricerca e sviluppo. Pertanto i prodotti possono presentare caratteristiche
diverse da quelle descritte.
ITALIANO
VOLTAGGIO PERICOLOSO ATTENZIONE AVVERTENZE SUL LASER
Questo simbolo riportato sul retro
dell'apparecchio ed in questo ma-
nuale segnala la presenza all'interno
di questo apparecchio di componenti
operanti ad alta tensione,non apritelo
perevitareilrischiodiscosseelettriche.
Questo simbolo riportato sul re-
trodell'apparecchioed inquesto
manualeindicanolapresenzasu-
gli stessi di importanti istruzioni
per la sicurezza d'uso.Leggetele
attentamente prima di utilizzare
l'apparecchio.
Questo apparecchio è dotato di un
sistema di lettura con raggio laser.
Benché il laser sia di bassa potenza
e con dispositivo di sicurezza che ne
impedisceilfunzionamentoasportello
apertoatteneteviscrupolosamentealle
seguenti avvertenze:
Non avvicinate l'occhio alla lente del
laserconl'apparecchioaperto,pericolo
di lesione della retina.
Nontentatedismontareomanomette-
rel'unitàlaser,pericolodiassorbimento
di radiazioni.

5
XF 900 CDITALIANO
ATTIVAZIONE E SOSTITUZIONE DELLA BATTERIA DEL TELECOMANDO
DESCRIZIONE COMANDI
8 9 10
1
2
3
4
5
6
7
23 22 21
11
12
13
14
15
16
17
18
19
20
COMANDI UNITÀ
1. Presa USB
2. Tasto BASS, aumento toni bassi
3. Tasto 9, precedente
4. Tasti MIC.VOL, regolazione volume microfono
5. Tasto ECHO
6. Tasto OPEN/CLOSE, sportello CD
7. Tasto PROG/P-MODE
8. Indicatore Led PAIR, accoppiamento Bluetooth
9. Indicatore Led CHARGE, stato ricarica batteria
10. Display
11. Tasto LIGHT (effetti Led disco light)
12. Tasto FUNCTION
13. Tasto /
14.TastoEQ,equalizzazionipredenite
15. Tasto :, successivo
16. Tasti 10/FOLD +/-
17. Manopola regolazione volume
18. Tasto accensione/spegnimento
19. Tasto , Stop
20. Presa USB per ricarica dispositivi esterni
21. Ingresso Microfono 2
22. Ingresso Microfono 1
23. Ingresso AUX IN
24. Sportello CD
TELECOMANDO
25. Tasto FUNC, selezione funzione
26.TastoEQ,equalizzazionipredenite
27. Tasto ECHO
28. Tasti FOLD/10
29. Tasti MIC VOL,regolazione volume microfoni
30. Tasto 9, precedente
31. Tasto PROG/P-MODE
32. Tasto , Stop
33. Tasto LIGHT (effetti Led disco light)
34. Tasto :, successivo
35. Tasto , Play/Pausa
36. Tasti regolazione volume
37. Tasto BASS, aumento toni bassi
38. Tasto accensione/standby
39. Tasto OPEN/CLOSE, sportello CD
TIRARE LA LINGUETTA
TIRARE
SPINGERE
Il telecomando utilizza una batteria tipo CR2025
Per attivare la batteria del telecomando (inclusa) togliere la linguetta
plastica di protezione.
Per la sostituzione della batteria:
1. Spingere il fermo plastico dell’alloggiamento porta batteria verso
destra;
2. Estrarre l’alloggiamento porta batteria;
3 Inserireunabatterianuovafacendoattenzionearispettarelepolarità;
4. Richiudere l'alloggiamento porta batteria.
24
9
108
33
34
36
37
38
25
26
27
28
29
30
31
32
35
39

6
XF 900 CD
TRASPORTO
Per il trasporto utilizzare le due maniglie poste lateralmente all'apparecchio.
ALIMENTAZIONE/RICARICA BATTERIA
Questaunitàfunziona conbatteriaricaricabile alpiombo12V ,4Ahealimentazione direte100-240V 50/60Hz.
Quando la batteria e' in fase di esaurimento o l'apparecchio non si accende, inserire il cavo di alimentazione
nella presa posteriore e la spina in una presa di corrente per effettuare la ricarica.
Stati della spia Led di Carica:
- SpiaLed(9)ROSSAssa:ildispositivoe'collegatocorrettamenteconilcavodialimentazioneelabatteria
è in carica.
- Spia Led (9) VERDEssa:operazione di ricarica terminata, la batteria e' carica.
Nota: Non collegare l'apparecchio a prese con tensione diversa da quella indicata.
FUNZIONI DI BASE
ACCENSIONE/SPEGNIMENTO
- Tenere premuto per 2 secondi il tasto principale (18) sull'unità, oppure premere il tasto (38) del teleco-
mando per accendere e utilizzare l'apparecchio con la sua batteria interna.
- Tenere premuto per 3 secondi il tasto principale (18) sull'unità, oppure premere il tasto (38) del teleco-
mando per spegnere completamente l'apparecchio o per ricaricare la batteria.
SELEZIONE DELLA FUNZIONE
Per selezionare la modalità di funzionamento, premere piu' volte il tasto FUNCTION (12) sull'unità oppure il tasto
FUNC (25) del telecomando per selezionare: CD,USB (solo se sulla presa USB (1) vi è collegata una memoria,
sul display compare una piccola scritta "USB"),BLUETOOTH,AUX-IN (sul display compare "AUX").
REGOLAZIONE DEL VOLUME
1. Ruotare la manopola del VOLUME (17) per aumentare o diminuire il volume generale di riproduzione
oppure utilizzare i tasti (36) del telecomando;
2. Utilizzare i tasti MIC.VOL (4) o (29) per regolare il volume del segnale sugli ingressi MIC (21 e 22).
PRE-EQUALIZZAZIONI
Questa unità ha un sistema di equalizzazioni audio pre impostate. Premere più volte il tasto EQ (14) sull'unità,
oppure il tasto EQ (26) del telecomando per selezionare una tra le 5 equalizzazioni audio disponibili che meglio si
adatta alla riproduzione sonora in corso.
BASS
Premere il tasto BASS (2) sull'unità oppure il tasto BASS (37) sul telecomando per aumentare i toni bassi.
EFFETTO ECHO
Premere il tasto ECHO (5) sull'unità oppure il tasto ECHO (27) sul telecomando per attivare l'effetto eco sugli ingressi
MIC, il display mostrerà la scritta ECHO-ON.
Premerlo nuovamente per disattivare l'effetto eco, il display mostrerà la scritta ECHO-OFF.
Nota: l'effetto eco agisce unicamente sugli ingressi microfonici.
DISCO-LIGHT
Per gestire tutte le illuminazioni sull'unità:
- Premere ripetutamente il tasto LIGHT (11)/(33),sul display (10) compariranno le indicazioni
L -1, L -2, L -3, L -4 e L -5 che fanno riferimento ai vari effetti luce sugli altoparlanti; selezionare L -OFF per
disattivare completamente l'illuminazione sugli altoparlanti;
- Tenere premuto per qualche secondo il tasto LIGHT (11)/(33) per disattivare o attivare l'illuminazione
sulla tastiera e sul cassetto CD; sul display (10) compariranno le indicazioni E -OFF (spento) e E -ON (acceso).
FUNZIONAMENTO LETTORE CD MP3
RIPRODUZIONE
1. Accendere l'apparecchio e selezionare la funzione CD;
ITALIANO

7
XF 900 CDITALIANO
2. Aprire il vano CD premendo il tasto OPEN/CLOSE (6) sull'unità oppure il tasto OPEN/CLOSE (39) sul telecomando
e inserire il disco con il lato scritto rivolto verso l'alto. Richiudere lo sportello con cura premendo nuovamente
il tasto OPEN/CLOSE (6) sull'unità oppure il tasto (39) del telecomando;
3. Dopo qualche secondo il Display (10) mostra il numero delle tracce (brani) presenti sul disco e la riproduzione
si avvierà automaticamente;
4. Premere il tasto / (13) sull'unità o il tasto (35) del telecomando per attivare la pausa;l'indicazione
del tempo inizierà a lampeggiare;
5. Premere nuovamente il tasto / (13) o il tasto (35) del telecomando per disinserire la pausa e avviare
la normale riproduzione;
6. Premere il tasto STOP (19) sull'unità o il tasto (32) del telecomando perarrestaredenitivamentela
riproduzione; il display (10) mostrerà le tracce presenti sul CD.
SALTO TRACCIA
1. Premendoil tasto :(15)sull'unitàoiltasto(34)deltelecomando,durantel’ascolto,sipassa alla tracciasuccessiva,
mentre con il tasto 9(3) sull'unità o il tasto (30) del telecomando si passa alla traccia precedente;
2. Tenendo premuto il tasto :(15)/(34) o 9(3)/(30) durante l'ascolto si ricerca velocemente un particolare
passaggio musicale;
3. Rilasciare il tasto per tornare alla normale riproduzione;
4. Il display LCD (10) mostra sempre quale traccia si sta ascoltando.
RIPRODUZIONE ININTERROTTA DI UNA SINGOLA TRACCIA
- In modalità di riproduzione.
1. Premere il tasto PROG./P-MODE (7) sull'unità oppure il tasto (31) del telecomando;
2. Il simbolo“ ”apparirà sul display;
3. Il lettore CD riprodurrà ininterrottamente la traccia visualizzata sul display;
4. Perinterromperelariproduzionecontinuadellatraccia,premereiltastoPROG./P-MODE(7)/(31)noalla
scomparsa del simbolo.
RIPRODUZIONE ININTERROTTA DELL'INTERA CARTELLA (FOLDER)
NB: funzione valida solo per CD MP3.
- In modalità di riproduzione.
1. Premere due volte il tasto PROG./P-MODE (7) sull'unità oppure il tasto (31) del telecomando;
2. La scritta“ DIR” apparirà sul display;
3. Il lettore CD riprodurrà ininterrottamente il numero della cartella visualizzata sul display;
4. Perinterromperelariproduzionecontinua,premereiltastoPROG./P-MODE(7)/(31)noallascomparsadella
scritta.
RIPETIZIONE ININTERROTTA DELL’ INTERO DISCO
- In modalità di riproduzione.
1. Premere tre volte il tasto PROG./P-MODE (7) sull'unità oppure il tasto (31) del telecomando;
2. La scritta“ ALL”apparirà sul display;
3. Il lettore CD riprodurrà ininterrottamente l’intero disco;
4. Perinterromperelariproduzionecontinuadell'interodisco,premereiltastoPROG./P-MODE(7)/(31)noalla
scomparsa della scritta.
RIPRODUZIONE CASUALE DEI BRANI
- In modalità di riproduzione.
1. Premere quattro volte il tasto PROG./P-MODE (7) sull'unità oppure il tasto (31) del telecomando;
2. La scritta“RAN”apparirà sul display;
3. Il lettore CD riprodurrà i brani secondo una sequenza casuale.
4. Perinterromperelariproduzionecasualedeibrani,premereiltastoPROG./P-MODE(7)/(31)noallascomparsa
della scritta.
RIPRODUZIONE INTRO DEI BRANI
- In modalità di riproduzione.
1. Premere cinque volte il tasto PROG./P-MODE (7) sull'unità oppure il tasto (31) del telecomando;

8
XF 900 CD
2. La scritta“INTRO”apparirà sul display;
3. Il lettore CD riprodurrà i primi 10 secondi di ogni brano presente sul disco;
4. Perinterromperelafunzioneintrodeibrani,premereiltastoPROG./P-MODE(7)/(31)noallascomparsadella
scritta.
PROGRAMMAZIONE
È possibile selezionare l'ordine di rirpoduzione dei brani.
1. Premere il tasto STOP (19) sull'unità o il tasto (32) del telecomando per arrestare la riproduzione;
2. Premere il tasto PROG./P-MODE (7) sull'unità o il tasto (31) del telecomando, sul display apparirà la scritta "P01";
3. Selezionare il brano che desiderate riprodurre per primo utilizzando i tasti :(15)/(34) o 9(3)/(30);
4. Premere il tasto PROG./P-MODE (7)/(31) per confermare;
5. Ripetere i punti 3 e 4 per memorizzare e riprodurre i brani che desiderate; per i CD audio si possono
memorizzare un massimo di 20 brani, mentre per i CD MP3 si possono memorizzare un massimo di 99 brani;
6. Premere il tasto / (13) sull'unità o il tasto (35) del telecomando per iniziare la riproduzione;
7. Premere due volte il tasto STOP (19)/(32) per annullare la programmazione.
FUNZIONE ALBUM
NB: funzione valida solo per cd MP3 contenenti directory o cartelle.
1. Quando ascoltate un brano Mp3 e volete cambiare directory, tenere premuto il tasto 10/FOLD +/- (16)
sull'unità o il tasto (28) del telecomando per posizionarsi sulle cartelle successive/precedenti;
2. Premere il tasto 10/FOLD + (16)/ (28) per spostarsi alla decima traccia successiva.Premere il
tasto 10/FOLD - (16)/ (28) per spostarsi alla decima traccia precedente.
FUNZIONAMENTO BLUETOOTH
1. Accendere l'apparecchio e selezionare la funzione bluetooth, sul display comparirà la scritta "BLUETOOTH";
2. Nella modalità Bluetooth il Led PAIR (8) comincerà a lampeggiare e il sistema si porterà automaticamente
in modalità ricerca;
3. Attivare la funzionalità Bluetooth sul dispositivo esterno da accoppiare ed avviare la ricerca dei dispositivi;
4. Terminata la ricerca selezionare il dispositivo "XF 900 CD";
5. Inserire la password "0000" se richiesto;
6. Premere il tasto /
(13) sull'unità
o il tasto (35) del telecomando
per avviare la riproduzione e utilizzare i
tasti :(15)/(34) o 9(3)/(30) per la selezione dei brani.
RIPRODUZIONE SU INGRESSO USB
1. Accendere l'apparecchio;
2. Inserire una memoria USB nella presa (1) e selezionare la funzione USB;
3. Per mettere in pausa la riproduzione, premere il tasto /
(13) sull'unità oppure il tasto
(35) del tele-
comando
; l'indicazione del tempo sul display comincerà a lampeggiare;
4. Per riprendere la riproduzione,premere nuovamente il tasto /
(13) sull'unità oppure il tasto
(35) del
telecomando
;
5. Premere il tasto :(15) sull'unità o il tasto :(34) del telecomando, durante l’ascolto per passare alla traccia
successiva.Premereiltasto 9(3)sull'unitàoiltasto 9(30)deltelecomandoperpassareallatracciaprecedente;
Fare riferimento al pararafo "Funzionamento lettore CD MP3" per le funzioni di ripetizione, salto traccia, ecc...
Note:
- Il lettore potrebbe non supportare alcuni dispositivi USB,questo è dovuto all'incompatibilità di alcuni processori.
- Per evitare interferenze dannose, collegare sempre le periferiche USB direttamente all'unità, non utilizzare
cavi di prolunga.
- Dal computer formattare le memorie USB in FAT.
PRESA USB CHARGE
E' possibile utilizzare la presa USB CHARGE (20) per la ricarica di dispositivi esterni USB.
Nota: non e' possibile utilizzare questa presa per la riproduzione di le audio.
ITALIANO

9
XF 900 CDITALIANO
AUX-IN
1. Accendere l'apparecchio e selezionare la funzione "AUX";
2. Collegare una qualsiasi unità provvista di uscita audio tramite cavo Jack da 3,5mm all'ingresso AUX IN (23);
3. Regolare il dispositivo esterno dai propri comandi.
UTILIZZO DEL MICROFONO
1. Collegare il microfono in dotazione nella presa MIC1(22) o MIC2 (21);
2. Accendere il microfono agendo sull'interruttore presente sul manico del microfono stesso portandolo in
posizione ON;
3. Regolare il volume di ingresso del microfono e l'effetto eco come desiderato tramite gli appositi comandi.
Nota: e' possibile utilizzare due microfoni contemporaneamente (secondo microfono non in dotazione).
RISOLUZIONE DEI PROBLEMI
Sesivericaunproblema,attenersiallaproceduradescrittanellaseguentetabella.
Se il problema non può essere risolto, contattare il rivenditore o il centro assistenza.
Problema Possibili cause Soluzione
Nessun suono riprodotto
quandol'apparecchioviene
acceso
1. Nessuna sorgente sonora in
ingresso
2. Manopola Volume a livello 0 o
regolazione volume dal teleco-
nado a livello 0
3. Nessun dispositivo USB colle-
gato
1. Collegare un dispositivo all'ingresso
AUX-IN
2. Regolare il volume
3. Collegare una memoria USB per ripro-
durreleaudioMP3
Suono distorto 1. Volume troppo alto
2.ErroreleAudio
1. Abbassare il volume
2.Controllareeriprodurreun'altrole
Audio
Nessunsuonodalmicrofono 1. La presa del microfono può non
essere collegata correttamente.
2. L'interrutore di accensione sul
microfono può essere in posizio-
ne "spento".
3. Volume del microfono basso.
1. Assicurarsi che il microfono sia collega-
to correttamente alla presa.
2. Accendere il microfono.
3. Regolare correttamente il volume del
microfono
Nessun suono quando si
inserisceundispositivoUSB
1.Formatolenonsupportato
2. USB non collegata corretta-
mente
1.Ilformatodeileaudiodeveessere
MP3
2. Collegare l'apparecchio USB corretta-
mente
Impossibile caricare la bat-
teria o la batteria ha una
durata breve
1. Il cavo di alimentazione non è
inserito bene nella presa
2. La batteria non è completamen-
te carica
3. La batteria potrebbe aver termi-
nato il suo ciclo di vita
1. Controllare se il cavo di alimentazione
è collegato in modo corretto
2. Normalmente ci vogliono 5-6 ore per
ricaricare completamente la batteria
3. Sostituire la vecchia batteria con una
nuovaaventelestessespeciche
tecniche
Daglialtoparlantisisentono
forti rumori
1. Microfono acceso ma troppo
vicino all'altoparlante
2. Il Volume del microfono potreb-
be essere troppo alto
3. Un cellulare viene utilizzato
troppo vicino all'altoparlante
4.Apparecchisenzalipossono
essere molto vicini a chi sta
utilizzando il microfono
1. Tenere il microfono alla distanza di 2
metri dal diffusore
2. Abbassare il volume del microfono
3. Tenere il cellulare lontano dall'altopar-
lante mentre si effettua una chiamata.
4. Tenere il diffusore lontano da apparec-
chi wireless

10
XF 900 CD
INFORMATIVA SULLA RIMOZIONE E LO SMALTIMENTO DELLE BATTERIE
Attenzione:Questa operazione è riservata esclusivamente al personale tecnico specializzato!
PROCEDURA PER LA RIMOZIONE DELLA BATTERIA DALL’ALTOPARLANTE AMPLIFICATO
Operare esclusivamente in assenza di collegamento dell’apparecchio alla rete elettrica!
1. Rimuovere le viti che serrano l'apparecchio;
2. Aprirlo e individuare la batteria;
3. Scollegare la batteria e rimuoverla.Collegarne una nuova di uguali caratteristiche e capacità.
SMALTIMENTO DELLA BATTERIA
Qualunquesiailtipodibatteriaesaurita,essanondeveesseregettatatrairiutidomestici,nelfuocoonell’acqua.
Ogni tipo di batteria esaurita deve essere riciclata oppure smaltita presso gli appositi centri di raccolta dedicati.
INFORMAZIONI AGLI UTENTI
ai sensi del Decreto Legislativo N° 49 del 14 Marzo 2014
“Attuazione della Direttiva 2012/19/UE sui riuti di apparecchiature elettriche ed elettroniche (RAEE)”
Ilsimbolodelcassonettobarratoriportatosull’apparecchiaturaindicacheilprodottoallanedellapropriavita
utiledeveessereraccoltoseparatamentedaglialtri riuti.L’utentedovrà,pertanto,conferirel’apparecchiatura
integradeicomponentiessenzialigiuntaanevitaagliidoneicentridiraccoltadifferenziatadeiriutielettronici
ed elettrotecnici, oppure riconsegnarla al rivenditore al momento dell’acquisto di nuova apparecchiatura di tipo
equivalente,in ragione di uno a uno, oppure 1 a zero per le apparecchiature aventi lato maggiore inferiore a 25cm.
L’adeguata raccolta differenziata per l’avvio successivo dell’apparecchiatura dimessa al riciclaggio, al trattamento
e allo smaltimento ambientale compatibile contribuisce ad evitare possibili effetti negativi sull’ambiente e sulla
salute e favorisce il riciclo dei materiali di cui è composta l’apparecchiatura.Lo smaltimento abusivo del prodotto
da parte dell’utente comporta l’applicazione delle sanzioni amministrative di cui al D.Lgs n. Decreto Legislativo
N° 49 del 14 Marzo 2014.
CARATTERISTICHE TECNICHE
GENERALI
Alimentazione: ...............................................................100-240V 50/60Hz
batteria interna al piombo ricaricabile 12V , 4Ah
Consumo: .......................................................................................... Max 39W
Potenza audio: .......................................................................................... Max 90W
Temperatura di funzionamento:......................................................................................5° ~ 35°C
Risposta in frequenza: .................................................................................. 45Hz - 18KHz
Rapporto segnale rumore: ...................................................................................................45dB
Impedenza: .......................................................................................................4Ω
Potenza di trasmissione di picco Bluetooth:...................................................................2,5mW
Potenza di trasmissione max Bluetooth:..........................................................................1,9mW
Banda di trasmissione Bluetooth:.......................................................................................2,4GHz
Dimensioni: ..........................................................................250x260x637mm
Peso: .................................................................................................8,1 Kg
ITALIANO

11
XF 900 CDENGLISH
NOTES ON USE
Listening at high volume for a long time may damage your hearing.
This is a precision electronic appliance; avoid using it in the following cases:
• Nearmagneticelds.
• Near heat sources such as heaters and stoves.
• In very humid places such as bathrooms, swimming pools, etc...
• In very dusty places.
• In places subject to strong vibrations.
• Do not bring your ear close to the speaker during the setting and volume adjustment phases,and in
particular to keep the volume to a minimum in the ignition phase.
• Position the appliance so that there is always enough space on its sides for the free circulation of air
(at least 5 cm).
• Ifliquids penetrateinsidetheappliance,immediatelydisconnect theplugfromthesocketandtaketheappliance
to the nearest authorized TREVI service center.
• Before Switch On/Recharging the appliance,always check that the power and connection cables are installed
correctly.
• The power cable must be connected to an outlet near the device and must be easily accessible.
• If you notice excessive heat on the device or on the power adapter, immediately disconnect the plug from
the main power socket.
• Do not pull on the power cable.
• Nonakedamesources,suchaslightedcandles,shouldbeplacedontheappliance.
• Theappliancemustnotbeexposedtodrippingorsplashingwaterandnoobjectslledwithliquid,such
as vases,must be placed on the appliance.
• Instruct children and people with little knowledge of the product to use it correctly.
• Keep this manual for future reference.
CARE AND MAINTENANCE
Use a slightly damp soft cloth for cleaning.Do not use solvents and abrasive substances.
IMPORTANT
This device is designed for non-professional home use.The good construction of this device guarantees its perfect
functioning for a long time. If,however, a problem should arise, it is advisable to consult the nearest TREVI Autho-
rized Service Center.
TREVI follows a policy of ongoing research and development.Therefore products may have different features from
those described.
To avoid possible hearing damage,limit the listening time to high volumes
CAUTION DANGEROUS VOLTAGE WARNINGS ON THE LASER
This symbol on the back of the
unit and in this manual indi-
cate the presence on them of
important instructions for safe
use.Please read them carefully
before using the appliance.
Thissymbolonthebackoftheunitand
inthismanualindicatesthepresencein
thisequipmentcomponentsoperating
athigh voltage,do not open it toavoid
the risk of electric shock.
This device is equipped with a laser
beam reading system. Although the
laser is of low power and with a safety
device that prevents open door opera-
tion,scrupulouslyobservethefollowing
warnings:
Do not bring the eye to the laser lens
with the device open, risk of retinal
injury.
Do not attempt to disassemble or tam-
per with the laser unit, risk of radiation
absorption.

12
XF 900 CD
ENGLISH
ACTIVATION AND REPLACEMENT REMOTE CONTROL'S BATTERY
UNIT
1. USB Socket
2. BASS button,bass increase
3. 9, previous track button
4. MIC VOL,Microphone Volume Control
5. Microphone ECHO
6. OPEN/CLOSE CD Door button
7. PROG/P-MODE button
8. PAIR Led,Bluetooth pairing indicator
9. CHARGE Led,Battery charge status indicator
10. Display
11. LIGHT button, disco light effects
12. FUNCTION button, to select input signal source
13. / button
14. EQ button, preset EQ
15. :, next track button
16. 10/FOLD +/- buttons
17. Main Volume control
18. Power ON/OFF Switch
19. , Stop button
20. USB socket for charging external devices
21. MIC 2, Microphone Input
22. MIC 1, Microphone Input
23. AUX IN Input
24. CD Door
REMOTE CONTROL
25. FUNC button, to select input signal source
26. EQ button, preset EQ
27. ECHO button
28. FOLD/10 button
29. MIC VOL buttons, Microphone Volume Control
30. 9, previous track button
31. PROG/P-MODE button
32. , Stop button
33. LIGHT button, disco light effects
34. :, next track button
35. , Play/Pause button
36. Volume buttons
37. BASS button, bass increase
38. , ON/OFF button
39. OPEN/CLOSE CD Door button
The remote control has a cell battery already installed. To activate
the battery, remove the transparent tab at the bottom of the remote
control.The remote control is now ready to use.
To Replace Battery:
1. Remove the battery compartment cover as per the illustration on
the left;
2. Observe the correct polarity and install a 3V lithium battery
(CR2025);
3. Close the the battery compartment.
KEY DESCRIPTION
8 9 10
1
2
3
4
5
6
7
23 22 21
11
12
13
14
15
16
17
18
19
20
24
9
108
33
34
36
37
38
25
26
27
28
29
30
31
32
35
39

13
XF 900 CDENGLISH
TRANSPORTATION
For transport to use the two handles located on the side of the appliance.
POWER/BATTERY CHARGE
This unit works with internal rechargeable lead battery 12V 4Ah and power supply 100-240V 50/60Hz.
When the battery is low or the device does not turn on, insert the power cable into the rear socket and the plug
into a power socket to recharge.
Status of the Charging LED light:
- LED indicator (9) RED:the device is correctly connected to the power cable and the battery is being charged.
- LED indicator (9) GREEN:charging operation completed, the battery is charged.
Note: Do not connect the appliance to an outlet with a voltage other than that indicated.
BASIC FUNCTIONS
POWER ON/OFF
- Press and hold button (18) on the unit for 2 seconds, or press the button (38) on the remote control to
switch on and use the appliance with its internal battery.
- Press and hold the button (18) on the unit for 3 seconds, or press the button (38) on the remote control
to completely switch off the appliance or to recharge the battery.
MODE SETTING FUNCTION
To select the operating mode, press more times the FUNCTION (12) button on the unit or press FUNC button (25)
on the remote control to select: CD, USB (only if the socket USB (1) is connected to a memory, a small icon "USB"
appears on the display), BLUETOOTH, AUX-IN (on display "AUX").
ADJUSTING THE VOLUME
1. Turn the VOLUME knob (17) to increase or decrease the main Volume or use the Volume buttons (36) on the
remote control;
2. To use MIC VOL buttons (4)/(29) to adjust the volume at the MIC input (21 and 22).
PRE-EQUALIZER
This unit has a pre audio equalization system set.Press several times the EQ button (14) on unit or EQ button (26)
on the remote control to select one of 5 available audio equalizers and that best suits the sound playback.
BASS TONE
Press BASS button (2) on the unit or BASS button (37) on the remote control to increase the bass.
ECHO EFFECT
Press ECHO button (5)/(27) to activate the echo effect on the MIC inputs, the display will show ECHO-ON.
Press it again to deactivate the echo effect, the display will show ECHO-OFF.
Note: the echo only works on microphone input.
DISCO-LIGHT EFFECTS
To manage all the lights on the unit:
- Press the LIGHT button (11)/(33) repeatedly, the indications L -1, L -2, L -3, L -4 and L -5 will appear
on the display (10) referring to the various light effects on the speakers; select L -OFF to completely
deactivate the lighting on the speakers;
- Press and hold the LIGHT button (11)/(33) for a few seconds to Switch On or Switch Off the lighting
on the keyboard and on the CD drawer;the indications E -OFF (off ) and E -ON (on) will appear on the display (10).
CD/MP3 PLAYER OPERATION
PLAYBACK
1. Switch on the appliance and select CD function;
2. Open the CD compartment by pressing the OPEN/CLOSE button (6) on the unit or OPEN/CLOSE button (39) on
the remote control and insert the disc with the written side facing up.Close the door carefully by pressing again
the OPEN/CLOSE button (6) on the unit or OPEN/CLOSE button (39) on the remote control;

14
XF 900 CD
3. After a few seconds the Display (10) shows the number of tracks (songs) present on the disc and playback
will start automatically;
4. Press / (13)/(35)buttontoactivatethepause;thetimeindicationwillstartashing;
5. Press / (13)/(35) button again to release the pause and start normal playback;
6. Press the STOP button (19)/(32)todenitivelystopplayback;thedisplay(10)will show the total tracks number.
JUMP TRACE AND QUICK SEARCH
1. Pressing the button :(15)/(34) while listening to it you go to the next track,while with key 9(3)/(30)
you go to the previous track;
2. By holding the button :(15)/(34) or 9(3)/(30) while listening, you quickly search for a particular musical
passage;
3. Release the button to return to normal playback;
4. The LCD display (10) always shows which track you are listening to.
REPEAT
- In playback mode:
• Press PROG./P-MODE (7)/(31),the icon " " appears on the display to play the same track continuously.
• Press PROG./P-MODE (7)/(31)," DIR" indication appears on the display to continuously play all the tracks
in the selected folder (only for MP3 CDs containing folders).
• Press PROG./P-MODE (7)/(31)," ALL" indication appears on the display to continuously play all the tracks.
• Press PROG./P-MODE (7)/(31),"RAN" indication appears on the display to randomly play all the tracks.
• PressPROG./P-MODE(7)/(31),"INTRO"indicationappearsonthedisplaytoplaytherst10sec.ofeachsong.
PROGRAMMING
You can select the order in which the tracks are played.
1. Press the button STOP (19)/(32) to stop playback;
2. Press the PROG./P-MODE (7)/(31) button,the message "P01" appears on the display;
3. Selectthetrackyouwanttoplayrstwiththebuttons:(15)/(34) or 9(3)/(30) on the unit;
4. Press PROG./P-MODE (7)/(31)buttononunittoconrm;
5. Repeat steps 3 and 4 to store and play the songs you want; for audio CDs a maximum of 20 tracks can be
stored, while for MP3/USB CDs a maximum of 99 tracks can be stored;
6. Press / (13)/(35) on the unit to start playback;
7. Press two time the button STOP (19)/(32) to cancel programming.
ALBUM FUNCTION
Note: function valid only for MP3 CDs containing folders
1. When listening to an Mp3 song and you want to change directory, press and hold the 10/FOLD +/- (16)/(28)
button to move to the next/previous folders;
2. Press the 10/FOLD + (16)/(28) button to move to the next 10th track.Press the 10/FOLD - (16)/(28) button to move
to the previous 10th track.
BLUETOOTH FUNCTION
1. Switch on the device and select the bluetooth function, the display will show "BLUETOOTH";
2. InBluetoothmode,thePAIRLED(8)willashingandthesystemwillautomaticallygointo"Research"mode;
3. Switch On the Bluetooth function on the external device to be paired and start the search for devices;
4. Once the search is complete, select the "XF 900 CD" devices;
5. Enter the password "0000" if requested;
6. Press /
(13) button on the unit or the button (35) on the remote control to start playback and use the
:(15)/(34) or 9(3)/(30) buttons for track selection.
USB INPUT
1. Switch On the appliance;
2. Insert a USB memory in the socket (1) and select USB function; playback starts automatically;
3. To pause playback, press /
(13) button on the unit or press
(35) button on the remote control
; the
timeindicationonthedisplaywillbegintoash;
ENGLISH

15
XF 900 CDENGLISH
4. To resume playback, press again the /
(13) button on the unit or press
(35) button on the remote
control
;
5. Press :(15) button on unit or button :(34) on the remote control,while listening to switch to the next track.
Press the 9(3) button on unit or 9(30) button on remote to go to the previous tracks;
Refer to the paragraph "MP3 CD player operation" for the repeat functions, track skip, etc...
Note:
- The player may not support some USB devices, this is due to the incompatibility of some processors.
- To avoid harmful interference, always connect USB devices directly to the unit,do not use extension cords.
- From the computer to format the USB memory in FAT.
USB CHARGE SOCKET
The USB CHARGE socket (20) can be used to charge external USB devices.
Note: this socket cannot be used to play audio les.
AUX-IN
1. Switch on the unit and select the "AUX" function;
2. Connect any unit equipped with audio output,through a cable 3.5mm jack to the AUX IN (23);
3. Use the external device from their commands.
TROUBLESHOOTING
If a problem occurs, follow the steps in the table below.
If the problem still can’t be solved, please contact your retailer.
Problem Possible cause Solution
Nosoundwhenpower
is turned ON
1. No input sound source comes
2. Volume knob in the lowest
position
3. USB not plugged
1. Input AUX signal
2. Adjust volume
3. Plug USB,play MP3
Distorted sound 1. Volume is too loud
2.Audioleerror
1. Turn the volume down
2.Checkandchangetheaudiole
No sound from the
microphone
1. Microphone socket may not be
plugged properly.
2. Microphone switch may not be
on.
3. Microphone volume is on lowest
mode.
1. Ensure the microphone is correctly plug-
ged into the socket.
2. Turn on the microphone
3. Adjust the microphone volume as per
users wish
No sound comes after
inserting USB
1.Incorrectleformat
2. USB may not be plugged properly
1. File format should be MP3
2. Plug USB correctly
Unable to charge or
the battery works only
for short duration
1. Connect with power cord to
charge
2. Battery not fully charged
3. Battery life may have ended
1. Check if power cord connected properly
2. Extend charging time;normally it takes 5-6
hour to fully charge
3. Replace old batteries with the same speci-
cationastheoldbatteries.

16
XF 900 CD
ENGLISH
Speaker makes loud
noises
1. Microphone switched on but may
too close to the speaker
2. Microphone switched on but is
not being used
3. Microphone volume may be too
loud
4. Mobile phone is being used too
close to the speaker
5. Other wireless equipment may be
placed very close to the speaker
1. Keep the microphone 2 meters away from
the speaker
2. Turn off microphone if not in use.
3. Adjust microphone volume to lower
mode
4. Keep mobile away from the speaker whilst
a ending a call.
5. Keep the speaker away from other wire-
less equipment
INFORMATION NOTE ON THE REMOVAL BATTERY
Warning: Only high-qualied personnel should perform this operation!
BATTERY REMOVAL
The appliance should not be plugged to the mains socket when performing this operation!
1. Remove the screws;
2. Remove the battery;
3. Connectanewonewithsamespecicationandcapacity.
INFORMATION ON DISPOSAL BATTERY
Usedbatteriesshouldnotbedisposedofwithhouseholdwasteorthrownintoreorwater.Usedbatteriesshould
be recycled or disposed of in separate waste collection centres.
INFORMATION TO USERS
pursuant to Legislative Decree No.49 of March 14, 2014
"Implementation of Directive 2012/19/EU on Waste Electrical and Electronic Equipment (WEEE)"
This wheeled bin symbol on the product indicates that at the end of its life must be collected separately from other
waste.The user must,therefore,take the remote control integrates the essential components that got to its life to
the appropriate differentiated collection centers for electronic and electro-technical waste,or return it to the dealer
when purchasing a new appliance of equivalent type, in terms of one to one,or one to zero for equipment having
longer side of less than 25cm. Appropriate separate collection for the decommissioned equipment for recycling,
processing and environmentally compatible disposal helps prevent negative impact on the environment and
human health and promotes recycling of the materials making up the product. Illegal dumping of the product by
the user entails the application of administrative sanctions stated in Legislative Decree n. Legislative Decree No.
49 of March 14, 2014.
TECHNICAL SPECIFICATIONS
Power Supply: ...............................................................100-240V 50/60Hz
internal lead acid rechargeable battery 12V 4Ah
Power consumption: .......................................................................................... Max 39W
Power audio: .......................................................................................... Max 90W
Operating temperature: .......................................................................................... 5° ~ 35°C
Frequency response: .................................................................................. 45Hz - 18KHz
S/N ratio: .................................................................................................. 45dB
Impedance: .......................................................................................................4Ω
Bluetooth peak transmission power:.................................................................................2,5mW
Bluetooth max power transmission:..................................................................................1,9mW
Band transmission Bluetooth:..............................................................................................2,4GHz
Dimensions: ..........................................................................250x260x637mm
Weight: .................................................................................................8,1 kg

17
XF 900 CD
Pour éviter d'éventuels dommages auditifs, limiter la durée d'écoute à volume élevé
NOTES D’EMPLOI
Une écoute prolongée à un volume élevé peut endommager votre audition.
Il s'agit d'un appareil électronique de précision; évitez de l'utiliser dans les cas suivants:
• Près de champs magnétiques.
• À proximité de sources de chaleur telles que radiateurs et poêles.
• Dans des endroits très humides tels que salles de bain, piscines, etc...
• Dans des endroits très poussiéreux.
• Dans des endroits soumis à de fortes vibrations.
• N'approchez pas votre oreille de l'enceinte pendant les phases de réglage et de réglage du volume,et en
particulier pour maintenir le volume au minimum pendant la phase d'allumage.
• Positionnezl'appareildemanièreàcequ'ilyaittoujourssufsammentd'espacesursescôtéspourla
libre circulation de l'air (au moins 5 cm).
• Sidesliquidespénètrentàl'intérieurdel'appareil,débranchezimmédiatementlachedelapriseetapportez
l'appareil au centre de service TREVI agréé le plus proche.
• Avantd'allumer/derechargerl'appareil,vérieztoujoursquelescâblesd'alimentationetdeconnexion
sont correctement installés.
• Lecâbled'alimentationdoitêtreconnectéàunepriseàproximitédel'appareiletdoitêtrefacilementaccessible.
• Si vous remarquez une chaleur excessive sur l'appareil ou sur l'adaptateur secteur, débranchez
immédiatementlachedelaprised'alimentationprincipale.
• Netirezpassurlecâbled'alimentation.
• Aucunesourcedeammenue,tellequedesbougiesallumées,nedoitêtreplacéesurl'appareil.
• L'appareil ne doit pas être exposé à des gouttes d'eau ou des éclaboussures et aucun objet rempli de liquide,
comme des vases, ne doit être placé sur l'appareil.
• Demandez aux enfants et aux personnes ayant peu de connaissances sur le produit de l'utiliser correctement.
• Conservez ce manuel pour référence future.
MANIEMENT ET ENTRETIEN
Pour le nettoyage, il est conseillé d’utiliser un chiffon doux légèrement humide. Évitez l’emploi de solvants ou de
substances abrasives.
IMPORTANT
Cet appareil est conçu pour un usage domestique (usage non professionnel).La bonne fabrication de cet appareil
garantit un fonctionnement parfait pour une longue période. Si toutefois quelques inconvénients devaient se
présenter, adressez-vous au Centre d’Assistance agréé TREVI le plus proche.
TREVI observe une politique de recherche et de développement continus. C’est pourquoi ses produits peuvent
présenter des caractéristiques différentes par rapport à celles qui sont décrites.
FRANCAIS
VOLTAGE
DANGEREUX
ATTENTION AVERTISSEMENT SUR LE LASER
Ce symbole apposé sur le dos
de l’appareil et reproduit dans
ce manuel indique la présence
d’éléments fonctionnant à haute
tensionàl’intérieurdecetappareil;
ne l’ouvrez pas, an d’éviter le
risque de décharges électriques.
Ce symbole apposé sur
le dos de l’appareil et
reproduit dans ce manuel
indique la présence d’in-
structions importantes
pour la sécurité d’emploi.
Lisez-les avec attention
avant d’utiliser l’appareil.
Cetappareilestpourvud’unsystèmedelectureà
rayonlaser.Bienque lelasersoitdefaiblepuissan-
ce et muni d’un dispositif de sécurité empêchant
son fonctionnement lorsque le volet est ou-
vert, suivez scrupuleusement les précautions
suivantes:n’approchez pas les yeux de la lentille
du laser lorsque l’appareil est ouvert; danger de
lesion de la retine.n’essayez pas de demonter
ou d’alterer l’unite laser; danger d’absorption
de radiations.

18
XF 900 CD
FRANCAIS
DESCRIPTION DE LA COMMANDE
COMMANDES DE L'UNITÉ
1. Entrée USB
2. BoutonBASS,amplicationdesbasses
3. Bouton 9, piste précédente
4. Bouton MIC VOL, réglage du volume du
microphone
5. Bouton ECHO
6. Bouton OPEN/CLOSE, porte CD
7. Bouton PROG/P-MODE
8. Indicateur LED PAIR, couplage Bluetooth
9. Indicateur LED CHARGE, état de charge de la
batterie
10.Afcher
11. Bouton LIGHT (effets de lumière LED disco)
12. Bouton FUNCTION, sélectionnez la fonction
13. Bouton /
14.BoutonEQ,égalisationsprédénies
15. Bouton :, piste suivant
16. Bouton 10/FOLD +/-
17. Réglage du volume
18. Bouton POWER ON/OFF, marche/arrêt
19. Bouton , Arrêtez
20. Prise USB pour charger des appareils externes
21. Entrée MIC 2
22. Entrée MIC 1
23. Entrée AUX-IN
24. Porte CD
TELECOMMANDE
25. Bouton FUNC, sélectionnez la fonction
26.BoutonEQ,égalisationsprédénies
27. Bouton ECHO
28. Bouton FOLD/10
29. Bouton MIC VOL, réglage du volume du
microphone
30. Bouton 9, sélection de piste précédente
31. Bouton PROG/P-MODE
32. Bouton , Arrêtez
33. Bouton LIGHT (effets de lumière LED disco)
34. Bouton :, sélectionner la piste suivante
35. Bouton , Lecture/Pause
36. Bouton de réglage du volume
37.BoutonBASS,amplicationdesbasses
38. Bouton , POWER ON/OFF, marche/arrêt
39. Bouton OPEN/CLOSE, porte CD
8 9 10
1
2
3
4
5
6
7
23 22 21
11
12
13
14
15
16
17
18
19
20
24
9
108
33
34
36
37
38
25
26
27
28
29
30
31
32
35
39

19
XF 900 CDFRANCAIS
TRANSPORT
Pourletransport,utilisezlesdeuxpoignéessituéessurlecôtédel'appareil.
ALIMENTATION/ CHARGE DE LA BATTERIE
Cet appareil fonctionne avec une batterie au plomb rechargeable 12V , 4Ah et alimentation secteur
100-240V 50/60Hz.
Lorsque la batterie est faible ou que l'appareil ne s'allume pas,insérez le cordon d'alimentation dans la prise arrière
etlachedansuneprisedecourantpourrecharger.
Etat de la LED indicatrice lors du chargement de la batterie:
- Led(9)ROUGE:l'appareil estcorrectementconnectéaucâbled'alimentationetlabatterieesten coursde
chargement.
- Led (9) VERT: le chargement est terminé, la batterie est chargée.
Remarque: Ne connectez pas l'appareil à une prise avec une tension autre que celle indiquée.
FONCTIONS
MARCHE/ARRÊT
- Appuyez sur le bouton (18) de l'appareil et maintenez-le enfoncé pendant 2 secondes, ou appuyez sur le
bouton (38) de la télécommande pour allumer et utiliser l'appareil avec sa batterie interne.
- Appuyez à nouveau sur le bouton (18) de l'appareil et maintenez-le enfoncé pendant 3 secondes,ou appuyez
sur le bouton (38) de la télécommande pour éteindre complètement l'appareil ou pour recharger la batterie.
SELECTION DE LA FONCTION
Pour changer le mode de fonctionnement, appuyez plusieurs fois sur le bouton FUNCTION (12) sur l'appareil ou
appuyez sur le boutton FUNC (25) sur la télécommande pour sélectionner: CD, USB (uniquement si une mémoire
estconnectéeauportUSB,unpetitmessage"USB"apparaîtàl'écran),BLUETOOTH,AUX-IN(l'écranafche
"AUX").
AJUSTEMENT DU VOLUME
1. Tournez le VOLUME (17) pour augmenter ou diminuer le volume général de lecture ou utilisez les boutons (36)
de la télécommande;
2. Utilisez les boutons MIC VOL (4)/(29) pour régler le volume du signal sur l'entrée MIC (21 est 22).
PRE-EGALISATION
Cette unité a un audio ensemble du système d'égalisation pré.Appuyez sur le bouton EQ (14) sur l'appareil,ou
le bouton (26) sur la télécommande pour sélectionner l'un des 5 égaliseurs audio disponibles, et qui convient le
mieux à la
lecture du son.
BASSE
Appuyez sur le bouton BASS (2) de l'appareil ou appuyez sur le boutton BASS (37) sur la télécommande pour
augmenter les graves.
La télécommande a une pile déjà installée. Pour activer la batterie, retirez la
languette transparente en bas de la télécommande. La télécommande est
maintenant prête à être utilisée.
Pour remplacer par une nouvelle batterie:
1. Retirez le couvercle du compartiment de la batterie comme indiqué sur
l'illustration de gauche;
2. Respectez la polarité et installez une pile au lithium 3V (CR2025);
3. Fermez le compartiment à piles.
ACTIVATION ET REMPLACEMENT DE LA BATTERIE DE LA TÉLÉCOMMANDE

20
XF 900 CD
FRANCAIS
ECHO EFFET
AppuyezsurleboutonECHO(5)/(27)pouractiverl'effetd'échosurlesentréesMIC,l'écranafcheraECHO-ON.
Appuyezànouveaupourdésactiverl'effetd'écho,l'écranafcheraECHO-OFF.
Remarque: l'écho ne fonctionne que sur les entrées MIC.
EFFET DE LUMIÈRE DISQUE
Pour gérer toutes les lumières de l'unité:
- Appuyez plusieurs fois sur le bouton LIGHT (11)/(33) les indications L -1, L -2, L -3, L -4 et L -5 apparaîtront
sur l'écran (10) en référence aux différents effets de lumière sur les enceintes; sélectionnez
L -OFF pour désactiver complètement l'éclairage des enceintes;
- Appuyez et maintenez enfoncé le bouton LIGHT (11)/(33) pendant quelques secondes pour désactiver
ou activer l'éclairage sur le clavier et sur le tiroir CD; les indications E -OFF (désactivé) et E -ON (activé)
apparaissentsurl'afchage(10).
FONCTIONNEMENT DU LECTEUR CD/ MP3
REPRODUCTION
1. Allumez l'appareil et sélectionnez la fonction CD;
2. Ouvrez le compartiment CD en appuyant sur le bouton OPEN/CLOSE (6) de l'appareil ou utilisez les boutons (39)
de la télécommande; et insérez le disque avec la face gravée vers le haut. Fermez soigneusement la porte en
appuyant à nouveau sur le bouton OPEN/CLOSE (6)/(39);
3. Après quelques secondes,l'écran (10) indique le nombre de pistes (chansons) présentes sur le disque et la
lecture démarre automatiquement;
4. Appuyez sur le bouton / (13)/(35) pour activer la pause; l'indication de l'heure commencera à clignoter;
5. Appuyez à nouveau sur le bouton / (13)/(35) pour libérer la pause et démarrer la lecture normale;
6. Appuyez sur le bouton (19)/(32)pourarrêterdénitivementlalecture;l'écran(10)montrerale
nombre total de pistes.
TRACE DE SAUT ET RECHERCHE RAPIDE
1. En appuyant sur le bouton :(15)/(34) tout en l'écoutant,vous passez à la piste suivante,tandis qu'avec la touche
9(3)/(30) vous passez à la piste précédente;
2. En maintenant enfoncée la touche :(15)/(34) ou 9(3)/(30) pendant l'écoute,vous recherchez rapidement un
passage musical particulier;
3. Relâchezleboutonpourreveniràlalecturenormale;
4. L'écran LCD (10) indique toujours la piste que vous écoutez.
RÉPÉTER
- En mode lecture:
• AppuyezsurPROG./P-MODE(7)/(31),l'icône" "apparaîtsurl'afchagepourreproduirelamêmepisteencontinu.
• Appuyez sur PROG./P-MODE (7)/(31), l'indication " DIR"iapparaîtsurl'afchagepourlireencontinutoutes
les pistes du dossier sélectionné (uniquement pour les CD MP3 contenant des dossiers).
• Appuyez sur PROG./P-MODE (7)/(31), l'indication " ALL"apparaîtsurl'afchagepourreproduireencontinu
toutes les pistes présentes.
• AppuyezsurPROG./P-MODE(7)/(31),l'indication"RAN"apparaîtsurl'afchagepourreproduirealéatoirement
toutes les pistes présentes.
• AppuyezsurPROG./P-MODE(7)/(31)surl'appareil,l'indication"INTRO"apparaîtsurl'afchagepourlireles
10 premières secondes.de chaque chanson.
PROGRAMMATION
Vous pouvez sélectionner l'ordre dans lequel les pistes sont lues.
1. Appuyez sur le bouton STOP (19)/(32) pour arrêter la lecture;
2. Appuyez sur la touche PROG./P-MODE (7)/(31), le message "P01"apparaîtsurl'afcheur;
3. Sélectionnez la piste que vous voulez lire en premier avec les boutons :(15)/(34) ou 9(3)/(30);
4. Appuyez sur le bouton PROG./P-MODE (7)/(31)surl'appareilpourconrmer;
5. Répétez les étapes 3 et 4 pour stocker et lire les chansons souhaitées; pour les CD audio, un maximum de 20
Table of contents
Languages:
Other Trevi Speakers System manuals

Trevi
Trevi XF 4800 RAVE User manual

Trevi
Trevi SB 8300TV User manual

Trevi
Trevi XB 70 BT User manual

Trevi
Trevi AVX 598USB User manual

Trevi
Trevi SB 5010TV User manual

Trevi
Trevi AVX 582USB User manual

Trevi
Trevi SB 8315 TV User manual

Trevi
Trevi AVX 582USB User manual

Trevi
Trevi SH 8400 BT User manual

Trevi
Trevi SB 8316 TV User manual