Trevi DS 1976 V User manual

DS 1976 V
Guida d’uso/ User guide
HI-FI SYSTEM CON RADIO FM, LETTORE MP3 DA USB, AUX-IN CON
CONNESSIONE BLUETOOTH®
HI-FI SYSTEM WITH RADIO FM, USB MP3 PLAYER, AUX IN AND
BLUETOOTH® CONNECTION
HI-FI SYSTEM
AVEC RADIO FM, USB LECTEUR MP3, AUX IN ET
CONNEXION BLUETOOTH®
HI-FI SYSTEM MIT RADIO FM, USB MP3-PLAYER, AUX IN UND
BLUETOOTH®-ANSCHLUSS
HI-FI SYSTEM CON RADIO FM, USB REPRODUCTOR DE MP3, AUX IN
Y CONEXIÓN BLUETOOTH®
AUX IN
* Per informazioni integrative e aggiornamenti di questo prodotto vedi: www.trevi.it
* For additional information and updates of this product see: www.trevi.it
USB
FM
RADIO
BLUETOOTH
CONNECTION
ita
eng
fra
deu
esp

DS 1976 V
ITALIANO
NOTE D’USO
Non ascoltare a volume alto per diverso tempo, potrebbe danneggiare il vostro udito.
Evitare di posizionare il riproduttore:
-Vicino a campi magnetici.
-Vicino a fonti di calore come caloriferi e stufe.
-In luoghi molto umidi come stanze da bagno, piscine, ecc...
-In luoghi molto polverosi.
-In luoghi soggetti a forti vibrazioni.
-Posizionare l’apparecchio in modo che ai suoi lati ci sia sempre abbastanza
spazio per la libera circolazione di aria (almeno 5 cm).
-Se dei liquidi penetrano all’interno dell’apparecchio scollegare immediatamente la
spina dalla presa e portare l’apparecchio al più vicino centro
assistenza autorizato TREVI.
CURA E MANUTENZIONE
Per la pulizia si consiglia l’uso di un panno morbido, leggermente inumidito. Evitate solventi o
sostanze abrasive.
IMPORTANTE
La buona costruzione di questo apparecchio ne garantisce per lungo tempo il perfetto funziona-
mento. Se tuttavia dovesse presentarsi qualche inconveniente, sarà opportuno consultare il più
vicino Centro Assistenza autorizzato.
TREVI
Persegue una politica di continua ricerca e sviluppo. Pertanto i prodotti possono presentare
caratteristiche diverse da quelle descritte.
DESCRIZIONE COLLEGAMENTI E COMANDI
1 2 3 4 5
7 8 9 10 11 126
1. Ingresso AUX-IN
2. Ingresso USB
3. Tasto STOP
4. Tasto SLEEP, autospegnimento
5. Tasto M+/10+, memorizzazione/
avanzamento +10
6. Display LCD
7. Tasto
9
, brano/stazione precedente
8. Tasto
/ , Play-Pausa/accoppiamento
Bluetooth
9.Tasto
:
, brano/stazione successiva
10. Tasto SET/MODE, impostazioni/
memorizzazioni/ripetizione
11. Tasto FUNCTION/ALARM, funzioni/
impostazione allarme
12. Manopola ON/OFF, VOL, BASS/TREBLE.
Stand-by,regolazionevolume,tonibassiealti
Pannello di controllo:

DS 1976 V
DESCRIZIONE COLLEGAMENTI E COMANDI
13. Antenna telescopica
14. Bass reflex
15. Presa alimentazione DC IN, 9V
16. Interruttore principale
17. Tasto STANDBY
18. Tasto ALARM1, attivazione allarme 1
19. Tasto CLOCK
20. Tasto ALARM2, attivazione allarme 2
21. Tasto TREB+, aumento toni alti
22.
Tasto M+/10+,
memorizzazione/
avanzamento +10
23. Tasto TREB-, diminuzione toni alti
24. Tasto 9
, brano/stazione precedente
25. Tasto
, Play/Pausa
26. Tasto SNOOZE
27. Tasto VOL-, diminuzione volume
28. Tasto STOP
29. Tasto :
, brano/stazione successiva
30. Tasto VOL+, aumento volume
31. Tasto BASS-, diminuzione toni bassi
32. Tasto BASS+, aumento toni bassi
33. Tasto MEM, memorizzazione
34.TastoMODE,ripetizione brano/tutto,Casuale
35. Tasto SLEEP, autospegnimento
36. Tasto MUTE, disattivazione audio
37. Tasto FUNC, selezione funzioni
ITALIANO
ATTIVAZIONE E SOSTITUZIONE DELLA BATTERIA DEL TELECOMANDO
Il telecomando monta una batteria tipo CR2025
Per attivare la batteria del telecomando (inclusa) togliere la
linguetta plastica di protezione.
Per la sostituzione della batteria:
1. Spingere il fermo plastico dell’alloggiamento porta batteria
verso destra
2. Estrarre l’alloggiamento porta batteria
1615
13
14
36
35
34
32
31
29
28
37
17
18
20
21
23
24
26
25
30
22
33
19
27
Pannello posteriore: Telecomando:

DS 1976 V
ALIMENTAZIONE
L’alimentatore in dotazione funziona con tensione di rete 100-240V~ 60/50Hz.
Inserire lo spinotto dell’alimentatore nella presa per alimentazione(15) e la spina in una presa di
corrente.
Nota: utilizzare solo l’alimentatore in dotazione, apparati diversi potrebbero avere polarità e/o
tensioni diverse.
Se non diversamente specificato, le descrizioni dei comandi valgono per il telecomando.
ACCENSIONE/SPEGNIMENTO
1. Portare l’interruttore principale(16) in posizione “I” per attivare l’apparecchio.
2.Portarel’interruttoreprincipale(16)inposizione“0”perdisattivarecompletamentel’apparecchio.
FUNZIONE STAND-BY
Una volta portato l’interruttore principale in posizione “I”, l’apparecchio si porterà in modalità
Stand-by (display illuminato con indicazione orario).
1. Premere il tasto (17) per accendere l’apparecchio.
2. Pre
mere
nuovamente il tasto (17) per riportare l’apparecchio in modalità standby.
Note:
- Per accendere/spegnere l’apparecchio utilizzando la manopola presente sull’unità stessa
(manopola
ON/OFF, VOL, BASS/TREBLE
(12)) è necessario premerla per circa due secondi.
- La funzione Stand-by è attivabile solamente se l’interruttore principale (16) è in posizione “I”.
REGOLAZIONE VOLUME
Ruotare la manopola del volume VOL(12) sull’unità per aumentare o diminuire il volume generale
di riproduzione o premere i tasti VOL+(30) e VOL-(27) sul telecomando per aumentare o diminuire
il volume.
FUNZIONE MUTE
È possibile attivare la funzione di esclusione audio dell’apparecchio tramite il tasto MUTE(36)
sul telecomando (sul display il livello del volume lampeggerà); per riattivare l’ascolto premere
nuovamente il tasto MUTE.
SELEZIONE SORGENTE
Premere più volte il tasto FUNC(37) sul telecomando per accedere in sequenza alle modalità
BLUETOOTH/RADIO FM/USB/AUX-IN.
FUNZIONAMENTO BLUETOOTH
1. Pemere in sequenza il tasto FUNC(37) fino alla visualizzazione sul display della voce “BT”;
l’apparecchio entrerà in ricerca per il collegamento con altri dispositivi BT (la scritta “BT”sul
display lampeggerà).
2. Abilitare il collegamento
Bluetooth® sul dispositivo esterno (Telefonino, Tablet, ecc...)
facendo
riferimento al suo Manuale Istruzioni.
3. Dal dispositivo esterno effettuare una ricerca dei dispositivi e selezionare “DS 1976 V”; se
richiesto
digitare il codice
“0000”.
4. Quando l’accoppiamento con il dispositivo esterno sarà avvenuto, la scritta “BT” sul
display
rimarrà accesa fissa.
ITALIANO

DS 1976 V
E’ ora possibile avviare la riproduzione musicale dal proprio dispositivo.
Tramite i tasti presenti sul telecomando 9(24), :(29) o sull’unità principale 9(7), :(9) è
possibile gestire la riproduzione dei brani contenuti nel dispositivo (telefono, tablet).
- Premere il tasto(25) per riprodurre o sospendere la riproduzione del brano.
- Premere il tasto 9(24) per passare al brano precedente.
- Premere il tasto :(29) per passare al brano successivo.
Note:
- Questa funzione è attiva solamente su dispositivi Bluetooth® che supportano il profilo AVRCP.
- A causa della continua evoluzione della tecnologia Bluetooth®, alcuni dispositivi potrebbero
non essere compatibili o pienamente compatibili con l’apparecchio TREVI DS 1976 V.
Per collegare un nuovo dispositivo è necessario portare l’apparecchio in modalità di ricerca:
- Premere e tenere premuto per qualche secondo il tasto (25) sul telecomando, la scritta
“BT” sul display tornerà a lampeggiare.
- Ripetere i passi da 2 a 4 sopra descritti.
Nota: A dispositivo accoppiato, può accadere che il collegamento si interrompa (ad esempio
quandocisiallontanitroppodall’unità);normalmenteilcollegamento siripristinaautomaticamente,
in caso contrario è necessario effettuare di nuovo la procedura di accoppiamento.
FUNZIONAMENTO RADIO
Ricerca automatica
1.Premere il tasto FUNC(37) fino alla visualizzazione sul display della frequenza radio FM.
2.Premere per qualche secondo il tasto MEM(33) sul telecomando, oppure premere per qualche
secondo il tasto SET/MODE(10) sull’unità, per attivare la funzione “AUTOSCAN”, ovvero la
memorizzazione automatica delle emittenti (la radio inizia una ricerca automatica delle stazioni
radio stereo e le salva automaticamente in memoria). Vengono salvate le prime 20 emittenti
radio.
3.Premere più volte il tasto M+/10+(22) sul telecomando per richiamare e ascoltare le varie
emittenti radio salvate nella memoria.
Ricerca manuale
1.Tenerepremutoperqualchesecondoitasti
9(24),:(29)
pereffettuareunascansionemanuale
delle frequenze radio; la ricerca si fermerà nel momento in cui verrà ricevuta una emittente
radio stereo.
2.Premere una volta i tasti
9(24), :(29)
per uno spostamento passo-passo ed effettuare una
sintonizzazione fine.
3.Per salvare la stazione radio ricevuta premere il tasto MEM(33), sul display lampeggierà la
posizione della memoria; tramite i tasti
9(24), :(29)
selezionare il numero di memoria
ITALIANO
DS 1976 V DS 1976 V
connected

DS 1976 V
desiderato e premere di nuovo MEM(33) per confermare. La stazione radio è ora salvata nella
posizione di memoria scelta. E’ possibile salvare un massimo di 20 emittenti radio.
Nota: per ottenere la migliore ricezione in FM estendete l’antenna. Se la ricezione non è buona
provate a regolare diversamente la lunghezza dell’antenna, comunque la qualità della ricezione
in FM dipende molto dal luogo dove è posto l’apparecchio.
La vicinanza di apparecchi TV, lampade al neon o altri elettrodomestici può provocare disturbi
nella ricezione di programmi radio, in questo caso allontanate il dispositivo.
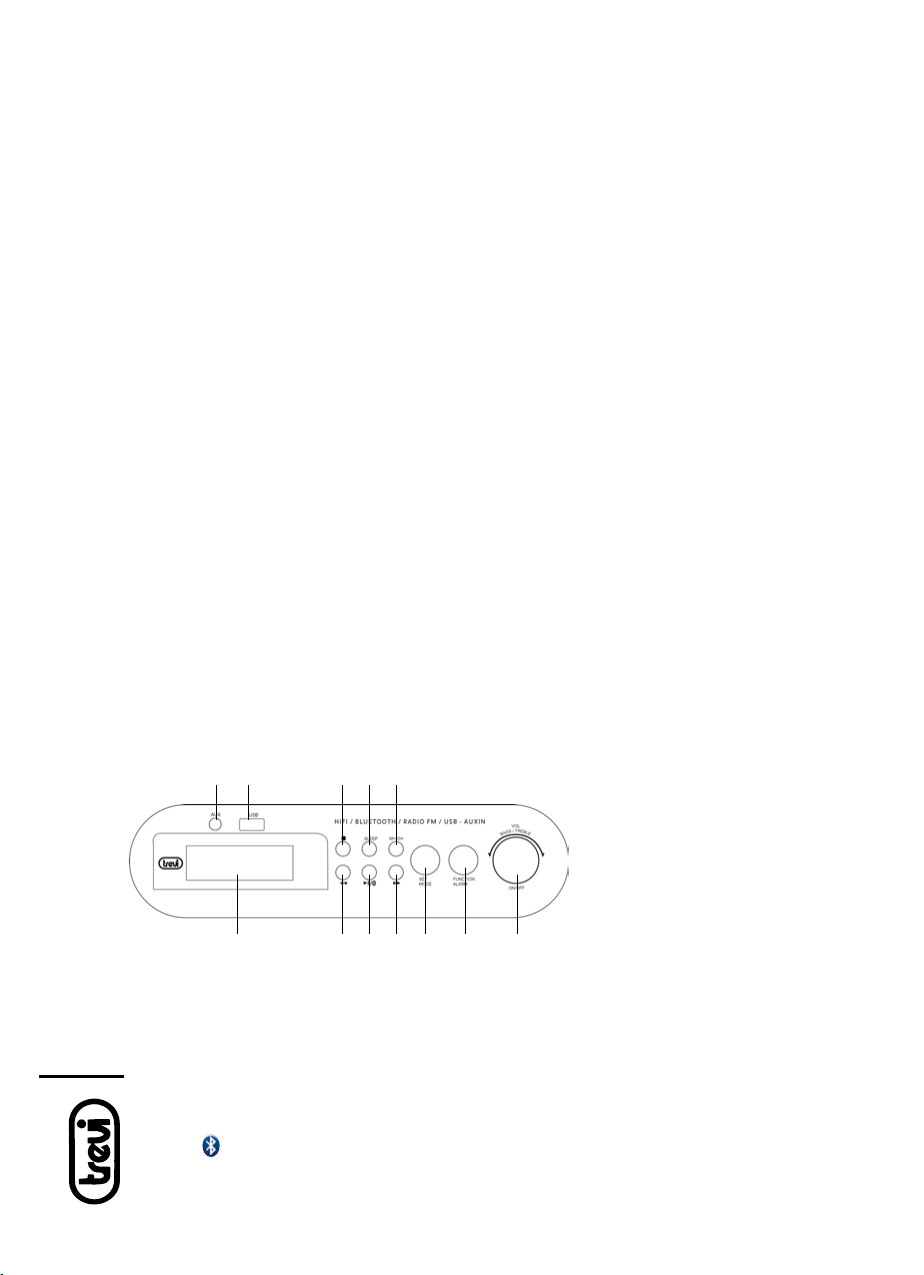
FUNZIONAMENTO USB
1. Inserire la memoria USB nell’ingresso USB(2).
2. Premere in sequenza il tasto FUNC(37) fino a visualizzare la voce USB; attendere qualche
secondo che il lettore carichi tutti i file MP3.
3. La riproduzione partirà in automatico.
4. Per inserire la pausa premere una volta il tasto
(25).
5. Per disinserire la pausa premere una seconda volta il tasto
(25).
6. Per passare alla riproduzione del brano precedente/successivo premere i tasti
9(24)
o
:(29)
.
7. Per avanzare velocemente in ordine
di decine sul numero del brano visualizzato, premere il
tastoM+/10+(22)sultelecomando.Adognipressioneilnumeroaumenteràdidiecinumeri
alla volta.
RIPRODUZIONE ININTERROTTA DI UN SINGOLO BRANO/TUTTI I BRANI
In modalità di riproduzione (USB) premere piu’ volte il tasto MODE(34) sul telecomando per
attivare in sequenza:
- Riproduzione continua di un singolo brano (sul display viene visualizzata per alcuni secondi
la scritta “REP 1”).
- Riproduzione continua di tutti i brani presenti in memoria (sul display viene visualizzata la
scritta “REP ALL”).
Per annullare la funzione di riproduzione continua premere più volte il tasto MODE(34) fino a far
scomparire le scritte sul display.
- Riproduzione casuale dei brani (sul display viene visualizzata la scritta “RAND”).
Per annullare la funzione premere più volte il tasto MODE(34) fino a far scomparire le scritte sul
display.
FUNZIONAMENTO AUX-IN
1. Collegare tramite cavo (non in dotazione) l’uscita audio di smartphones, tablet, multimedia
players con l’ingresso AUX IN(1) del riproduttore.
2. Premere in sequenza il tasto FUNC(37) fino a visualizzare sul display la voce “AU”.
3. Attivare la riproduzione della sorgente esterna (vedi manuale dell’apparecchio).
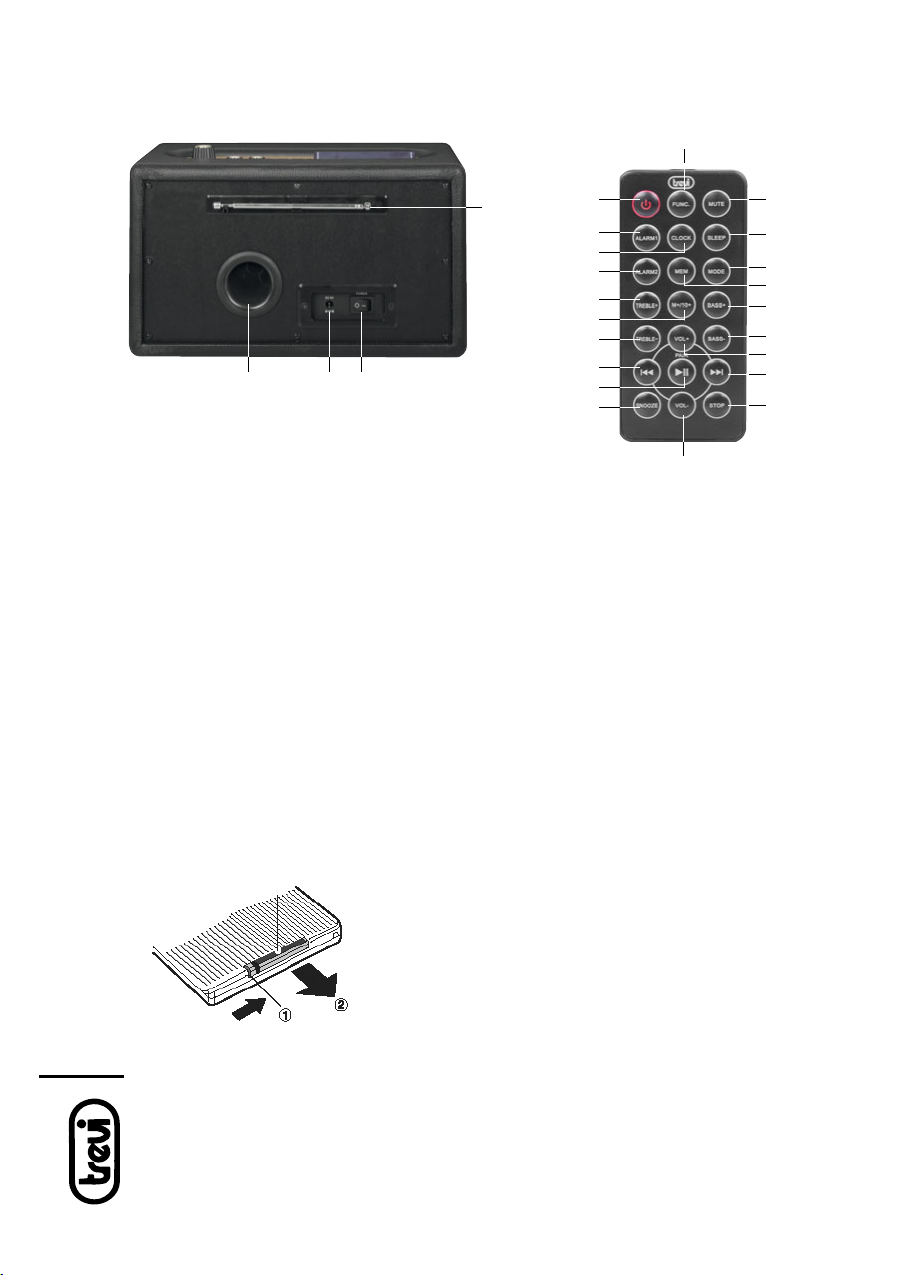
IMPOSTAZIONE OROLOGIO
Per impostare l’ora seguire i passi successivi:
1. Portare l’apparecchio in modalità Stand-by.
2. Tenere premuto per qualche secondo il tasto SET/MODE(10) sull’unità, l’indicazione delle ore
comincerà a lampeggiare.
3. Utilizzare i tasti
9(7)
o
:(9)
sull’unità
per impostare l’ora corretta
.
4. Premere il tasto SET/MODE(10) per confermare e passare alla regolazione dei minuti.
5. Utilizzare nuovamente i tasti
9(7)
o
:(9) per impostare i minuti corretti
.
6. Premere nuovamente il tasto SET/MODE(10) sull’unità per confermare.
ITALIANO

DS 1976 V
IMPOSTAZIONE ALLARME
L’apparecchioèdotatodi2allarmi.Perimpostarel’allarme1,2oentrambi,seguireipassisuccessivi:
1. Portare l’apparecchio in modalità Stand-by.
2. Premere il tasto ALARM1(18) sul telecomando. La scritta “Alarm1” lampeggerà e comparirà
la scritta “OFF”.
3. Tenere premuto per qualche secondo il tasto FUNCTION/ALARM (11) sull’unità, la scritta “OFF”
comincerà a lampeggiare.
4. Premere il tasto
9(7)
o
:(9) sull’unità per attivare la funzione allarme spostando la scritta su
“ON”.
5. Premere il tasto FUNCTION/ALARM (11) per confermare.
6. Premere il tasto
9(7)
o
:(9) sull’unità per selezionare la sorgente (Radio, USB, Buzzer) da
utilizzare come sveglia.
Premere il tasto FUNCTION/ALARM (11) per confermare.
7. Utilizzare i tasti
9(7)
o
:(9) per impostare l’ora
. Premere il tasto FUNCTION/ALARM (11)
per confermare.
8. Utilizzare i tasti
9(7)
o
:(9) per impostare i minuti
. Premere il tasto FUNCTION/ALARM
(11) per confermare.
La scritta “Alarm1” rimarrà fissa sul display ad indicare la sua attivazione
Nota: se viene selezionata Radio, verrà riprodotta l’ultima stazione ascoltata, mentre se viene
selezionata USB, viene riprodotto il primo brano presente nella memoria (non è possibile im-
postare un brano).
Per impostare l’allarme 2, premere il tasto ALARM2(20) sul telecomando e
ripetere i passi da 3
a 8 sopra descritti.
Per disattivare completamente la funzione allarme
1. Premere e tenere premuto per qualche secondo il tasto ALARM1(18) sul telecomando. La
scritta “Alarm1” e la scritta “ON” lampeggeranno.
2. Premere il tasto
9(7)
o
:(9) sull’unità per selezionare la scritta “OFF”.
3. Premere il tasto ALARM1(18) sul telecomando per confermare.
SPEGNIMENTO DELLA SVEGLIA/SUONERIA
Per disinserire lasveglia (suoneria, USB o Radio)premere il tastoFUNCTION/ALARM(11) sull’unità
per arrestarlo completamente.
Se desiderate spegnere momentaneamente la sveglia (funzione Snooze), premere la manopola
ON/OFF, VOL, BASS/TREBLE(12) sull’unità; sul display la scritta “Alarm 1” e la scritta “Snooze”
cominceranno a lampeggiare, l’interruzione dura 9 minuti, trascorsi i quali la sveglia si riattiverà.
FUNZIONE SLEEP
Il pulsante SLEEP(35) sul telecomando vi permette di programmare lo spegnimento automatico
dell’apparecchio fino a 90 minuti dopo l’attivazione. Questa funzione va attivata ad apparecchio
acceso.
Regolare il tempo di spegnimento premendo il tasto SLEEP(35) più volte; i minuti permessi sono
90, 80, 70, 60, 50, 40, 30, 20, 10, 00 (funzione SLEEP disattivata).
ITALIANO

DS 1976 V
CARATTERISTICHE TECNICHE
SEZIONE RADIO
Banda di frequenza: ................................................................... FM 87.5 - 108.0 MHz
AMPLIFICAZIONE
Potenza Totale: ........................................................25W (7,5W x2+10W Subwoofer)
INGRESSI
Profili Bluetooth®: .................................................................................A2DP, AVRCP
USB: ....................................................................................................... Versione 2.0
AUX IN: ..........................................................................................Presa Jack 3.5mm
GENERALI
Alimentazione: ..............DC 9V- 2A con alimentatore esterno 100-240V~ in dotazione
Consumo: ...........................................................................................................18W
Dimensioni: .....................................................................................160X300x170mm
Peso: .......................................................................................................... 2,650 Kg.
Avvertenze per il corretto smaltimento del prodotto.
Il simbolo riportato sull’apparecchiatura indica che il rifiuto deve essere oggetto di “raccolta
separata” pertanto il prodotto non deve essere smaltito insieme ai rifiuti urbani.
L’utente dovrà consegnare il prodotto presso gli appositi “centri di raccolta differenziata” predi-
sposti dalle amministrazioni comunali, oppure consegnarlo al rivenditore contro acquisto di un
nuovo prodotto.
Laraccoltadifferenziatadelrifiutoelesuccessiveoperazioniditrattamento,recuperoesmaltimento
favoriscono la produzione di apparecchiature con materiali riciclati e limitano gli effetti negativi
sull’ambiente e sulla salute causati da una gestione impropria del rifiuto.
Lo smaltimento abusivo del prodotto comporta l’applicazione di sanzioni amministrative.
ITALIANO

DS 1976 V
ENGLISH
1 2 3 4 5
7 8 9 10 11 126
1. AUX-IN jack
2. USB port
3. STOP
key
4. SLEEP
key
5. M+/10+ key, storage/progress +10
6. LCD Display
7.
9
key, track/previous station
8.
/ key, Play-Pause/pairing Bluetooth
9.
:
key, track/next station
10. SET/MODE key, settings/storage/repeat
11. FUNCTION/ALARM key, functions/alarm
setting
12. ON/OFF, VOL, BASS/TREBLE knob.
Standby, volume, bass and treble setting
Control panel:
DESCRIPTION OF CONTROLS
NOTES FOR USE
Do not listen at high volume for a long time, can damage your hearing.
Avoid placing the player:
-Near magnetic fields.
-Near sources of heat such as heaters and stoves.
-In places with high humidity such as bathrooms, swimming pools, etc...
-In dusty places.
-In areas subject to strong vibration.
-Place the unit so that its sides there is always enough space for the free movement of air (at
least 5 cm).
-If liquids penetrate inside the device immediately disconnect the plug from the socket and take
it to the nearest an authorized TREVI assistance.
CARE AND MAINTENANCE
For cleaning we recommend the use of a soft, slightly damp cloth. Avoid solvents or abrasives.
IMPORTANT
Thegoodconstruction of thismachineguarantees the perfectfunctioning fora long time. However,
should any problem arise, you should consult the nearest authorized service center.
TREVI
It pursues a policy of continuous research and development. Therefore the products may show
different characteristics from those described.

DS 1976 V
DESCRIPTION OF CONTROLS
LITHIUM BATTERY INSTALLATION OF REMOTE CONTROL
The remote control includes one CR2025 lithium battery.
To replace the battery:
1. Gently push the clasp to the right direction accordingly to the
instruction.
2. Pull out the battery compart.
3. Take the drained battery out and install a new lithium battery
in the compartment with the positive polarity upwarded.
4. Push compartment back to its position with a “click” sound
indicating install finished.
ENGLISH
13. Telescopic antenna
14. Bass reflex
15. Socket DC IN, 9V
16. Main switch
17. STANDBY key
18. ALARM1 key
19. CLOCK key
20. ALARM2 key
21. TREB+ key, increase treble
22. M+/10+ key
torage/progress +10
23. TREB- key, decrease treble
24. 9 key
, track/previous station
25. key
, Play/Pause
26. SNOOZE key
27. VOL- key
28. STOP key
29. : key
, track / next station
30. VOL+ key
31. BASS- key, decrease bass
32. BASS+ key, increase bass
33. MEM key
34. MODE key, Rep1/ALL, Rand
35. SLEEP key
36. MUTE key
37. FUNC key, selection functions
1615
13
14
36
35
34
32
31
29
28
37
17
18
20
21
23
24
26
25
30
22
33
19
27
Back panel: Remote control:

DS 1976 V
ENGLISH
POWER
The supplied power adapter works with voltage 100-240V ~ 60 / 50Hz.
Insert the plug into the socket for DC power (15) and the plug into a power outlet.
Note: Use only the supplied power adapter, several devices may have polarities and/or different
voltages.
Unless otherwise specified, the command descriptions are for the remote control.
ON/OFF
1. Set the main switch (16) to “I” to turn on the device.
2. Set the main switch (16) to “0” to turn off the device completely.
STAND-BY FUNCTION
Once the main switch to “I” position, the unit will go into standby mode (display lit with indication
time).
1. Press the button (17) to turn the unit.
2. Pre
mere
nuovamente il tasto (17) to restore in standby mode.
Notes:
- To turn on/off the unit using the knob on the unit (ON/OFF knob, VOL, BASS/TREBLE (12))
press it for about two seconds.
- The stand-by function is activated only if the main switch (16) is in “I” position.
VOLUME ADJUSTMENT
Turn the volume knob VOL(12) on the unit to increase or decrease the overall volume of playback
or press the VOL+(30) or VOL-(27) on the remote control to increase or decrease the volume.
MUTE FUNCTION
You can also press the MUTE(36) button on the remote control to turn off the sound temporarily
(the volume level will flash on display); press the MUTE button again to cancel the mute function
and restore the sound.
SOURCE BUTTON
PresstheFUNC(37) button repeatedlyto switch among BLUETOOTH/RADIOFM/USB/AUX-IN modes.
BLUETOOTH OPERATION
Prior to use Bluetooth function, your system should be paired firstly with your Bluetooth device
(“Pairing” means establish connection between Bluetooth device such as mobile phone, Tablet,
PC, etc...)
1. First press FUNC(37) button until you see the display of “BT”; the unit will go into research for
connection with other devices BT (marked “BT” on the display will flash).
2. Enable the Bluetooth® connection on the external device (phone, tablet, etc...) with reference
to its Operating Manual.
3. From the external device search of devices and select “DS 1976 V”; if required, type the code
“0000”.
4. When the connection with the external device will be the case, the “BT” on the display will
remain on steadily.

DS 1976 V
ENGLISH
Now you can start playing music from your device.
With the keys on the remote control 9(24), :(29) or the main unit 9(7), :(9) you can control
the playback of tracks on the device (phone, tablet).
- Press(25) button to play or pause the song.
- Press 9(24) button to previous track.
- Press key :(29) button to next track.
Notes:
- This function only works on Bluetooth®devices that support AVRCP.
- Due to the continuous evolution of Bluetooth®technology, some devices may not be compatible
or fully compatible with the device TREVI DS 1976 V.
To connect a new device you need to switch the power to search mode:
- Press and hold the button(25) on the remote control for a few seconds, the “BT” on the
display will blink.
- Repeat steps 2 to 4 above.
Note: A paired device, it may happen that the connection is interrupted (for example, when we
wander too far from the unit); Normally the connection is restored automatically, otherwise you
need to back pairing.
RADIO FUNCTION
Auto Search
1. Press the FUNC(37) button repeatedly until the display will show FM radio frequency.
2. Press MEM key(33) for a few seconds on the remote control, or press for a few seconds the
SET/MODE(10) button on the unit to activate the “AUTOSCAN” or the automatic tuning (the
radio starts an automatic station search stereo radio and automatically saves in memory).
They are saved in the top 20 issuers radio.
3. Press the M+/10+(22) key on remote control to call and listen to the various radio stations
saved in memory.
Manual Search
1. Press and hold buttons
9(24), :(29)
for a few seconds to perform a manual scan of radio
frequencies; The search will stop when a radio station is received stereo.
2. Press once the keys
9(24), :(29)
for a shift step by step and make a fine tuning.
3. To save the received station, press MEM(33) button, the display will flash the memory location;
using the keys
9(24), :(29)
select the desired memory number and press again MEM(33)
to confirm. The radio station is now saved in memory location choice. You can save up to 20
radio stations.
DS 1976 V DS 1976 V
connected

DS 1976 V
ENGLISH
Note: For the best FM reception extend the antenna. If the reception is not good try to adjust the
antenna length otherwise, however the quality of the FM reception depends on the place where
you place the unit.
The proximity of TV sets, fluorescent lamps or other appliances may cause interference in
the reception of radio programs, in this case removed the device.
USB FUNCTION
1. Insert the USB memory to the USB socket(2).
2. First press the button FUNC(37) until you see the entry USB; wait a few seconds for the player
loads all MP3 files.
3. Playback will start automatically.
4. To enter a pause, press the button
(25) once.
5. To release the pause, press the button
(25) a second time.
6. To switch to playback of the previous/next track press the
9(24)
o
:(29)
.
7. To fast forward in order of tens on the track number appears, press the M+/10+(5) on the
unit. Each press will increase the number of ten numbers at a time.
UNINTERRUPTED REPRODUCTION OF A SINGLE TRACK / ALL SONGS
In playback mode (USB), press more ‘times MODE(34) button on the remote control to activate
in sequence:
- Listening to a single track (the display shows the word “REP 1”).
- Continuous playback of all songs in memory (the display shows the word “REP ALL”).
To cancel continuous playback repeatedly press the button MODE(34) until no lettering on the
display.
- Shuffle Playback (the display shows the word “RAND”).
To cancel the repeatedly function press the button MODE(34) until no lettering on the display.
AUX-IN FUNCTION
1. Connect via cable (not supplied) audio output of smartphones, tablets, multimedia players
to AUX IN(1) jack of the unit.
2. Press FUNC (37) button until you see the “AU” on display.
3. Start playing the external source (see its manual).
CLOCK SETTING
To set the time, please, to follow next steps:
1. Put the unit in standby mode.
2. Press and hold for a few seconds SET/MODE(10) button on the unit, indicating the hours will
start flashing.
3. Use 9(7)
o
:(9) on the unit to set the time correctly.
4. Press SET/MODE(10) to confirm and go to the minute setting.
5. Use keys again 9(7)
o
:(9) to set the correct minutes.
6. Press the SET/MODE(10) on the unit to confirm.

DS 1976 V
ENGLISH
ALARM SETTING
The device is equipped with 2 alarms. To set the alarm 1, 2 or both, follow the steps below:
1. Put the unit in Stand-by mode.
2. Press the button ALARM1(18) on the remote control. The word “Alarm1” blink and appear
“OFF”.
3. Press and hold for a few seconds the FUNCTION/ALARM button (11) on the unit, the word “OFF”
blinks.
4. Press the 9(7) or :(9) on the unit to activate the alarm function by shifting the writing of “ON”.
5. Press the FUNCTION/ALARM button (11) to confirm.
6. Press the 9(7) or :(9) on the unit to select the source (Radio, USB, Buzzer) from use as an
alarm clock. Press the FUNCTION/ALARM button (11) to confirm.
7. Use the 9(7) or :(9) to set the hour. Press the FUNCTION/ALARM button (11) to confirm.
8. Use the buttons 9(7) or :(9) to set the minutes. Press the FUNCTION/ALARM (11) to confirm.
The word “Alarm 1” remains fixed on the display to indicate its activation
To set the alarm 2, press and hold the button for a few seconds ALARM2(20) on the remote
control and repeat steps 3 through 8 above.
To disable the alarm
1. Press and hold for a few seconds the ALARM1 button (18) on the remote control. There
written “Alarm1” and the word “ON” will flash.
2. Press the 9(7)
o
:(9) n the unit to select “OFF”.
3. Press ALARM1(18) on the remote control to confirm.
OFF THE ALARM
To disarm the alarm (Buzzer, USB or Radio), press FUNCTION/ALARM(11) on the unit to stop
completely.
If you want to silence the alarm, press the ON/OFF, VOL, BASS/TREBLE(12) knob on the unit; the
interruption lasts 9 minutes, after which the alarm will turn on again.
SLEEP FUNCTION
The SLEEP(35) button on the remote control allows you to program the automatic shutdown of
the unit up to 90 minutes after activation. This function is activated when the unit is turned on.
Adjust the sleep time by pressing SLEEP(35) several times; the minutes are allowed:
90, 80, 70, 60, 50, 40, 30, 20, 10, 00 (SLEEP OFF).

DS 1976 V
SPECIFICATIONS
RADIO SECTION
Tuning Range:............................................................................ FM 87.5 - 108.0 MHz
AMPLIFICATION
Audio Output Power:................................................25W (7,5W x2+10W Subwoofer)
IMPUT
Bluetooth® Profile:.................................................................................A2DP, AVRCP
USB: ..................................................................................................................... 2.0
AUX IN:....................................................................................................Jack 3.5mm
GENERAL
Power source: ............................DC 9V - 2A with AC/DC adaptor 100-240V~included
Power consumption.............................................................................................18W
Dimensions: ....................................................................................160X300x170mm
Weight:........................................................................................................2,650 Kg.
Precautions for correct disposal of the product.
The symbol shown on the equipment indicates that waste must be disposed of in “separate
collection” and so the product must not be disposed of together with urban waste.
The user must take the product to special “separate waste collection centres” provided by local
government, or deliver it to the retailer against the purchase of a new product.
Separatecollectionofwasteandsubsequenttreatment,recyclinganddisposaloperationspromotes
the production of equipment with recycled materials and limits negative effects on the environment
and on health caused by improper handling of waste.
Illegal disposal of the product leads to the enforcement of administrative penalties.
ENGLISH

DS 1976 V
NOTES D’EMPLOI
• Cet appareil est un instrument électronique de haute précision ; évitez donc de l’utiliser dans
les cas suivants :
• Près de sources de chaleur comme des radiateurs et des poêles.
• Dans des endroits très humides comme les salles de bains, les piscines, etc.
• Dans des endroits très poussiéreux.
• Dans des endroits exposés à de fortes vibrations.
• Placez l’appareil de sorte qùil y ait toujours assez d’espace sur ses côtés pour laisser circuler
librement l’air (au moins 5 cm).
• Sides liquides pénètrent à l’intérieur de l’appareil, débranchez-le immédiatementet amenez-le
au centre d’assistance agréé TREVI le plus près de vous.
• Contrôlez toujours, avant d’allumer l’appareil, que les câbles d’alimentation et les câbles de
connexion sont correctement installés.
MANIEMENT ET ENTRETIEN
Pour le nettoyage, il est conseillé d’utiliser un chiffon doux, légèrement humide. Évitez l’emploi
de solvants ou de substances abrasives.
IMPORTANT
La bonne fabrication de cet appareil garantit un fonctionnement parfait pour une longue période.
Si toutefois quelques inconvénients devaient se présenter, adressez-vous au Centre d’Assistance
agréé le plus proche.
TREVI
Poursuit une politique de recherche et de développement continu. Par conséquent, les produits peuvent
présenter des caractéristiques différentes de celles décrites.
FRANÇAIS
DESCRIPTION BRANCHEMENTS ET COMMANDES
1 2 3 4 5
7 8 9 10 11 126
1.
Entree
AUX-IN
2.
Entree
USB
3.
Bouton
STOP
4.
Bouton
SLEEP
5.
Bouton
M+/10+, stockage/progrès +10
6. Écran LCD
7.
Bouton
9
, station/piste précédente
8.
Bouton
/ ,Lecture-Pause/appariement
Bluetooth
9.
Bouton
:
, station/piste prochaine
10.
Bouton
SET/MODE, paramètres/stockage/
répétition
11.
Bouton
FUNCTION/ALARM, fonctions/
réglage de l’alarme
12.
Bouton
ON/OFF, VOL, BASS/TREBLE.
Veille, le volume, basses et les aigus
Panneau de contrôle:

DS 1976 V
DESCRIPTION BRANCHEMENTS ET COMMANDES
ACTIVATION ET REMPLACEMENT DE LA PILE DE LA TÉLÉCOMMANDE
FRANÇAIS
13. Antenne télescopique
14. Bass reflex
15. DC IN, 9V
16. Interrupteur principal
17. Bouton VEILLE
18. Bouton ALARM1, activer l’alarme 1
19. Bouton CLOCK
20. Bouton ALARM2, activer l’alarme 2
21. Bouton TREB+, augmenter les aigus
22. Bouton M+/10+,
stockage/progrès +10
23. Bouton TREB-, diminuer les aigus
24. Bouton 9
, station/piste précédente
25. Bouton
, Play/Pausa
26. Bouton SNOOZE
27. Bouton VOL-, diminuer les volume
28. Bouton STOP, ARRÊT
29. Bouton :
, piste/station suivante
30. Bouton VOL+, augmenter le volume
31. Bouton BASS-, diminué basse
32. Bouton BASS+, augmenter basse
33. Bouton MEM, le stockage
34. Bouton MODE, Rep1/All/ aléatoire
35. Bouton SLEEP, arrêt automatique
36. Bouton MUTE
37. Bouton FUNC, sélection de fonction
1615
13
14
36
35
34
32
31
29
28
37
17
18
20
21
23
24
26
25
30
22
33
19
27
Panneau arrière: Télécommande:
La télécommande est alimentée par une pile de type CR2025.
Retirez la languette plastique de protection pour activer la pile de
la télécommande (fournie).
Pour remplacer la batterie:
1. Ôtez le logement porte pile dans la direction de la flèche
(voir l’arrière du boîtier de la télécommande)
2. Remplacez la pile avec une autre du même type CR2025

DS 1976 V
ALIMENTATION
L’alimentateur fourni en dotation nécessite, pour fonctionner, d’une tension du réseau AC
100-240V~60/50Hz.
Branchezlafichedel’alimentateursurlaprised’alimentation(15)etlafichesuruneprisedecourant.
REMARQUE: employez uniquement l’alimentateur en dotation, puisque des appareils différents
pourraient avoir des polarités et/ou des tensions différentes.
Sauf indication contraire, les descriptions des commandes sont fournies à la télécommande.
MARCHE/ARRÊT
1. Mettez l’interrupteur principal (16) sur “I” pour allumer l’appareil.
2. Mettez l’interrupteur principal (16) à “0” pour éteindre complètement l’appareil.
FONCTION DE VEILLE
Une fois mené l’interrupteur principal sur position “I”, l’appareil passe en mode veille (écran
allumé avec le temps d’indication).
1. Appuyez sur la touche (17) pour allumer l’appareil.
2. Appuyez sur la touche (17) pour restaurer la machine en mode veille.
Remarque :
- Pour allumer / éteindre l’appareil en utilisant le bouton de l’appareil (ON/OFF bouton, VOL, BASS/
TREBLE (12)), vous devez appuyer pendant environ deux secondes.
- Le stand-by fonction est activée uniquement si l’interrupteur principal (16) est en position “I”.
RÉGLAGE DU VOLUME
Tournez le volume VOL(12) dans l’unité pour augmenter ou diminuer le volume global de la
lecture ou appuyez sur le bouton VOL+(30) et VOL-(27) sur la télécommande pour augmenter
ou diminuer le volume.
FONCTION MUTE
Vous pouvez activer la fonction de coupure de l’appareil via le MUTE(36) sur la télécommande
(l’affichage du niveau de volume clignote); pour réactiver l’écoute appuyez sur la touche MUTE.
SÉLECTION DE LA SOURCE
Appuyez plusieurs fois sur la touche FUNC(37) pour accéder en séquence au mode BLUETOOTH
/RADIO FM/USB/AUX-IN.
FONCTIONNEMENT DU BLUETOOTH
1. Tout d’abord appuyer sur la touche FUNC(37) jusqu’à ce que vous voyez l’affichage de
«BT»; l’unité ira à la recherche pour la connexion avec d’autres appareils BT (marquée «BT» sur
l’affichage clignote).
2. Activez la connexion Bluetooth® sur l’appareil externe (téléphone, tablette, etc...) en référence
à son manuel d’exploitation.
3. De la recherche externe de l’appareil de dispositifs et sélectionnez “DS 1976 V”; si nécessaire,
tapez le code “0000”.
4. Lorsque la connexion avec le dispositif externe sera le cas, le “BT” sur l’écran reste allumé de
façon constante.
FRANÇAIS

DS 1976 V
Il est maintenant possible de lancer la lecture musicale au départ de son propre dispositif.
Avec les touches de la télécommande 9(24), :(29) ou de l’unité principale 9(7), :(9), vous
pouvez contrôler la lecture de pistes sur l’appareil (téléphone, tablette).
- Appuyez sur la touche (25) pour commencer ou suspendre la lecture du morceau.
- Appuyez sur la touche 9(24) pour revenir au morceau précédent.
- Appuyez sur la touche :(29) pour passer au morceau successif.
Remarque :
- Cette fonction n’est active que sur des dispositifs Bluetooth® compatibles avec le profil AVRCP.
- À cause de l’évolution continue de la technologie Bluetooth®, certains dispositifs pourraient
ne pas être compatibles ou pas tout à fait compatibles avec l’appareil TREVI DS 1976 V.
Pour connecter un nouveau dispositif, il faut mettre l’appareil en mode de recherche :
-Appuyezetmaintenezleboutonpendantquelquessecondes(25)surlatélécommande,lemot
“BT” sur l’affichage clignote.
- Répétez les point 2 à 4 ci-dessus.
Remarque: Le dispositifaccouplé, il se peut quela connexion s’interrompe (par exemple lorsqu’on
s’éloigne trop de l’unité d’amplification/alimentation); normalement, la connexion se rétablit
automatiquement, autrement il faut effectuer à nouveau la procédure d’accouplement.
FONCTIONNEMENT DE LA RADIO
Recherche automatique
1. Appuyez sur la touche FUNC(37) jusqu’à ce que l’afficheur affiche la fréquence radio FM.
2. Appuyez sur le bouton pendant quelques secondes MEM(33) sur la télécommande, ou appuyez
pour quelques-uns selon le SET/MODE(10) sur l’appareil pour activer le “AUTOSCAN» ou la
syntonisation automatique (la radio commence une recherche automatique de la station la
radio stéréo et enregistre automatiquement en mémoire). Ils sont enregistrés dans le top 20 des
émetteurs radio.
3.AppuyezsurlatoucheM+/10+(5)surlatélécommandepourtéléphoneretécouterlesdifférents
stations de radio enregistrées en mémoire.
Recherche manuelle
1. Appuyez et maintenez pendant quelques secondes à quelques touches 9(24) ou :(29) pour
effectuer une analyse manuelle des fréquences radio; La recherche arrêter quand une station
de radio est reçu stéréo.
2.Appuyez une fois surles touches 9(24) ou:(29)pour une étape dechangement et de faireune
réglage fin.
3.Pourenregistrerlastationreçue,appuyezsurMEM(33),l’affichageferaclignoterleemplacement
de mémoire; grâce à touches 9(24) ou :(29) sélectionner le numéro de mémoire et appuyez
à nouveau sur MEM(33) pour confirmer. La station de radio est maintenant enregistré dans choix
de l’emplacement mémoire. E ‘peut enregistrer jusqu’à 20 stations de radio.
FRANÇAIS
DV 1976 V DV 1976 V
connected

DS 1976 V
Remarque: Pour la meilleure réception FM étendre l’antenne. Si la réception est pas bon essayer
d’ajuster la longueur de l’antenne contraire, mais la qualité de la réception FM dépend de l’endroit
où vous placez l’appareil.
La proximité de téléviseurs, les lampes fluorescentes ou d’autres appareils peut provoquer
des interférences dans la réception de programmes de radio, dans ce cas, retiré le dispositif.
FONCTIONNEMENT USB
1.Introduisez la mémoire USB dans le port USB(2).
2.Appuyez plusieurs fois sur la touche FUNC(37) jusqu’à l’affichage de l’option USB; attendez
pendant quelques secondes que le lecteur charge tous les fichiers MP3.
3.La lecture démarre automatiquement.
4.Pour activer la pause, appuyez une fois sur la touche(25).
5.Pour désactiver la pause, appuyez une deuxième fois sur la touche(25).
6. Pour passer à la lecture du morceau précédent/suivant, appuyez sur les touches 9(24) ou
:(29).
7. Pour avancer rapidement dans l’ordre de plusieurs dizaines dans le numéro de piste apparaît,
appuyez sur le M+/10+(5) sur la télécommande. Chaque pression va augmenter le nombre
de dix numéros à la fois.
LECTURE ININTERROMPUE D’UN MÊME MORCEAU/TOUS LES MORCEAUX
En mode de lecture (USB) appuyez plusieurs fois la touche MODE(34) sur la télécommande pour
activer en séquence :
- Répétition continue d’un même morceau (l’afficheur montre le message “REP 1”).
- Répétition continue de tous les morceaux disponibles dans la mémoire (l’afficheur montre
le message “REP ALL”).
Pour annuler la fonction de répétition continue, appuyez plusieurs fois sur la touche MODE(34)
jusqu’à ce qu’il ne lettrage sur l’écran.
Lecture aléatoire
Pour activer chansons aléatoire, appuyez M+/10+(22), l’écran affiche le mot “RAND”.
Pour annuler, appuyez sur le bouton à nouveau M+/10+ (l’écriture sur l’écran disparaîtra).
FONCTIONNEMENT AUX-IN
1.À l’aide d’un câble, connectez la sortie audio de smartphones, tablettes, lecteurs multimédia
avec l’entrée AUX IN(1) du lecteur.
2.Appuyez plusieurs fois sur la touche FUNC(37) jusqu’à l’affichage de l’option “AU”.
3.Activez la lecture de la source extérieure (voir manuel de l’appareil).
PROGRAMMATION DE L’HORLOGE
Pour définir le temps de suivre les étapes suivantes:
1. Placer l’unité en mode veille.
2. AppuyezetmaintenezpendantquelquessecondeslatoucheSET/MODE(10)surl’unité,indiquant
les heures se mettent à clignoter.
3. Utilisez
9(7)
o
:(9)
de l’appareil pour régler l’heure.
4. Appuyez sur la touche SET/MODE(10) pour confirmer et aller au réglage des minutes.
5. Utilisez les touches à nouveau
9(7)
o
:(9)
pour régler les minutes correctes.
6. Appuyez sur la touche SET/MODE(10) sur l’unité pour confirmer.
FRANÇAIS
Table of contents
Languages:
Other Trevi Stereo System manuals

Trevi
Trevi CMP 574 USB User manual

Trevi
Trevi HCX 1200 BT User manual

Trevi
Trevi HFX 1058 User manual

Trevi
Trevi SB 8350TV User manual

Trevi
Trevi HF 1900 BT User manual

Trevi
Trevi HCX 10D6 DAB User manual

Trevi
Trevi HCV 1035 BT User manual

Trevi
Trevi HCV 10D35 DAB User manual

Trevi
Trevi MCX 1024 USB User manual

Trevi
Trevi MCX 1021 USB User manual

Trevi
Trevi HCX 10D8 DAB User manual

Trevi
Trevi MCX 1045IPD User manual

Trevi
Trevi TT 1060CD User manual

Trevi
Trevi HCX 1030 S User manual

Trevi
Trevi SB 8370 SW User manual

Trevi
Trevi TT 1072 DAB User manual

Trevi
Trevi MCX 1021 USB User manual

Trevi
Trevi TT 1070 E User manual

Trevi
Trevi TT 1068 E User manual

Trevi
Trevi AV 610 USB User manual