Trevi HCX 10D8 DAB User manual

SISTEMA HIFI CON DAB+/CD/MP3/USB/AUX IN E CONNESSIONE BLUETOOTH®
Manuale d'uso e collegamento
HIFI STEREO SYSTEM WITH DAB+/CD/MP3/USB/AUX IN AND BLUETOOTH®
CONNECTION
User manual and connection
SYSTÈME HIFI AVEC DAB+/CD/MP3/USB/AUX IN ET CONNEXION BLUETOOTH®
Mode d'emploi et connexion
HIFI-ANLAGE MIT DAB+/CD/MP3/USB/AUX IN UND BLUETOOTH®-VERBINDUNG
Bedienungsanleitung und Anschluss
EQUIPO DE ALTA FIDELIDAD CON DAB+/CD/MP3/USB/AUX IN Y CONEXIÓN
BLUETOOTH®
Manual de usuario y la conexión
HCX 10D8 DAB
Guida d’uso
User guide
USB
INPUT
CD MP3
PLAYER
RADIO
PLL FM AUX IN
BLUETOOTH
CONNECTION
DAB+

2
HCX 10D8 DAB
ATTENZIONE
RISCHIO DI SCOSSE
ELETTRICHE!
NON ESPORRE A
PIOGGIA E UMIDITÀ
ATTENZIONE: NON APRITE L'APPARECCHIO. ALL'INTERNO NON VI SONO
COMANDI MANIPOLABILI DALL'UTENTE NE PARTI DI RICAMBIO. PER TUTTE
LE OPERAZIONI DI SERVIZIO RIVOLGERSI AD UN CENTRO DI ASSISTENZA
AUTORIZZATO TREVI
WARNING!
WARNING: DO NOT OPEN THE SET. NEITHER CONTROLS OR SPARE PARTS TO
BE USED BY THE USER ARE TO BE FOUND INSIDE IT. APPLY TO AUTHORISED
TREVI CENTERS FOR SERVICE OPERATIONS.
DANGER OF ELECTRIC SHOCK!
DO NOT EXPOSE TO
RAIN OR HUMIDITY
ATTENTION
ATTENTION: NE PAS OUVRIR L’APPAREIL, A L’INTERIEUR IL N’Y A PAS DE
COMMANDESAMANIPULERPARL’UTILISATEUROUDEPIECESDERECHANGE.
POUR TOUTES LES OPERATIONS DE SERVICE IL FAUT S’ADRESSER A UN
SERVICE D’ASSISTANCE AUTORISE TREVI.
RISQUE DE DECHARGES
ELECTRIQUES
NE PAS EXPOSER A LA PLUIE ET A
L’HUMIDITE
ACHTUNG
ACHTUNG: DAS GERÄT NICHT ÖFFNEN. IM INNERN BEFINDEN SICH KEINE VOM
BENUTZERSELBSTINSTANDSETZBARENTEILEUNDAUCHKEINEERSATZTEILE.
FÜR JEGLICHE SERVICEARBEITEN, WENDEN SIE SICH BITTE AN EINE TREVI
AUTORISIERTEN KUNDENDIENSTSTELLE.
GEFAHR ELEKTRISCHER SCHLÄGE
NICHT DER FEUCHTIGKEIT UND
DEM REGEN AUSSETZEN
ATENCION
ATENCION: NO ABRIR EL APARATO, EN SU INTERIOR NO HAY MANDOS QUE
PUEDAN SER MANIPULADOS POR EL USUARIO NI PARTES DE REPUESTO.
PARA TODAS LAS OPERACIONES DE SERVICIO DIRIGIRSE A UN CENTRO DE
ASISTENCIA AUTORIZADO TREVI.
PELIGRO DE CHOQUES
ELECTRICOS
NO EXPONER A LLUVIA Y
HUMEDAD
UK PLUG ONLY
WIRES CONNECTIONS TO A UK THREE-PIN PLUG
The wires in this mains lead are coloured in accordance with the following wiring codes:
Blue:............................................................Neutral
Brown:.........................................................Live
The wires in this mains lead must be connected to the terminals in the plug as follows:
Blue wire:.....................................................N or Black
Brown wire: .................................................L or Red
Neither wire is to be connected to the earth (E or W) terminal of three-pin plug.
Should the fuse fail in the plug remove the plug form the wall socket and replace the fuse
with a 3 Amp. ASTA approved BS 1362 fuse.
WARNING!

3
HCX 10D8 DAB
VOLTAGGIO PERICOLOSO ATTENZIONE AVVERTENZE SUL LASER
Questo simbolo riportato sul retro
dell'apparecchio ed in questo manuale
segnala la presenza all'interno di questo
apparecchio di componenti operanti ad
alta tensione, non apritelo per evitare il
rischio di scosse elettriche.
Questo simbolo riportato sul retro
dell'apparecchio ed in questo manuale
indicano la presenza sugli stessi di im-
portanti istruzioni per la sicurezza d'uso.
Leggetele attentamente prima di utilizzare
l'apparecchio.
Questoapparecchioèdotatodiunsistema
di lettura con raggio laser. Benché il laser
sia di bassa potenza e con dispositivo di
sicurezza che ne impedisce il funziona-
mento a sportello aperto attenetevi scru-
polosamente alle seguenti avvertenze:
Non avvicinate l'occhio alla lente del
laser con l'apparecchio aperto, pericolo
di lesione della retina.
Non tentate di smontare o manomettere
l'unità laser, pericolo di assorbimento di
radiazioni.
NOTE D'USO
Ascoltare a volume alto per lungo tempo, potrebbe danneggiare il vostro udito.
Questo apparecchio è uno strumento elettronico di alta precisione, evitate quindi di utilizzarlo nei seguenti casi:
• Vicino a campi magnetici.
• Vicino a fonti di calore come caloriferi e stufe.
• In luoghi molto umidi come stanze da bagno, piscine, ecc...
• In luoghi molto polverosi.
• In luoghi soggetti a forti vibrazioni.
• Non avvicinare l’orecchio all’altoparlante durante le fasi di messa punto e regolazioni del volume, e in particolare di tenere il
volume al minimo nella fase di accensione.
• Posizionare l’apparecchio in modo che ai suoi lati ci sia sempre abbastanza spazio per la libera circolazione di aria (almeno 5
cm).
• Se dei liquidi penetrano all’interno dell’apparecchio scollegare immediatamente la spina dalla presa e portare l’apparecchio al
più vicino centro assistenza autorizato TREVI.
• Controllare sempre prima di ricaricare l’apparecchio, che i cavi di alimentazione e di collegamento siano installati correttamente.
• Nessuna sorgente di fiamma nuda, quali candele accese, dovrebbe essere posta sull’apparecchio.
• L’apparecchio non deve essere esposto a stillicidio o a spruzzi d’acqua e nessun oggetto pieno di liquido, quali vasi, deve essere
posto sull’apparecchio.
• Conservare il presente manuale per futuri riferimenti.
CURA E MANUTENZIONE
Per la pulizia si consiglia l’ uso di un panno morbido, leggermente inumidito. Evitate solventi o sostanze abrasive.
IMPORTANTE
Questo dispositivo e' progettato per uso domestico non professionale. La buona costruzione di questo apparecchio ne garantisce
per lungo tempo il perfetto funzionamento. Se tuttavia dovesse presentarsi qualche inconveniente, sarà opportuno consultare il più
vicino Centro Assistenza autorizzato TREVI.
TREVI persegue una politica di continua ricerca e sviluppo. Pertanto i prodotti possono presentare caratteristiche diverse da
quelle descritte.
Per evitare possibili danni all’udito, limitare il tempo di ascolto a volumi elevati.
ITALIANO

4
HCX 10D8 DAB
DESCRIZIONE COMANDI
1. Alloggio CD
2. Tasto STANDBY
3. Display
4. Regolazione volume
5. Tasto/SCAN, Play/Pausa/Ricerca e memorizzazione
automatica stazioni radio
6. Tasto SOURCE, selezione sorgente
7. Presa Cuffie
8. Ingresso Audio (AUX IN)
9. Tasto , Stop.
10. Ingresso USB.
11. Tasto 9/TUNE-, traccia/stazione radio precedente
12. Tasto :/TUN+, traccia/stazione radio successiva
13. Tasto MENU/INFO, accesso ai menu/visualizzazione infor-
mazioni su display
14. Tasto SELECT/MONO/ST, conferma della selezione impo-
stazioni/ascolto radio mono/stereo
15. Ricevitore telecomando
UNITÀ VISTA FRONTALE
UNITÀ VISTA POSTERIORE
ITALIANO
1. Presa antenna, inserire il cavo di antenna in dotazione
2. Cavo di alimentazione
3. Prese di collegamento casse R/L

5
HCX 10D8 DAB
TIRARE LA LINGUETTA
TIRARE
SPINGERE
DESCRIZIONE COMANDI
1. Tasto , accensione/Stand-by
2. Tasti numerici di selezione
3. Tasto MEMORY
4. Tasto 9/TUN-, traccia/stazione radio precedente
5. Tasto FOLDER+, selezione cartella successiva in modalità
CD o USB
6. Tasto REPEAT, attiva la modalità di ripetizione
7. Tasto FOLDER-, selezione cartella precedente in modalità
CD o USB
8. Tasti INFO, SCAN, MENU' su sorgente radio DAB/FM
9. Tasti 9,:,/ su sorgente Bluetooth
10. Tasti DISPLAY, , / su sorgente su sorgente CD/USB
11. Tasti VOL+/-, regolazione volume
12. Tasto MUTE, esclusione audio apparecchio
13. TastoRANDOM,selezionecasualedelletracceinriproduzione
14. Tasto CH-/DOWN, selezione della memoria precedente/
scorrimento voci di menu'
15. Tasto :/TUN+, traccia/stazione radio successiva
16. Tasto ENTER, conferma della selezione
17. Tasto MONO/ST, ascolto radio mono/stereo
18. Tasto CH+/UP, selezione della memoria successiva/scorri-
mento voci di menu'
19. Tasto SLEEP, attivazione della funzione di autospegnimento
20. Tasto X_BASS, attivazione della funzione Xbass, esaltazione
toni bassi
21. Tasto EQUALIZER, selezione tra varie modalità audio preim-
postate
22. Tasto SOURCE, selezione sorgente
TELECOMANDO
ATTIVAZIONE E SOSTITUZIONE DELLA BATTERIA DEL TELECOMANDO
Il telecomando monta una batteria tipo CR2025
Per attivare la batteria del telecomando (inclusa) togliere la linguetta plastica di
protezione.
Per la sostituzione della batteria:
1. Spingere il fermo plastico dell’alloggiamento porta batteria verso destra.
2. Estrarre l’alloggiamento porta batteria.
3. Inserire una batteria nuova facendo attenzione a rispettare le polarità.
4. Richiudere l'alloggiamento porta batteria.
ITALIANO

6
HCX 10D8 DAB
ITALIANO
ALIMENTAZIONE
Collegare il cavo di alimentazione (2) in una presa di corrente 100-240V 50/60Hz.
Non collegare l'apparecchio a prese con tensione diversa da quella indicata.
Alla prima acensione l'apparecchio effettuerà una scansione delle stazione DAB presenti, il display mostrerà la scritta SCANTIME.
Attendere fino a quando il display mostrera' l'orario corrente.
Nota: Se non diversamente specificato, le descrizioni dei comandi valgono sia per l'apparecchio che per il telecomando.
ACCENSIONE/SPEGNIMENTO
1. Premere il tasto STANDBY/FUNC(2) per accendere l'unità.
2. Premere il tasto STANDBY/FUNC(2) per spegnere l'unità
Nota: In sorgente CD, USB o AUX, se entro 15 minuti non viene effettuata alcuna operazione, l'unità entrerà automaticamente in
modalità STANDBY.
CONTROLLO VOLUME, FUNZIONE XBASS E EQUALIZER
1. Ruotare il controllo Volume (4) sull'apparecchio o premere il tasto VOL+ o VOL- (11) del telecomando per aumentare o diminuire
il volume.
2. Premere il tasto XBASS (20) per attivare la funzione di esaltazione dei toni bassi. Premerlo di nuovo per disattivarla.
3. Premere il tasto EQUALIZER (21) per selezionare una tra le dinamiche audio preimpostate (Classic, Rock, Pop, Jazz, Flat).
FUNZIONAMENTO RADIO FM
1. Accendere l'apparecchio e premere più volte il tasto SOURCE (6) fino a far comparire sul display l'indicazione FM.
2. Premere più volte i tasti :/TUN+ (12) o 9/TUN- (11) sull'unità, oppure i tasti :/TUN+ (15) o 9/TUN- (4) del telecomando
per aumentare o diminuire la frequenza di 0,05MHz ed effettuare una ricerca passo-passo.
3. Tenere premuto per qualche secondo i tasti :/TUN+ (12) o 9/TUN- (11) sull'unità, oppure i tasti :/TUN+ (15) o 9/TUN- (4)
del telecomando per sintonizzarsi sulla stazione radio successiva o precedente con il miglior segnale ricevuto.
4. Per attivare la funzione di ricerca e memorizzazione automatica delle stazione radio (SCAN) premere a lungo il tasto /
SCAN. L'apparecchio è in gradi di memorizzare fino a 20 stazioni. Premendo a lungo il tasto MENU'(13, 8 sul telecomando) e'
possibile selezionare il tipo di ricerca automatica; alla voce SCAN confermare con SELECT(14) e selezionare STRONG (stazioni
con forte segnale) o ALL (tutte le stazioni), confermare con SELECT(14).
5. Per memorizzare una stazione radio:
- Portarsi sulla frequenza da memorizzare, premere a lungo il tasto MEMORY(3) del telecomando.
Sul display lampeggia la scritta PROG.
- Conitasti:/TUN+(15)o 9/TUN-(4)deltelecomando,selezionareilnumerodimemoriaincuisidesiderasalvare
la stazione radio.
- Premere il tasto ENTER(16) per confermare.
- L'apparecchio è in gradi di memorizzare fino a 20 stazioni.
6. Per richiamare una stazione radio memorizzata utilizzare i tasti CH+(18) e CH-(14).
7. Per commutare l'ascolto da STEREO a MONO e viceversa premere il tasto MONO/ST(14).
Nota: Per ottenere la migliore ricezione in FM collegate ed orientate l’antenna. Se la ricezione non è buona provate a regolare
diversamente la lunghezza e l’orientamento dell’antenna, comunque la qualità della ricezione in FM dipende molto dal luogo dove
è posto l’apparecchio.
FUNZIONAMENTO RADIO DAB/DAB+
1. Accendere l'apparecchio e premere più volte il tasto SOURCE (6) fino a far comparire sul display l'indicazione DAB.
Alla prima accensione la radio effettuerà una scansione e memorizzazione automatica di tutte le stazioni DAB disponibili.
2. Se si desidera ripetere l'operazione di scansione delle stazioni DAB disponibili premere a lungo il tasto MENU/INFO(13) per
accedere al menu DAB. Comparirà la scritta Full scan.
3. Premere il tasto SELECT(14) per avviare la scansione delle stazioni DAB.
4. Premere il tasto :/TUN+ (12) o 9/TUN- (11) sull'unità, oppure i tasti :/TUN+ (15) o 9/TUN- (4) del telecomando per
scorrere le varie stazioni DAB sintonizzate. Premere il tasto SELECT (14) sulla stazione DAB desiderata per avviare la riproduzione.
5. Premere il tasto MENU/INFO(13) piu' volte per visualizzare informazioni sulla stazione ricevuta.
MENU RADIO DAB/DAB
+
1. Premere a lungo il tasto MENU/INFO (13) per accedere al menu DAB.
2. Premere il tasto :/TUN+ (12) o 9/TUN- (11) sull'unità, oppure i tasti :/TUN+ (15) o 9/TUN- (4) del telecomando per
visualizzare le varie voci del menu DAB.
3. Premere il tasto SELECT (14) per selezionare la voce del menu visualizzata.

7
HCX 10D8 DAB
Fullscan(Ricerca completa):permettedi scansionarel’intera bandaDAB/DAB+ ememorizzare automaticamentele stazionitrovate.
Manual tune (Sintonizzazione manuale): permette di scansionare manualmente una singola frequenza DAB/DAB+. Premere il
tasto :/TUN+ o 9/TUN- per selezionare il numero del canale relativo alla frequenza da scansionare e successivamente premere
il tasto SELECT (14) per avviare la scansione. Le stazioni trovate verranno automaticamente memorizzate. Al termine premere a
lungo il tasto MENU/INFO (13) per tornare al menu DAB.
DRC: permette di abilitare/disabilitare la funzione DRC per migliorare il suono durante l’ascolto in ambienti rumorosi. È possibile
impostare il livello di DRC in alto (high), basso (low) o OFF (spento).
Prune (Elimina): permette di eliminare dalle lista delle stazioni memorizzate tutte le radio trovate ma non disponibili (scarso segnale).
Spostarsi con i tasti :/TUN+ o 9/TUN- su Y(YES) e confermare l’eliminazione con il tasto SELECT (14).
System (Sistema): permette di accedere al sottomenù di sistema:
Language:e' possibilescegliere lalinguadei menu';sonodisponibili Italiano,Inglese (default),Deutsch,Spanish, Dutch,Francais.
Factory Reset (Ripristino valori di fabbrica): permette di ripristinare le impostazioni di fabbrica dell’apparecchio. Al termine
del ripristino verrà effettuata una scansione automatica delle stazione DAB/DAB+. Spostarsi con i tasti :/TUN+ o 9/TUN- su
Y(YES) e confermare con il tasto SELECT (14).
SW version (Versione del software): permette di visualizzare la versione del software dell’apparecchio.
MEMORIZZAZIONE STAZIONI RADIO
Per memorizzare una stazione radio, effettuare le seguenti operazioni:
1. Sintonizzare la stazione radio desiderata.
2. Premere a lungo il tasto MEMORY(3), il display mostrerà la scritta PROG.
3. Utilizzare i tasti :/TUN+ o 9/TUN- per selezionare una locazione di memoria.
4. Premere il tasto SELECT (14) per confermare e salvare la stazione radio.
Ripetere questa operazione per ogni stazione radio che si desidera salvare. Sono disponibili 20 locazioni di memoria.
5. Per richiamare una stazione radio memorizzata utilizzare i tasti CH+(18) e CH-(14).
FUNZIONAMENTO LETTORE CD-MP3
RIPRODUZIONE
1. Accendere l'apparecchio e premere più volte il tasto SOURCE (6) fino a far comparire sul display l'indicazione CD READ, che
sta ad indicare il caricamento del disco. In caso di assenza del disco sul display comparirà l'indicazione NO DISC.
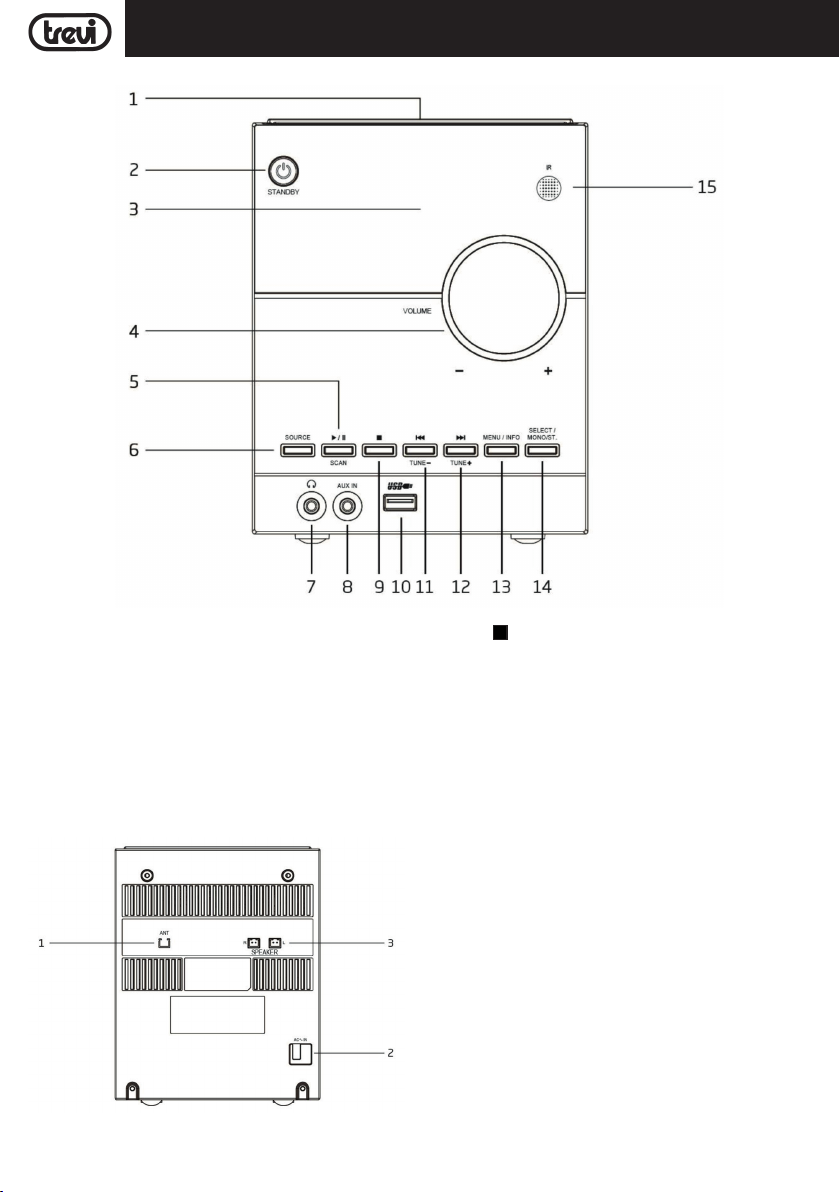
2. Aprire il vano CD(1) sollevando lo sportello nel punto centrale (scritta OPEN) ed inserire il disco, con il lato scritto rivolto verso
l'alto. Richiudere delicatamente lo sportello.
3. Dopo qualche secondo il display (3) mostrerà il numero delle tracce presenti sul disco. Premere il tasto(5) sull'apparecchio
o il tasto(10) del telecomando per attivare la riproduzione musicale.
4. Premere il tasto(5) sull'apparecchio o il tasto(10) del telecomando per attivare la pausa, il display mostrerà il
simbololampeggiante. Ripremere il tasto per disinserire la pausa.
5. Premere il tasto (9) sull'apparecchio, o il tasto (10) del telecomando, per arrestare definitivamente la riproduzione.
SALTO TRACCIA E RICERCA VELOCE
1. Premere una volta i tasti :/TUN+ (12) o 9/TUN- (11) sull'unità, oppure i tasti :/TUN+ (15) o 9/TUN- (4) del telecomando
per posizionarsi sulla traccia precedente o successiva.
2. Tenere premuto il tasto :/TUN+ (12) o 9/TUN- (11) sull'unità, oppure i tasti :/TUN+ (15) o 9/TUN- (4) del telecomando
durante l'ascolto per ricercare velocemente un particolare passaggio musicale. Rilasciare il tasto per tornare alla normale
riproduzione.
RIPETIZIONE
• Premere il tasto REPEAT (6) del telecomando, fino a far comparire sul display l'indicazione RPT ONE per riprodurre continuamente
la stessa traccia.
• Premere il tasto REPEAT (6) del telecomando fino a far comparire sul display l'indicazione RPT ALL per riprodurre continuamente
tutte le tracce presenti.
• Premere il tastoREPEAT (6) del telecomandofino a far comparire sul display l'indicazione RPT FOLD perriprodurrecontinuamente
tutte le tracce presenti nella cartella selezionata (solo per CD MP3 contenenti cartelle).
• Premere il tasto REPEAT (6) del telecomando fino a far comparire sul display l'indicazione NORMAL per riprodurre tutte le tracce
presenti una sola volta.
• Premere il tasto RANDOM (13) del telecomando (sul display compare l'indicazione RANDOM) per riprodurre casualmente tutte
le tracce presenti. Premerlo di nuovo per disattivare la funzione.
FUNZIONE ALBUM
NOTA: funzione valida solo per CD MP3 contenenti cartelle.
1. Durante la riproduzione di un CD MP3 con piu' cartelle, premere i tasti FOLDER+(5) e FOLDER-(7) per selezionare la cartella
che si desidera riprodurre.

8
HCX 10D8 DAB
ITALIANO
FUNZIONE ID3
NOTA: funzione valida solo per tracce MP3
1. Durante la riproduzione di un CD MP3 premere il tasto DISPLAY(10) per attivare la funzione ID3, verranno mostrate informazioni
riguardanti la traccia in riproduzione.
FUNZIONAMENTO INGRESSO USB
RIPRODUZIONE
1. Collegare all'ingresso USB (10) un dispositivo di memoria USB.
2. Accendere l'apparecchio e premere più volte il tasto SOURCE (6) fino a far comparire sul display l'indicazione USB READ, che
sta ad indicare il caricamento dei dati presenti nel dispositivo USB. In caso di assenza del dispositivo USB, sul display comparirà
l'indicazione NO USB.
Note:
- I'apparecchio potrebbe non supportare alcuni dispositivi USB, questo è dovuto all'incompatibilità di alcuni processori.
3. Per il resto delle funzioni fare riferimento al paragrafo "FUNZIONAMENTO LETTORE CD-MP3" .
INGRESSO AUX IN
1. Accendere l'apparecchio e premere più volte il tasto SOURCE (6) fino a far comparire sul display l'indicazione AUDIO IN.
2. Collegare una qualsiasi unità provvista di uscita audio tramite apposito cavo all'ingresso AUX IN (8).
3. Comandare l'unità esterna dai propri comandi.
4. Regolare il volume tramite il controllo sull'unità (4) o tramite i tasti VOL+ o VOL- (11) del telecomando.
FUNZIONAMENTO BLUETOOTH
1. Accendere l'apparecchio e premere più volte il tasto SOURCE (6) fino a far comparire sul display l'indicazione BT.
2. La scritta "PAIRING" sul display comincerà a lampeggiare e il sistema entrerà automaticamente in ricerca.
3. Attivare la funzionalità Bluetooth sul dispositivo esterno da accoppiare e renderlo visibile.
4. Avviare la ricerca dei dispositivi. Al termine ricercare il dispositivo "HCX 10D8 DAB".
5. Inserire la password "0000" se necessario.
6. Ad accoppiamento avvenuto l'apparecchio emetterà un suono di notifica e la scritta "BT AUDIO" sul display rimarrà fissa.
7. Avviare la riproduzione audio dal proprio dispositivo.
8. Premere una volta i tasti :/TUN+ (12) o 9/TUN- (11) sull'unità, oppure i tasti :o 9(9) del telecomando per posizionarsi
sulla traccia precedente o successiva.
9. Premere il tasto(5) sull'apparecchio o il tasto(9) del telecomando per attivare la pausa. Ripremere il tasto per disinserire
la pausa.
10. Tenere premuto per qualche secondo il tasto/per eliminare l'accoppiamento.
FUNZIONE SLEEP
La funzione SLEEP permette di programmare lo spegnimento automatico dopo un certo tempo dell'apparecchio.
Premendo piu' volte il tasto SLEEP e' possibile selezionare il tempo di spegnimento (90, 80, 70, 60, 50, 40, 30, 20, 10, 00=spento).
Sul display compare il simbolo ZZZ ad indicare la funzione attiva. Passato il tempo programmato l'apparecchio si porta in modo
standby automaticamente.
PRESA CUFFIE
1. Inserire le cuffie nella presa cuffie (7).
2. Avviare la riproduzione desiderata e regolare il volume.
SPECIFICHE TECNICHE
Alimentazione e consumo: ............... 100-240V 50/60Hz - 22W
Ricezione banda in FM: .......................................87.5 - 108 MHz
Ricezione banda DAB/DAB+: ..........................174.928 - 239.200 MHz
Potenza di trasmissione Bluetooth: .................................................2,5mW
Frequenza di trasmissione Bluetooth:..............................................2,4GHz
Dimensioni unità: ...............................140 x 210 x 170 mm
Dimensioni altoparlanti: ...............................130 x 125 x 170 mm

9
HCX 10D8 DAB
ENGLISH
NOTES OF USE
Listen at high volume for long periods of time, may damage your hearing.
• Avoid using it in the following cases:
- Near strong heat sources, such as central heating plants or stoves.
- In very humid places such as bathrooms, swimming pools, etc.
- In very dusty places.
- In places subject to strong vibrations.
- Position the appliance in such a way that there is always enough room for free air circulation (at least 5 cm).
• Do not block the air inlets.
• If any liquid enters the appliance, unplug it immediately from the socket and take it to the nearest TREVI authorised service centre.
• Before switching on the appliance, always check that the power cable and the connection cable are properly installed.
• No naked flame sources, such as lighted candles, should be placed on this.
• The apparatus shall not be exposed to dripping or splashing water and no object filled with water, such as vases, should be placed
on the unit.
• Keep this manual for future reference.
CARE AND MAINTENANCE
For cleaning we recommend the use of a soft, slightly damp cloth. Avoid solvents or abrasives.
IMPORTANT
The good construction of this machine guarantees the perfect functioning for a long time. However, should any problem arise, you
should consult your nearest authorized service center.
TREVI pursues a policy of continuous research and development. Therefore, the products may have different features from those
described.
DANGEROUS VOLTAGE
This symbol on the back of the unit
and in this manual indicates the pre-
sencein thisequipmentcomponents
operatingathighvoltage,donotopen
it to avoid the risk of electric shock.
To avoid possible hearing damage, limit the time listening at high volumes
WARNINGS ON THE LASER
This device is equipped with a laser beam reading
system. Although the laser is of low power and with
a safety device that prevents open door operation,
scrupulously observe the following warnings:
Do not bring the eye to the laser lens with the device
open, risk of retinal injury.
Do not attempt to disassemble or tamper with the laser
unit, risk of radiation absorption.
CAUTION
This symbol on the back of the
unit and in this manual indicate
thepresenceonthemofimportant
instructions for safe use. Please
read them carefully before using
the appliance.

10
HCX 10D8 DAB
ENGLISH
DESCRIPTION OF COMMANDS
1. CD player
2. STANDBY button
3. Display
4. Volume adjustment
5. / SCAN button, Play / Pause / Search and store radio
stations automatically
6. SOURCE button, source selection
7. Headphones socket
8. Audio Input (AUX IN)
9. Key , Stop.
10. USB input.
11. 9/ TUNE - button, previous track / radio station
12. :/ TUN +button, next track / radio station
13. MENU / INFO key, access to menus / display information
display
14. SELECT / MONO / ST button, selection of mono / stereo
radio / settings confirm
15. Remote control receiver
1. Antenna socket, insert the supplied antenna cable
2. Power cord
3. R / L speaker connection sockets

11
HCX 10D8 DAB
The remote control comes with a cell battery already installed. To activate the
battery, remove the transparent tab at the bottom of the remote control. The remote
control is now ready to use.
To Replace With a New Battery:
1. Remove the battery compartment cover as per the illustration on the right.
2. Observe the correct polarity and install a 3V lithium battery (CR2025).
3. Close the cover.
ENGLISH
DESCRIPTION OF COMMANDS
1. Key , on / standby
2. Numeric selection keys
3. MEMORY button
4. 9/ TUN- button, previous track / radio station
5. FOLDER + button, next folder selection in CD or USB mode
6. REPEAT button, activates the repeat mode
7. FOLDER- button, previous folder selection in CD or USB
mode
8. INFO, SCAN, MENU buttons on DAB / FM radio source
9. 9,:,/keys on Bluetooth source
10. DISPLAY, , /buttons on source on CD / USB source
11. VOL +/- keys, volume adjustment
12. MUTE button, device sound exclusion
13. RANDOMbutton,random selectionof thetracksbeingplayed
back
14.CH-/DOWNbutton, selectionofpreviousmemory /scrolling
menu items
15. Key:/ TUN +, track / next radio station
16. ENTER key, confirm selection
17. MONO / ST button, mono / stereo radio listening
18. CH + / UP button, selecting the next memory / scrolling
menu items
19. SLEEP button, activation of the auto-off function
20. X_BASS key, Xbass function activation, bass tone enhan-
cement
21.EQUALIZER button,selectionof variouspresetsound modes
22. SOURCE button, source selection

12
HCX 10D8 DAB
ENGLISH
SUPPLY
Connect the power cord (2) to 100-240V 50 / 60Hz power outlet.
Do not connect the appliance to electrical outlets other than those indicated.
At the first start-up the device will scan the DAB stations present, the display will show the word SCANTIME. Wait until the display
shows the current time.
Note: Unless otherwise specified, the descriptions of the commands apply to both the device and the remote control.
ON / OFF
1. Press the STANDBY / FUNC (2) button to turn the unit on.
2. Press the STANDBY / FUNC (2) button to turn off the unit
Note: In CD, USB or AUX source, if no operation is performed within 15 minutes, the unit will automatically enter STANDBY mode.
VOLUME CONTROL, XBASS AND EQUALIZER FUNCTION
1. Turn the Volume control (4) on the unit or press the VOL + or VOL- (11) button on the remote control to increase or decrease
the volume.
2. Press the XBASS button (20) to activate the bass boost function. Press it again to deactivate it.
3. Press the EQUALIZER key (21) to select one of the preset audio dynamics (Classic, Rock, Pop, Jazz, Flat).
FM RADIO OPERATION
1. Switch on the appliance and press the SOURCE button (6) repeatedly until the FM indication appears on the display.
2. Press the keys:/TUN+ (12) or 9/TUN- (11) on the unit repeatedly, or the keys:/TUN+ (15) or 9/TUN- (4) on the remote
control to increase or decrease the frequency 0.05MHz and perform a step-by-step search.
3. Hold down for a few seconds the keys:/TUN+ (12) or 9/TUN- (11) on the unit, or the keys:/TUN+ (15) o 9/TUN- (4) on
the remote control to tune into the station next or previous radio with the best signal received.
4. Press the SCAN key for a long time to activate the automatic radio station search and save function (SCAN). The unit is able to
store up to 20 stations. By long pressing the MENU key (13, 8 on the remote control) it is possible to select the type of automatic
search; under SCAN confirm with SELECT (14) and select STRONG (stations with strong signal) or ALL (all stations), confirm
with SELECT (14).
5. To store a radio station:
- Move to the frequency to be memorized, press and hold down the MEMORY (3) key on the remote control.
The word PROG flashes on the display.
- With the keys:/TUN+ (15) o 9/TUN- (4) on the remote control, select the memory number where you want to save the radio
station.
- Press the ENTER key (16) to confirm.
- The unit can store up to 20 stations.
6. To call up a stored radio station use the CH + (18) and CH- (14) buttons.
7. To switch the playback from STEREO to MONO and vice versa, press the MONO / ST button (14).
Note: To get the best FM reception connected and oriented the antenna. If reception is not good try to adjust the length and orientation
of the antenna differently, however the quality of FM reception depends very much on the place where the device is placed.
RADIO DAB / DAB + OPERATION
1. Switch on the appliance and press the SOURCE button (6) several times until the DAB indication appears on the display.
When you switch it on for the first time, the radio will automatically scan and store all the available DAB stations.
2. If you want to repeat the scan operation of the available DAB stations, long press the MENU / INFO button (13) to access the
DAB menu. Full scan will appear.
3. Press the SELECT (14) button to start scanning the DAB stations.
4. Press the:/TUN+ (12) o 9/TUN- (11) button on the unit, or the:/TUN+ (15) o 9/TUN- (4) buttons on the remote control
to scroll through the various tuned DAB stations. Press the SELECT (14) button on the desired DAB station to start playback.
5. Press the MENU / INFO button (13) several times to display information about the received station.
RADIO DAB / DAB + MENU
1. Long press the MENU / INFO button (13) to enter the DAB menu.
2. Press the key:/TUN+ (12) o 9/TUN- (11) on the unit, or the keys:/TUN+ (15) o 9/TUN- (4) on the remote control to
display the various DAB menu items .
3. Press the SELECT (14) button to select the displayed menu item.

13
HCX 10D8 DAB
ENGLISH
Full scan: allows you to scan the entire DAB / DAB + band and automatically store the found stations.
Manual tune: allows you to manually scan a single DAB / DAB + frequency. Press the:/TUN+ o 9/TUN- key to select the
channel number for the frequency to be scanned and then press the SELECT (14) key to start scanning. The found stations will
be automatically stored. At the end, long press the MENU / INFO key (13) to return to the DAB menu.
DRC: allows you to enable / disable the DRC function to improve the sound while listening in noisy environments. The DRC level
can be set up (high), low (low) or OFF (off).
Prune: allows you to delete from the list of stations stored all the radio found but not available (poor signal). Move with the keys:/
TUN+ o 9/TUN- to Y (YES) and confirm the deletion with the SELECT key (14).
System: allows access to the system submenu:
Language:itispossibletochoose thelanguageofthemenus;Italian,English(default), Deutsch,Spanish,Dutch,Francaisareavailable.
Factory Reset: allows you to reset the device to the factory settings. At the end of the reset an automatic scan of the DAB / DAB
+ stations will be performed. Move with the keys: / TUN + or 9 / TUN- to Y (YES) and confirm with the SELECT key (14).
SW version: allows you to view the software version of the device.
STORING RADIO STATIONS
To store a radio station, perform the following steps:
1. Tune to the desired radio station.
2. Long press the MEMORY key (3), the display will show PROG.
3. Use the:/TUN+ o 9/TUN- keys to select a memory location.
4. Press the SELECT (14) button to confirm and save the radio station.
Repeat this operation for each radio station you want to save. There are 20 memory locations available.
5. To call up a stored radio station use the CH + (18) and CH- (14) buttons.
CD-MP3 PLAYER OPERATION
REPRODUCTION
1. Switch on the appliance and press the SOURCE button (6) several times until the CD READ indication appears on the display,
indicating that the disc is being loaded. If the disc is not on the display the NO DISC indication will appear.
2. Open the CD compartment (1) by lifting the door at the center point (OPEN text) and insert the disk, with the written side facing
up. Close the door gently.
3. After a few seconds the display (3) will show the number of tracks on the disc. Press the button to activate music playback.
4.Pressthe button toactivatethepause,thedisplaywillshowtheflashingsymbol.Pressthekeyagainto deactivatethepause.
5. Press the button to stop playback permanently.
JUMP TRACE AND QUICK SEARCH
1. Press the :/TUN+ o 9/TUN- to move to the previous track or next one.
2. Press and hold the :/TUN+ o 9/TUN- during playback to quickly search a particular musical passage. Release the button to
return to normal playback.
REPEAT
• Press the REPEAT button (6) on the remote control, until the RPT ONE indication appears on the display to reproduce the same
track continuously.
• Press the REPEAT key (6) on the remote control until the RPT ALL indication appears on the display to continuously reproduce
all the tracks present.
• Press the REPEAT button (6) on the remote control until the RPT FOLD indication appears on the display to continuously play all
the tracks in the selected folder (only for MP3 CDs containing folders).
• Press the REPEAT (6) key on the remote control until the NORMAL indication appears on the display to play back all the tracks
present only once.
• Press the RANDOM button (13) on the remote control (the RANDOM indication appears on the display) to randomly reproduce
all the tracks present. Press it again to deactivate the function.
ALBUM FUNCTION
NOTE: function valid only for MP3 CDs containing folders.
1. When playing an MP3 CD with multiple folders, press the FOLDER + (5) and FOLDER- (7) buttons to select the folder you want
to play.

14
HCX 10D8 DAB
ENGLISH
ID3 FUNCTION
NOTE: function valid only for MP3 tracks
1. During playback of an MP3 CD, press the DISPLAY button (10) to activate the ID3 function, information regarding the track
being played will be shown.
USB INPUT OPERATION
REPRODUCTION
1. Connect a USB memory device to the USB (10) input.
2. Switch on the appliance and press the SOURCE button (6) several times until the USB READ indication appears on the display,
indicating that the data on the USB device is loading. In the absence of the USB device, the display will show NO USB.
Note:
- The device may not support some USB devices, this is due to the incompatibility of some processors.
3. For the rest of the functions, refer to the paragraph "CD-MP3 PLAYER OPERATION".
INPUT AUX IN
1. Switch on the appliance and press the SOURCE button (6) several times until the AUDIO IN indication appears on the display.
2. Connect any unit with audio output through the appropriate cable to the AUX IN (8) input.
3. Command the external unit from its commands.
4. Adjust the volume by controlling the unit (4) or by using the VOL + or VOL- (11) keys on the remote control.
BLUETOOTH OPERATION
1. Switch on the appliance and press the SOURCE button (6) several times until the BT indication appears on the display.
2. The word "PAIRING" will start to flash on the display and the system will automatically enter search.
3. Activate the Bluetooth functionality on the external device to be paired and make it visible.
4. Start the device search. At the end, look for the "HCX 10D8 DAB" device.
5. Enter the password "0000" if necessary.
6. After pairing, the device will emit a notification sound and the word "BT AUDIO" will remain on the display.
7. Start audio playback from your device.
8. Press the :/TUN+ or 9/TUN- to move to the previous or next track.
9. Press the to activate the pause. Press the key again to deactivate the pause.
10. Hold down the key for a few seconds to remove the coupling.
SLEEP FUNCTION
The SLEEP function allows you to program the automatic switch-off after a certain time of the device.
By pressing the SLEEP key several times you can select the switch-off time (90, 80, 70, 60, 50, 40, 30, 20, 10, 00 = off).
The symbol ZZZ appears on the display to indicate the active function. After the programmed time has elapsed, the device switches
to standby mode automatically.
HEADPHONES
1. Insert the headphones into the headphone jack (7).
2. Start the desired playback and adjust the volume.
TECHNICAL SPECIFICATIONS
Power and consumption: ............. 100-240V 50 / 60Hz - 22W
FM band reception: .......................................87.5 - 108 MHz
DAB / DAB + band reception: ..........................174.928 - 239.200 MHz
Bluetooth transmission power: ....................................................2.5mW
Bluetooth transmission frequency: .................................................2.4GHz
Unit dimensions: ...............................140 x 210 x 170 mm
Speaker dimensions: ...............................130 x 125 x 170 mm

15
HCX 10D8 DAB
FRANÇAIS
Pour éviter d’éventuels dommages auditifs, limiter le temps d’écoute à volume élevé.
AVERTISSEMENT
NOTES D’EMPLOI
Cet appareil est un instrument électronique de haute précision; évitez donc de l’employer dans les cas suivants:
• A proximité de fortes sources de chaleur telles que des radiateurs ou tout appareil de chauffage.
• Dans des lieux très humides tels que des salles de bains, des piscines, etc.
• Dans des lieux très poussiéreux.
• Dans des lieux sujets à des fortes vibrations.
• Positionner l’appareil de façon à laisser toujours de l’espace pour la libre circulation de l’air à ses côtés (au moins 5 cm).
• N’obstruez pas les fentes d’aération.
• Si des substances liquides pénètrent à l’intérieur de l’appareil, débranchez immédiatement la fiche et apportez l’appareil au
centre d’assistance agréé TREVI le plus proche.
• Avant de mettre l’appareil en fonction, vérifiez toujours que les câbles d’alimentation et de connexion soient correctement
installés.
SOIN ET ENTRETIEN
Pour le nettoyage on conseille l’emploi d’un chiffon doux, légèrement imbibé. Evitez les solvants ou les substances abrasives.
IMPORTANT
La bonne construction de cet appareil garantit pour longtemps son parfait fonctionnement. Si toutefois des inconvénients devaient
se présenter, contactez le Centre d’Assistance agréé le plus proche.
TREVI poursuit une politique de recherche et de développement continus. Par conséquent, les produits peuvent présenter des
caractéristiques différentes par rapport aux données mentionnées.
VOLTAGE DANGEREUX ATTENTION AVERTISSEMENT SUR LE
LASER
Ce symbole apposé sur le dos de l’appa-
reil et reproduit dans ce manuel indique
la présence d’éléments fonctionnant à
haute tension à l’intérieur de cet appareil;
ne l’ouvrez pas, afin d’éviter le risque de
décharges électriques.
Ce symbole apposé sur le dos de l’appa-
reil et reproduit dans ce manuel indique
la présence d’instructions importantes
pour la sécurité d’emploi. Lisez-les avec
attention avant d’utiliser l’appareil.
Cet appareil est pourvu d’un système
de lecture à rayon laser. Bien que le
laser soit de faible puissance et muni
d’un dispositif de sécurité empêchant
son fonctionnement lorsque le volet
est ouvert, suivez scrupuleusement les
précautions suivantes:n’approchez pas
les yeux de la lentille du laser lorsque
l’appareil est ouvert; danger de lesion de
la retine.n’essayez pas de demonter ou
d’altererl’unitelaser;danger d’absorption
de radiations.

16
HCX 10D8 DAB
FRANÇAIS
DESCRIPTION DES COMMANDES
1. Lecteur CD
2. Touche STANDBY
3. Display
4. Réglage du volume
5. Touche / SCAN, Lecture / Pause / Recherche et
mémorisation de la radio stations automatiquement
6. Touche SOURCE, sélection de la source
7. Prise casque
8. Entrée audio (AUX IN)
9. Touche , d'arrêt.
10. Entrée USB.
11. 9/ TUNE - bouton, piste précédente / station de radio
12. :/ TUN + bouton, piste suivante / station de radio
13. Touche MENU / INFO, accès aux menus / affichage des
informations
14. Touche SELECT / MONO / ST, sélection de la radio mono /
stéréo / réglages pour confirmer
15. Récepteur de télécommande
1. Prise d’antenne, insérez le câble d’antenne fourni
2. Cordon d'alimentation
3. Prises de connexion haut-parleur R / L

17
HCX 10D8 DAB
FRANÇAIS
DESCRIPTION DES COMMANDES
1. Touche marche / veille
2. Touches de sélection numériques
3. Bouton MEMORY
4. Touche 9/ TUN-, piste précédente / station de radio
5. Bouton FOLDER +, sélection du dossier suivant en mode
CD ou USB
6. Touche REPEAT, active le mode de répétition
7. Touche FOLDER, sélection du dossier précédent en mode
CD ou USB
8. Touches INFO, SCAN, MENU de la source radio DAB / FM
9. Touches9,:,/sur une source Bluetooth
10. AFFICHER , /boutons sur la source sur la source
CD / USB
11. Touches VOL +/-, réglage du volume
12. Bouton MUTE, exclusion du son de l'appareil
13. Bouton RANDOM, sélection aléatoire des pistes en cours
de lecture
14. Bouton CH / DOWN, sélection de la mémoire précédente /
éléments du menu déroulant
15. Touche:/ TUN +, piste / station de radio suivante
16. Touche ENTER, confirme la sélection
17. Touche MONO / ST, écoute radio mono / stéréo
18. Touche CH + / UP, sélection de la mémoire suivante /
éléments du menu déroulant
19. Touche SLEEP, activation de la fonction d'arrêt automatique
20.ToucheX_BASS,activationde lafonctionXbass,amélioration
de la tonalité des basses
21. Touche EQUALIZER, sélection de divers modes sonores
présélectionnés
22. Touche SOURCE, sélection de la source
La télécommande est livrée avec une pile déjà installée. Pour activer la batterie,
retirezlalanguettetransparentesituéeaubasdelatélécommande.Latélécommande
le contrôle est maintenant prêt à être utilisé.
Pour remplacer par une nouvelle batterie:
1. Retirez le couvercle du compartiment de la batterie comme indiqué sur l'illu-
stration à droite.
2. Respectez la polarité et installez une pile au lithium 3V (CR2025).
3. Fermez le capot.

18
HCX 10D8 DAB
FRANÇAIS
ALIMENTATION
Branchez le cordon d’alimentation (2) à une prise de courant 100-240V 50 / 60Hz.
Ne branchez pas l’appareil à des prises électriques autres que celles indiquées.
Lors du premier démarrage, l’appareil recherchera les stations DAB présentes, l’écran affichera le mot SCANTIME. Attendez que
l'écran affiche l'heure actuelle.
Remarque: Sauf indication contraire, les descriptions des commandes s'appliquent à la fois au périphérique et à la télécommande.
ALLUMÉ ÉTEINT
1. Appuyez sur la touche STANDBY / FUNC (2) pour allumer l’appareil.
2. Appuyez sur le bouton STANDBY / FUNC (2) pour éteindre l'appareil.
Remarque: En source CD, USB ou AUX, si aucune opération n'est effectuée dans les 15 minutes, l'appareil entre automatiquement
en mode STANDBY.
COMMANDE DE VOLUME, FONCTION XBASS ET ÉGALISEUR
1. Tournez le bouton de contrôle du volume (4) sur l'appareil ou appuyez sur la touche VOL + ou VOL- (11) de la télécommande
pour augmenter ou diminuer le volume.
2. Appuyez sur le bouton XBASS (20) pour activer la fonction de renforcement des basses. Appuyez à nouveau pour le désactiver.
3. Appuyez sur la touche EQUALIZER (21) pour sélectionner l’une des dynamiques audio prédéfinies
FONCTIONNEMENT DE LA RADIO FM
1. Mettez l'appareil en marche et appuyez plusieurs fois sur le bouton SOURCE (6) jusqu'à ce que l'indication FM apparaisse à
l'écran.
2. Appuyez plusieurs fois sur les touches:/TUN+ (12) ou 9/TUN- (11) de l'appareil, ou sur les touches:/TUN+ (15) ou 9/
TUN- (4) de la télécommande pour augmenter ou diminuer le fréquence 0,05 MHz et effectuez une recherche pas à pas.
3. Appuyez pendant quelques secondes sur les touches:/TUN+ (12) ou 9/TUN- (11) de l'appareil, ou sur les touches:/TUN+
(15) ou 9/TUN- (4) de la télécommande pour syntonisez la station suivante ou précédente avec le meilleur signal reçu.
4. Appuyez longuement sur la touche SCAN pour activer la fonction de recherche et de sauvegarde automatique des stations de
radio (SCAN). L'unité est capable de stocker jusqu'à 20 stations. En appuyant longuement sur la touche MENU (13, 8 sur la
télécommande), il est possible de sélectionner le type de recherche automatique; Sous SCAN, confirmez avec SELECT (14) et
sélectionnez STRONG (stations avec signal puissant) ou ALL (toutes les stations), confirmez avec SELECT (14).
5. Pour stocker une station de radio:
- Déplacez vous sur la fréquence à mémoriser, maintenez la touche MEMORY (3) de la télécommande enfoncée.
Le mot PROG clignote à l'écran.
- Avec les touches:/TUN+ (15) ou 9/TUN- (4) de la télécommande, sélectionnez le numéro de la mémoire où vous souhaitez
enregistrer la station de radio.
- Appuyez sur la touche ENTER (16) pour confirmer.
- L'appareil peut stocker jusqu'à 20 stations.
6. Pour appeler une station de radio mémorisée, utilisez les touches CH + (18) et CH- (14).
7. Pour passer de la lecture de STEREO à MONO et inversement, appuyez sur le bouton MONO / ST (14).
Remarque: pour obtenir la meilleure réception FM connectée et orientée vers l’antenne. Si la réception n’est pas bonne, essayez de régler différemment
la longueur et l’orientation de l’antenne. Toutefois, la qualité de la réception FM dépend beaucoup de l’endroit où est placé l’appareil.
RADIO DAB / DAB + OPERATION
1. Allumez l'appareil et appuyez plusieurs fois sur le bouton SOURCE (6) jusqu'à ce que l'indication DAB apparaisse à l'écran.
Lorsque vous l'allumez pour la première fois, la radio recherche et stocke automatiquement toutes les stations DAB disponibles.
2. Si vous souhaitez répéter le balayage des stations DAB disponibles, appuyez longuement sur la touche MENU / INFO (13) pour
accéder au menu DAB. L'analyse complète apparaîtra.
3. Appuyez sur le bouton SELECT (14) pour lancer le balayage des stations DAB.
4. Appuyez sur la touche:/TUN+ (12) ou 9/TUN- (11) de l’appareil ou sur les touches:/TUN+ (15) ou 9/TUN- (4) de la
télécommande pour faire défiler les différentes fonctions accordées. Stations DAB. Appuyez sur la touche SELECT (14) de la
station DAB souhaitée pour lancer la lecture.
5. Appuyez plusieurs fois sur le bouton MENU / INFO (13) pour afficher les informations sur la station reçue.
RADIO DAB / DAB + MENU
1. Appuyez longuement sur le bouton MENU / INFO (13) pour accéder au menu DAB.
2. Appuyez sur la touche:/TUN+ (12) ou 9/TUN- (11) de l'appareil ou sur les touches:/TUN+ (15) ou 9/TUN- (4) de la
télécommande pour afficher les différents menus DAB. articles .
3. Appuyez sur la touche SELECT (14) pour sélectionner l'élément de menu affiché.

19
HCX 10D8 DAB
FRANÇAIS
Full scan: permet d’analyser la totalité de la bande DAB / DAB + et d’enregistrer automatiquement les stations trouvées.
Manual tune: vous permet de balayer manuellement une seule fréquence DAB / DAB +. Appuyez sur la touche:/TUN+ ou 9/
TUN- pour sélectionner le numéro de canal de la fréquence à balayer, puis appuyez sur la touche SELECT (14) pour lancer le
balayage. Les stations trouvées seront automatiquement stockées. À la fin, appuyez longuement sur la touche MENU / INFO
(13) pour revenir au menu DAB.
DRC: permet d'activer / désactiver la fonction DRC pour améliorer le son lors de l'écoute dans des environnements bruyants. Le
niveau DRC peut être configuré (haut), bas (bas) ou OFF (désactivé).
Prune: permet de supprimer de la liste des stations mémorisées toutes les radios trouvées mais non disponibles (signal médiocre).
Déplacez-vous avec les touches:/TUN+ ou 9/TUN- to Y (YES) et confirmez la suppression avec la touche SELECT (14).
Systèm: permet d'accéder au sous-menu système:
Language: il est possible de choisir la langue des menus. Italien, anglais (par défaut), allemand, espagnol, néerlandais, français
sont disponibles.
Factory Reset: vous permet de réinitialiser l'appareil aux paramètres d'usine. A la fin de la réinitialisation, un balayage automatique
des stations DAB / DAB + sera effectué. Déplacez-vous avec les touches:/TUN+ ou 9/TUN- to Y (YES) et confirmez avec
la touche SELECT (14).
Version SW: permet de visualiser la version du logiciel de l'appareil.
STOCKAGE DE STATIONS RADIO
Pour mémoriser une station de radio, procédez comme suit:
1. Syntonisez la station de radio souhaitée.
2. Appuyez longuement sur la touche MEMORY (3), l’écran affichera PROG.
3. Utilisez les touches:/TUN+ ou 9/TUN- pour sélectionner un emplacement de mémoire.
4. Appuyez sur la touche SELECT (14) pour confirmer et enregistrer la station de radio.
Répétez cette opération pour chaque station de radio que vous souhaitez enregistrer. Il y a 20 emplacements de mémoire disponibles.
5. Pour appeler une station de radio mémorisée, utilisez les touches CH + (18) et CH- (14).
UTILISATION DU LECTEUR CD-MP3
LA REPRODUCTION
1. Mettez l'appareil en marche et appuyez plusieurs fois sur le bouton SOURCE (6) jusqu'à ce que l'indication CD READ apparaisse à
l'écran, indiquant que le disque est en cours de chargement. Si le disque n’est pas sur l’affichage, l’indication NO DISC apparaît.
2. Ouvrez le compartiment à CD (1) en soulevant la porte par le centre (texte OPEN) et insérez le disque en orientant la face écrite
vers le haut. Fermez la porte doucement.
3. Après quelques secondes, l’écran (3) indiquera le nombre de plages du disque. Appuyez sur la touche pour activer la
lecture de musique.
4. Appuyez sur la touche pour activer la pause, l'écran affichera le symbole clignotant. Appuyez à nouveau sur la touche
pour désactiver la pause.
5. Appuyez sur le bouton pour arrêter la lecture de façon permanente.
SAUT DE TRACE ET RECHERCHE RAPIDE
1. Appuyez sur les touches:/TUN+ o 9/TUN- pour passer à la piste précédente ou suivante.
2. Maintenez les touches:/TUN+ o 9/TUN- enfoncées pendant la lecture pour rechercher rapidement un passage musical
particulier. Relâchez le bouton pour revenir à la lecture normale.
RÉPÉTER
• Appuyez sur le bouton REPEAT (6) de la télécommande jusqu'à ce que l'indication RPT ONE apparaisse à l'écran pour reproduire
la même piste en continu.
• Appuyez sur la touche REPEAT (6) de la télécommande jusqu'à ce que l'indication RPT ALL apparaisse à l'écran pour reproduire
en continu toutes les plages présentes.
• Appuyez sur le bouton REPEAT (6) de la télécommande jusqu'à ce que l'indication RPT FOLD apparaisse à l'écran pour lire en
continu toutes les plages du dossier sélectionné (uniquement pour les CD MP3 contenant des dossiers).
• Appuyez sur la touche REPEAT (6) de la télécommande jusqu'à ce que l'indication NORMAL apparaisse à l'écran pour reproduire
toutes les pistes présentes une seule fois.
• Appuyez sur le bouton RANDOM (13) de la télécommande (l'indication RANDOM apparaît à l'écran) pour reproduire de manière
aléatoire toutes les pistes présentes. Appuyez à nouveau pour désactiver la fonction.
FONCTION ALBUM
REMARQUE: fonction valide uniquement pour les CD MP3 contenant des dossiers.
1. Lors de la lecture d'un CD MP3 comportant plusieurs dossiers, appuyez sur les touches FOLDER + (5) et FOLDER- (7) pour
sélectionner le dossier que vous souhaitez lire.

20
HCX 10D8 DAB
FRANÇAIS
FONCTION ID3
NOTE: fonction valide uniquement pour les pistes MP3
1. Pendant la lecture d'un CD MP3, appuyez sur le bouton DISPLAY (10) pour activer la fonction ID3. Les informations relatives à
la piste en cours de lecture s'afficheront.
OPERATION D'ENTREE USB
LA REPRODUCTION
1. Connectez un périphérique de stockage USB à l’entrée USB (10).
2. Mettez l'appareil en marche et appuyez plusieurs fois sur le bouton SOURCE (6) jusqu'à ce que l'indication USB READ apparaisse
à l'écran, indiquant que les données du périphérique USB sont en cours de chargement. En l'absence du périphérique USB,
l'écran affichera NO USB.
Remarque:
- Il est possible que le périphérique ne prenne pas en charge certains périphériques USB, en raison de l'incompatibilité de certains
processeurs.
3. Pour le reste des fonctions, reportez-vous au paragraphe "FONCTIONNEMENT DU LECTEUR CD-MP3".
INPUT AUX IN
1. Mettez l'appareil en marche et appuyez plusieurs fois sur le bouton SOURCE (6) jusqu'à ce que l'indication AUDIO IN apparaisse
à l'écran.
2. Connectez toute unité avec une sortie audio via le câble approprié à l'entrée AUX IN (8).
3. Commandez l'unité externe à partir de ses commandes.
4. Réglez le volume en contrôlant l'appareil (4) ou en utilisant les touches VOL + ou VOL- (11) de la télécommande.
FONCTIONNEMENT BLUETOOTH
1. Mettez l'appareil en marche et appuyez plusieurs fois sur le bouton SOURCE (6) jusqu'à ce que l'indication BT apparaisse à
l'écran.
2. Le mot "PAIRING" commencera à clignoter à l'écran et le système entrera automatiquement en recherche.
3. Activez la fonctionnalité Bluetooth sur le périphérique externe à jumeler et rendez-la visible.
4. Lancez la recherche de périphérique. A la fin, recherchez le périphérique "HCX 10D8 DAB".
5. Entrez le mot de passe "0000" si nécessaire.
6. Après la liaison, l'appareil émet un son de notification et le mot "BT AUDIO" reste affiché.
7. Lancez la lecture audio à partir de votre appareil.
8. Appuyez sur les touches :/TUN+ ou 9/TUN- pour passer à la piste précédente ou suivante.
9. Appuyez sur le bouton pour activer la pause. Appuyez à nouveau sur la touche pour désactiver la pause.
10. Maintenez la touche / enfoncée pendant quelques secondes pour retirer le couplage.
FONCTION SLEEP
La fonction SLEEP vous permet de programmer l'extinction automatique après un certain temps de l'appareil.
En appuyant plusieurs fois sur la touche SLEEP, vous pouvez sélectionner l'heure de désactivation (90, 80, 70, 60, 50, 40, 30, 20,
10, 00 = désactivé).
Le symbole ZZZ apparaît à l'écran pour indiquer la fonction active. Une fois le temps programmé écoulé, l'appareil bascule auto-
matiquement en mode veille.
PRISE CASQUE
1. Insérez le casque dans la prise casque (7).
2. Lancez la lecture souhaitée et ajustez le volume.
SPÉCIFICATIONS TECHNIQUES
Puissance et consommation: ............. 100-240V 50 / 60Hz - 22W
Réception de la bande FM: .......................................87,5 - 108 MHz
Réception de bande DAB / DAB +: ......................174,928 - 239,200 MHz
Puissance de transmission Bluetooth: ...........................................2.5mW
Fréquence de transmission Bluetooth: ..........................................2,4 GHz
Dimensions de l'unité: ...............................140 x 210 x 170 mm
Dimensions du haut-parleur: ...............................130 x 125 x 170 mm
Table of contents
Languages:
Other Trevi Stereo System manuals

Trevi
Trevi MCX 1021 USB User manual

Trevi
Trevi CMP 574 USB User manual

Trevi
Trevi AV 610 USB User manual

Trevi
Trevi TT 1068 E User manual

Trevi
Trevi MCX 1024 USB User manual

Trevi
Trevi SB 8370 SW User manual

Trevi
Trevi TT 1060CD User manual

Trevi
Trevi HCV 10D35 DAB User manual

Trevi
Trevi TT 1070 E User manual

Trevi
Trevi SB 8350TV User manual

Trevi
Trevi MCX 1045IPD User manual

Trevi
Trevi HCX 1080 BT User manual

Trevi
Trevi HCV 1035 BT User manual

Trevi
Trevi HCX 10D6 DAB User manual

Trevi
Trevi MCX 1021 USB User manual

Trevi
Trevi DS 1976 V User manual

Trevi
Trevi HCX 1200 BT User manual

Trevi
Trevi SB 8340 SW User manual

Trevi
Trevi HF 1900 BT User manual

Trevi
Trevi HFX 1058 User manual