Trevi HCX 1030 S User manual

SISTEMA HIFI STEREO CON CD/MP3/USB
Manuale d'uso e collegamento
HIFI STEREO SYSTEM WITH CD/MP3/USB
User manual and connection
SYSTEME STEREO HIFI AVEC CD/MP3/USB
Mode d'emploi et connexion
HCX 1030 S
Guida d’uso
User guide
USB
INPUT
CD MP3
PLAYER
RADIO
PLL FM
AUX
IN
HIFI STERO ANLAGE MIT CD/MP3/USB
Bedienungsanleitung und Anschluss
ESTEREO CON CD/MP3/USB
Manual de usuario y la conexión

2
HCX 1030 S
WARNING!
WARNING:DONOTOPENTHESET.NEITHERCONTROLSORSPAREPARTSTO
BE USED BY THE USER ARE TO BE FOUND INSIDE IT. APPLY TO AUTHORISED
TREVI CENTERS FOR SERVICE OPERATIONS.
ATTENZIONE
RISCHIO DI SCOSSE
ELETTRICHE!
NON ESPORRE A PIOGGIA E
UMIDITÀ
ATTENZIONE: NON APRITE L'APPARECCHIO. ALL'INTERNO NON VI SONO
COMANDI MANIPOLABILI DALL'UTENTE NE PARTI DI RICAMBIO. PER TUTTE
LE OPERAZIONI DI SERVIZIO RIVOLGERSI AD UN CENTRO DI ASSISTENZA
AUTORIZZATO TREVI
DANGER OF ELECTRIC SHOCK!
DO NOT EXPOSE TO
RAIN OR HUMIDITY
ATTENTION
ATTENTION: NE PAS OUVRIR L’APPAREIL, A L’INTERIEUR IL N’Y A PAS DE
COMMANDESAMANIPULERPARL’UTILISATEUROUDEPIECESDERECHANGE.
POUR TOUTES LES OPERATIONS DE SERVICE IL FAUT S’ADRESSER A UN
SERVICE D’ASSISTANCE AUTORISE TREVI.
RISQUE DE DECHARGES
ELECTRIQUES
NE PAS EXPOSER A LA PLUIE ET A
L’HUMIDITE
ACHTUNG
ACHTUNG: DAS GERÄT NICHT ÖFFNEN. IM INNERN BEFINDEN SICH KEINE
VOM BENUTZER SELBST INSTANDSETZBAREN TEILE UND AUCH KEINE
ERSATZTEILE. FÜR JEGLICHE SERVICEARBEITEN, WENDEN SIE SICH BITTE
AN EINE TREVI AUTORISIERTEN KUNDENDIENSTSTELLE.
GEFAHR ELEKTRISCHER SCHLÄGE
NICHT DER FEUCHTIGKEIT UND
DEM REGEN AUSSETZEN
ATENCION
ATENCION: NO ABRIR EL APARATO, EN SU INTERIOR NO HAY MANDOS QUE
PUEDAN SER MANIPULADOS POR EL USUARIO NI PARTES DE REPUESTO.
PARA TODAS LAS OPERACIONES DE SERVICIO DIRIGIRSE A UN CENTRO DE
ASISTENCIA AUTORIZADO TREVI.
PELIGRO DE CHOQUES
ELECTRICOS
NO EXPONER A LLUVIA Y
HUMEDAD
WARNINGS
UK PLUG ONLY
WIRES CONNECTIONS TO A UK THREE-PIN PLUG
Thewiresinthismainsleadarecolouredinaccordancewiththefollowingwiringcodes:
Blue: Neutral
Brown: Live
Thewiresin this mains lead must be connected to the terminalsinthe plug as follows:
Blue wire:...........................N or Black
Brown wire: .......................L or Red
Neither wire is to be connected to the earth
(E or W) terminal of three-pin plug.
Should the fuse fail in the plug remove the
plugformthewallsocketandreplacethe fuse
with a 3 Amp. ASTA approved BS 1362 fuse.

3
HCX 1030 S
NOTE D'USO
Questo apparecchio è uno strumento elettronico di alta precisione, evitate quindi di utilizzarlo nei seguenti casi:
- Vicino a campi magnetici.
- Vicino a fonti di calore come caloriferi e stufe.
- In luoghi molto umidi come stanze da bagno, piscine, ecc...
- In luoghi molto polverosi.
- In luoghi soggetti a forti vibrazioni.
- Posizionare l’apparecchio in modo che ai suoi lati ci sia sempre abbastanza
spazio per la libera circolazione di aria (almeno 5 cm).
- Se dei liquidi penetrano all’interno dell’apparecchio scollegare immediatamente la spina dalla presa e portare l’apparecchio al
più vicino centro assistenza autorizzato TREVI.
- Controllare sempre prima di ricaricare l’apparecchio, che i cavi di alimentazione e di collegamento siano installati correttamente.
- Nessunasorgentediammanuda,qualicandeleaccese,dovrebbeesserepostasull’apparecchio.
- L’apparecchio non deve essere esposto a stillicidio o a spruzzi d’acqua e nessun oggetto pieno di liquido, quali vasi, deve essere
posto sull’apparecchio.
- Conservare il presente manuale per future referenze.
Posizionate l'apparecchio in modo che ai suoi lati ci sia sempre abbastanza spazio per la libera circolazione di aria (almeno 5 cm).
Non ostruite le feritoie di ventilazione.
Se dei liquidi penetrano all'interno dell'apparecchio scollegate immediatamente la spina dalla presa e portate l'apparecchio al più
vicino centro assistenza autorizzato TREVI.
Controllate sempre prima di accendere l'apparecchio che i cavi di alimentazione e di collegamento siano installati correttamente.
CURA E MANUTENZIONE
Per la pulizia si consiglia l’uso di un panno morbido, leggermente inumidito. Evitate solventi o sostanze abrasive.
IMPORTANTE
La buona costruzione di questo apparecchio ne garantisce per lungo tempo il perfetto funzionamento. Se tuttavia dovesse presentarsi
qualche inconveniente, sarà opportuno consultare il più vicino Centro Assistenza autorizzato.
TREVI persegue una politica di continua ricerca e sviluppo. Pertanto i prodotti possono presentare caratteristiche diverse da quelle
descritte.
AVVERTENZE SUL LASER
Questo apparecchio è dotato di un sistema di lettura con raggio laser. Benché il laser sia di bassa potenza e con
dispositivo di sicurezza che ne impedisce il funzionamento a sportello aperto attenetevi scrupolosamente alle
seguenti avvertenze:
Non avvicinate l'occhio alla lente del laser con l'apparecchio aperto, pericolo di lesione della retina.
Non tentate di smontare o manomettere l'unità laser, pericolo di assorbimento di radiazioni.
Per evitare possibili danni all’udito, limitare il tempo di ascolto a volumi
elevati.
ITALIANO

4
HCX 1030 S
DESCRIZIONE COMANDI
1. TASTO STANDBY
2. INDICATORE STANDBY
3. TASTO EQ/ID3
4. DISPLAY
5. TASTO STOP
6. TASTO FUNCTION
7. ALTOPARLANTI
8. TASTO PROG./P.MODE/MEM
9. TASTO 10/M./FOLD.-
10. TASTO 10/M./FOLD.+
11. PRESA CUFFIE
12. CONTROLLO VOLUME
13. INGRESSO USB
14. INGRESSO AUX IN
15. TASTO PREV/TUN.-
16. TASTO NEXT/TUN.+
17. TASTO PLAY/PAUSA/SCAN
18. ALLOGGIO CD
19. TASTO APERTURA VANO CD
20. ANTENNA FM
21. CONNETTORE PER ALTOPARLANTE DESTRO
22. CONNETTORE PER ALTOPARLANTE SINISTRO
UNITÀ FRONTE/RETRO
ITALIANO

5
HCX 1030 S
Il telecomando funziona con una batteria a bottone modello CR2025 inclusa.
Per rendere funzionante il telecomando occorre rimuovere la linguetta isolante (se presente) inserita nel vano batteria.
Qualora si rendesse necessaria la sostituzione della batteria seguire le seguenti istruzioni:
Aprire il vano batteria.
Sostituire la batteria con una modello CR2025 rispettando le polarità.
Richiudere il vano batterie.
Per prevenire la perdita di liquido da parte della batteria con il conseguente danneggiamento del telecomando, assicurarsi di
installarla correttamente.
Rimuovere la batteria dal telecomado se non si usa per lunghi periodi.
COLLEGAMENTI
Collegare i cavi audio degli altoparlanti nelle prese connettore per altoparlante (21 e 22) rispettando i colori (presa rossa nel con-
nettore rosso e presa bianca nel connettore bianco).
ALIMENTAZIONE
Inserire la spina in una presa di corrente 230V~ 50Hz. Non collegare l'apparecchio a prese con tensione diversa da quella indicata
Nota: Se non diversamente specicato, le descrizioni dei comandi valgono sia per l'apparecchio che per il telecomando.
ACCENSIONE/SPEGNIMENTO
1. Premere il tasto STANDBY (1). L'apparecchio si accenderà.
2. Premere nuovamente sul tasto STANDBY (1) per spegnere l'apparecchio.
In modalità CD/USB, in modo STOP se l'apparecchio non riceve nessun comando per 15 minuti, si porterà automaticamente in modalità standby.
Sarà sufciente premere nuovamente il tasto Standby (1) per riaccendere l'apparecchio.
CONTROLLO VOLUME ED EQUALIZZAZIONE
1. Ruotare il Controllo Volume (12) sull'apparecchio o premere il tasto VOL+ (14) o VOL- (13) del telecomando per aumentare o
diminuire il volume.
2. Premere il tasto MUTE (18) del telecomando per escludere momentaneamente l'audio. Ripremerlo per ripristinare l'audio.
3. PremereiltastoEQ(9)deltelecomandoperimpostareunaequalizzazionepredenita.Èpossibilesceglieretra:Rock,Classic,
Pop, Jazz, Flat.
PRESA CUFFIE
Inserireiljackdellacufanellapresa(11),glialtoparlantiverrannodisabilitati.
ITALIANO
DESCRIZIONE COMANDI
1. TASTO FUNCTION
2. TASTO MEMORY
3. TASTO ID3
4. TASTO FOLD.+/+10
5. TASTO FOLD.-/-10
6. TASTO MEM.-
7. TASTO PREV/TUN.-
8. TASTO P-MODE
9. TASTO EQ
10. TASTO STOP
11. TASTO NEXT/TUN:+
12. TASTO PLAY/PAUSA
13. TASTO VOL.-
14. TASTO VOL.+
15. TASTO MEM.+
16. TASTO MONO/STEREO
17. TASTO STANDBY
18. TASTO MUTE
19. TRASMETTITORE IR
20. VANO BATTERIE
TELECOMANDO

6
HCX 1030 S
ITALIANO
FUNZIONAMENTO RADIO
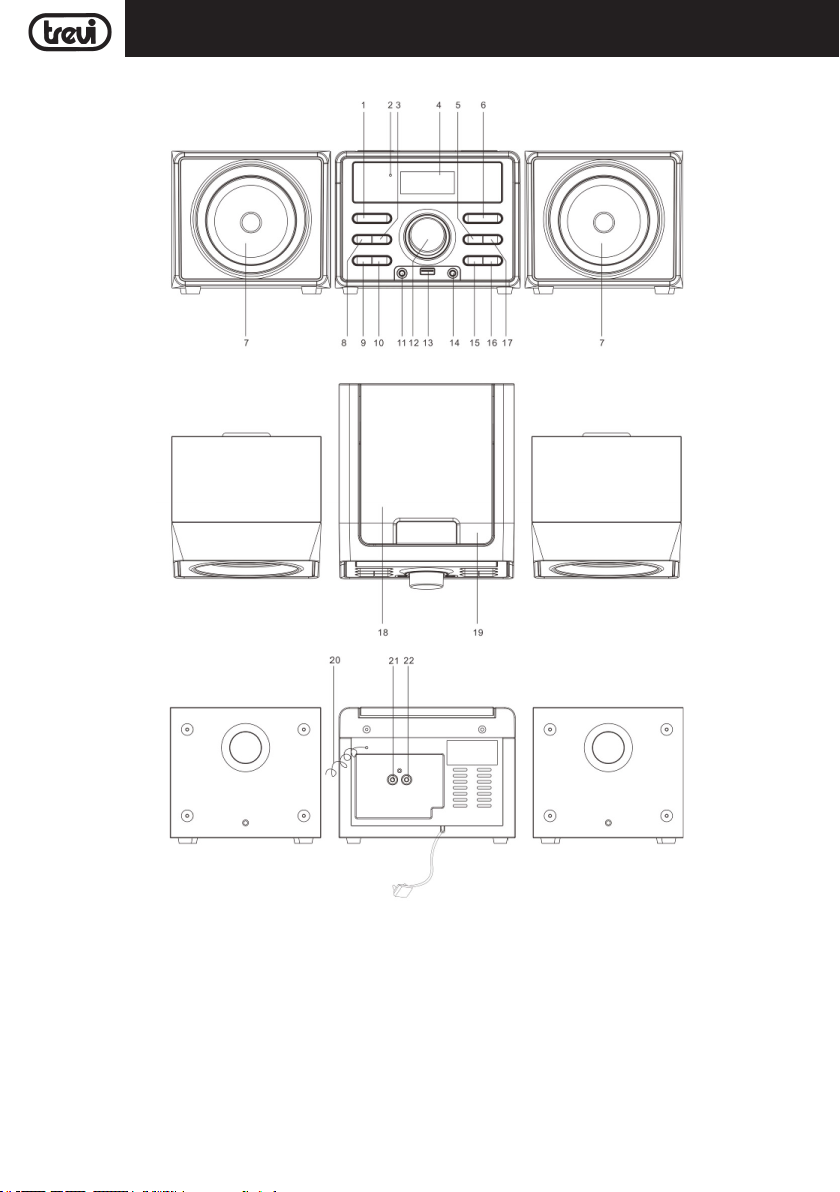
1. Accenderel'apparecchioepremereiltastoFUNCTION(6)noafarcompariresuldisplayl'indicazioneFM.
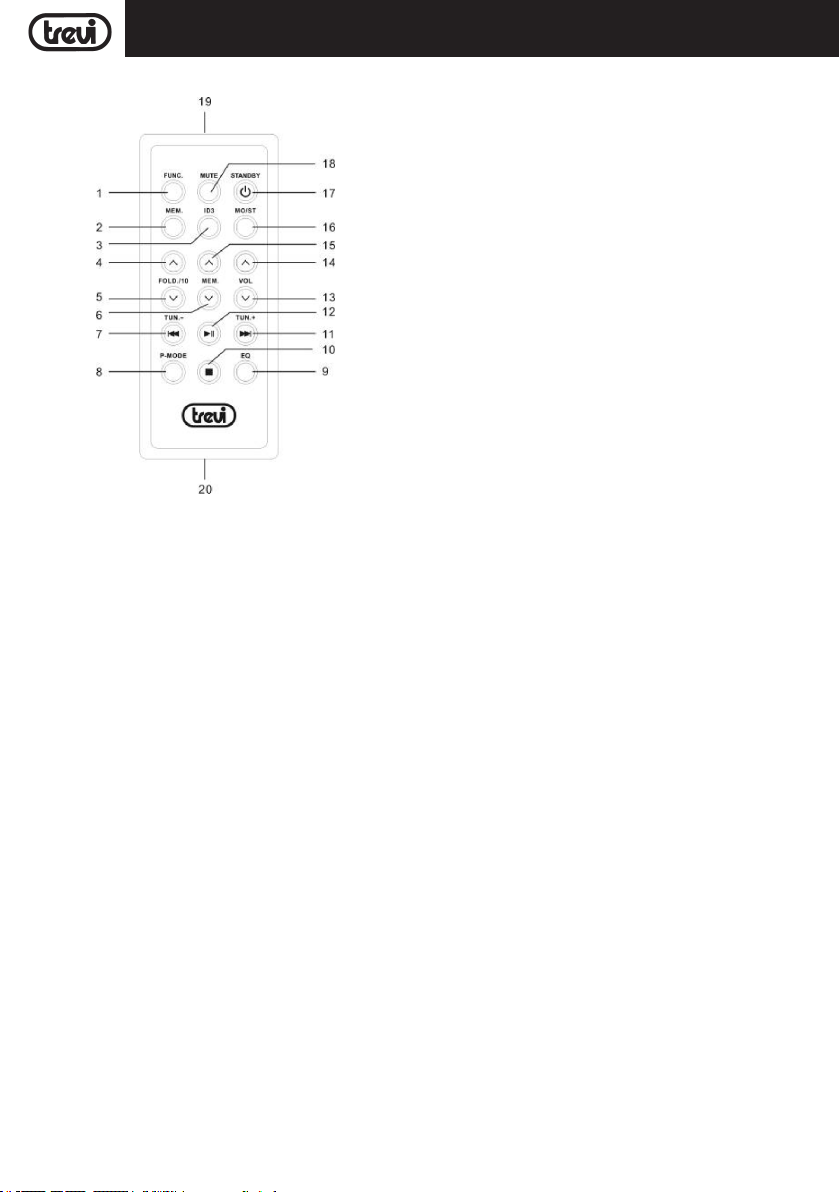
2. Premere una volta i tasti TUN+ (16) o TUN- (15) per aumentare o diminuire la frequenza di 0,05MHz.
3. Tenere premuto a lungo i tasti TUN+ (16) o TUN- (15) per sintonizzarsi sulla stazione radio successiva o precedente.
4. Premere il tasto PLAY/PAUSE (17) sull'apparecchio o il tasto (12) del telecomando per avviare la ricerca automatica delle stazioni
radio.L'apparecchiopuòmemorizzarenoa20stazioniradio.
5. Premere una volta i tasti M.-(9) o M.+(10) sull'apparecchio o i tasti MEM.-(6) o MEM.+(15) del telecomando per posizionarsi
sulla stazione memorizzata precedente o successiva.
6. Per memorizzare una stazione radio premere il tasto MEMORY (2) del telecomando e con i tasti MEM.-(6) o MEM.+(15)
selezionare il numero di memoria in cui si desidera salvare la stazione radio e premere di nuovo il tasto MEMORY (2).
7. Premere il tasto MO/ST(16) del telecomando per passare dall'ascolto stereo a quello mono se supportato dalla stazione radio
sintonizzata.
Nota: Per ottenere la migliore ricezione in FM estendete e orientate l’antenna. Se la ricezione non è buona provate a regolare diversamente
la lunghezza e l’orientamento dell’antenna, comunque la qualità della ricezione in FM dipende molto dal luogo dove è posto l’apparecchio.
FUNZIONAMENTO LETTORE CD-MP3
RIPRODUZIONE
1. Accenderel'apparecchioepremereiltastoFUNCTION(6)noafarcompariresuldisplayl'indicazioneCD.
2. Aprire il vano CD premendo il relativo tasto OPEN/CLOSE (19) ed inserire il disco con il lato scritto rivolto verso l'alto. Richiudere
lo sportello premendo dolcemente.
3. Dopoqualchesecondoildisplaymostreràilnumerodelletraccepresentisuldiscoelariproduzionesiavvieràautomaticamente.
4. Premere il tasto PLAY/PAUSE (17) sull'apparecchio o il tasto PAUSE (12) del telecomando per attivare la pausa, l'indicazione
deltemposuldisplaylampeggera'.RipremereiltastoperdisinserirelaPAUSA.
5. PremereiltastoSTOP(5)perarrestaredenitivamentelariproduzione.
6. In caso di disco MP3 con piu' cartelle, premere i tasti FOLD.+ e - (10 e 9) per selezionare le diverse cartelle da riprodurre.
SALTO TRACCIA E RICERCA VELOCE
1. Premere una volta i tasti PREV(15) o NEXT(16) per posizionarsi sulla traccia precedente o successiva.
2. Premere il tasto PREV(15) o NEXT(16) a lungo durante l'ascolto per ricercare velocemente un particolare passaggio musicale.
RIPETIZIONE
PremereiltastoP-MODE(8)deltelecomandonoafarcompariresuldisplayl'icona per riprodurre continuamente la stessa
traccia.
PremereiltastoP-MODE(8)deltelecomandonoafarcompariresuldisplayl'indicazione DIR (solo con disco MP3) per
riprodurre continuamente tutte le tracce presenti nella cartella (folder) in riproduzione.
PremereiltastoP-MODE(8)deltelecomandonoafarcompariresuldisplayl'indicazione ALL per riprodurre continuamente
tutte le tracce presenti.
PremereiltastoP-MODE(8)deltelecomandonoafarcompariresuldisplayl'indicazioneINTROperriprodurreiprimi10secondi
di ogni traccia presente sul disco.
PremereiltastoP-MODE(8)deltelecomandonoafarcompariresuldisplayl'indicazioneRAN.L'apparecchioiniziera'lariprodu-
zione casuale dei brani del disco.
Premerepiu'volteiltastoP-MODE(8)noafarscomparirequalsiasiicona/scrittadaldisplayperannullarelafunzionediripetizione.
FUNZIONE PROGRAM
Riproduzione secondo una programmazione impostata dall'utente.
1. Se il CD è in riproduzione, arrestarla premendo il tasto STOP (5).
2. PremereiltastoMEM.(6)oiltastoMEMORY(2)deltelecomando,suldisplaycompariràlascrittaP----.
3. SelezionareilnumerodellatracciachesidesiderariprodurretramiteitastiPREV(15)oNEXT(16).Suldisplaycompariràla
scritta P01xx, dove P01 indica la posizione della traccia nella sequenza da riprodurre e xx indica il nuero della traccia.
4. ConfermareconiltastoMEM.(8)oiltastoMEMORY(2)deltelecomandoeproseguireinserendoulterioritracce,noadun
massimodi20tracce(99condiscoMP3).SuldisplaycomparirannoinsequenzaP01xx, P02xx, P03xx, ecc.
5. Premere il tasto PLAY/PAUSE per iniziare la riproduzione programmata.
6. Premere il tasto STOP per arrestare la riproduzione, premerlo di nuovo per disattivare la programmazione.
FUNZIONAMENTO INGRESSO USB
RIPRODUZIONE
1. Collegare all'ingresso USB (13) un dispositivo di memoria USB.
2. Accenderel'apparecchioepremereiltastoFUNCTION(6)noafarcompariresuldisplayl'indicazioneUSB,lariproduzione
delle tracce dal dispositivo USB si avvierà automaticamente.

7
HCX 1030 S
Note:
- Il lettore potrebbe non supportare alcuni dispositivi USB, questo è dovuto all'incompatibilità di alcuni processori.
3. Per il resto delle funzioni fare riferimento al paragrafo "FUNZIONAMENTO LETTORE CD-MP3" .
SISTEMA ID3
L'apparecchiodisponediunsistemaID3.Seillemp3chesivuoleriprodurreèinformato"ID3",l'apparecchiovisualizzeràauto-
maticamentesuldisplayleinformazionidi"NOMETITLE","NOMEARTISTA"e"NOMEALBUM".Perdisattivarequestafunzioneè
sufcientepremereetenerepremutoilpulsanteID3(3)epassare,quindi,allavisualizzazionenormale.
INGRESSO LINE IN
1. Accenderel'apparecchioepremereiltastoFUNCTION(6)noafarcompariresuldisplayl'indicazioneAUXIN.
2. Collegare una qualsiasi unità provvista di uscita audio tramite apposito cavo all'ingresso AUX IN (14).
3. Comandare l'unità esterna dai propri comandi.
4. Regolare il volume tramite il controllo sull'unità (12) o tramite i tasti VOL+ (14) o VOL- (13) del telecomando.
SPECIFICHE TECNICHE
Alimentazione .......................................... 230V~ 50Hz
Consumo ........................................................20W
Standby ................................................... <0.5W
Frequenza di ricezione FM ........................................87.5 - 108MHz
Porta USB ..........................................................2.0
Unità ....................................175x136x205mm
Speaker ....................................150x136x148mm
ITALIANO
INFORMAZIONI AGLI UTENTI ai sensi del Decreto Legislativo N° 49 del 14 Marzo 2014
“Attuazione della Direttiva 2012/19/UE sui riuti di apparecchiature elettriche ed elettroniche (RAEE)”
Ilsimbolodelcassonettobarratoriportatosull’apparecchiaturaindicacheilprodottoallanedellapropriavitautiledeveessere
raccoltoseparatamentedaglialtririuti.L’utentedovrà,pertanto,conferirel’apparecchiaturaintegradeicomponentiessenziali
giuntaanevitaagliidoneicentridiraccoltadifferenziatadeiriutielettroniciedelettrotecnici,oppurericonsegnarlaalrivenditoreal
momento dell’acquisto di nuova apparecchiatura di tipo equivalente, in ragione di uno a uno, oppure 1 a zero per le apparecchiature
aventi lato maggiore inferiore a 25 cm. L’adeguata raccolta differenziata per l’avvio successivo dell’apparecchiatura dimessa al
riciclaggio, al trattamento e allo smaltimento ambientale compatibile contribuisce ad evitare possibili effetti negativi sull’ambiente
e sulla salute e favorisce il riciclo dei materiali di cui è composta l’apparecchiatura. Lo smaltimento abusivo del prodotto da parte
dell’utente comporta l’applicazione delle sanzioni amministrative di cui al D.Lgs n. Decreto Legislativo N° 49 del 14 Marzo 2014.

8
HCX 1030 S
ENGLISH
NOTES ON USE
This is a precision electronic appliance; avoid using it in the following cases:
• Listeningtohighvolumeforalongtimecoulddamageyourhearing.
• Do not close the ear to the loudspeaker during step setting and volume adjustments, and in particular keep the volume down
at the ignition
• Near strong heat sources, such as central heating plants or stoves.
• Inveryhumidplacessuchasbathrooms,swimmingpools,etc.
• Inverydustyplaces.
• In places subject to strong vibrations.
• Positiontheapplianceinsuchawaythatthereisalwaysenoughroomforfreeaircirculation(atleast5cm).
• Do not block the air inlets.
• Ifanyliquidenterstheappliance,unplugitimmediatelyfromthesocketandtakeittothenearestTREVIauthorisedservice
centre.
• Beforeswitchingontheappliance,alwayscheckthatthepowercableandtheconnectioncableareproperlyinstalled.
• Theapparatusshallnotbeexposedtodrippingorsplashingwater.Noobjectslledwithliquid,suchasvases,shouldbeplaced
on the unit.
• Nonakedamesources,suchaslightedcandles,shouldbeplacedon.
• Keep this manual.
CARE AND MAINTENANCE
Useaslightlydampsoftclothforcleaning.Donotusesolventsandabrasivesubstances.
IMPORTANT
Thisdeviceisdesignedforhomeuse(notprofessionaluse).Thisappliancehasbeencarefullybuilttoensurelong-lastingperfect
performance.However,shouldanyinconvenienceoccur,pleasecontactyourlocalauthorisedTREVIServiceCentre.
TREVIfollowsapolicyofongoingresearchanddevelopment.Thereforeproductsmayhavedifferentfeaturesfromthosedescribed.
LASER WARNING
Thisdeviceisequippedwithalaserbeamreadingsystem.Althoughthelaserisoflowpowerandisequipped
withasafetydevicethatpreventsitsoperationwhentheshutterisopen,thefollowingprecautionsshould
betaken:Donotapproachtheeyesofthelaserlenswhenthedeviceisopen;Dangeroflesionoftheretina.
Do not attempt to disassemble or alter the laser unit; Danger of radiation absorption.
To avoid possible hearing damage, limit the time listening at high
volumes.
Precautions for correct disposal of the product.
Thesymbolshownontheequipmentindicatesthatwastemustbedisposedofin“separatecollection”andsotheproductmustnotbedisposedof
together with urban waste.
Theusermusttaketheproducttospecial“separatewastecollectioncentres”providedbylocalgovernment,ordeliverittotheretaileragainstthe
purchase of a new product.
Separatecollectionofwasteandsubsequenttreatment,recyclinganddisposaloperationspromotestheproductionofequipmentwithrecycled
materialsandlimitsnegativeeffectsontheenvironmentandonhealthcausedbyimproperhandlingofwaste.
Illegal disposal of the product leads to the enforcement of administrative penalties.

9
HCX 1030 S
ENGLISH
1. STANDBY BUTTON
2. STANDBY INDICATOR
3. BUTTON EQ / ID3
4. DISPLAY
5. STOP BUTTON
6. FUNCTION BUTTON
7. SPEAKERS
8. BUTTON PROG./P-MODE/MEM
9. BUTTON 10 / M. / FOLD.-
10. BUTTON 10 / M. / FOLD. +
11. HEADPHONE INPUT
12. VOLUME CONTROL
13. USB INPUT
14. INPUT AUX IN
15. BUTTON PREV / TUN.-
16. BUTTON NEXT / TUN. +
17. PLAY / PAUSE / SCAN BUTTON
18. CD PLAYER
19. OPEN/CLOSE CD
20. ANTENNA FM
21. RIGHT CONNECTOR
22. LEFT CONNECTOR
COMMANDS

10
HCX 1030 S
ENGLISH
1. FUNCTION BUTTON
2. MEMORY BUTTON
3. BUTTON ID3
4. BUTTON FOLD+ / + 10
5. BUTTON FOLD .- / - 10
6. BUTTON MEM.-
7. BUTTON PREV / TUN.-
8. P-MODE BUTTON
9. BUTTON EQ
10. STOP BUTTON
11. BUTTON NEXT / TUN +
12. PLAY / PAUSE BUTTON
13. BUTTON VOL.-
14. BUTTON VOL+
15. BUTTON MEM. +
16. MONO / STEREO BUTTON
17. BUTTON STANDBY
18. MUTE BUTTON
19. IR TRANSMITTER
20. BATTERIES COMPARTMENT
REMOTE
TheremotecontrolworkswithaCR2025batteryincluded.
Removetheinsulatingtab(ifpresent)insertedinthebatterycompartment.
Ifyouneedtoreplacethebattery,followtheinstructionsbelow:
- Openthebatterycompartment.
- ReplacethebatterywithaCR2025respectingthepolarity.
- Closethebatterycompartment.
Topreventbatteryleakagebesuretoinstallitproperly.
Removethebatteryfromtheremoteifitisnotusedforlongperiods.
CONNECTIONS
Connect the speaker audio cables to the speaker connector sockets (21 and 22), respecting the colors (red plug in the red connector
and white plug in the white connector).
POWER
Plug the unit into a 230V ~ 50Hz power outlet. Do not connect the device to sockets with a voltage other than the one indicated
Note: Unless otherwise specied, command descriptions apply to both the unit and the remote control.
ON/OFF
1.PresstheSTANDBYkey(1).Theappliancewillturnon.
2. Press the STANDBY (1) button again to turn off the unit.
InCD/USBfunction,inSTOPmodeiftheunitdoesnotreceiveanycontrolfor15minutes,itwillautomaticallygotostandbymode.
PresstheStandbybutton(1)againtoturnontheunitagain.
VOLUME CONTROL AND EQUALIZATION
1. Turn Volume Control (12) on the unit or press VOL + (14) or VOL- (13) on the remote control to increase or decrease the volume.
2.PresstheMUTEbutton(18)ontheremotecontroltotemporarilyexcludetheaudio.Restartittorestoretheaudio.
3. Press the EQ button (9) on the remote control to set a default equalizer. You can choose from: Rock, Classic, Pop, Jazz, Flat.
HEADPHONE
Plug the headphone into the socket (11), the speakers will be disabled.

11
HCX 1030 S
ENGLISH
RADIO OPERATION
1.TurnontheunitandpresstheFUNCTIONbutton(6)untiltheFMindicationappearsonthedisplay.
2.PresstheTUN+(16)orTUN-(15)buttonsoncetoincreaseordecreasethefrequencyof0.05MHz.
3. Press and hold the TUN + (16) or TUN- (15) buttons for tuning to the next or previous radio station.
4. Press the PLAY / PAUSE button (17) on the remote control unit or button (12) to start automatic radio station search. The unit
can store up to 20 radio stations.
5. Press the M .- (9) or M. + (10) buttons once on the remote control unit or the MEM- (6) or MEM. + (15) buttons on the remote
control to move to the previous or next station.
6.TostorearadiostationpresstheMEMORYbutton(2)ontheremotecontrolandusetheMEM.-(6)orMEM+(15)keysto
selectthememorynumberinwhichyouwanttosavetheradiostationandpressagaintheMEMORYkey(2).
7.PresstheMO/STbutton(16)ontheremotetoswitchfromstereotomonoifsupportedbythetunedradiostation.
Note: To get the best FM reception, extend and orient the antenna. If reception is not good, try adjusting the length and orientation of the antenna
differently, however the quality of FM reception depends very much on where the unit is located.
CD-MP3 PLAYER OPERATION
1.TurnontheunitandpresstheFUNCTIONbutton(6)untiltheCDindicationappearsonthedisplay.
2.OpentheCDcompartmentbypressingtheOPEN/CLOSEbutton(19)andinsertthediscwiththesidefacingup.Closethe
doorbygentlypressing.
3.Afterafewsecondsthedisplaywillshowthenumberoftracksonthediscandplaybackwillstartautomatically.
4. Press the PLAY / PAUSE button (17) on the unit or the PAUSE (12) button on the remote control to activate the pause, the time
displayontheashingdisplay.PressthebuttonagaintoturnoffthePAUSE.
5.PresstheSTOPbutton(5)tostoptheplayback.
6.IfyouhaveMP3folderswithmultiplefolders,presstheFOLDkeys.+and-(10and9)toselectthedifferentfolderstoplay.
PREV/NEXT SONG SELECT AND FAST SEARCH
1. Press the PREV (15) or NEXT (16) buttons once to move to the previous or next track.
2.PressthePREV(15)orNEXT(16)buttonforalongtimewhilelisteningtoquicklysearchforaparticularmusicpassage.
REPEAT
Press the P-MODE button (8) on the remote until the icon appearsonthedisplaytoplaythesametrackcontinuously.
Press the P-MODE button (8) on the remote until the DIRindication(MP3disconly)appearsonthedisplaytocontinuously
playbackallthetracksinthefolderbeingplayed.
Press the P-MODE button (8) on the remote control until ALLisdisplayedtocontinuouslyplayallthetracksinthedisplay.
PresstheP-MODEbutton(8)ontheremoteuntiltheINTROindicatorappearsonthedisplaytoplaytherst10secondsofeach
track on the disc.
PresstheP-MODEbutton(8)ontheremotecontroluntiltheRANindicationappearsonthedisplay.Theunitwillstartplaying
random tracks on the disc.
PresstheP-MODEbutton(8)severaltimesuntilanyicon/textinthedisplaydisappearstocanceltherepeatfunction.
PROGRAM FUNCTION
Playbackaccordingtouser-setprogramming.
1.IftheCDisplaying,stopitbypressingtheSTOPbutton(5).
2.PresstheMEMkey(6)orMEMORYbutton(2)ontheremotecontrol,P----willappearonthedisplay.
3.SelectthetracknumberyouwanttoplayusingthePREV(15)orNEXT(16)buttons.P01xxwillappearonthedisplay,where
P01indicatesthepositionofthetrackinthesequencetobeplayedandxxindicatesthetrackzero.
4.ConrmwiththeMEMkey(8)ortheMEMORY(2)keyontheremotecontrolandcontinueinsertingmoretracks,uptoamaximum
of20tracks(99withMP3disc).ThedisplaywillshowinsequenceP01xx,P02xx,P03xx,andsoon.
5.PressthePLAY/PAUSEbuttontostarttheprogrammedplayback.
6.PresstheSTOPbuttontostopplayback,pressitagaintodisableprogramfunction.
USB INPUT OPERATION
REPRODUCTION
1.ConnectaUSBmemorydevicetotheUSBport(13).
2.TurnontheunitandpresstheFUNCTIONbutton(6)untiltheUSBdisplayappearsonthedisplay,playbackoftracksfromthe
USBdevicewillstartautomatically.
Notes: The player may not support some USB devices, this is due to the incompatibility of some processors.
3. For the rest of the functions refer to "PLAYBACK CD-MP3 PLAYBACK".

12
HCX 1030 S
ENGLISH
SYSTEM ID3
TheunithasanID3system.Ifthemp3leyouwanttoplayisin"ID3"format,thedevicewillautomaticallydisplay"TITLENAME",
"ARTISTNAME"and"NAMEALBUM"informationonthedisplay.TodeactivatethisfunctionsimplypressandholdtheID3(3)
buttonandthengotothenormaldisplay.
INPUT LINE IN
1.TurnontheunitandpresstheFUNCTIONbutton(6)untiltheAUXINindicatorappearsonthedisplay.
2.ConnectanyaudiooutputunitwithaspecialcabletotheAUXINinput(14).
3. Command the external unit from its own commands.
4. Adjust the volume using the control on the unit (12) or the VOL + (14) or VOL- (13) buttons on the remote control.
TECHNICAL SPECIFICATIONS
Powersupply: 230V~50Hz
consumption: 20W
Standby: <0.5W
FMreceptionfrequency: 87.5-108MHz
USB: 2.0 port
Unit size: 175x136x205mm
Speaker size: 150x136x148mm

13
HCX 1030 S
FRANÇAIS
NOTES D’EMPLOI
Cetappareilestuninstrumentélectroniquedehauteprécision;évitezdoncdel’employerdanslescassuivants:
• A proximité de fortes sources de chaleur telles que des radiateurs ou tout appareil de chauffage.
• Dans des lieux très humides tels que des salles de bains, des piscines, etc.
• Dans des lieux très poussiéreux.
• Dans des lieux sujets à des fortes vibrations.
Positionner l’appareil de façon à laisser toujours de l’espace pour la libre circulation de l’air à ses côtés (au moins 5 cm).
N’obstruez pas les fentes d’aération.
Sidessubstancesliquidespénètrentàl’intérieurdel’appareil,débranchezimmédiatementlacheetapportezl’appareilaucentre
d’assistance agréé TREVI le plus proche.
Avantdemettrel’appareilenfonction,vérieztoujoursquelescâblesd’alimentationetdeconnexionsoientcorrectementinstallés.
SOIN ET ENTRETIEN
Pourlenettoyageonconseillel’emploid’unchiffondoux,légèrementimbibé.Evitezlessolvantsoulessubstancesabrasives.
IMPORTANT
La bonne construction de cet appareil garantit pour longtemps son parfait fonctionnement. Si toutefois des inconvénients devaient
se présenter, contactez le Centre d’Assistance agréé le plus proche.
TREVI poursuit une politique de recherche et de développement continus. Par conséquent, les produits peuvent présenter des
caractéristiques différentes par rapport aux données mentionnées.
Pour éviter d’éventuels dommages auditifs, limiter le temps d’écoute
à volume élevé.
AVERTISSEMENT SUR LE LASER
Cetappareilestpourvud’unsystèmedelectureàrayonlaser.Bienquelelasersoitdefaiblepuissanceet
muni d’un dispositif de sécurité empêchant son fonctionnement lorsque le volet est ouvert, suivez scrupu-
leusementlesprécautionssuivantes:n’approchezpaslesyeuxdelalentilledulaserlorsque l’appareil est
ouvert; danger de lesion de la retine.
n’essayez pas de demonter ou d’alterer l’unite laser; danger d’absorption de radiations.
Recommandations pour l’élimination correcte du produit.
Lesymbolegurantsurl’appareilindiquequeleproduitfaitl’objetd’une“collecteséparée“.C’estpourquoi,leproduitnedoitpasêtreéliminé
avec les déchets urbains.
L’utilisateurdoitremettreleproduitauprèsde“déchargesspécialiséesdecollecteséparée“prévuesparlesautoritéslocales,oubienlerendreau
revendeur quand il achètera un nouvel appareil équivalent.
Lacollecteséparéeduproduitetlesopérationssuccessivesdetraitement,recyclageetéliminationfavorisentlaproductiond’appareilscomposés
pardesmatériauxrecyclésainsiquepermettentd’éviterdeseffetsnégatifssurl’environnementetsurlasantédespersonnessuiteàunegestion
impropre du déchet.
Toute élimination abusive du produit entraîne l’application de sanctions administratives.

14
HCX 1030 S
FRANÇAIS
1. BOUTON STANDBY
2. INDICATEUR STANDBY
3. BOUTON EQ / ID3
4. AFFICHAGE
5. BOUTON STOP
6. BOUTON DE FONCTION
7. SPEAKERS
8. BUTTON PROG./P-MODE/MEM
9. BUTTON 10 / M. / FOLD.-
10. BUTTON 10 / M. / FOLD. +
11. ENTRÉE DE PRISA CASQUEE
12. CONTRÔLE DU VOLUME
13. ENTRÉE USB
14. INPUT AUX IN
15. BOUTON PREV / TUN.-
16. BOUTON NEXT / TUN. +
17. BOUTON PLAY / PAUSE / SCAN
18. LECTEUR DE CD
19. OPEN / CLOSE CD
20. ANTENNA FM
21. CONNECTEUR DROIT
22. CONNECTEUR GAUCHE
DESCRIPTION DES COMMANDES

15
HCX 1030 S
FRANÇAIS
1. BOUTON DE FONCTION
2. BOUTON DE MÉMOIRE
3. BOUTON ID3
4. BOUTON FOLD + / + 10
5. BOUTON FOLD - / - 10
6. BOUTON MEM.-
7. BOUTON PREV / TUN.-
8. BOUTON P-MODE
9. BOUTON EQ
10. BOUTON D'ARRÊT
11. BOUTON NEXT / TUN +
12. BOUTON PLAY / PAUSE
13. BOUTON VOL.-
14. BOUTON VOL +
15. BUTTON MEM. +
16. BOUTON MONO / STEREO
17. BOUTON STANDBY
18. BOUTON MUTE
19. TRANSMETTEUR IR
20. COMPARTIMENT DES BATTERIES
TÉLÉCOMMANDE
La télécommande fonctionne avec une batterie CR2025 incluse.
Retirez la languette isolante (si présent) insérée dans le compartiment à piles.
Si vous devez remplacer la batterie, suivez les instructions ci-dessous:
- Ouvrir le compartiment à piles.
- Remplacez la batterie par un CR2025 en respectant la polarité.
- Fermer le compartiment de la batterie.
Pour éviter les fuites de batterie, assurez-vous de l'installer correctement.
Retirez la batterie de la télécommande si elle n'est pas utilisée pendant de longues périodes.
LES LIAISONS
Connectezlescâblesaudioduhaut-parleurauxprisesduconnecteurduhaut-parleur(21et22),enrespectantlescouleurs(che
rougeduconnecteurrougeetcheblancheduconnecteurblanc).
PUISSANCE
Branchez l'appareil dans une prise de courant 230V ~ 50Hz. Ne connectez pas l'appareil aux prises avec une tension autre que
celle indiquée
Remarque: Sauf indication contraire, les descriptions des commandes s'appliquent à la fois à l'unité et à la télécommande.
ALLUMÉ ÉTEINT
1.AppuyezsurlatoucheSTANDBY(1).L'appareils'allume.
2.AppuyezdenouveausurlatoucheSTANDBY(1)pouréteindrel'appareil.
EnmodeCD/USB,en mode STOP si l'appareil ne reçoit aucun contrôle pendant 15 minutes, il passe automatiquement en mode veille.
Appuyezdenouveausurleboutondeveille(1)pourallumerl'appareilànouveau.
CONTRÔLE ET ÉGALISATION DU VOLUME
1.Tournezlecontrôleduvolume(12)surl'appareilouappuyezsurVOL+(14)ouVOL-(13)delatélécommandepouraugmenter
ou diminuer le volume.
2.AppuyezsurlatoucheMUTE(18)delatélécommandepourexcluretemporairementl'audio.Redémarrez-lepourrestaurerl'audio.
3.AppuyezsurlatoucheEQ(9)delatélécommandepourréglerunégaliseurpardéfaut.Vouspouvezchoisirparmi:Rock,Classic,
Pop, Jazz, Flat.
CASQUE DE MUSIQUE
Branchez le casque dans la prise (11), les haut-parleurs seront désactivés.

16
HCX 1030 S
FRANÇAIS
FONCTIONNEMENT DE LA RADIO
1.Allumezl'appareiletappuyezsurlatoucheFUNCTION(6)jusqu'àcequel'indicationFMapparaissesurl'afchage.
2.AppuyezunefoissurlesboutonsTUN+(16)ouTUN-(15)pouraugmenteroudiminuerlafréquencede0.05MHz.
3.AppuyezetmaintenezenfoncéslesboutonsTUN+(16)ouTUN-(15)pourréglerlastationderadiosuivanteouprécédente.
4.AppuyezsurlatouchePLAY/PAUSE(17)delatélécommandeousurlebouton(12)pourlancerlarechercheautomatiquede
la station de radio. L'unité peut stocker jusqu'à 20 stations de radio.
5.AppuyezunefoissurlesboutonsM.-(9)ouM.+(10)surlatélécommandeousurleMEM-(6)ouMEM.+(15)delatélécom-
mande pour passer à la station précédente ou suivante.
6.Pourmémoriserunestationderadio,appuyezsurlatoucheMEMORY(2)delatélécommandeetutilisezlestouchesMEM.-(6)
ouMEM+(15)poursélectionnerlenumérodemémoiredanslequelvoussouhaitezenregistrerlastationderadioetappuyez
sur À nouveau la touche MEMORY (2).
7.AppuyezsurlatoucheMO/ST(16)delatélécommandepourpasserdelachaînestéréoàlamonosipriseenchargeparla
station de radio accordée.
Remarque: Pour obtenir la meilleure réception FM, étendez et orientez l'antenne. Si la réception n'est pas bonne, essayez d'ajuster la longueur
et l'orientation de l'antenne différemment, mais la qualité de la réception FM dépend beaucoup de l'emplacement de l'unité.
FONCTIONNEMENT DU CD-MP3
1.Allumezl'appareiletappuyezsurlatoucheFUNCTION(6)jusqu'àcequel'indicationduCDapparaissesurl'afchage.
2.OuvrezlecompartimentCDenappuyantsurlatoucheOPEN/CLOSE(19)etinsérezledisqueaveclecôtéorientéverslehaut.
Fermezlaporteenappuyantdoucement.
3.Aprèsquelquessecondes,l'afchageindiquelenombredepistessurledisqueetlalecturedémarreautomatiquement.
4.AppuyezsurlatouchePLAY/PAUSE(17)del'appareilousurlatouchePAUSE(12)delatélécommandepouractiverlapause,
l'afchagedel'heuresurl'afchageclignotant.AppuyezànouveausurleboutonpouréteindrelaPAUSE.
5.AppuyezsurlatoucheSTOP(5)pourarrêterlalecture.
6.SivousavezdesdossiersMP3avecplusieursdossiers,appuyezsurlestouchesFOLD.+Et-(10et9)poursélectionnerles
différents dossiers à jouer.
PREV / NEXT PISTE ET RECHERCHE RAPIDE
1.AppuyezunefoissurlesboutonsPREV(15)ouNEXT(16)pourpasseràlapisteprécédenteousuivante.
2.AppuyezsurleboutonPREV(15)ouNEXT(16)pendantunelonguepériodependantl'écoutepourrechercherrapidementun
passage de musique particulier.
RÉPÉTER
AppuyezsurlatoucheP-MODE(8)delatélécommandejusqu'àcequel'icône apparaisse sur l'écran pour jouer la même
piste en continu.
AppuyezsurlatoucheP-MODE(8)delatélécommandejusqu'àcequel'indication DIR (disque MP3 uniquement) apparaisse
sur l'écran pour lire en continu toutes les pistes du lecteur en cours de lecture.
AppuyezsurlatoucheP-MODE(8)delatélécommandejusqu'àceque ALLsoitafchépourlireenpermanencetoutesles
pistesdel'afchage.
AppuyezsurlatoucheP-MODE(8)delatélécommandejusqu'àcequel'indicateurINTROapparaissesurl'écranpourlireles10
premières secondes de chaque piste sur le disque.
AppuyezsurlatoucheP-MODE(8)delatélécommandejusqu'àcequel'indicationRANapparaissesurl'afchage.L'appareil
commence à lire des pistes aléatoires sur le disque.
AppuyezplusieursfoissurlatoucheP-MODE(8)jusqu'àcequetouteicône/texteàl'écrandisparaissepourannulerlafonction
de répétition.
FONCTION PROGRAMME
Lectureselonlaprogrammationdénieparl'utilisateur.
1.SileCDestencoursdelecture,arrêtez-leenappuyantsurleboutonSTOP(5).
2.AppuyezsurlatoucheMEM(6)oulatoucheMEMORY(2)delatélécommande,P----apparaîtsurl'afchage.
3. Sélectionnez le numéro de piste que vous souhaitez jouer à l'aide des boutons PREV (15) ou NEXT (16). P01xx apparaîtra sur
l'afchage,oùP01indiquelapositiondelapistedanslaséquenceàjoueretxxindiquelezérodelapiste.
4.ConrmezaveclatoucheMEM(8)oulatoucheMEMORY(2)delatélécommandeetcontinuezàinsérerplusdepistes,jusqu'à
20pistesmaximum(99avecundisqueMP3).L'afchages'afcheenséquenceP01xx,P02xx,P03xx,etc.
5.AppuyezsurlatouchePLAY/PAUSEpourlancerlalectureprogrammée.
6.AppuyezsurlatoucheSTOPpourarrêterlalecture,puisappuyezànouveaupourdésactiverlafonctiondeprogramme.

17
HCX 1030 S
FRANÇAIS
FONCTIONNEMENT D'ENTRÉE USB
LA REPRODUCTION
1. Connectez un périphérique de mémoire USB au port USB (13).
2.Allumezl'appareiletappuyezsurlatoucheFUNCTION(6)jusqu'àcequel'afchageUSBapparaissesurl'afchage,lalecture
des pistes depuis le périphérique USB démarre automatiquement.
Remarques: Le lecteur ne supporte pas certains périphériques USB, cela est dû à l'incompatibilité de certains processeurs.
3. Pour le reste des fonctions, reportez-vous à la section "PLAYBACK CD-MP3 PLAYBACK".
SYSTEM ID3
L'unitédisposed'unsystèmeID3.Silechiermp3quevoussouhaitezlireestenformat"ID3",l'appareilafcheraautomatiquement
lesinformations"NOMTITRE","ARTISTENOM"et"NOMALBUM"àl'écran.Pourdésactivercettefonction,appuyezsimplementsur
latoucheID3(3)etmaintenez-laenfoncée,puispassezàl'afchagenormal.
LIGNE D'ENTRÉE AUX IN
1.Allumezl'appareiletappuyezsurlatoucheFUNCTION(6)jusqu'àcequel'indicateurAUXINapparaissesurl'afchage.
2.Connectezuneunitédesortieaudioavecuncâblespécialàl'entréeAUXIN(14).
3. Commande l'unité externe à partir de ses propres commandes.
4. Réglez le volume à l'aide de la commande de l'appareil (12) ou des touches VOL + (14) ou VOL- (13) de la télécommande.
SPÉCIFICATIONS TECHNIQUES
Alimentation: 230 V ~ 50 Hz
Consommation: 20W
En veille: <0.5W
Fréquence de réception FM: 87,5 - 108 MHz
USB: port 2.0
Taille de l'unité: 175x136x205mm
Taille du haut-parleur: 150x136x148mm

18
HCX 1030 S
DEUTSCH
ANWEISUNGEN ZUM GEBRAUCH
Dieses Gerät ist ein elektronisches Instrument höchster Präzision; vermeiden Sie deshalb, das Gerät in folgenden Fällen zu benutzen:
• In der Nähe von Wärmequellen, wie z.B. Heizkörpern oder Öfen.
• In sehr feuchten Räumen, wie z.B. Badezimmern, Schwimmbädern, usw.
• In sehr staubigen Räumen.
• An Plätzen, die starken Vibrationen ausgesetzt sind.
Das Gerät muß so aufgestellt werden, daß an den Seiten genügend Raum für den freien Luftumlauf vorhanden ist (mindestens 5 cm.).
Die Ventilationsöffnungen nicht abdecken.
Sollten Flüssigkeiten im Innern des Geräts eindringen, ziehen Sie den Stecker sofort aus der Steckdose und bringen Sie das Gerät
in die nächstgelegene TREVI-autorisierte Kundendienststelle.
Vor Inbetriebnahme des Gerätes überprüfen Sie stets, daß die Netzkabel und die Verbindungskabel ordnungsgemäß installiert sind.
PFLEGE UND WARTUNG
Zum Reinigen benutzen Sie einen leicht angefeuchteten, weichen Lappen. Verwenden Sie keine Lösungsmittel oder Scheuermittel.
WICHTIG
Die gute Bauweise des Geräts gewährleistet den einwandfreien Betrieb auf längere Zeit hin. Sollten trotzdem irgendwelche Störungen
auftreten, wenden Sie sich an die nächstgelegene TREVI-autorisierte Kundendienststelle.
Die Firma TREVI ist für die ständige Forschung und Entwicklung seiner Produkte engagiert. Auf Grund dieser Tatsache können die
Produkte andere Merkmale als die beschriebenen aufweisen.
Um Hörschäden zu vermeiden, begrenzen Sie die Zeit bei hoher
Lautstärke zu hören.
HINWEISE IN BEZUG AUF DEN LASER
DiesesGerätistmiteinemLaser-Lesesystemversehen.DerLaserverfügtübereineniedrigeLeistungundistmit
einer Sicherheitsvorrichtung versehen, die den Betrieb bei geöffneter Klappe verhindert. Halten Sie sich trotzdem
sorgfältig an folgende Hinweise:
beigeöffnetemgerät,dasaugenichtandielinsedeslasersnähern.esbestehtdiegefahr,dassdienetzhautdabeiverletztwird.
versuchen sie nicht, die lasereinheit abzumontieren oder unsachgemäss zu behandeln. es besteht die gefahr, daß
strahlen dabei absorbiert werden.
Hinweise zur ordnungsgemäßen Entsorgung des Produkts.
DasaufdemGerätangebrachteSymbolweistdaraufhin,dassdasAltgerät“getrenntzusammeln”istunddasProduktdahernichtzusammenmit
dem Gemeindeabfall entsorgt werden darf.
DerBenutzermussdasProduktzudenentsprechenden,vonderGemeindeverwaltungeingerichteten“Wertstoffsammelstellen”bringenoderdem
Händler beim Kauf eines neuen Produkts übergeben.
Die getrennte Müllsammlung und anschließende Aufbereitung, Wiederverwertung und Entsorgung fördern die Herstellung von Geräten unter
Verwendung wiederverwerteter Materialien und vermindern die negativen Auswirkungen auf die Umwelt und Gesundheit in Folge einer falschen
Müllverwaltung.
Die widerrechtliche Entsorgung des Produkts führt zur Auferlegung von Verwaltungsstrafen.

19
HCX 1030 S
DEUTSCH
1. STANDBY-TASTE
2. STANDBY-ANZEIGE
3. BUTTON EQ / ID3
4. ANZEIGE
5. STOP-TASTE
6. FUNKTIONSTASTE
7. LAUTSPRECHER
8. TASTE PROG./P-MODE / MEM
9. TASTE 10 / M. / FOLD.-
10. TASTE 10 / M. / FOLD. +
11. KOPFHÖRER EINGANG
12. VOLUMENSTEUERUNG
13. USB-EINGANG
14. EINGANG AUX IN
15. BUTTON PREV / TUN.-
16. TASTE NÄCHST / TUN. +
17. PLAY / PAUSE / SCAN-TASTE
18. CD-SPIELER
19. OFFEN / SCHLIESSEN CD
20. ANTENNE FM
21. RECHTSANSCHLUSS
22. LINKER ANSCHLUSS
BESCHREIBUNG DER BEDIENELEMENTE

20
HCX 1030 S
DEUTSCH
1. FUNKTIONSTASTE
2. MEMORY-TASTE
3. TASTE ID3
4. TASTE FOLD + / + 10
5. BUTTON FOLD .- / - 10
6. TASTE MEM.-
7. BUTTON PREV / TUN.-
8. P-MODE-TASTE
9. TASTE EQ
10. STOP-TASTE
11. TASTE NEXT / TUN +
12. PLAY / PAUSE-TASTE
13. TASTE VOL.-
14. TASTE VOL +
15. TASTE MEM. +
16. MONO / STEREO-TASTE
17. TASTE STANDBY
18. MUTE-TASTE
19. IR TRANSMITTER
20. BATTERIES COMPARTMENT
FERNBEDIENUNG
Die Fernbedienung funktioniert mit einem CR2025 Akku im Lieferumfang enthalten.
Entfernen Sie die Isolierlasche (falls vorhanden), die in das Batteriefach eingelegt ist.
Wenn Sie den Akku austauschen müssen, folgen Sie den Anweisungen unten:
- Batteriefach öffnen.
- Tauschen Sie die Batterie mit einem CR2025 in Bezug auf die Polarität aus.
- Batteriefach schließen.
Um ein Austreten von Batterien zu vermeiden, müssen Sie es richtig installieren.
Entfernen Sie den Akku von der Fernbedienung, wenn er längere Zeit nicht benutzt wird.
ANSCHLÜSSE
Verbinden Sie die Lautsprecher-Audiokabel mit den Lautsprechersteckdosen (21 und 22), unter Berücksichtigung der Farben (roter
Stecker im roten Stecker und weißer Stecker im weißen Stecker).
LEISTUNG
Schließen Sie das Gerät an eine 230V ~ 50Hz Steckdose an. Schließen Sie das Gerät nicht an die Steckdosen an, mit einer anderen
Spannung als dem angegebenen
Hinweis: Sofern nicht anders angegeben, gelten Befehlsbeschreibungen sowohl für das Gerät als auch für die Fernbedienung.
AN AUS
1. Drücken Sie die STANDBY-Taste (1). Das Gerät schaltet sich ein.
2. Drücken Sie die Taste STANDBY (1) erneut, um das Gerät auszuschalten.
Bei CD / USB-Funktion, im STOP-Modus, wenn das Gerät 15 Minuten lang keine Steuerung empfängt, geht es automatisch in den
Standby-Modus.
DrückenSiedieStandby-Taste(1)erneut,umdasGerätwiedereinzuschalten.
VOLUMENSTEUERUNG UND EQUALISIERUNG
1. Drehen Sie die Lautstärkeregelung (12) am Gerät oder drücken Sie VOL + (14) oder VOL- (13) auf der Fernbedienung, um die
Lautstärke zu erhöhen oder zu verringern.
2. Drücken Sie die MUTE-Taste (18) auf der Fernbedienung, um den Ton vorübergehend auszuschließen. Starten Sie es neu, um
das Audio wiederherzustellen.
3. Drücken Sie die Taste EQ (9) auf der Fernbedienung, um einen Standard-Equalizer einzustellen. Sie können wählen: Rock, Classic,
Pop, Jazz, Flat.
KOPFHÖRER
Stecken Sie den Kopfhörer in die Steckdose (11), die Lautsprecher werden deaktiviert.
Table of contents
Languages:
Other Trevi Stereo System manuals

Trevi
Trevi HCX 10D6 DAB User manual

Trevi
Trevi HFX 1058 User manual

Trevi
Trevi DS 1976 V User manual

Trevi
Trevi HCX 1080 BT User manual

Trevi
Trevi HCX 10D8 DAB User manual

Trevi
Trevi HCX 1200 BT User manual

Trevi
Trevi TT 1060CD User manual

Trevi
Trevi MCX 1021 USB User manual

Trevi
Trevi MCX 1045IPD User manual

Trevi
Trevi MCX 1025 USB User manual

Trevi
Trevi HCV 1035 BT User manual

Trevi
Trevi SB 8370 SW User manual

Trevi
Trevi AV 610 USB User manual

Trevi
Trevi HF 1900 BT User manual

Trevi
Trevi TT 1070 E User manual

Trevi
Trevi SB 8350TV User manual

Trevi
Trevi SB 8340 SW User manual

Trevi
Trevi HCV 10D35 DAB User manual

Trevi
Trevi TT 1068 E User manual

Trevi
Trevi CMP 574 USB User manual