manuals.online logo
Brands
  1. Home
  2. •
  3. Brands
  4. •
  5. Uberhaus
  6. •
  7. Bathroom Fixture
  8. •
  9. Uberhaus 14925004 User manual

Uberhaus 14925004 User manual

1
1
2
3
4
5B
6
7
8
Gasket
Handshower
Filter Gasket
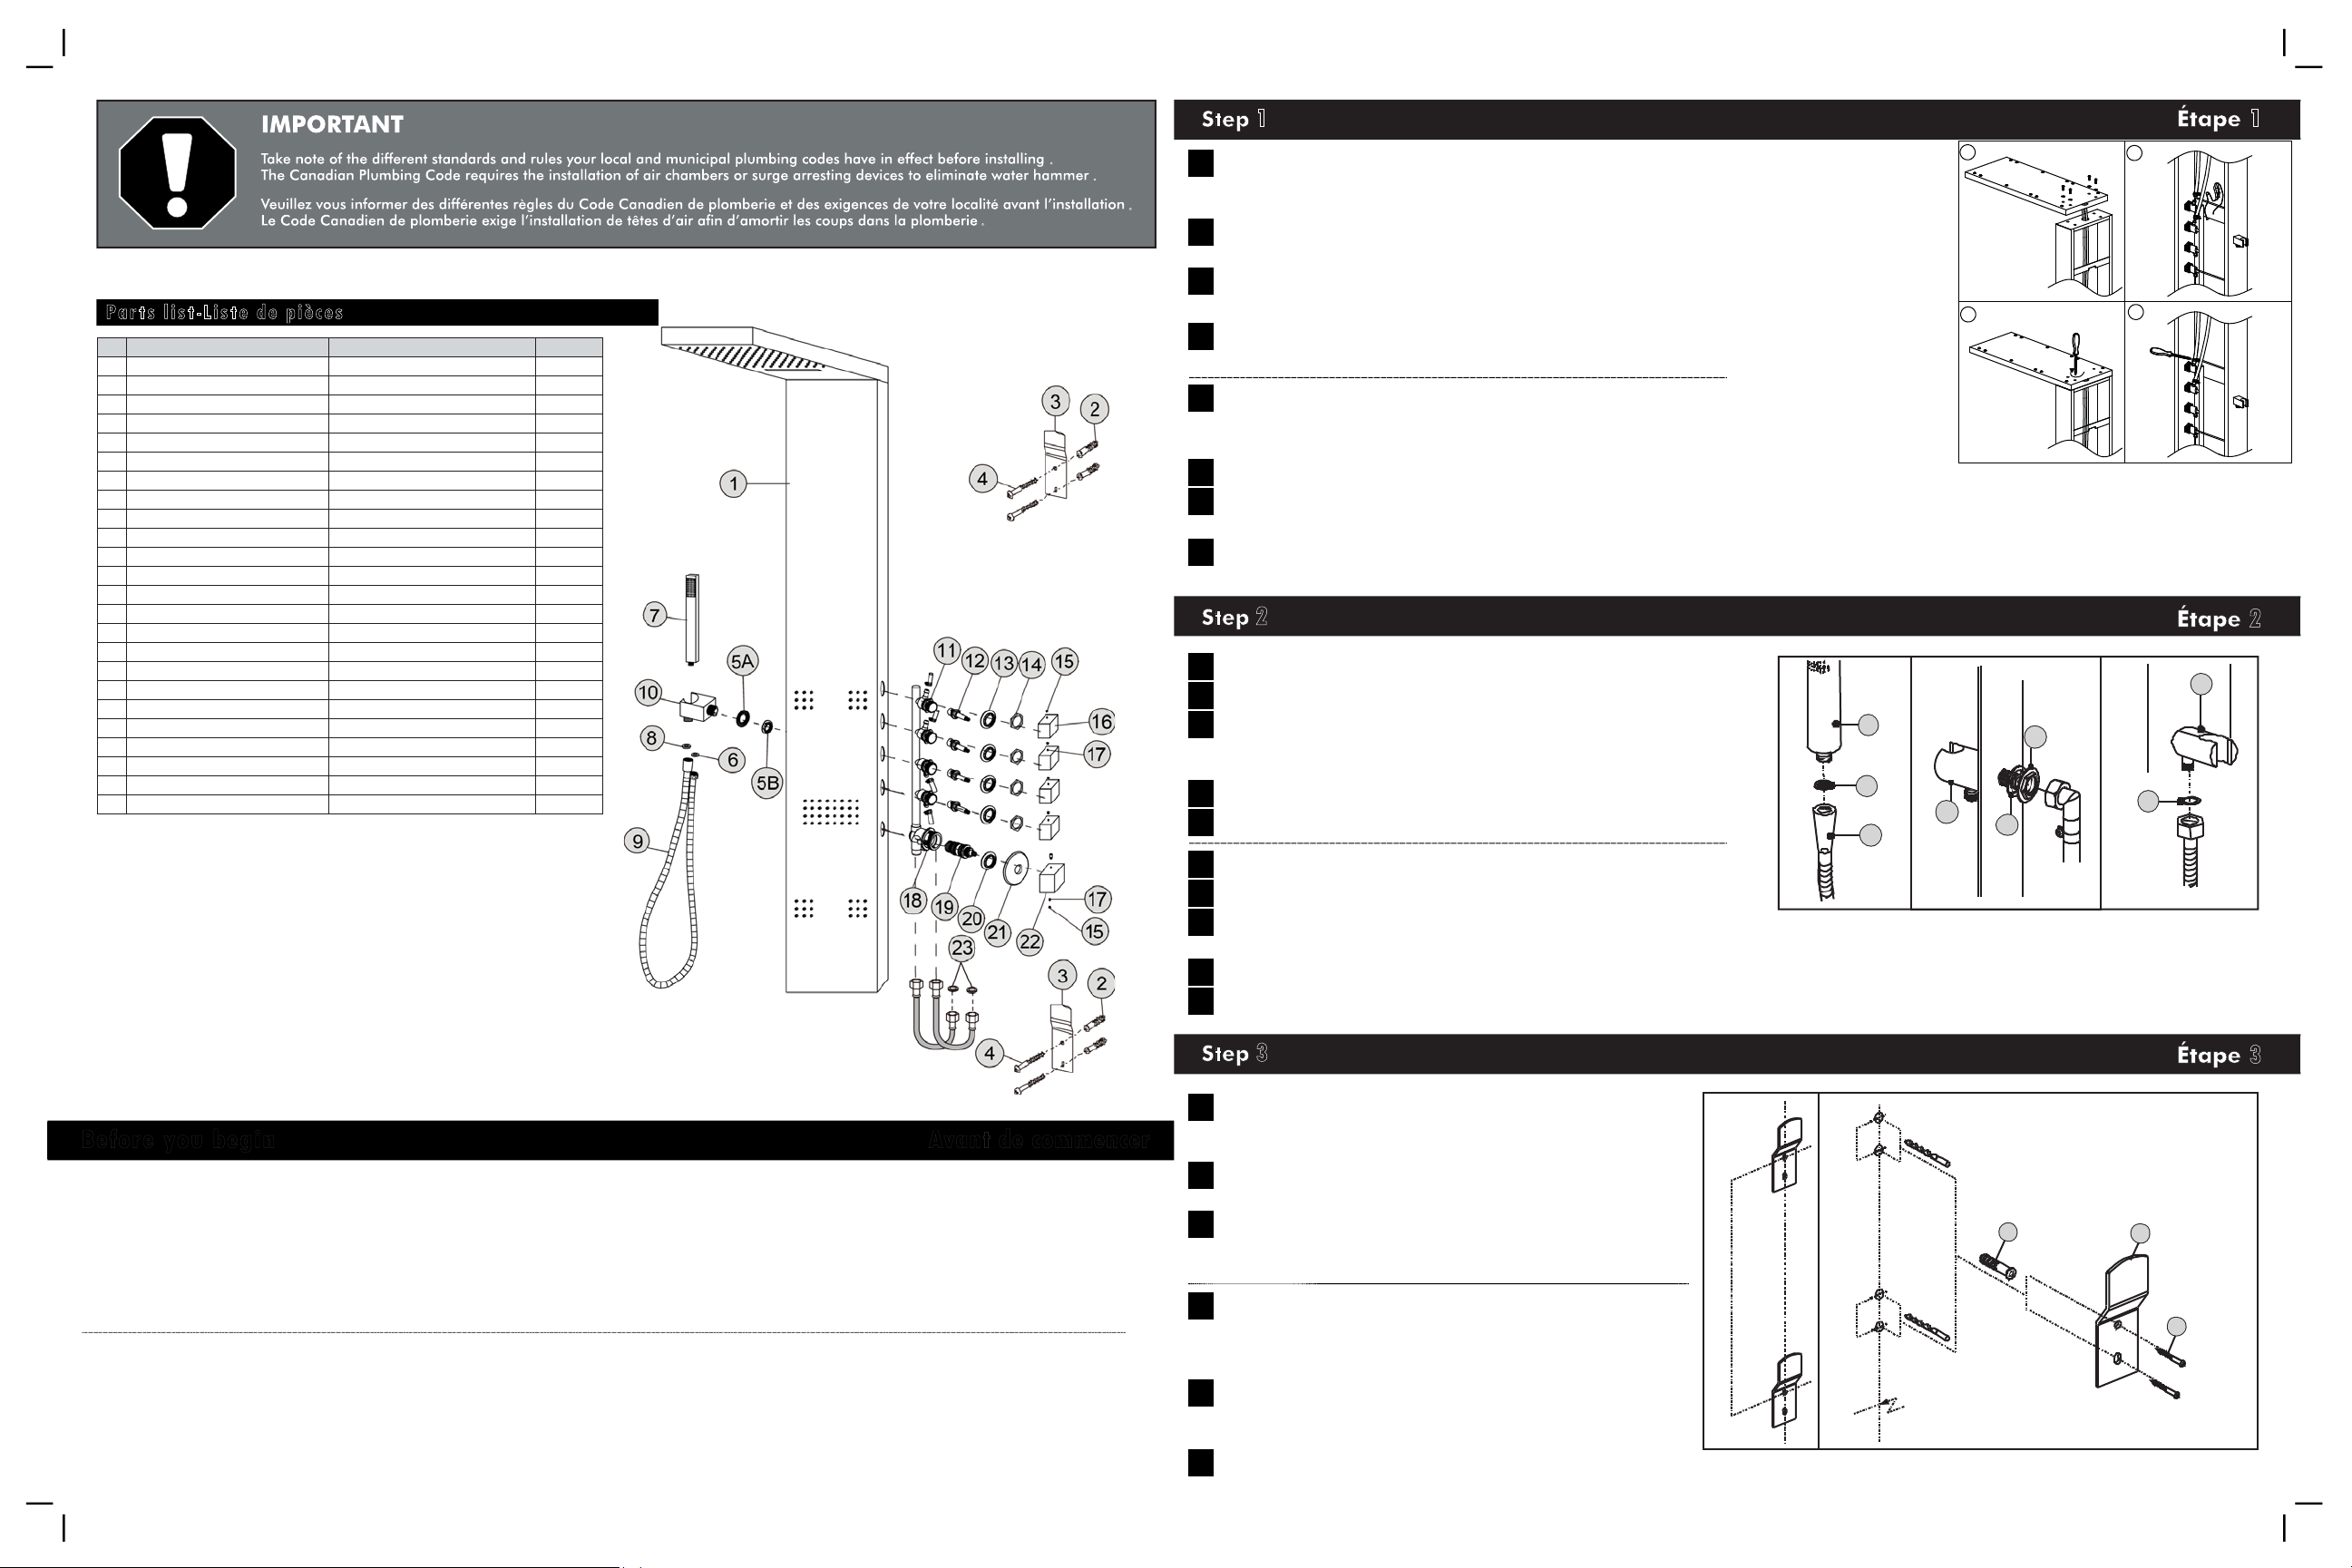
I There are 5 holes on the shower head and the top of the shower panel; 1 large hole and
4 small holes. Pass both hoses through the large hole and insert screws into the small
holes on the shower head.
II
With a screwdriver, tighten all screws to attach shower head to panel.
Make sure shower head is tight.
III
Connect the hoses to the water inlet or diverter valve body. The top hose is connected
to the rain shower, the second hose is for the waterfall effect.
IV Fix water hoses and water inlet in place with a stainless steel clip.
Tighten the hoses and water inlet with a screwdriver.
I Il y a 5 trous sur la pomme de touche et le dessus du panneau; 1 grand trou et 4 petits.
Faites passer les tuyaux dans le grand trou et insérez les vis dans les petits trous de
la pomme de douche.
II
À l'aide d'un tournevis, serrez les vis afin de fixer la pomme de douche au panneau. Vérifiez que celle-ci est bien serrée en place.
III Raccordez les boyaux au raccord d'entrée d'eau ou au corps de l'inverseur.
Le tuyau supérieur se raccorde à l'effet de pluie, et le second tuyau alimente l'effet de chute d'eau.
IV Fixez les boyaux et le raccord d'entrée d'eau en place à l'aide d'une pince
en acier inoxydable.Serrez les boyaux et le raccord d'entrée d'eau à fond à l'aide d'un tournevis.
Shower Column
9 Flexible Hose
Plastic Anchor
Positioning And Support Brackets
Screws
Threaded Washer
5A Washer
Avant de commencer
1. Shut off the water supply valves of the existing faucet. Remove the old faucet/shower assembly and properly clean surface on
which shower column is to be installed.
2. Identify the parts that make up your shower column.
3. Gather the hardware parts and check them against the list above, to ensure no part is missing.
4. Have all necessary tools ready.
5. Organize a space for assembly ; wall carpeting or a blanket will protect the furniture against scratches.
6. Never force parts into assembly. They should all fit snugly.
1. Fermer les valves d'entrée d'eau du robinet existant. Désinstaller l’ancienne robinetterie/douche et nettoyer la surface sur laquelle
la colonne de douche sera installée.
2. Repérer les pièces qui composent la colonne de douche.
3. Rassembler les pièces et au moyen de la liste ci-dessus, vérifier qu’il n’en manque aucune.
4. Préparer les outils nécessaires.
5. Organiser l’espace d’assemblage : utiliser un bout de moquette ou une couverture afin de protéger les meubles des égratignures.
6. Ne pas forcer pour assembler les pièces. Elles doivent s’assembler sans effort.
Description
Joint
Douchette
Rondelle filtrante
Colonne de douche
Tuyau souple
Cheville en plastique
Pattes de fixation et de soutien
Vis
Rondelle filetée
Rondelle
DescriptionNo
I-III
4 X4PCS
3 X2PCS
2 X4PCS
Horizontal bottom line
(ligne horizontale du bas)
90 cm ± 0.5 cm
2 cm2 cm
I Use a pencil to mark drill holes on wall. Keep a distance
between the top centre holes of the two positioning
and support brackets of 90 cm ± 0.5 cm.
II Drill holes on the wall, keeping a distance of 2 cm
between positioning holes for each bracket.
III Put four plastic anchors into the holes. Make sure the
anchors do not fall out easily. Fix both brackets by
tightening the screws.
I À l’aide d’un crayon, marquer les trous à percer sur le
mur. Garder une distance de 90 cm ± 0.5 cm entre les
trous supérieurs et centraux des deux pattes de fixation
et de support.
II Percer les trous dans le mur, en ayant soin de garder
une distance de 2 cm entre les trous de fixation de
chaque patte.
III Insérer quatre chevilles en plastique dans les trous.
Vérifier que les chevilles ne tombent pas facilement. Fixer les deux pattes en serrant les vis.
Parts list-Liste de pièces 14925004




10 Handshower Holder Support pour douchette
Before you begin
1
1
1
2
2
3
3
11 Valve body Corps de soupape
12 Diverter Valve Soupape d'inverseur
13 Valve Cover Couvercle de soupape
14 Hexagonal Nut Écrou hexagonal
15 Cover Plaque supérieure
16 Function Knob Bouton de fonctions
17 Set Screw Vis de réglage
18 Valve body Corps de soupape
19 Thermostatic Valve Soupape thermostatique
20 Plastic Cover Rondelle de plastique
21 Temperature Plate Plaque de température
22 Temperature Control Knob Bouton de contrôle de température
23 Filter Gasket Rondelle filtrante
3
4
32
1
7
9
8
10
11
6
5B
5A
20 24 21
1
16 17
19
22
23
25
26
18
12
13
14
12
15
4
3
4
32
1PCS
4PCS
2PCS
4PCS
1PCS
1PCS
1PCS
1PCS
1PCS
1PCS
1PCS
Quantity
4PCS
4PCS
4PCS
4PCS
5PCS
4PCS
5PCS
1PCS
1PCS
1PCS
1PCS
1PCS
2PCS
I Put filter gasket between the handshower and flexible hose.
II Connect the handshower to the flexible hose.
III Fix the handshower holder on the panel body. Then connect the
water hose to the holder with one threaded washer and
washer at the back.
IV Put one gasket into the flexible hose.
VConnect the flexible hose to the male elbow of the holder.
I Insérer la rondelle filtrante entre la douchette et le tuyau souple.
II Connecter la douchette au tuyau souple.
III Fixer le support pour douchette sur le panneau. Puis connecter le tuyau souple au support au moyen d’une rondelle filetée
et d’une rondelle à l’arrière.
IV Insérer une rondelle dans le tuyau souple.
VRelier le tuyau souple au coude mâle du support.
10 5A
5B
7
8
9
6
10
I-II III IV-V
4
2
3
1
Maintenance Entretien
I Hang the hanging plates at the back of the column on the positioning and
support brackets.
1 Tighten the screws after shower has been used for some time.
2 Keep these instructions for future reference, in case you need to call Customer Service for replacement parts.
1 Resserrer les vis après avoir utilisé la douche pendant un certain temps.
2 Conserver ces instructions pour référence future ou au cas où vous auriez besoin de communiquer avec le Service à la clientèle
pour un remplacement de pièces.
I Accrocher les plaques de suspension au dos de la colonne aux pattes de fixation
et support.
14925004
3
LIMITED ONE YEAR WARRANTY
THANK YOU FOR PURCHASING THIS UBERHAUS SHOWER COLUMN. THESE PRODUCTS HAVE
BEEN MADE TO DEMANDING, HIGH-QUALITY STANDARDS AND ARE ONE YEAR GUARANTEED FOR
DOMESTIC USE AGAINST MANUFACTURING FAULTS. THIS WARRANTY DOES NOT AFFECT YOUR
STATUTORY RIGHTS.
IF THIS SHOWER COLUMN SHOULD EVER DEVELOP A LEAK OR DRIP DURING THE WARRANTY PERIOD,
WE WILL FREE OF CHARGE PROVIDE THE CARTRIDGES NECESSARY TO PUT THE FAUCET BACK IN
GOOD WORKING CONDITION UNDER NORMAL INSTALLATION, UES AND SERVICE. REPLACEMENT
PARTS MAY BE OBTAINED BY CALLING MECANAIR CUSTOMER SERVICE DIRECTLY AT 1-866-206-0888
OR VISIT WWW.MECANAIR.NET. PROOF OF PURCHASE (ORIGINAL SALES RECEIPT) FROM THE
ORIGINAL CONSUMER PURCHASER MUST ACCOMPANY ALL WARRANTY CLAIMS.
NORMAL WEAR AND TEAR, INCLUDING ACCESSORY WEAR, IS NOT COVERED UNDER THIS WARRANTY.
THE SHOWER COLUMN IS GUARANTEED IF USED FOR NORMAL TRADE PURPOSES, AND IS VALID FOR
THE ORIGINAL BUYER ONLY. ANY WARRANTY IS DEEMED INVALID IF THE FAUCET HAS BEEN USED
IMPROPERLY, OR SUBJECT TO NEGLECT. RONA IS NOT RESPONSIBLE FOR ANY COCTS RELATED TO
LABOUR, INJURIES OR ANY OTHER LOSS INCURRED DURING THE PRODUCT INSTALLATION, REPAIR
OR REPLACEMENT, INCLUDING ANY INDIRECT OR CONSEQUENTIAL DAMAGES.
DUE TO CONTINUOUS PRODUCT IMPROVEMENT, WE RESERVE THE RIGHT
TO CHANGE THE PRODUCT SPECIFICATIONS WITHOUT PRIOR NOTICE.
GARANTIE LIMITÉE D'UN AN
MERCI D’AVOIR ACHETÉ CETTE COLONNE DE DOUCHE UBERHAUS. CE PRODUIT A ÉTÉ CONÇU POUR
RÉPONDRE À DES NORMES DE HAUTE QUALITÉ TRÈS STRICTES ET EST GARANTI UNE ANNÉE POUR
USAGE DOMESTIQUE CONTRE TOUT DÉFAUT DE FABRICATION SUIVANT LA DATE D’ACHAT. CETTE
GARANTIE N’AFFECTE PAS VOS DROITS LÉGAUX.
DANS LE CAS OÙ LE COLONNE DE DOUCHE AURAIT DES FUITES OU DÉGOUTTEMENTS DURANT
LA PÉRIODE DE GARANTIE, NOUS VOUS ENVERRONS LES CARTOUCHES SANS FRAIS AFIN DE LE
REMETTRE EN BONNE CONDITION EN AUTANT QUE LE PRODUIT AIT ÉTÉ INSTALLÉ ET UTILISÉ SELON
DES CONDITIONS NORMALES. LES PIÈCES DE REMPLACEMENT PEUVENT ÊTRE OBTENUES EN
COMMUNIQUANT DIRECTEMENT AVEC LE SERVICE À LA CLIENTÈLE DE MECANAIR AU 1-866-206-0888
OU EN VISITANT LE WWW.MECANAIR.NET. UNE PREUVE D’ACHAT (REÇU ORIGINAL D’ACHAT) DU
CONSOMMATEUR QUIA FAIT L’ACHAT DU PRODUIT DOIT ACCOMPAGNER TOUTE RÉCLAMATION DE
GARANTIE.
L’USURE NORMALE N’EST PAS COUVERTE PAR CETTE GARANTIE. CE COLONNE DE DOUCHE EST
GARANTISI UTILISÉ DE FAÇON NORMALE ET EST VALIDE POUR LE PREMIER ACHETEUR SEULEMENT.
TOUTE GARANTIE EST INVALIDE SI LE ROBINET A ÉTÉ UTILISÉ DE FAÇON NON RECOMMANDÉE, OU A
FAIT L’OBJET DE NÉGLIGENCE. RONA N’EST PAS RESPONSABLE DES FRAIS DE MAIN-D’OEUVER,
DES BLESSURES OU TOUTE AUTRE PERTE OU DOMMAGES SUBIS PENDANT L’INSTALLATION, LES
RÉPARATIONS OU LE REMPLACEMENT, INCLUANT TOUT DOMMAGE CONSÉCUTIF OU INDIRECT.
DÛ À L’AMÉLIORATION CONTINUE DE NOS PRODUITS, NOUS NOUS RÉSERVONS LE DROIT DE
MODIFIER LES CARACTÉRISTIQUES DE CE PRODUIT SANS AVERTISSEMENT.
Installation instructions
SHOWER COLUMN
14925004 MODEL
Instructions d'installation
COLONNE DE DOUCHE
MODÈLE 14925004
RECOMMENDED TOOLS
(NOE PROVIDED WITH PRODUCT)
OUTILS RECOMMANDÈS
(NON FOURNIS AVEC LE PRODUIT)
Teflon Tape
(Ruban teflon)
Spanner(Clé)
Screwdriver(Tournevis)
Pencil(Crayon)
Electric drill
(Perceuse électrique)
Drill bit(Mèche)

Tape measure(Ruban à mesurer)
(3m~5m)
4
4
5
5
I Finish the installation.
I Terminer l’installation.
6
6
WARNING: WATER PIPES AND WATER HOSES ON PANEL
MUST BE CONNECTED CORRECTLY. DO NOT INTERCHANGE.
I Identify the hot/cold water pipes on the wall.
II Put one filter gasket between the red water hose of the panel and the hot water pipe on
the wall, tighten connectors securely. Put one filter gasket between the blue
water hose of the panel and the cold water pipe on the wall, tighten
connectors securely.
III Tape the hose connectors completely with teflon tape.
AVERTISSEMENT: LES TUYAUX D’EAU ET BOYAUX D’EAU DU PANNEAU
DOIVENT ÊTRE CONNECTÉS CORRECTEMENT. NE LES INVERSEZ PAS.
I Repérer les tuyaux d’eau chaude/froide sur le mur.
II Placer une rondelle filtrante entre le boyau d’eau chaude (rouge) du panneau et le
tuyau d’eau chaude dans le mur. Serrer fermement pour assurer la connexion.
Placer une rondelle filtrante entre le boyau d’eau froide (bleu) du panneau et le tuyau
d’eau froide dans le mur. Serrer fermement pour assurer la connexion.
III Recouvrir complètement les raccords de tuyauterie avec du ruban de plomberie en téflon.

Other Uberhaus Bathroom Fixture manuals

Uberhaus Vanity User manual

Uberhaus

Uberhaus Vanity User manual

Uberhaus 14925006 User manual

Uberhaus

Uberhaus 14925006 User manual

Uberhaus 80465001 User manual

Uberhaus

Uberhaus 80465001 User manual

Uberhaus 80465029 User manual

Uberhaus

Uberhaus 80465029 User manual

Uberhaus Rona 97585010 User manual

Uberhaus

Uberhaus Rona 97585010 User manual

Uberhaus 14925017 User manual

Uberhaus

Uberhaus 14925017 User manual

Uberhaus 70845000-01-02-03 User manual

Uberhaus

Uberhaus 70845000-01-02-03 User manual

Uberhaus 80465028 User manual

Uberhaus

Uberhaus 80465028 User manual

Uberhaus FLAIR FLWV-2433 User manual

Uberhaus

Uberhaus FLAIR FLWV-2433 User manual

Uberhaus SHOWER COLUMN 14925000 User manual

Uberhaus

Uberhaus SHOWER COLUMN 14925000 User manual

Uberhaus 06105004 User manual

Uberhaus

Uberhaus 06105004 User manual

Uberhaus 75175019 User manual

Uberhaus

Uberhaus 75175019 User manual

Uberhaus 98495005 User manual

Uberhaus

Uberhaus 98495005 User manual

Popular Bathroom Fixture manuals by other brands

agape EVO 21 AKIT21L Assembly instructions

agape

agape EVO 21 AKIT21L Assembly instructions

Triton LocBoard LB18-S Installation & assembly instructions

Triton

Triton LocBoard LB18-S Installation & assembly instructions

Toto TTSH301C Installation and owner's manual

Toto

Toto TTSH301C Installation and owner's manual

Orbital Systems R3 OS8733-E manual

Orbital Systems

Orbital Systems R3 OS8733-E manual

Porcelanosa Noken Tono 100234994 N351780038 manual

Porcelanosa

Porcelanosa Noken Tono 100234994 N351780038 manual

KEUCO Axess 35006 010801 Mounting instruction

KEUCO

KEUCO Axess 35006 010801 Mounting instruction

Add-A-Bathroom FP800T installation guide

Add-A-Bathroom

Add-A-Bathroom FP800T installation guide

Panasonic DH-3ND1 operating instructions

Panasonic

Panasonic DH-3ND1 operating instructions

Signature Hardware Provincetown 948559 manual

Signature Hardware

Signature Hardware Provincetown 948559 manual

Decolav 1441 Series manual

Decolav

Decolav 1441 Series manual

IKEA HAVSEN manual

IKEA

IKEA HAVSEN manual

RIHO SCANDIC NXT 204 installation manual

RIHO

RIHO SCANDIC NXT 204 installation manual

Kohler ARCHER 7501X-4 installation instructions

Kohler

Kohler ARCHER 7501X-4 installation instructions

Zenith 2114S Assembly instructions

Zenith

Zenith 2114S Assembly instructions

American Standard Aspirations TU06150 Series manual

American Standard

American Standard Aspirations TU06150 Series manual

VINNOVA 553036 manual

VINNOVA

VINNOVA 553036 manual

Dreamline PRISM PLUS installation instructions

Dreamline

Dreamline PRISM PLUS installation instructions

RamonSoler 745103 installation instructions

RamonSoler

RamonSoler 745103 installation instructions

manuals.online logo
manuals.online logoBrands
  • About & Mission
  • Contact us
  • Privacy Policy
  • Terms and Conditions

Copyright 2025 Manuals.Online. All Rights Reserved.