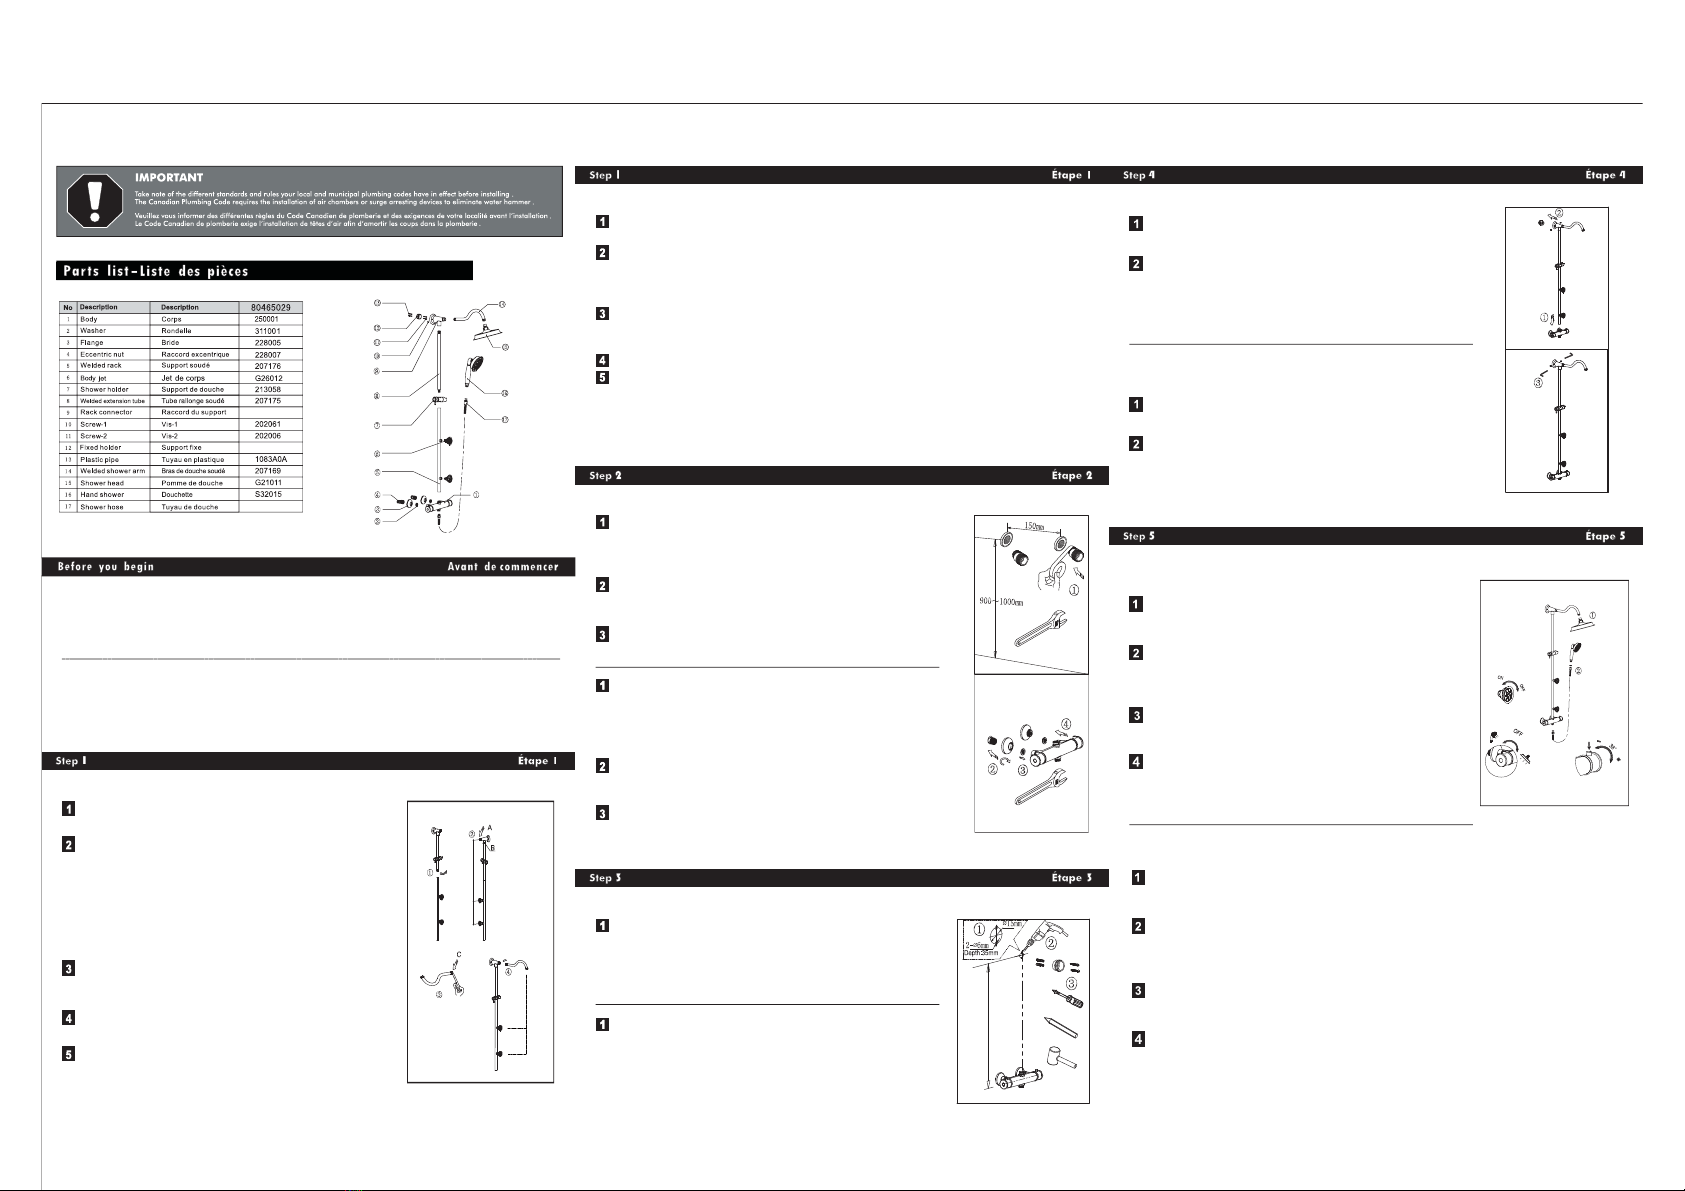
Testing connections
Install the shower head,connect the faucet body with the
hand shower through the shower hose(the sealing washer
must be used)
Verify that there are no leaks by slowly opening the hot
and cold water.In case of a leak,shut off the water supply
and tighten connectors1/4 turn using the appropriate
tool.Repeat if necessary.
Turn faucet on and leave both hot and cold water running
for at least one minute to evacuate all air trapped in the
pipes.Turn off water.
You can now turn on water supply.
Your UBERHAUS faucet is now installed and ready to
use!
Vérification des raccordements
Installez la pomme de douche,raccordez le corps du
robinet à la douchette à l'aide du tuyau de douche(sans
oublier la rondelle d’étanchéité).
Vérifier l’étanchéité des raccords en ouvrant lentement
l’alimentation d’eau.En cas de fuite,couper l'alimentation
puis serrer les raccords d’un quart de tour avec l’outil
approprié.Répéter au besoin.
Ouvrir l’eau chaude et l’eau froide pendant au moins une
minute afin d’évacuer I’air emprionné dans la tuyauterie.
Couper l’alimentation d’eau de nouveau.
Rétablir l’alimentation d’eau.
Votre robinet UBERHAUS est maintenant installé et
prêt à être utilisé!
Insert the welded rack into the faucet.
To ensure the product installation is firm,assemble the
rack connector into the fixed holder with the Allen key.
Insérez le support soudé dans le robinet.
Pour assurer une installation solide du produit, assemblez
le raccord au support fixe à l'aide de la clé hexagonale.
Seal the eccentric nut with the tape,connect the eccentric nut
with the embedded outlet pipe.The distance between the two
outlet pipes is 150 mm; they should stand 900mm-1000mm
from the ground.
Pass the flange through the eccentric nut and turn clockwise
to desired position until the flange and the wall are on the
same level.
Connect the faucet body screw with the eccentric nut by
hand.(The eccentric nut washer must be inserted).
Enroulez du ruban d'étanchéité sur le raccord
excentrique,puis vissez celui-ci sur le tuyau de sortie
encastré;la distance entre les deux tuyaux de sortie est de
150mm et ils doivent être situés entre 900mm et 1000mm du
sol.
Introduisez la bride dans le raccord excentrique,tournez
dans le sens horaire jusqu'à la position souhaitée pour que
la bride et le mur soient au même niveau.
Posez la vis du corps du robinet sur le raccord excentrique à
la main(sans oublier la rondelle de raccord excentrique).
Insert the welded extension tube into welded rack
and then tighten properly.
Check whether the outlet of rack connector at A
point and the two body jets are on the same
parallel line. In case of any deviation, use Allen
wrench to loosen the hexagon socket set screw
at B point, adjust the direction to make the outlet
of the rack connector and the two body jets are
on the same parallel line, then tighten the socket
set screw.
Entwine the thread male at C point of the elbow
of the top shower head 6-8 turns with thread
sealing tape clockwise.
Insert the elbow into the rack connector and
tighten tightly.
Check whether the outlet of top shower head
faces down vertically. If there is any deviation,
rotate the top shower head counterclockwise (up
to one circle), adjust the direction to ensure the
outlet faces down vertically. Do not damage the
sealing ring.
Shut off the water supply valves of the existing faucet.Remove the old faucet and
properly clean surface on which faucet is to be installed.
Fermez la soupape d’alimentation d’eau.Enlevez le vieux robinet et nettoyez la surface
sur laquelle le robinet sera install
é.
According to the basic dimensions of the product,choose a
fixed position point.
Then drill in the wall and insert the plastic pipes into the
holes.Tighten the fixed holder on the wall with the tapping
screw.
Placez le point de position fixe en fonction des dimensions
de base du produit.
Percez alors le mur et introduisez les tuyaux en plastique
dans les trous.Serrez le support fixe au mur à l'aide de la vis
autotaraudeuse.
Insérez le tube de rallonge soudé dans le support soudé, puis serrez les deux
pièces à fond.
Vérifiez que la sortie du raccord au point A est bien alignée avec les deux jets
corporels. En cas de déviation, desserrez l'écrou hexagonal au point B à l'aide
de la clé hex; ajustez la sortie du raccord afin qu'elle soit bien alignée avec les
deux jets corporels, puis resserrez l'écrou à l'aide de la clé hex.
Enfilez le raccord mâle au point C, soit au coin de la partie supérieure de la
pomme de douche, de 6 à 8 tours dans le sens horaire; sécurisez le raccord à
l'aide de ruban de plomberie.
Insérez le coude dans le support et serrez en place.
Vérifiez que la sortie d'eau de la pomme de douche est verticale et face vers
le bas. En cas de déviation, faites tourner la pomme de douche dans le sens
antihoraire (jusqu'à un tour complet), en ajustant la direction afin que la sortie
d'eau soit dirigée vers le bas. Prenez soin de ne pas endommager le joint.
213087
213084
H11028
On the same parallel line
In the same direction
Face down vertically
Reference 1100mm
Press
䶘দ


