manuals.online logo
Brands
  1. Home
  2. •
  3. Brands
  4. •
  5. VeriFone
  6. •
  7. Payment Terminal
  8. •
  9. VeriFone VX 520 Series User manual

VeriFone VX 520 Series User manual

Other manuals for VX 520 Series

18

Other VeriFone Payment Terminal manuals

VeriFone V240m User manual

VeriFone

VeriFone V240m User manual

VeriFone FlexClock User manual

VeriFone

VeriFone FlexClock User manual

VeriFone T650p User manual

VeriFone

VeriFone T650p User manual

VeriFone V200t User manual

VeriFone

VeriFone V200t User manual

VeriFone omni 5 series User manual

VeriFone

VeriFone omni 5 series User manual

VeriFone Omni 3200 User manual

VeriFone

VeriFone Omni 3200 User manual

VeriFone Vx-520 Series APACS 40 User manual

VeriFone

VeriFone Vx-520 Series APACS 40 User manual

VeriFone HICAPS VX680 User manual

VeriFone

VeriFone HICAPS VX680 User manual

VeriFone P200 User manual

VeriFone

VeriFone P200 User manual

VeriFone Omni Vx Series User manual

VeriFone

VeriFone Omni Vx Series User manual

VeriFone M400 User manual

VeriFone

VeriFone M400 User manual

VeriFone Omni 3600 User manual

VeriFone

VeriFone Omni 3600 User manual

VeriFone IX90 UX700 User manual

VeriFone

VeriFone IX90 UX700 User manual

VeriFone HICAPS VX680 User manual

VeriFone

VeriFone HICAPS VX680 User manual

VeriFone HICAPS VX680 User manual

VeriFone

VeriFone HICAPS VX680 User manual

VeriFone NURIT 8020 User manual

VeriFone

VeriFone NURIT 8020 User manual

VeriFone Vx-520 Series APACS 40 Manual

VeriFone

VeriFone Vx-520 Series APACS 40 Manual

VeriFone DUET Vx810 User manual

VeriFone

VeriFone DUET Vx810 User manual

VeriFone P400 User manual

VeriFone

VeriFone P400 User manual

VeriFone VX 520 Series User manual

VeriFone

VeriFone VX 520 Series User manual

VeriFone V240m User manual

VeriFone

VeriFone V240m User manual

VeriFone NURIT 8000 User manual

VeriFone

VeriFone NURIT 8000 User manual

VeriFone VX 680 User manual

VeriFone

VeriFone VX 680 User manual

VeriFone Vx520 XEFB410 User manual

VeriFone

VeriFone Vx520 XEFB410 User manual

Popular Payment Terminal manuals by other brands

LinkPoint 9100 Installation guides

LinkPoint

LinkPoint 9100 Installation guides

PAX D180SRF manual

PAX

PAX D180SRF manual

LinkPoint AIO Reference manual

LinkPoint

LinkPoint AIO Reference manual

Moneris hispeed 6200 operating manual

Moneris

Moneris hispeed 6200 operating manual

Ingenico iUC280 owner's manual

Ingenico

Ingenico iUC280 owner's manual

Ingenico Tetra Move/5000 user guide

Ingenico

Ingenico Tetra Move/5000 user guide

Ingenico iWL250B Quick reference guide

Ingenico

Ingenico iWL250B Quick reference guide

Optimum M4230 installation guide

Optimum

Optimum M4230 installation guide

Triton RL5000 Service manual

Triton

Triton RL5000 Service manual

Ingenico group Lane/8000 installation guide

Ingenico group

Ingenico group Lane/8000 installation guide

Infinite Peripherals Infinea Tab Lite user manual

Infinite Peripherals

Infinite Peripherals Infinea Tab Lite user manual

Ingenico iCT220, iCT250 Quick reference guide

Ingenico

Ingenico iCT220, iCT250 Quick reference guide

Optomany axept S900 user guide

Optomany

Optomany axept S900 user guide

Moneris iWL220 reference guide

Moneris

Moneris iWL220 reference guide

PAX S920 Quick reference guide

PAX

PAX S920 Quick reference guide

Moneris iWL220 reference guide

Moneris

Moneris iWL220 reference guide

Skyzer iWL252 BLUETOOTH quick guide

Skyzer

Skyzer iWL252 BLUETOOTH quick guide

Magtek DYNAPRO Quick installation guide

Magtek

Magtek DYNAPRO Quick installation guide

manuals.online logo
manuals.online logoBrands
  • About & Mission
  • Contact us
  • Privacy Policy
  • Terms and Conditions

Copyright 2025 Manuals.Online. All Rights Reserved.

Your new CareCredit Terminal!
TERMINAL SET UP
Step 1
Step 2
Step 4
Step 3
Take your box to the location where
you will set up your terminal.
Remove the terminal from the box.
Plug your terminal’s power cord
into the back of your terminal and a
convenient power outlet near where
the terminal will be used.
A. Press the F2 button. B. Press the purple
“Deposit”key.
C. Press the F3 button.
You should see“dialing
primary”on your
terminal’s display. A
receipt will print: 0.00
Plug your terminal’s phone line into
the back of your terminal and a
phone jack located near the place
where you will use your terminal.
NOTE: Your terminal comes with a power plug,
phone line, and printer paper. In addition, extra
supplies of printer paper are provided in your kit.
See other side for additional information.
If your terminal displays“no line,” call 1–800–859–9975.
PRS
7
GHI
4
QZ.
1
’
”
*
�
BACK
ENTER
CANCEL
ABC
2
TUV
8
ABC
0
JKL
5
DEF
3
#
WXY
9
MNO
6
Vx520Terminal
PAPER
FEED
REPORTS
REPRINT
DEPOSIT
SET-UP
ALPHA
F3
F2
F1
F4
VX 520
P/NCUST-1172-904
PRS
7
GHI
4
QZ.
1
’
”
*
�
BACK
ENTER
CANCEL
ABC
2
TUV
8
ABC
0
JKL
5
DEF
3
#
WXY
9
MNO
6
Vx520Terminal
PAPER
FEED
REPORTS
REPRINT
DEPOSIT
SET-UP
ALPHA
F3
F2
F1
F4
VX 520
P/NCUST-1172-904
PRS
7
GHI
4
QZ.
1
’
”
*
�
BACK
ENTER
CANCEL
ABC
2
TUV
8
ABC
0
JKL
5
DEF
3
#
WXY
9
MNO
6
Vx520Terminal
PAPER
FEED
REPORTS
REPRINT
DEPOSIT
SET-UP
ALPHA
F3
F2
F1
F4
VX 520
P/NCUST-1172-904
PRS
7
GHI
4
QZ.
1
’
”
*
�
BACK
ENTER
CANCEL
ABC
2
TUV
8
ABC
0
JKL
5
DEF
3
#
WXY
9
MNO
6
Vx520Terminal
PAPER
FEED
REPORTS
REPRINT
DEPOSIT
SET-UP
ALPHA
F3
F2
F1
F4
VX 520
P/NCUST-1172-904
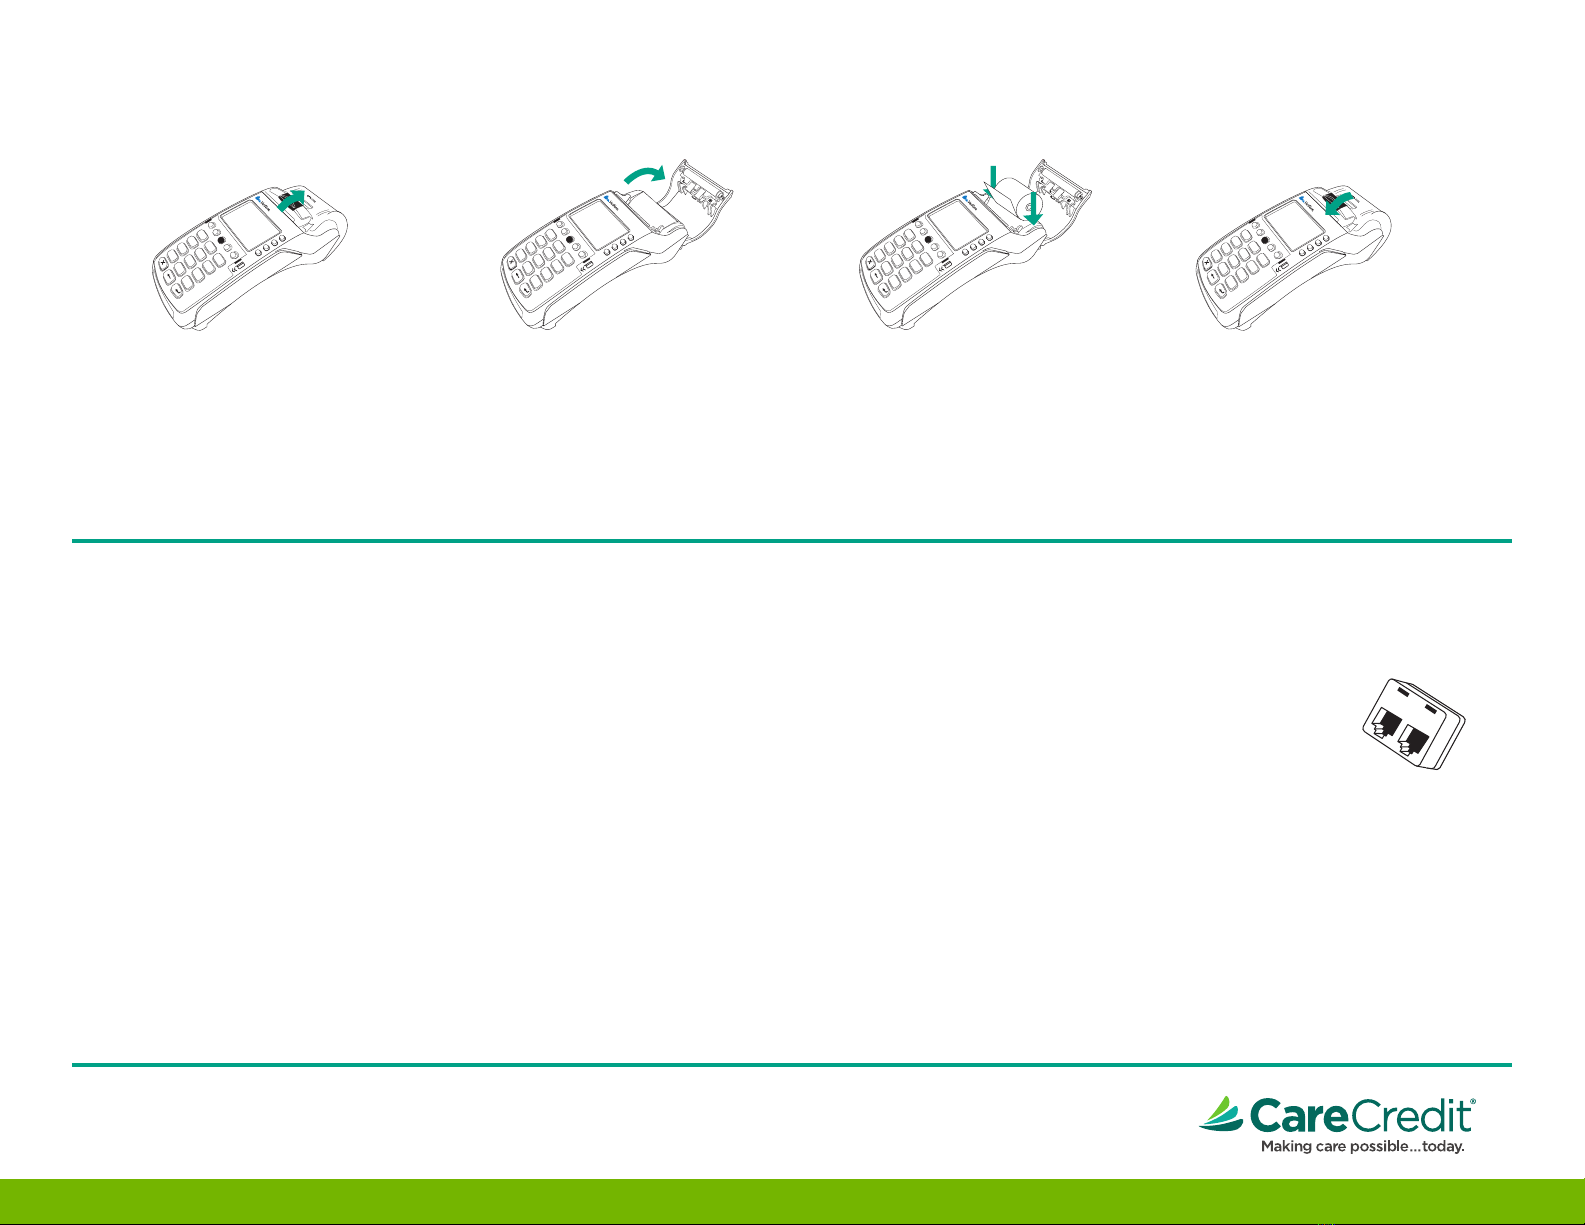
LOADING THE PRINTER WITH PAPER
1. Hook your finger under the latch
and lift up to swing the paper roll
cover open.
2. Remove any partial roll of paper in
the printer tray by lifting it up.
3. Loosen the glued leading edge of
the new paper roll or remove the
protective strip. Unwind the paper
roll past any glue residue.
4. Hold the roll so the paper feeds from
the bottom of the roll.
5. Drop the paper roll into the
printer tray.
6. Pull paper up past the glue residue.
7. Close the paper roll cover by gently
pressing directly on the cover until it
clicks shut, allowing a small amount of
paper past the glue residue to extend
outside the printer door.
8. Tear the paper off against the serrated
metal strip in the printer.
EQUIPMENT MAINTENANCE
Please protect the Synchrony Bank equipment. Use power strips with power surge protection.
Remember that the terminal is a computer and needs to be treated as such. Keep liquids away from
the equipment. Keep the equipment powered up at all times, and on a circuit which is not turned
off and on nightly.
EQUIPMENT REPLACEMENT
In the event of malfunction, before calling Synchrony Bank, please perform these steps:
• Make sure the equipment is plugged into a live 110 outlet.
• Make sure all plugs are secure.
• Make sure that all phone lines have a dial tone.
• Make sure the phone line jacks are secure.
If Synchrony Bank determines that the equipment needs to be replaced, we will replace the
equipment and arrange to have the old equipment picked up. Repack the equipment in the
original box. If the original box is not available, place the equipment in a comparably-sized box.
If the terminal is being replaced, obtain voice authorizations and perform forced purchases
(on the voice authorized transactions only) until the replacement terminal arrives.
OPTIONAL SETUPS
Splitter:
Your analog telephone or fax machine
can share a telephone line with your
terminal. We have provided a line
splitter for your convenience.
Simply plug the phone or fax line into
one side of the line splitter and the terminal
line into the other side. Plug the adapter into
the wall phone jack and now you are ready to
start processing.
CONTINUE ON TO THE SECOND BOX
849-920-00 10/2017
You’re all set! For additional help please call 1-800-859-9975